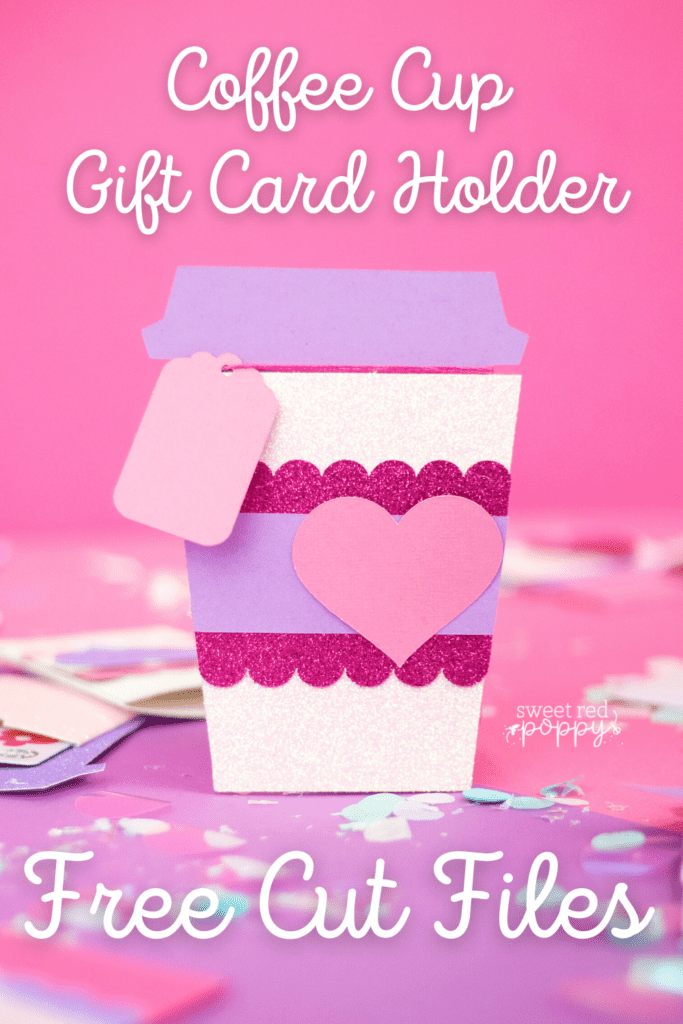
Create a Valentine's Day coffee cup gift card holder. Get the free cut files, step-by-step photo tutorial, and video in this post.
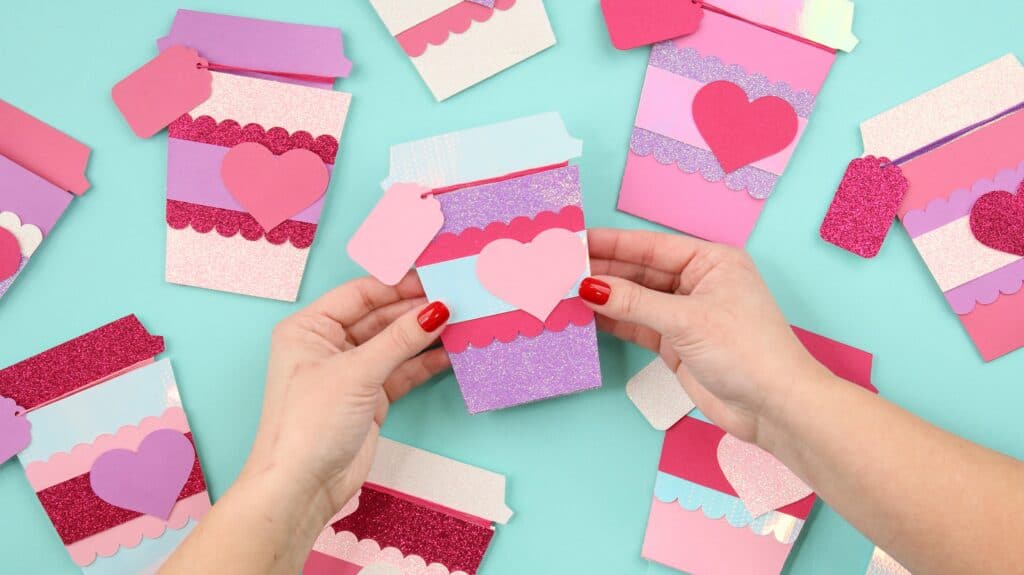
Create a Valentine's Day coffee cup made from cardstock with a sweet surprise inside. Gently pull up on the coffee cup lid to reveal a secret pouch for a gift card!
Plus, I'm sharing some of my favorite Cricut tips and tricks to help you get amazing results!
In this tutorial, I'll walk you through how to use this cut file in Cricut Design Space, cut it out of cardstock paper and assemble a coffee cup gift card holder.
One of the things I love about this project is that the entire design fits on one piece of 12" x 12" piece of cardstock paper. I like to cut out the design on 3-4 pieces of paper and then mix and match all of the different pieces.
Looking for more Valentine's Day SVG cut files? Click here to see ALL of my Valentine's Day projects.

It's also a great scrap buster! If you're like me and you save all of your scraps, this is the perfect time to use them up.
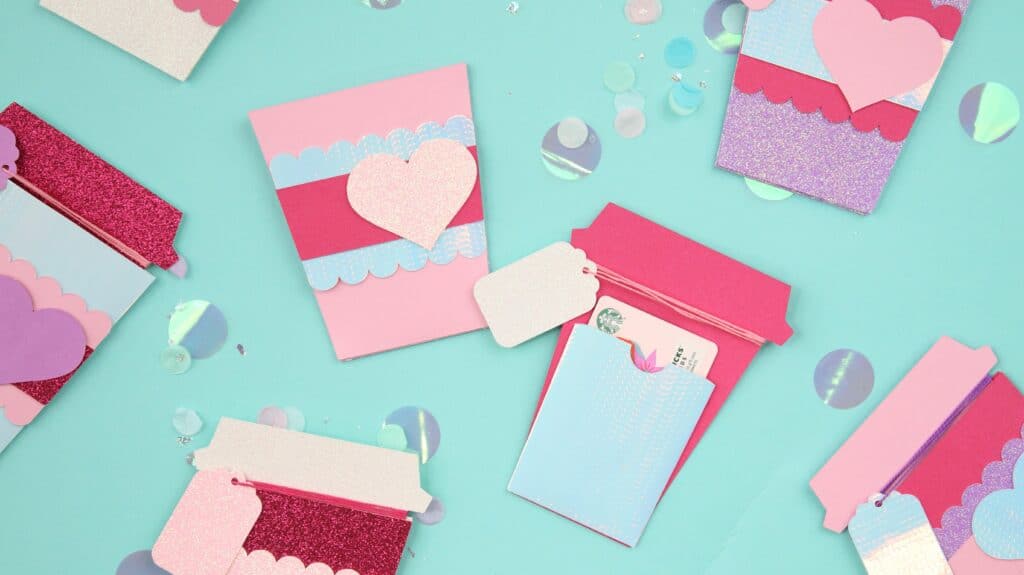
This coffee cup gift cardholder makes a great gift for Valentine's Day, but can I let you in on a little secret? I use this same cut file ALL year round!

Just change the colors of cardstock, and it works for any season or holiday. I send these cute little gifts to my children's teachers throughout the year and even drop a few off at the school's front office for a fun little pick me up. I even keep a few on hand for last-minute birthday gifts.
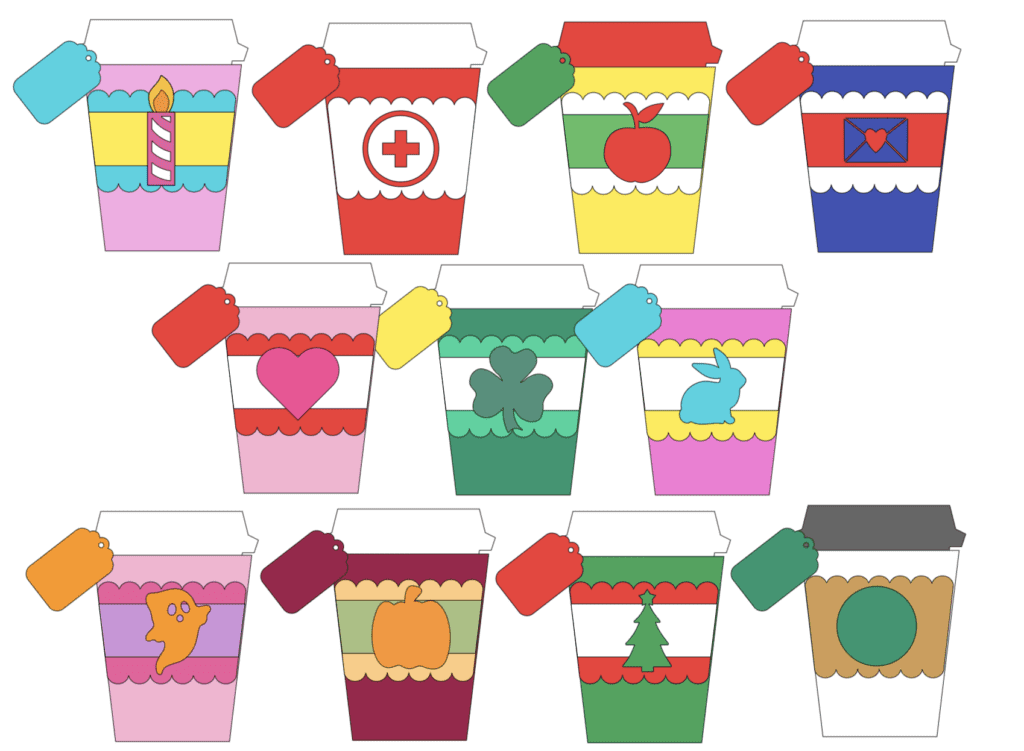
Here's a mockup example of what you could create with this file using basic shapes and outlines from Design Space.
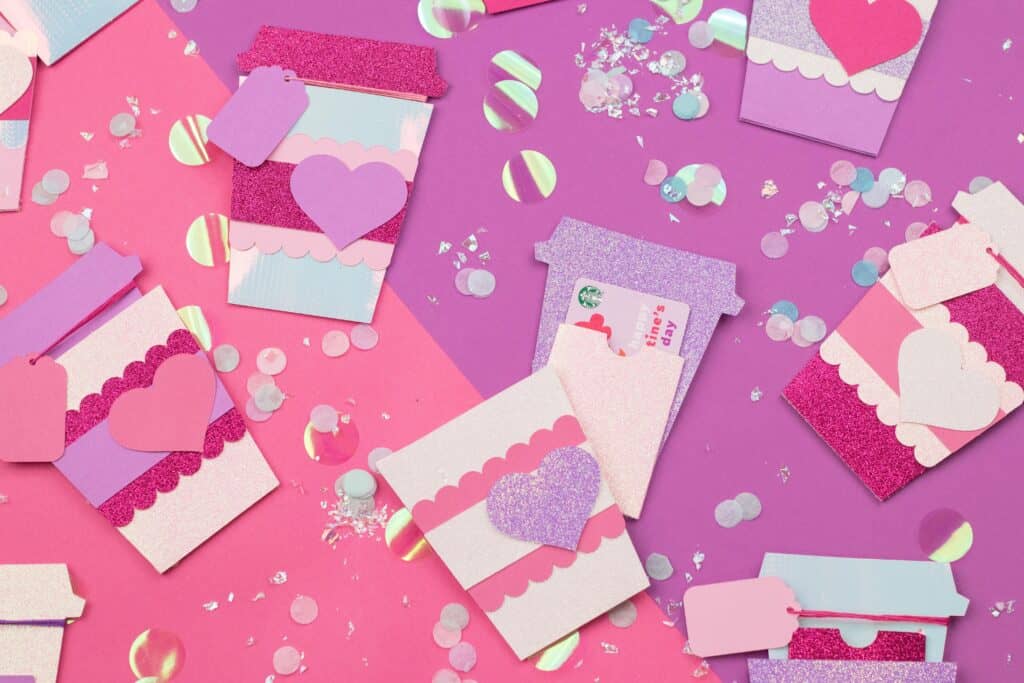
Here are a few different ways you could use this file. Place a $5 dollar gift card inside, and you can give a sweet little treat to anyone!
- Use red, white, and blue cardstock and leave one in your mailbox for your mail carrier.
- Create a card with your school colors for your teachers and office staff.
- Craft a card with red and white paper for your favorite nurses.
- Create a holiday-themed cup.
I stopped by a local craft store to grab the supplies for this project. You can shop for the supplies in person or order online using the links below.
Why Shop Through My Links?
When you shop through my affiliate links, it doesn't cost you anything extra, but it helps me out in a big way! I earn a small commission from those purchases, and that support allows me to continue creating and sharing free tutorials and patterns for you. Thank you so much for helping me keep this creative community going! 💕
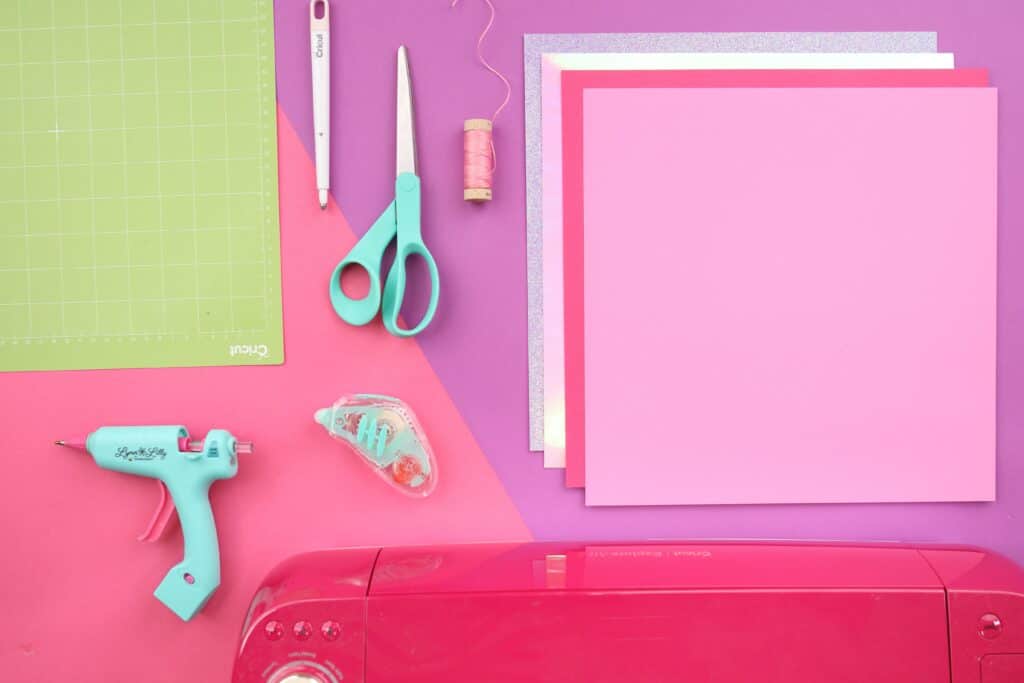
Table of Contents
Coffee Cup Gift Card Holder Supplies
- Cricut Maker, Cricut Explore, or Other Cutting Machine- You can also get this on Cricut.
- Scoring Wheel or Stylus
- Fine-Point Blade
- StandardGrip Mat
- Cardstock
- Cricut Pen (Optional)
- Craft Glue, Tape, or Hot Glue and Hot Glue Sticks
- Ribbon or Embroidery Floss
- Gift Card
DOWNLOAD THE FREE COFFEE CUP GIFT CARD HOLDER CUT FILE HERE.

Watch the video tutorial below!
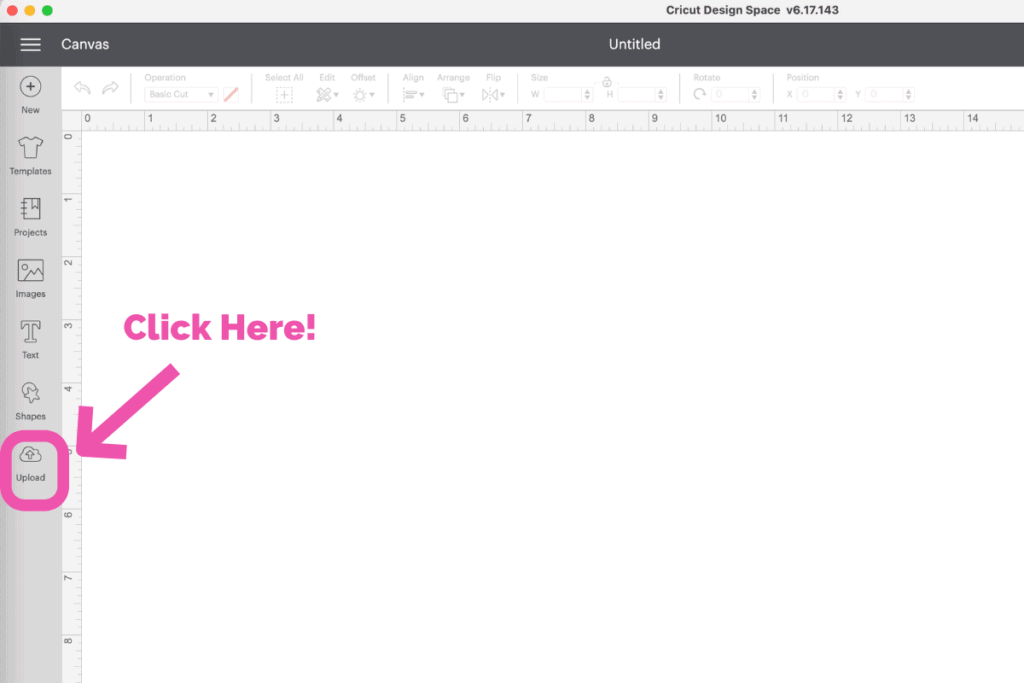
STEP 1: Upload the Coffe Cup File
Open Cricut Design Space and click the + to create a new project.
In the Design Panel on the left, select "UPLOAD."
If you are a Design Space PRO, you can skip to step 2, but be make sure to attach your score lines before you cut!
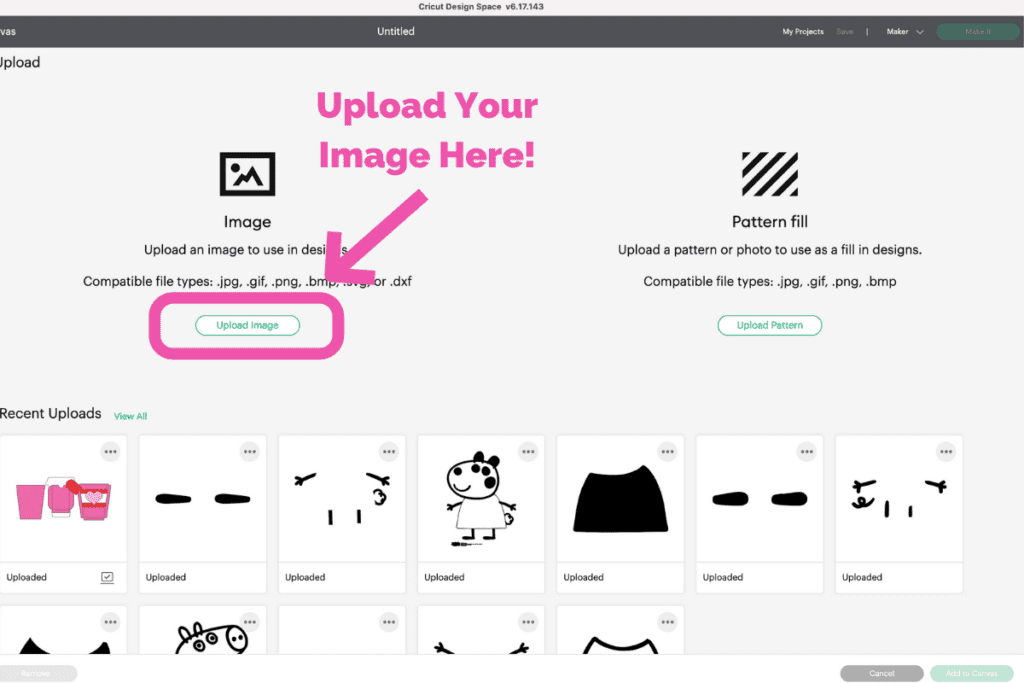
Click "UPLOAD IMAGE."
Click "BROWSE" or drag and drop the file.
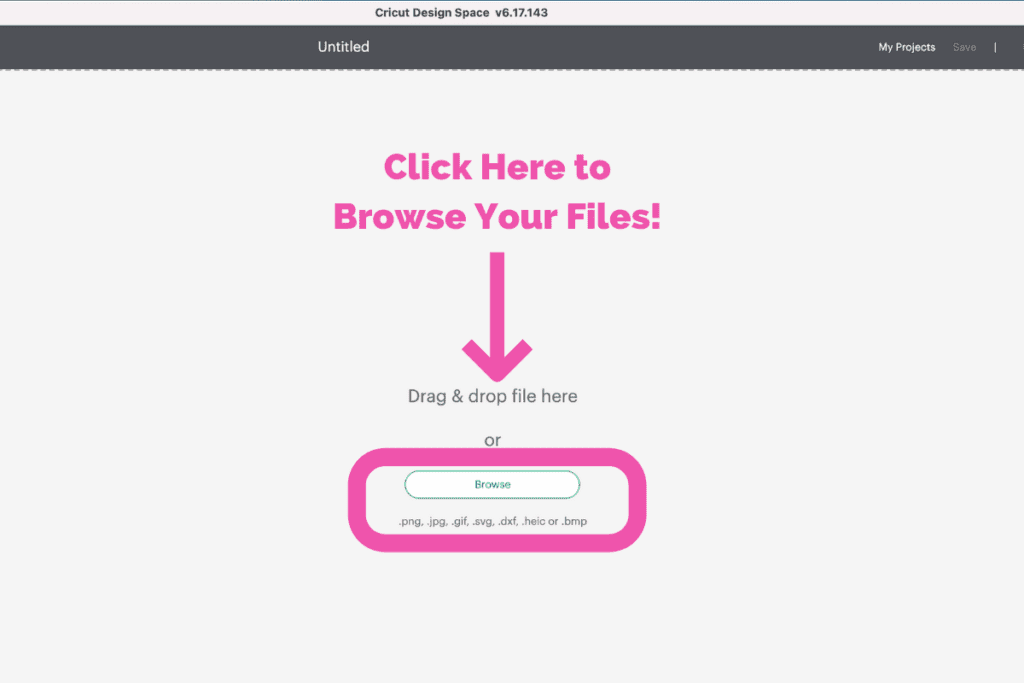
Navigate to the file on your device to click "OPEN" it to Cricut Design Space.
On the Prepare Screen you can change the name of the project and add tags. Click "UPLOAD."
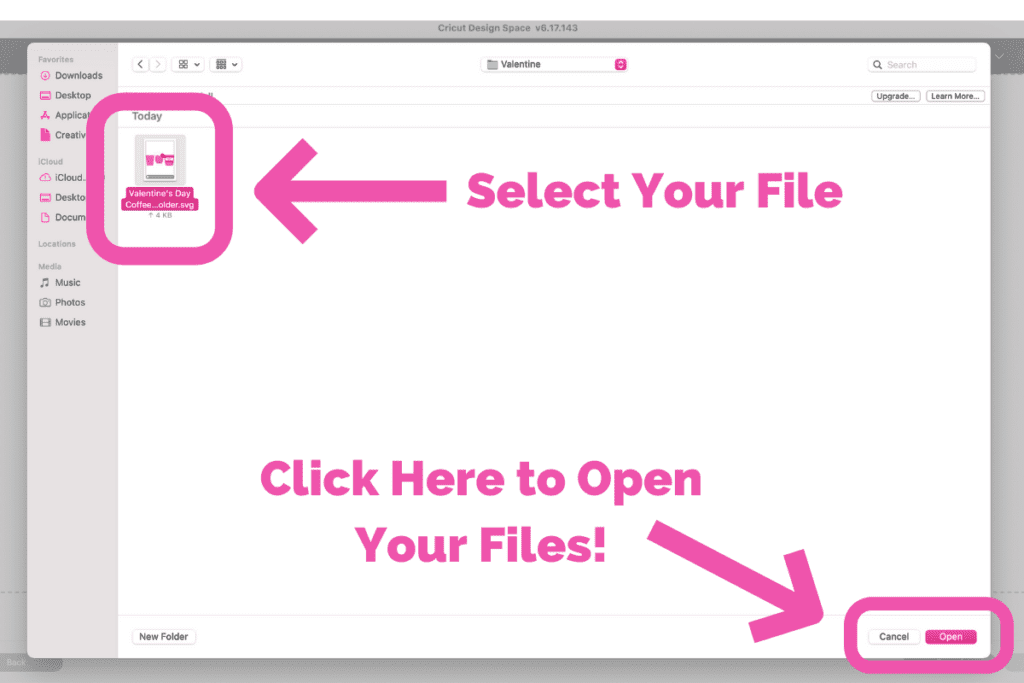
Once you have the file uploaded, select it and click "INSERT IMAGES" to bring it onto your canvas.
STEP 2: Prepare the Coffee Cup File In Cricut Design Space
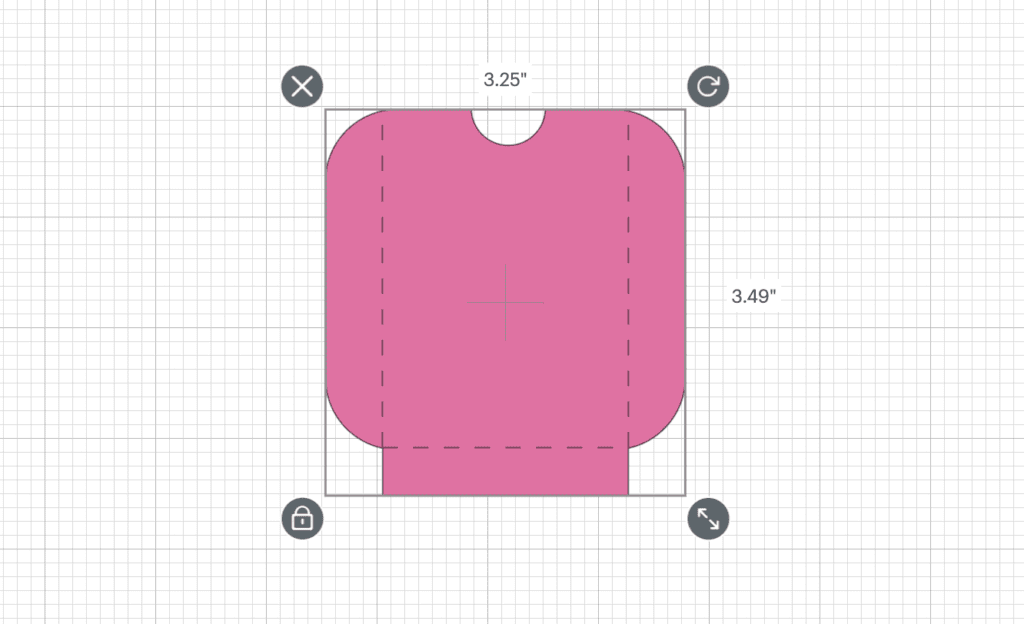
Immediately after uploading the file, select the image and select “UNGROUP”. Next, switch the cut lines on the gift card holder to “SCORE.”
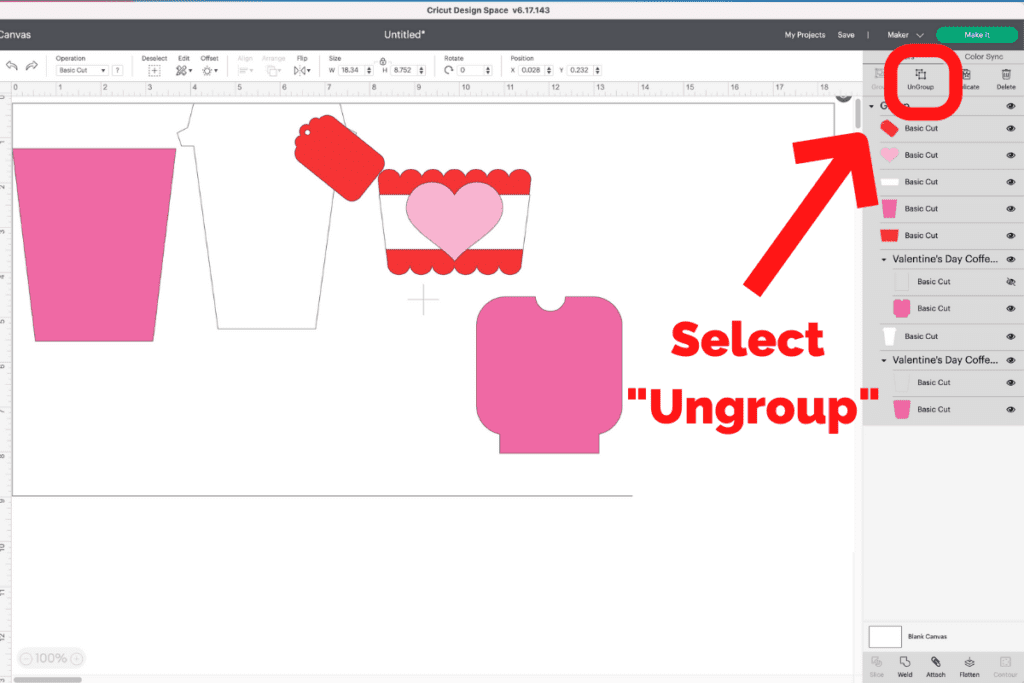
Select the score lines and “ATTACH” the lines to the gift card holder to ensure they stay in the correct position. This will tell the cutting machine to score the lines on that layer in that exact spot.

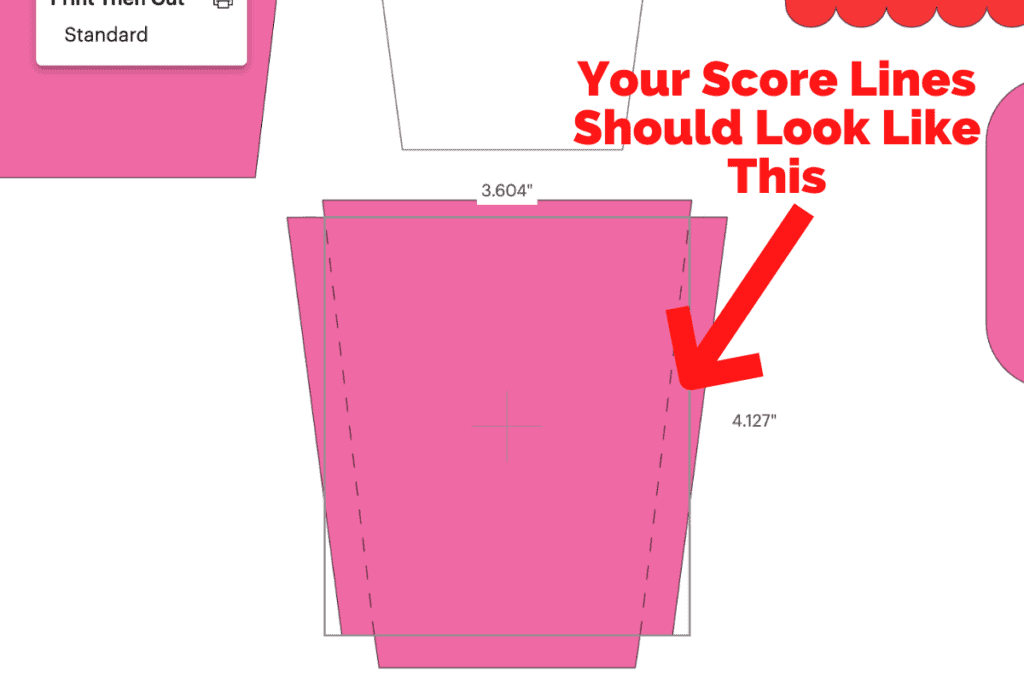
These three steps are REALLY important or your score lines will be cut lines!
Repeat this process to attach the score lines to the gift card holder as well. This is the curved pink design.
If desired, you can use the text tool to add a message to the gift tag.
To do this, select “TEXT.” Type in your message, and resize the text to fit your design.
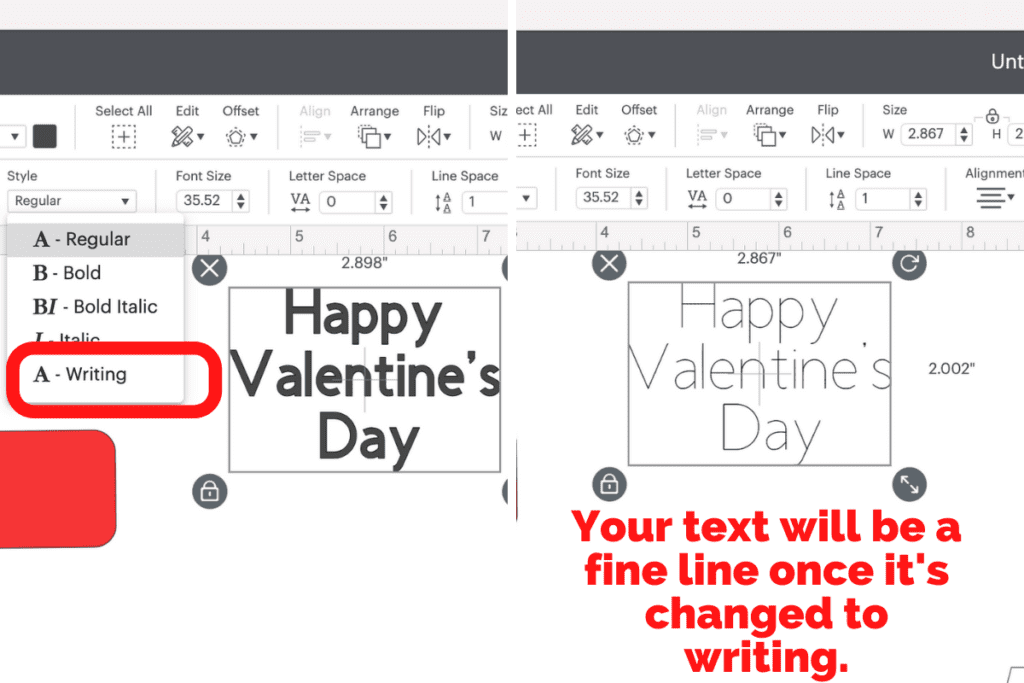
Switch the font style to “WRITING.” Now you can select a writing font.
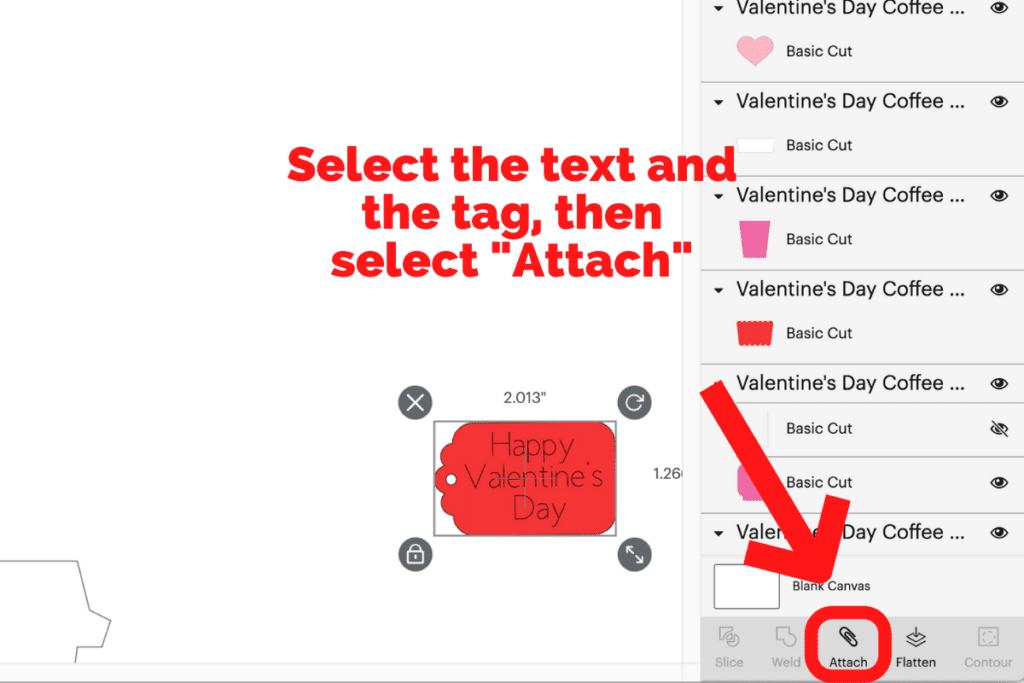
Finally, select the writing and the tag and attach them together.
Once you are ready to go, select your machine and then select “MAKE IT.”
Connect to your cutting machine and select the material you're using.
Click "CONTINUE."
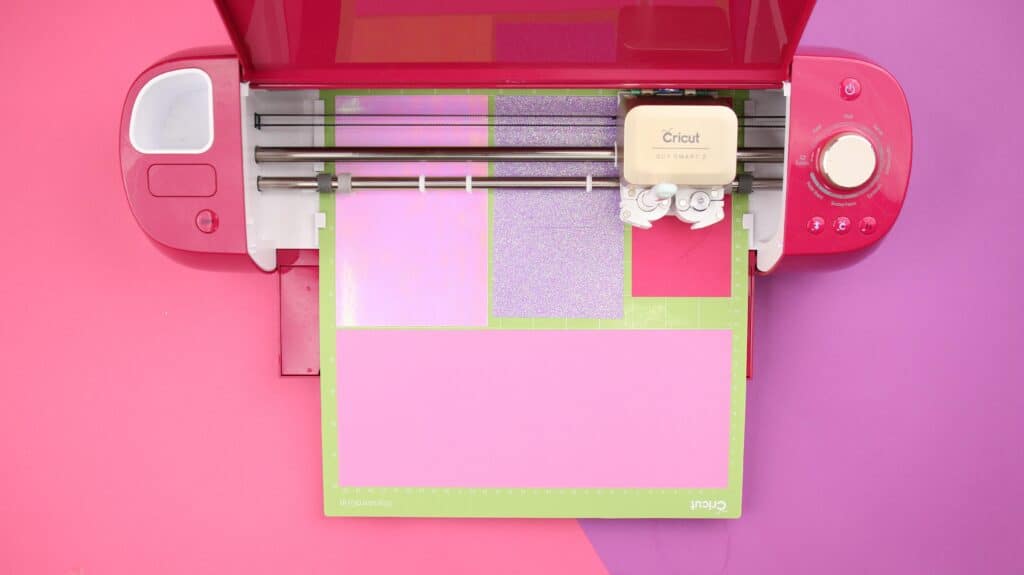
STEP 3: Cut Out the Coffee Cup
I'd recommend using a Standard Grip Mat for this project especially if you are using glitter paper or heavy cardstock.
Start by removing the clear liner from your Cricut mat and then set it aside.
Place the cardstock paper onto the mat and press down firmly on the paper to adhere it to the mat. This step is really important when cutting out cardstock to ensure you get the best results possible.
*PRO TIP - For the very best results, always check your blade before cutting cardstock. If it's covered in tiny cardstock pieces, push on the plunger to reveal the blade and gently blow on it to remove any debris.
If you're only cutting out one coffee cup you can cut it out of one piece of paper or use scraps like I'm doing in the photo below.
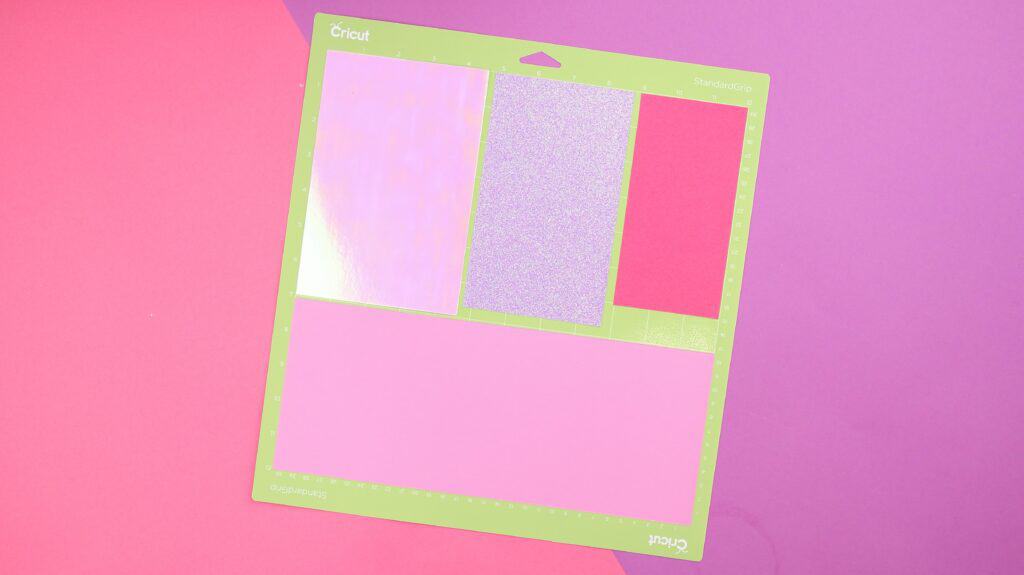
*PRO TIP - If you are using a thick cardstock paper like glitter cardstock for the pieces with scoring lines, be sure to place those pieces of cardstock facing pretty side down. This will place the scoring line on the back of the material making it easier to fold.
Insert the mat into the cutting machine and press "GO."
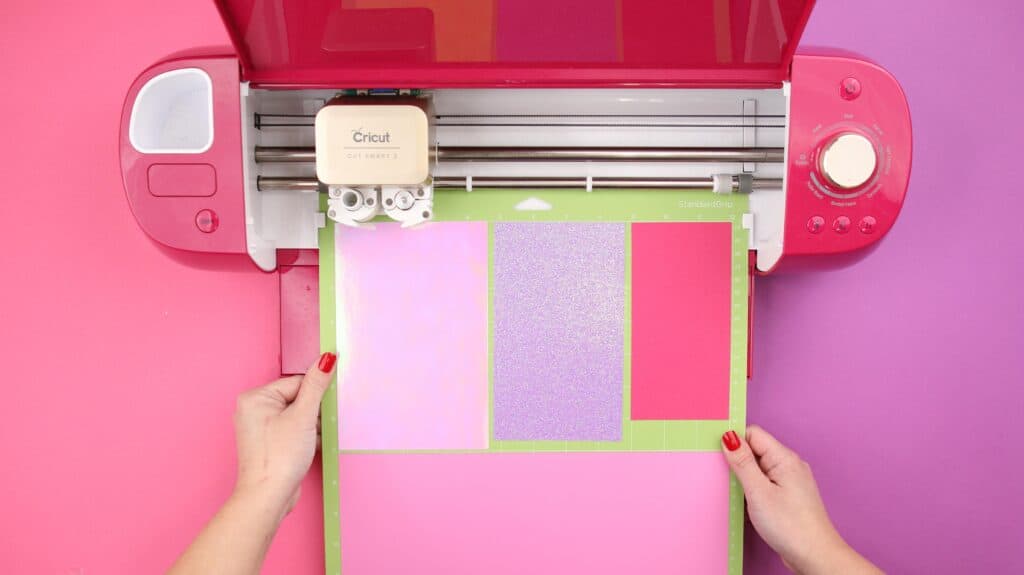
Once the machine has finished cutting the design, remove the mat from the machine. Repeat this process until you've cut out all of the pieces for your Valentine’s Day Coffee Cup Gift Card Holder.
Don't forget to load your scoring stylus or scoring wheel so that the machine can create your score lines. This helps to give you a guide for where to fold.
*PRO TIP - When you're working with cardstock it's important to always peel your mat away from your material. This prevents your cardstock from curling or ripping.
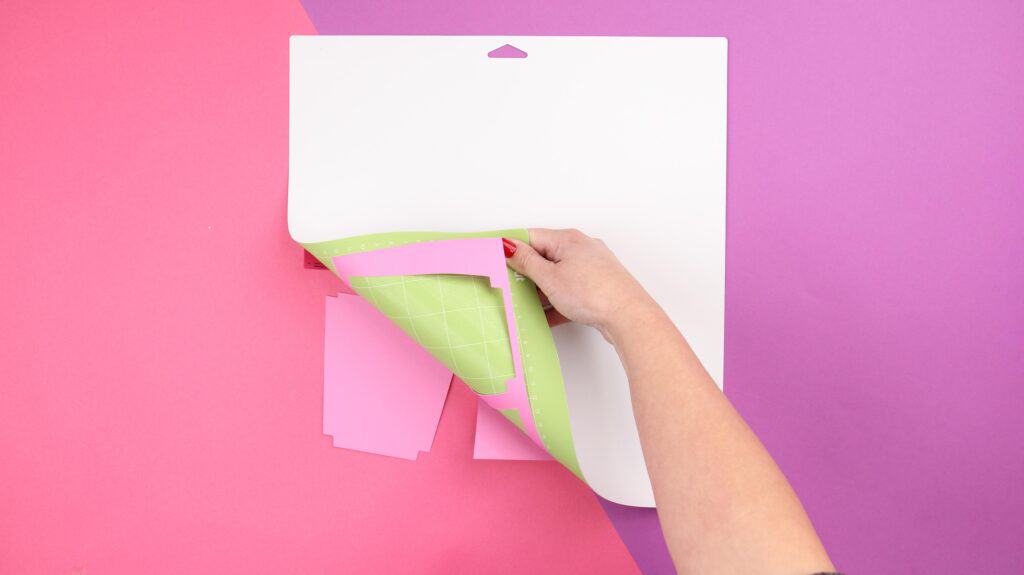
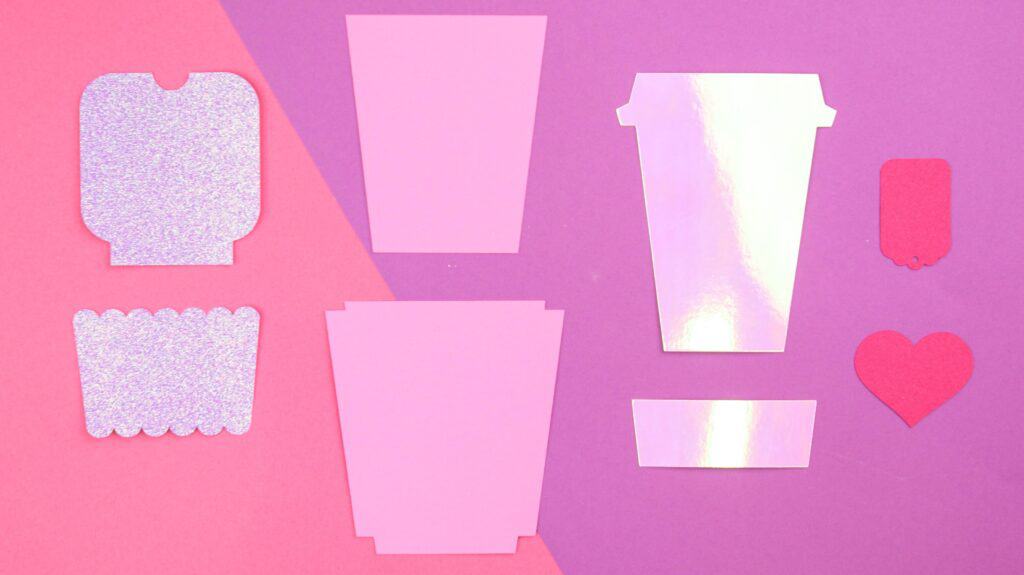
You should now have a total of 8 pieces cut out.
STEP 4: Assemble the Valentine's Day Coffee Cup
Lay all of the coffee cup gift card pieces out in front of you.
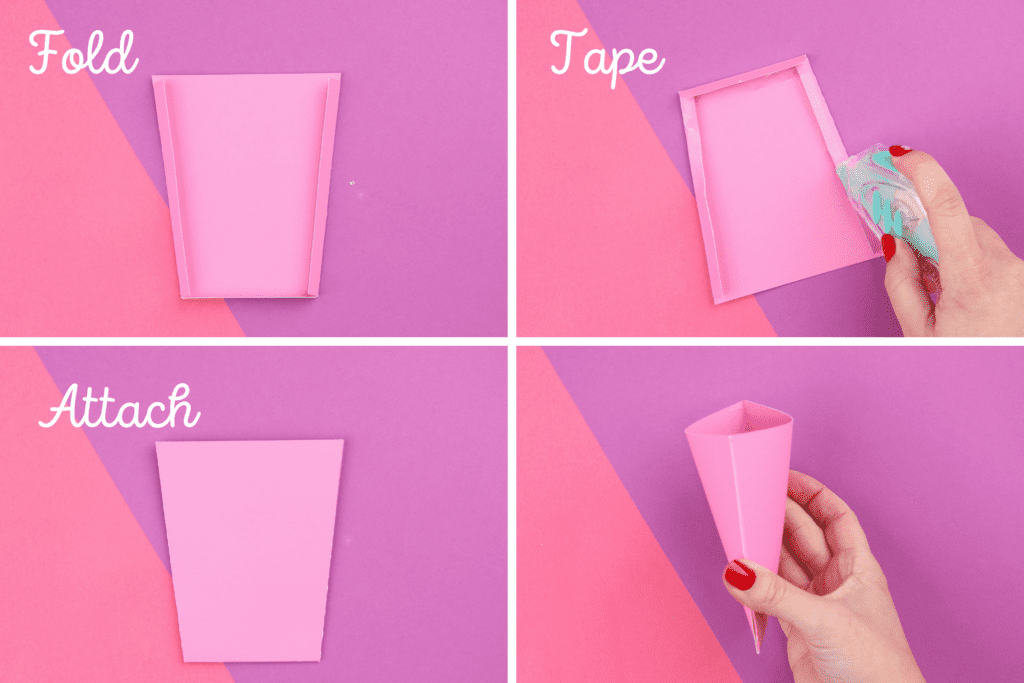
Let's start by creating the gift card pocket on the base of the coffee cup.
- Fold the sides and bottom inward along the score lines.
- Apply glue or double-sided tape to the sides and bottom of the gift card holder.
- Place it on top of the coffee cup and secure the papers together.

Now, let's create the coffee cup pocket. This consists of two different pieces.
- Take the larger coffee cup and fold the sides and bottom inward along the score lines.
- Apply tape or glue to the folded edges.
- Align the folded coffee cup with the smaller coffee cup to create the coffee cup pocket.

Let's move on to the coffee cup sleeve and decoration.
- Place adhesive on the back of the scallop trim and align it with the coffee cup pocket.
- Add adhesive to the back of the straight trim and place it on top of the scallop trim.
- Finally, add tape or glue to the back of the heart and place it slightly off center.
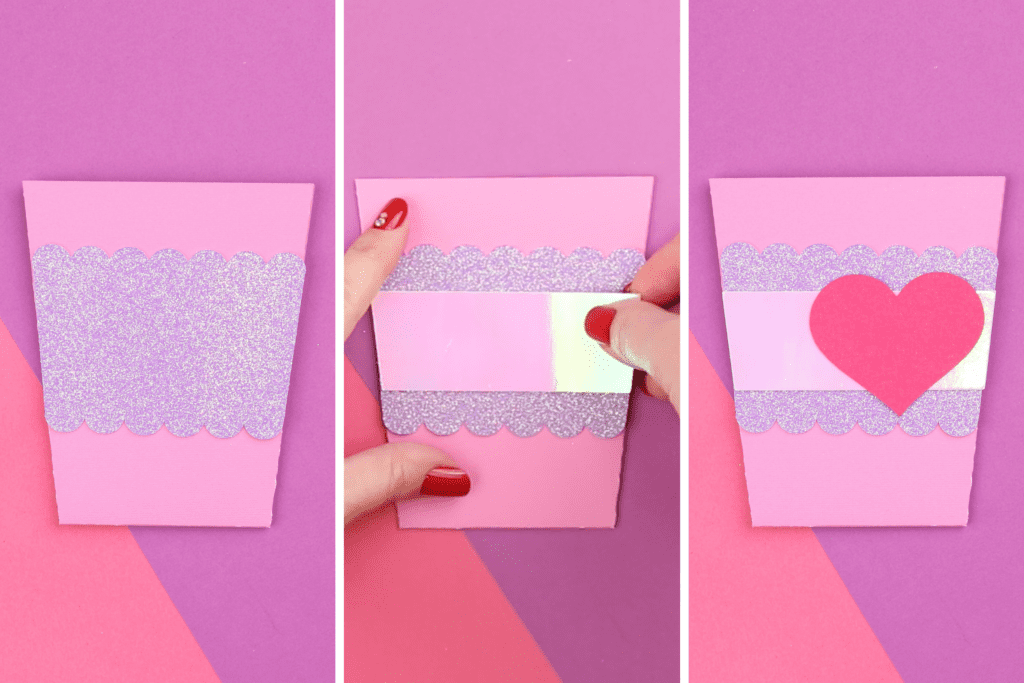
Add your gift tag to your coffee cup for the finishing touch!
- Cut a piece of string or embroidery floss about 30" long. Thread the name tag onto the string.
- Wrap the thread around the coffee cup top base several times.
- Tie the thread in a knot at the back of the cup.
- Add a dot of glue to the knot for extra security.

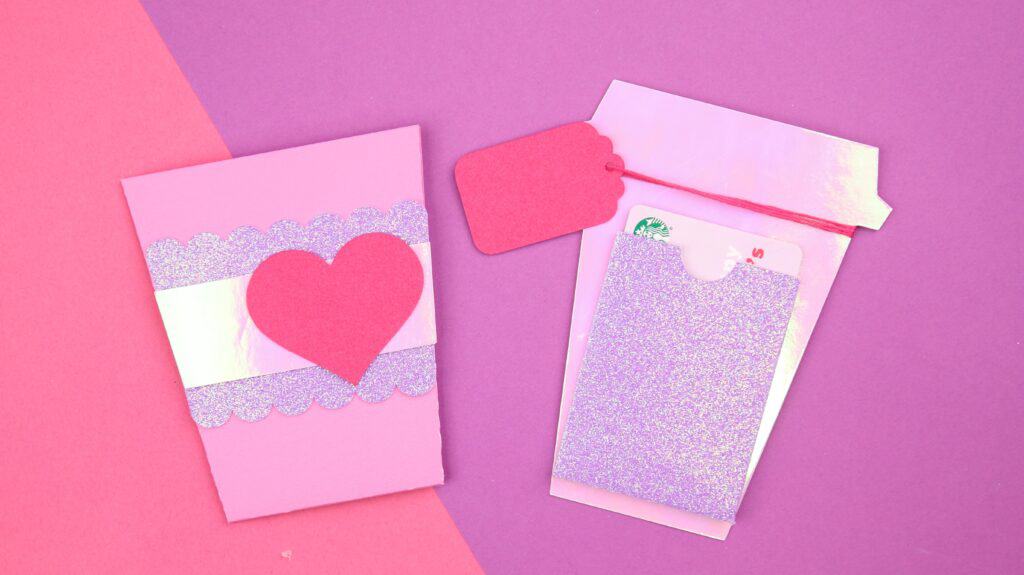
STEP 5: Add a Gift Card
Add a gift card to the gift card pouch and slide it into the coffee cup pocket.
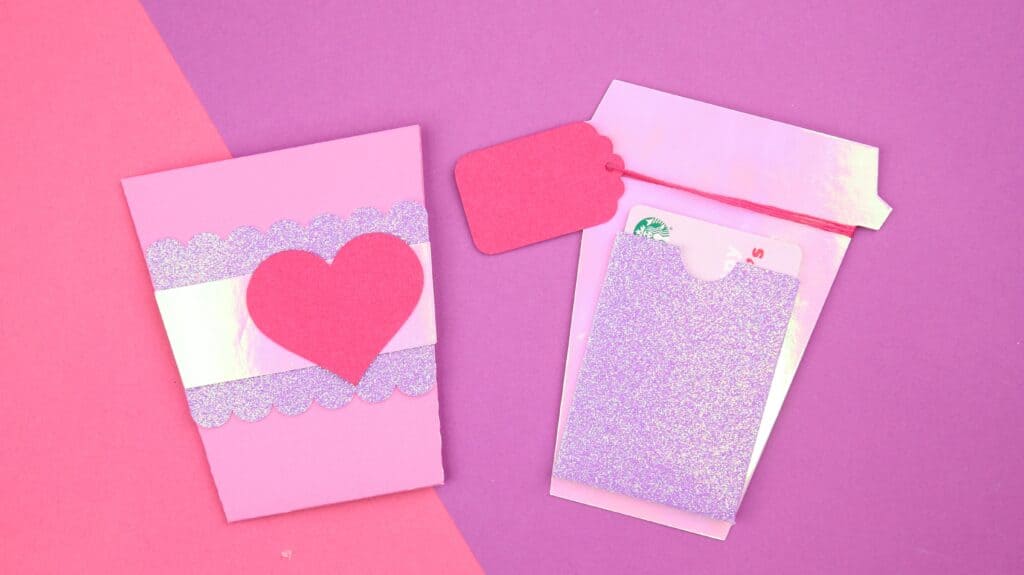

Now you have your finished Valentine's Coffee Cup Gift Card Holder. Once you make one, you'll want to make more. Don't say I didn't warn you!
This SVG cut file was created by our designer Maggie. Looking for more of her designs? Click here!

Don't forget to post your finished coffee cup gift card holders on Instagram and use the hashtag #sweetredpoppy to be featured on my Instagram stories.
Join my Cricut, crafting and sewing Facebook group where you can show us what you’re making, ask questions, and learn from others!
Don’t want to forget about this project? Save it for later! Click here to save this pin to your favorite crafting Pinterest board!
Looking for more Valentine's Day Cricut projects? Check out these other great posts.
Adorable! You are right! Make this for any season, any theme! Thank you.
So cute. But when I tried to make it-the size was off and tried to make it over 8 different pages. How do I fix this?
What is the size supposed to be? can i resize the file before i ungroup it?
Do you have a PDF file for instructions?
Can we make and sell these gift card holders? I was going to use them in coffee themed gift baskets.
Hi
I don’t own a cricut
Can I buy the pattern.
I made this! My mom has recently gone into hospice and the wife of another patient brings her coffee. I made this and added a gift card. Perfect timing. Thank you. Question: the sentiment on the tag didn't print, I did ‘attach'. I could only find ‘pen’, couldn’t find the option to ‘writing’ I do have access .