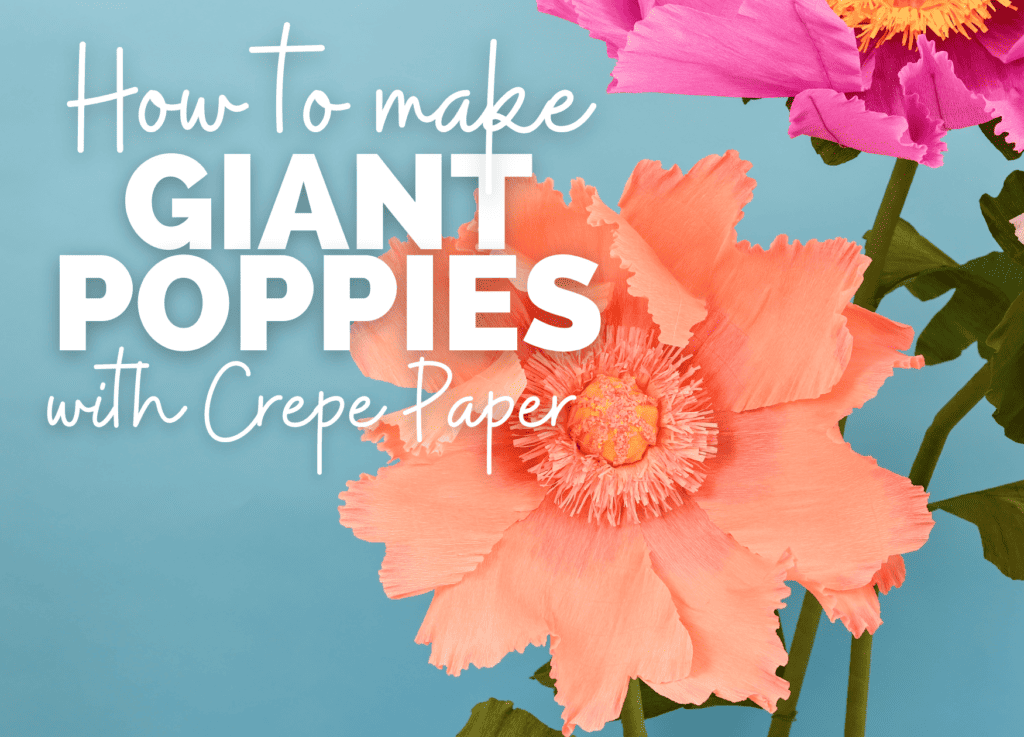
Learn How to Make Giant Poppy Flowers with Crepe Paper in this Step-By-Step Tutorial and my FREE Printable Template.
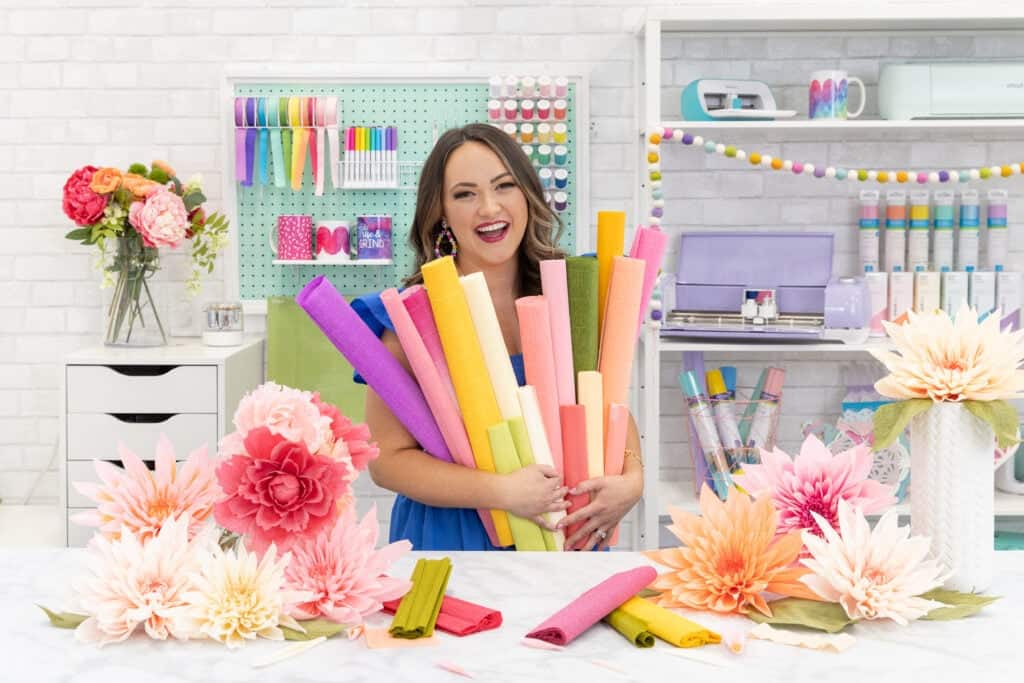
Today, I'm going to teach you how to make your very own Giant Paper Poppy Flowers using crepe paper. Trust me, these flowers are a total showstopper!

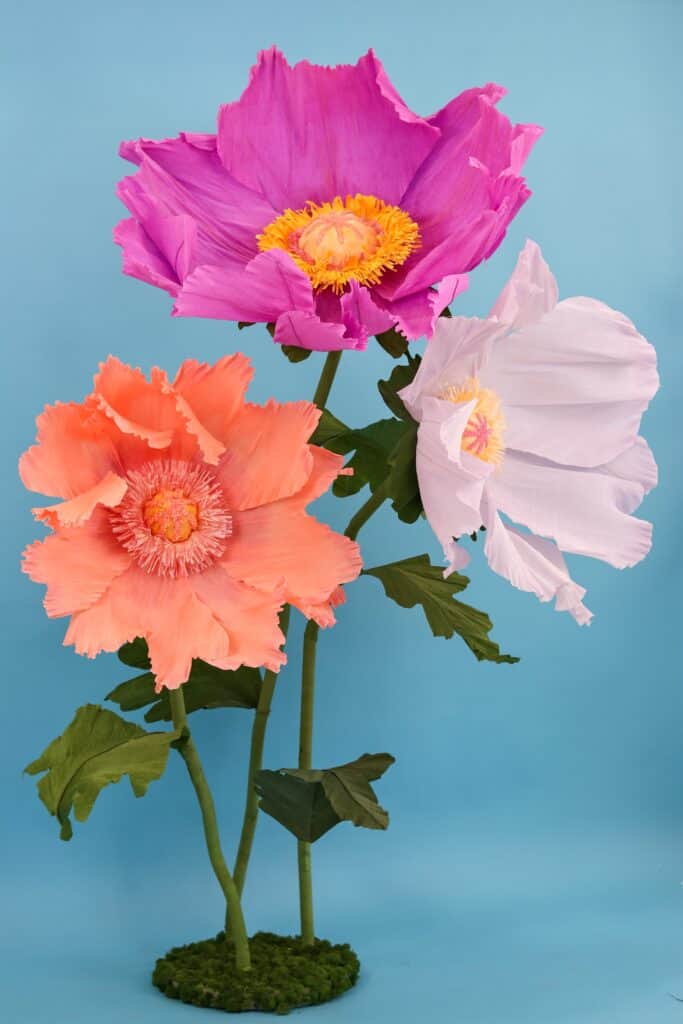
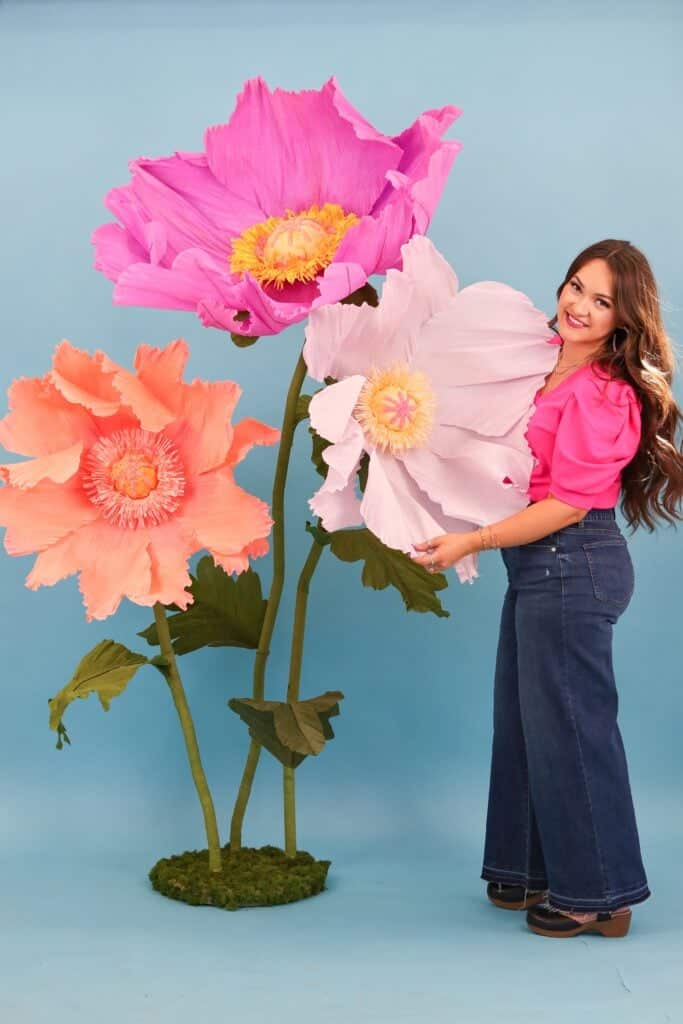
I recently made three standing poppy flowers and I am completely obsessed with them. They're the perfect addition to any celebration, whether it's a wedding, birthday, Easter, or baby shower.
As soon as I saw these giant standing paper flowers, I knew I had to try them myself.
And let me tell you, they are too whimsical and wonderland-ish to pass up! These flowers are a great way to add a touch of magic to any event. So, let's grab our supplies and get started on making some of the most stunning decorations you've ever seen!
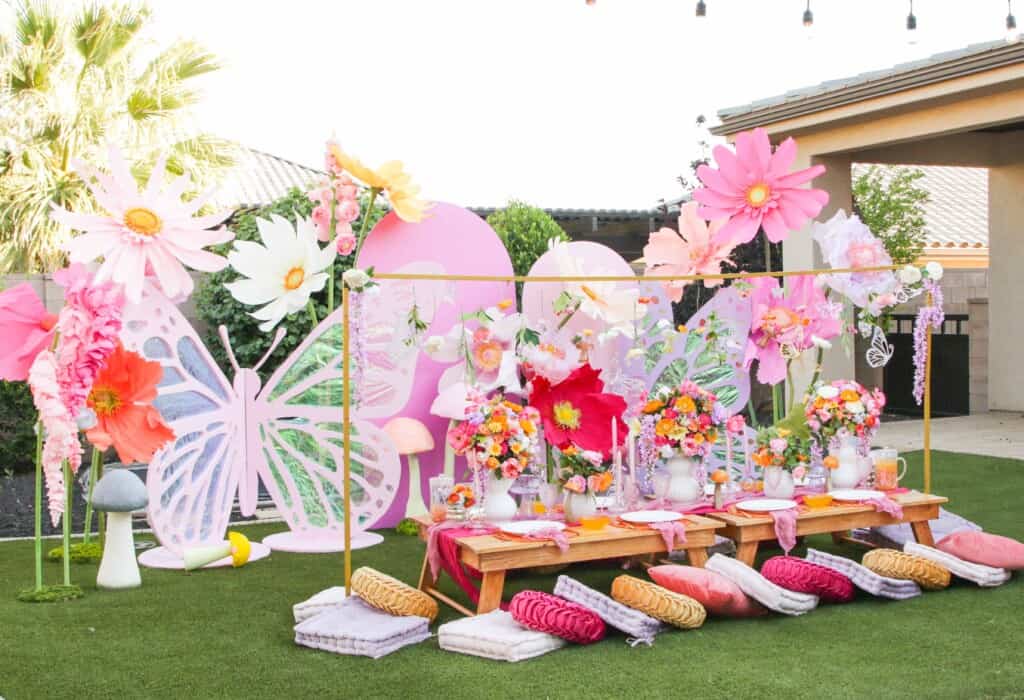
Below is a photo of the crepe paper Poppies and Daisies that I made for my daughter's birthday party. I also made giant five-foot wooden butterflies. Click the links below for the full tutorials!
Related - Crepe Paper Daisies
Related - Giant Wooden Butterfly

I'll walk you through my version of how I shaped the poppy flowers and base, what supplies I used, and which techniques worked best for this project. After lots of trial and error, I have a few tips and tricks up my sleeve!
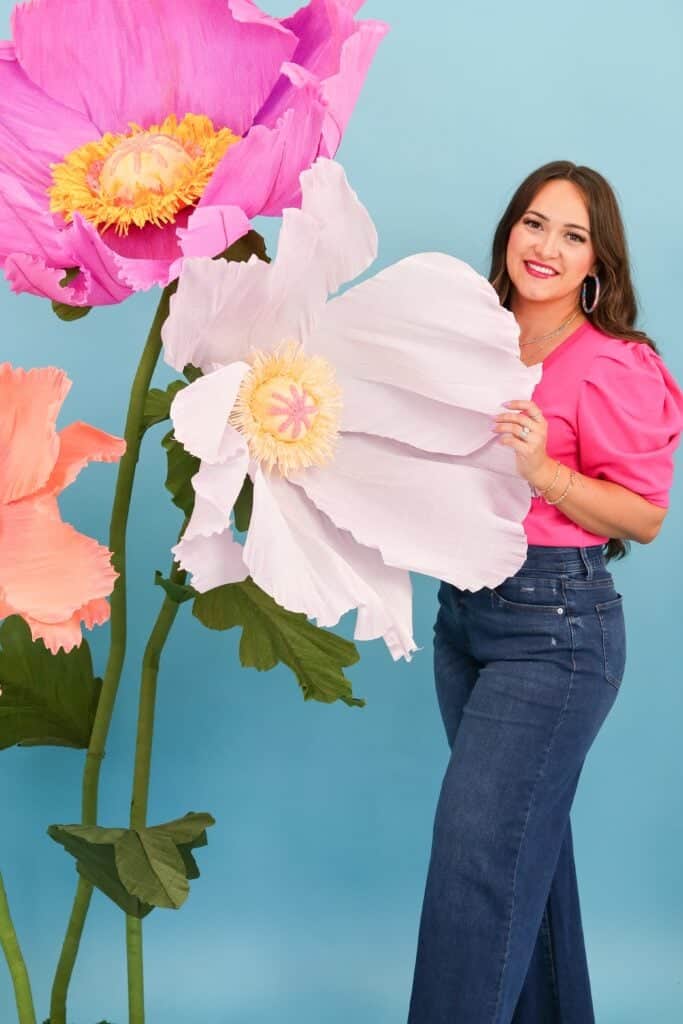
Table of Contents
Characteristics of a Poppy Flowers
Poppy flowers bloom in a variety of colors, usually form 4-6 petals, and have many stamens.
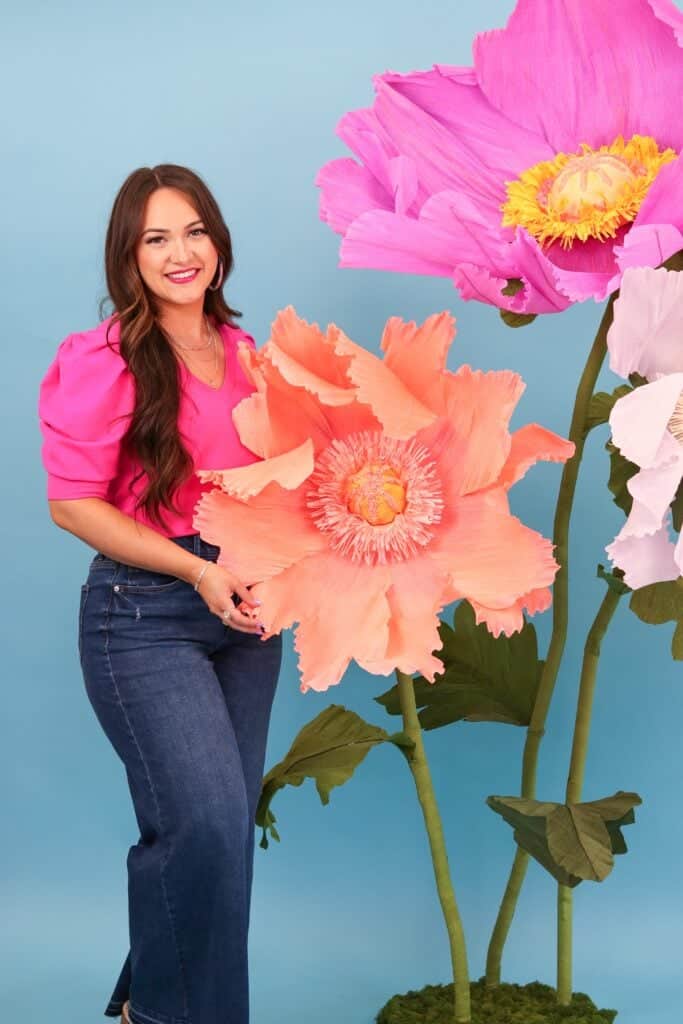
A poppy flower can grow up to 2 to 3 feet tall and measure 5 inches across. The ones I am making are 3 to 5 feet tall, and the flower is about 6 times bigger—my flowers measure approximately 32 to 38 inches across, and a singular petal measures 17 ½ x 15 inches.
What is Crepe Paper?
Is this your first time working with crepe paper? Don't worry! I've got you covered with everything you need to know! Crepe paper is a textured paper with stretch and is ideal for making realistic-looking flowers. You've probably used crepe paper streamers before, right? It's very similar to that, but we'll be using giant rolls of it in a heavier weight to create these flowers.
Click here to read my Crepe Paper Resource Guide to learn more about what crepe paper is, how to cut it, all the different weights, and where to buy it.
What Crepe Paper is Best for this Project?
The best crepe paper to use depends solely on the project you're making.
For this project, both light-weight and heavy-weight crepe paper were used to make these flowers.
Heavy-weight crepe paper has more structure and flexibility- making it the best option for the large petals, stamen, and leaves.
Light-weight crepe paper is delicate and is best for the center of the flower such as the pistil.
Typically crepe paper is sold in weights of 180 grams and 60 grams. I used 180 grams for my petals and leaves. I recommend using 60 grams to create the more delicate parts of the flower, like the stamen. I used 180 gram crepe paper on mine, and I think it would have looked better with a softer weight.
What's the Best Glue?
I experimented with three types of glues: Hot Glue, E6000, and Tacky Glue.
When using hot glue, make sure your glue gun is set to a low temp when using it on the petals and stamen pieces (some glue guns have dual temps).
If you have a high-temp glue gun, it may warp the crepe paper. Either way, it can get a bit messy. I recommend buying some finger protectors (you can find them at a local craft or dollar store) to keep those fingers from getting burned! Something to keep in mind is, that hot glue is a fast-drying glue. So, this may be the glue for you if you're a fast-paced crafter.
When it came to using the Tacky Glue, I did notice that it slightly discolored the crepe paper during the drying process. It took about 30-40 minutes for the glue to fully dry, but the results were clean and the adhesive dried clear.
E6000 adhesive is a good in-between. The glue sets after about 10 minutes but will need 24 hours to fully cure. I noticed it leaves behind a shiny residue, but doesn't stain the crepe paper like the Tacky Glue.
In conclusion, the three worked out just fine, it's more personal preference. Personally, I prefer using a fine-tip hot glue gun as I'm not the most patient when it comes to drying times. However, some of my employees who made these flowers preferred E6000.
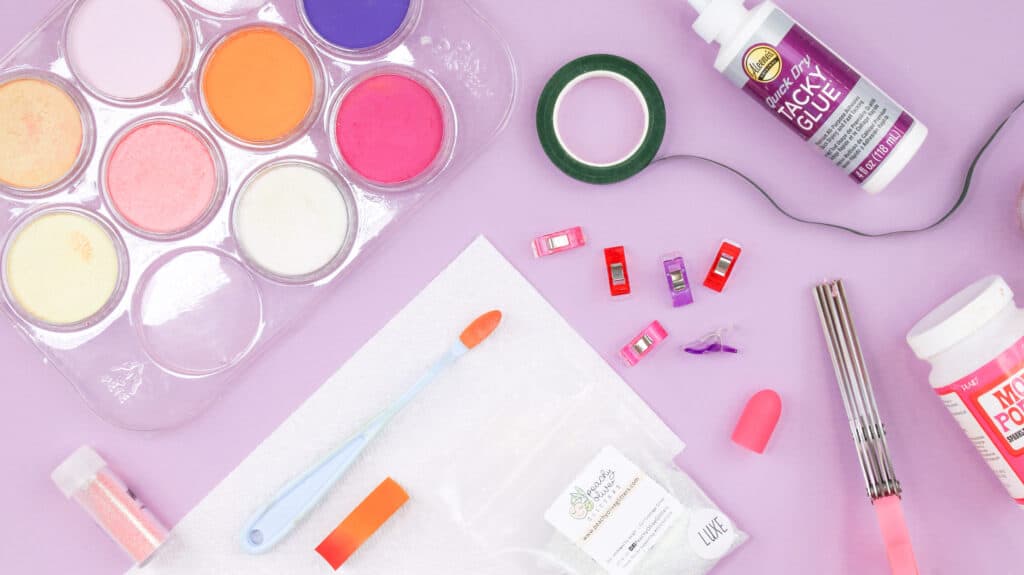
What are Pan Pastels and Why use them for this Project?
Pan Pastel is chalk powder pressed into a pan that can then be applied to materials for vibrant colors without all the harsh streaks. Compared to typical dry pastels, pan pastels produce less dust and are super blendable with the right sponge applicators.
However, pan-pastels can be a bit pricey, so I recommend buying one or two at a time. If you want a more budget-friendly option, you can opt for regular chalk or Dollar Tree eyeshadow palettes.
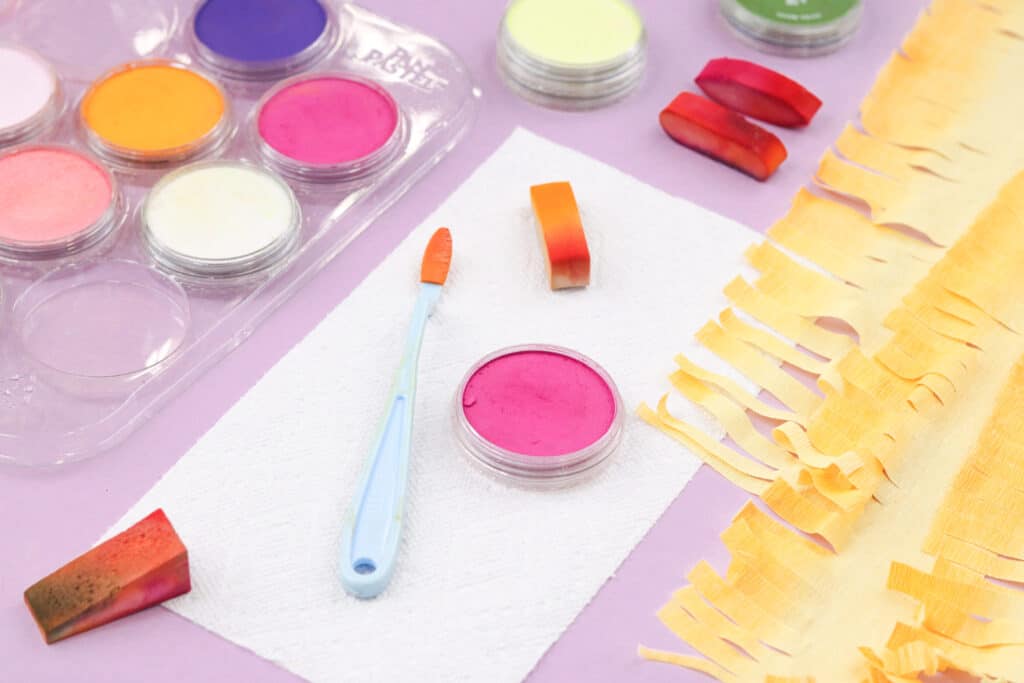
Applying pan pastels to paper flowers brings the paper flowers to life! It adds depth, contrast, and interest.
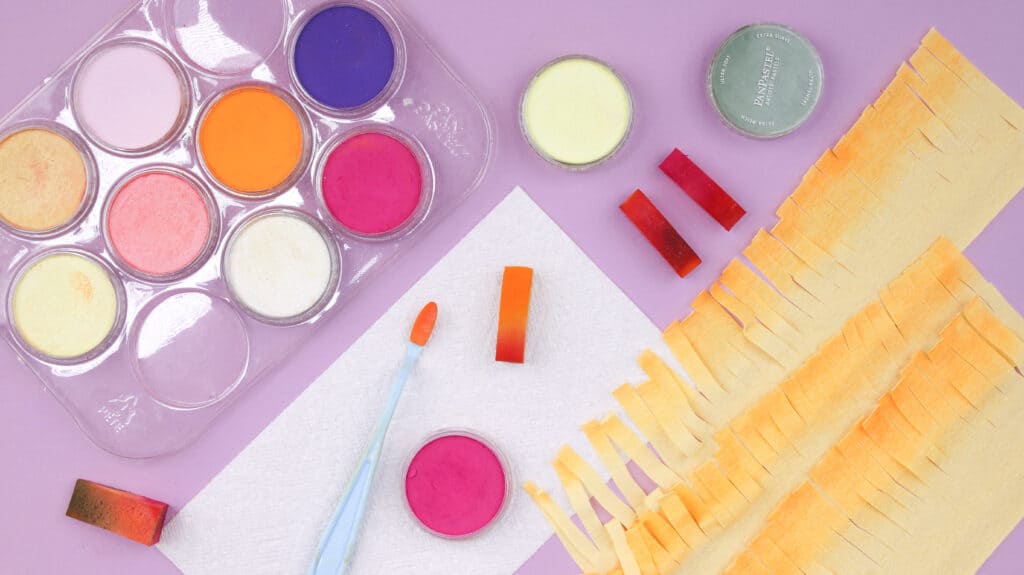
You can find pan pastel kits with a variety of colors. I like to use this kit here, or a more budget-friendly option would be to buy individual pan pastels.
I recommend purchasing a color that's a few shades darker or lighter than the crepe paper that you are working with.
Supplies for Giant Poppy Flowers
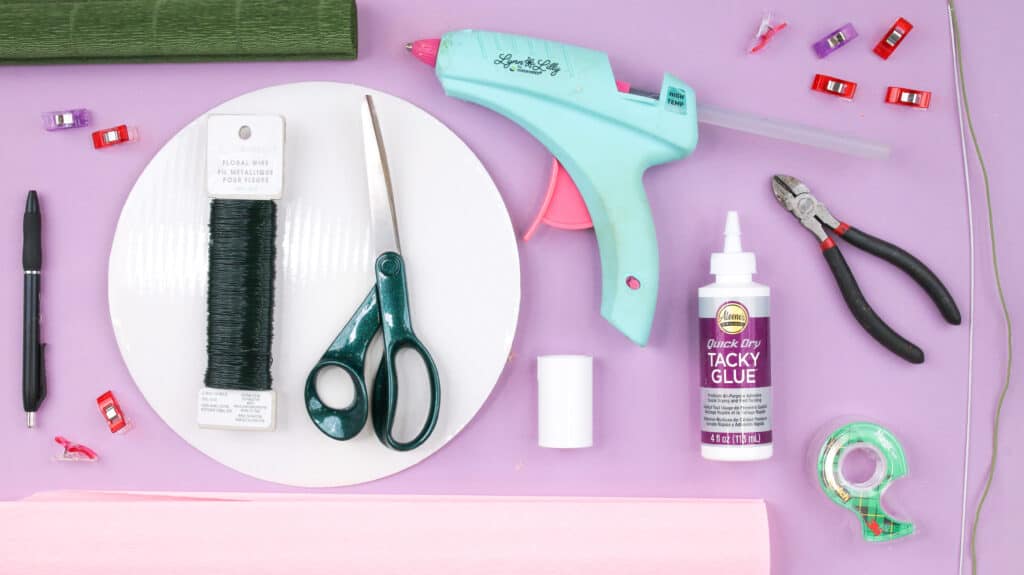
Before purchasing any of the supplies for this tutorial, I recommend reading the entire blog post from start to finish so that you understand what each supply is needed for!
Why Shop Through My Links?
Just click on one of the links below and purchase whatever you need for this project. I’ll earn a small commission at no extra cost to you.
Your support helps me continue creating and sharing free content with you.
It's a simple way to show your support and keep our community thriving. Thanks for your support of my small business—it means the world to me and my family! 💕
Shop my favorite craft supplies here!
Crepe Paper Flower Head
- Crepe Paper- Light & Heavy Weight I recommend reading THIS post before purchasing crepe paper!
- 18 Gauge Green Floral Stem (For leaves)
- 18 Gauge White Floral Stem Wire 16 inch Package of 50 (You will need four pcs per petal)
- Dual Temp Hot Glue Gun and/or Tacky Glue
- Hot Glue Sticks
- 4-Inch Styrofoam Ball (to create flower center)
- Drill & 7/32” Drill Bit
- Scissors
- 10-inch Cake Plate (this creates a sturdy base to attach your petals to)
- Paper Towels
- Tape
- Wire Cutters/Pliers
- Clover Clips
- Finger Guards
- Pan Pastel & Sponges (this is optional but adds depth to the flowers!)
- Mod Podge
- Parchment Paper
Cement Flower Base & PVC Pipe Stems
I recommend purchasing all of the following supplies from Lowe's. I've linked the exact products I used below. You can shop each link below and schedule the entire order for delivery or in-store pickup.
- 3/4” Schedule 40 PVC Coupling: You will need two per flower; I've linked to a bag of 10.
- 3/4" x 5ft PVC Pipe - 1 per flower You can also purchase longer lengths and cut them down to save $$. You will need between 3-5' of pipe for each flower stem.
- PVC Pipe Cutter
- Quickrete Concrete Miz 80 lb. Bag
- Paint Sticks (for mixing concrete)
- 5 Gal. Paint Bucket (to mix concrete in)
- 17" Clear Plant Saucer (to use a mold for the concrete base)
- Heat Gun Budget Option - High End Option (this is used to bend the PVC Pipe)
*I earn commissions on qualifying purchases from Lowe's and Amazon. Thanks for shopping through my affiliate links and supporting my small business.
Click HERE to shop all of the supplies on Amazon!
Download the Giant Paper Poppy Template Here!
Print Template
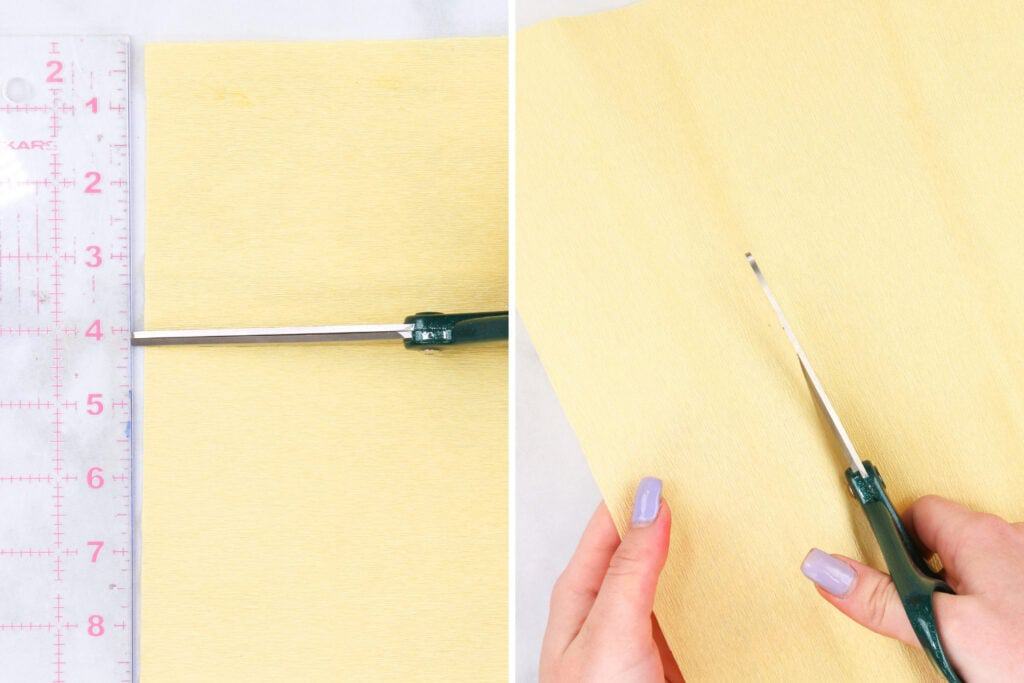
To get started, print out the Sweet Red Poppy Giant Paper Poppy Template after downloading, measure the test square, and make sure it measures 1 inch.
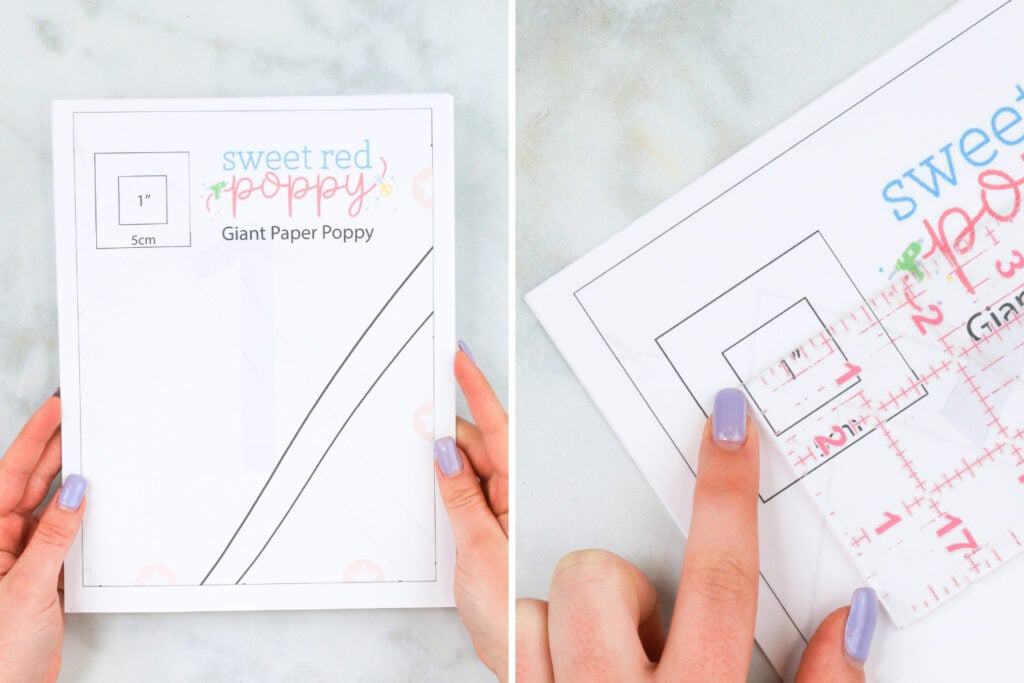
With scissors, cut on the cut lines to remove excess paper.
Download the Giant Paper Poppy Template Here!
Afterward, tape the template together in order starting with 1 through 9, making sure to line up the stars as you go.

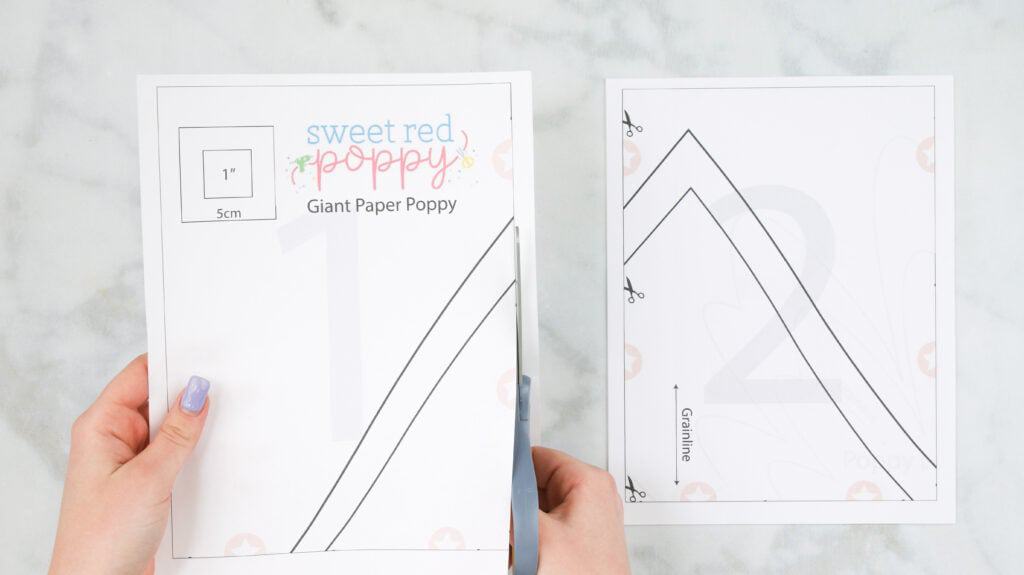
Cutting out & Assembling Poppy Petals
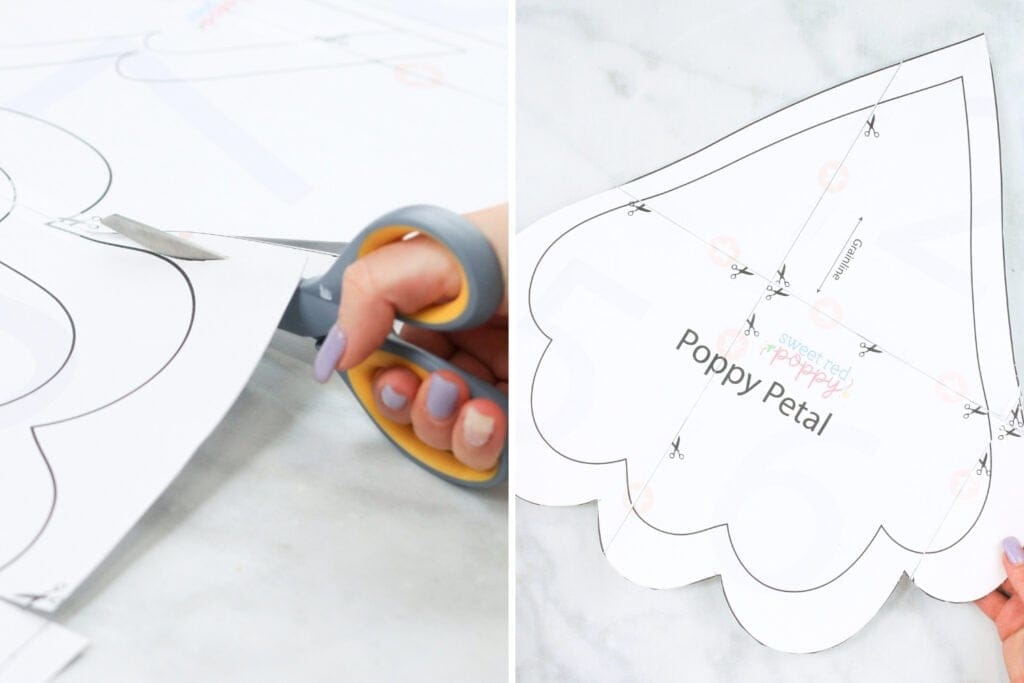
Now, it's time to cut out all the giant flower pieces from the template. Wait to cut out the smaller pieces located in the centers of leaves and poppy petals.
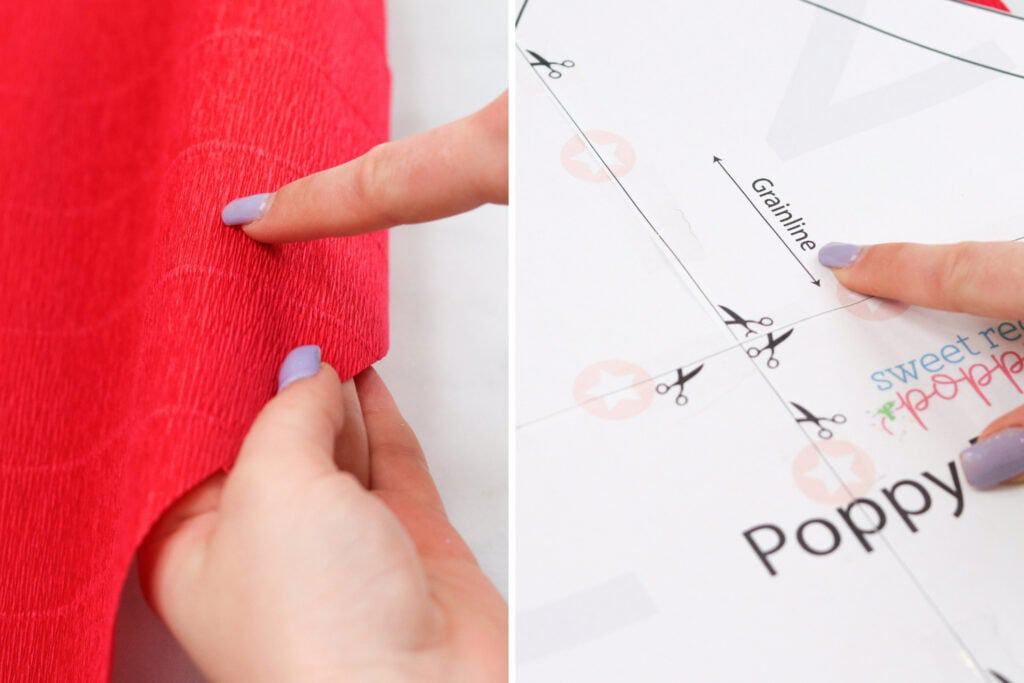
Once all the pieces have been cut, place the Poppy Petal on top of your crepe paper. The grainline marking on the pattern should run perpendicular to the large lines that run along the length of the crepe paper.
A good way to double check this is to check the crepe paper for stretch. You want the greatest amount of stretch going across the petal from side to side to allow you to shape it.
Then, cut out 5-6 of these petal pieces.
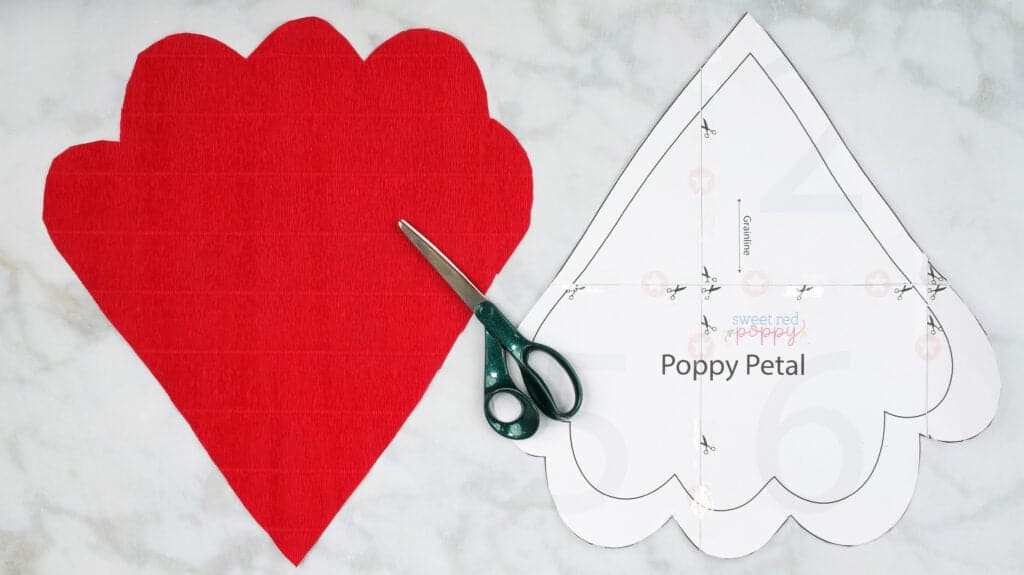
Pro Tip: Use Clover Clips to clip the template to the crepe paper. This will keep the template from moving when cutting around it.
Since crepe paper can be pricier, I like to take my time and cut each petal by hand to get the most out of my roll.
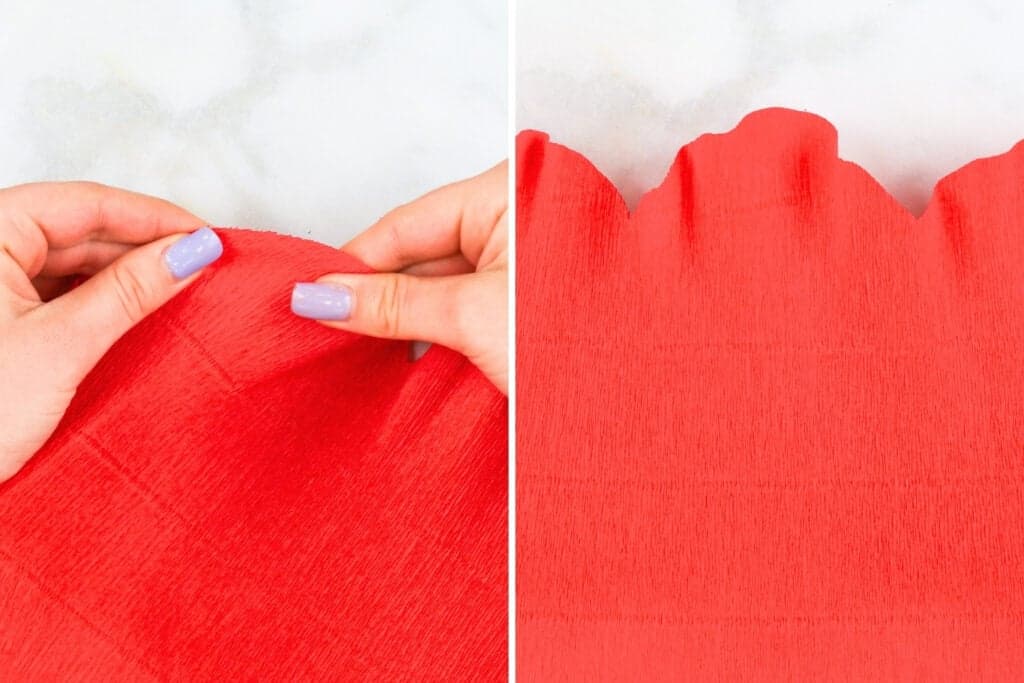
Shape Petals

When shaping the crepe paper petals, lightly stretch the petals from the center. Over-stretching will result in awkward indents in the crepe paper.
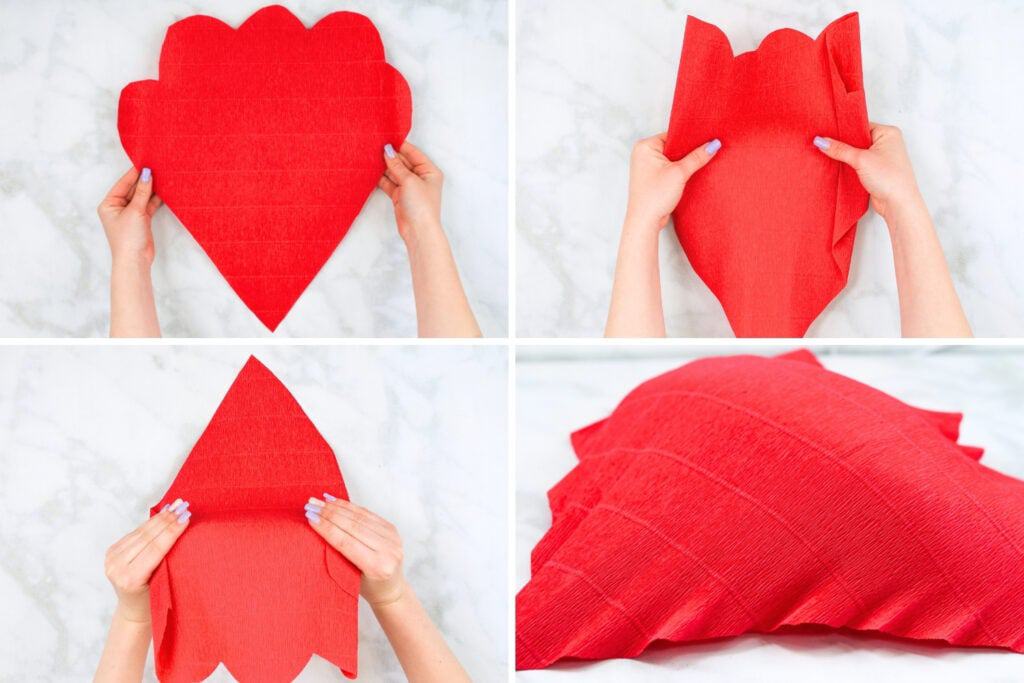
I have found that scrunching the sides of the petal together helps to get a better hold on the center. Then, gently push the crepe paper down with your thumbs and stretch it with your fingers in the back until you reach the sides. Doing this will help to round the petals.
Along the outer edges, gently pull every 2 inches to create waves.
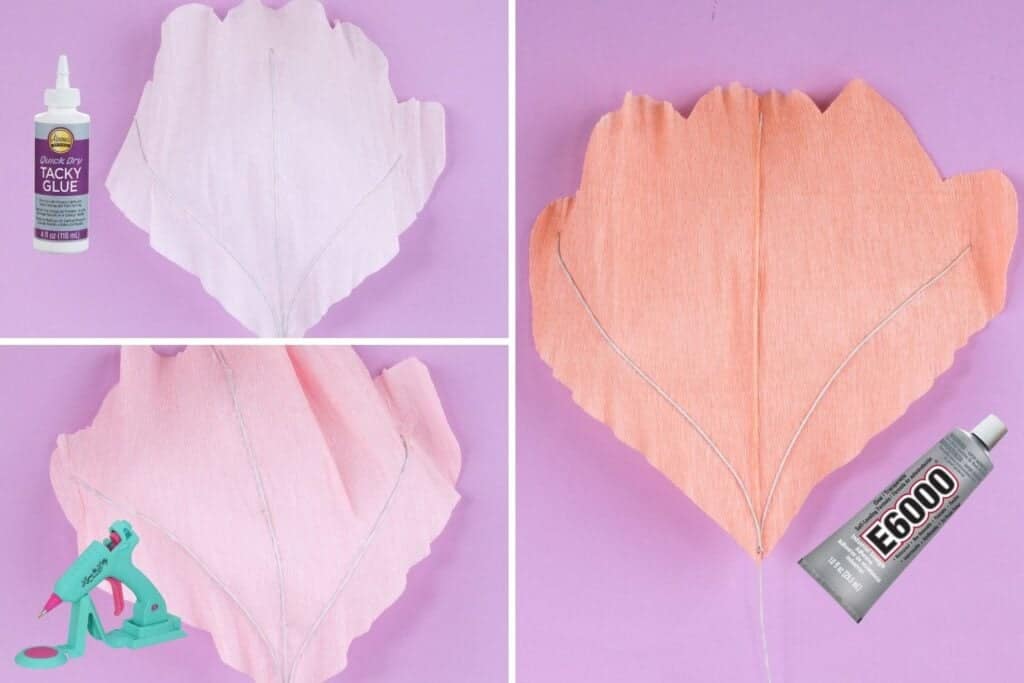
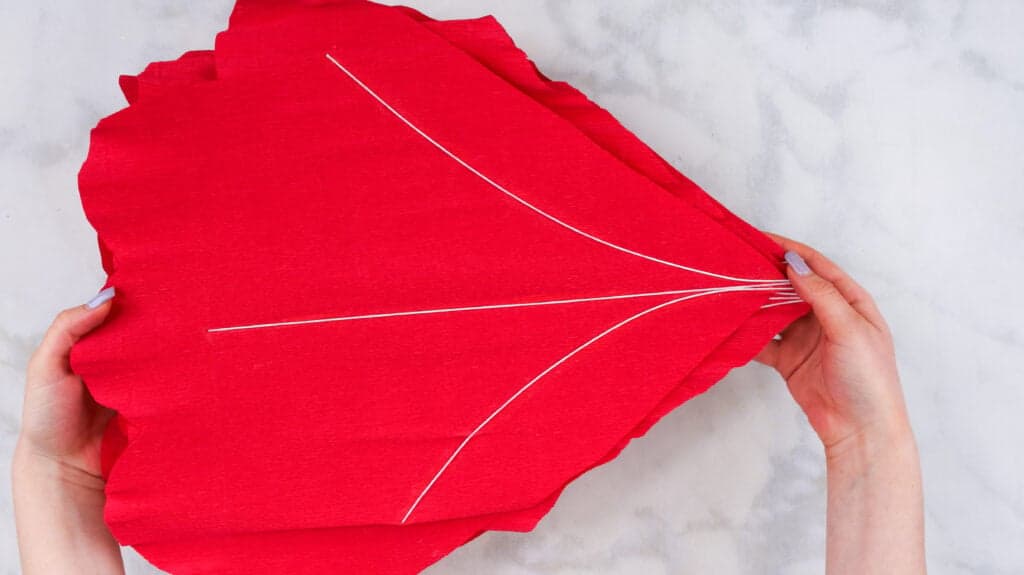
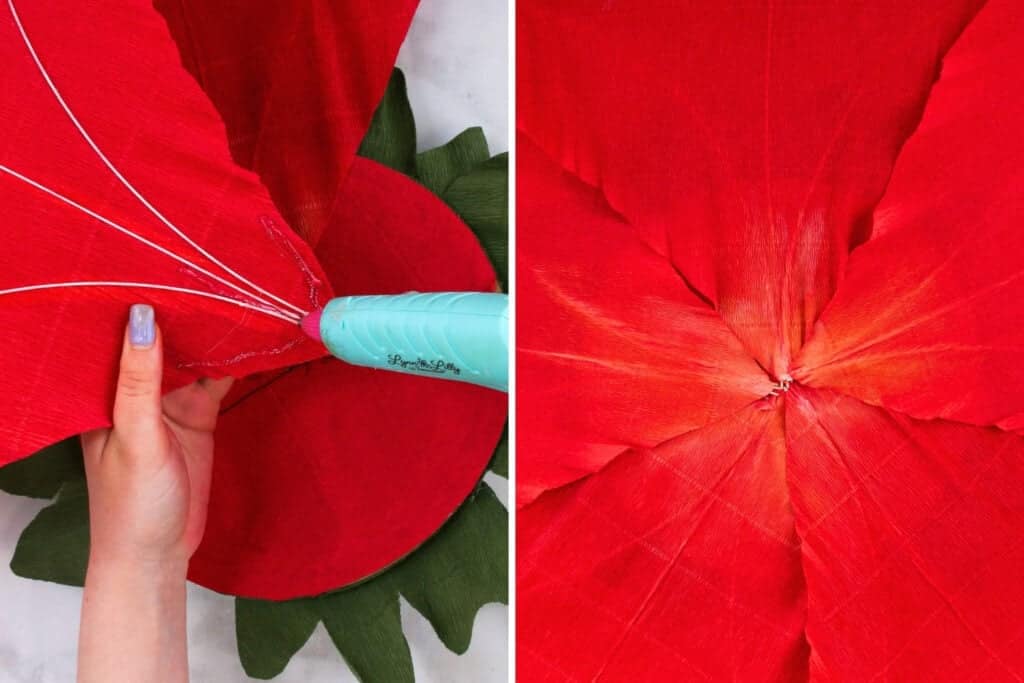
Add Wires to Petals
After stretching the crepe petals, it's time to add the wires that will help the petals keep their shape. I'm using 18 gauge 16-inch White Floral Wires and placing one down the middle first.
I used a lightweight floral wire on the first few flowers that I made, and it didn't offer the petals enough support. Be sure to use 18 gauge for the best results.
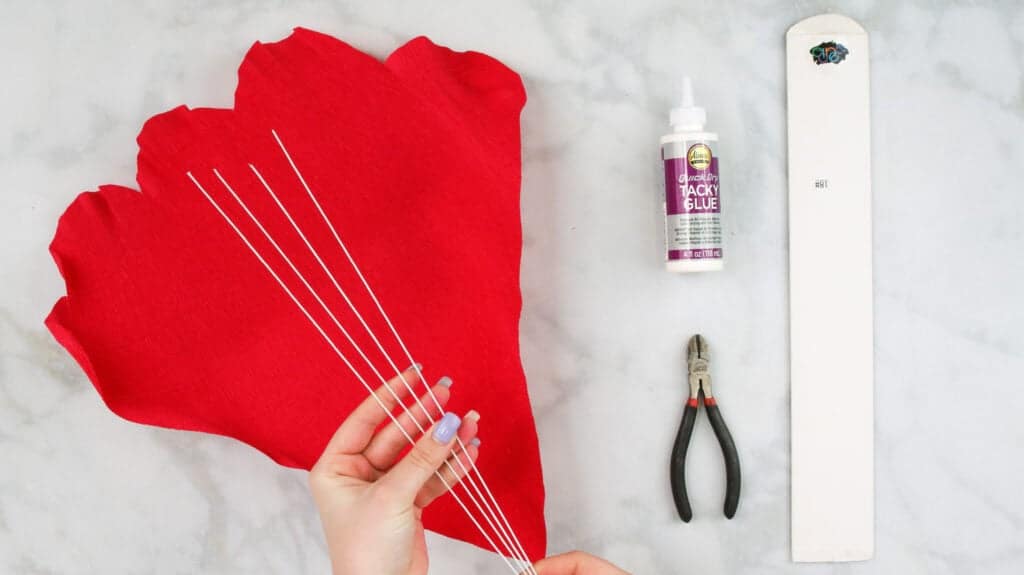
For this part, you can use hot glue which is what I used for the three giant poppies I made. In this tutorial, I'm using Tacky Glue.
I like to add a dot of glue 3 inches below the tip of the petal, then adhere one end of the wire to the glue dot and hold it in place. Add another glue dot to the opposite end, set the other end of the wire into the glue, and hold it in place with a clip.
When I'm working on my petals I like to create them assembly line style. Find a large flat surface and lay out all of your petals in front of you. Complete each step on all 5-6 petals. This saves you from waiting around for everything to dry and I find you pick up on a better technique and tips and tricks when you do it this way.
Pro tip: Use Clover clips to keep all the wires in place while they dry.
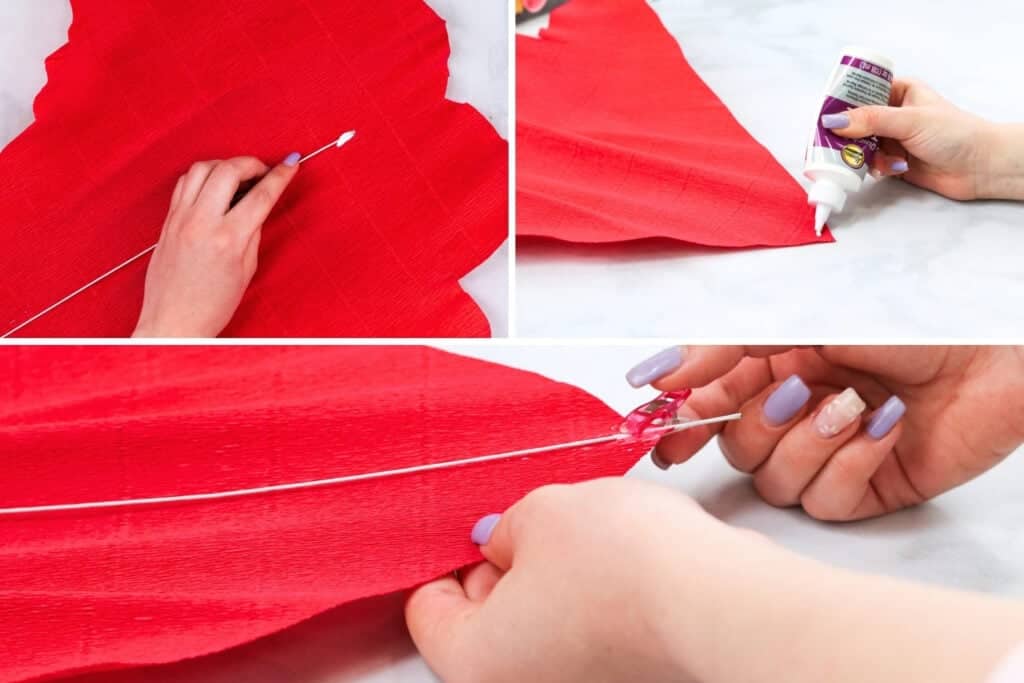
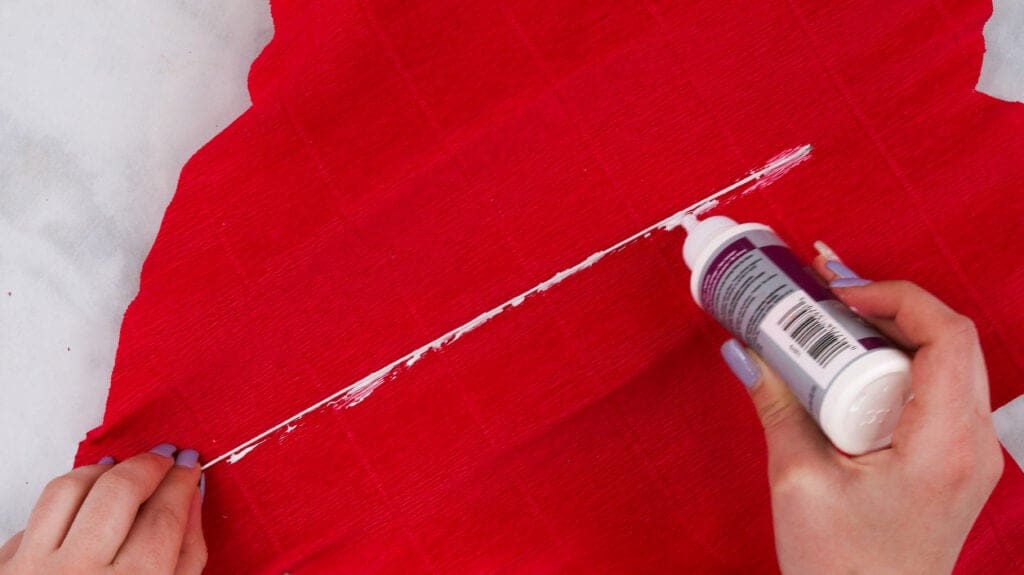
Run a line of glue below the wire running down the center of the petal, and push the wire into the glue. Let this dry for 15-30 minutes. While it's drying repeat the steps taken to the other petal pieces.
It's okay if there's excess wire- we'll cut this off later.
Now it's time to add 2 support wires to each petal. On one side of a petal, add a dot of glue, and attach one end of a wire, secure it in place with a craft clip.
Then, slowly bend the wire so it joins together with the center wire at the bottom of the petal.
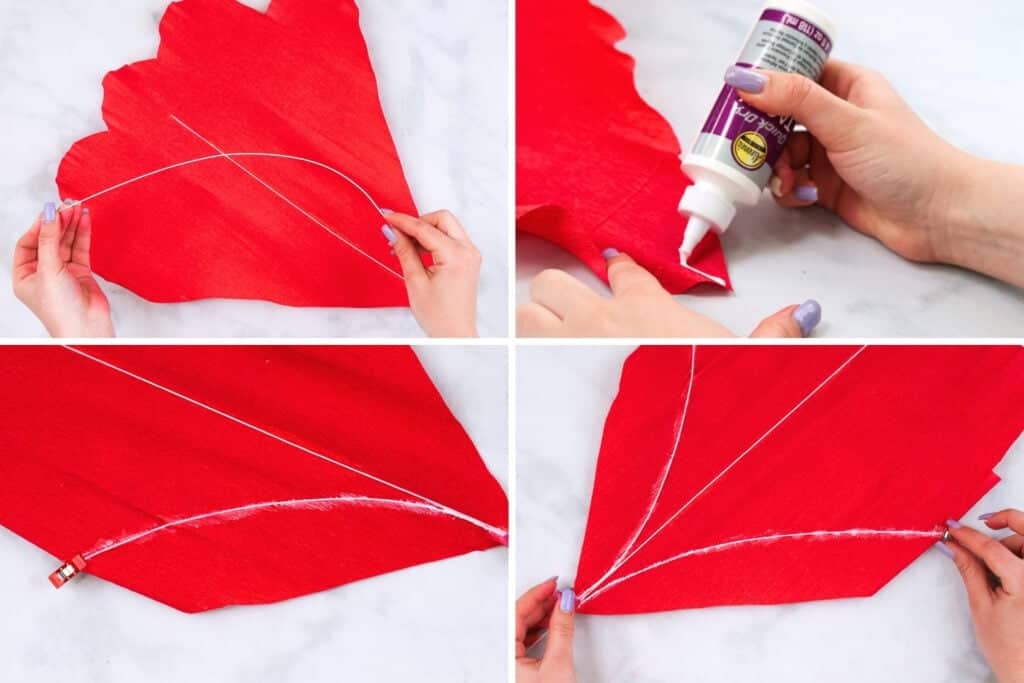
Run a line of glue underneath the wire, following the curve of your wire, and press it into place. Repeat this to the other side of the petal.
Let Petals Dry
Let your petals dry for 30 minutes if using Tacky Glue.
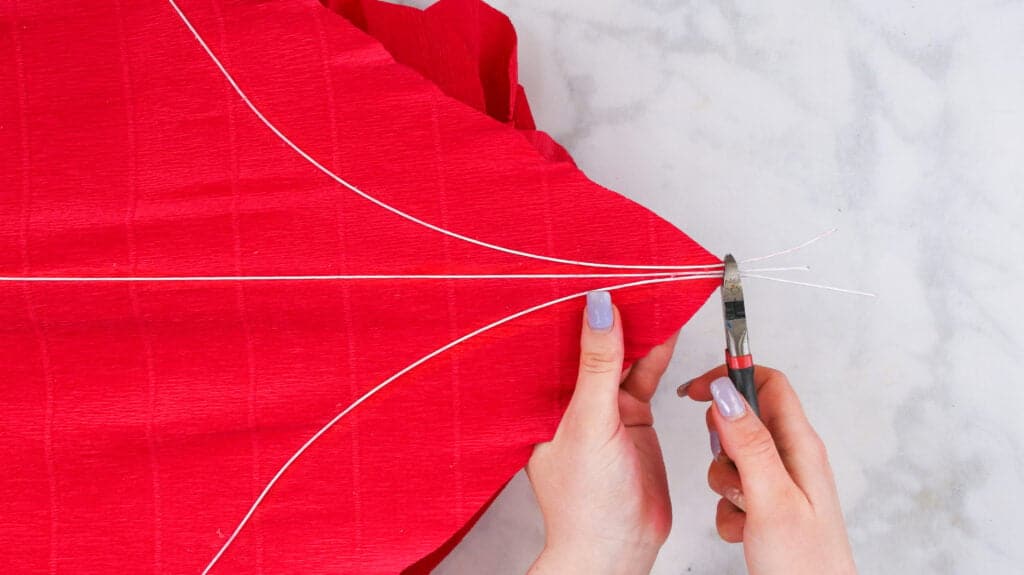
Clip off any extra wires with needle-nose pliers.
Cutting & Assembling Leaves
While your petals are drying, we can move on to assembling the leaves.
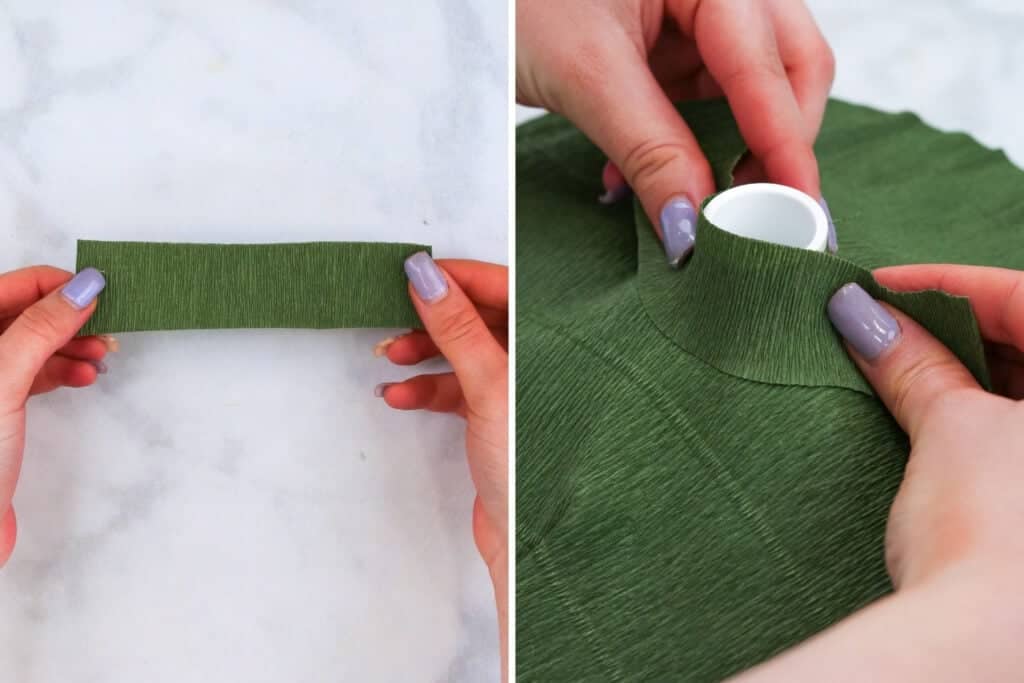
Cut out the half-leaves from the assembled template, place them on top of some heavy-weight green crepe paper sideways, follow the grainline, and cut.
Flip the half-leaf template you just cut out of the crepe paper to the wrong side, place it on top of the crepe paper, and cut. Or fold the crepe paper in half, place the template on top, and cut.
Again, I typically cut one piece at a time so I don't waste any material. I'm normally a bit of an impatient crafter, but crepe paper tends to be pricey, so I like to stretch my budget as much as possible here!
Here's a little tip I learned from cutting way too many leaves. When I first started making leaves, I really wanted the lines to run outward and upward from the center of the leaf to reassemble veins as they would naturally in nature. However, I found the leaf is stronger and has more structure when the heavier lines run in the opposite direction pointing down.
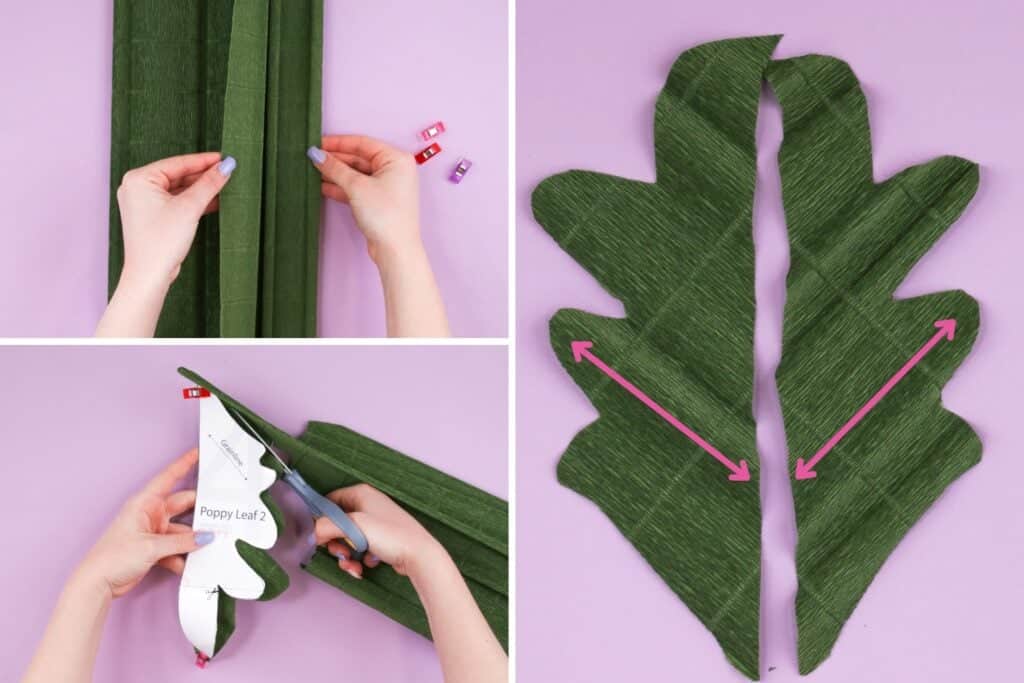
Bring the two halves together- the grainlines should make a V-shape. Apply a line of hot glue or tacky glue along one of the sides of the leaves, place the other on top, and let it dry.
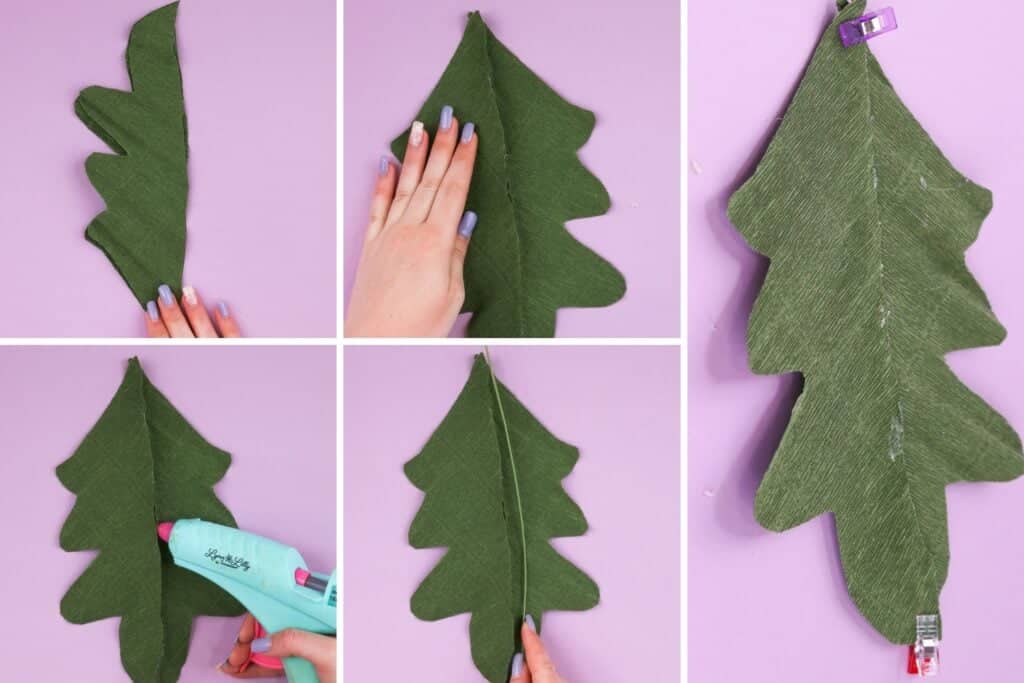
Unfold, then grab a 16-inch Green Floral Wire, place it next to the seam created, and fold the seam over the wire- hiding the wire from sight. (Depending on the leaf you're cutting out, you may need to add two additional wires along the back seam extending outward for extra support).
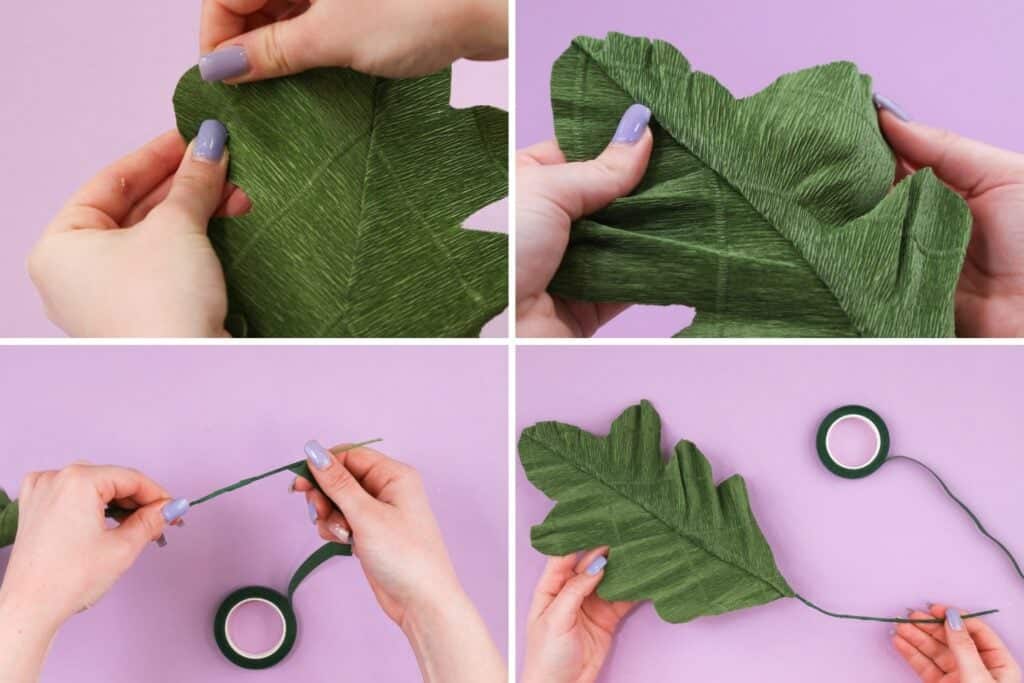
Stretch and pinch the edges to create a more realistic-looking leaf.
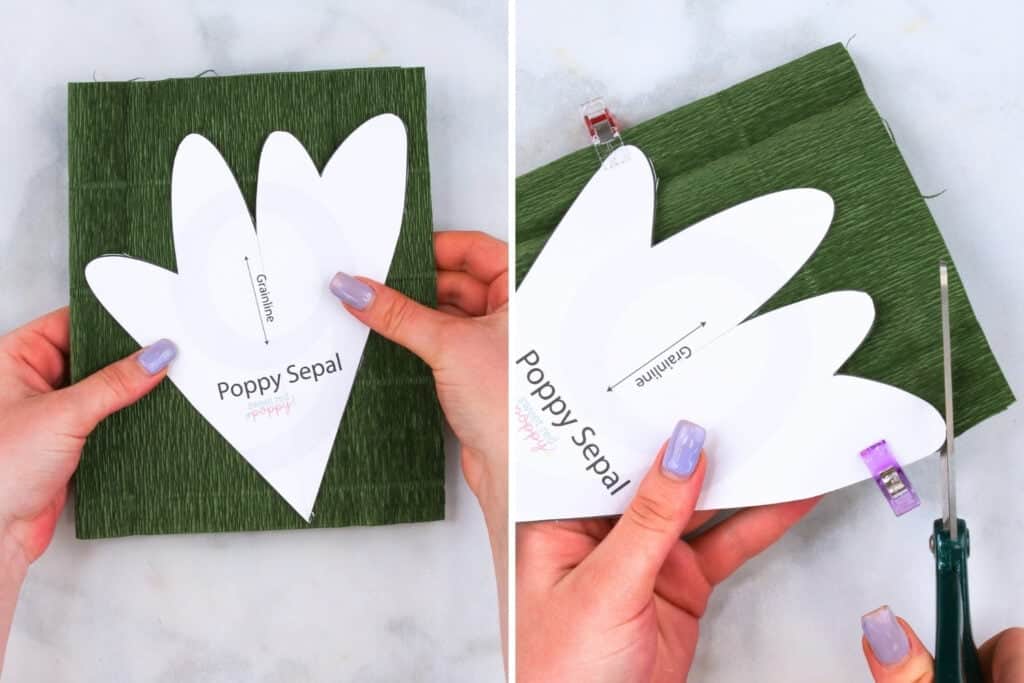
Cut out 5 of the Sepal pieces using the same technique used to cut out the petals.
Assembling Stamen & Pistil
Next, let's assemble the pistil and stamen.
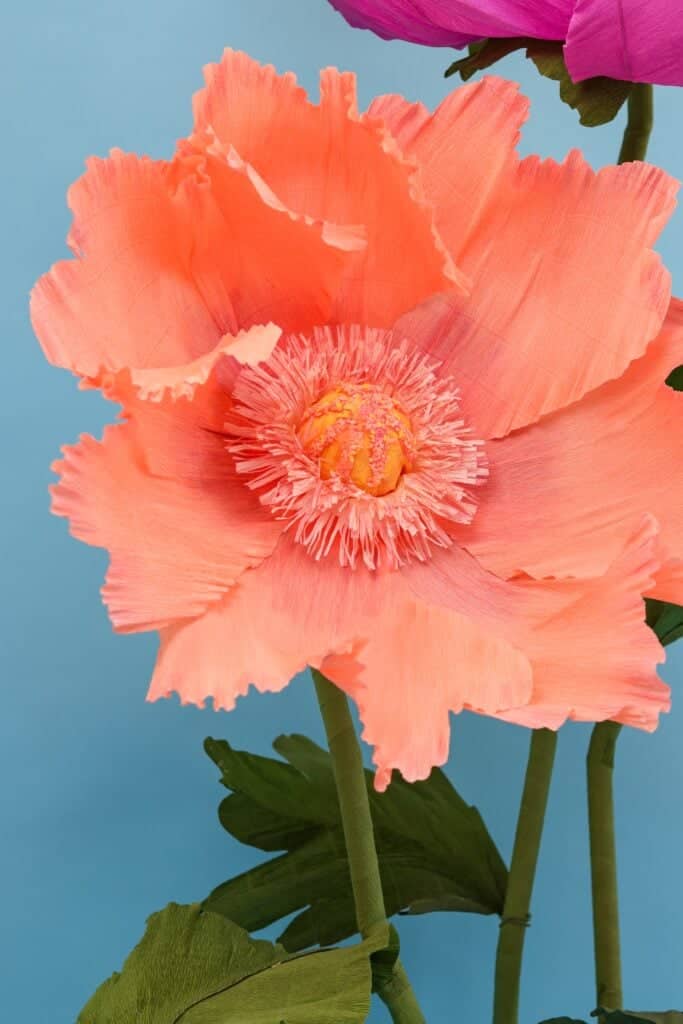
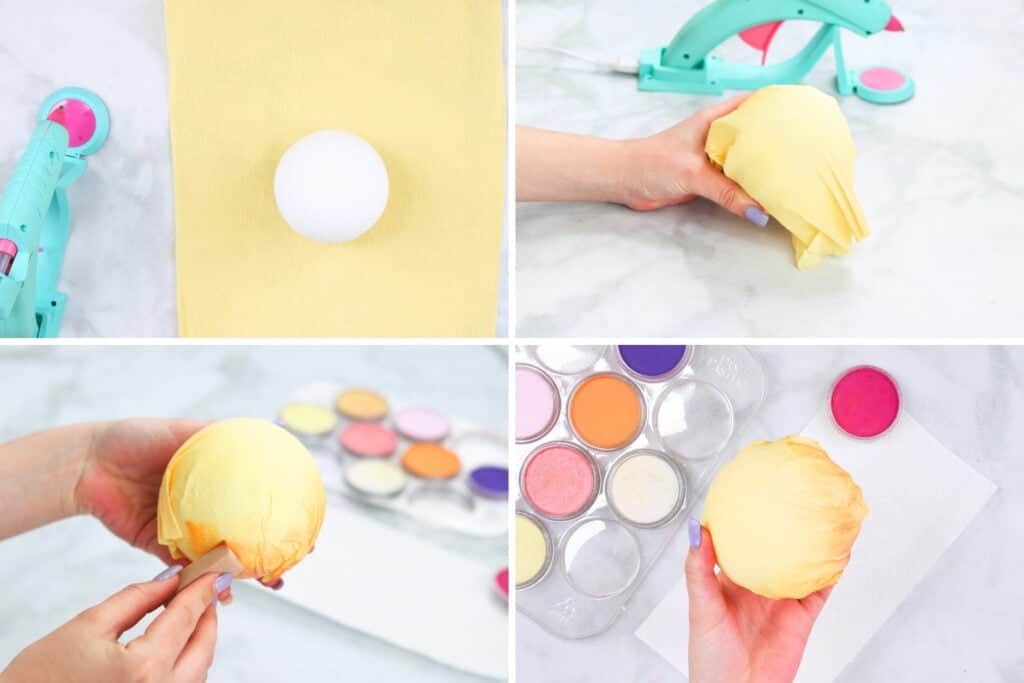
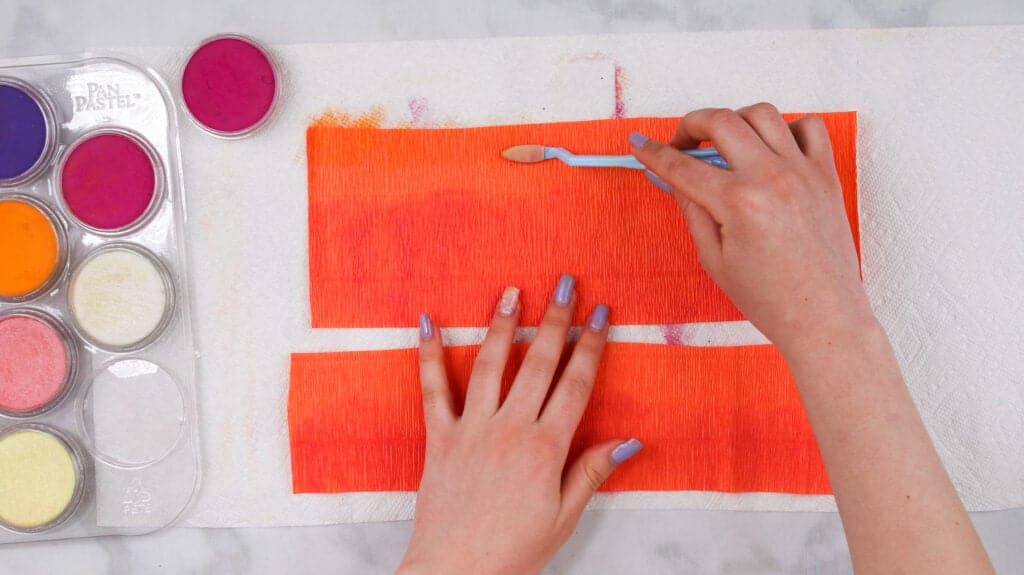
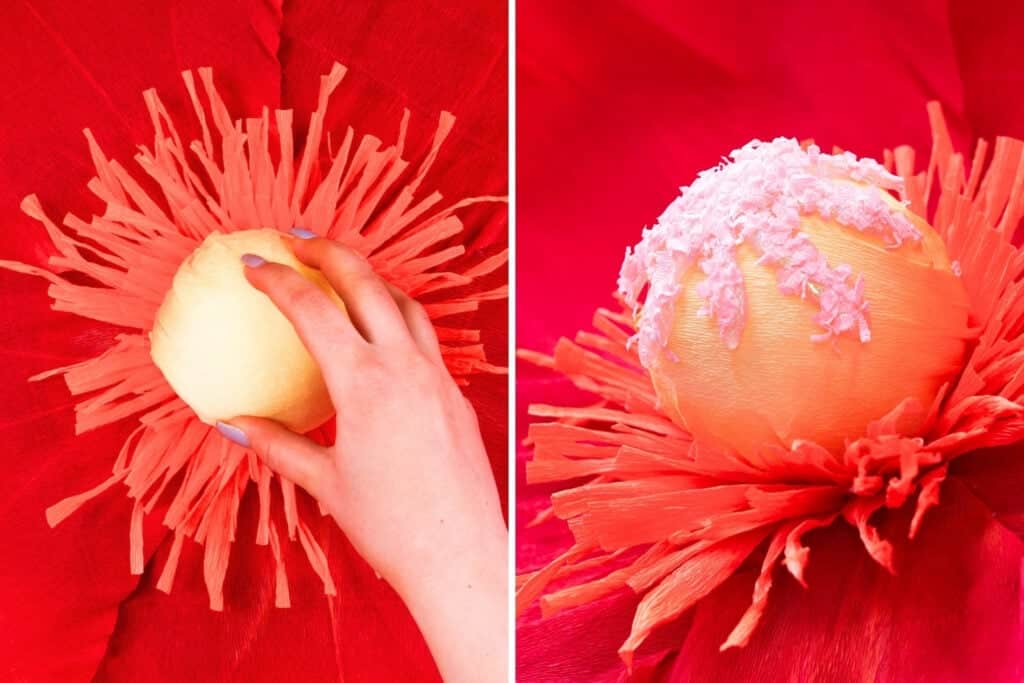
For the pistil, stretch and mold lightweight crepe paper to cover a 4 to 6-inch styrofoam ball, gluing it into place as you go. You can apply pan pastel to add contrast and depth. I lightly tapped the pan pastel with a sponge onto the ball-shaped pistil, forming a ring of bright orange around the center of the ball.
Cut 4 strips of Crepe Paper
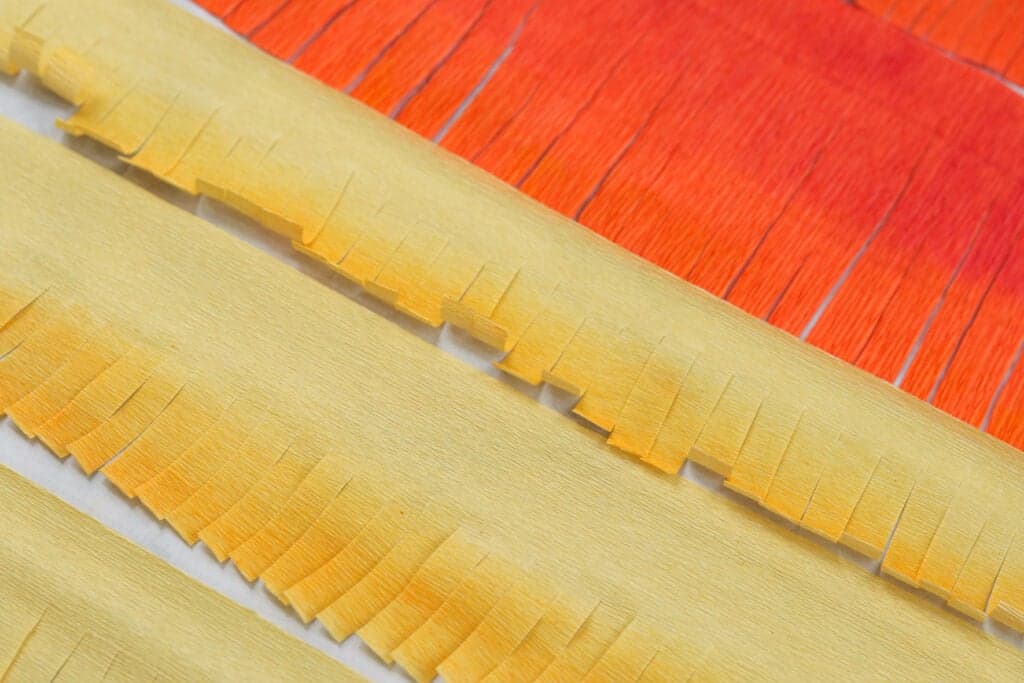
Next, cut four strips or more out of crepe paper (I picked rusty orange crepe paper), each one a half-inch bigger than the other. For example, the biggest strip I made measured 4 inches wide by 13 ½ inches in length, and the others measured 3.5, 3, and 2.5 inches in height.
If you'd like to add more variation to your stamen, consider using two or three different colors of crepe paper.
Create the Stamen
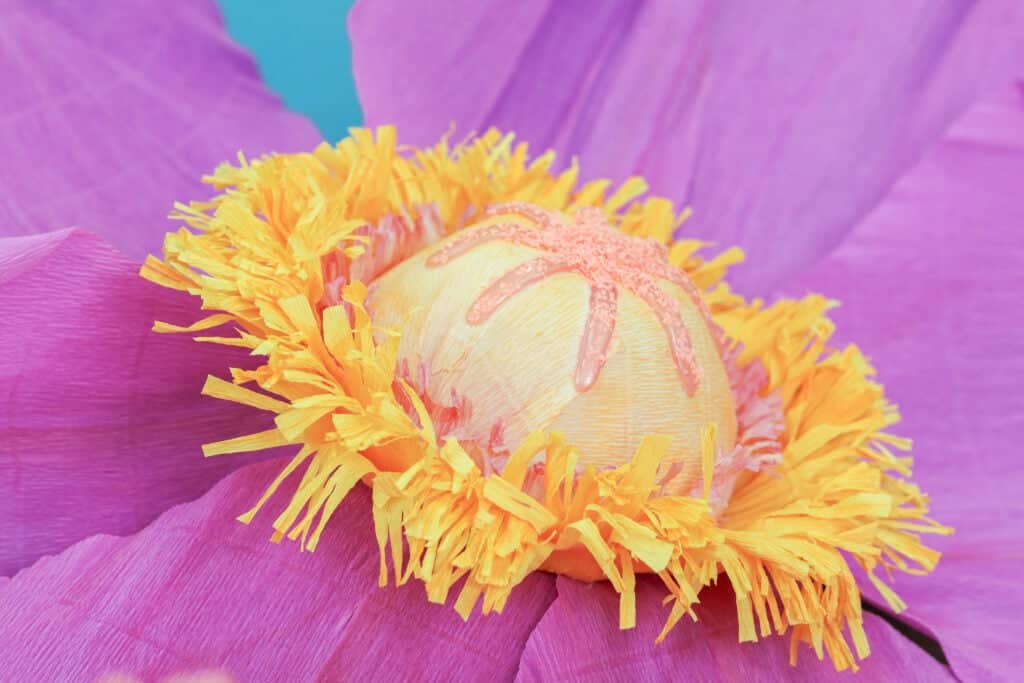
Afterward, I like to apply pan pastel along one of the edges before fringing. When applying pan pastel, it's best to apply it along the length of the crepe paper.
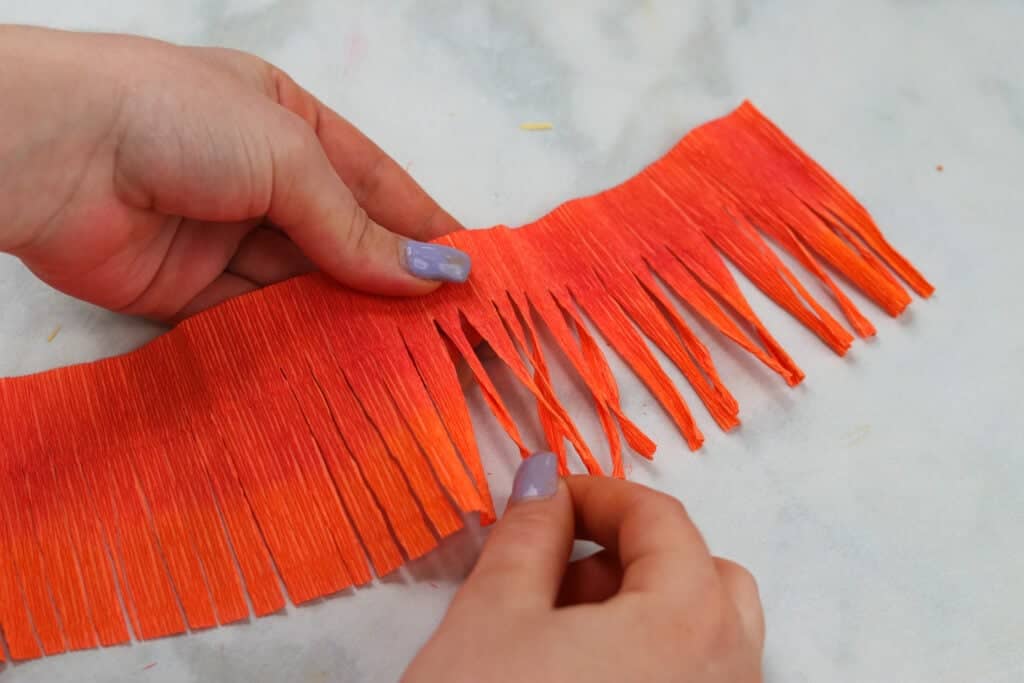
After cutting the strips, it's time to fringe them. Stack your strips and with your scissors, cut into the crepe paper every 1/4-1/2-inch horizontally while holding the strips vertically.
After fringing, rub the fringe in between your fingers shaping it so that each stamen piece can stand on its own.
Pro Tip: It helps to wet your fingers before curling the stamen pieces.
Glue Stamen Strips to the Pistil
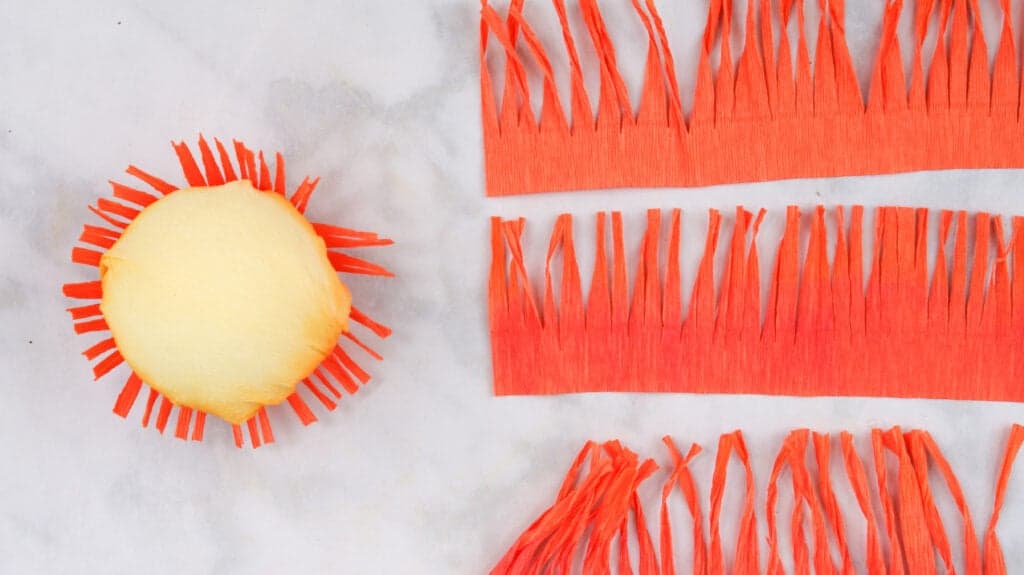
Finally, wrap the strips around the styrofoam ball, starting with the smallest one first. Draw a line of glue along the bottom edge of the crepe paper, then wrap it around the ball.
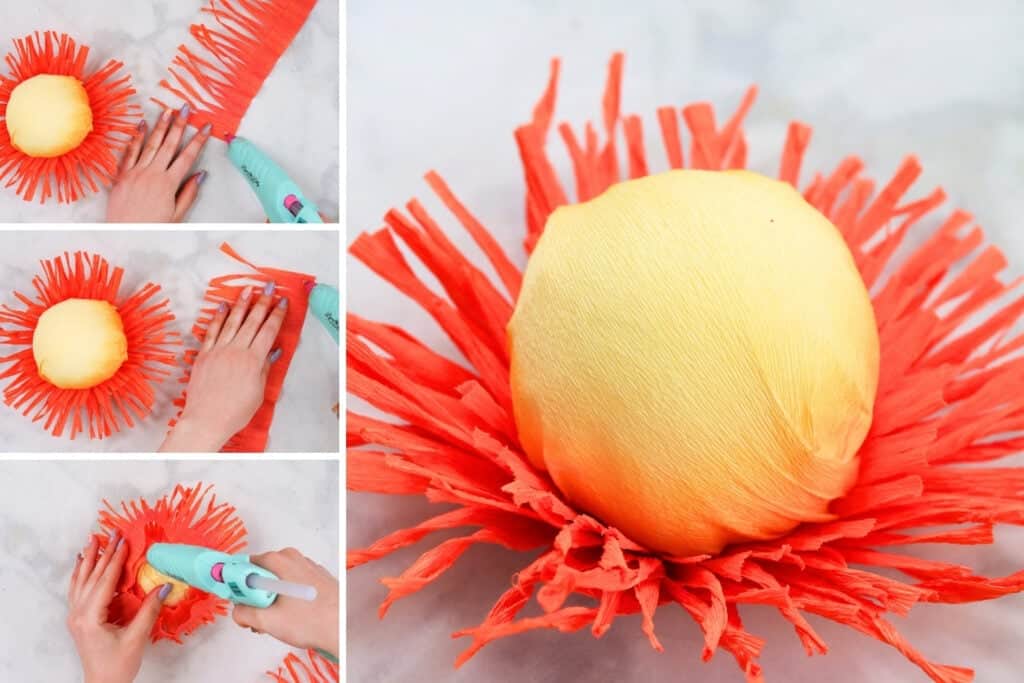
Fluff the stamen pieces and the centerpiece of this poppy flower is done! Don't be afraid to bend and shape the crepe paper to create your desired look.
As a reminder, using heavier weight crepe paper on this will result in a stamen thats more rigid, while a lightweight crepe paper will give a softer droopier look.
In case you're wondering my pistil ended up measuring 10 inches across.
Add Texture to Pistil (Optional)
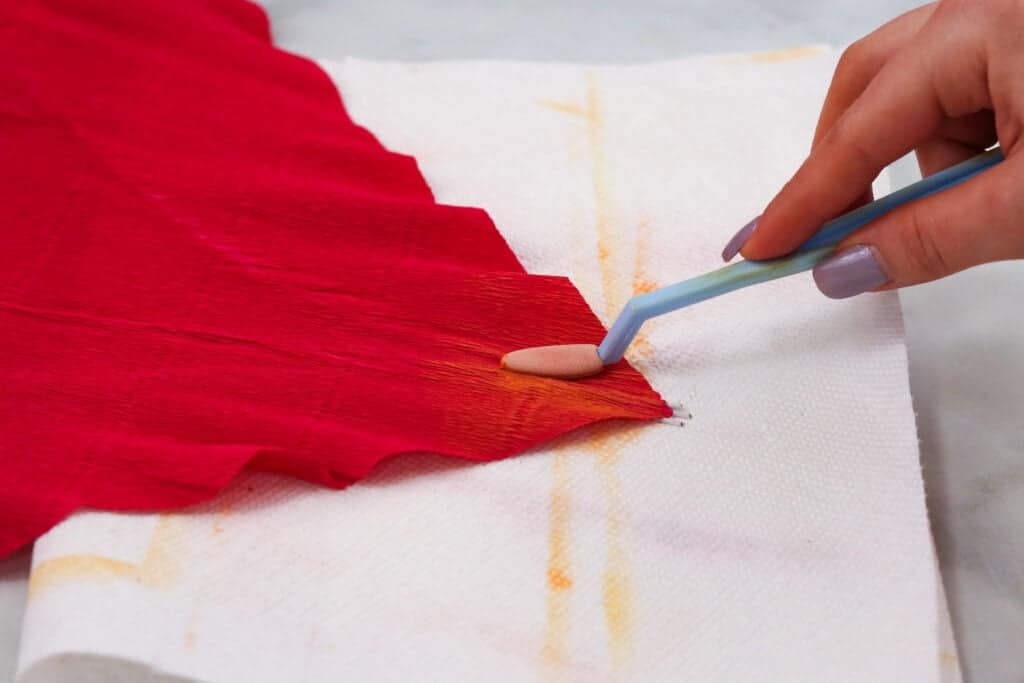
This is optional, but I added a sculpted hot glue piece I placed on top of the styrofoam ball to add texture. To make this, set your dual-temp hot glue gun to high, and place a piece of parchment paper (or something with a non-stick surface) onto the surface you're working on. *This works best with a full-size glue gun instead of a fine-point glue gun.
Make a shape that consists of 8 lines (if your glue dries too fast as you do this, use a heat gun to re-heat the glue to get a consistent texture). I let mine dry and added fine glitter using a paintbrush, brushing over the glue to add some shine.
You could also opt to make the pistil out of air-dry clay!

Then, I brushed Mod Podge over the glue shape, sprinkled a handful of leftover tiny pieces of crepe paper over the glue, and adhered the glue piece to the center of the styrofoam ball by adding hot glue along the back of each line.

Assembling the Flower Base
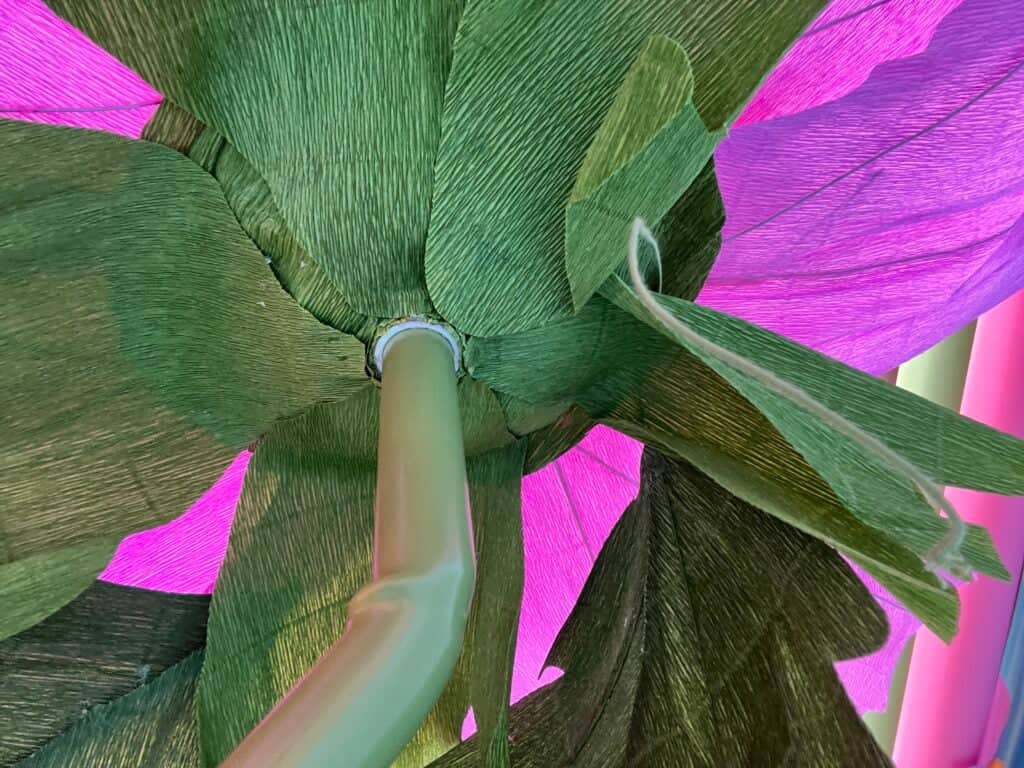
The base is the last piece we need to assembler before bringing it all together. Grab a 10-inch Cake Plate, a 2-inch PVC pipe, a Drill, a 7/32-inch Drill Bit, 22 Gauge Floral Wire, scissors, a pen, and leftover crepe paper from your leaves and petals.
*After making multiple tester versions I've found using a cake plate creates a sturdy base to build your flower off of. However, you could skip the cake plate altogether and adhere your petals directly to the PVC pipe coupler.
(If you plan on hanging your flowers on a wall, you don't need a PVC pipe or drill).
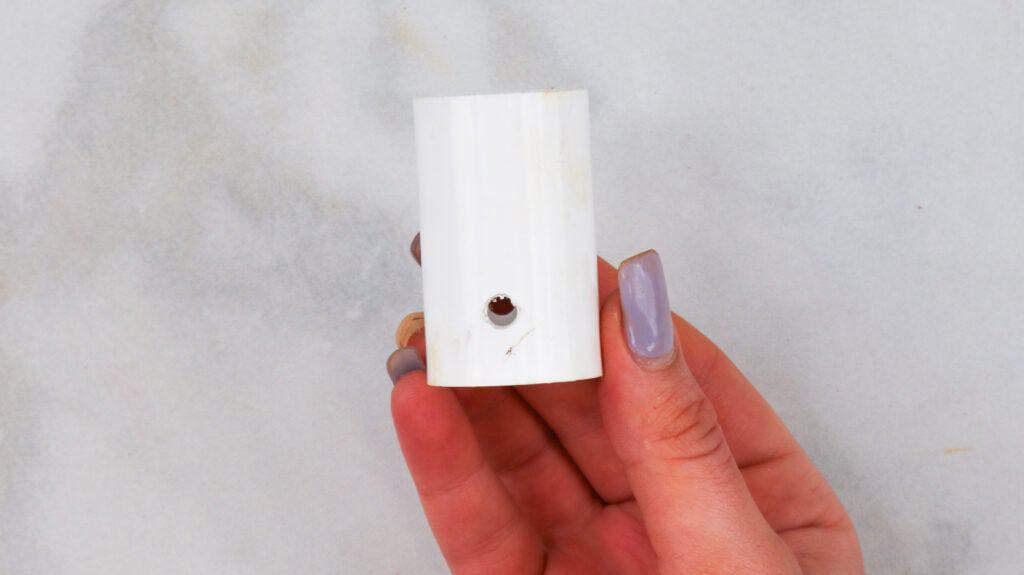
Prepare PVC Pipe
First, drill a 7/32-inch hole into both sides of a PVC pipe using a drill.
Add PVC Pipe to the Cake Plate
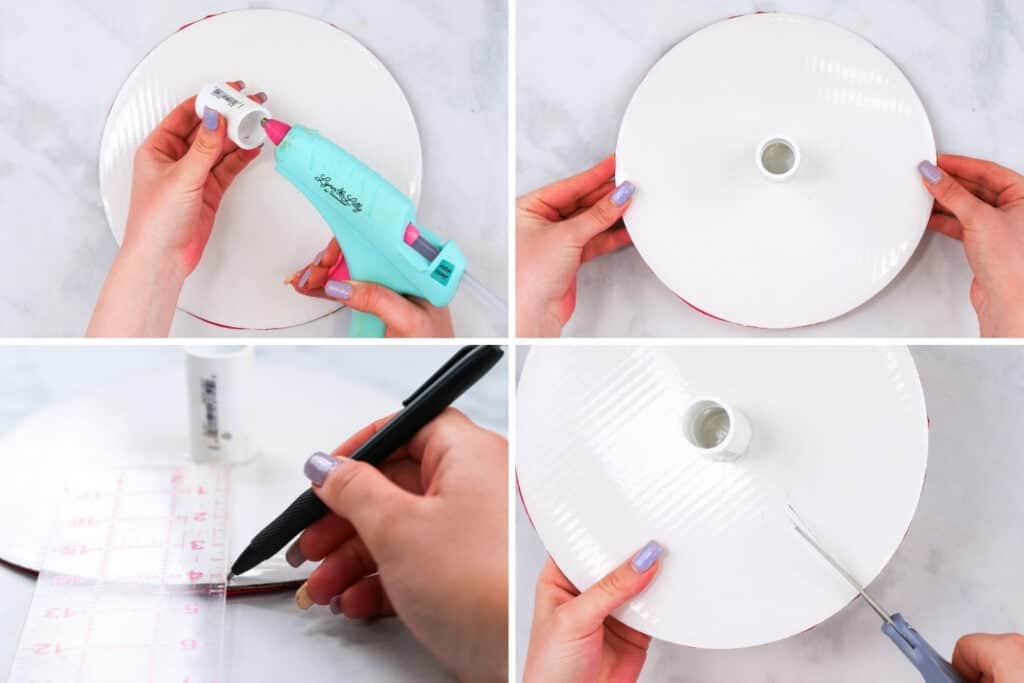
Using a hot glue gun adhere the PVC pipe to the center of the cake plate. With a ruler and pen, mark each side of the cake board where it lines up with the holes of the PVC pipe, and cut 2-inch slits.
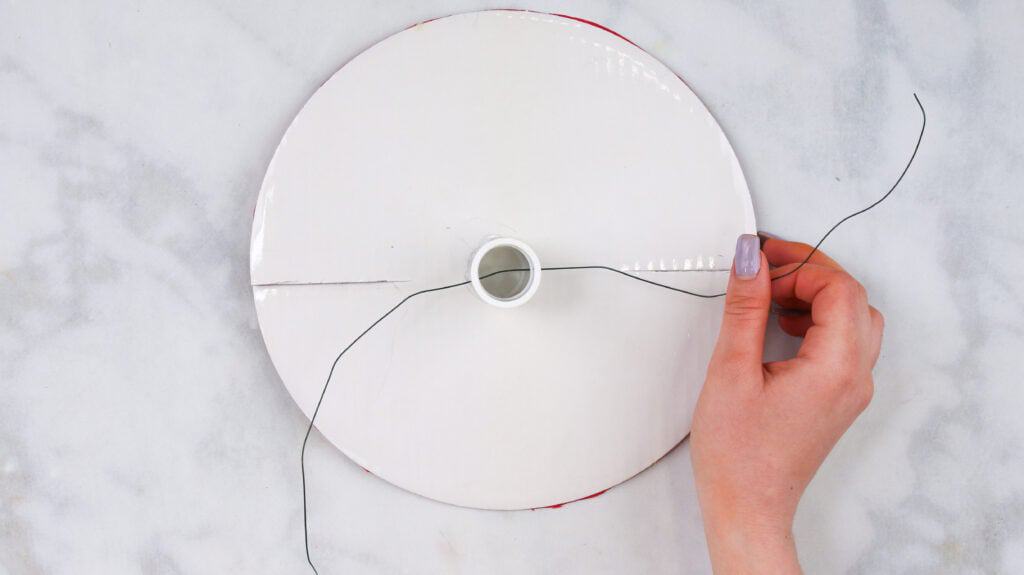
Add Wires to Base
Next, pull a piece of wire through the holes of the PVC pipe and slits and wrap the two ends of the wire together, gluing it into place on the other side of the cake plate. Cut the excess wire with pliers if needed.
Add Crepe Paper to the Base

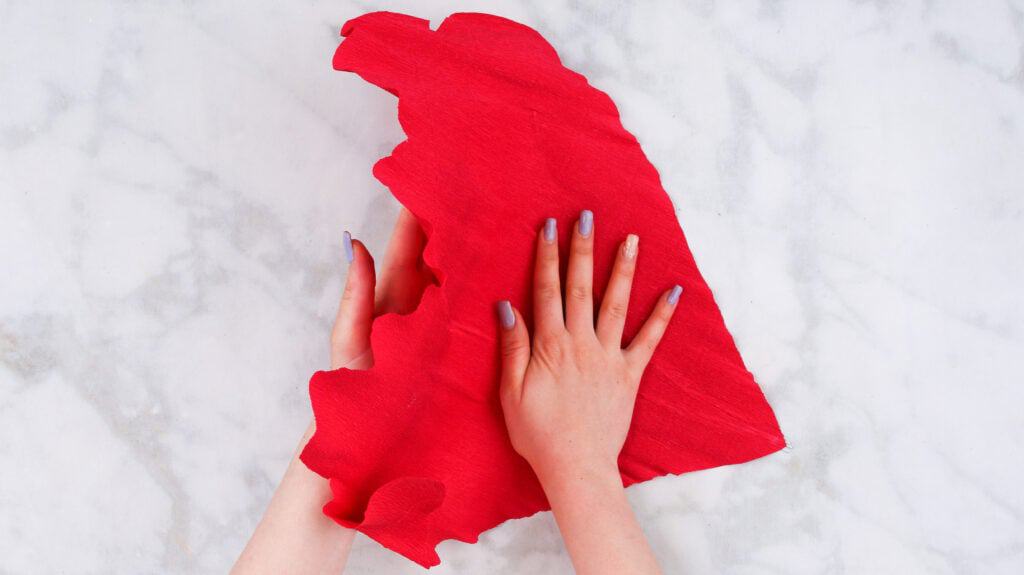
Stretch and mold a piece of crepe paper (the same shade as your petals) over the flat side of the plate, glue it into place, and cut it to size.
On the other side of the cake plate (with PVC pipe), grab some paper towels or an alternative to create a dome and glue it around the pipe. This will give the bottom of the flower a nice rounded shape.
Stretch and mold the crepe paper you used for the leaves over the pipe and glue it into place. You can use scrap pieces of crepe paper to piece this together if needed.
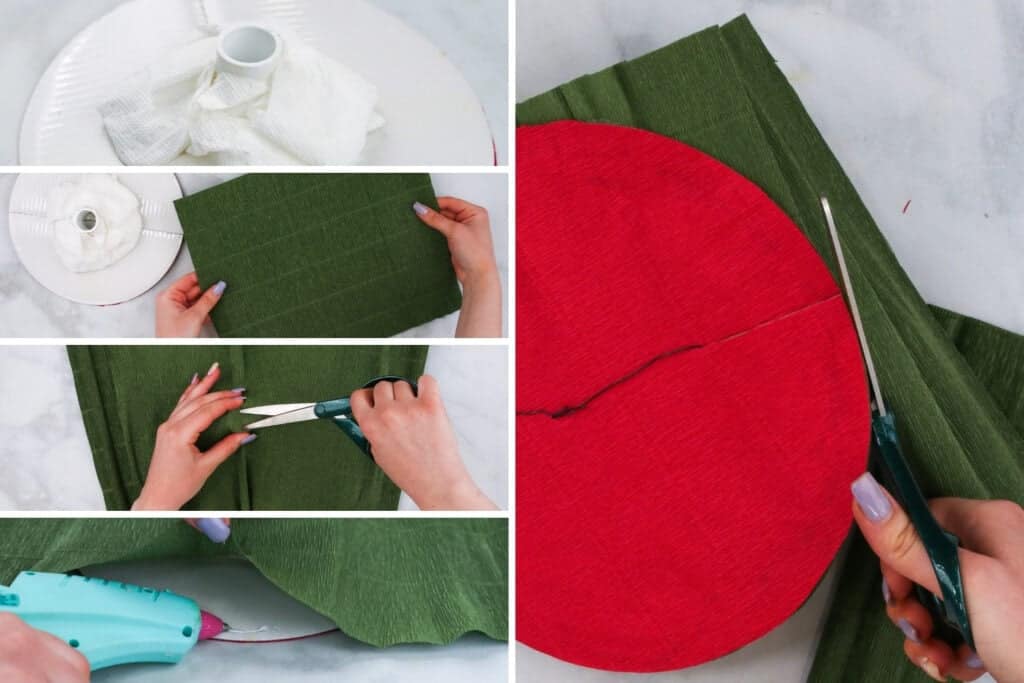
Cut out a hole for the PVC pipe to pop its head through, and wrap a strip of crepe paper around the pipe, securing it into place with hot glue.
Add Sepal Pieces to the Base
Now, glue all five Sepal pieces to the bottom of the cake plate around the pipe, stretching them to fit over the domed base.
I like to secure almost the entire length of the sepal so it doesn't look droopy.
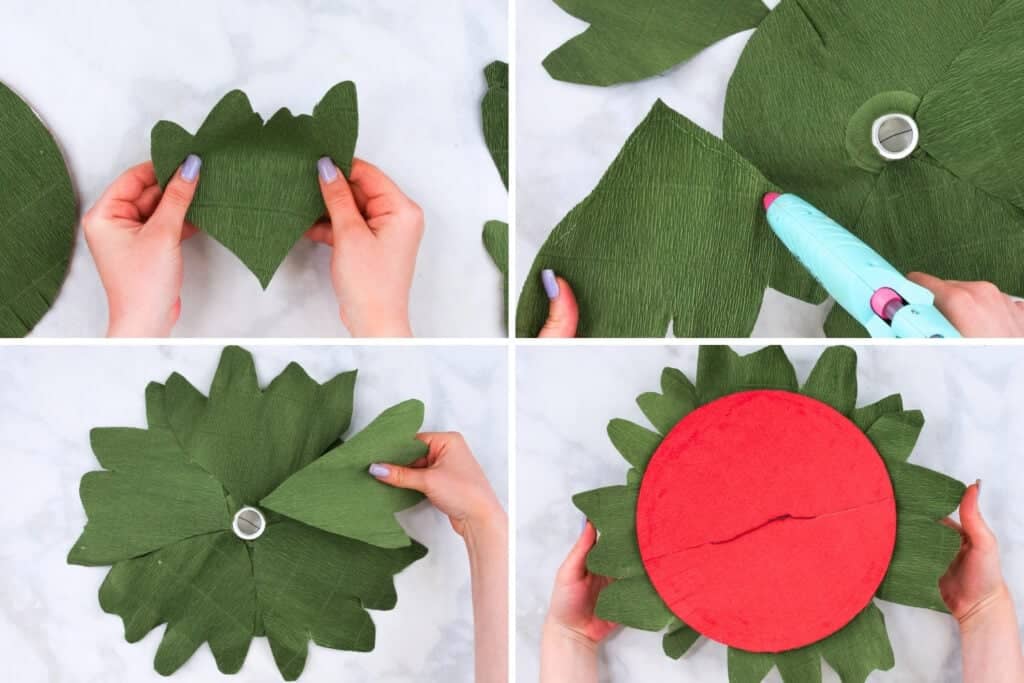
Adding Pan Pastel to Petals
It’s time to glue the petals to the base which should be completely dry by now, but first, let's add some pan pastel to the petals.
Pan pastel is optional, but adds great contrast! I applied orange, magenta, and light pink pastel to the pointed edges of my petals swiping with the grain of the crepe paper a quarter of the way up the petal. Feel free to add color to the outer edges of the petals as well.
You can also add pan pastel to the back of the petal along the length of the wire stems to help it blend in with the color of the crepe paper.
Also, reshape the petals if needed. They may have lost their shape during the drying process. I like to bend them into a shape that resembles a letter C.
Bringing it All Together
We're finally to the most exciting part of this process! Bring all of the pieces you've assembled together to create the flower!
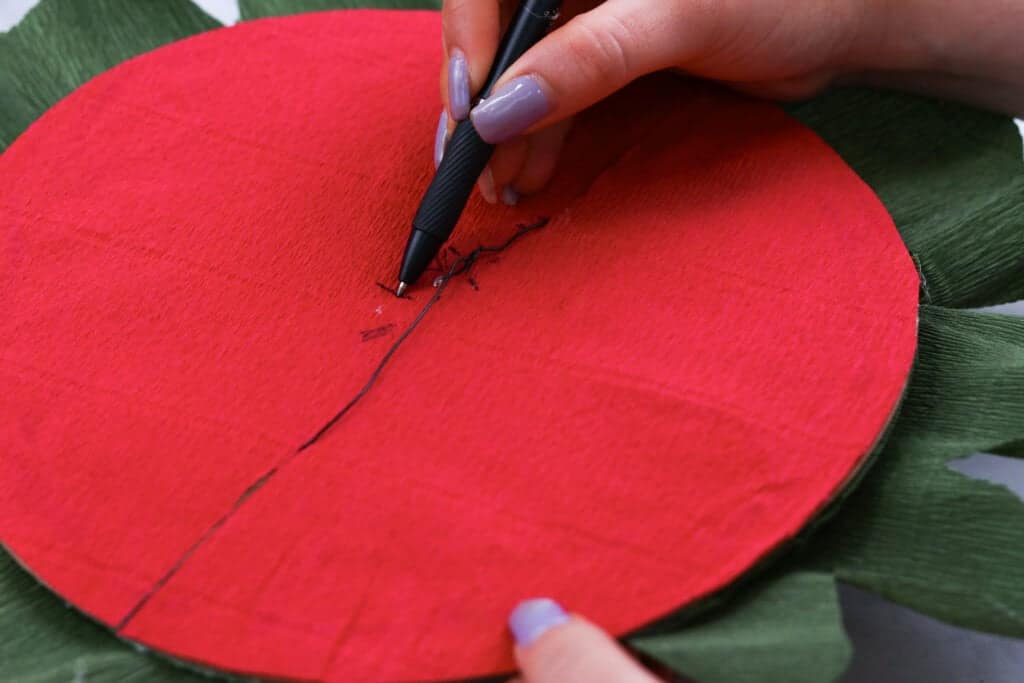
To get an idea of where you want to place your petals, place them on the cake plate before gluing them to test out positioning. Then, mark with a pen where the petals should be secured with glue.
Go ahead and secure the petals to the base with hot glue. I like to draw a line of hot glue in the shape of a V along the back of the petal with a large glob at the very base of the petal.
Hold the petal in place until the hot glue cools completely. Each petal should slightly overlap the petal that sits next to it.
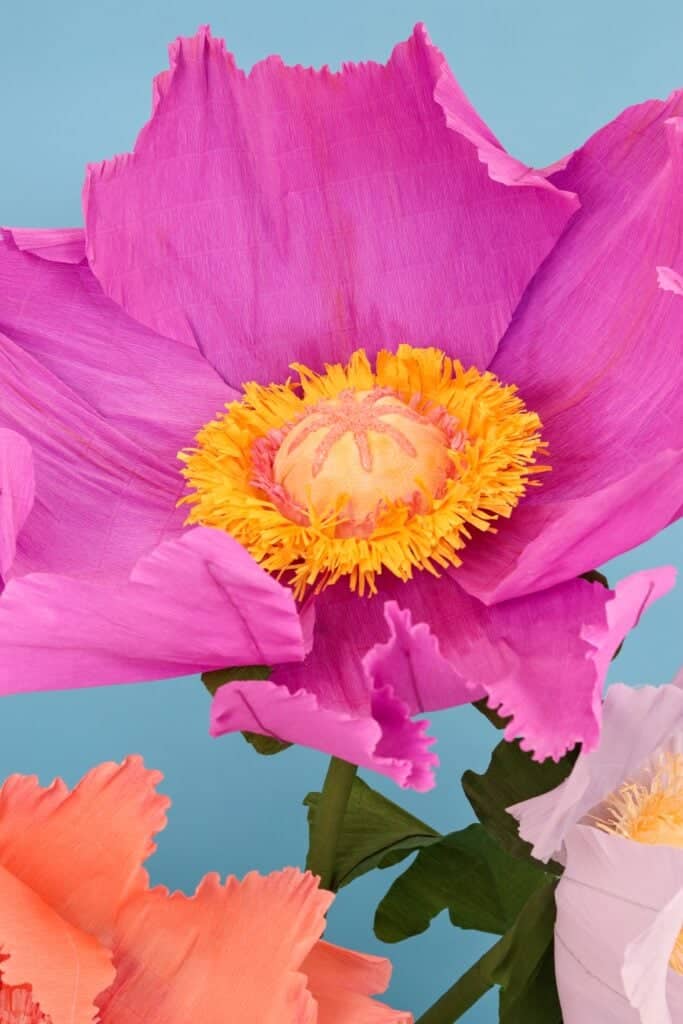
Lastly, secure your pistil to the center of the flower with hot glue, let it cool completely, and you've finished your flower! You now have a beautiful giant crepe paper poppy flower!

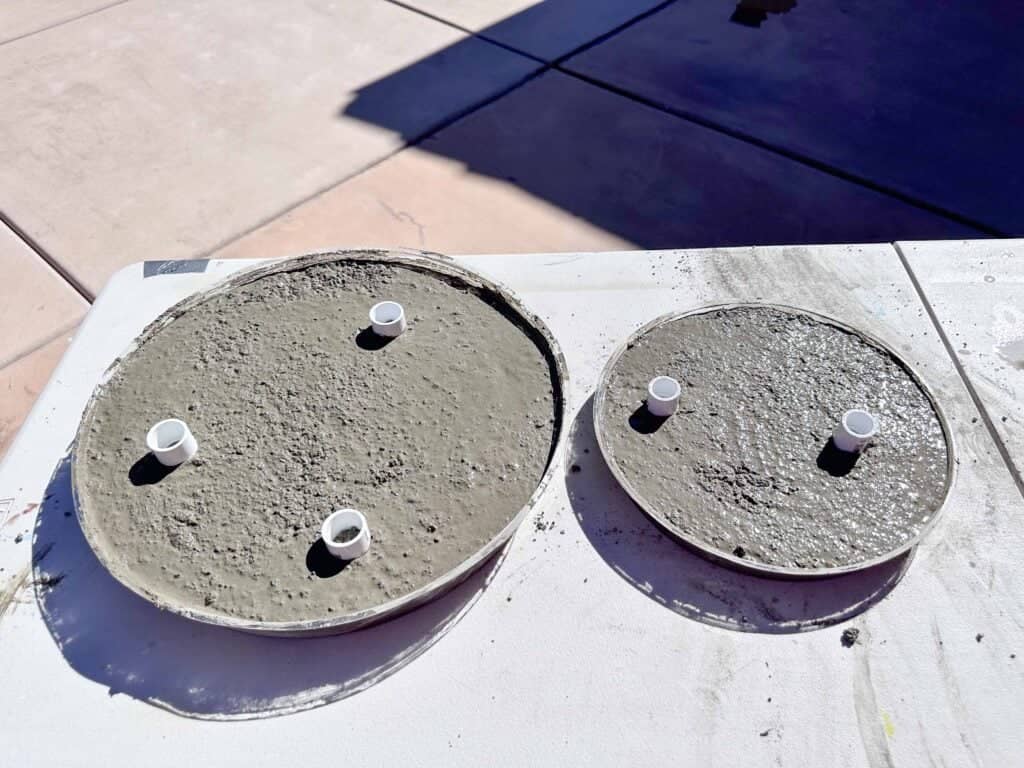
Assembling Concrete Base for Standing Flowers
To make the concrete base, I bought quickset concrete mix, a 17-inch plastic plant saucer tray, three 3/4" x 5 ft. PVC pipes, three 3/4" PVC Coupling Adaptors, Green Colorshot acrylic spray paint, and preserved deer moss.
Prepare the concrete mixture according to the instructions, pour it into a plastic plant saucer tray (I used 17-inch diameter), and place 3 coupling adaptors into the concrete to hold your flowers. Let the concrete dry for 24-48 hours before removing the plastic plant saucer.
Once the concrete dries, spray paint it green, brush Mod Podge onto the surface or use hot glue to add in the moss. Adding preserved moss to the concrete base adds a natural, organic touch that softens the harshness of the concrete.

How to Create the Giant Stems and Shape PVC Pipe
Now, it's time to tackle the stem for our huge crepe paper poppy! For this part of the flower, you will need three pieces of 3/4" Schedule 40 PVC pipe. To create a more organic-looking flower display, you'll want to vary the heights of the stems. This will offset the flowers and create visual interest.
Use a PVC cutter to cut the pipe it into various lengths. I left the first one at 5 feet, then snipped the others down to 4 feet and 3 feet.
Next up, it’s time to shape our PVC pipe.
I recommend doing this next part of the project outside on a flat surface where you have good ventilation. If you have heat-resistant gloves and safety goggles, go ahead and grab those as well!

Hold the heat gun about 3-5 inches away from the area of the PVC pipe that you would like to bend. Slowly heat the pipe along a 3” length on all sides. Be careful not to overheat the PVC as it will start to burn.
Once it starts to soften, you can begin to bend the pipe. Any shaping you make to the pipe should be subtle. Bend the PVC pipe while it’s warm against the edge of a table and hold it in place until it cools.
I find it's best to add a slight curve to the very top of the PVC pipe so that the flower is completely visible from the front once you secure it place. If you leave the pipe straight, the flower will point upward at the sky instead.
Once your PVC pipes have cooled completely, you can coat them with a layer of green paint to match the base.

Not sure how to shape your PVC pipes? I found it was helpful to test it all out by adding in my flowers to see if the angles and heights of my pipes was right.
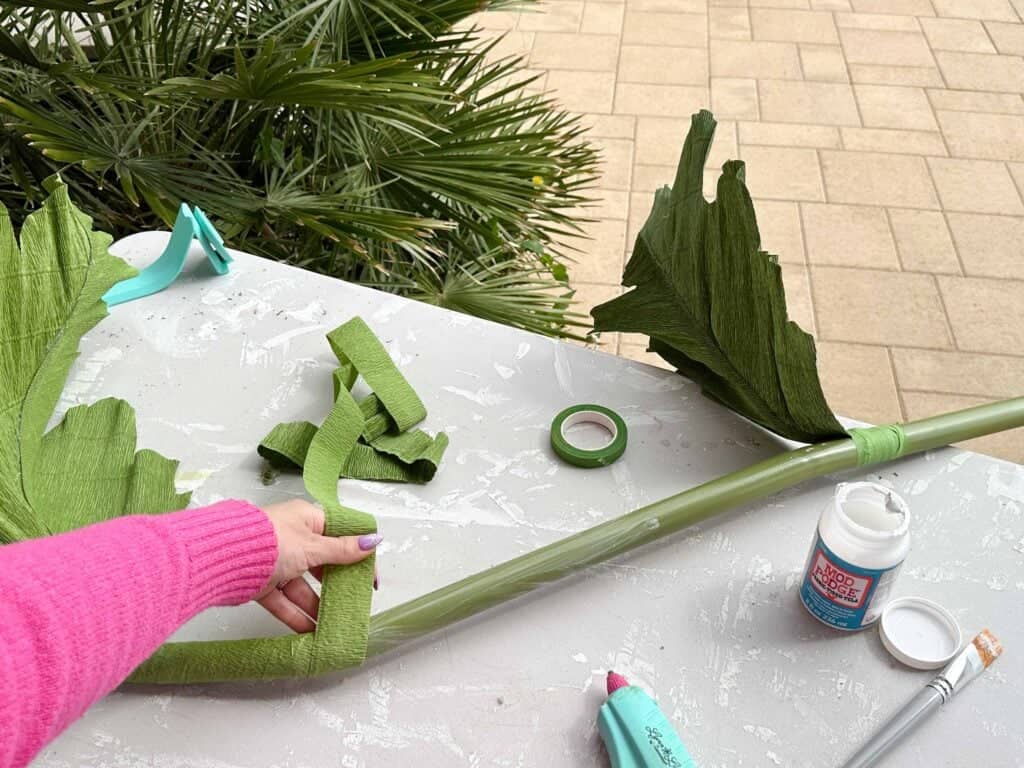
Wrap the PVC Pipe in Crepe Paper
This next step is optional, but it really adds to the look of the finished flower!
Cut 1-2" strips of crepe paper along the length of the roll. Stretch the paper to get the most length out of each strip.
If you made leaves, now is the time to attach them to your PVC pipe. Trim the wire that extends from the base of the leaf to about 5". Use hot glue or floral tape to secure the base of the leaf to the PVC pipe.
Starting from the top of the PVC pipe stem, coat it with Mod Podge in 12" sections as you work.

Wrap the crepe paper around the PVC pipe and slightly overlap the edges. If needed, secure the ends of the crepe paper with hot glue for extra security.
Allow the stems 24 hours to dry completely.
Assemble the Giant Paper Flower Pieces
We're in the final home run of this project, and the end is finally in sight! Whoo-hoo! Go ahead and pat yourself on the back for making it this far!
Grab your concrete base, stems, and crepe paper flowers. Secure the stems by placing them into the couplers in the concrete base. Now, you can secure the flowers by sliding them onto the PVC pipe stems.
You might find you need to change around or reposition your stems/flower until it looks just right.
This project was a fun experiment, full of research, hot glue, and of course plenty of mistakes. Despite the challenges, it turned out amazingly beautiful and whimsical in the end.
As you begin creating your own giant crepe paper poppy, remember that it's more than okay to make mistakes! In fact, they are an important part of the creative journey.
While I've outlined some steps for you to follow, don't hesitate to experiment and discover your own unique approach to these flowers. Let your imagination roam free and embrace the process.
Whether you follow my instructions step-by-step or blaze your own trail, the most important thing is that you express yourself and infuse your personal style into your creation.
Want more crepe paper flowers? Check out these stunning oversized crepe paper dahlias I made!
Or these gorgeous oversized daisies!

Looking for more paper flower projects? Click here!
Join my crafting and sewing Facebook group where you can show us what you’re making, ask questions, and learn from others!

How many flowers do you get from 1 roll of crepe paper?
One roll of crepe paper will yield one flower.
How much crepe paper is needed of green for the leaves and to wrap around Pipe to make one flower?
Also if anyone has made these yet can you comment level of difficulty and how they turned out pics would be great.
Hi, Kimberly! I wasn't entirely sure how to reach out to you directly, but I was hoping I could use one of your images for a photo collage. I would be happy to give appropriate credit when sharing, but could not find any of your social media links either! If possible, could you email and I could share more detail about the project. Thank you!
Hi Tori, you can use one of my images for a photo collage as long as you credit me. Thanks!
Did you wrap the wire in paper so it blended in on the back of the flower? I just couldn’t see this step, and i wanted to know before adding the wire to wrap it or is it a straight cut piece to cover it.
I did not cover my wire with crepe paper along the back of each petal. I used a pan pastel in a similar shade to the crepe paper to camouflage it.
What are the smaller stencils for? Did you use the smaller stencil for the 3ft flower? Did you use the larger stencil for the 4ft and 5ft flower? Which stencil did you use for the leaves, the small or big one?
Hi
Very lovely flowers. We are struggling to hold the flowers in the pipe. Is there a trick when putting the flowers into the pipe. They want to flop
Thanking you
Thank you so much for sharing this beautiful idea! I'm going to try this for our granddaughter's 1st birthday party. I really appreciate you for sharing.
Thanks for sharing this tutorial!!! How much ch did it cost to make these flowers? They are so beautiful great job!!