Sew a Baby Bodysuit With This Beginner-Friendly Step-By-Step Photo Tutorial and Video. Free Sewing Pattern in 9 Different Sizes.
I’ve always loved sewing bodysuits for my babies, and now I’m sharing my tried and true pattern with you!

If you’ve followed Sweet Red Poppy for a while, then it comes as no surprise that I love sewing for babies!

I had three babies in under three years and being on a tight budget with little ones meant looking for any opportunity to save money.
I sewed 90% of my babies' clothes and one of the things I loved the very most was making bodysuits! Every afternoon, I'd put all three babies down for naps and sew uninterrupted for an hour.
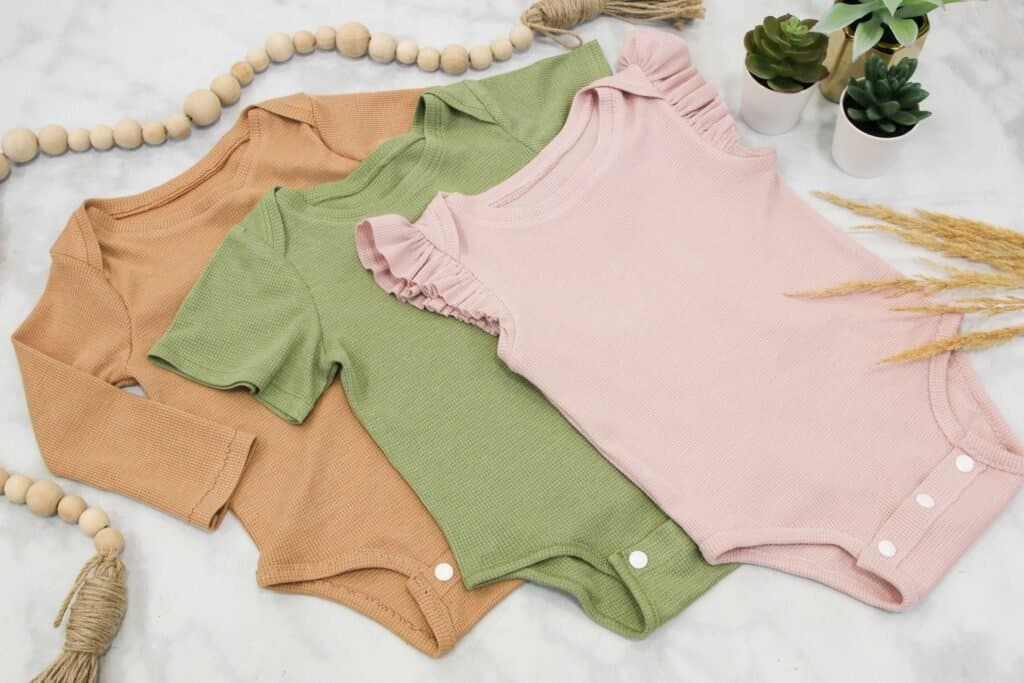
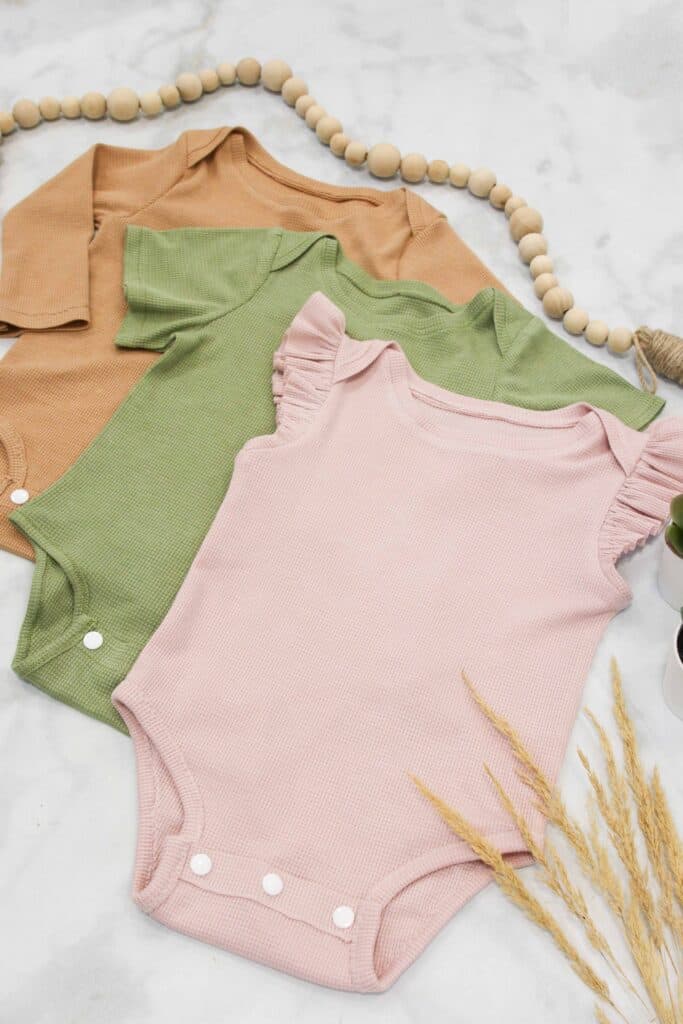
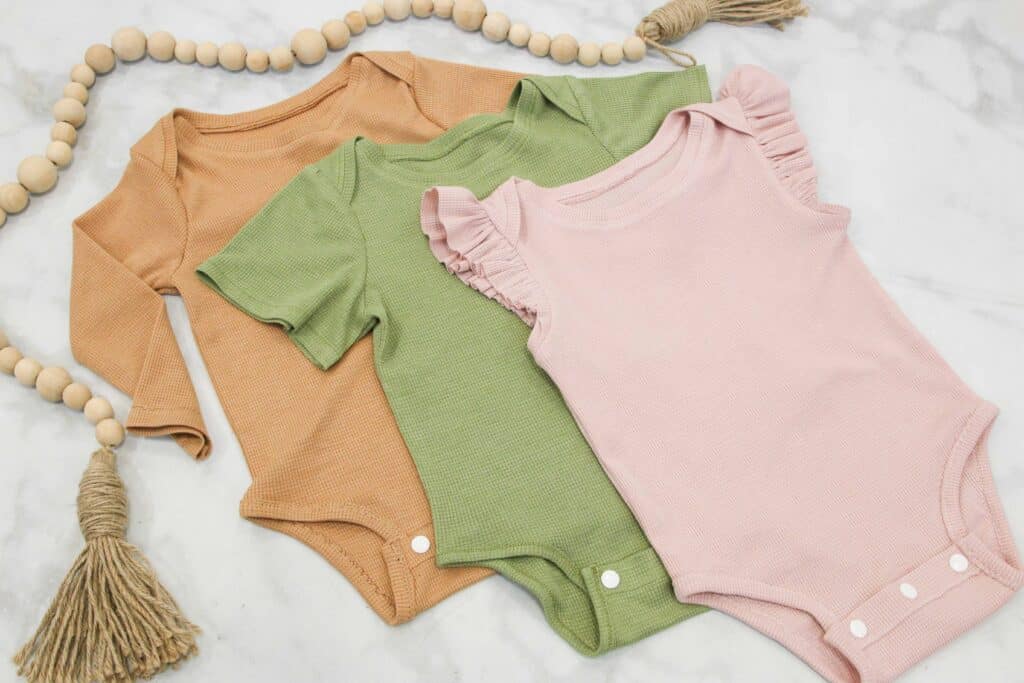
(I'll be sharing the sleep gown version pictured below soon) Enjoy this throwback photo of Vivi in a handmade onesie and Top Knot Hat.

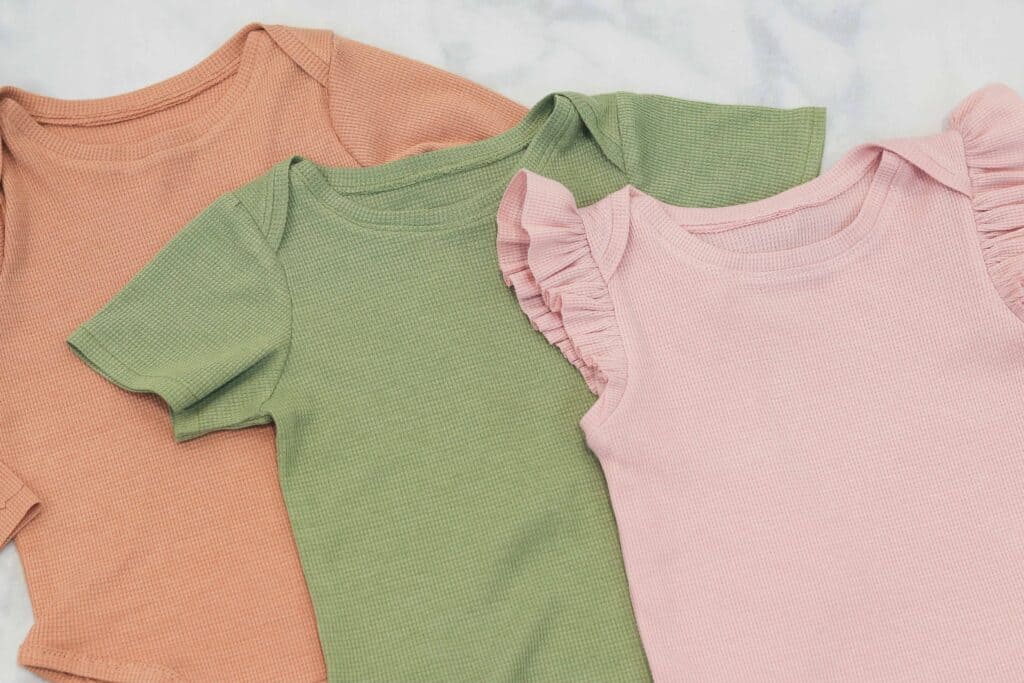
I’m sharing a step-by-step tutorial today to help you make your own baby onesie out of knit fabric.
Baby Bodysuit Sizes
My free baby bodysuit sewing pattern includes the following sizes.
- Preemie
- Newborn
- 3-6 Month
- 6-9 Month
- 9-12 Month
- 12-18 Month
- 18-24 Month
- 2 Years
Looking for even more free baby sewing patterns? Be sure to check out the posts listed below!
- Free Leggings Pattern
- Free Top Knot Baby Hat
- Free Baby Bandana Bib Pattern
- Free Baby Burp Cloth Sewing Pattern
- All The Best Hair Bow Tutorials
Beginner-Friendly Baby Bodysuit Sewing Pattern
This download includes a professionally drafted, color-coded baby bodysuit sewing pattern in 9 different sizes.
Step-by-step detailed photos, detailed written instructions, and a video are also included.
Baby Bodysuit Pattern Includes
Included in this pattern is a professionally drafted and graded color-coded pattern. Use the 1x1 inch printing guide to ensure accuracy and quickly put this pattern together with its no-trim pieces.
Fabric Requirements
For this pattern, I recommend using a medium-weight knit fabric with a content of 95% Cotton, 5% Lycra/Spandex. Having at least 5% Lycra or Spandex allows the fabric to have elasticity and bounce back to its original shape without getting stretched out over time.
To determine the stretch of your fabric simply stretch a 2-inch piece of the knit fabric in one direction and repeat this process in the opposite direction. Choose the direction of the greatest stretch to go around the head.
Seam Allowance
This sewing pattern uses a 3/8” seam allowance. Seam allowances are included in the sewing pattern.
Finishing Techniques
When sewing this pattern you can use a variety of different techniques to finish the seams.
First, you can use the stretch stitch on your sewing machine. This looks like a lightning bolt and allows seams to have more give, so the stitches don’t pop when stretched out.
If you don't have this option, use a zig-zag stitch and narrow the width of the stitch.
The final option is to finish the seams with a serger. The serger creates a seam that is cut and finished in one step. This option creates a more professional-looking finish.
Choosing the Right Size
Make sure to take fresh measurements whenever you are sewing for a baby! Babies grow so quickly that they tend to outgrow sizes between measurements. For the very best fit, you'll want to use up-to-date measurements!
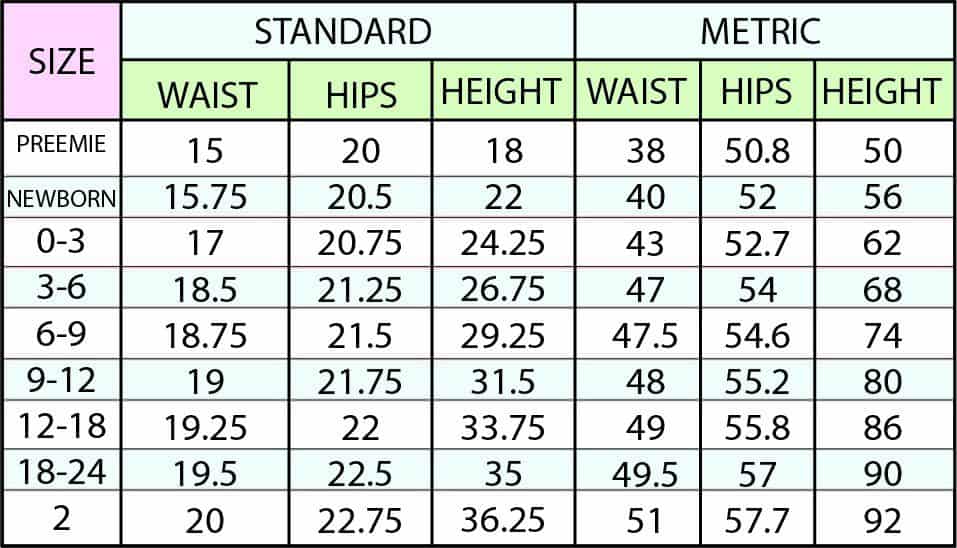
Table of Contents
Why Shop Through My Links?
When you shop through my affiliate links, it doesn't cost you anything extra, but it helps me out in a big way! I earn a small commission from those purchases, and that support allows me to continue creating and sharing free tutorials and patterns for you. Thank you so much for helping me keep this creative community going!
Baby Bodysuit Sewing Supplies
- Knit Fabric
- Thermoweb Soft Stretch Lite
- Knit Interfacing
- Scissors or Rotary Cutter & Mat
- Thread
- Pins or Clips
- Iron & Ironing Board
- Sewing Machine Needle
- Fabric Pen or Chalk
- Printer
- Printing Paper
- Tape
- Heavy Starch (for shifty knit fabrics)
Click to shop my favorite sewing supplies here!
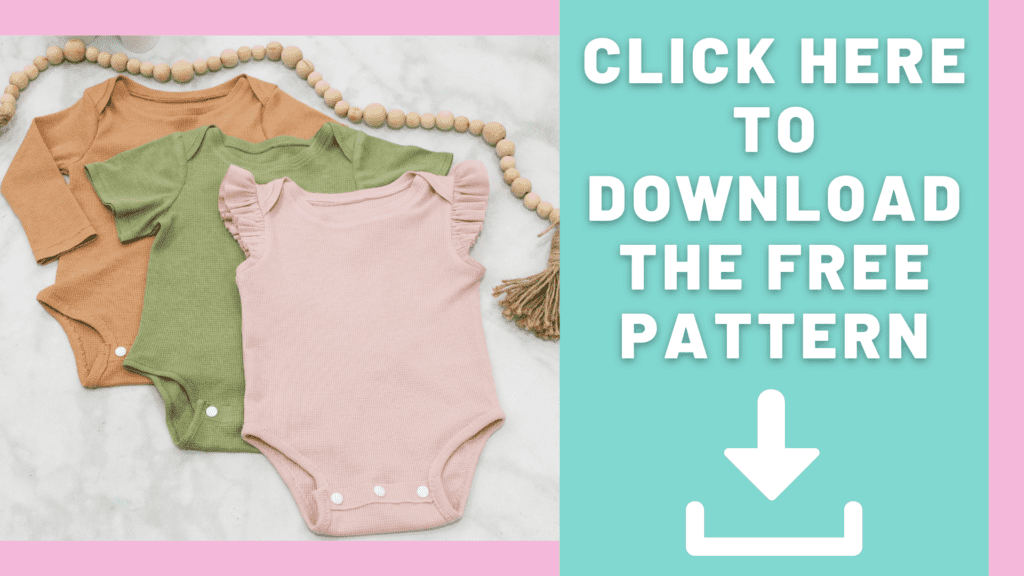
Download the Free Baby Bodysuit Sewing Pattern Here
Step #1: Download & Assemble the Baby Bodysuit Sewing Pattern
Download this baby pattern and print it out. There are three different sleeve options.
I’ll be sewing the short sleeve option in this tutorial.
*PRO TIP: I like to print off my pattern on cardstock so that it will last for multiple uses.
Download the pattern to your computer and print the pattern at 100% with no scaling.
Align the circles and black lines together as you are piecing the pattern together. You can connect the pieces of paper with tape or a glue stick.
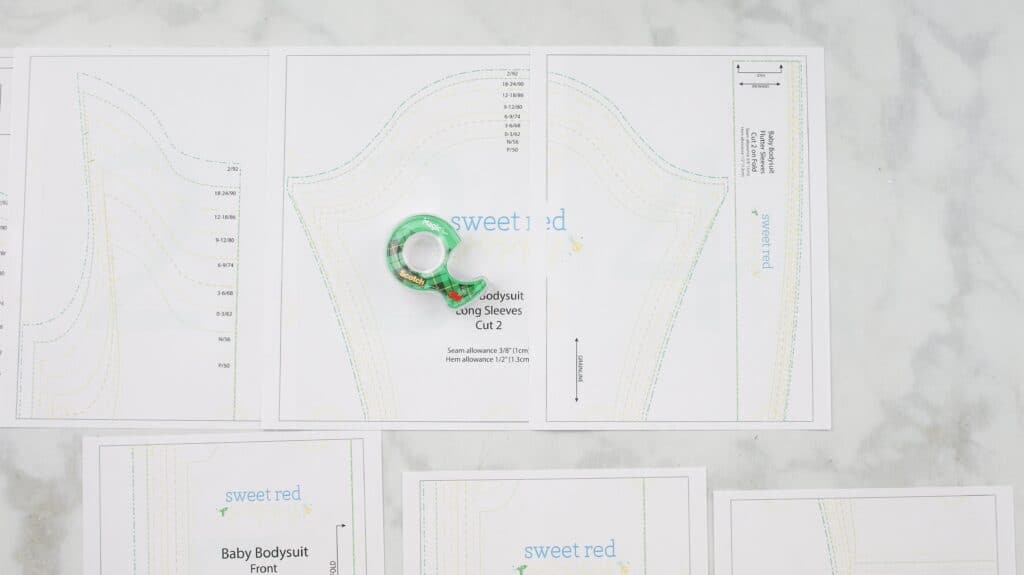
Below is a photo of how the pattern pieces together.
Feel free to trim off the excess from each piece of the pattern or hold the pieces up to the light and align them together without trimming.
Once you reach a paper without any stars on the right-hand side you can move down and start a new row.
Once you have everything taped together, cut out your desired size.
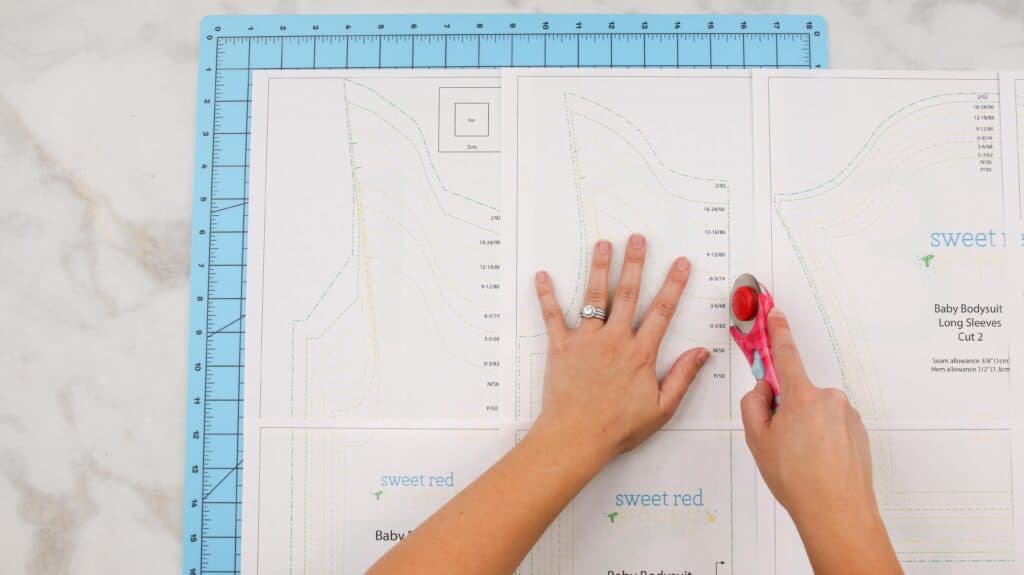
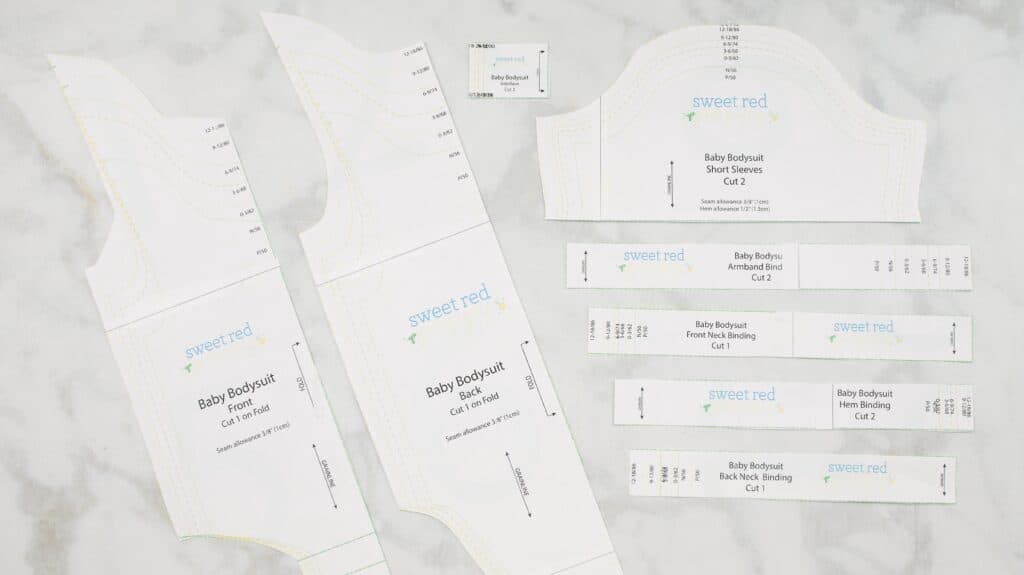
You should have the following pieces.
- Front Bodysuit
- Back Bodysuit
- Sleeve (Short, Flutter, or Long)
- Hem Binding
- Front Neck Binding
- Back Neck Binding
- Interfacing
- *Baby Bodysuit Armband (For Flutter Only)
Step #2: Cut out the Baby Bodysuit Pattern and Fabric
Your knit fabric should be washed and dried before you cut it out. This will help to preshrink the fabric and prevent the color from running.
Lay the pattern pieces on top of the fabric with the greatest amount of stretch going across (This is very important!) the pattern horizontally. Pin it in place and cut around the outside of the pattern.
*The bodysuit front and back need to be cut on the fold.
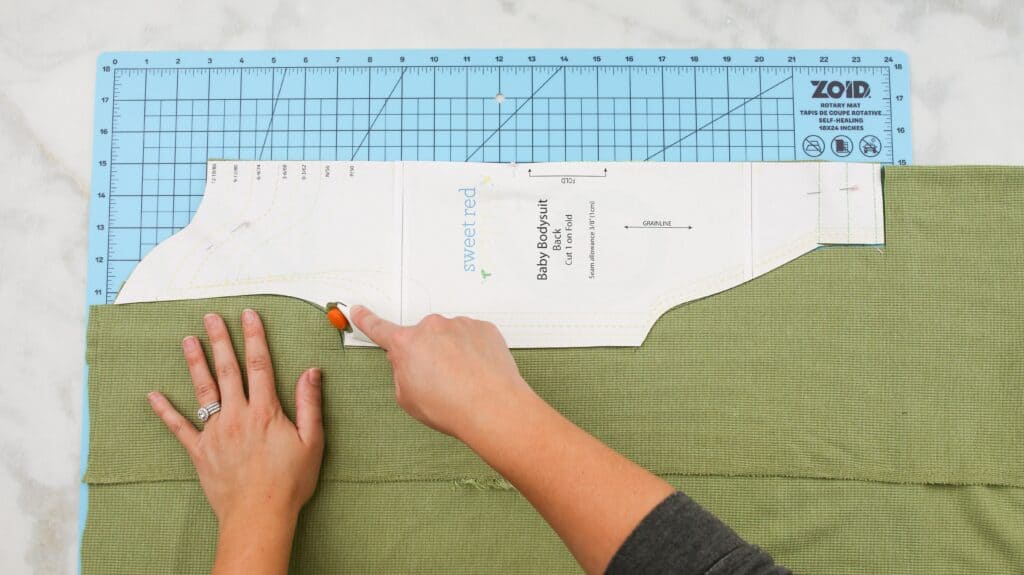
Make sure to transfer any marking from the shoulders on the front and back pattern pieces to the fabric.
Once you’ve cut out your fabric pieces, cut out your interfacing.
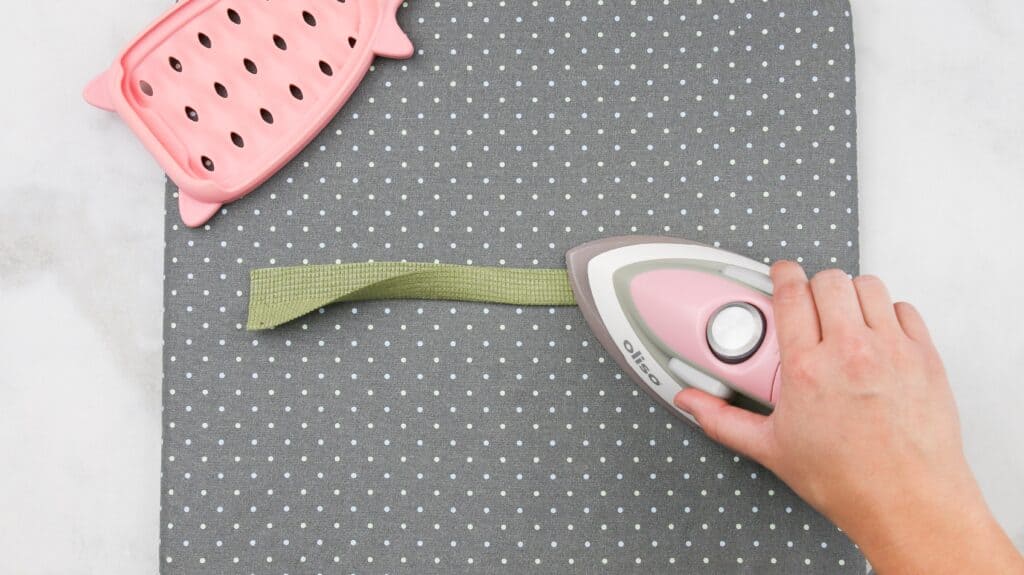
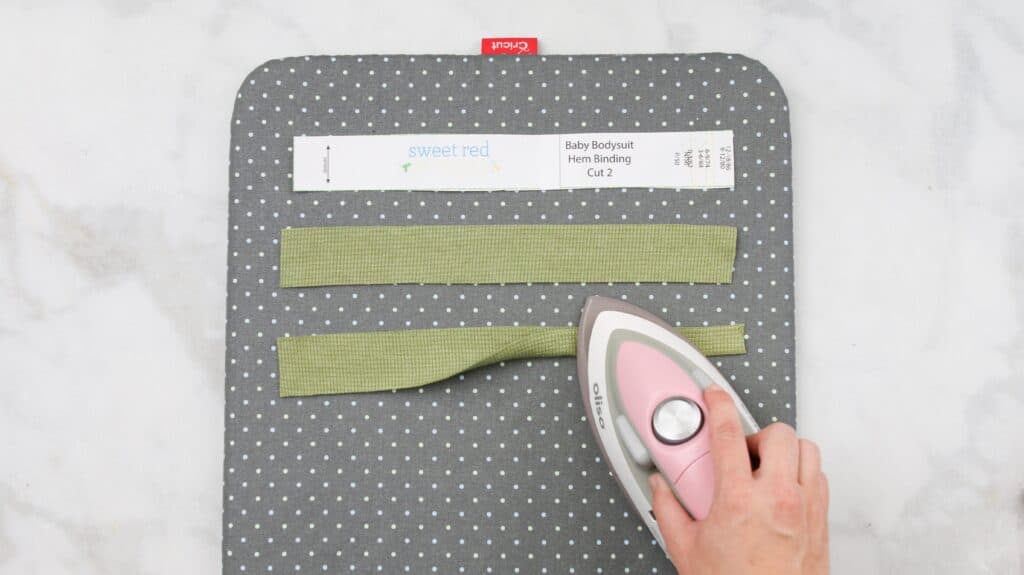
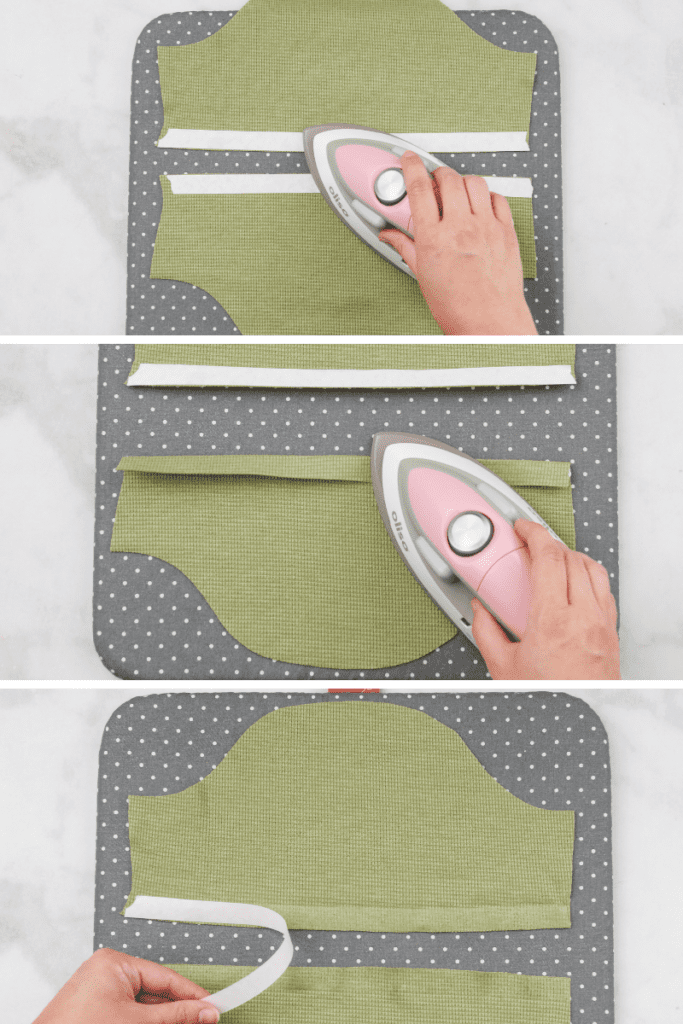
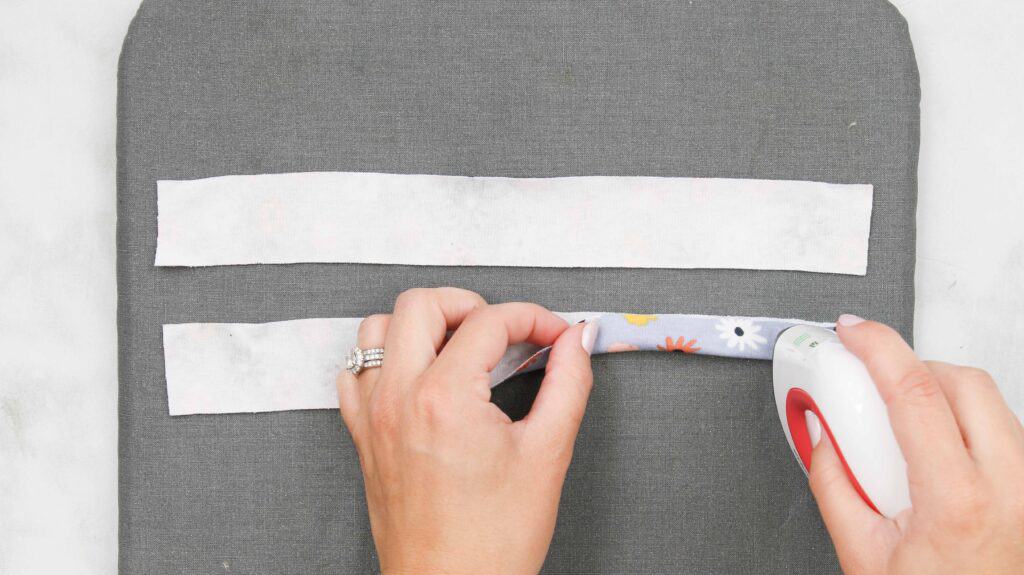
Step #3: Press Neck, Hem, and Arm Bands
There are four different bands that will need to be pressed to prepare them to be sewn to the bodysuit.
Pressing your bands before pinning them to the fabric gives your bodysuit a more professional-looking finish.
- Front Neck Binding
- Back Neck Binding
- Hem Binding x2
- *Armband x2 (for flutter sleeve option)
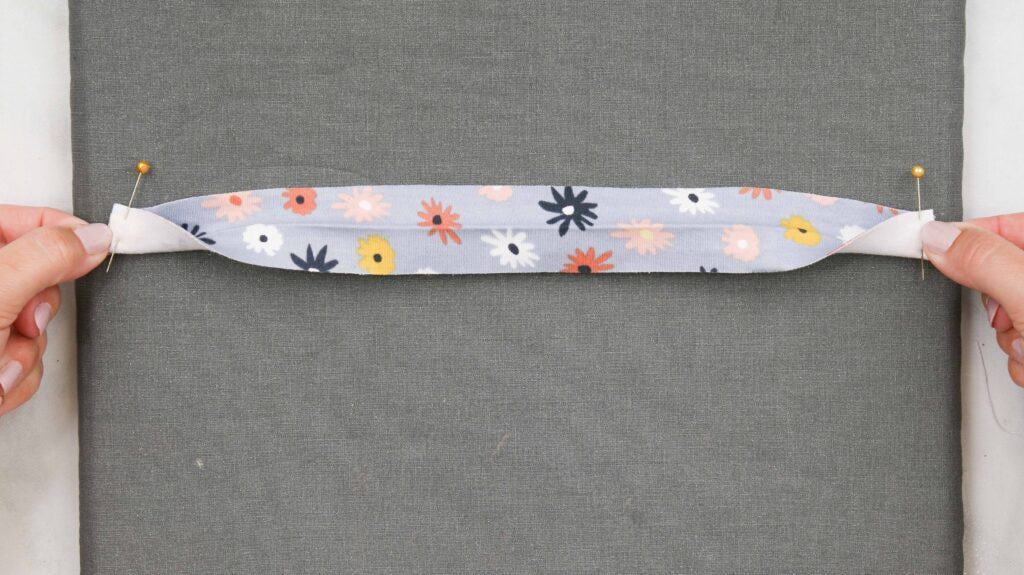
Fold the band in half longways, with wrong sides together, and press well with plenty of steam to set the crease.
*PRO TIP - If you’re working with a hard to manage fabric, spray it with heavy starch. This will make the fabric easier to manipulate.
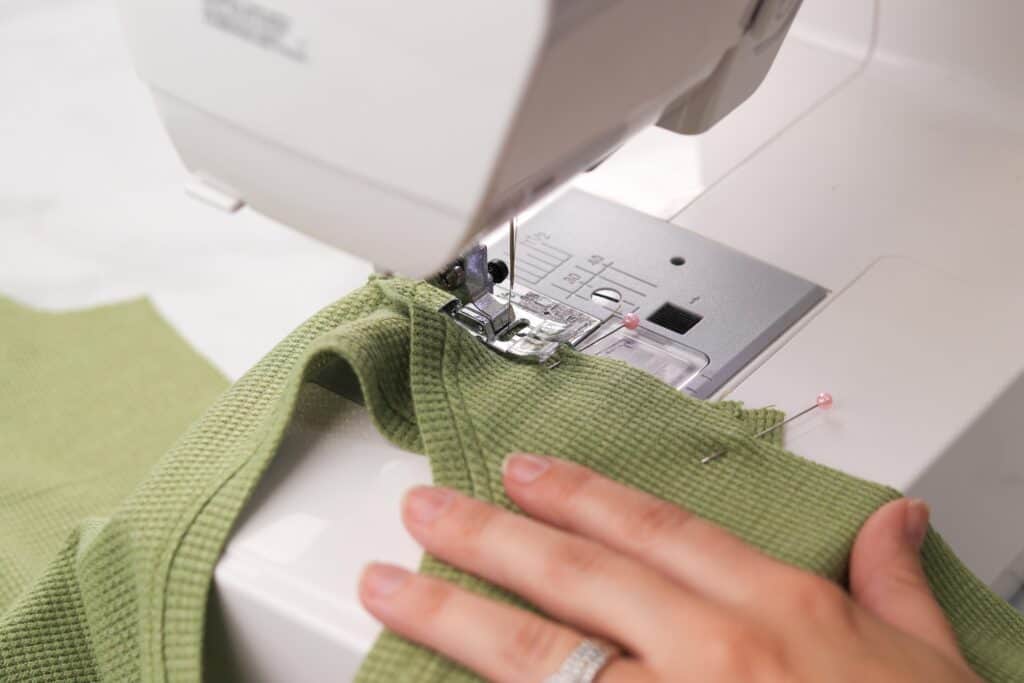
Step #4: Attach Neck Binding to Front and Back Neckline
Mark the center of the bodysuit neckline and the center of the neck binding.
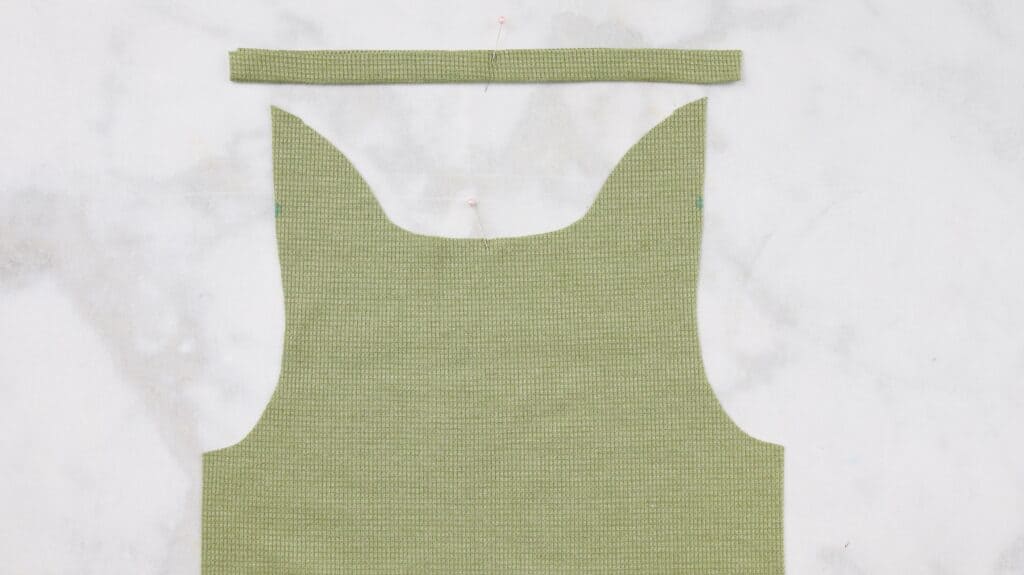
This will help you to evenly distribute the neck binding.
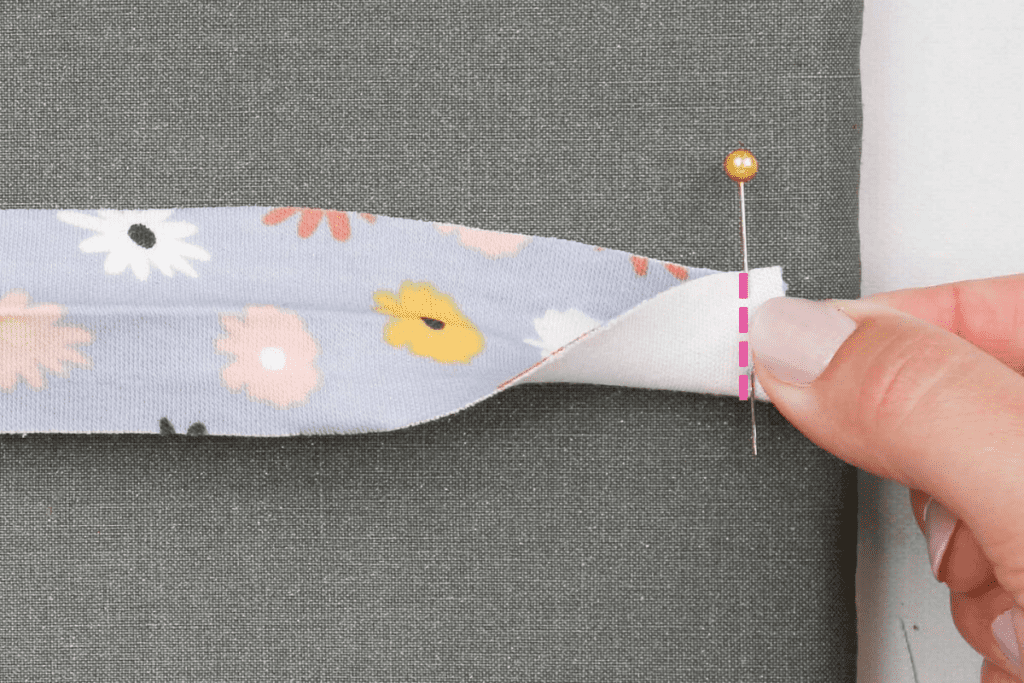
Lay the neck binding on top of the front baby bodysuit neckline with raw edges aligned.
Pin the neck binding and neckline together at the center marking.
Next, pin the neck binding to the edge of the neckline. The end of the neck binding should extend beyond the edge of the neckline.
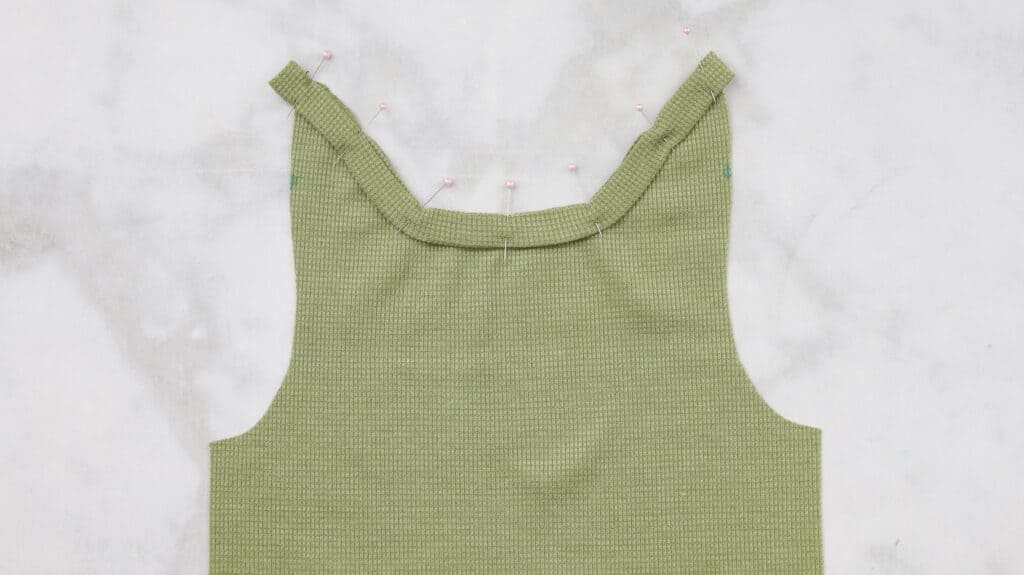
Evenly distribute the fullness of the neckline between pins making sure not to stretch out the neckline.
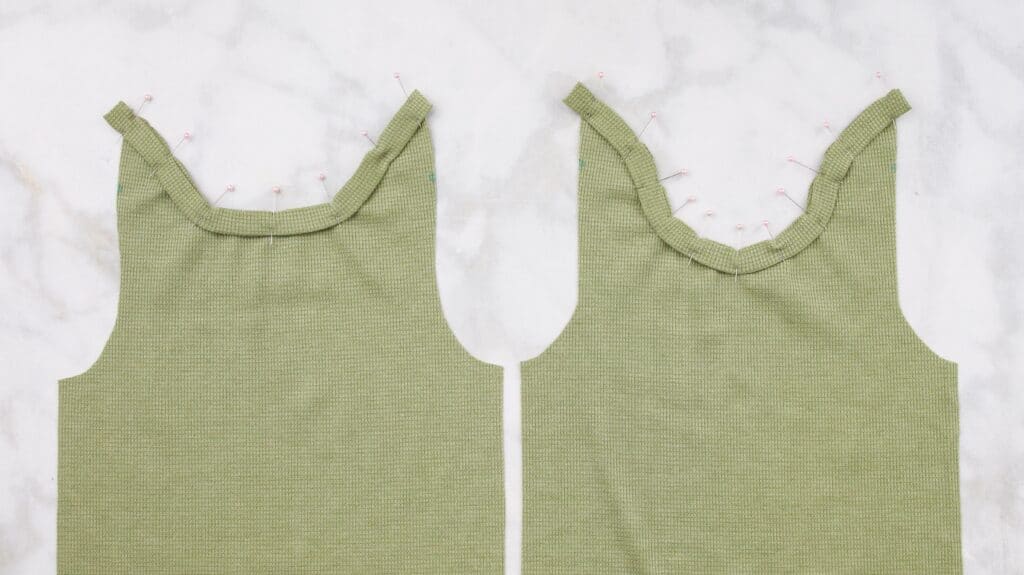
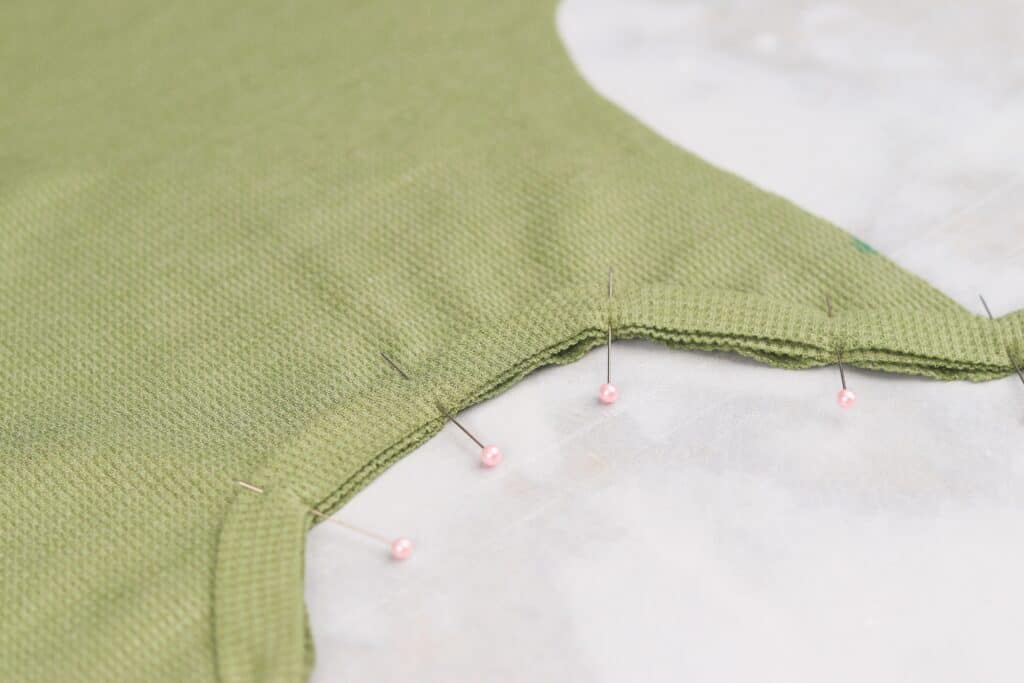
Sew the neckline with a 3/8” seam allowance. If you are using a sewing machine, use a stretch stitch (this looks like a lightning bolt) or a narrow zig-zag stitch.
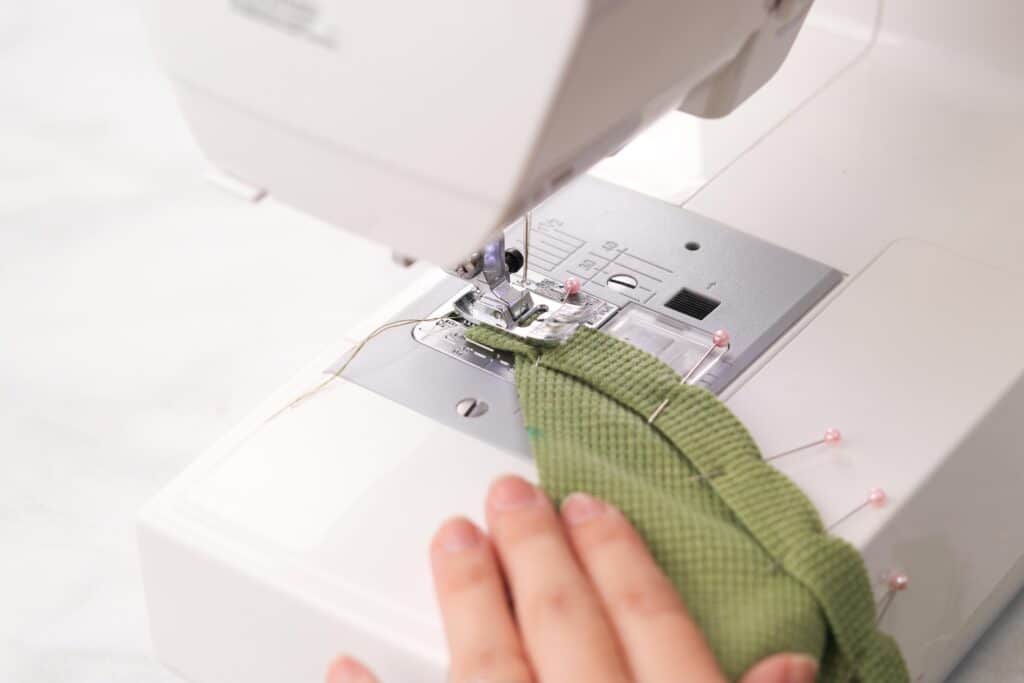
Press the binding upwards away from the neckline. Use plenty of steam to shrink the neck binding to it’s original size.
Topstitch 1/4” from the seam catching the neckline and neckband using a stretch, zig-zag stitch, or a straight stitch with the length increased.
Press the neckline.
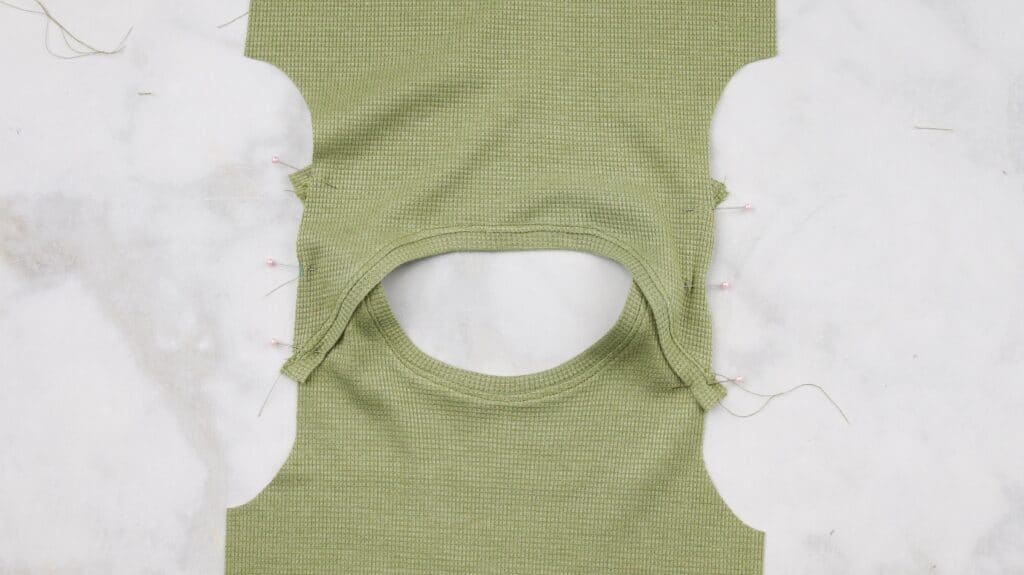
Step #5: Join Front and Back Bodysuit Shoulders
Lay the front bodysuit out in front of you with with right side facing upward. Lay the back bodysuit on top overlapping the shoulders. Take care to line up the markings on each side. Pin the shoulders together along the edge of the fabric.
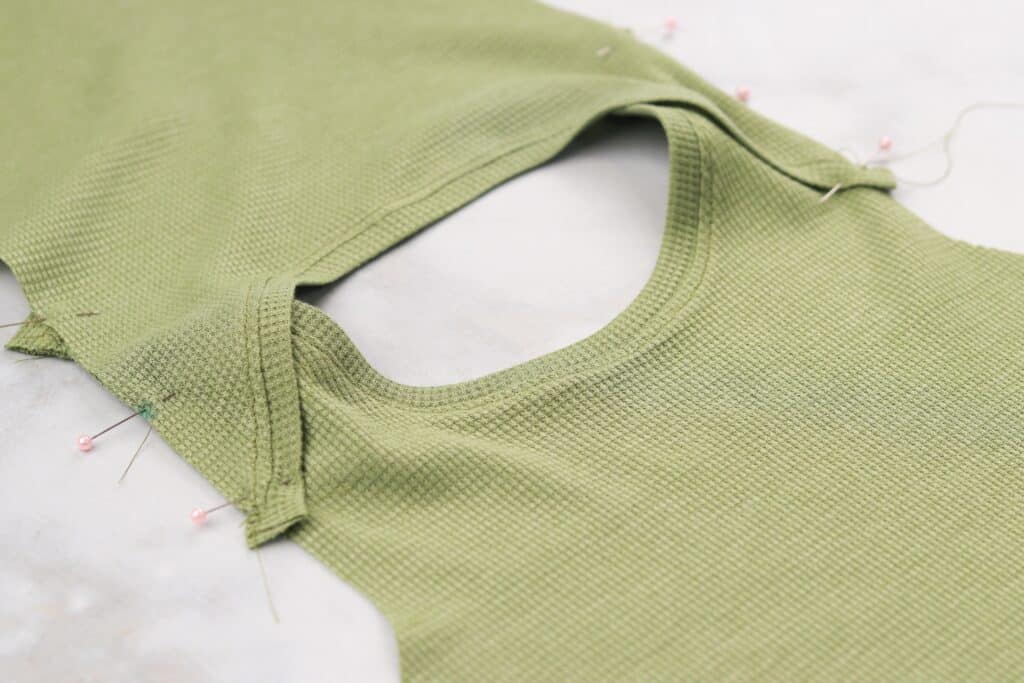
The edge of the neck binding will extend slightly beyond the shoulders on both sides.
Sew the shoulders together with a basting stitch.
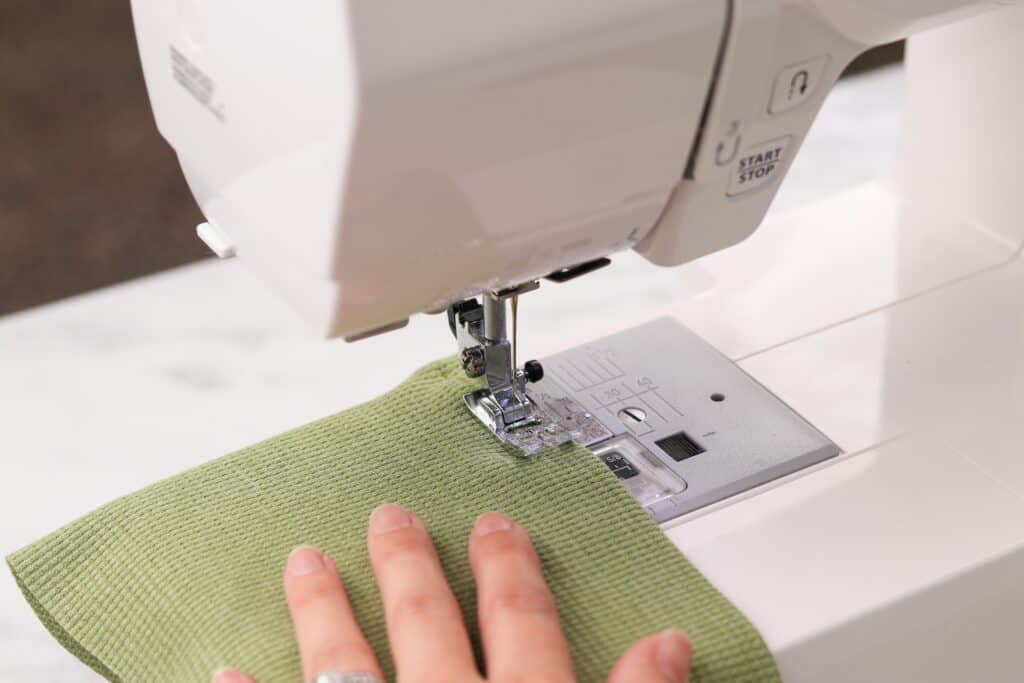
Step #6: Sew the Bodysuit Sleeves
One of my favorite techniques for great-looking seams when sewing with knit fabric is using Thermoweb Soft Stretch Lite.
This step is optional, but it will give you a beautiful hem without any waviness.
To use Soft Stretch Lite you will need to apply it to the wrong side of the hem. I really like that it has a liner on one side because that allows the position of the hem tape to be more precise.
Iron the hem tape along the entire hem.
Fold the hem upwards along the edge of the adhesive and press with a hot iron to create a crease.
Once the fabric has cooled, peel back the liner from the hem tape. If you peel the liner away and see any residue on the liner the tape hasn’t had sufficient heat to fully adhere to the hem. Give it a bit more heat and try again.
With the hem folded upwards press again to adhere the fabrics together.

Stitch along the length of the sleeve to secure the hem.
Lay the bodysuit out in front of you with the right side facing up. Lay the sleeves out in front of you.
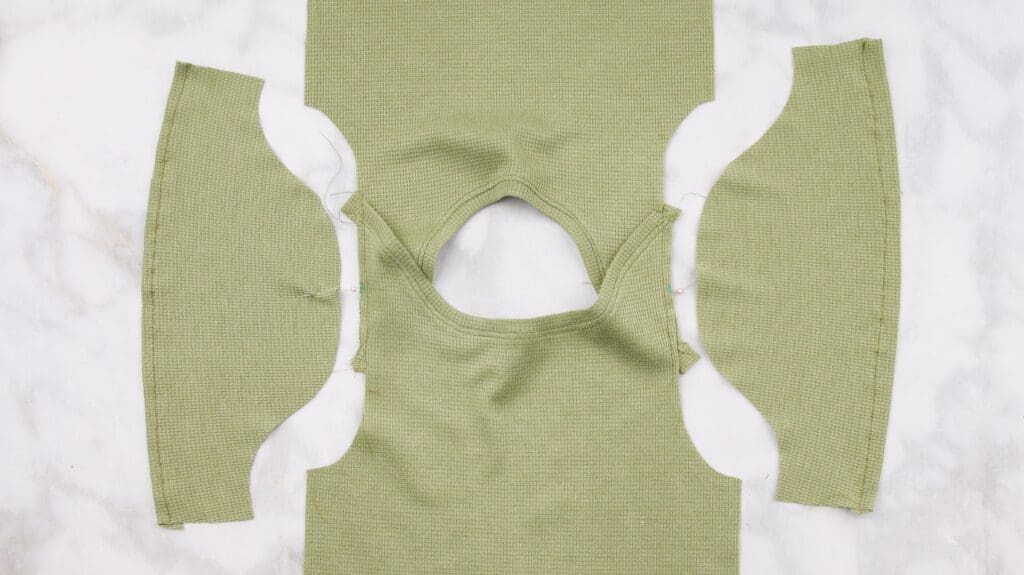
Fold the sleeve in half to find the center and mark it with a pin.
Pin the center of the sleeve to the marking from the previous step. Right sides should be facing together.
Pin along the entire armhole to secure the sleeve into place.
Sew the sleeve with a 3/8” seam allowance.
Press the sleeve seam allowance towards the sleeve and trim away any excess neck binding.
*Sewing Flutter Sleeves to Bodice
The photos for this step were taken from my Madeline dress pattern so the bodice will appear slightly different but it uses the same method of construction.
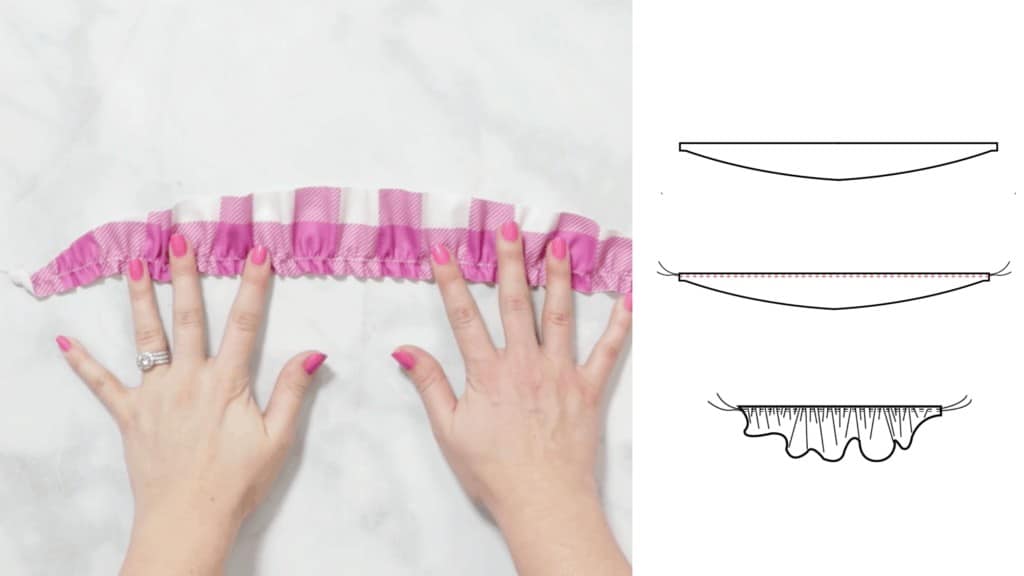
Flutter Sleeves - Sew two basting lines across the straight portion of each flutter sleeve. Gather to fit the armscye. *Flutter sleeves require the armbands.
Sewing Flutter Sleeves onto Bodice - Open the bodice so that the right side is facing upwards.
Take your flutter sleeve and place right sides together on the bodice. Match up the middle point of the sleeve to the front and back bodice seam. Align the edges of the flutter sleeve with the edge of the armscye. Pin in place.
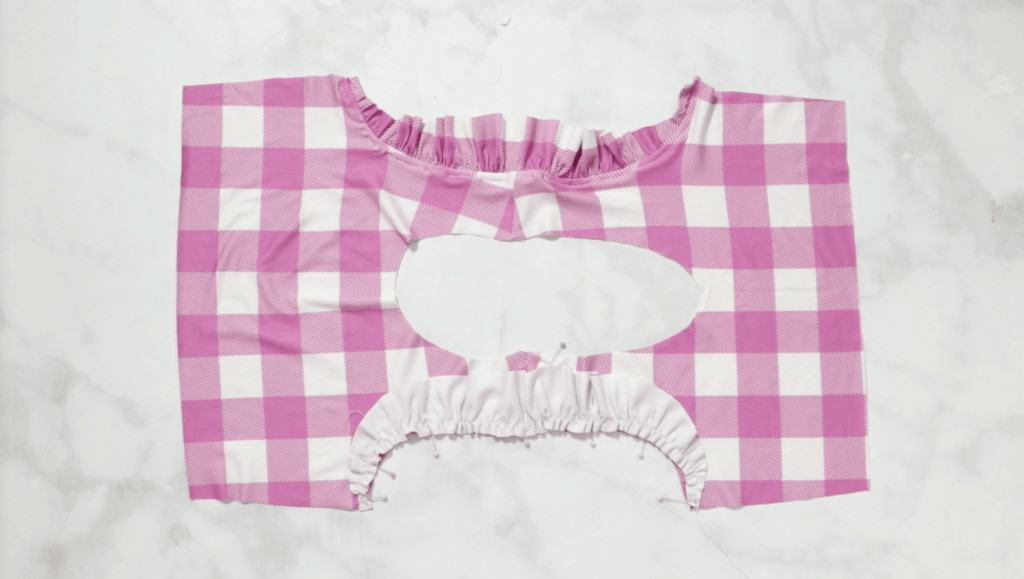
Attach Armband - Attach the center of the armband to the shoulder seam and pin the entire length of the armscye. You should have 4 raw edges aligned.
Press flutter sleeve seam allowance towards the bodice. Top stitch 1/4" from the seam if desired.
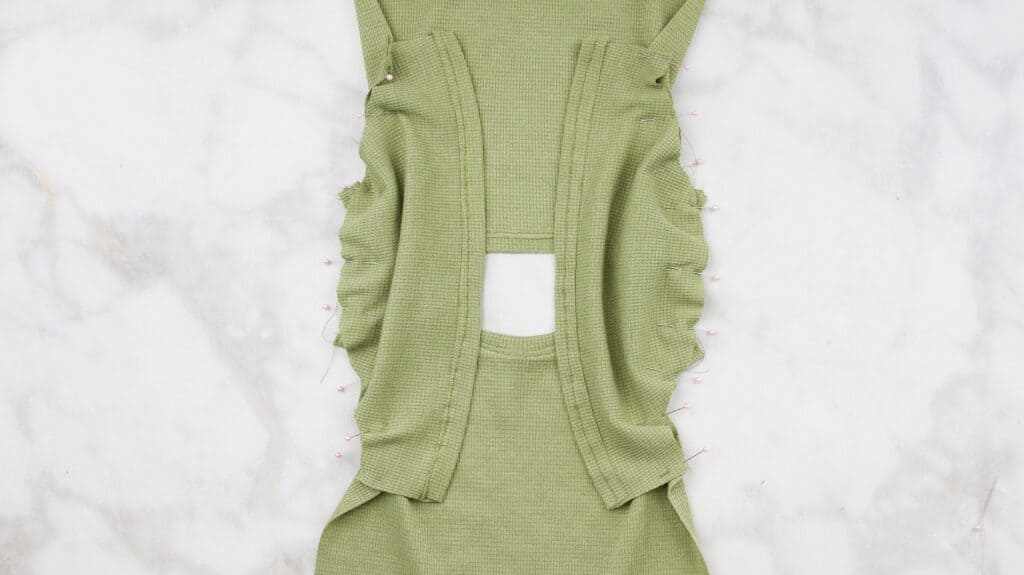
Fold the bodysuit in half with the right sides together. Pin the sleeves together and the front and back of the bodysuit.
Sew along the sleeve and the side seams.
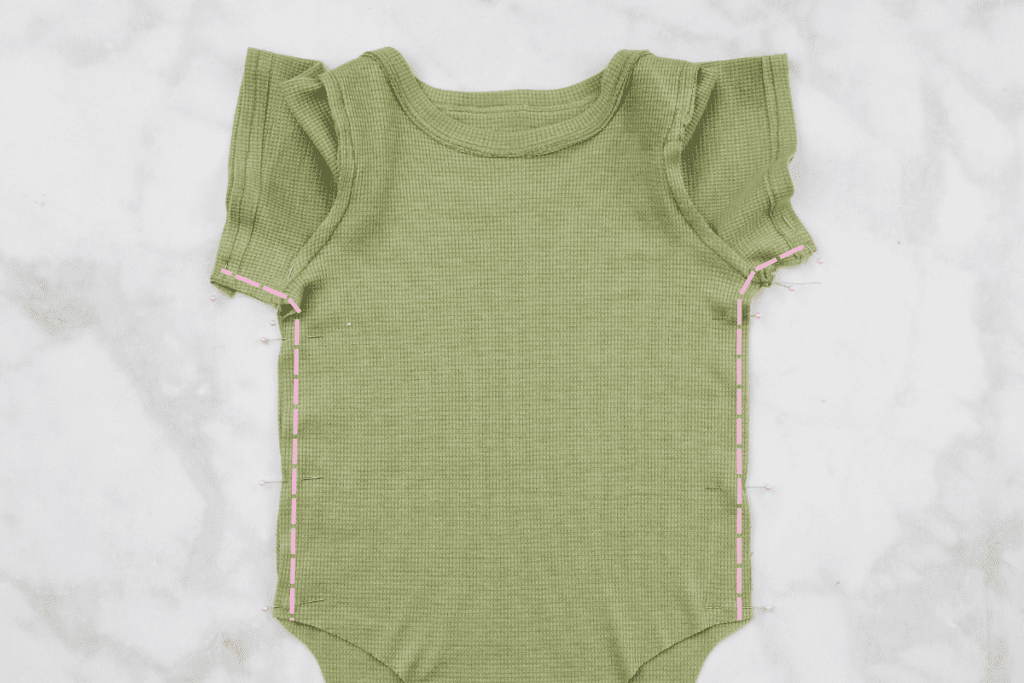
Trim any excess threads.
Step #7: Create the Snap Placket
Adhere the interfacing along the crotch of the bodysuit using the pattern markings as a guide. It should be placed 1/4" from the raw edge of the fabric.
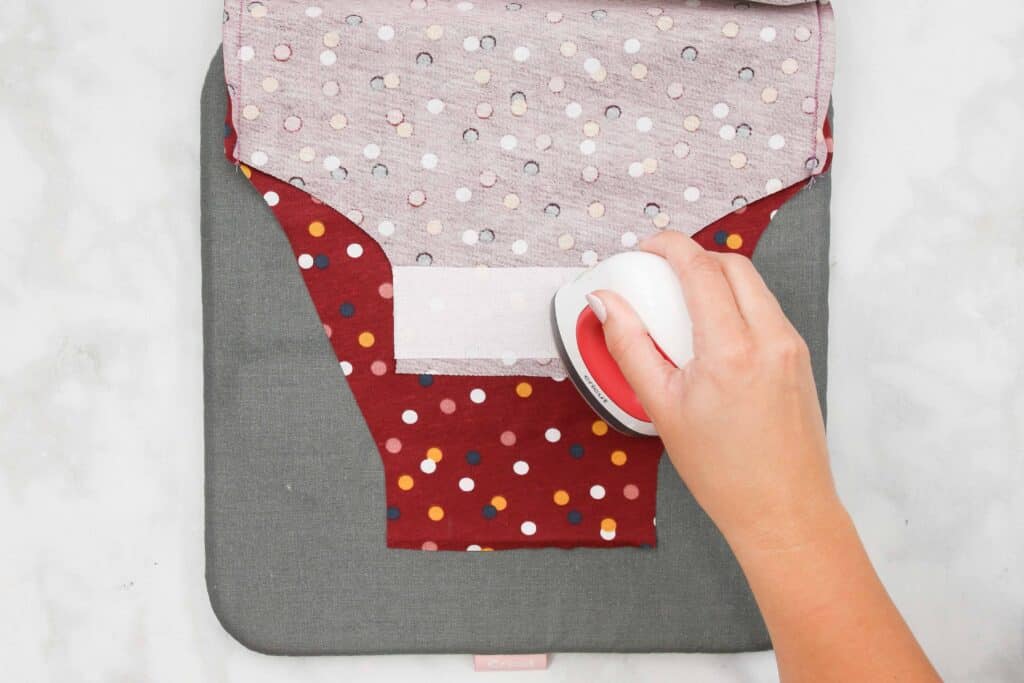
Fold the raw edge upwards towards the interfacing. Fold the interfacing in half, the folded edge of the fabric should just barely cover the upper edge of the interfacing.
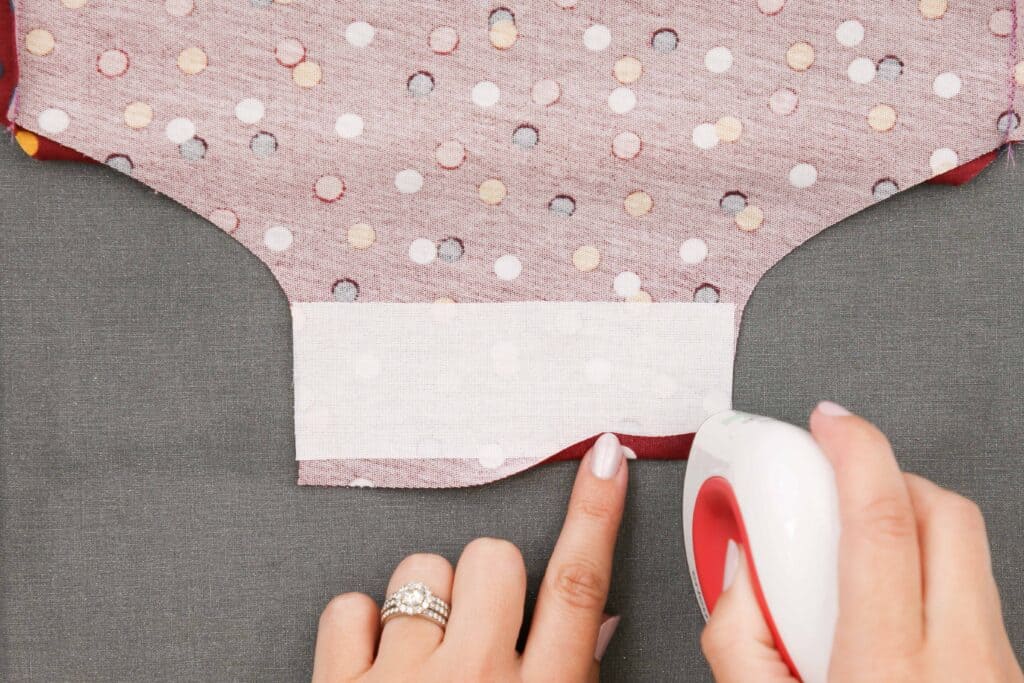
Press, pin the fabric in place and sew 1/8" from the edge of the folded fabric. Repeat with the other side.

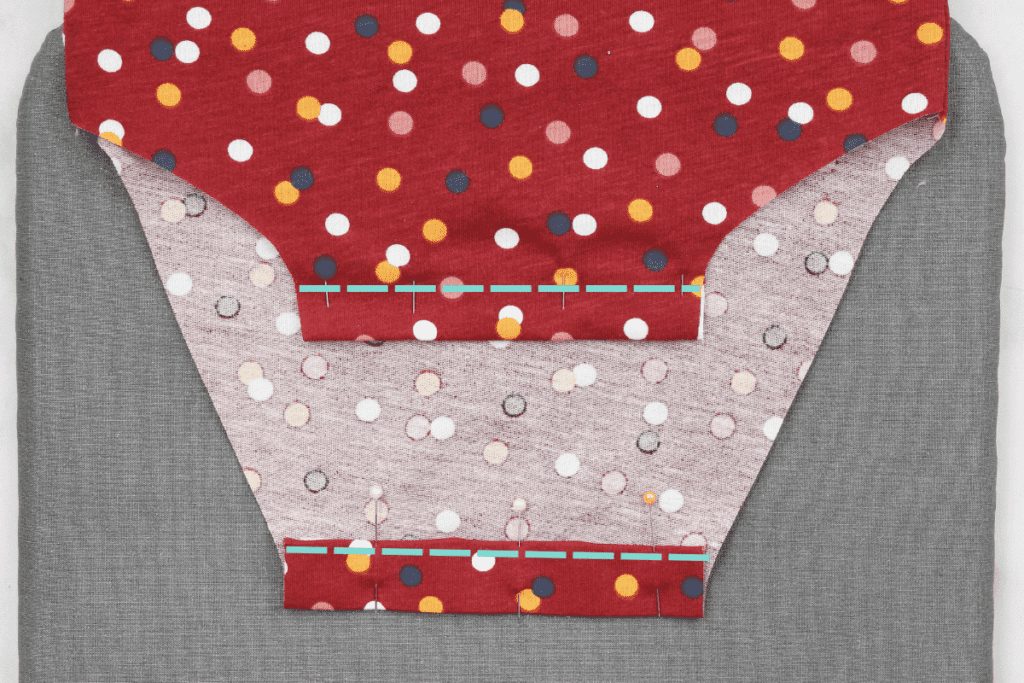
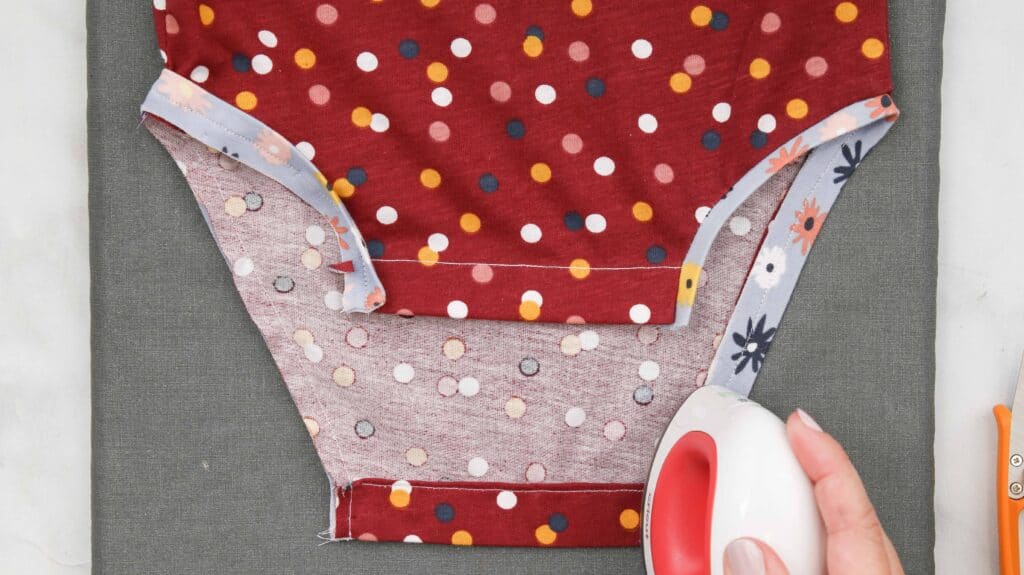
Step #8 Sew the Leg Binding
Press the leg binding in half lengthwise with the wrong sides together. Use starch to help stabilize the knit fabric.
Next, fold the leg binding in half against the direction of the fold with right sides together. Pin the short ends together.
*This step will encase the raw edges.
Sew along the short raw edges 1/4" from the edge.

Turn the leg binding right side out and push the seam allowance inward to form a sharp corner.
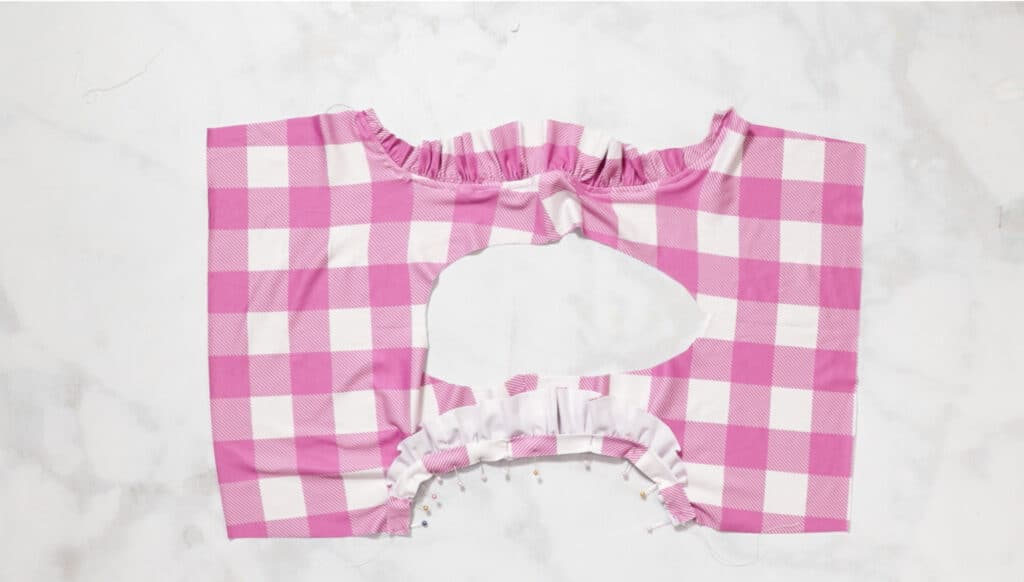
Find the center of the leg opening on the bodysuit as well as the center of the leg binding.
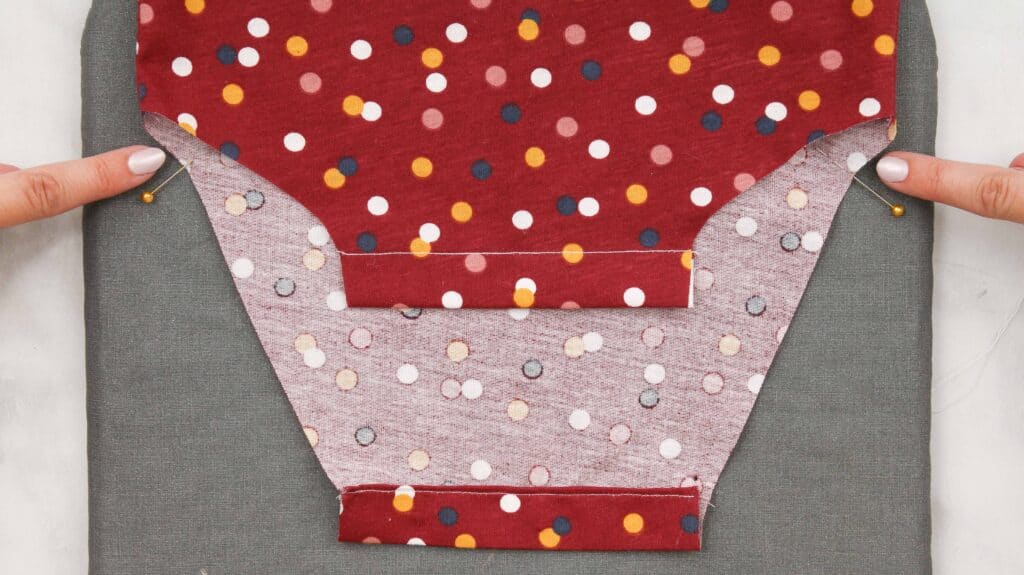
Align the center of the leg binding with the center of the leg. Then align the finished edge of the leg binding with the finished edge of the snap placket.
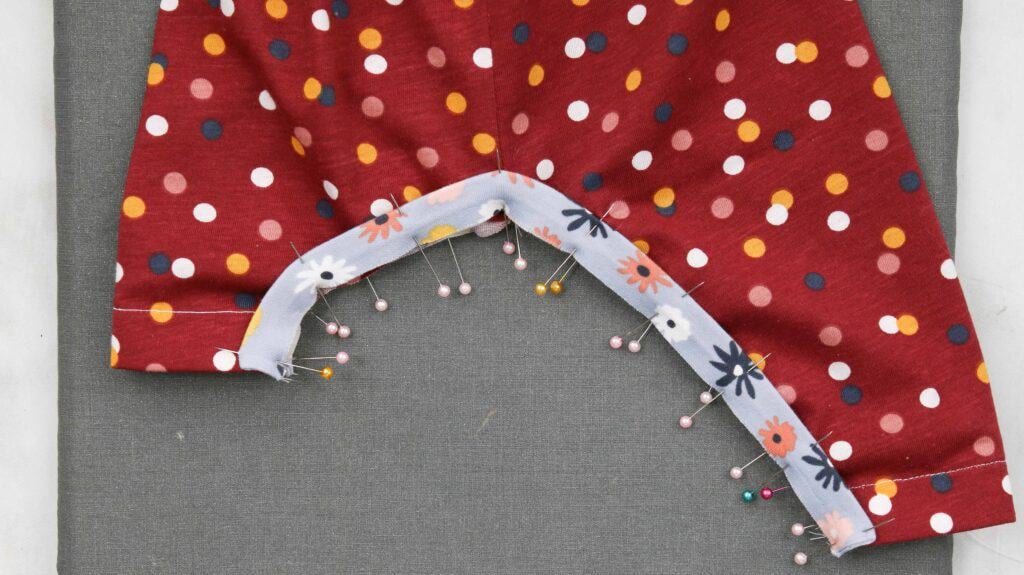
The raw edges of the binding should be aligned with the raw edge of the leg opening. Be sure to evenly distribute the fullness by using plenty of pins. Gently stretch the leg binding to fit the leg opening.
Sew the binding with a 1/2" seam allowance.
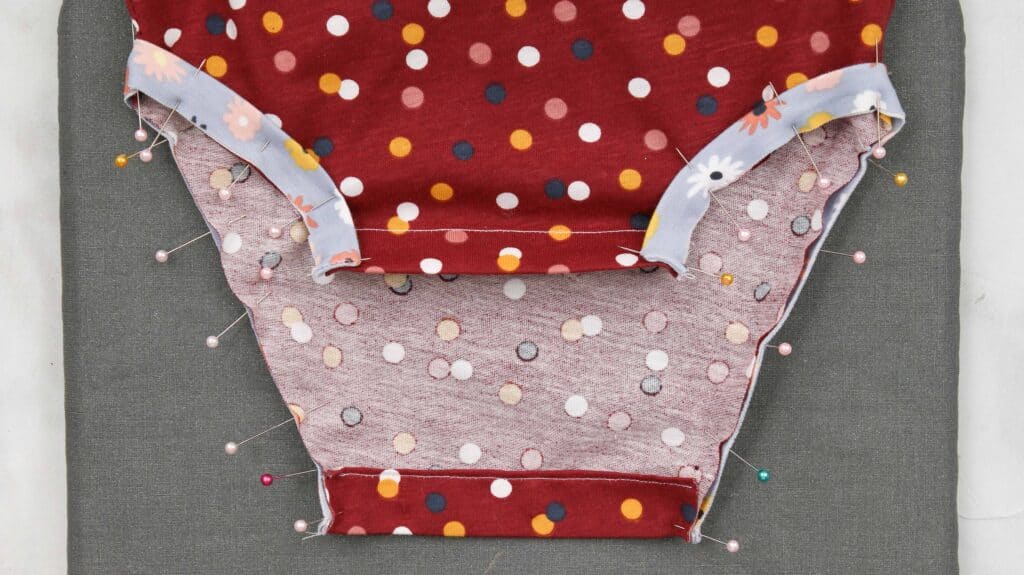
fold the binding outward away from the bodysuit and press well.
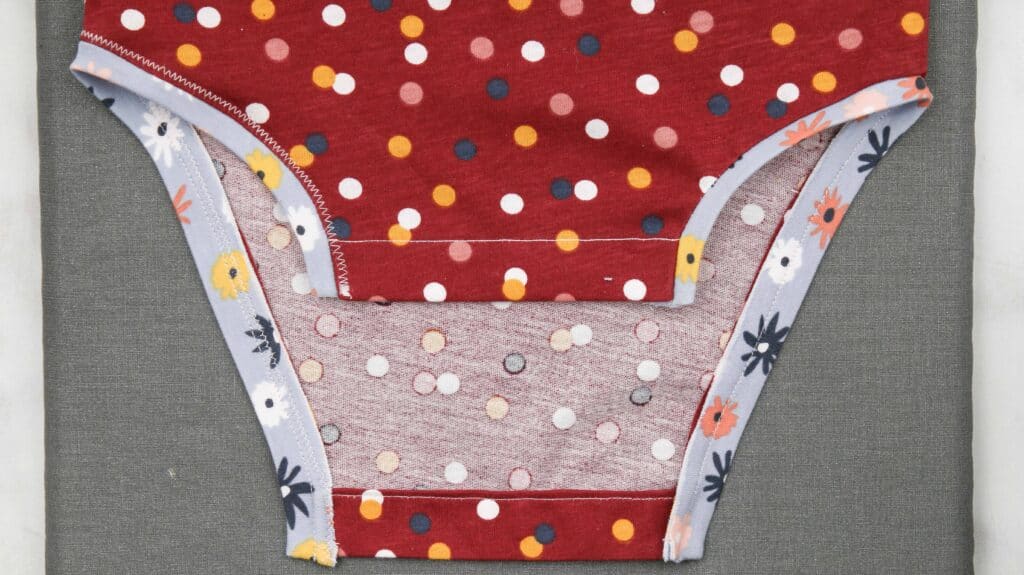
You can trim down the snap placket seam allowance edge to remove some of the bulk where the seams allowances meet.
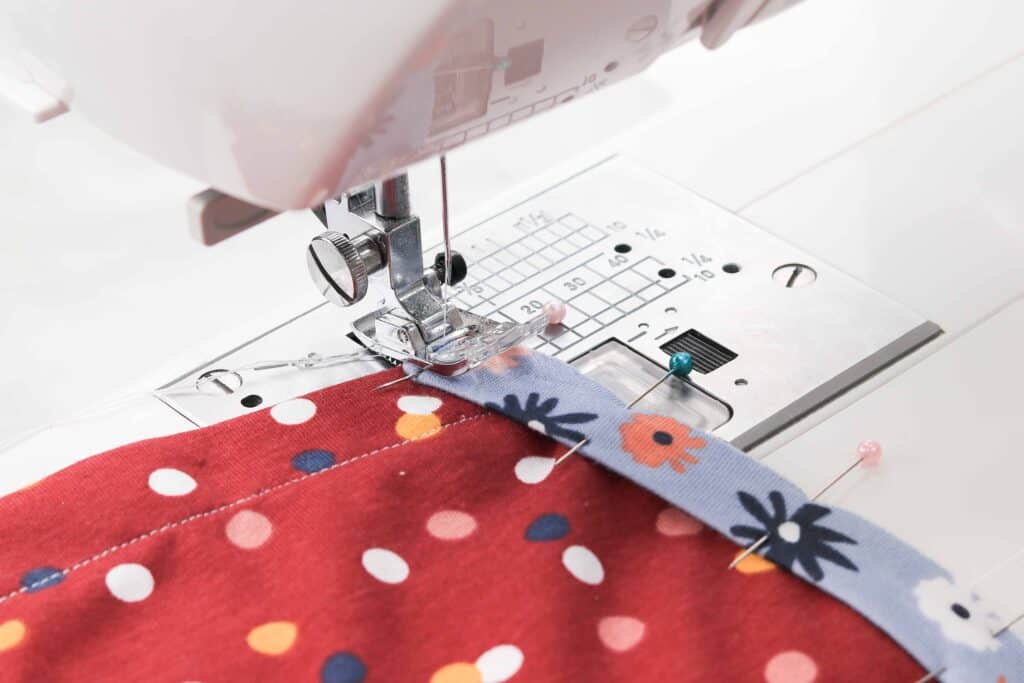
Topstitch the leg binding in place by sewing from the front of the bodysuit 1/8" from the seam.
Step #9: Install the Bodysuit Snaps
Install three snaps along the interfaced crotch following the directions of your snap packaging.
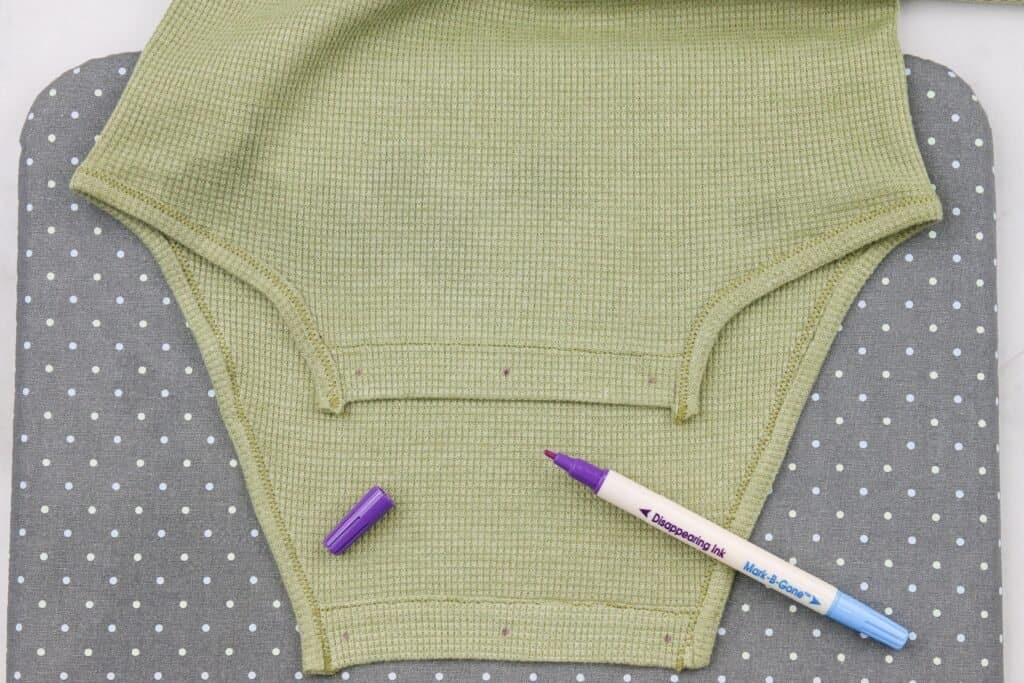
The cap and socked should be attached to the front of the bodysuit and the stud and socket should be placed on the back of the bodysuit.
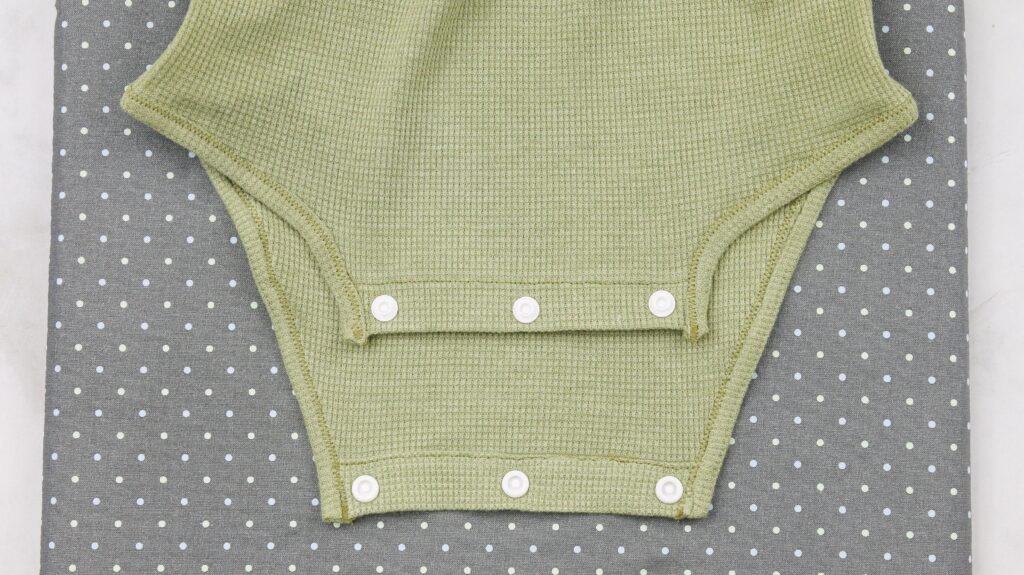
Give your finished baby bodysuit a good pressing with plenty of steam and trim away any excess threads.
Don’t want to forget about this pattern? Save this project for later! Click here to save this project on Pinterest.
Join my crafting and sewing Facebook group where you can show us what you’re making, ask questions, and learn from others!
These are so adorable. I love them
Too cute! You make it look so simple.
Nice!!
Super cute!
How wonderful!
Aww these are too cute!
These are adorable!
Good tutorial.
So cute. Can't wait to make one.
Love these, you have given such details instructions
Too cute!!
I’ve always wanted to try sewing a bodysuit with this type of neckline! Thanks for the amazing tutorial!
To cute
I love these little bodysuits and the thermal fabric you chose.
I love how you can make is all so very much your own
Thanks for easy to understand instructions! My Mom taught to me sew growing up, so really am excited to make a few of these for a friend who is having her first baby in December.
Great Tutorial, such a cute outfit for any baby
I appreciate how beginner friendly your instructions are. Thank you for all great patterns
Amazing pattern, looks so easy and I love the flutter sleeves!
Watched the video and I think I can actually do this! Thank you for sharing!
I would love to be able to make things like this. So cute and adorable.
So cute, I can’t wait to try to make one, thank you!! ♥️
Thanks, looks great!
Such a wonderful project and the video is so informative for ideas on making the body suite
Love these colors!
How cute! This would be a nice handmade thoughtful baby gift!
How cuuute
As usual, you make it look easy. Can't wait to try!
Too cute! I can’t wait to try this!
Big fan of the ruffle sleeve
Love, love love
My mother-in-law likes this kind of stuff.
So easy an adorable! Excellent instructions.
Very cool! I would love to make some clothes for my grandbabies.
Like the sleeves on the pink one
Great that Joann's sponsored the post
so cute and it looks pretty easy too!
Cute pattern. Would make such a sweet gift!
You do wonderful sewing! I love this pattern just wish I had a little one to make it for.
Those are adorable and there's something so wonderful about homemadewithlove clothing, especially for the wee ones.
So cute
This sure seems easy enough. Do you have a printable instructions for this pattern?
These are so cute!!
I love the waffle knit/thermal like fabric and the ruffled sleeves! So cute!
Looks so cool!
Soooo cute!! I love there are so many sizes!
The ruffle one is super adorable!!
I can’t wait to get my sewing machine set up so I can try to make these adorable onesies!
Great gift idea.
Great baby shower gift idea.
Thanks for the video that was great!
great video instructions very clear
Where was all this when my babies were little
Very Cute!
Great pattern. GOing to make several to have on hand for baby shower gifts~
Very cute seems like a great pattern.
So cute! You make it look so simple. I don't sew a lot now, but I think even I could make one of these following your directions. Thank you.
I’m so excited for to try this pattern! I’ve already made a few baby hats, baby sheets, and I printed the leggings pattern out yesterday. I’m expecting my first grandbaby in October and enjoying sewing all things baby girl!
Enjoy your projects Thank you
Great workwomanship!
very cute!
Thank you for sharing this!
Nice! Need someone to have a baby now so I can make it!
Thank you for the tutorial. You make it look easy!
Running to buy the stuff to do this!!!
So cute and thanks for posting the different sizes!!!
This is an amazing pattern.
"Beginner Friendly" patterns is my current area area of expertise. lol! I appreciate you posting this tutorial on how to bring this pattern to life. I'll attempt it right after I finish sewing this simple baby hat that I have off to the side of me right now.
So ADORABLE thanks for sharing it!
Thanks for sharing I really love how you posted different sizes! thanks
Great instructions and pattern.
This would be so cute for babyshower gifts!!
I gotta learn how to make these properly before I become a mother!!
I don't have any babies to do this for but I think they're cute!
Bodysuits are absolutely ADORABLE! Thank you!
<3
Where are the markings on the pattern for the shoulders? I guess I missed that.
Love watching your videos. You make everything looks so easy and achievable for all us novices out there.
Thank You very much for the pattern! This is superb! I have already sewn two.
How much fabric did you purchase? I didn't see fabric yardage requirements anywhere?
Thank you for helping me.
did I miss the yardage requirements? I didn't see it.
This was the easiest pattern for a romper that I have encountered, Bravo! I love it and have made a bunch for my great-grandbabies & grand-neices. If someone in our family has a boy, think they would be great too! Thank you so much for the pattern and your detailed instructions. I also made the little leggins to match...so sweet!
Love this! Quick question...do you hem the flutter sleeves? I'm making a newborn and it doesn't appear to have much room for a hem.
Thank you!
I was excited to see you now have Cricut baby items to download. I downloaded the bodysuit and I’d like the leggings pattern. I went to Cricut and it was the pattern with all the sewing lines not for the Cricut machine cuts.
I appreciate any help you can give me. I thank you, in advance.
Brenda
The snaps are not on the supplies list? Any link/rec from Joann's?
I want to make the sleep sack that you mentioned. Where would the instructions for this be? Thank you.
I've always wanted to try out sewing baby clothes, and this blog has given me the perfect opportunity with so many free baby patterns! I really want to express my gratitude for not only sharing the patterns but also everything else I need, the sizes go according to age which will really help me create a pattern making for fashion design baby collection! I'm excited to create a cute wardrobe for my little one! Thanks for sharing your expertise and being so generous!
Hi - I'm confused which line I should cut for which sizes at the bottom of the baby bodysuit back and front pieces? The part that wraps around and snaps? Any help appreciated! Thanks for sharing this pattern.
How much fabric do you need for the onesies? (long sleeve)
It says internal server error to download the pattern
Just tried making the newborn size as a gift for a friend. Instructions are simple enough to follow but I don't think the pattern was graded correctly for the sizes. For example, sewing the neck binding with 3/8 seam allowance was really difficult, there was barely any space left in the neck binding piece to press up and have a nice looking neck, unless that was the intent. Similarly for the leg binding, sewing with 1/2 in seam allowance, there was no space left in the binding for it to turn out. I will try it again but will increase the width of he bindings for my next one.
So, I am almost finished but the instructions call for the leg band, but there is no pattern piece for leg banding, and the piece I do have is the hem binding, but nowhere in the instructions is there a place for installing the hem binding. I assume that the hem binding IS the leg band? I assume I won't have an answer before I proceed, but an answer would be good for anyone else that needs the clarification. (maybe update the instructions?)
Thank you so much for sharing all your fantastic patterns! You are so generous! Your instructions with illustrations are so detailed and easy to follow. I just finished the 3-6 mos. size of this bodysuit and it turned out great. There are quite a few new babies I know at this time for whom I am going to have so much fun sewing these. Thanks again!
Hı seam allowance