Learn how to create the viral kraft paper banner in this blog post, where I share tips, tricks, materials, and answer your most asked questions.
If you’ve ever wondered how to make the viral hand-painted Kraft paper banners that you’ve seen all over social media, you’re in the right place!
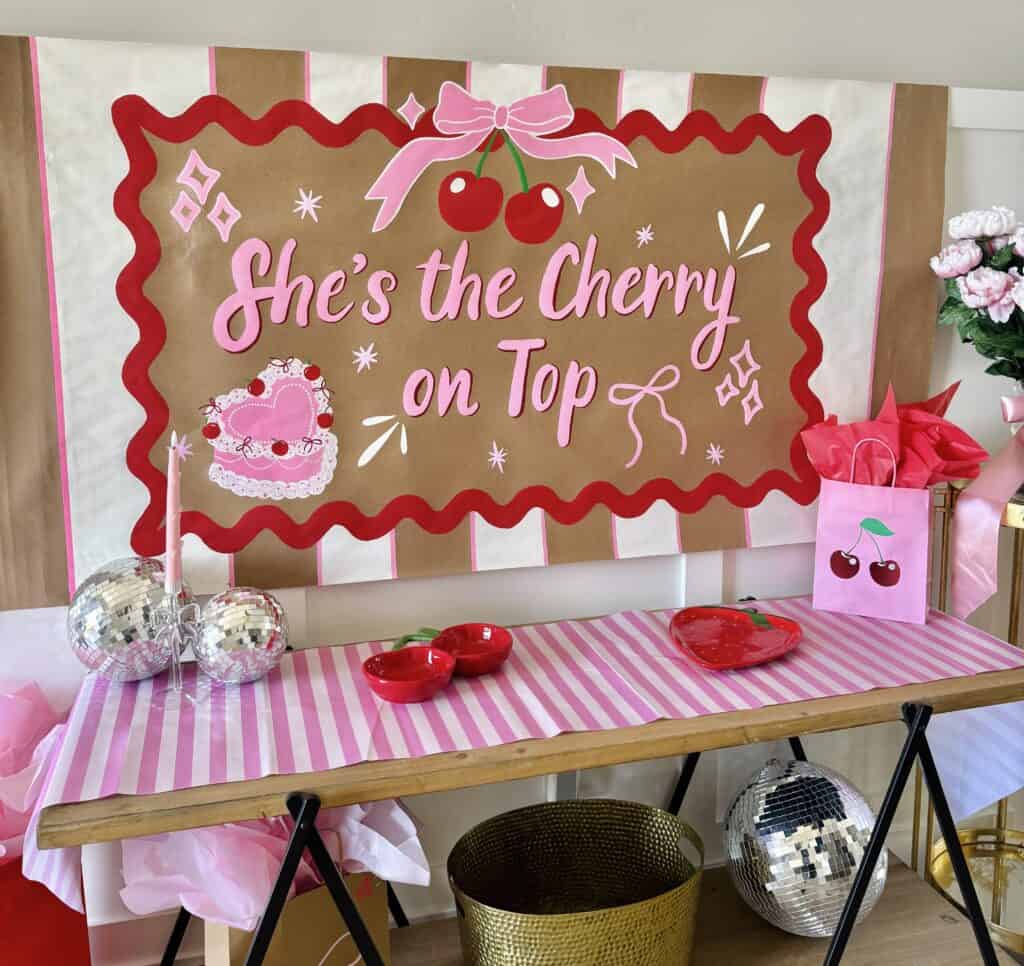
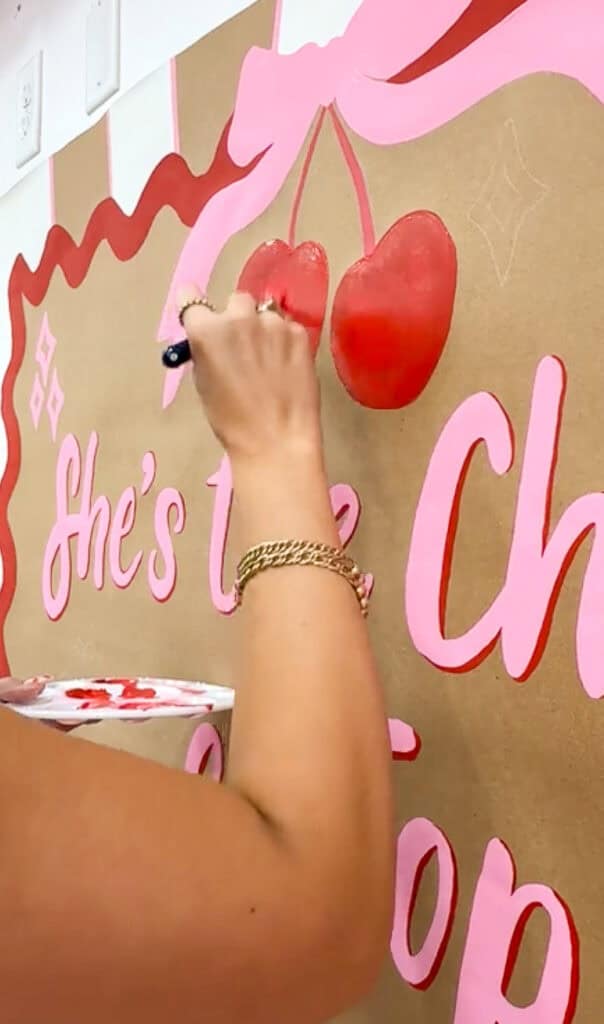
I recently hosted a cherry-themed baby shower, and I hand-painted a paper banner with the saying "She's the cherry on top" to go with the theme. I'm obsessed with how it turned out!
Once I painted my first banner, I couldn't seem to stop myself from painting a banner for every occasion! I'm warning you now, once you start, you won't want to stop!
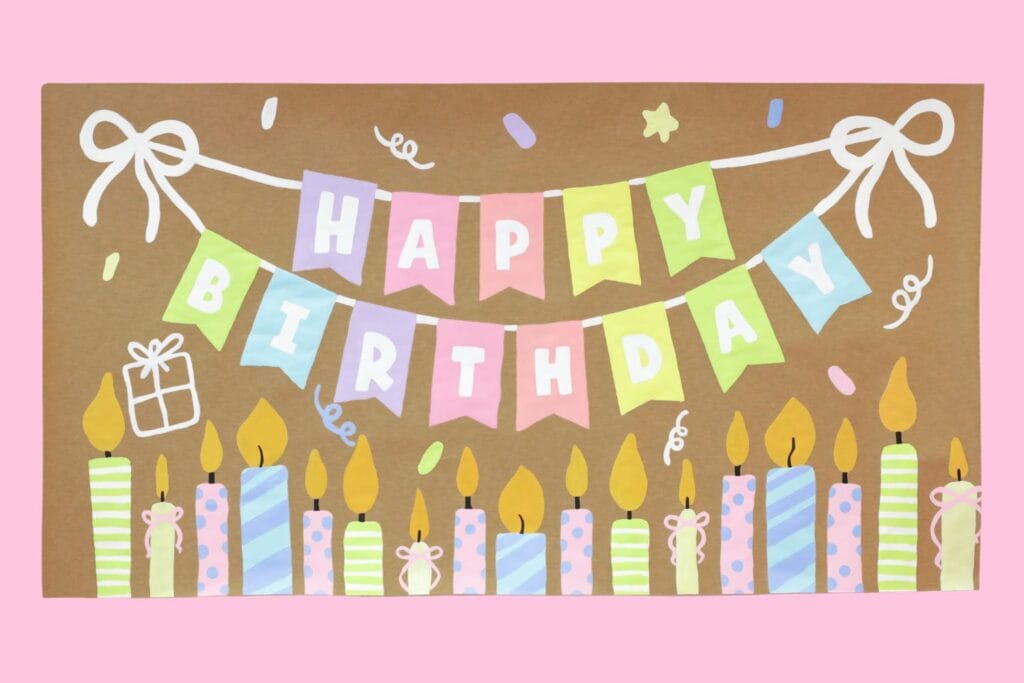
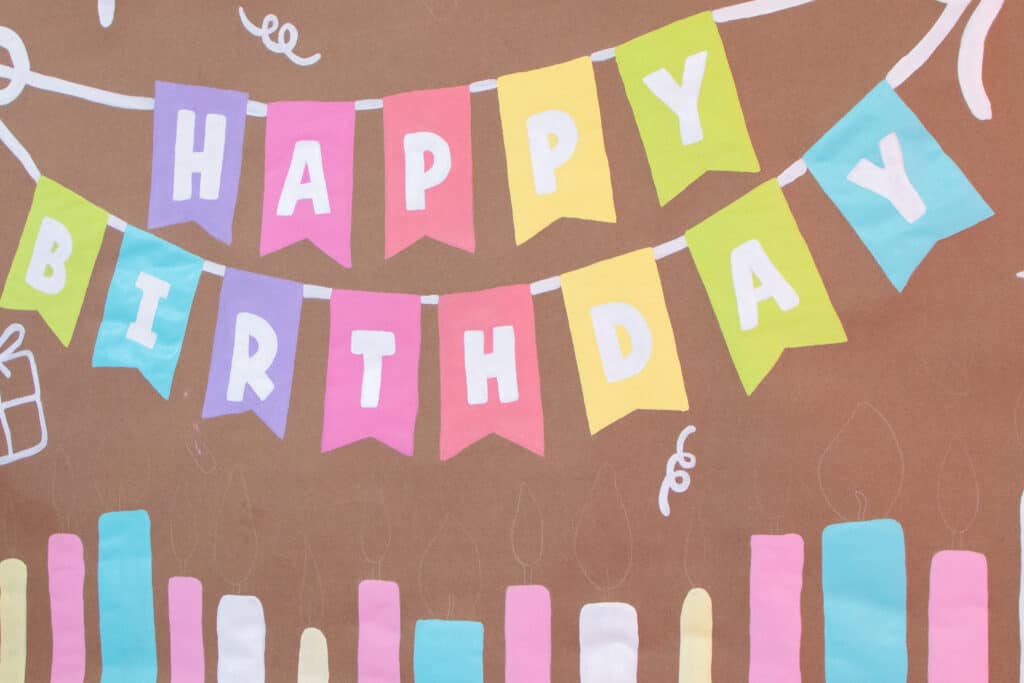
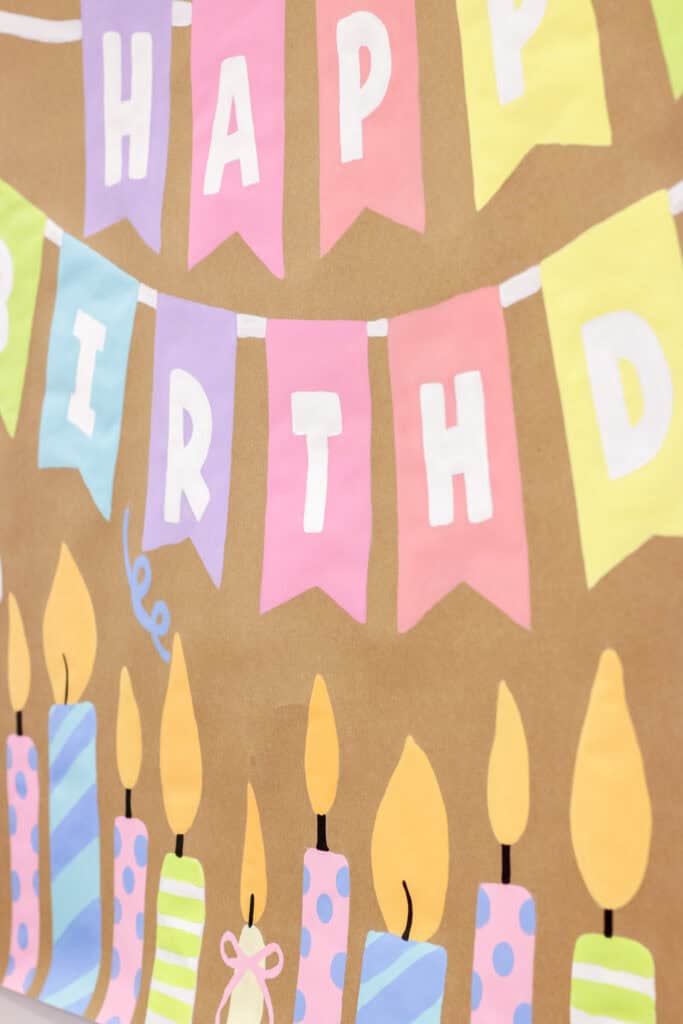
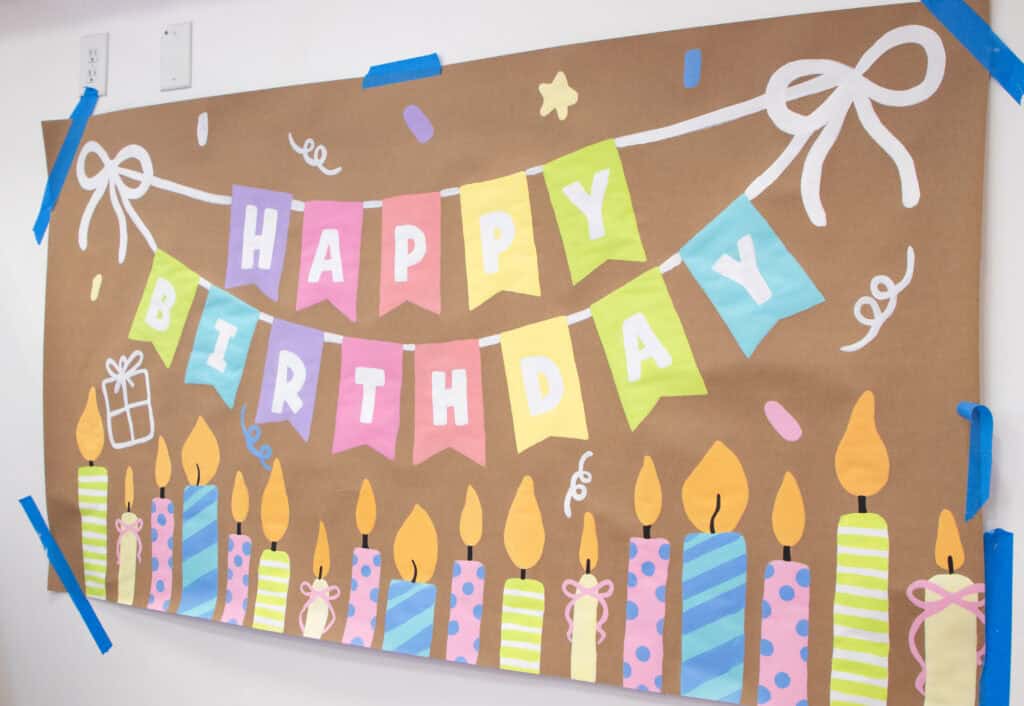
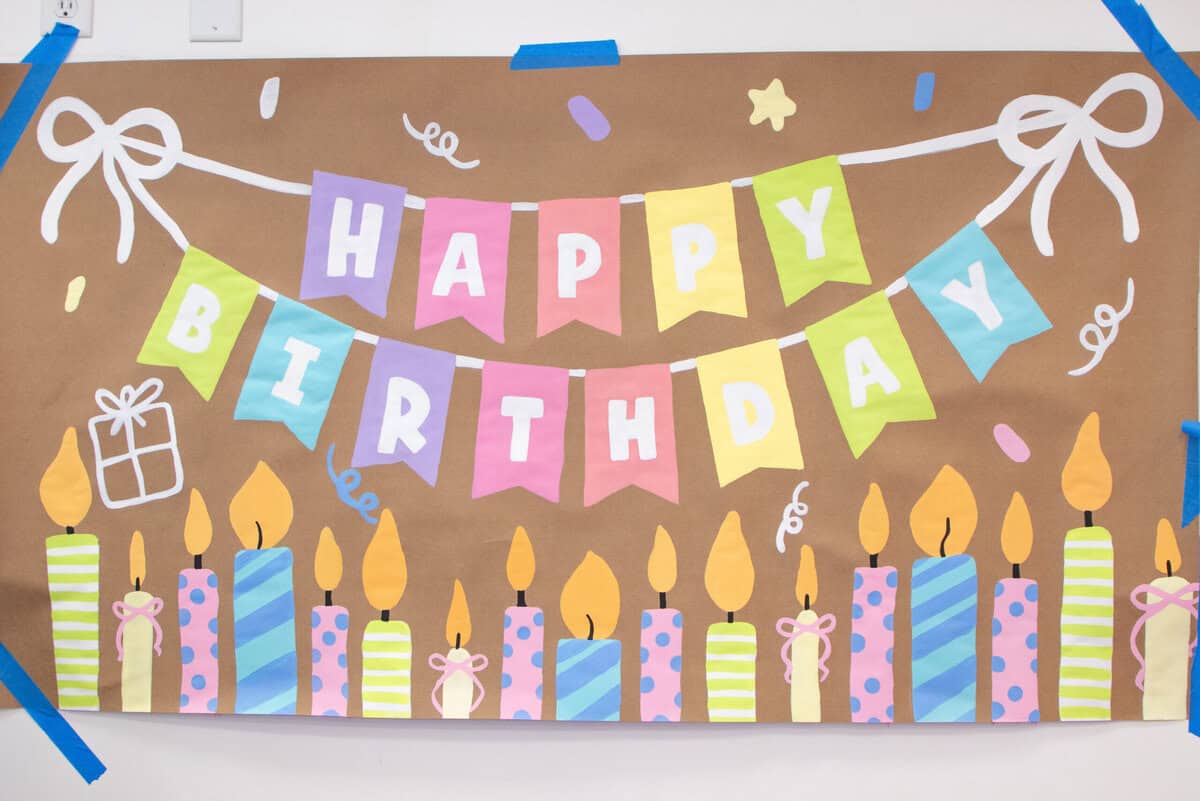
Here's another example of a birthday-themed banner with the phrase "Happy Birthday," candles lining the bottom, sprinkles, and confetti.
You've probably seen these viral hand-painted paper banners popping up everywhere this year. They're great for creating personalized banners for birthdays, graduations, baby showers, other special events, and holidays.
In this tutorial, I'll walk you through the step-by-step process of creating banners, share the materials you'll need, and answer common questions about creating paper banners, so you can create your own confidently at home. Trust me, it's easier than you think!
Don’t want to forget about this tutorial? Save this project for later to your Pinterest!
Table of Contents
What is a Paper Banner Sign?
Paper banner signs are made from brown Kraft or construction paper with hand-painted lettering and graphics. These paper banner signs first appeared on Pinterest and gained popularity for their rustic, handmade look and the ability to customize a banner for a loved one from home in an affordable way.
Since the trend took off, many small businesses have started making these adorable paper banner signs for others on social media, especially Etsy.
How Much Do Custom Painted Banners Cost?
Custom banners can sell for anywhere from $30 to $200, depending on the size, time required, special requests, and materials used to create one.
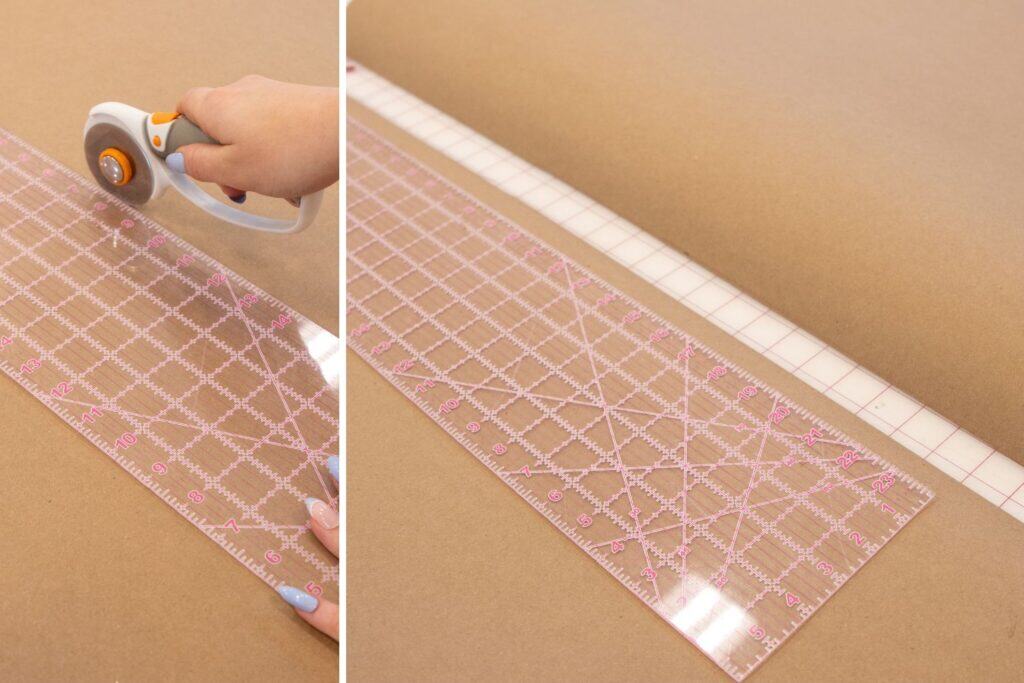
The first step is to cut out a banner from a roll of Kraft paper.
Step One: Cut Banner
Which Type of Paper Is Best for Painted Banners?
Because we're painting on paper, there's a chance that the paper you're using will warp. To prevent that from happening, I recommend using a heavier Kraft paper or even contractor paper.
Kraft paper is a common supply that people use for crafts and wrapping gifts because of its durability. Keep in mind that Kraft paper can come in a wide variety of thicknesses. This is the one I used here or get it on Amazon here. I recommend using a heavier-weight kraft paper to ensure you paint doesn't leak through, to prevent any warping, and ensure it doesn't rip.
Another type of paper you can use is contractor's paper, which is thicker than Kraft paper and is great if you plan on turning your newfound hobby of painting banners into a small business.
Banner Measurements
The Kraft paper roll I bought for this project measured 36 inches in height, which worked perfectly with the height of my design. The length of the banner ended up measuring 66 inches.
Many shops that sell custom-painted banners will offer them in a variety of sizes, such as small, medium, and large. Typically, a large banner will be the full height of a Kraft paper roll, which typically measures 3ft.
During my research, I discovered people were using their Cricut Venture to draw designs onto various materials. This is genius! It works well if your banner fits on a 24 x 28-inch mat. However, you can also do this with other Cricut machines if you want to create a smaller banner measuring around 12 inches x 24 inches.
I would definitely recommend creating a mockup or template for each of your banners to use as a guide. This is especially helpful when you’re first getting started. This will help you ensure the banner looks balanced with even spacing and prevents any waste. It's also a great way to test out different color combinations.
How Do You Make the Template?
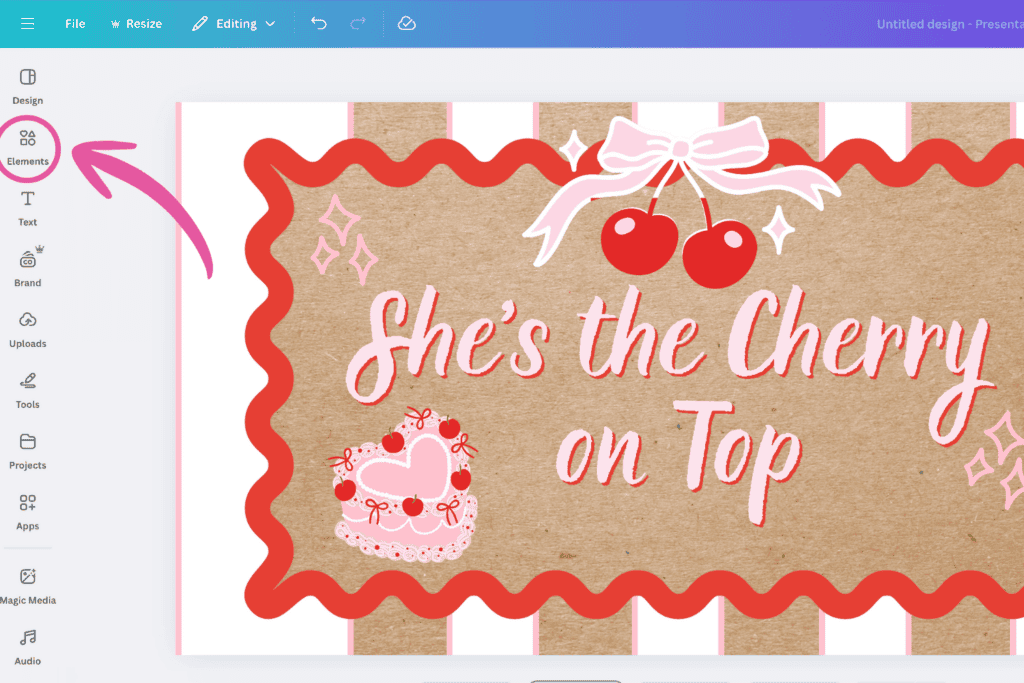
To create my templates, I used the design software, Canva. You could also use Cricut Design Space if you plan on drawing onto a banner with your machine or prefer the design software.
Before designing, I put together an inspirational board with coquette elements I knew I wanted to include in the design. Doing this is a great way to figure out your overall theme, color scheme, design elements, and fonts. You can duplicate the design and play with different elements and easily change the color palette so see what best fits your vision.
To show you how to create a template in Canva for this project, I'll go over how I created mine below.
First, you need to cut and measure your paper material. My Kraft paper roll measured 36 inches in height and was cut at 66 inches in width.
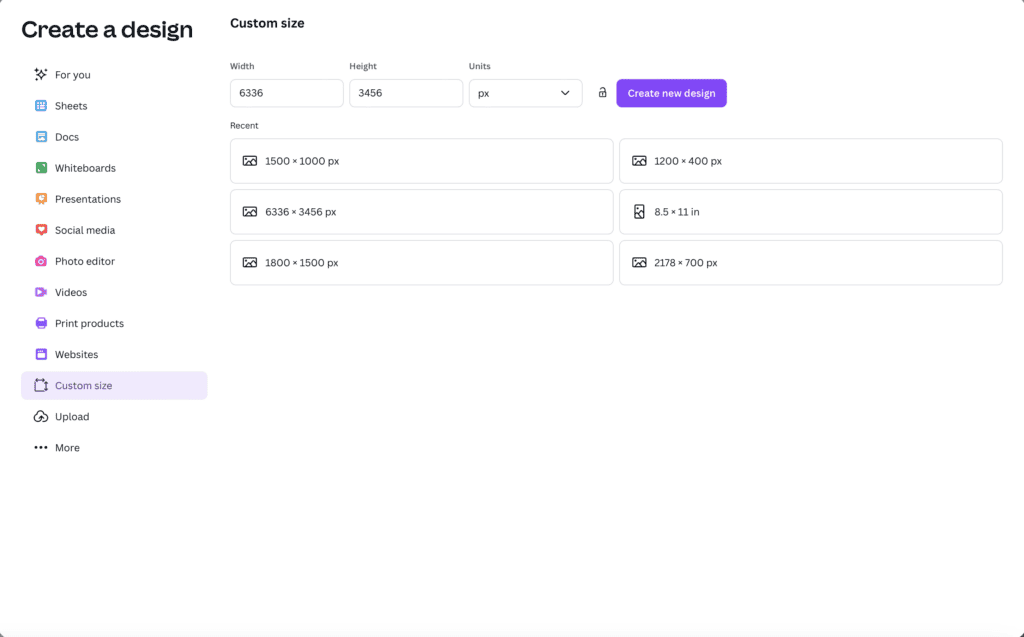
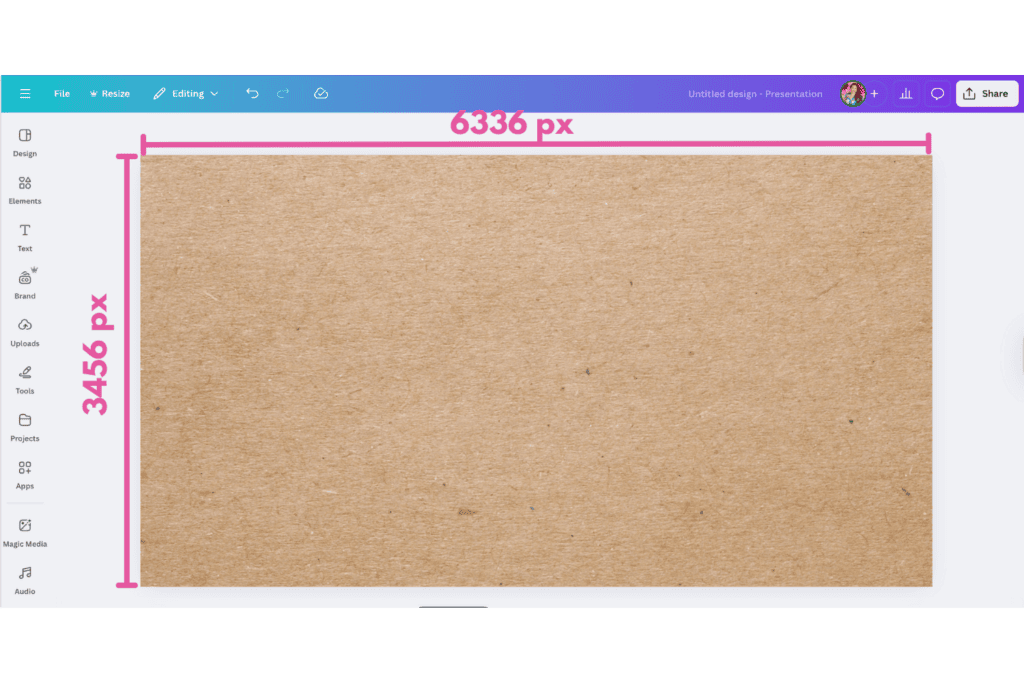
Head over to Canva.com. In Canva, create a new design and choose "Custom Size" to input your measurements. You can choose whether or not you want your units to be in inches or convert your measurements into pixels. For mine, I entered 6336 px x 3456 px.
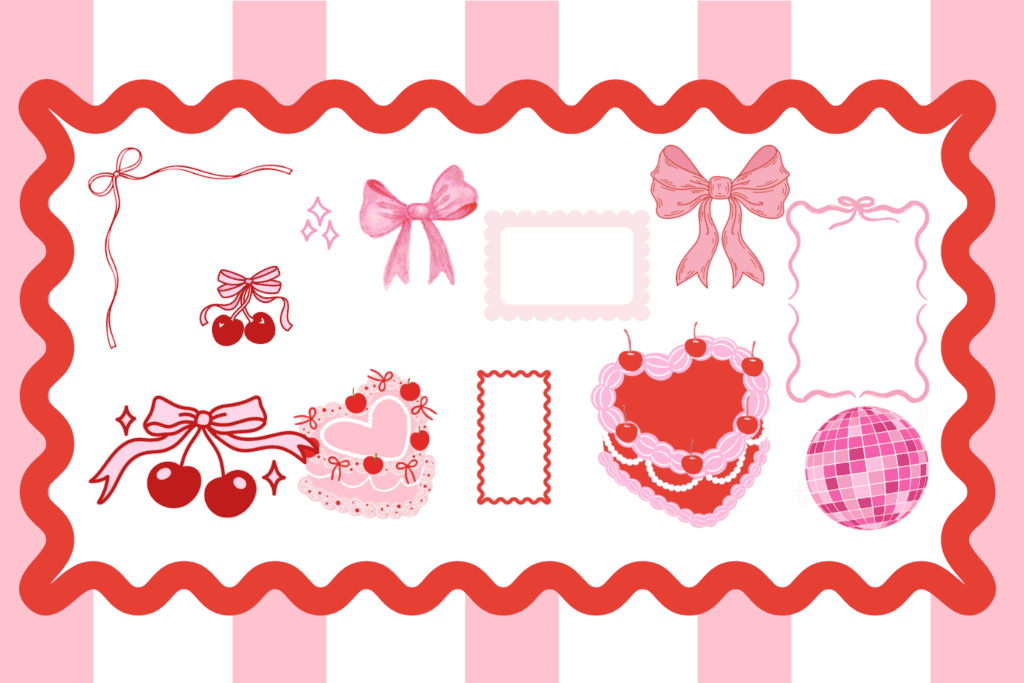
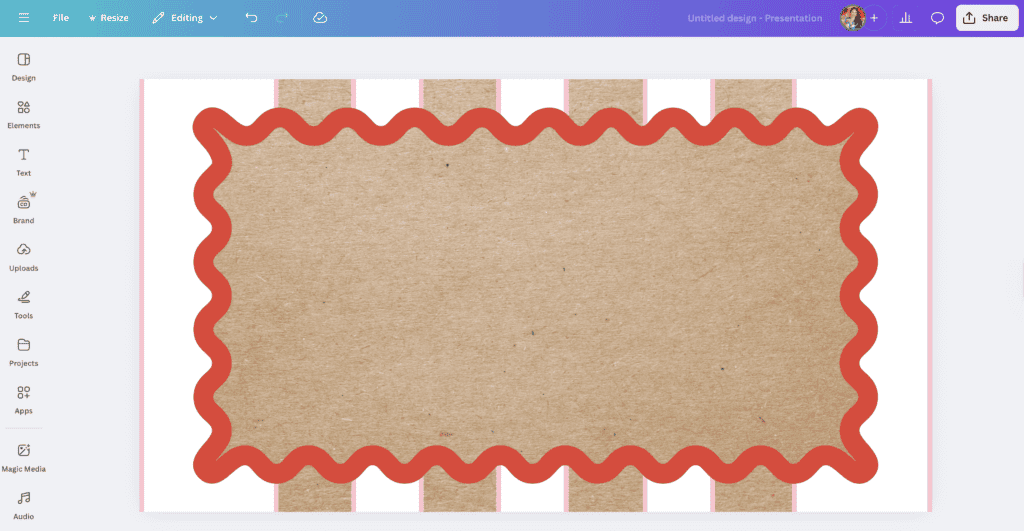
I knew I wanted a theme that incorporated bows and cherries, and used the colors white, light pink, and red. For my base, I used white rectangles with pink outlines and imported a squiggly red frame from a previous project in the center of my design.
Once I had the base down, it was time for the text. I chose the phrase "She's the Cherry on Top" using the font Holla.
*PRO TIP - If you're just starting out with painting banners, opt for a font that has a consistent thickness all the way through. This makes it so much easier to paint.
To go with my cherry soda theme, I searched for cherry elements in Canvas's elements panel. I chose a cherry heart-shaped cake graphic and a cherry-bow design.
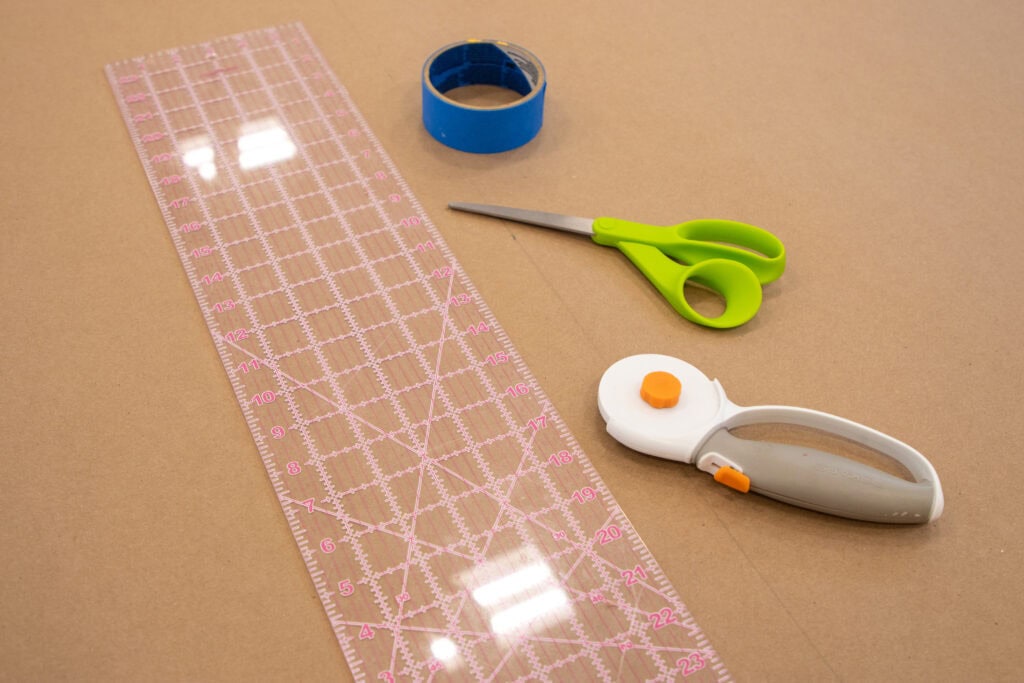
The next step is to gather all your supplies. Here's a list of all the supplies I used to create this project:
Shop all the supplies on Amazon here!
Supplies Used
- Roll of Kraft Paper or this one
- Scissors
- Painters Tape
- Acrylic Ruler
- Americana and Folkart Acrylic Paint
- White-Colored Pencils
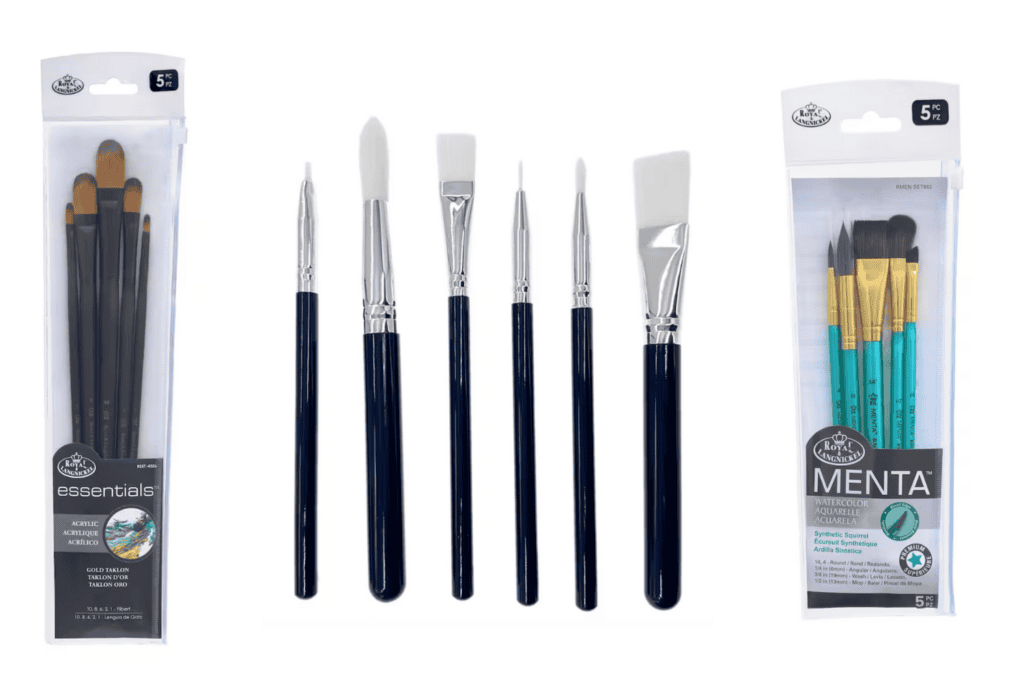
- Filbert 5 Piece Brush Set
- Watercolor Round 5 Piece Brush Set
- Decorating Brush Set by Makery
- Royal Langnickel Menta Synthetic Squirrel Watercolor 5 Piece Brush Set
- Foam Stippler Brush
- Posca Markers
- TMY Mini Projector
Why Shop Through My Affiliate Links?
When you shop through my affiliate links, it doesn't cost you anything extra, but it helps me out in a big way! I earn a small commission from those purchases, and that support allows me to continue creating and sharing free tutorials and patterns for you. Thank you so much for helping me keep this creative community going!
Step Two: Set Up Projector
Once you're happy with your design, you can connect a projector into your device to project your screen. The projector I used is the TMY Mini Projector I bought from Amazon. It's a reasonably priced projector, and it works great.
Hang your blank banner on the wall using painter's tape, ensuring it's straight and aligned with your projector. This part may take some time. If your image is too small, move the projector closer to the banner; if your image is too large, move it away from the banner.
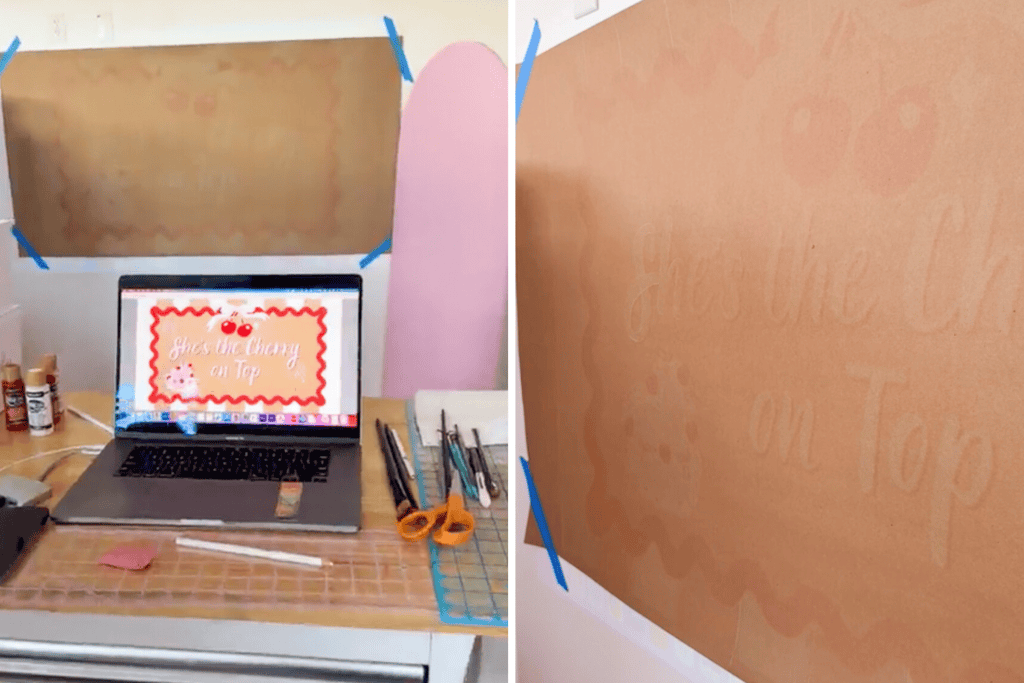
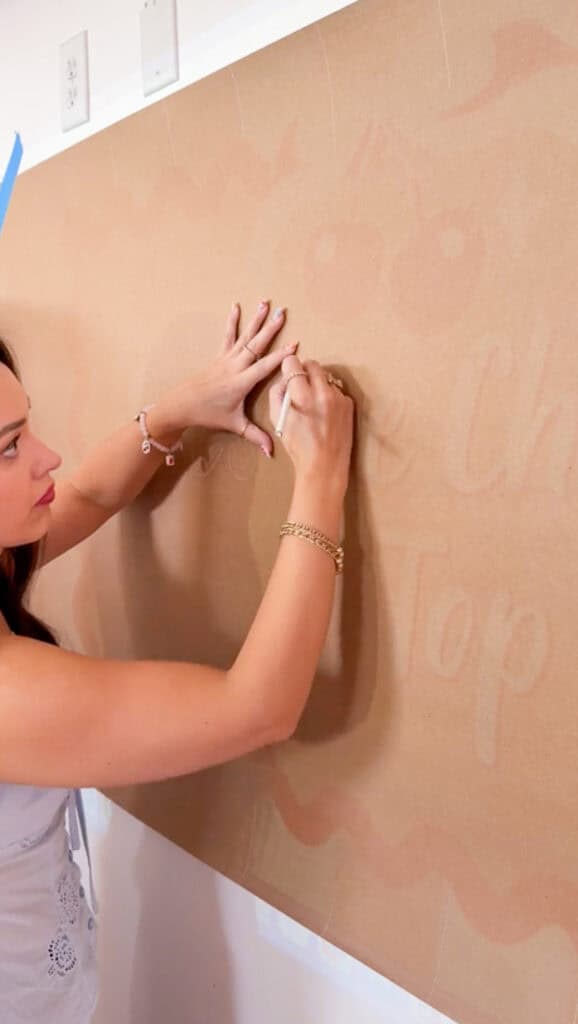
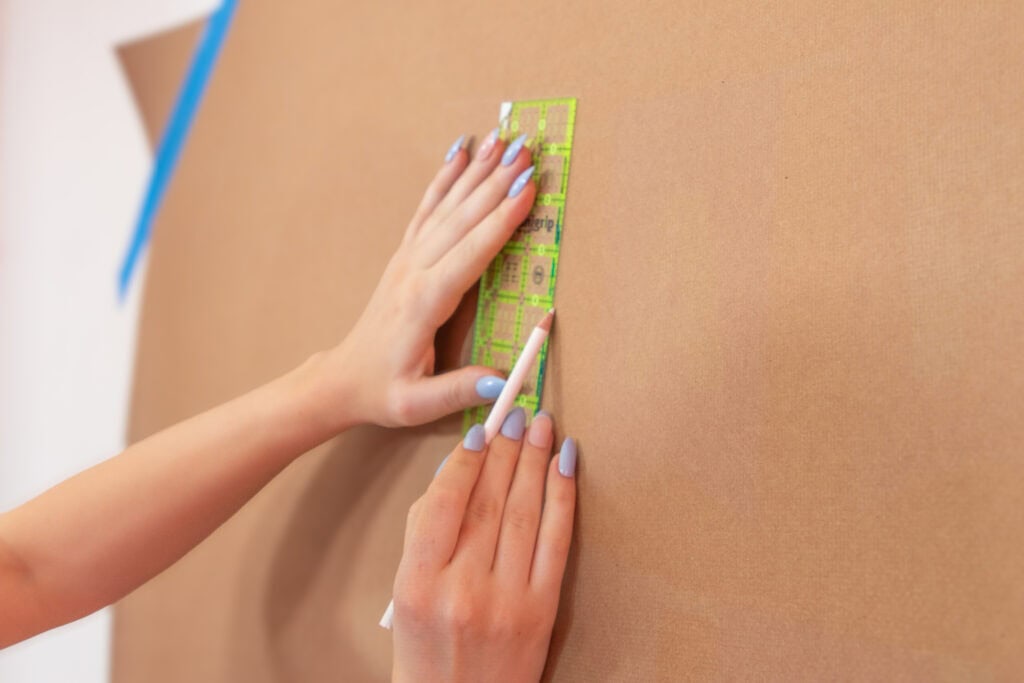
Step Three: Trace Your Design
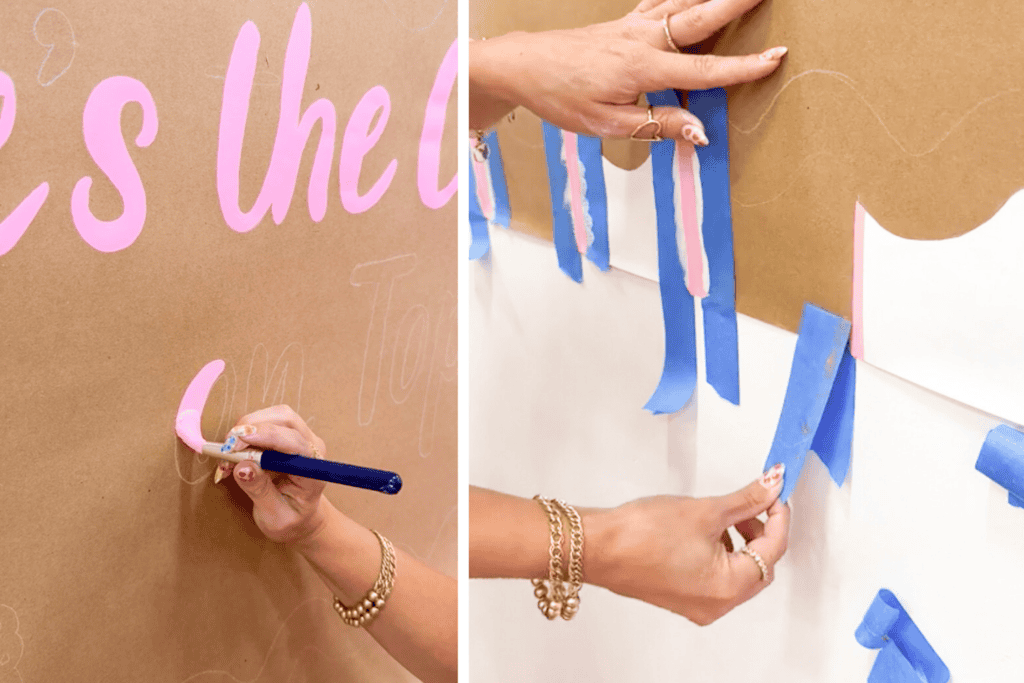
Next, take a white-colored pencil, chalk pen, or mechanical pencil to trace your design. I used a white-colored pencil to see my lines clearly.
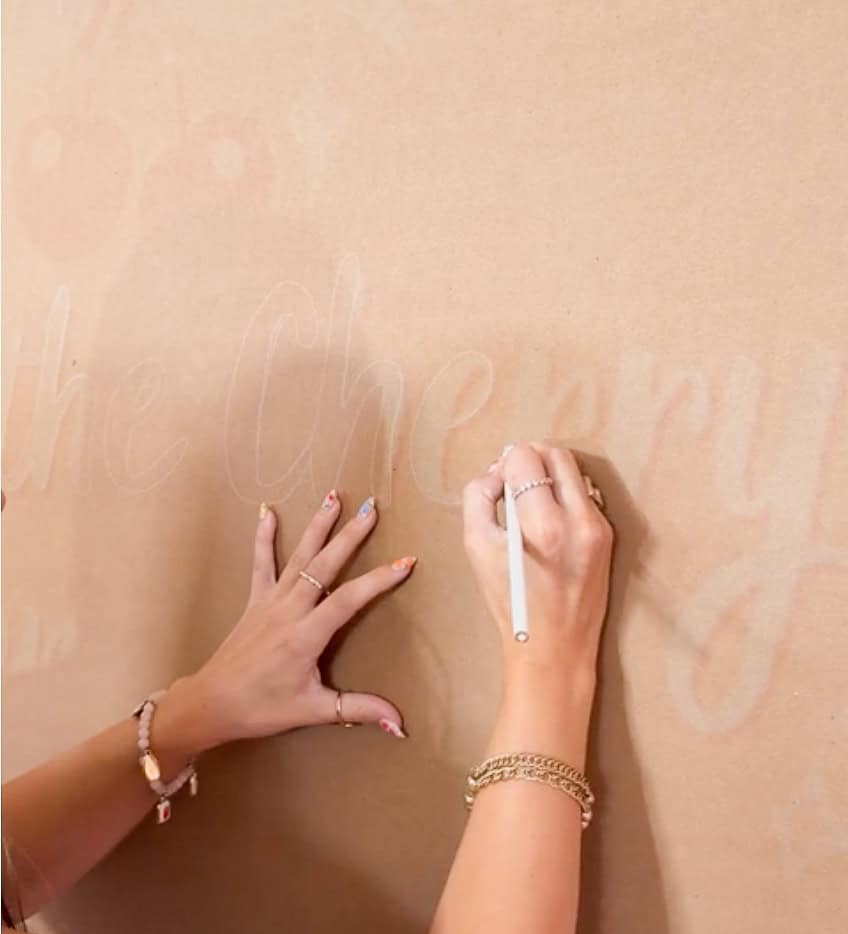
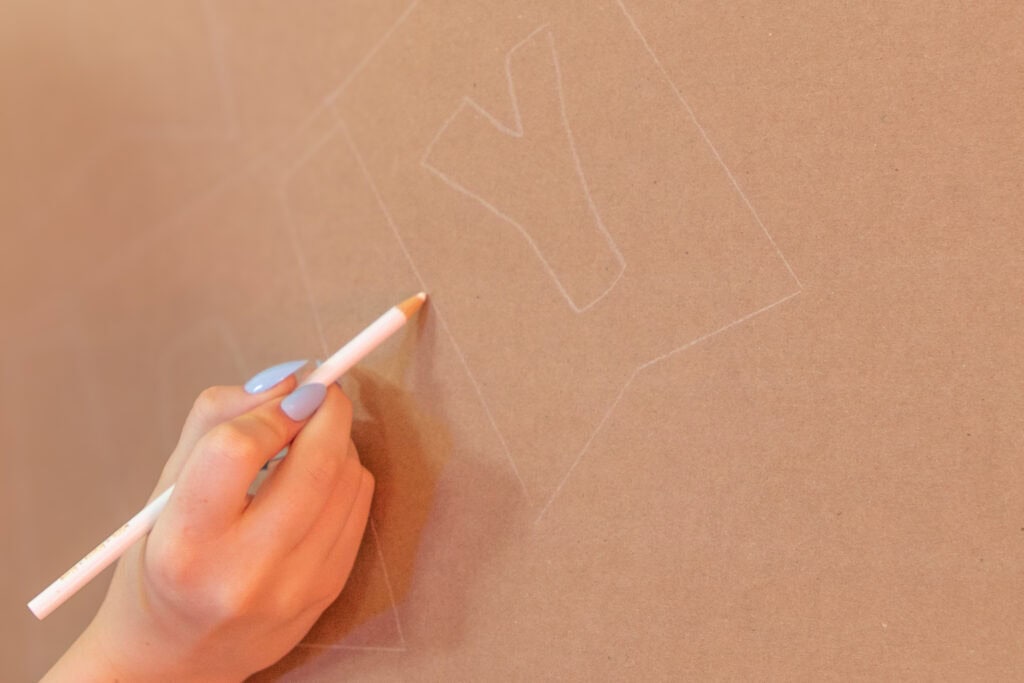
Tip: Use an acrylic ruler to help achieve those straight lines. I used this technique when outlining the stripes in the background of the cherry banner and the flag banners in my birthday design.
Paints I Used
Acrylic is the best medium to use when painting these banners, not only because it's fast-drying. It adheres easily to materials like paper, which works well with the surface we're painting on for this project.
I used pastel-colored paints to create the birthday banner. The paints used were White, Baby Pink, Mango, Pale Yellow, Citrus Green, Ocean View, Bleu Moyen, and Lavender Clair from brands Craft Smart, Deco Art, Folk Art, and Apple Barrel.
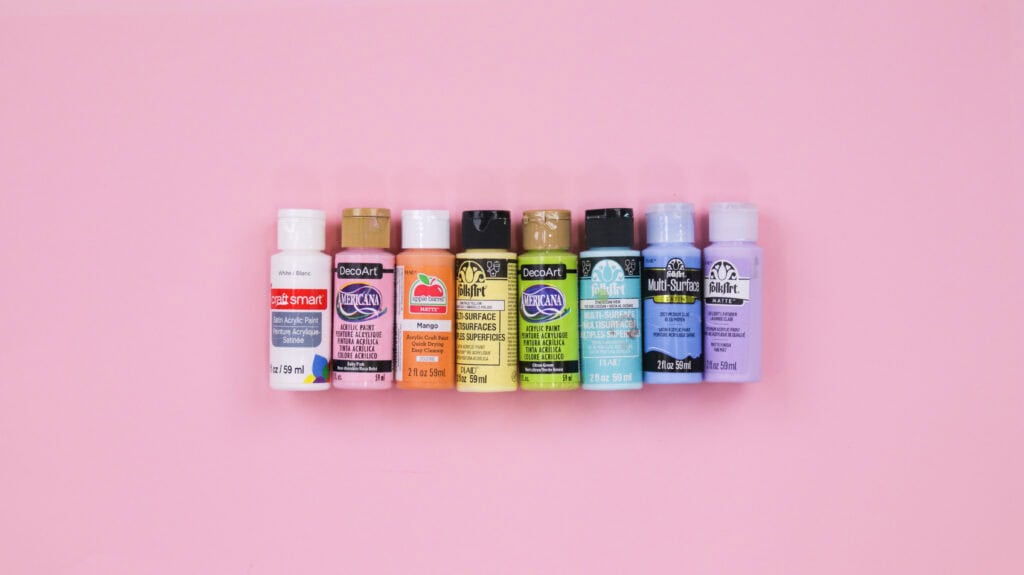
The paints I used to make my cherry banner were from brands Americana and Folk Art I got from Hobby Lobby. The paints I used from Americana seemed to be more opaque. I used colors True Red and White from Americana. From Folk Art, I used Baby Pink.
I suggest grabbing a couple bottles of each color, so you don't run out in the middle of painting your banner.
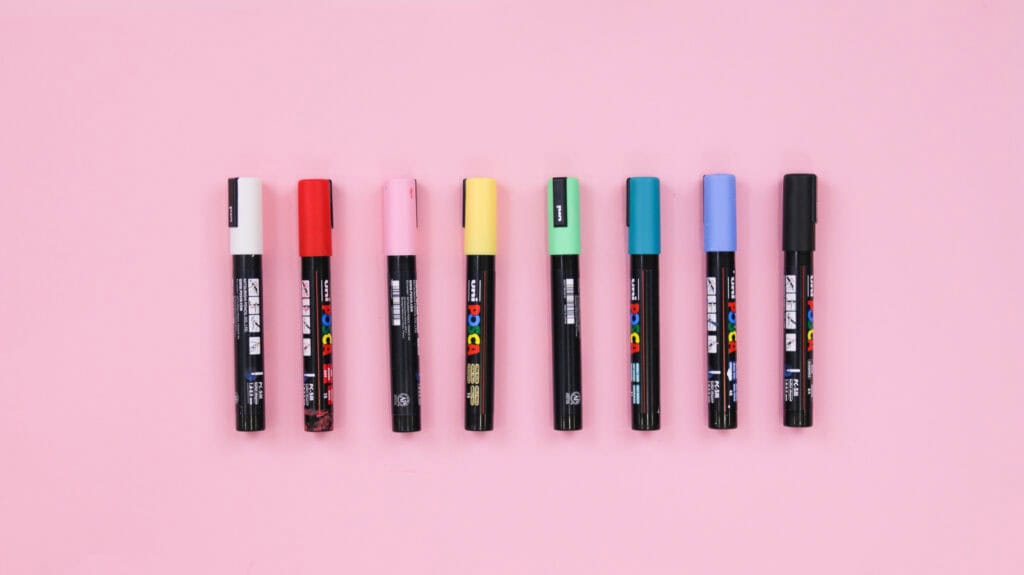
Can I Use Markers Instead?
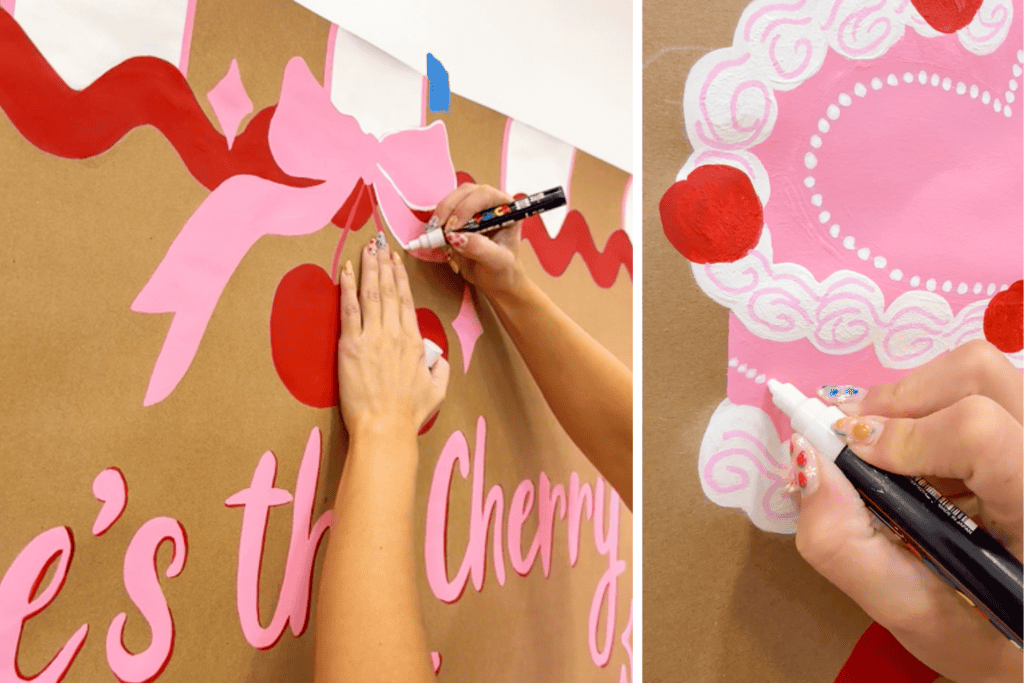
I do recommend using acrylic paint over markers because you will most likely be filling in big empty spaces. There's a chance that markers will run out of ink faster, taking more time and material. But I do recommend using Posca markers or acrylic paint markers for all the detail work.
Markers are great for outlining the acrylic paint base layers. I used Light Pink, Red, and White Posca markers to draw details onto the heart cake in the corner of my banner.
Paint Brushes I Used
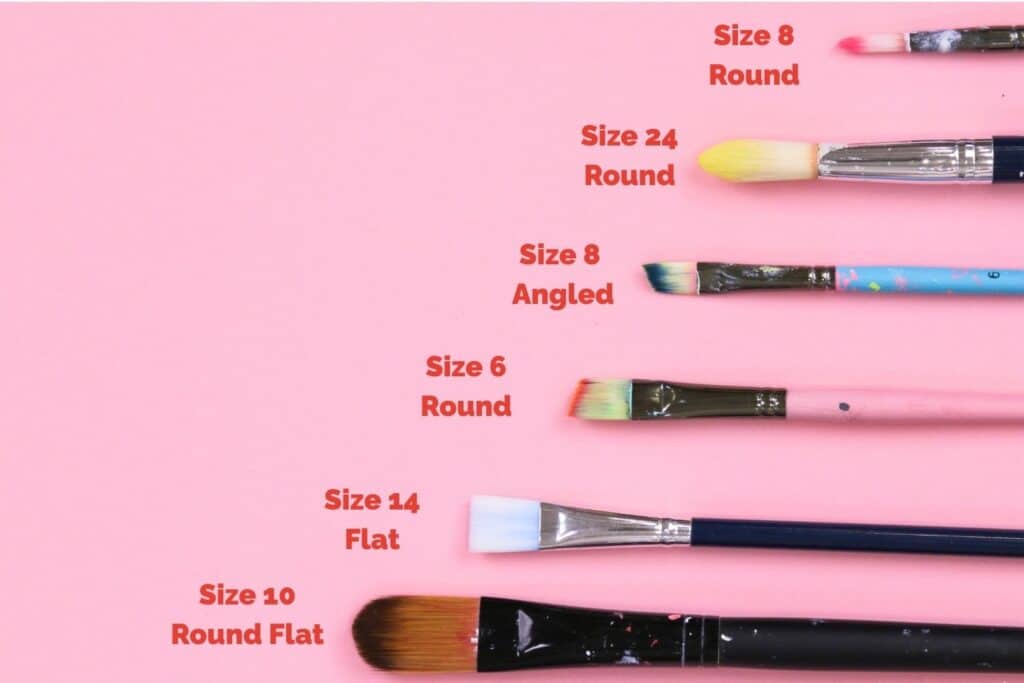
I used paintbrushes from Michaels that are round and have soft bristles. Round paintbrushes are best for lettering! Using paintbrushes with soft bristles is amazing for this project because, compared to coarser brushes, they apply smoothly and less streakily. I'll link all the brushes I used below:
- Filbert 5 Piece Brush Set
- Watercolor Round 5 Piece Brush Set
- Decorating Brush Set by Makery
- Royal Langnickel Menta Synthetic Squirrel Watercolor 5 Piece Brush Set
Shout out to the the creator, @wavypaintbrush, who uses make-up brushes, Wet & Wild, and Eco Tools from Walmart, to create her banners. Make-up brushes are soft-bristle brushes, made to apply product for a smooth finish. Like paintbrushes, there are many brushes to choose from, but the best ones to use for projects like this are the OG foundation brush, eye shadow brush for smaller details, and an angled concealer brush. Try this out and let me know how it goes!
Best Painting Technique
Before painting, make sure your brush is fully loaded when painting each stroke. You'll want to dab your brush into the paint until all the bristles are covered and there are no dry spots. Then, dab off the excess paint for a smooth finish.
When painting your banner, use light to medium pressure or else you'll have blotches of excess paint left behind when you apply it.
If you have a multi-layered banner, paint the bottom-most layers first. Then, build up your layers from there, painting on the details last.
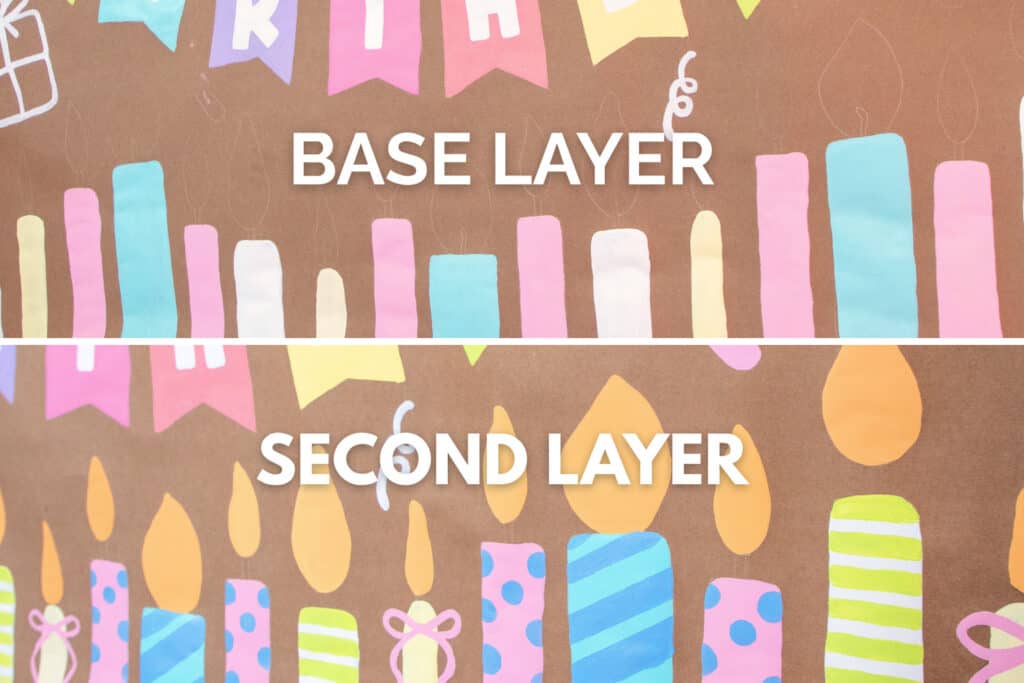
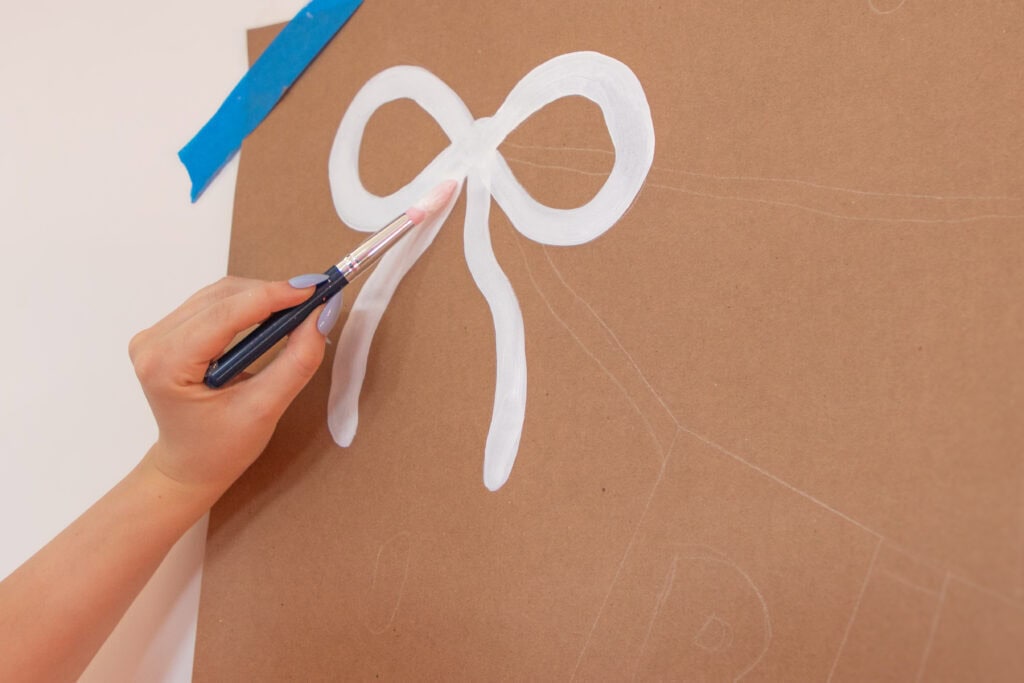
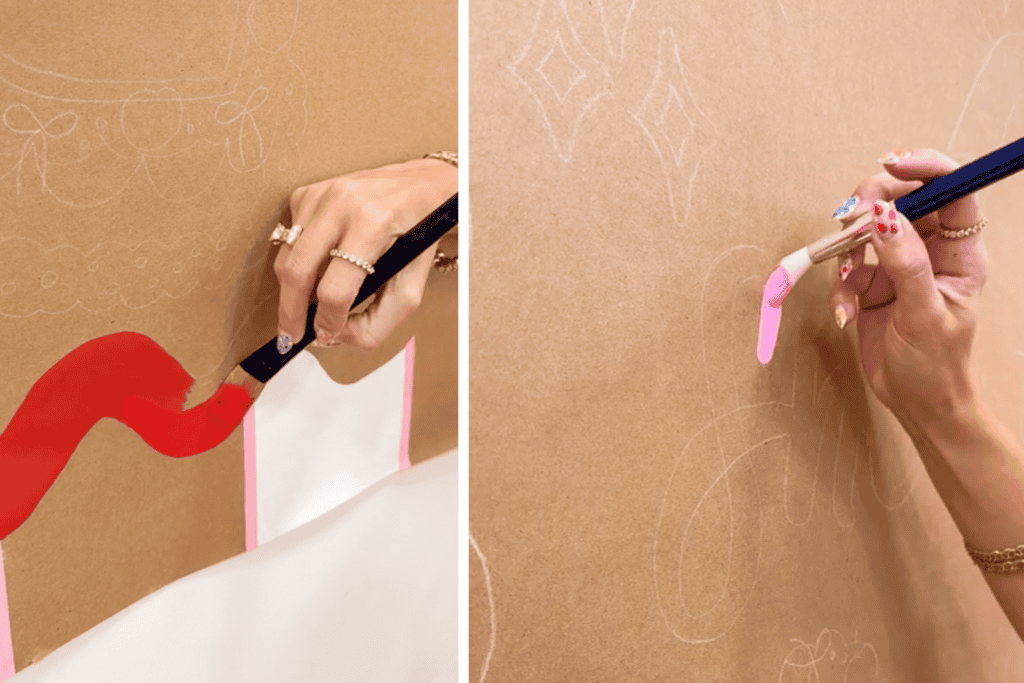
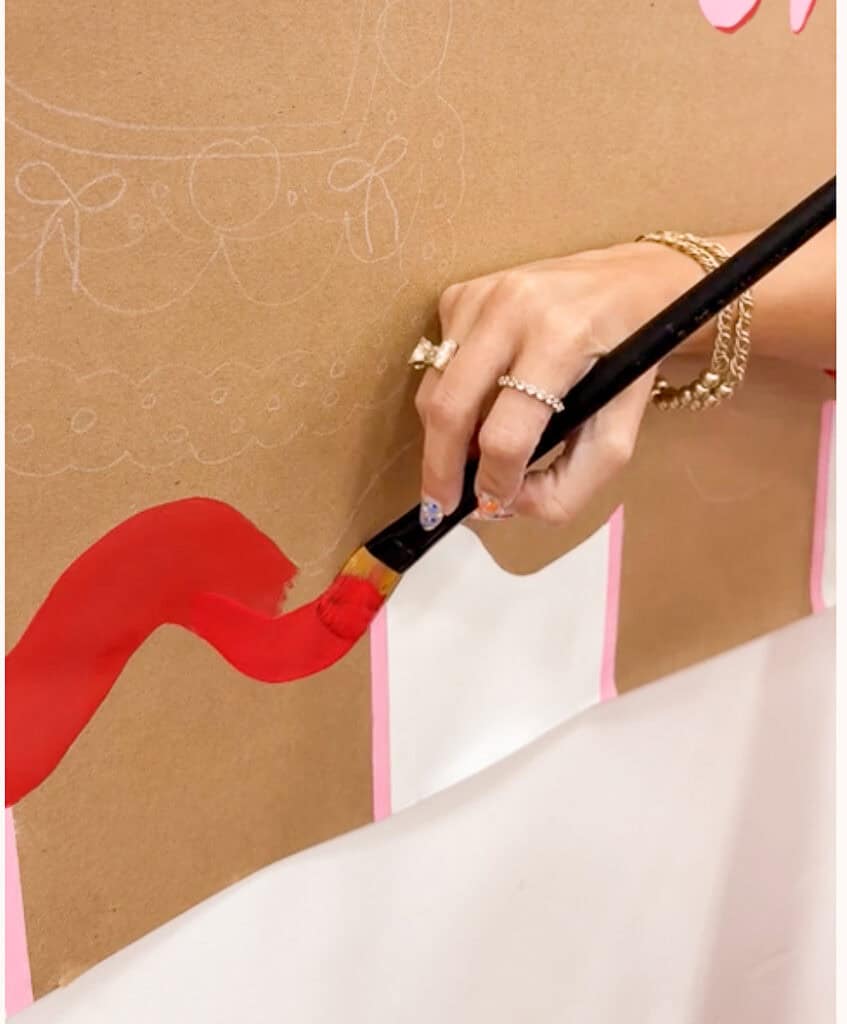
Step Four: Apply Base Layers
Now, it's time to paint! You'll want to start with your base layers first and build up your design from there. This means starting with the background and painting the shadows of your lettering and other elements. Then later, we will go over these base layers with the second layer.
For the background, I used a flat brush, size 10, when painting the stripes and the base layer of the heart-shaped cake, and a medium round 10 mm brush for my lettering.
Tip: If you are painting stripes, apply painter's tape to the sides of your stripes to get crisper lines.
Step Five: Paint Second Layer
This layer gives you a chance to cover up any small mistakes that you made in the last layer. If your base layers are looking transparent, now is the time to apply another coat of paint to those layers before moving on.
For the second layer of my cherry banner, I painted the red frame, cherries, and pink bow. To paint the red frame, I used a size 10 flat brush to cover more surface area while painting the wavy design. I also used a medium 10 mm round decorating brush to paint the bow and cherries. Let your layers completely dry before you go in with the details.
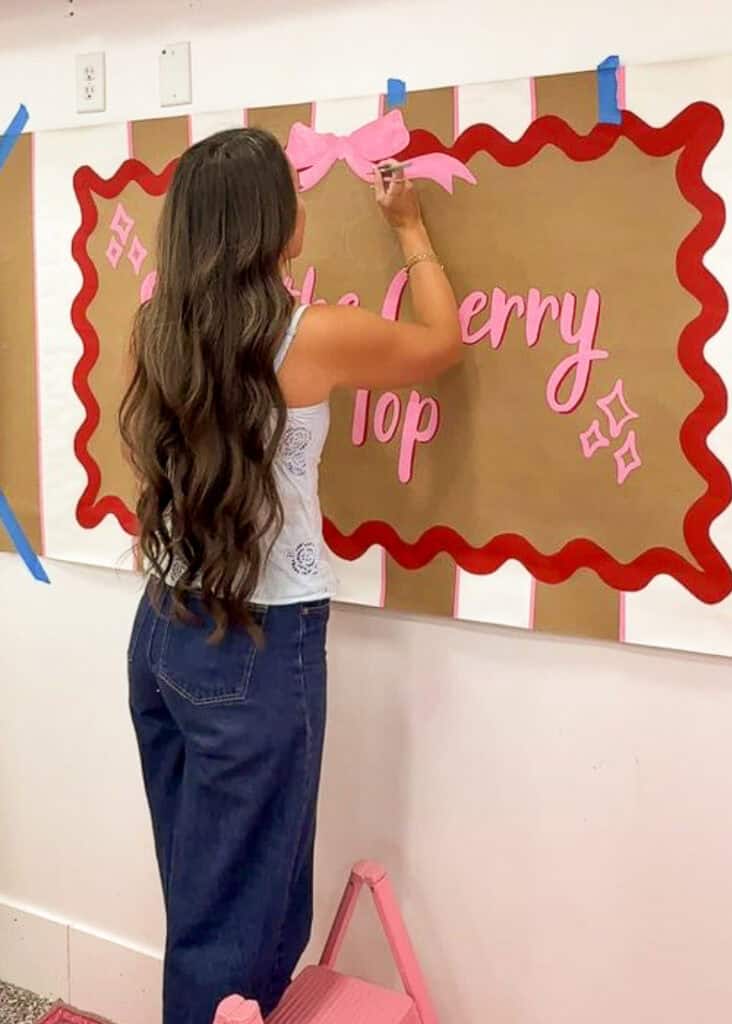
Step Six: Paint Final Layer
Once you've finished painting all your base layers, it's finally time to apply the details using fine-point brushes, stippler brushes, and paint pens.
On the birthday banner, I painted the patterns on the candles using a spouncer brush for the polka dots, a round flat brush for the stripes, then added wicks using black Posca markers.
On my cherry banner, I dabbed cherries onto the cake graphic with a foam spouncer brush, then went in with a fine-point watercolor brush to smooth out blotches of paint.
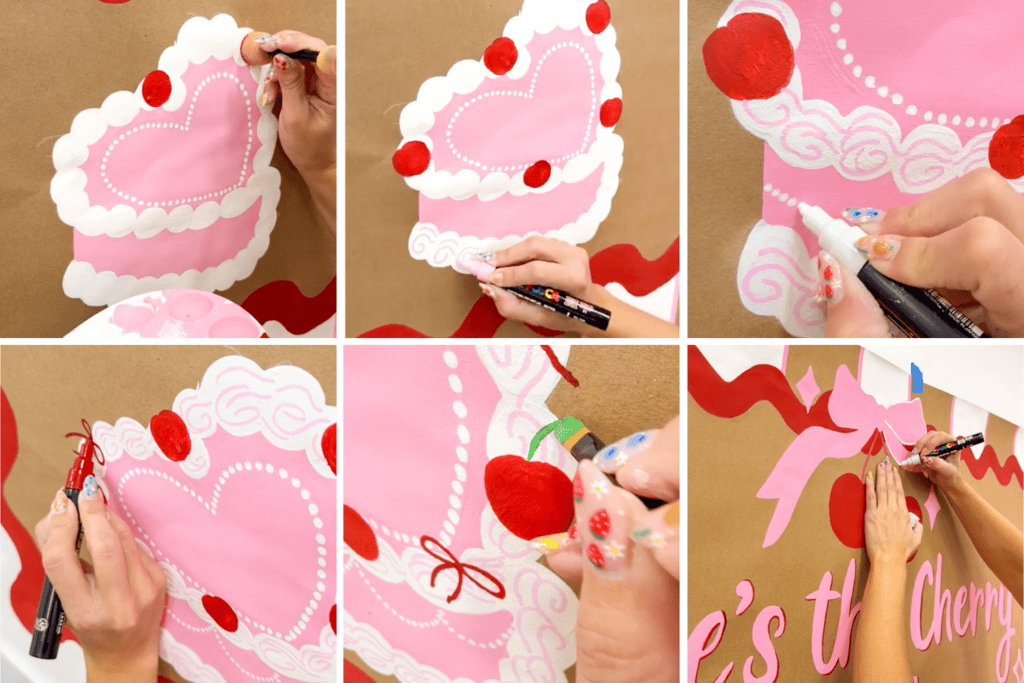
With a size 6 flat brush, I painted the green stems of the cherries and smaller details with the Posca markers. Then, I added more smaller elements, such as bows and sparkles, to fill in space and really bring it all together.
When you're done painting the details, your banner is finally finished!
How Much Time Did it Take?
Depending on the size of your project and other factors, I'd plan and dedicate a day to finishing your banner. The whole project took about 8 hours to assemble and paint, and drying time took a couple of hours. Smaller banners take a few hours to assemble and paint.
Grab some snacks, water, and turn on your favorite series, and have fun!!
How to Package Banners
When your banner is ready to be taken down, and you want to store it away or send it off to the recipient, carefully roll it up outwardly and place it inside a PVC pipe or a mailing tube from your local post office. For extra protection, you can use bubble wrap. Many artists use this method for their paintings.
Finished Paper Banner
I'm so happy with how these banner turned out! Also, the cherry banner paired so well with my DIY Dirty Soda Bar, it was a big hit!
You can see how my finished cherry banner turned out by following me, @sweetredpoppy, on all the social media platforms and checking out my most recent videos! Click to see how the banner turned out here, and don't forget to share with your friends!
I hope this tutorial was helpful, and I can't wait to see all your banner creations! If you followed along this tutorial and made a banner yourself, don't forget to tag me on social media so that I can see your creations!
If you're interested in DIY-ing a dirty soda bar or just intrigued to see how mine turned out, you can check it out by watching the YouTube video below!

Want more crafty tutorials? Here's a list of tutorials that I've made this year so far:
-
How to Make Giant Crepe Paper Poppy Flowers
Learn How to Make Giant Poppy Flowers with Crepe Paper in this Step-By-Step Tutorial and my FREE Printable Template. Today, I'm going to teach you how to make your very own Giant Paper Poppy Flowers using crepe paper. Trust me, these flowers are a total showstopper! I recently made three standing poppy flowers and I...Read…
-
How to Organize your Craft Room Tips and Tricks
Learn How to Easily Organize Your Craft Room Utilizing Different Storage Ideas for Sewing, Cricut, Paper Crafting and Painting. Today, I’m going to be sharing some of my favorite tips and tricks for organizing and tidying up your crafting supplies. If your New Year's Resolution was to be more organized this year, I've got you...Read…
-
DIY Valentine Paper Bow Garland Template
Create a paper bow garland in just two steps by downloading the FREE bow template that you can cut by hand or with a Cricut machine in this step-by-step tutorial. Valentine's Day is just around the corner which means it's time for a new bow tutorial! In the past, I've made countless hair bows and...Read…
-
All About Bags Round-Up
My favorite bag, bin, and pouch sewing tutorials are all in one place! With a variety of sizes, shapes, and styles, you're sure to find what you're looking for. Each design is complete with step-by-step instructions to ensure you end up with a beautiful bag in the end. Many of these tutorials involve zippers. If...Read…
-
What is Fleece Fabric and How to Sew It
Today I'm Sharing My Best Tips For Cutting and Sewing Fleece Like A Pro! Plus, Grab My Free Sewing Patterns Just For Fleece. Today I'm sharing everything I know about fleece - what it is, the different types available, pattern suggestions, and all my best tips for working with this awesome fabric! Fleece is one...Read…
Leave a Reply