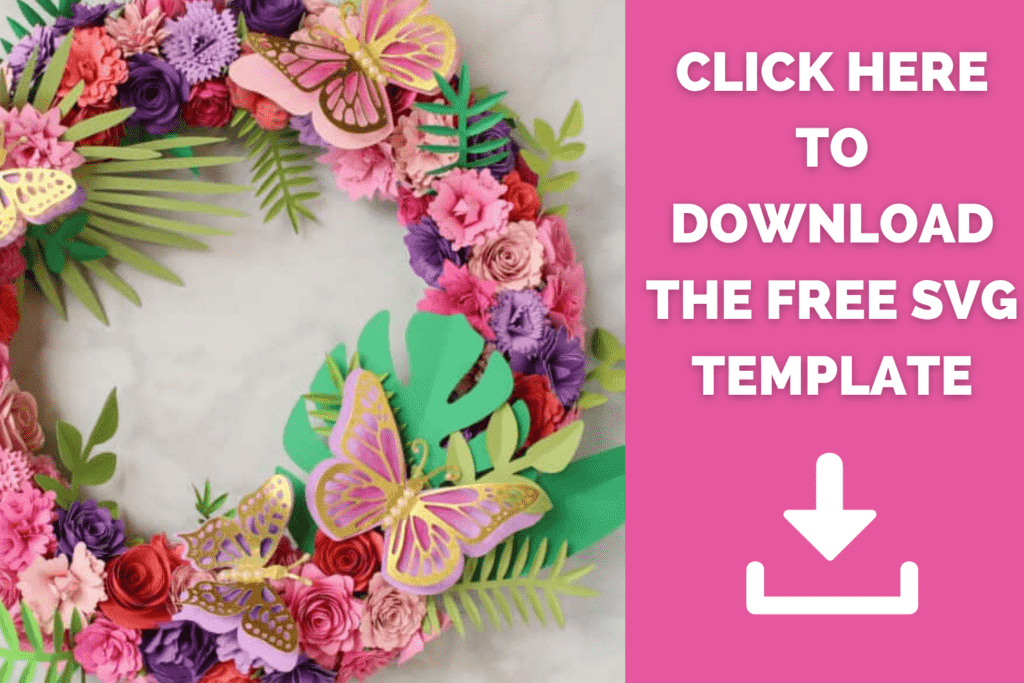
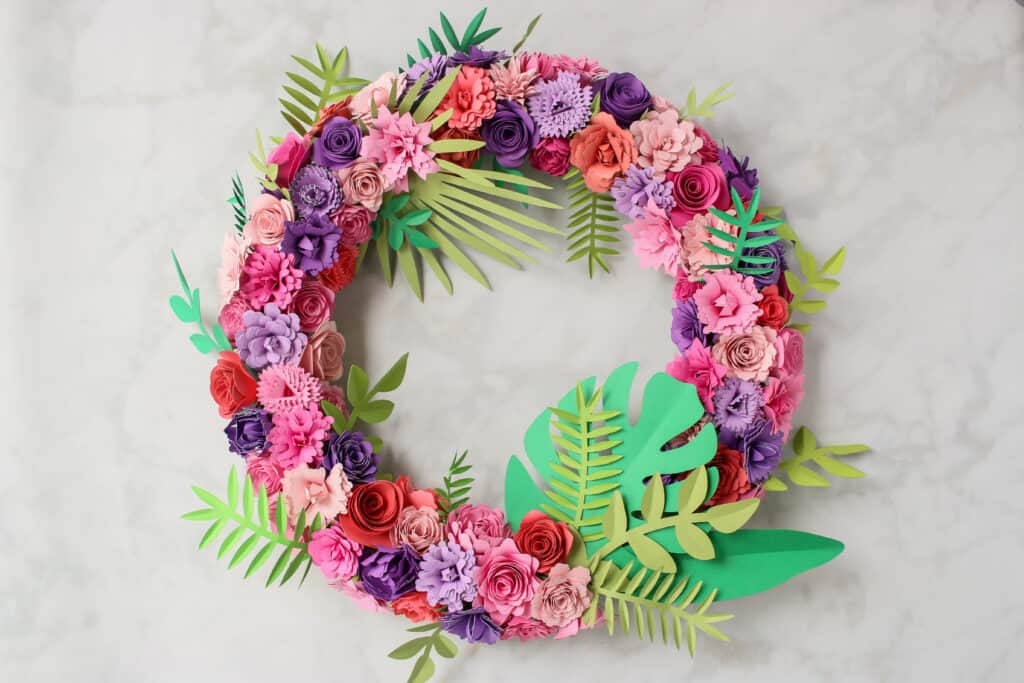
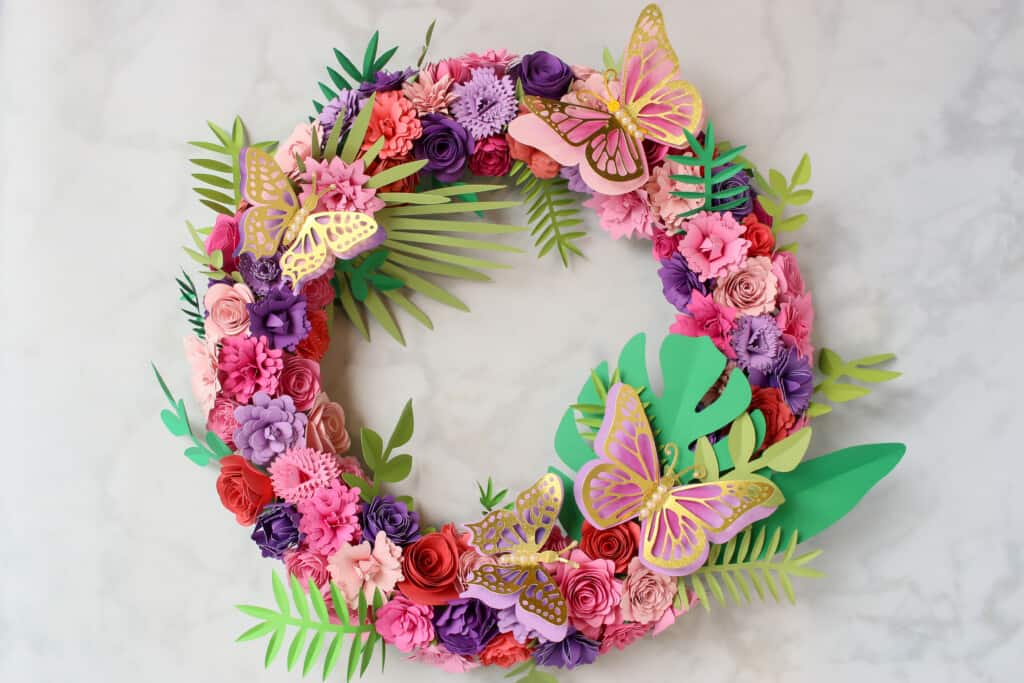
Make a Rolled Paper Flower Wreath With Leaves and Butterflies With This Tutorial. Plus, Get 12 FREE Rolled Flower SVG Cut File Templates.
Rolled paper flowers are one of my favorite things to make with my Cricut machine! Today, I'm sharing 12 free rolled paper flower templates as well as leaves, and layered butterflies so you can make your own wreath to welcome in spring's arrival.
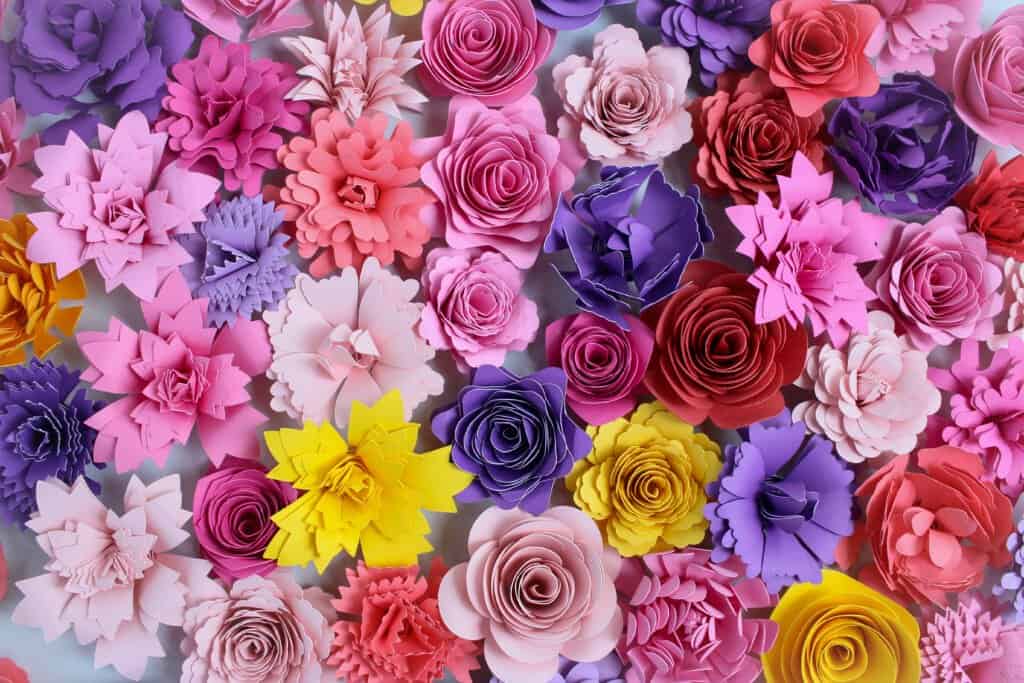
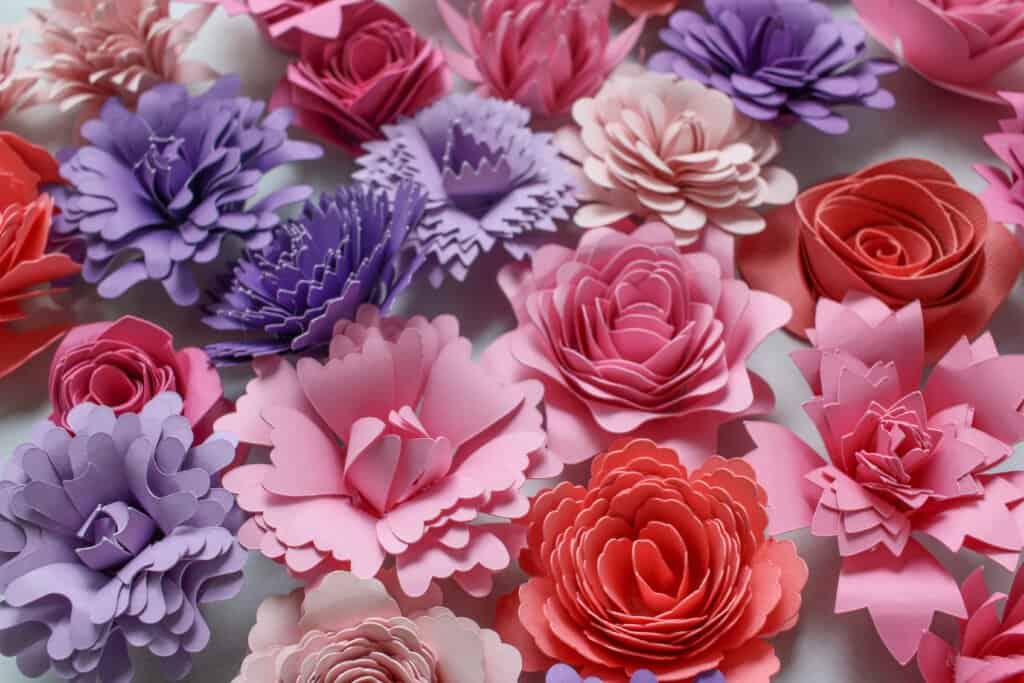
I love making rolled paper flowers because they look so impressive but really don't require too much effort at all! This wreath is a combination of rolled flowers, beautiful butterflies, and various leaves to give it a really fun and full shape.
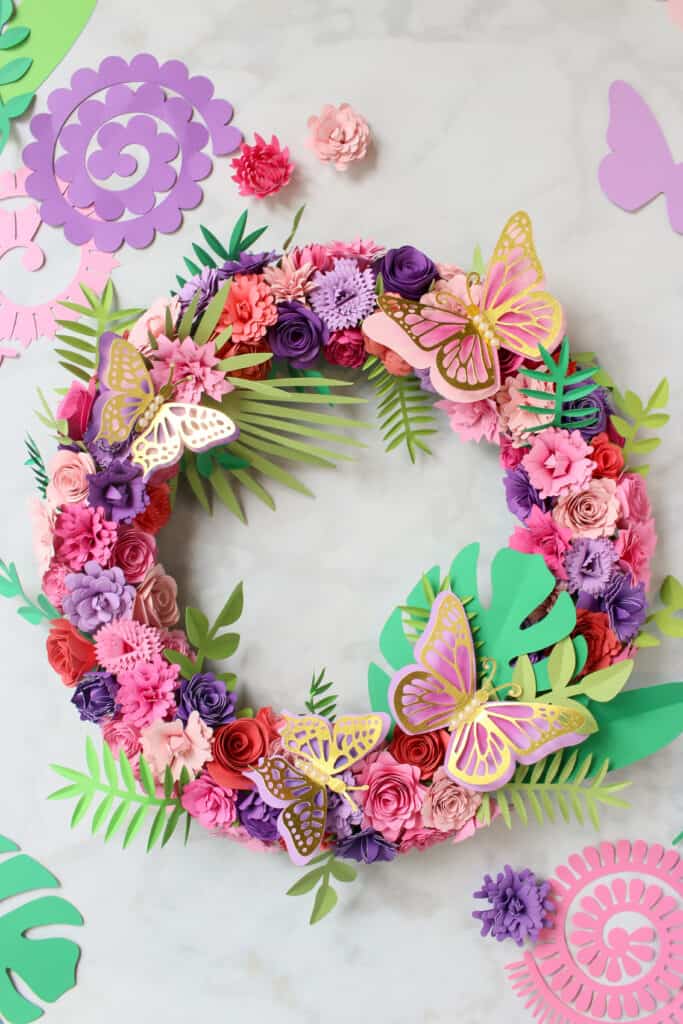
If you have wanted to try paper flowers, rolled flowers are a great place to start. With 12 different rolled flower designs, all requiring a similar technique, you are sure to feel accomplished with this wreath!
I have a few tips and tricks that take your flowers above and beyond!
Did you know I have TEN more paper flower blog posts? Click here to see them all! I have everything from paper Daisies, Anemones, and Peonies, to Dahlias, and Oversized Roses.
Table of Contents
What Kind of Cutting Mat Should I Use to Cut Rolled Flowers?
Rolled paper flower cut files are can be really delicate so it's important to use the correct mat. A Lightgrip cutting mat is ideal. It will hold the 65 lb paper steady, but it will come off really easily when you remove it from the mat.
You can absolutely use a Standardgrip mat as well, but one that has been used a bit with weakened adhesive is best. Otherwise, peeling your mat away from your design can be a bit tricky and you risk tearing the paper.
For the butterflies and leaves, using a standard grip mat will give you the best results.
What Kind and How Much Paper Should I Use For Rolled Flowers?
The correct paper choice for rolled flowers is really important. With these designs, you want to keep in mind that you will see the front, back, and the edge of your paper. That being said, you want to look for "Solid-Core" paper. This type of paper is the same color all throughout the paper, as opposed to being printed on one or two sides.
Additionally, I recommend using lighter-weight paper such as 65lb. This weight is much easier to roll than a heavier variety.
For this wreath, I used the following amounts of paper:
75-90 Rolled Flowers: Requiring 38-45 sheets of 8.5x11 paper in shades of pink, peach, and purple.
24 Leaves: Requiring about 5 sheets of 8.5x11 paper in shades of green.
4 Butterflies: Requiring 1 sheet of 8.5x11 textured gold cardstock and 1 additional 8.5x11 sheet of pink and/or purple cardstock.
What Kind of Glue Should I Use?
For rolled flowers, you can use tacky glue or hot glue. There are pros and cons with both, but I prefer and recommend using a hot glue gun.
Tacky glue is nice because it has a thinner consistency and you don't have to worry about burning your fingers. However, tacky glue takes a longer time to dry. This means that you have time to readjust your flower after applying glue if you want to change the density of your blossom, but it also means you have to hold the flower steady for a longer time before the glue dries and stabilizes.
Hot glue dries very quickly, which makes creating your flower and positioning the petals in place a much faster process. I really like this aspect of using hot glue, especially when I'm making a lot of paper flowers, like in this wreath.
If you're worried about burning your fingers, pick up a few silicon finger guards!
Tips and Tricks for Making Rolled Flowers
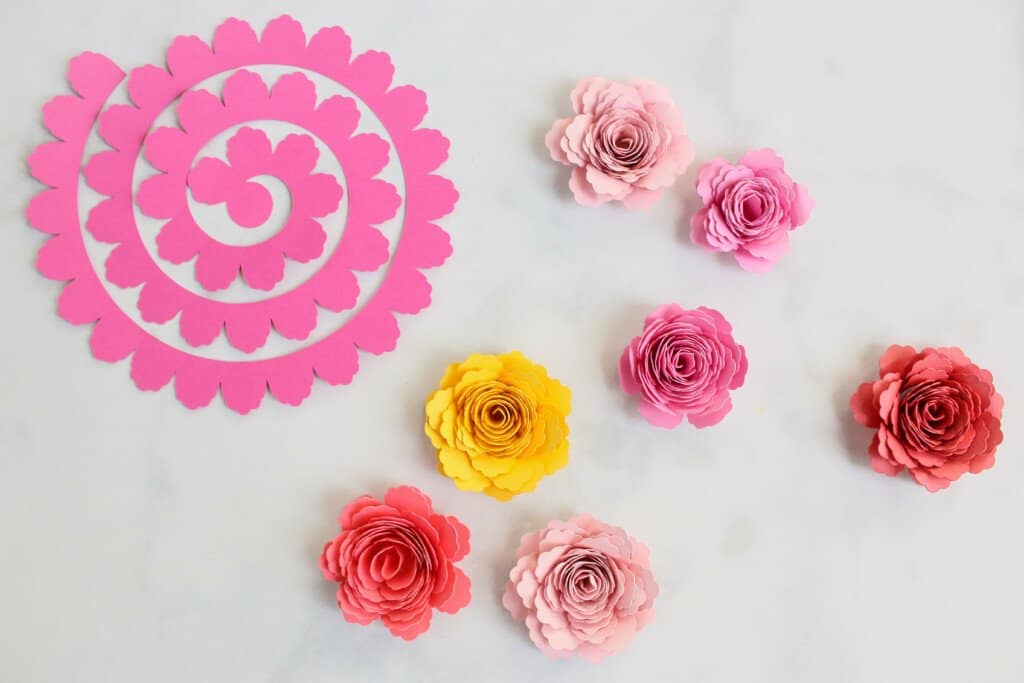
After you finish rolling up your paper flower on your quilling tool, there are a few things to consider before you glue it into place. Remove your bud from the tool and assess your flower.
You can leave your flower rolled very tight. Or you can let your flower relax and unroll a bit to create a more natural-looking flower. This creates some space and room for all the petals to "breath." Doing this allows you to fluff out your petals to create a fuller blossom.
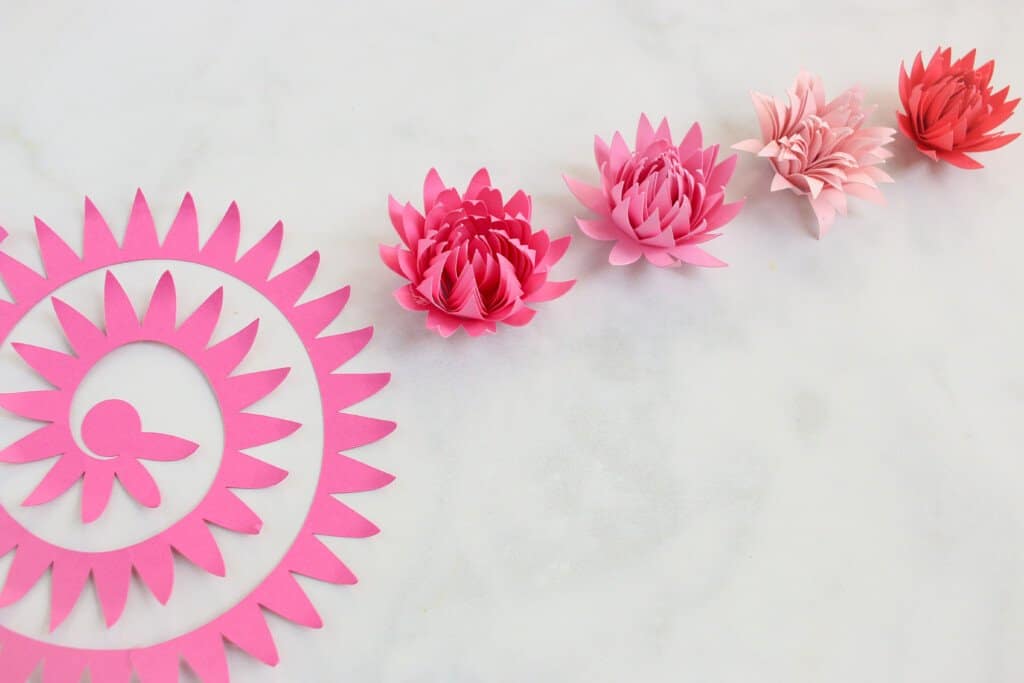
With some of the rolled flower designs, you can shape your petals in multiple ways, creating some very different looks. You can bend the petals inwards or outwards. I love this aspect of paper flowers because it's like a two-for-one design! For some designs, there is one direction to shape the petals that's much easier than the other.
I encourage you to experiment with both the direction you bend the petals and how tight or loose you roll them and see which way you like better. Below are some examples of the different looks of one flower design rolled and shaped slightly differently.
Once you like the look of your flower, then apply glue to both the circle portion and the bottom rolled edges to create a strong seal.
How Long Will it Take to Make Rolled Paper Flowers?
This is certainly a more time-intensive project as it requires quite a lot of flowers. That being said, rolling flowers is the perfect project to do while watching a show or listening to a podcast if you like to multitask like I do!
It will take a few hours to prepare the flowers, leaves, and butterflies. But once everything is prepped, assembling the wreath comes together quite quickly.
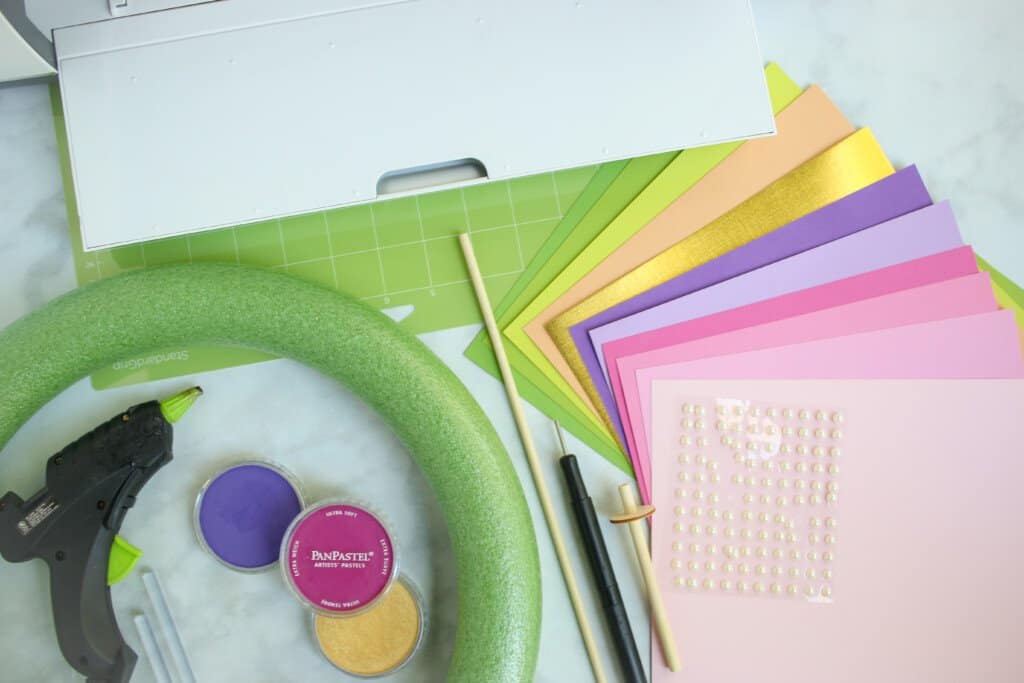
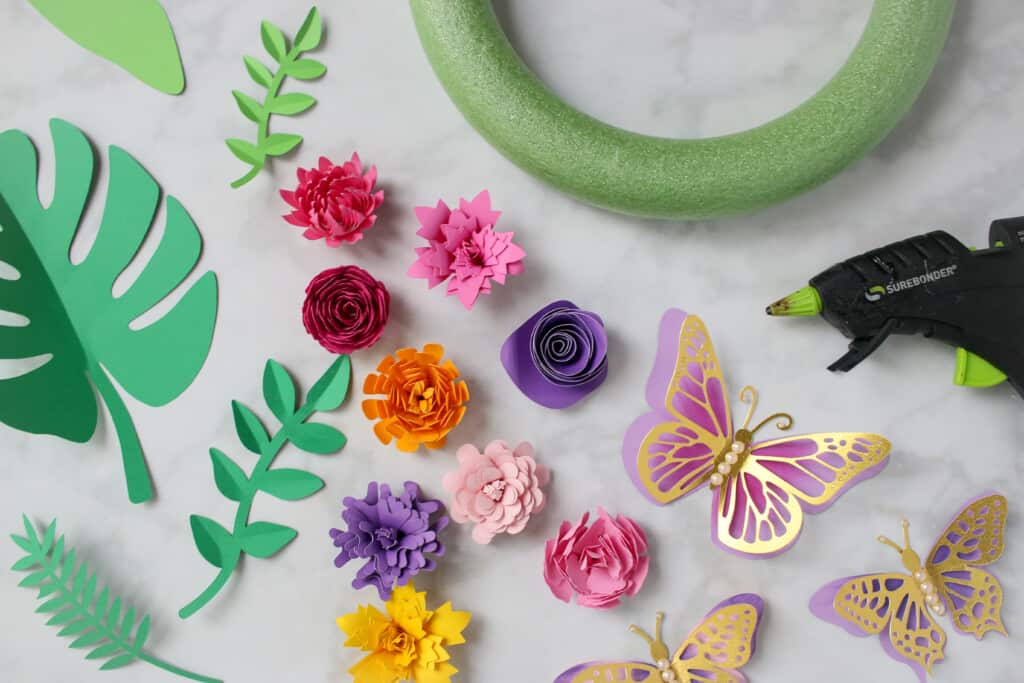
Rolled Flower Wreath Supplies:
- Cricut Maker, Cricut Explore, or Other Cutting Machine
- You can cut this on any Cricut machine. If using the Cricut Joy, you will need to resize the flower so that it is no wider that 4.5”
- 12" x 12" or 12" x 24" Standard Grip Cutting Mat or Light Grip Cutting Mat
- Cardstock
- Rolled paper flowers look best with solid core paper. I used Pinks, Purples, and Greens for the leaves.
- Gold Cardstock
- Hot Glue Gun
- Hot Glue Sticks
- Pearl Stickers
- Finger Guards
- *Optional, to protect your fingers from hot glue burns
- Foam Wreath Form
- I used a 12-inch wreath form
- Small 4mm Wooden Skewer
- This is used to roll the petals on the flowers to make them look more realistic
- Paper Quilling Tool
- Pan Pastels
Why Shop Through My Links?
When you shop through my affiliate links, it doesn't cost you anything extra, but it helps me out in a big way! I earn a small commission from those purchases, and that support allows me to continue creating and sharing free tutorials and patterns for you. Thank you so much for helping me keep this creative community going!
Let's Get Started!
Download Your Free Rolled Paper Flower SVG Files Here!
Want to learn how to make even MORE paper flowers?
Get The Ultimate Guide to Paper Flowers E-Book and get access to ALL of my printable paper flower tutorials and flower SVG files in my Ultimate Guide to Paper Flowers Ebook by clicking here!
Step #1: Upload Your Cut Files
Need help uploading your SVG file? Click here to read my blog post that will walk you through this process.
Open Cricut Design Space and click the + to create a new project.
In the Design Panel on the left, select "UPLOAD."
If you are a Design Space PRO, you can skip to step #2.
Click "UPLOAD IMAGE."
Click "BROWSE" or drag and drop the file.
Navigate to the file on your device to click "OPEN" to add it to Cricut Design Space.
On the Prepare Screen, you can change the name of the project and add tags. Click "UPLOAD."
Once you have the file uploaded, select it and click "INSERT IMAGES" to bring it onto your canvas.
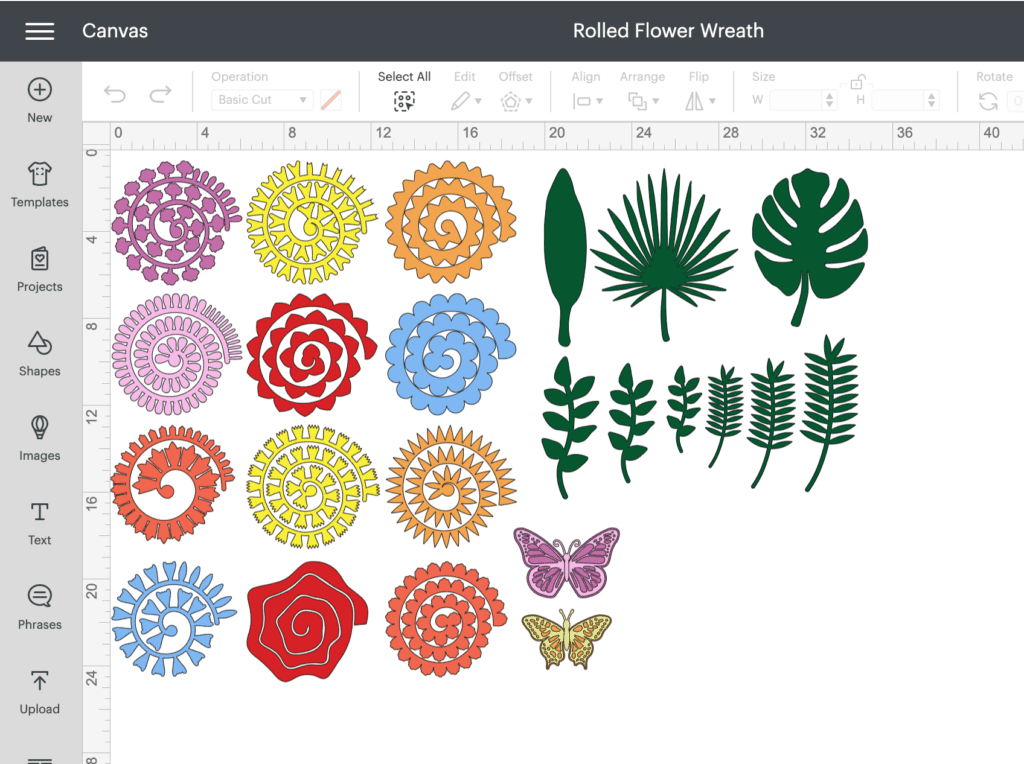
Select "UNGROUP" in the top right-hand corner. Then "UNGROUP" the flowers, leaves, and butterfly components to adjust the size and color as desired.
Step #2: Prepare the Cut Files in Cricut Design Space
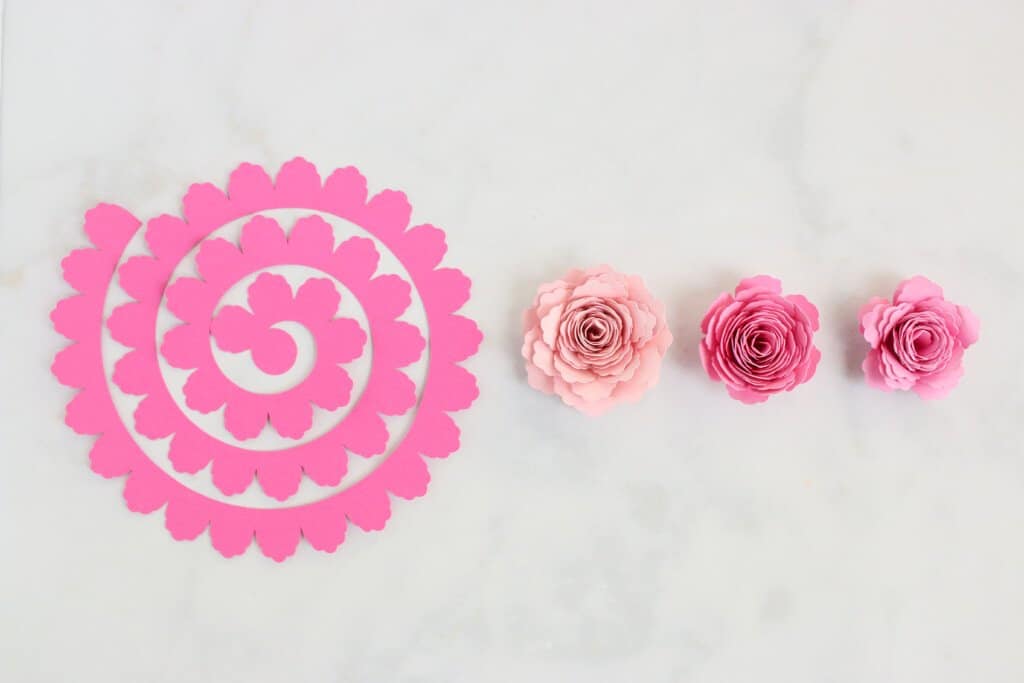
There are 12 different rolled paper flower designs for this wreath. Each measure between 1 and 2.5 inches in diameter, depending on how tightly you roll the flowers.
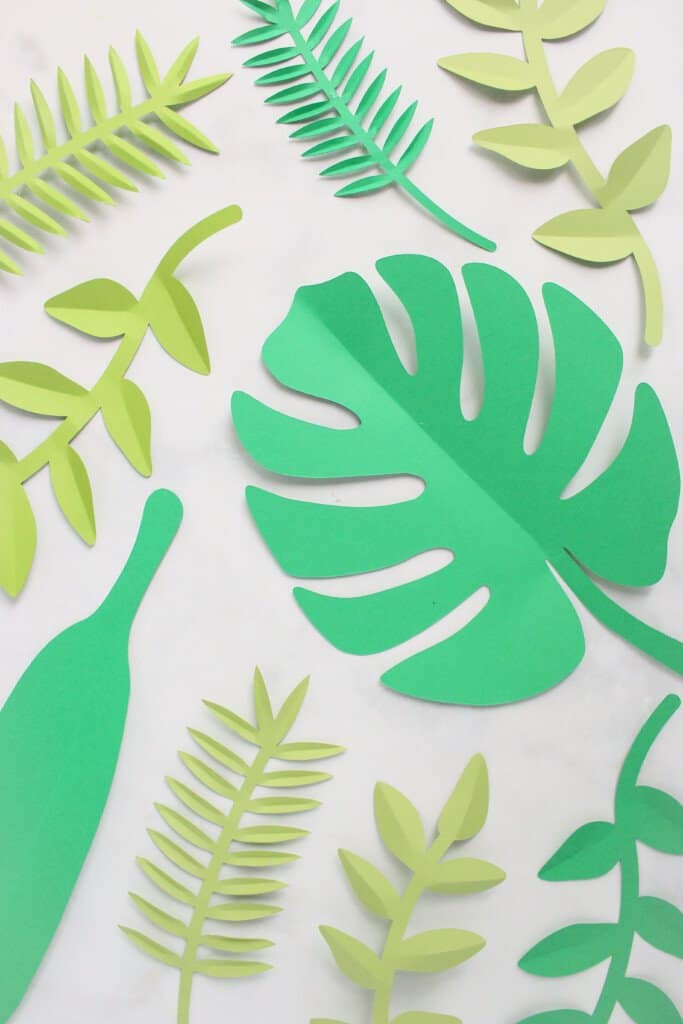
In addition to the flower cut files, there is a variety of leaves, as well as two different layered butterflies. You can include however many leaves and butterflies in your wreath as you'd like.
For my 12-inch wreath, I used the following number of elements:
- 80 Rolled Flowers: Requiring 40 sheets of 8.5x11 paper
- 24 Leaves: Requiring about 5 sheets of 8.5x11 paper
- 4 Butterflies: Requiring 1 sheet of 8.5x11 gold cardstock and 1 additional 8.5x11 sheet of colored cardstock
Step #3: Cut out the Wreath Components
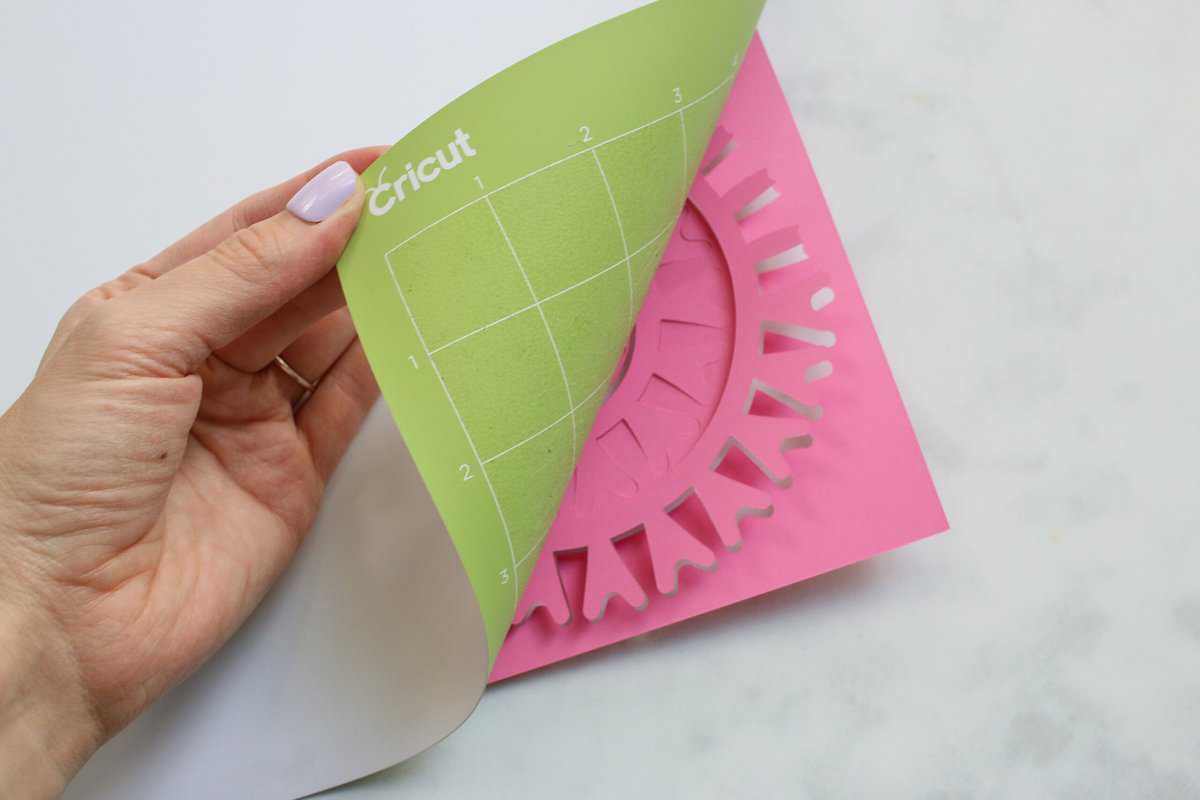
Start by removing the clear liner from your Cricut mat and then set it aside. Again, I like to use a light grip or well-used standard grip cut mat for the rolled flowers since the cut files are a bit more delicate than the other designs.
Place the cardstock paper onto the mat and press down firmly on the paper to adhere it to the mat. This step is really important when cutting out cardstock to ensure you get the best results possible.
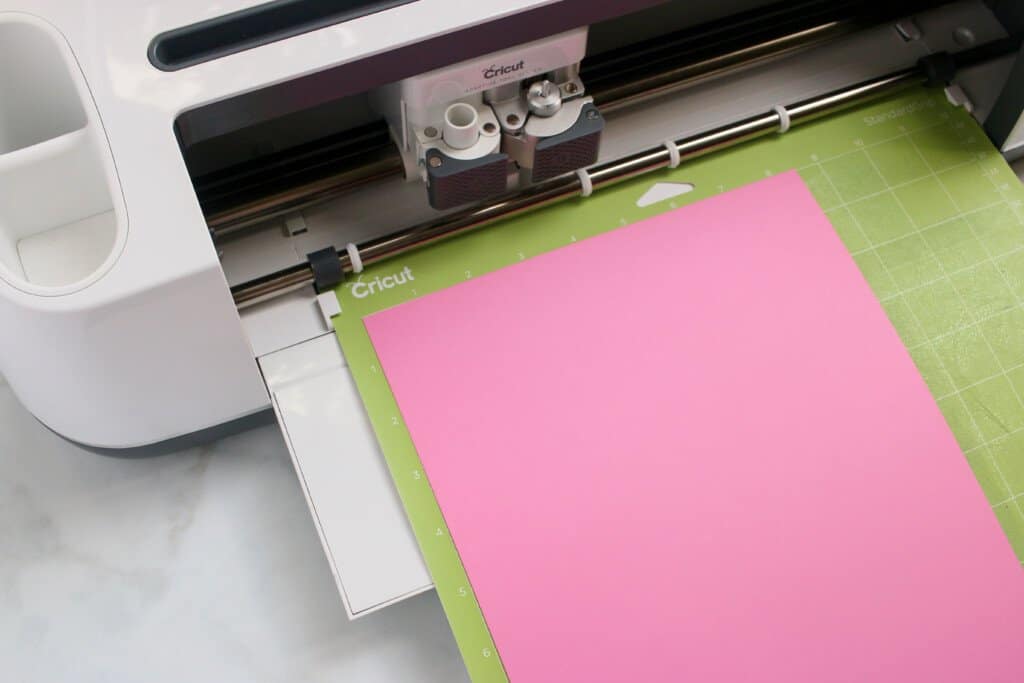
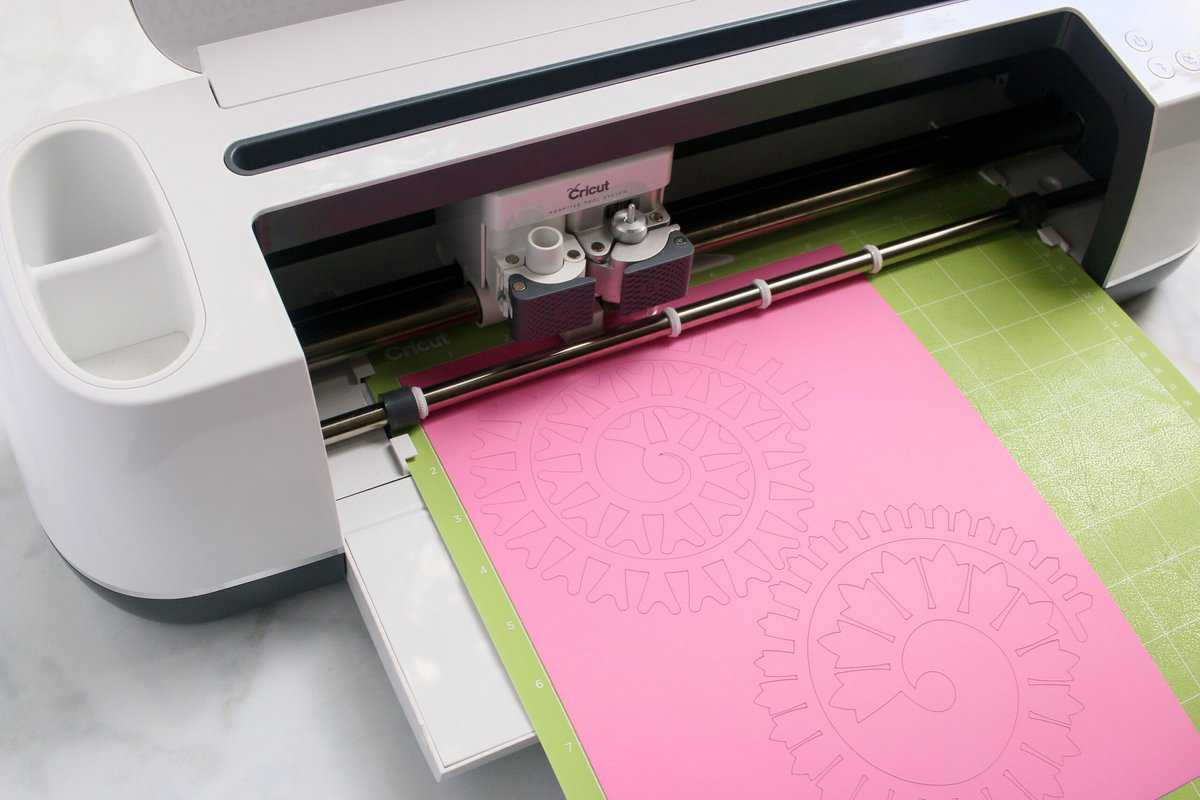
Insert the mat into the cutting machine and press "GO."
Once the machine has finished cutting the design, unload the mat from the machine. Repeat this process until you've cut out all the components for your wreath.
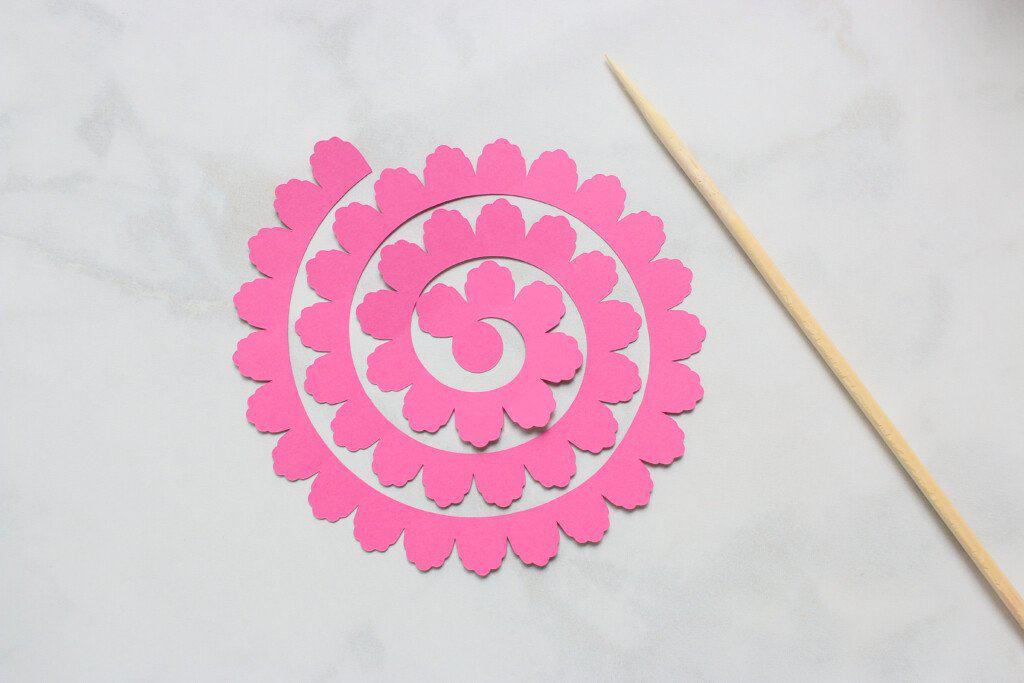
Step #4: Shape and Roll Flowers
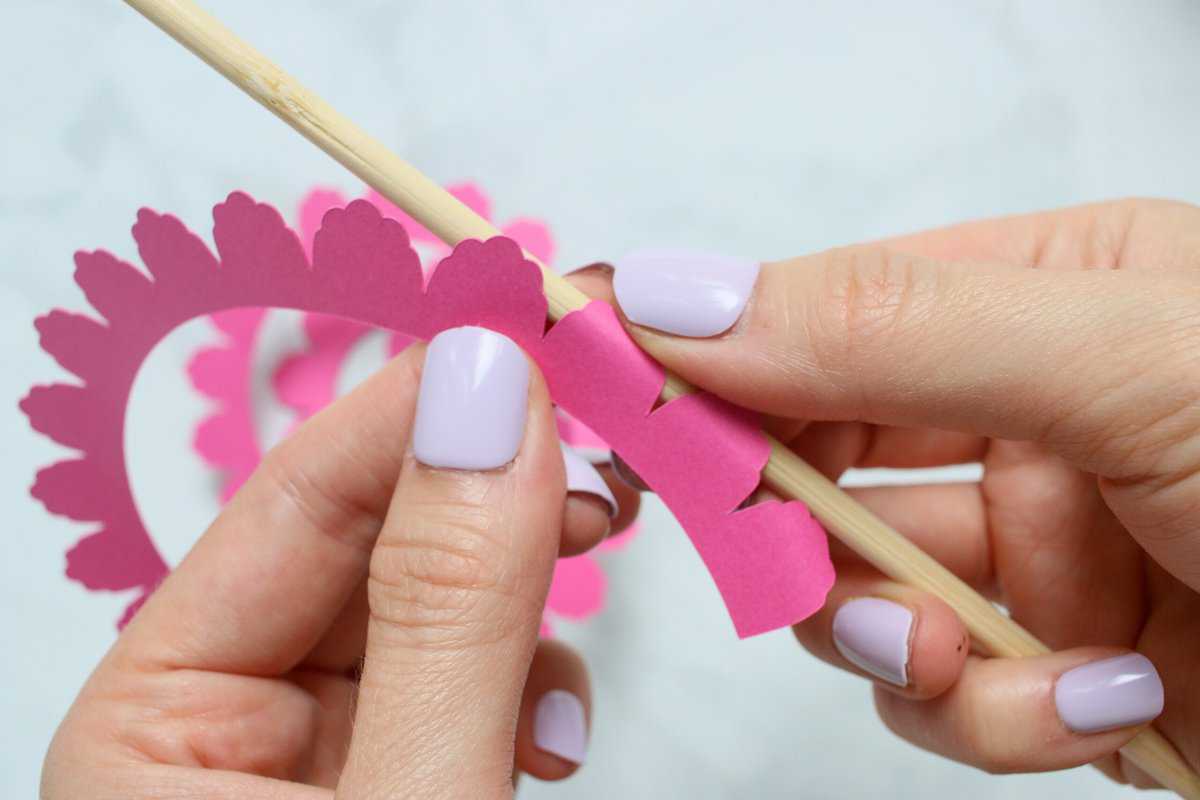
After you have cut out all your flowers, use a skewer, dowel, or chopstick to curl the petals and give them some shape.
You can do this in a variety of ways, curling them all in one direction or using a combination by curling the first few petals inward and the remainder outward and vice versa. You can create so many unique looks with one flower design so experiment and have fun with this step!
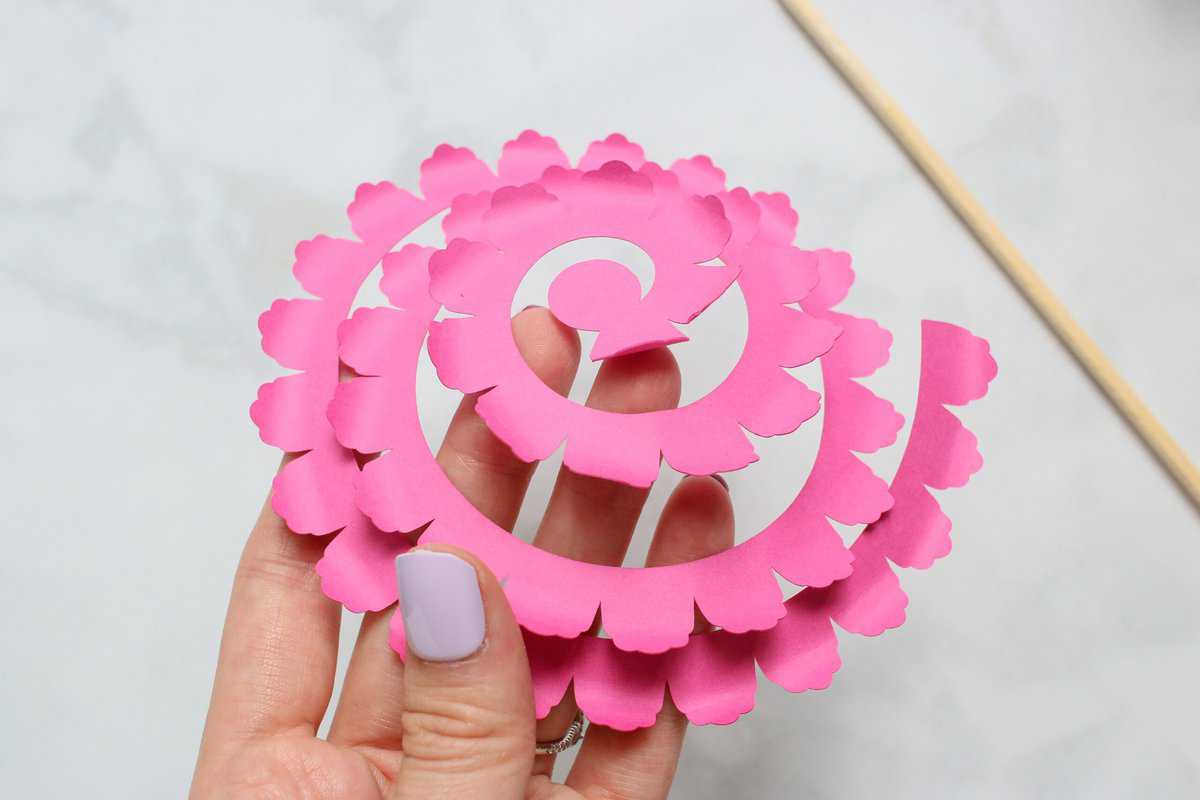
Grab a quilling tool and place the outer end of the paper flower spiral into the slot of the tool. Begin rolling the paper flower around the quilling tool until you get to the end of the piece.
The beginning will roll quite easily and get a bit trickier toward the end. Don't worry, this is normal. And the more flowers you roll, the easier the process becomes.

Once you reach the end, wiggle your quilling tool slightly to carefully remove the paper flower.
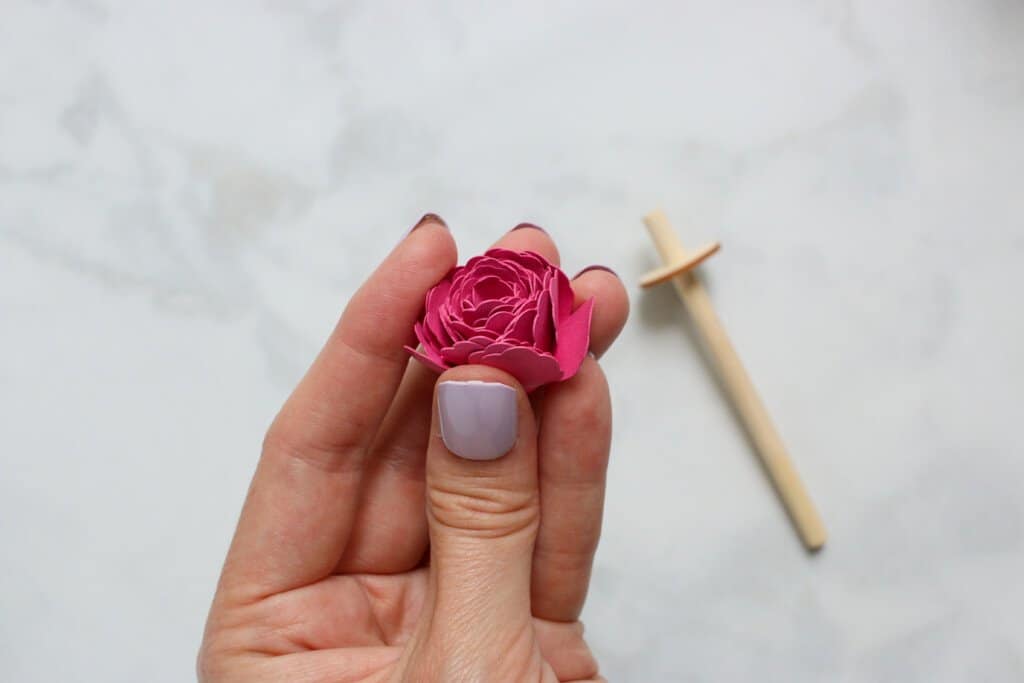
Now before you apply hot glue to finish off your flower, you have some options! You may opt to let your flower unroll a bit to loosen the petals. See the photo below. This will result in a bigger flower with more room to further shape and curl the petals.
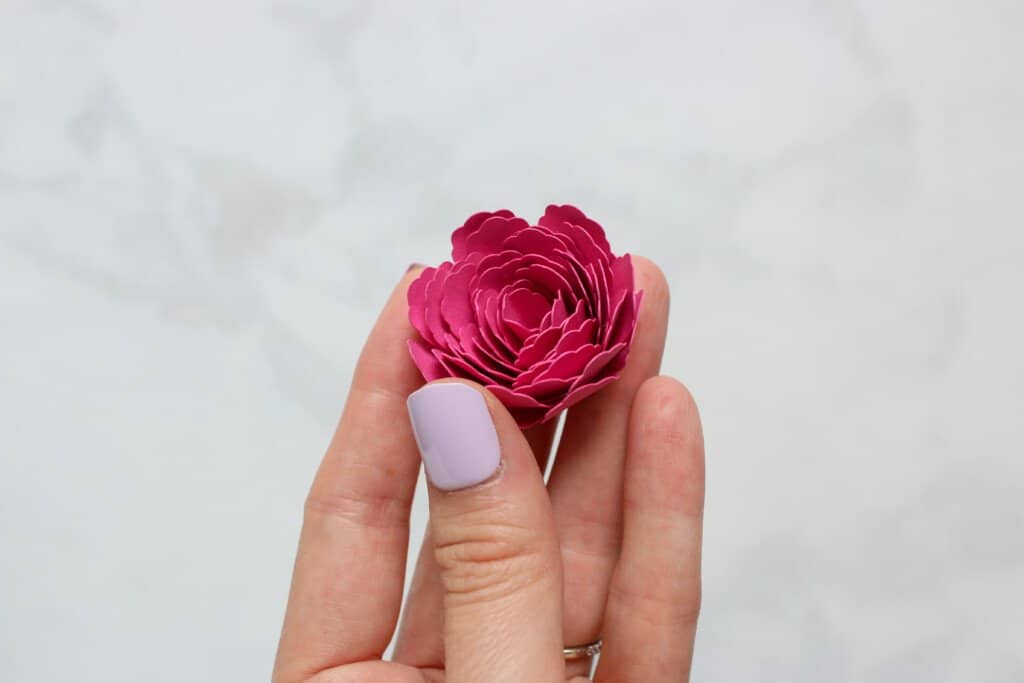
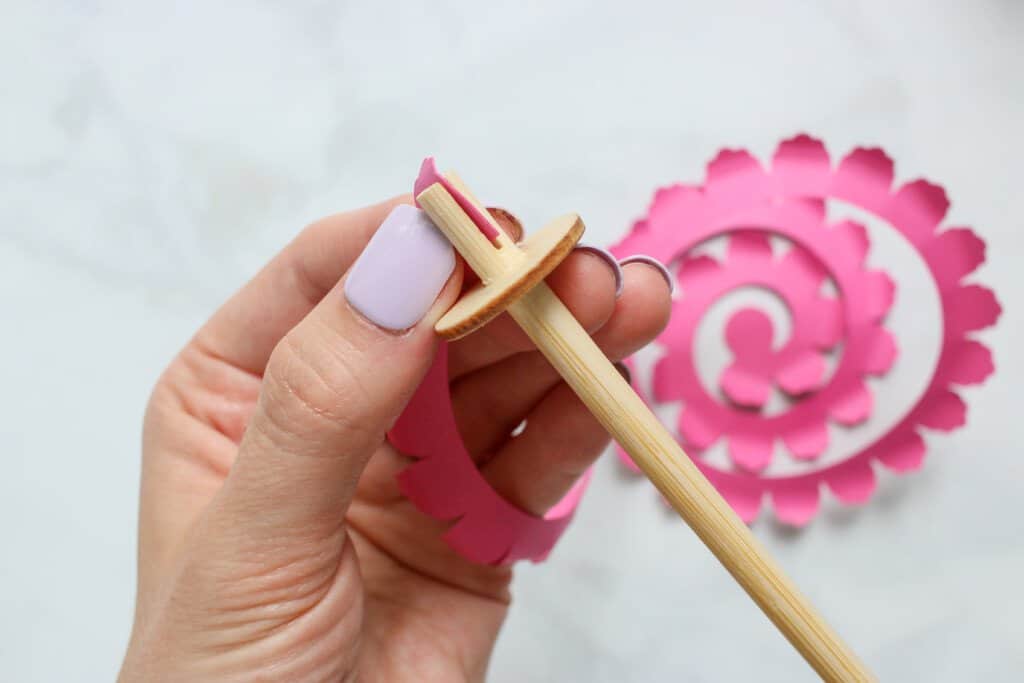
However, you can also leave the flower rolled tightly for a smaller blossom and immediately apply glue to the bottom.
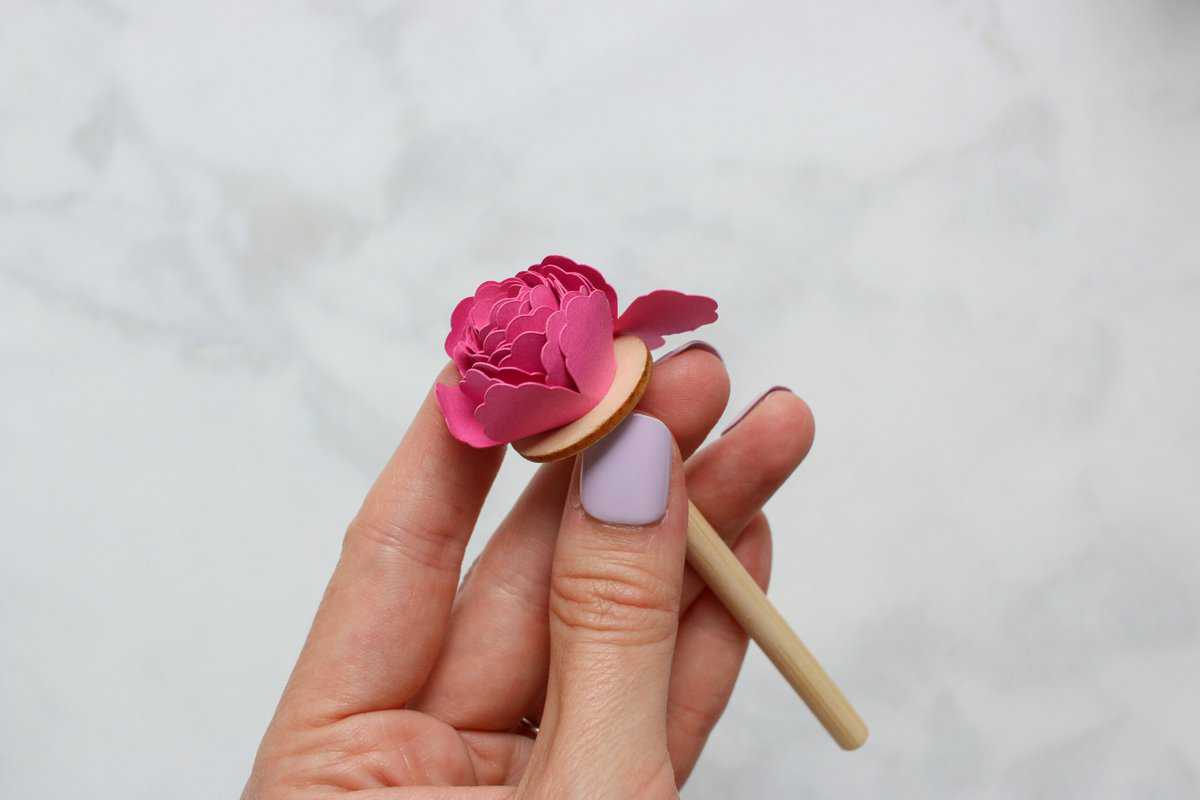
For this wreath, I used a combination of these techniques to give me a wider variety of flower looks and sizes. I love how one flower design can look so different depending on how you shape the petals and how loose or tight you roll it!
Once you're satisfied with the look of your flower, apply glue to the circular tab and press tightly onto the rolled edges to create a strong bond.

Add any additional shape to the petals as desired. Continue shaping, rolling, and gluing your flowers until you have enough to cover your wreath.
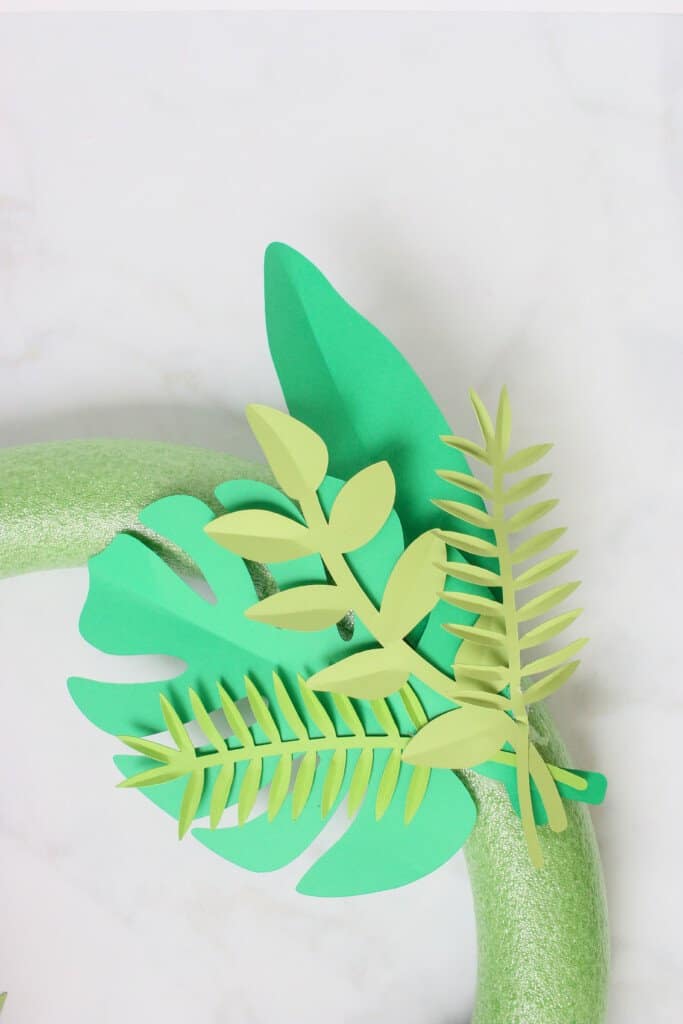
Step #5: Shape the Leaves
Once you have all your leaves cut out, you can add some dimension to them with a craft knife.
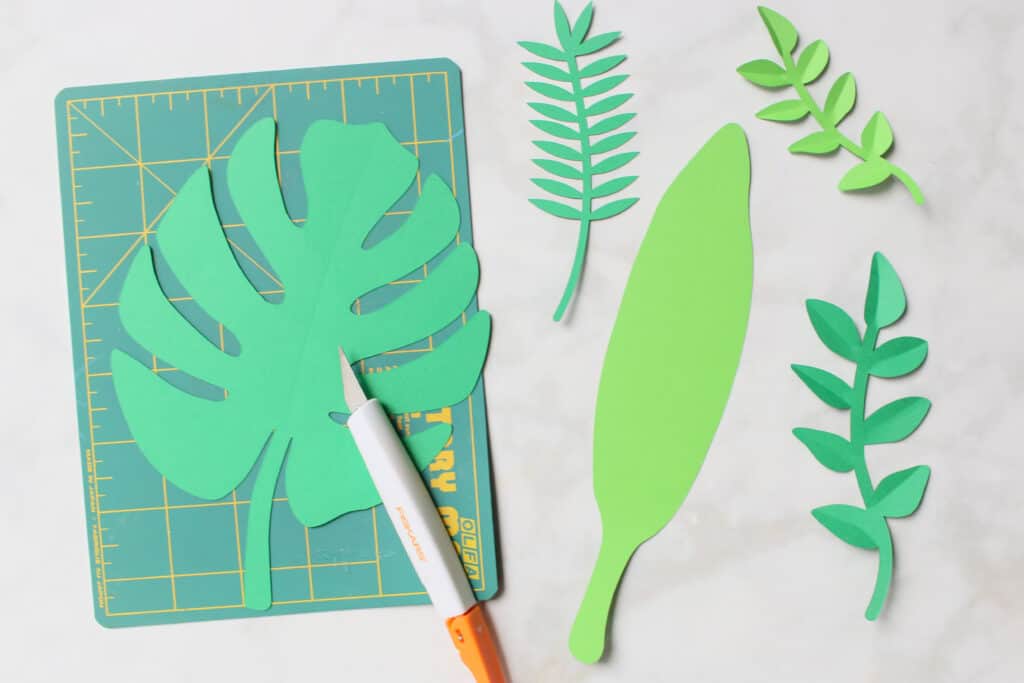
Create "veins" by gently scoring lines along your leaves with the knife.
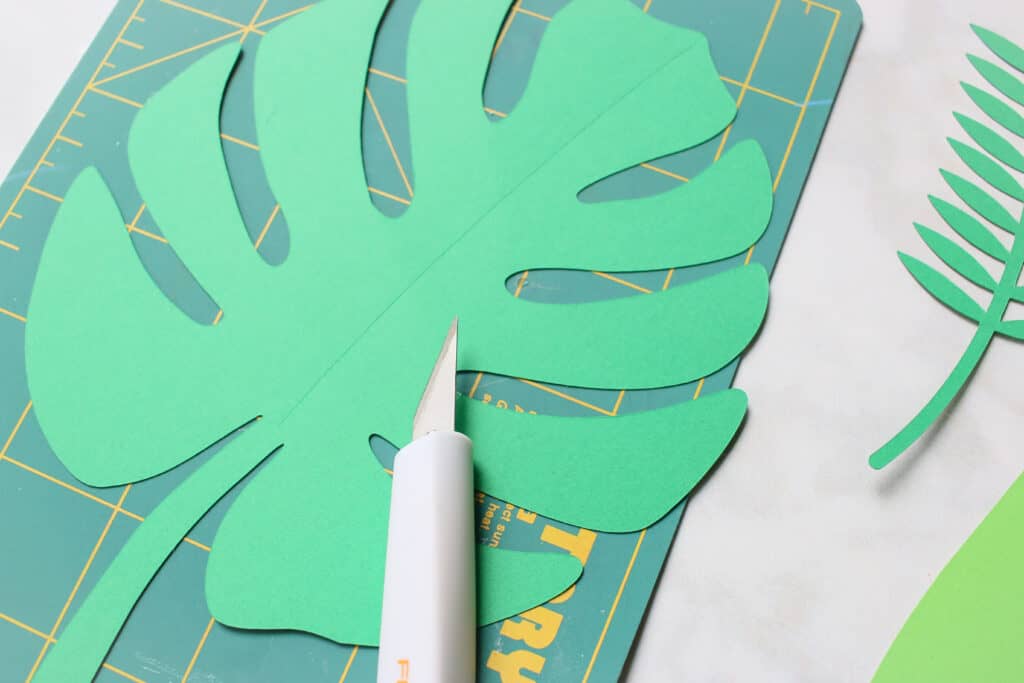
Then fold along these score lines to give the leaves some natural shape.
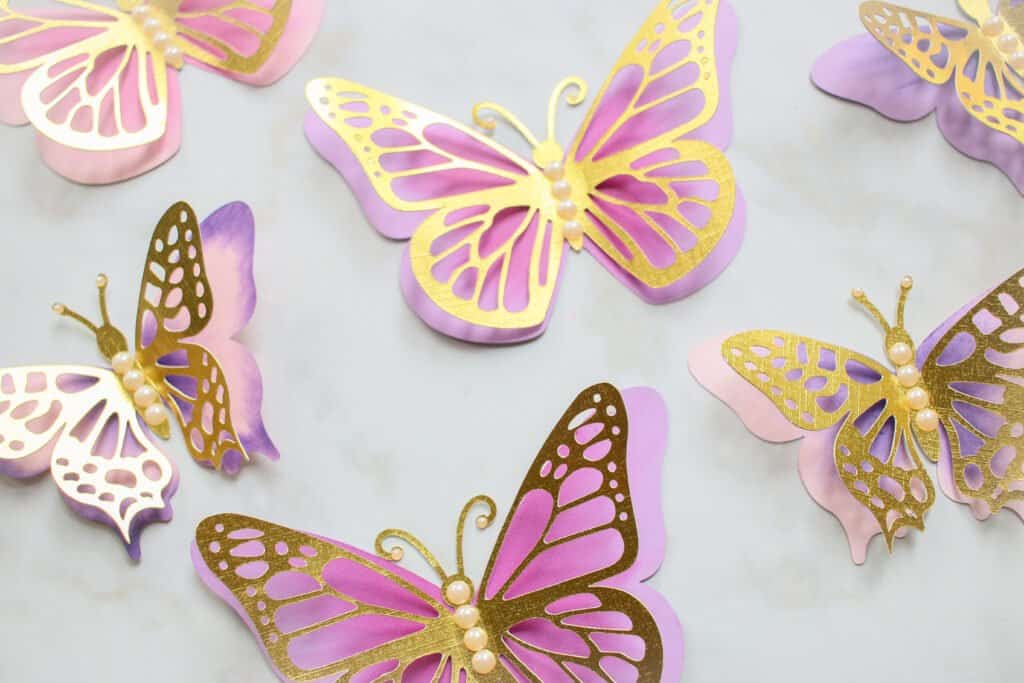
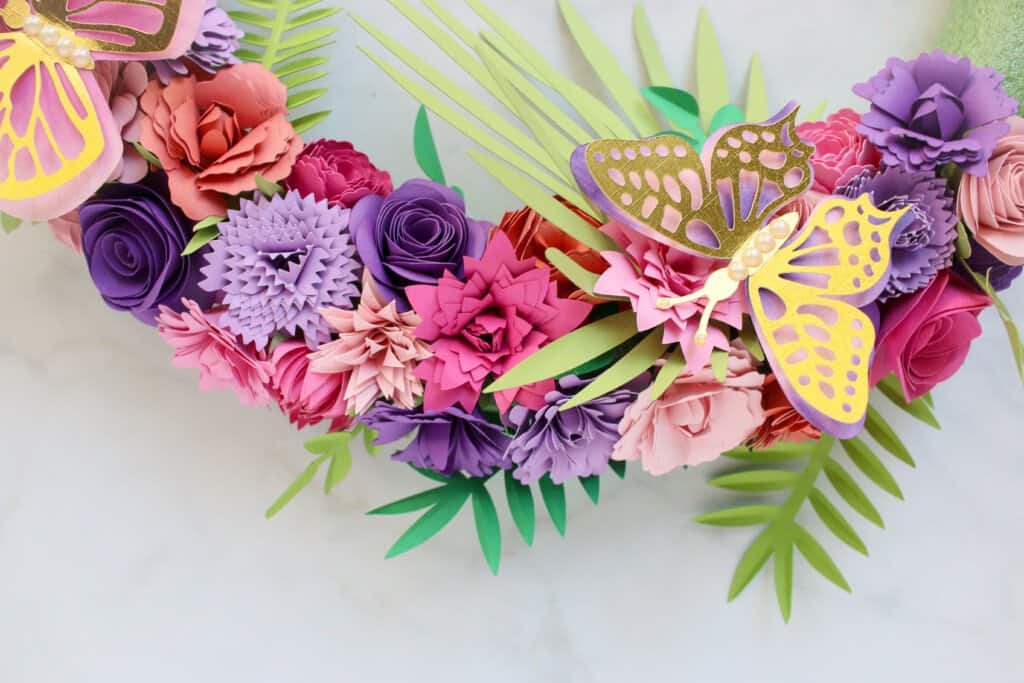
Step #6: Create the Butterflies
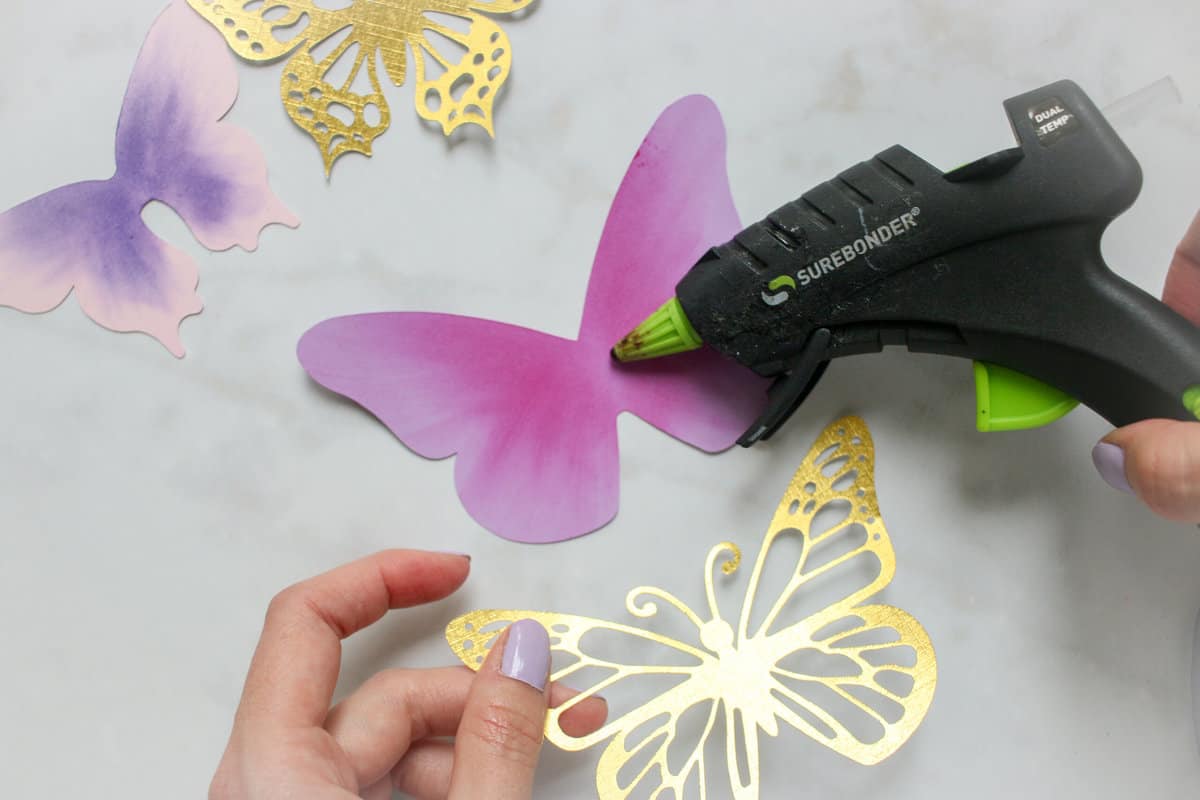
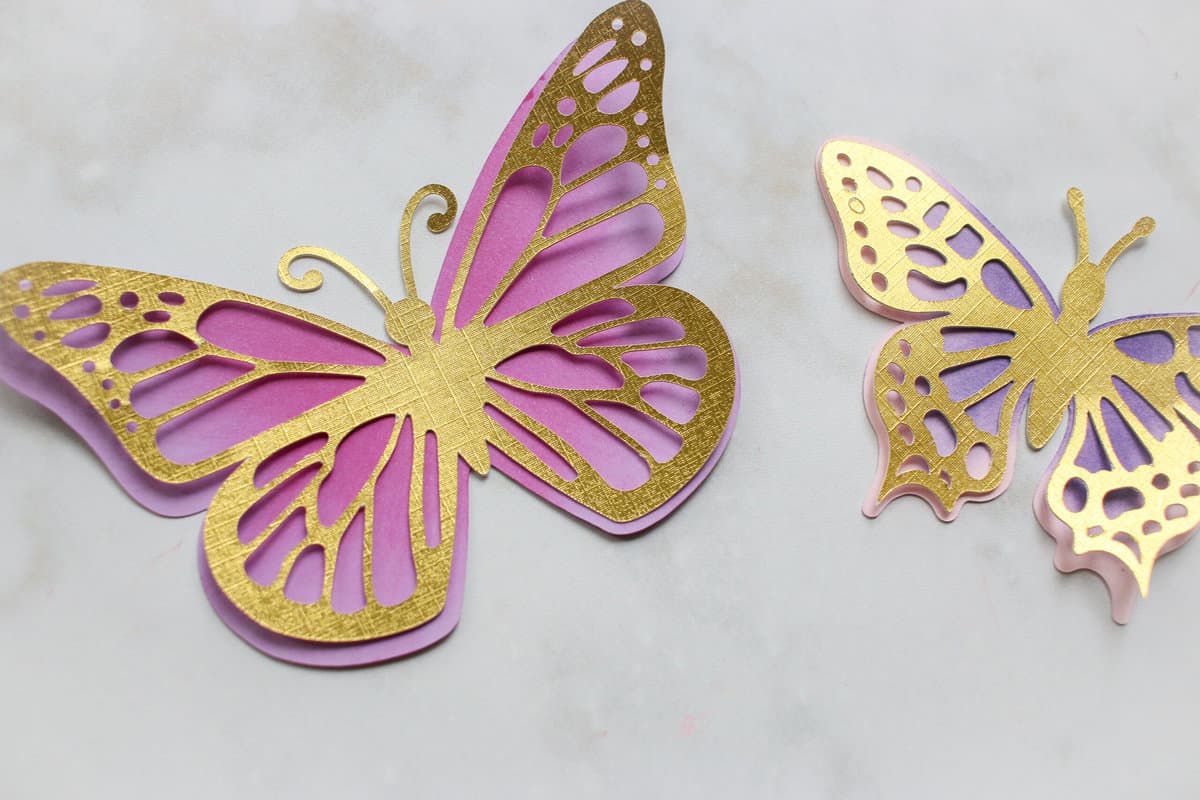
Each butterfly should have one solid, colored layer and one detailed, gold layer.
To add further depth to your butterfly, use pan pastels. Pastel colors that are a few shades lighter or darker than your paper will show up the most.
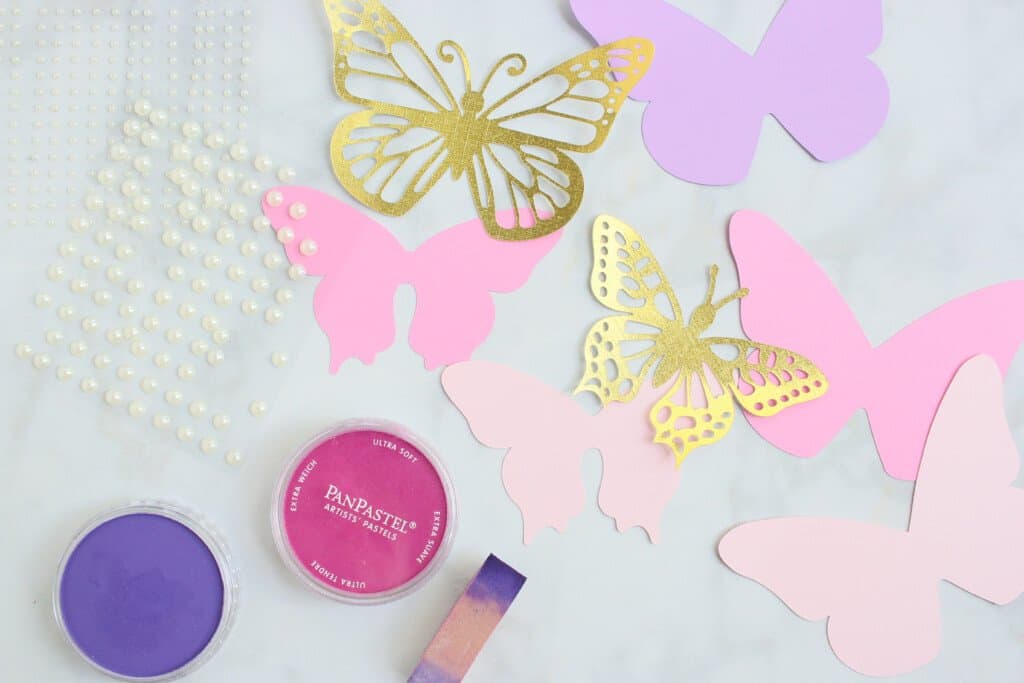
Use a sponge to apply swipes of pastel to the innermost portion and/or along the edges of the butterfly.
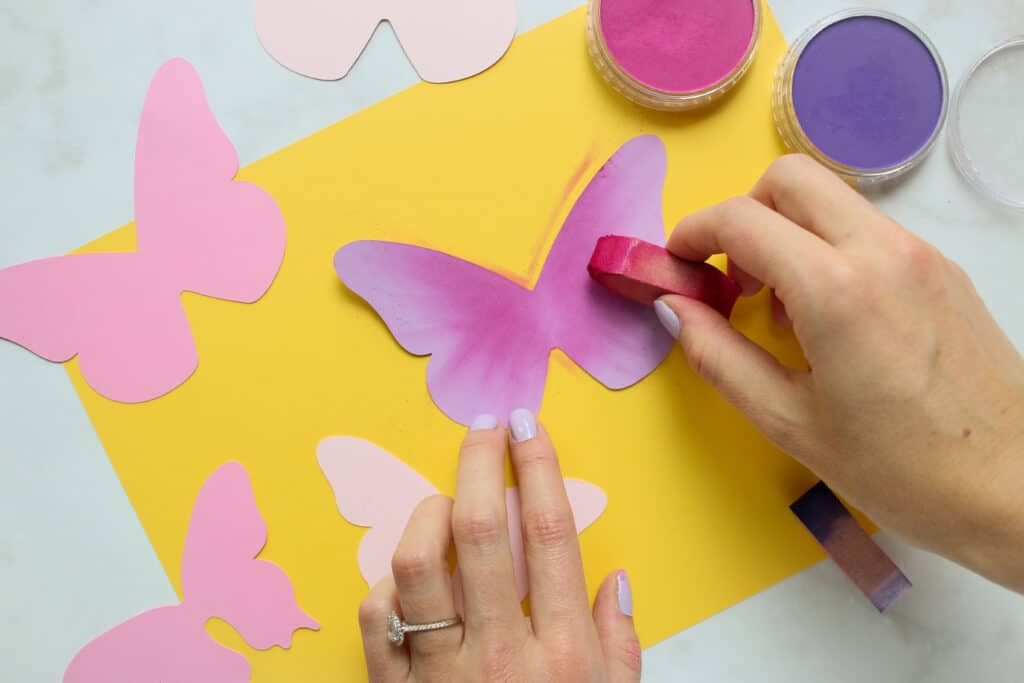
Then apply glue to just the body portion of the butterfly and layer the gold piece on top of your colored butterfly.
Add pearl stickers to the body and antennas for a final touch.
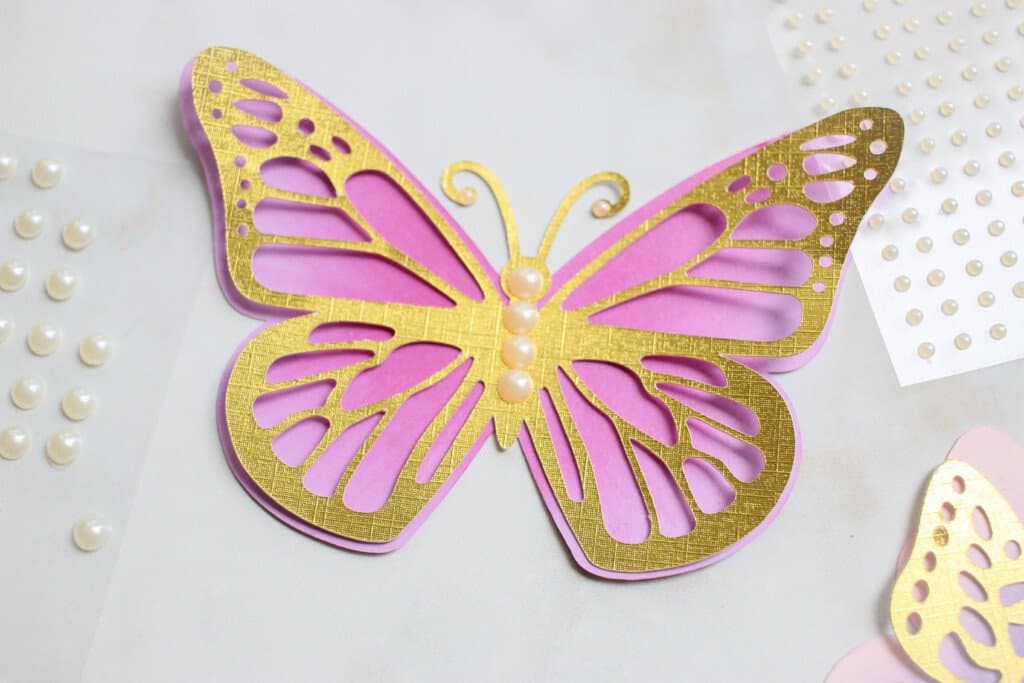
Raise the edges of the gold butterfly to give the wings some movement.
Step #7: Assemble the Wreath
Now gather all your prepared elements: flowers, leaves, and butterflies, in addition to your wreath form and glue.
Begin by gluing your rolled flowers to your wreath.
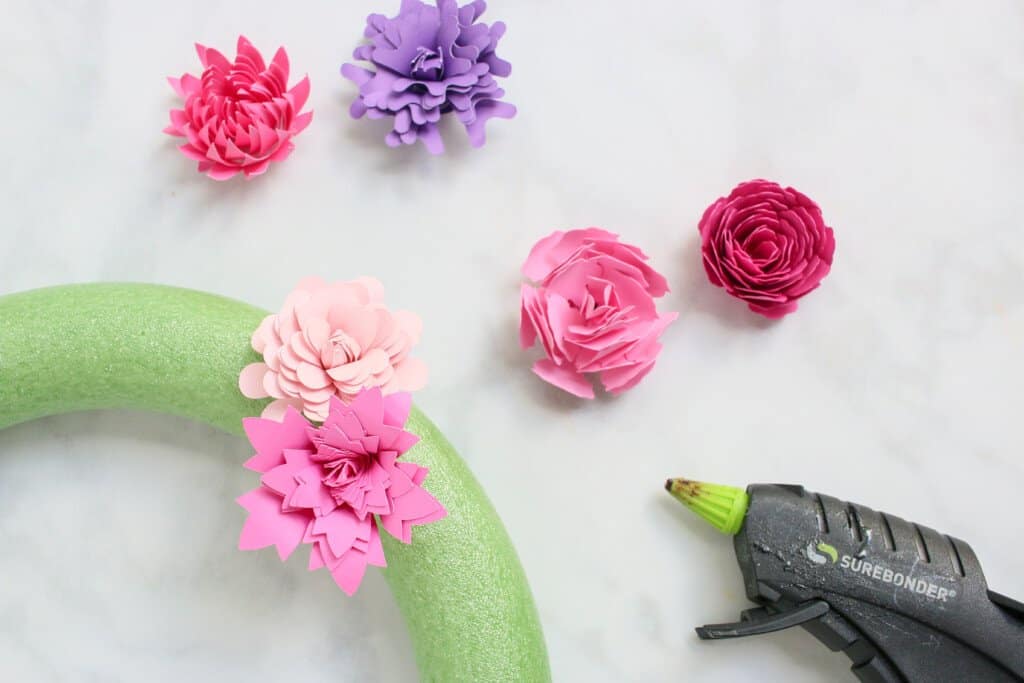
Nestle the flowers closely together to avoid any empty gaps between the petals.
Add greenery as you go, positioning the leaves so they stick out along the outer and inner edges of the wreath.
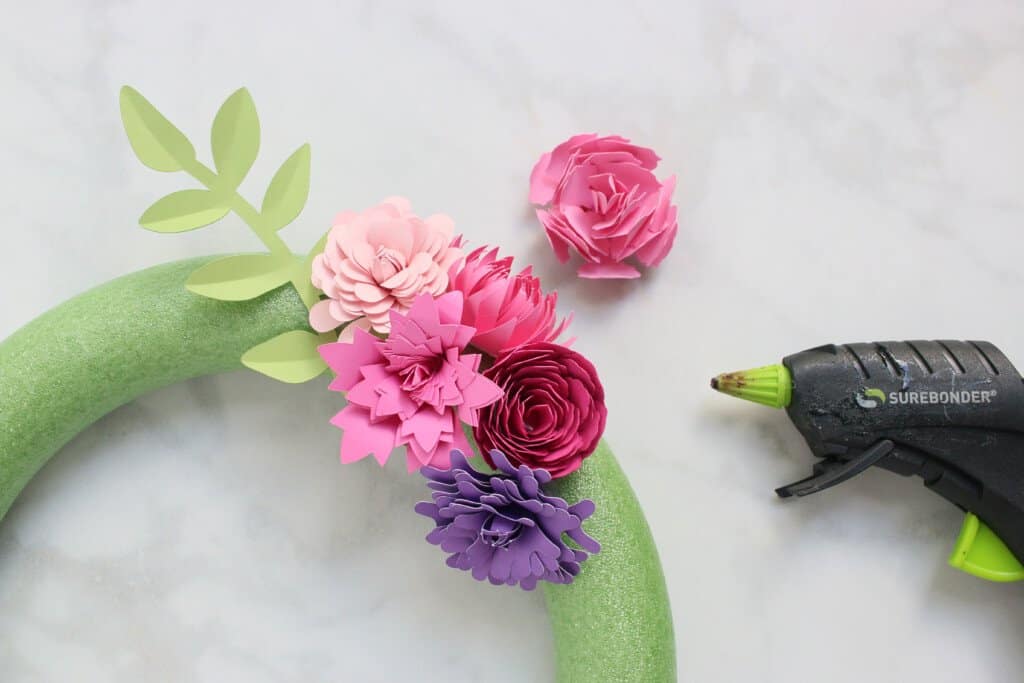
I also created a cluster of leaves to act as a focal point of the wreath. This is totally optional, and you can alternatively add the leaves sporadically throughout the wreath instead.
Continue gluing on flowers until you cover your entire wreath. You can stop here if butterflies aren't your thing, but I love the added touch of sparkle they bring!
Now add your butterflies. You are welcome to add the butterflies as you attach the flowers and leaves, or you can wait until the end.
To apply the butterflies, simply glue them on top of your flowers or leaves.
Once you've covered the entirety of your wreath, hang it on a wall or door to admire!
Have you made rolled flowers before? What do you think of them? Let me know in the comments below!
Don’t want to forget about these FREE SVG Files? Save this project for later! Click here to save this project on Pinterest.

I have downloaded this several times, and the butterfly is not included. Can I get this from another post?
I also noticed the butterfly is missing from the svg.
The two gems of this post are silicone finger guards and the paper quilling tool…I didn’t know either existed and now I’m like
I love the colors!
This is beautiful I’ve never made anything with flowers as I’m not a fan but my mother would love this.
How Beautiful!
I loved the layered butterflies added to it! Makes it pop!
I so want to make this! Thank you! Never made flowers or butterflies this way.
Love this wreath! Great, clear instructions.
So pretty. How long does something like this take to make?
Why aren’t the butterflies included in this file I did not see them
I love this wreath and your instructions are fantastic!
This is so pretty. I would have never thought of using paper to make a wreath. Great idea!
Love all of the wonderful crafts! Getting my child into helping me is what I enjoy the most.
I love the roll up flowers and all the variety !!
Wow. I think these flowers are beautiful. I think Kim is an amazing mother to be able to do these wonderful things and share them and a gifted creator. I AM A FAN!
I would like to recreate your pretty wreath, but i do not have a Cricket Machine...yet!!
This is beautiful! I wish I had a cutting machine so I could make things like this!
Love this wreath! Thanks for the great idea!!
I’ve never tried to make a paper wreath before but will definitely try this.
What a beautiful wreath!
Thanks for sharing!
How cute!
This turned out so elegant and detailed...just lovely!
Cannot wait to try this..It is beautiful!
I love doing thing's like this with the kid's, they have so much fun when it's a rainy day outside. There's much to do to make that wreath but slow and steady and it get s done before you know it.
This is so pretty I know my best friend would love this
Beautifully made. Like everything else you make.
Beautiful! You make it look so easy!
I love it!! I just happen to have the wreath so I can attempt to make this!!
This is a beautiful wreath and an excellent tutorial.
Love it, can't wait to try!
Amazing
I love the colors! So cheerful! All of your examples are beautiful! This would be such a fun project!!
So beautiful! The butterflies make this look so happy.
So beautiful! Kim always has great step by step instructions, easy to follow.
So pretty! The butterflies finish it off nicely.
Thank you soo much for providing a free svg!! In love the flower wreath!!
Love this!!
It’s worth all the time to make it, it’s so beautiful and colorful. Thank you for a very detailed instructions and free svg file download.
xoR
such a great easter / spring project
I have always wanted to try rolled paper flowers and with this in depth tutorial I no longer have a reason not to. Thank you for sharing!!
This is lovely!
I can’t wait to try this!
So cute! I’m going to have to try this for spring.
I can't wait to try this! Plus at the end of the post you show more files for anemone, daisies, and peonies! I want them all! Spring and flowers are my favorites. I have sewn your patterns, paper crafting your items is new for me.
This is a beautiful spring/summer wreath!!!!!...wow!
I love this beautiful wreath.
LOVE all of the flower type options!!! AND...the butterflies, OH MY!
I love this wreath - so beautiful. Will be fun to make. Thank you for your great ideas.
So beautiful. Thank you for the detailed instructions and cut files.
Love this but it looks like it takes a lot of time and patience!
Love it!!!
If only I had a Cricut to be able to make theses beautiful flowers!!
Wow! Beautiful! Thanks for sharing!
Looks easy enough to make
Very pretty
This is so cute for spring!
My Aunt taught me to quill 40 years ago. This looks so much easier. thank you
Super duper cute!
I am absolutely blown away by the creativity of this wreath! It’s not something I’d ever think of but it looks absolutely amazing!! My favorite part of being a part of a crafty community is witnessing the endless creativity of others and all of the inspiration that comes with!
can't wait to try to make this.. love your files
This is super cute!
I love this! I have always wanted to try rolled flowers!
Gorgeous spring wreath. You do beautiful work and make it look so easy.
This is such a fun and cute spring project! I wish I had a cricut maker.
Thanks so much for the free SVG's! I feel bad to even complain when you've been so generous, but I wanted to let you know that the butterflies are not included in the download!
This is beautiful. The rolled flowers are very "lifelike". Thank you for sharing.
Very pretty. Mine would never look that good.
Perfect for spring!
Can't wait to try
Oh Wow!! Your flower wreath is stunning. I can't wait to try some of the flowers. Thanks for sharing this with us.
I love the look of this floral wreath and looks like a lot of fun to make. Soon!
Such a beautiful and colorful design
I'm going to have to limber up my fingers for this. Thank you for the design and tutorial.
Thank you for sharing. I would love to make this
This is so pretty. Thanks for the tutorial!
That looks like a fun craft that my kids and I could enjoy doing.
wow, so pretty
I like the "Tips and Tricks for Making Rolled Flowers". Very helpful and looks like a lot of fun to do.
I love the butterfly!
Beautiful! Thank you!
Another artistic project. Very pretty
would love to do these designs
You make everything look so easy! Love this and would love to try. Thank you for sharing your talent.
Everything is fantastic. The butterflies are gorgeous.
this is definitely a project to prep and then assemble on a Netflix binge watching day. Looks beautiful.
This is awesome. My daughter and I love making wreaths, so this way will be different. I hope it comes out as beautiful as this one. Thank you for the steps.
I need to make this! Soooo pretty!
I love this it's so beautiful
Beautiful
This is one of the best rolled paper wreaths I have seen. Thanks for the information!
So beautiful! I have really wanted to learn flowers
Thank you!
I love love all the details
Such a pretty wreath! Can you make it with a wire wreath form?
Hi!
I noticed that the butterflies are not in the file. Do you have a seperate link to the butterflies?
Thank you so much!
Wonderful tutorial on making a rolled paper flower wreath!!
I love how creative you are and how you give to us that may not have too much svg files or even any pattern of any kind. Sewing too! This is such a cute fun spring wreath.
The step by step tutorial really makes this a fun and easy craft to do ourselves. Thank you for sharing.
I wish I had easier access to cardstock for these beautiful projects.
That is absolutely beautiful! I love the colors and how perfect it is for spring.
This looks so fun, can’t wait to try it!
Pretty colors for a wreath
So bright and cheery and perfect for Spring!
What a beautiful wreath and really great instructions too
Wonderful tips for making rolled flowers-thanks!
This would look beautiful on a front door.
You make the BEST tutorials! Thank you!
really beautiful flowers. would be great for a wedding or just everyday
Very pretty
very sweet
This is so cute!!
Very pretty! Hardly looks like paper.
Beautiful wreath!!
So pretty!
So cute!
This is so beautiful
Beautiful!!!!!!!
How does printed cardstock look for flower making?
This looks so pretty. I haven't made a wreath in years and I don't think it looked anywhere this nice. 😉
This is amazing!
I'd love to make this for my daughter's wedding! She loves flowers and butterflies!
Beautifule!
I love all the different designs. Back when COVID shut down the schools and they went virtual my son's 3d art teacher assigned rolled paper flowers. It was disastrous for us but we got a few.
Great wreath
This is beautiful! I can't wait to make this for my mom. She will love it.
I love how full this looks! Thanks for the inspiration!
Beautiful and out of the box Cricut idea!
I love all the paper flowers.
This looks like a lovely spring wreath!
pretty with good instructions
This is beautiful
Good luck y’all
really pretty paper rolled flower reath
What size are your flowers...seems like mine always come out small! They are just beautiful!
great rolled paper flower wreath. love to make
So much to learn from this tutorial!
Super beautiful and super inspiring! Thank you for sharing!
Lovely wreath to make!!
Your wreath is GORGEOUS!!
beautiful
I love the detailed instructions and the finish product is spectacular!
So Pretty and bright, having the right tool is key on this craft
pretty flowers
Crafty hands , you did a beautiful job .
Awesome!
Hooray for SpringTime!!!! What is the name of the tool that you are using?
Love this wreath and flowers!!
Thank you!!
Where did you get your quilling tool?
You do an amazing job making your tutorial videos!
great flowers for spring
beautiful
Fantastic idea!
I'd love to try making this. The colours are so gorgeous!
pretty flowers and really looks easy
This Wreath is absolutely beautiful love how you added all of the extra details
The butterflies are so beautiful
love the wreath and flowers. the butterfly is really cute.
Thank you for all your blog posts!
Would vinyl work? I'd love to make this for the front door.
You make it look so easy
This looks like so much fun! Can not wait to try this. Thank you for sharing your time and talents!
Looks like fun!
This wreath is incredible. Thank you for the tutorial and svg file.
So Pretty!! I love all the bright colors! You always share your ideas so freely. Thank you!
Thank You. Can't wait to try
Absolutely beautiful - can't go wrong with flowers and butterflies!!
Love these flowers my next project
Love you picture tutorials, they make assembly easy. The down load is missing the butterflies and a couple leave though.
Wish I had a Cricut to make things like this.
Gorgeous! Love
the many variations
of flowers and the
colors! Thanks for
the svg file.
Carla from Arizona
This is absolutely Stunning!! I wish I had a Cricut so I could make something like this.
This looks like a fun project! I wish I had a Cricut so I could join you and make the wreath and other projects.
Great instructions! Very detailed. Thank you!
Your paper flowers are all so lovely. I may actually try this.
Great instructions! Very detailed. Thank you for sharing this post
I love your designs! I hope to try some of these out once I get a cricut!
You are a PRO at using this machine! The wreath is beautiful! Maybe I will win a Circuit machine and learn to make beautiful things.
I click on download rolled Flowers here and it just won’t download at all. Nothing is working but I keep sending trying to press
Click on the words above the photo to download. Clicking on the photo doesn't work.
I can't EVEN!!!!! I am so excited to try this out! Excuse me as I put ALL of my paycheck towards this project (and Joann's) XD
I don't see the link to download the svgs