Find Out How to Make a Realistic Gerbera Daisy Paper Flower With This Free Template and Step-By-Step Photo and Video Tutorial.
One of the things I love most about daisies is their bright and cheerful color! I’ve loved daisy flowers for as long as I can remember so of course, I wanted to try my hand at making a paper version that would last forever.
After making paper Peonies, Dahlias, Oversized Roses, and Rolled flowers, this was the next flower on my list to tackle!
If you love the look of fresh flowers but hate it when they eventually wilt, you’re sure to enjoy making paper flowers that look fresh year-round.
If you’re new to paper flowers, don’t fret! I’ll walk you through everything you need to know from the best paper to use, and the right tools to purchase to the correct shaping technique and Cricut instructions.
Towards the end of this post, I'll show you how to make a large paper Gerbera Daisy flower using this SVG cut file!

Whenever I design paper flower templates it’s always important that I make them look as realistic as possible. That means quite a bit of testing and research goes into each of my paper flower designs.
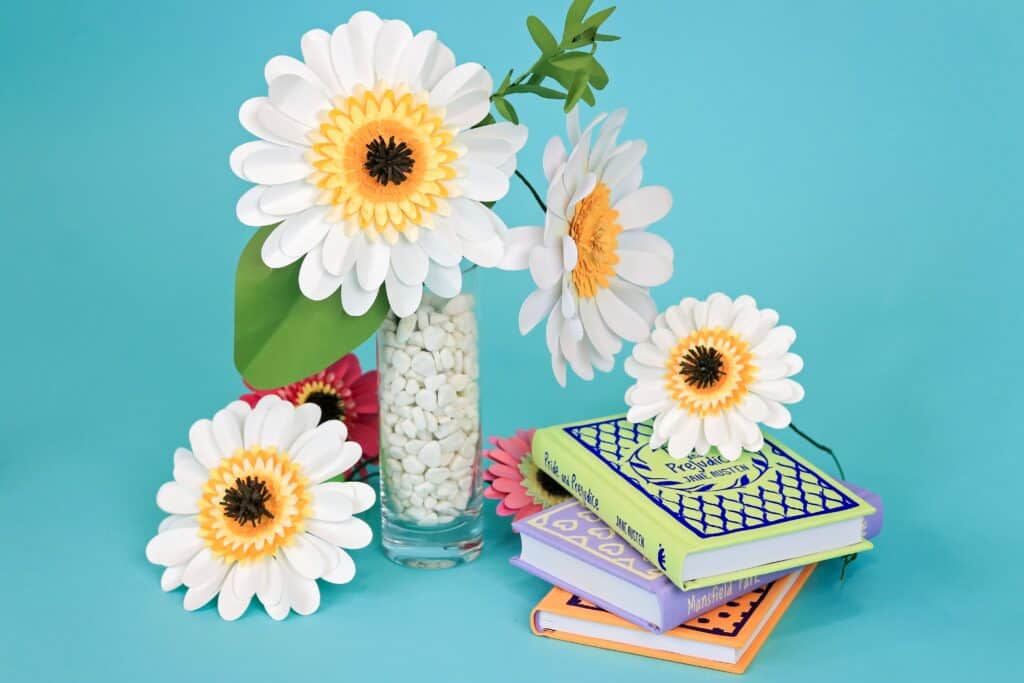
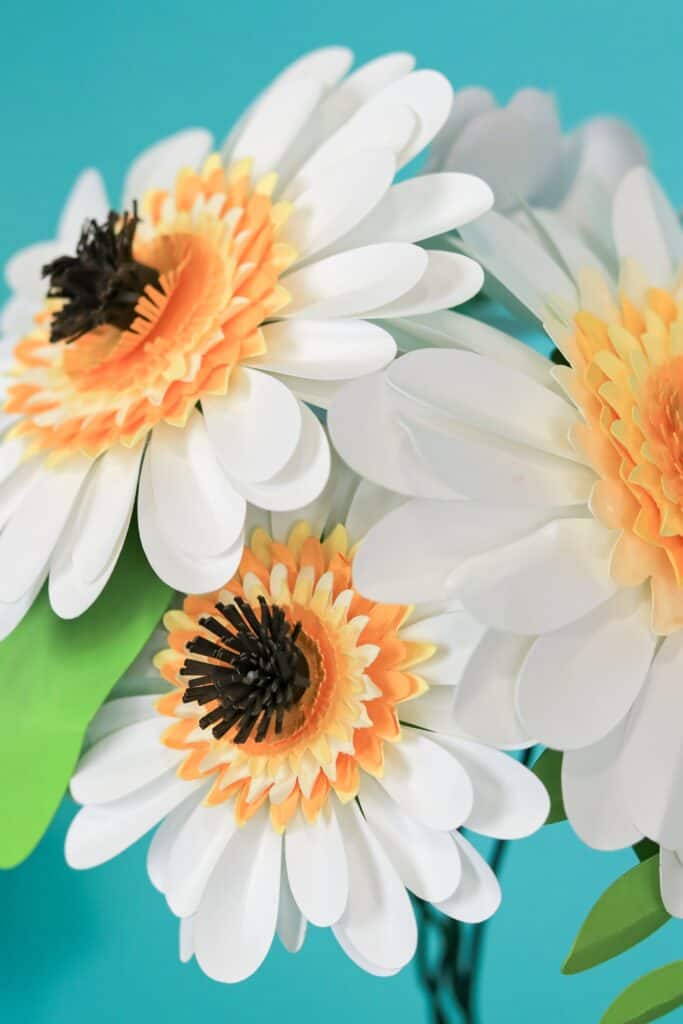
This specific template is designed to mimic the look of a Gerbera daisy plant. Before crafting this flower, I researched its life cycle- focusing on how it bloomed and how many petals and centers formed during the growing process.
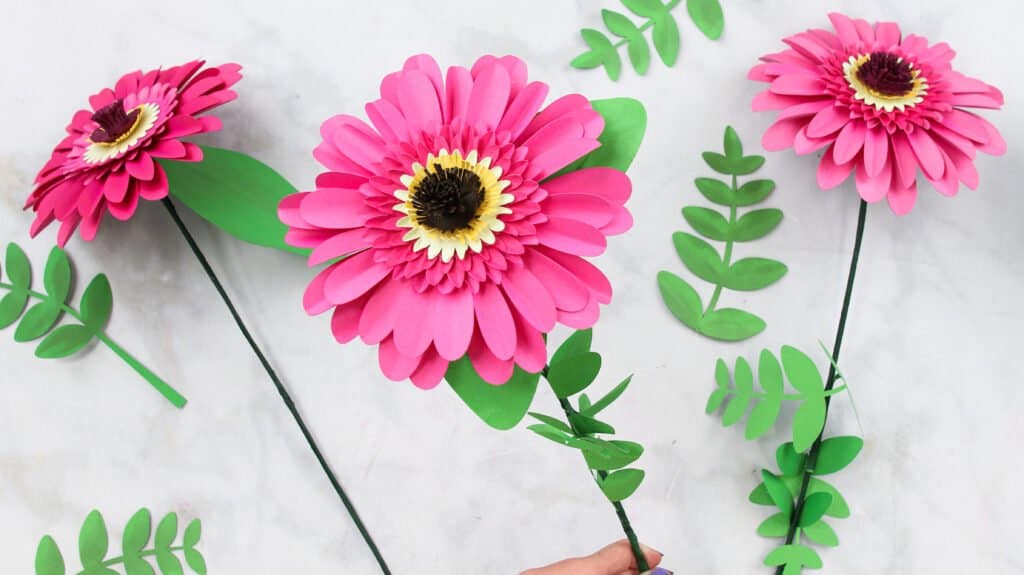
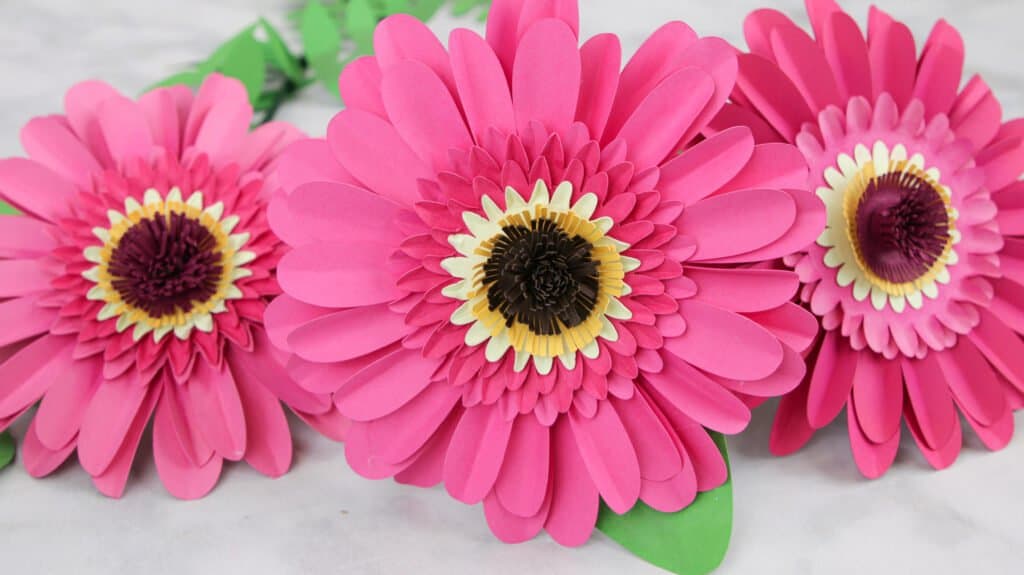
This flower grows between 8-10 inches tall and 3-4 inches wide. It has bright petals, a sturdy stem, a lighter-colored halo, and a dark center. Knowing and studying these characteristics helps to make a realistic Gerbera daisy plant.
This free SVG file and template will help you to make your own Gerbera Daisy flower from the comfort of your home with a little help from your smart cutting machine.
What Type of Paper Should I Use to Make Paper Flowers?
When making paper flowers, it's very important to use the correct type of paper to achieve the best results. This will give you flowers that look realistic and lifelike.
I strongly recommend using cardstock between 60-80lbs, as it will curl and manipulate the easiest. My personal preference is 65lb cardstock for most flowers because it's on the lighter side and it's easier to manipulate. But this project pairs really well with 80lb cardstock because it's a sturdier flower and it adds a nice level of crispness to the petals.
What’s the Best Place to Shop for Cardstock for Paper Flowers?
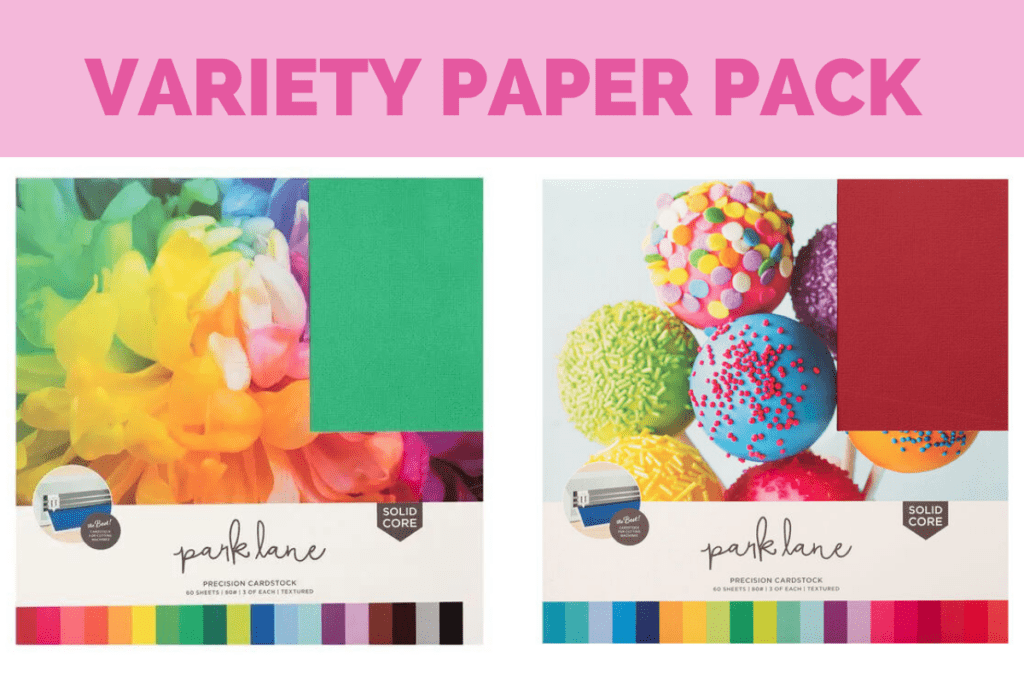
I recommend shopping for cardstock at your local craft store. You can shop in person from the open paper shelves or online. Park Lane has quite a few variety packs of precision paper that work well for this project and they offer paper in 65lb or 80lb options.
When you are shopping for paper look for cardstock that is solid core! This is really important! White core paper (or "value pack") is a cheaper type of cardstock that has color printed on each side on a white piece of cardstock. When you cut into it, it is white on the inside. It tends to look cheap when it's used with paper flowers.
Instead, you'll want to make sure you select a paper that says, "Solid Core". This means the color hasn't been printed on the outside of the paper. Solid core paper has been dyed and has the same color on the inside and outside.
I recommend shopping online and ordering a Park Lane Precision Cardstock Variety Pack. This will give you a variety of different colors for your flowers in an 80lb weight.
How Much Paper Do I Need to Make Paper Flowers?
PETALS: 2 Pieces of 12 x 12" Cardstock
CENTER: 1-2 Pieces of 12 x 12" Cardstock ( I recommend light yellow and dark grey or black.)
GREENERY: 2 Pieces of 12 x 12" Cardstock
When in doubt, cut extra petals! Accidents happen, especially when you're working with something as light as paper. I recommend cutting extra petals, stamen, and greenery whenever you make paper flowers just in case something goes wrong!
You'll also find it's nice to have extra pieces while you're creating your flowers in case you need to fill in an empty spot or add extra volume.
Should I Cut by Hand or With a Cutting Machine?
This specific flower does require a cutting machine because of how detailed the petals and center are. It would be really difficult to cut this flower by hand!
Looking for a paper flower that you can cut by hand, click here!
This project will go much faster if you use a 12 x 24" mat and load two pieces of paper on the mat at a time!
What Is the Finished Size of This Flower?
If you use the template as provided without making any changes to it, this tutorial will give you one flower that measures 6.5" across.
The template size can be increased to create a larger flower if desired.
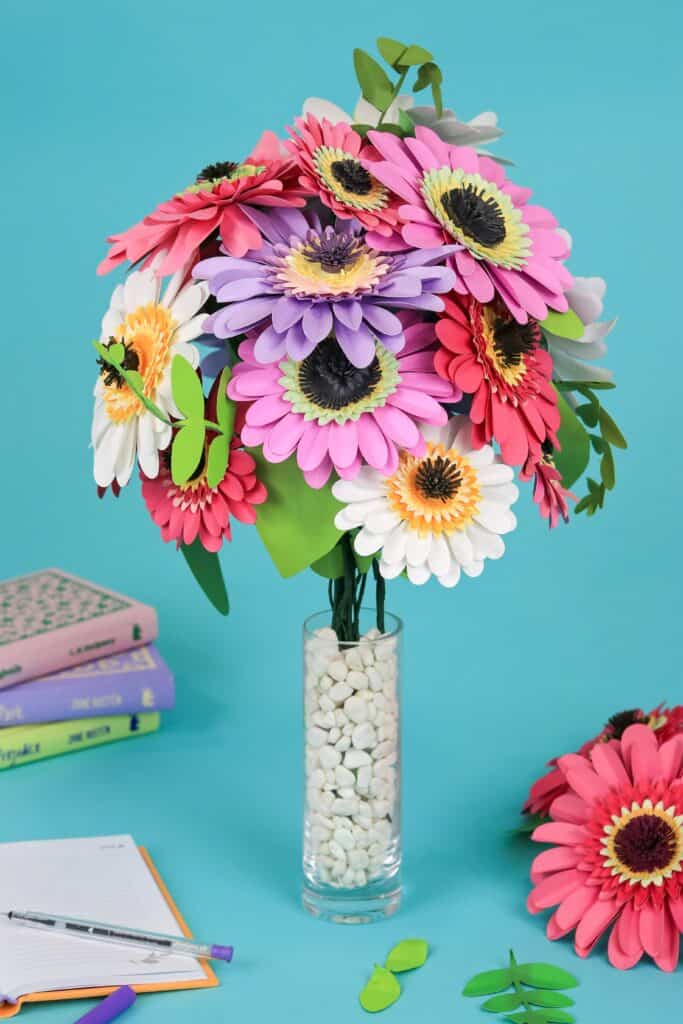
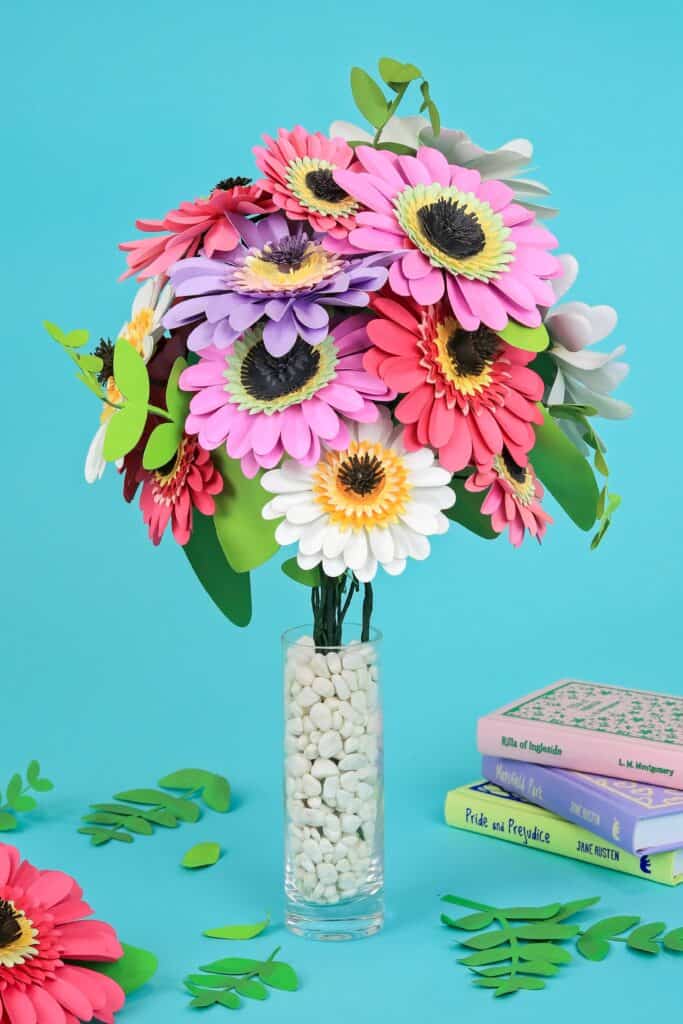
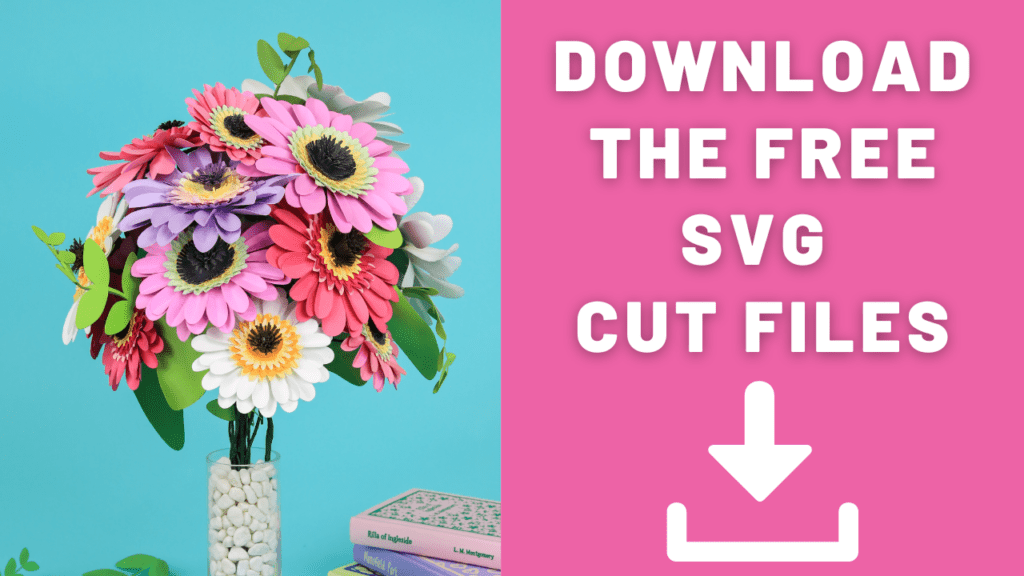
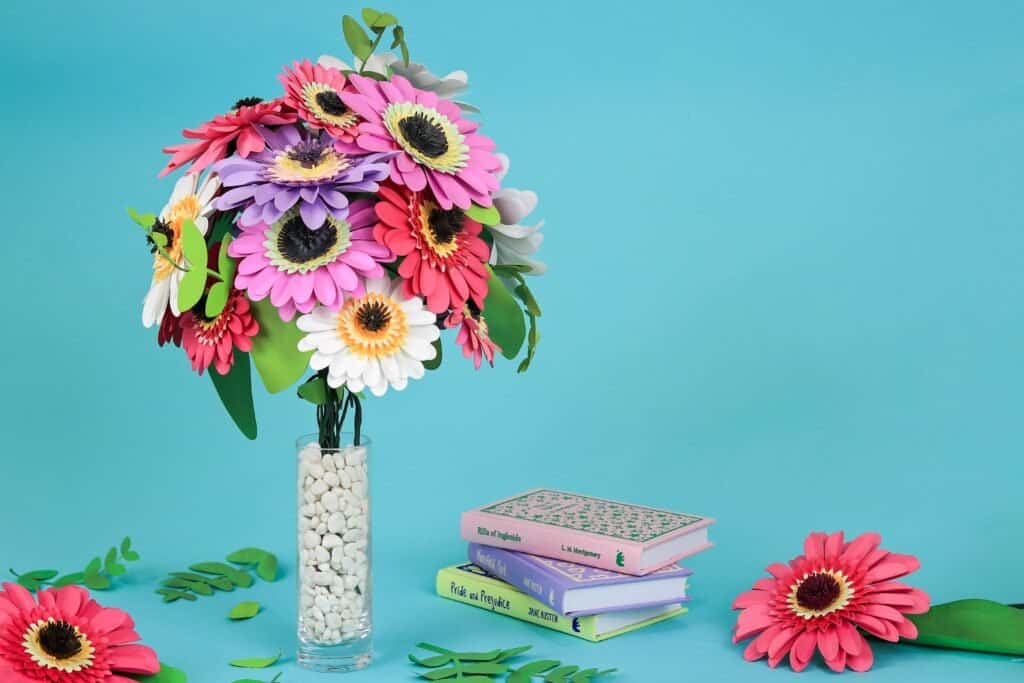
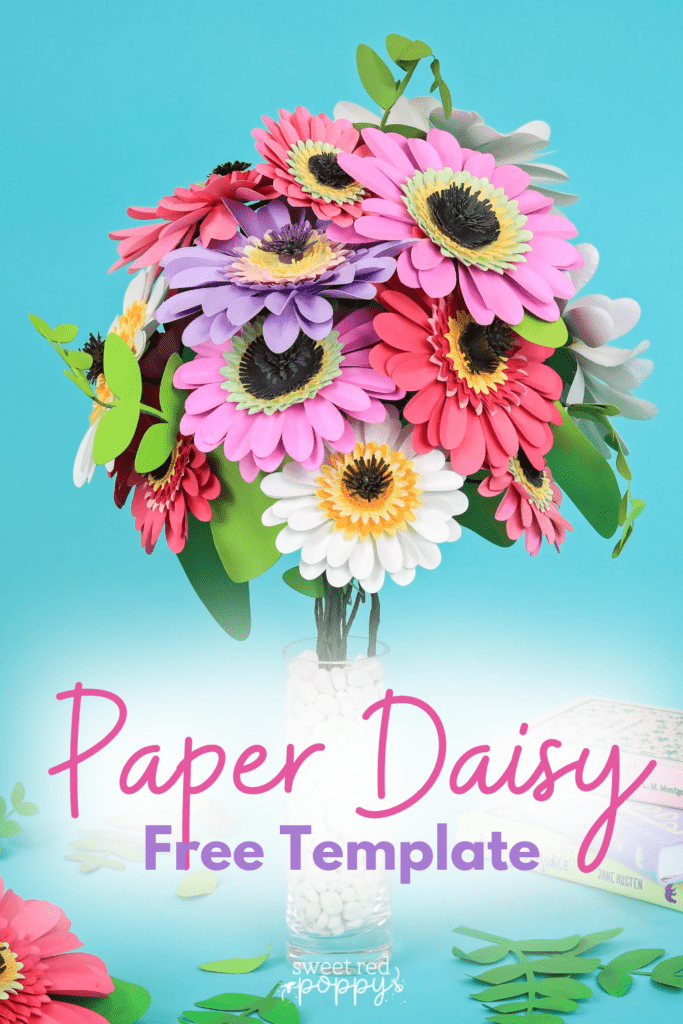
If you look at the bouquet of flowers, you can see I made three different sizes. If you plan on making a bouquet of flowers, be sure to vary the sizes and colors of your flowers to give it a more realistic look.
What Are Pan Pastels and Do I Need Them for This Project?
Pan pastels really bring this project to life. They give the flowers a realistic look by providing more depth. However, pan pastels can be pretty pricey. I've linked to my favorite pan pastel kit which will give you a variety of different colors.
For a more budget-friendly option, you can order a single pan pastel. Make sure to choose a color that's at least a few shades darker or lighter than the paper you will be working with so that it shows up and adds contrast to your flower petals.
Pan pastels can be easily blended together and each little pot is loaded with color. When I say a little goes a long way, I really mean it! They are highly pigmented. They also put off very low dust and they are erasable in case of mistakes.
This kit comes with several micropore sponges which makes applying the pan pastel quite simple. The sponge is reusable, easy to clean and it’s smooth so it won’t damage your paper. The benefit of using a sponge is that it will prevent you from having any brush strokes left behind on your project, giving you an even application of color.
If you're planning on making tons of paper flowers, I'd really recommend investing in this kit. If you're not totally sold on it, try purchasing an individual pan pastel here.
Let’s get started!
Table of Contents
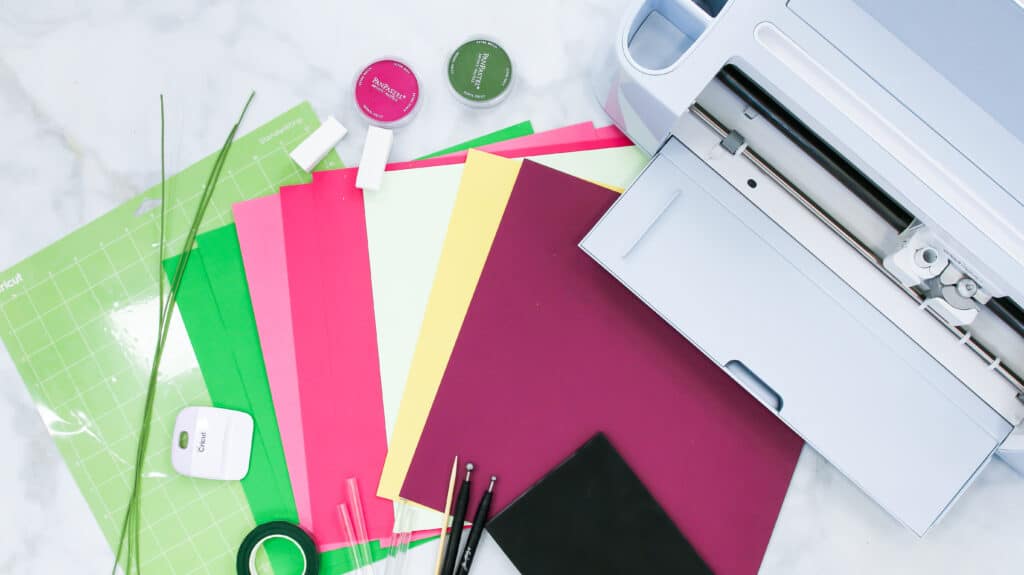
Gerbera Daisy Supplies
Shop all the Gerbera Daisy Supplies here!
- 65 - 80 lb Solid Core Cardstock - I recommend this variety pack
- This weight will curl and manipulate the easiest. (Check the paper recommendation section above for more details)
- 2 pieces of 12" x 12" cardstock for the petals (2 medium, 2 large).
- The center can be all one color (1 piece of 8.5" x 11" or 12" x 12" paper) but I recommend using a contrasting color or multiple colors for the centers.
- 2 pieces of 12" x 12" cardstock for greenery
- Floral Wire Stems
- I used 3 stems for each flower to make a thicker more realistic looking stem
- Floral Tape
- Hot Glue Gun
- Glue Gun Sticks
- Needle Nose Wire Cutters
- Scraper Tool
- Pan Pastel Kit, or Individual Pan Pastels (read above paragraph for more detail)
- Sponges
- Flower Shaping Mat
- Cricut Machine
- Wooden Skewers
- This is used to shape the petals to make them look more realistic.
- Tweezers
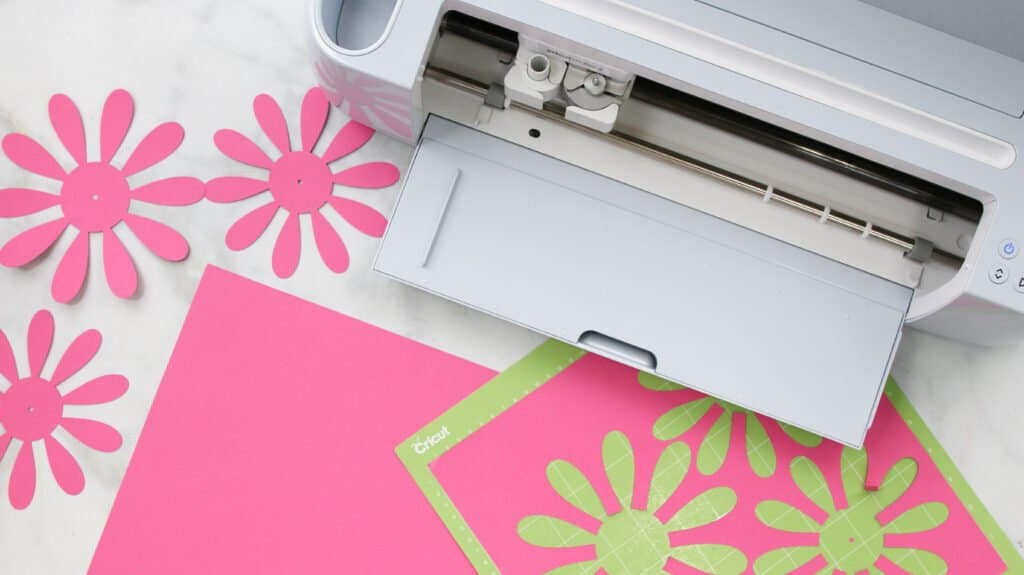
- 12" x 12" or 12" x 24" Standard Grip Cricut Cutting Mat
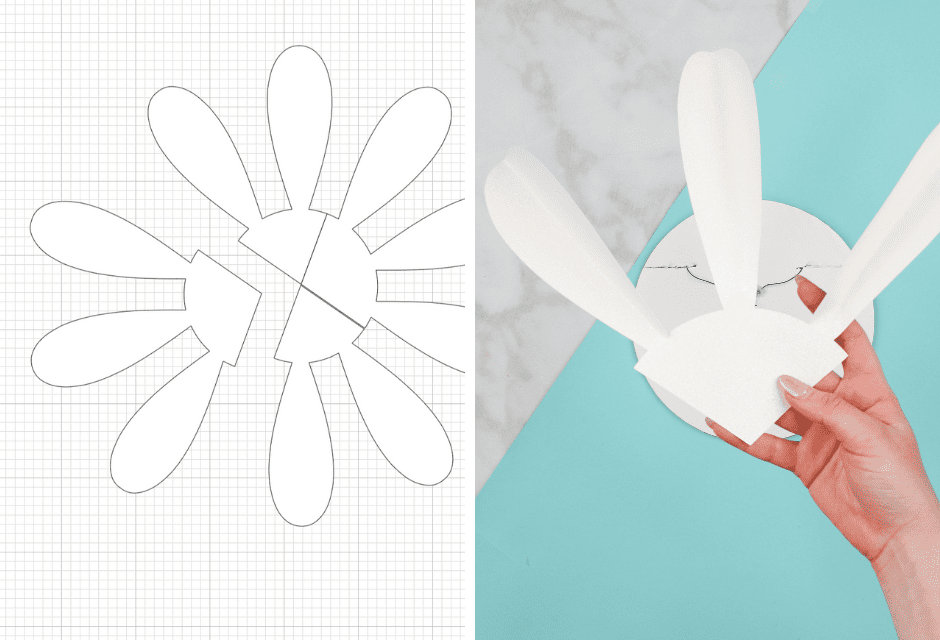
Download the Free Paper Daisy SVG Template Here
Get The Ultimate Guide to Paper Flowers E-Book
Looking for even more paper flowers??? Get access to ALL of my printable paper flower tutorials and flower SVG files in my Ultimate Guide to Paper Flowers Ebook by clicking here!
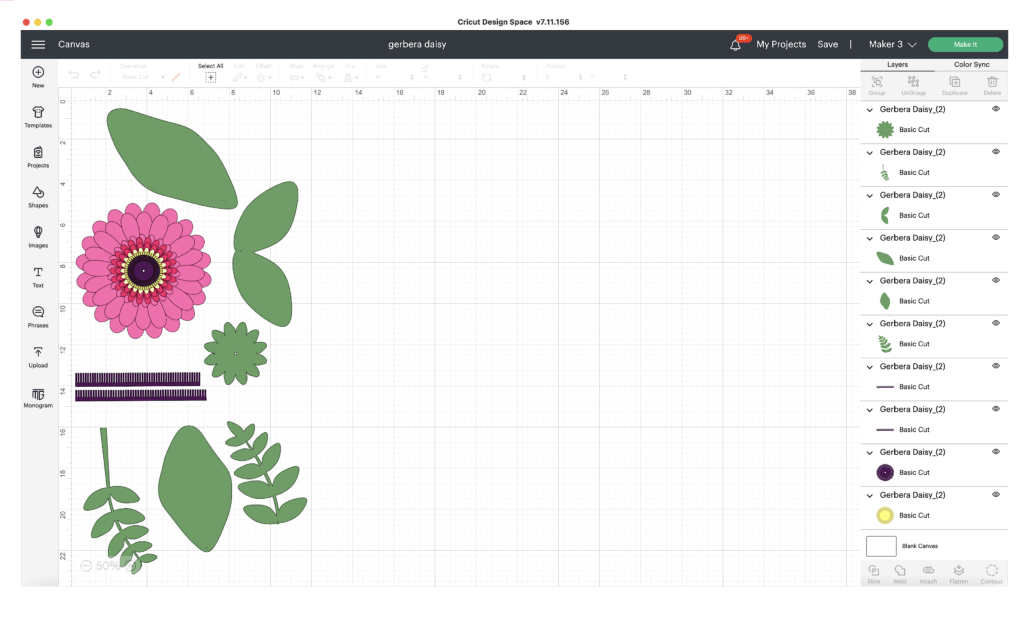
Upload Gerbera Daisy SVG File
Start by downloading the SVG file to your computer.
Go to Cricut Design Space and start a New Project. Click the “Upload” option.
Select the downloaded daisy SVG file and upload it to your canvas.
Once added, ungroup the flower pieces in the layers panel and resize them or change the colors of the flower if desired.
Step One: Cut out your flower pieces
One Daisy Flower Consists of:
- 2 medium petals
- 2 large petals
- 4 centers
- 2 stamen circle pieces
- 2 stamen paper strips
- 5 leaves
- 1 flower base
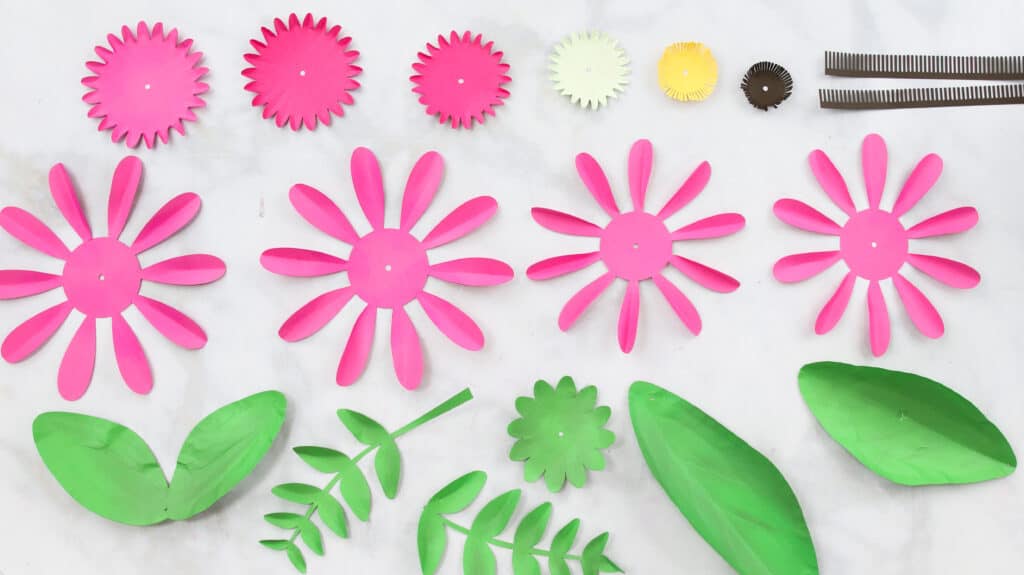
Load your mat with Cardstock and cut out all the flower pieces
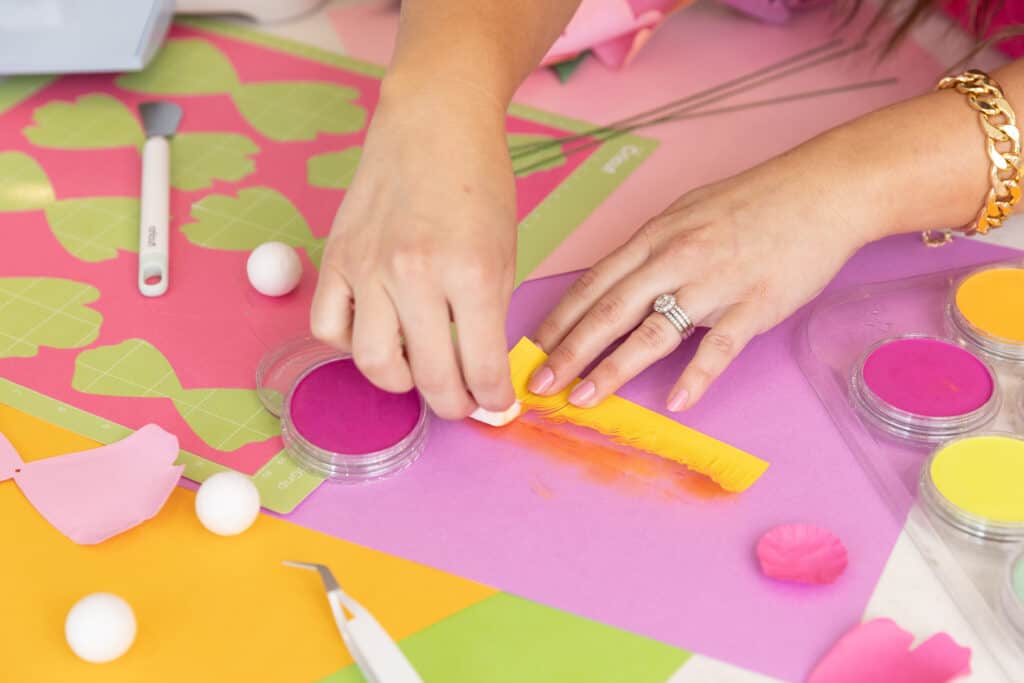
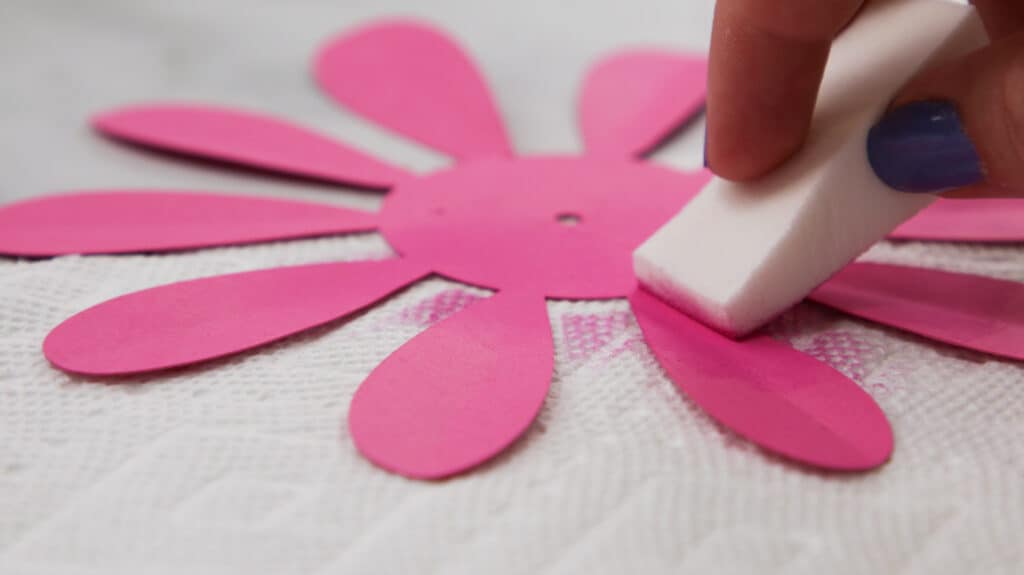
Step Two: Apply Pan Pastels (Optional)
I love to add pan pastel to my flower petals and stamen because it adds depth to the flower and a touch of realism.
Grab a paper towel or piece of paper to put underneath your flower pieces before applying pastel (it can get a little messy).
Gather your 4 petals (2 medium and 2 large) and start applying pan pastel that's a slightly darker color than your paper base. I recommend using a sponge for an even application or you can use a paintbrush as an alternative.
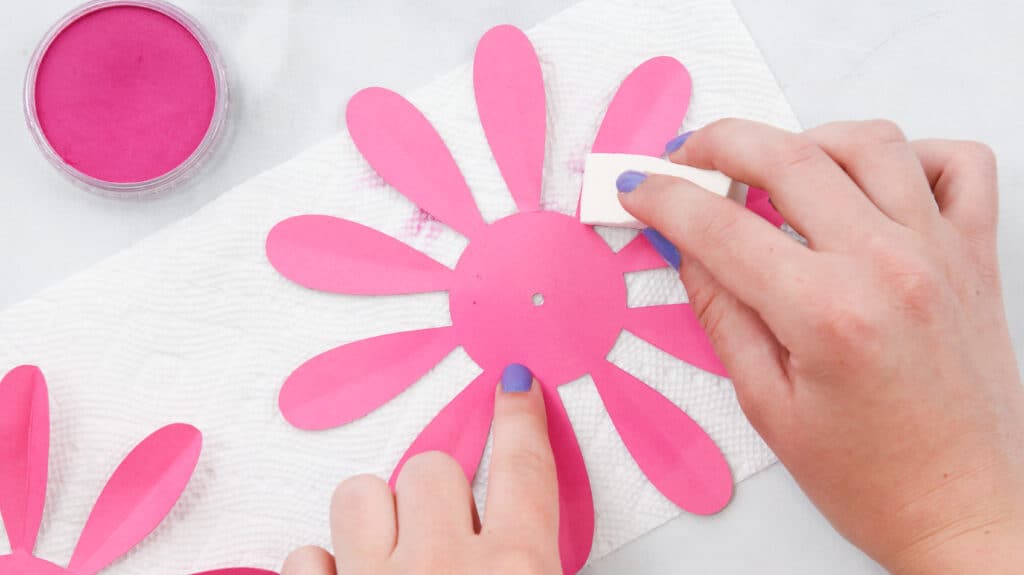
Apply the pastel to the center and slowly move towards the top of each petal in a sweeping motion to form a gradient.
You can do this step to your centers and stamen pieces.
Step Three: Shape Your Flower Pieces
Shaping this particular flower can be a little bit tricky. Before finding other ways to shape this flower, I used my fingers to shape the petals. While this may be a method you can use, there are tools and other techniques that can help you along the way to make this step much easier on your hands!
Start by shaping your petals using your scraper tool. Put your Scraper Tool in the center of a petal (lengthwise) and pinch the sides of the petal to make a rounded point and a score line down the middle. Do this to all four petals.

Pro Tip: If you don't have a scraper tool handy, you can grab a skewer or a clay molding tool and use the same technique. You can even create this shape by folding the petal along the edge of a table.
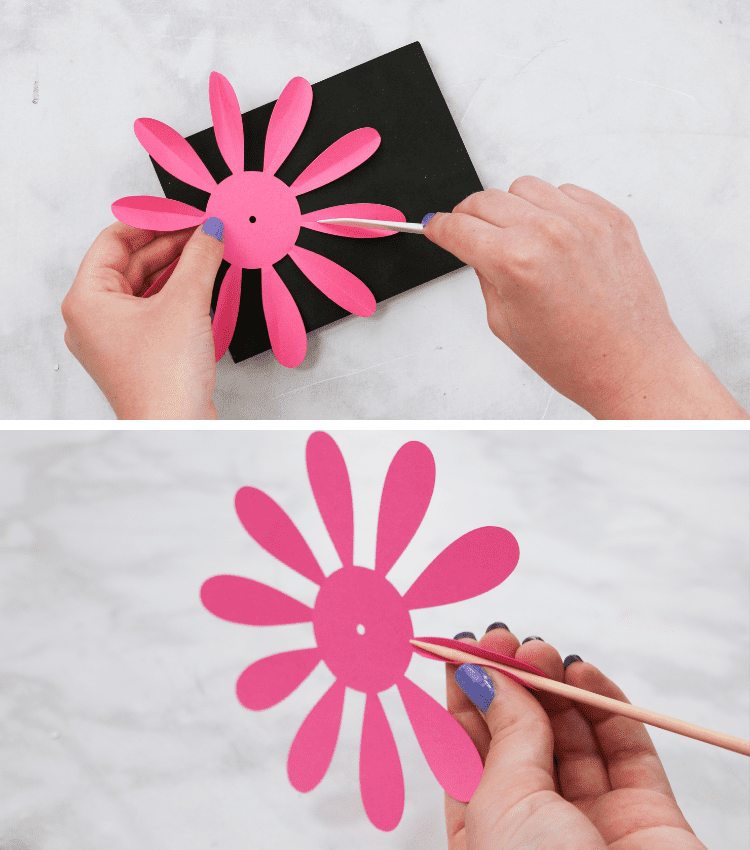
Curl some petals downwards and some upwards with a skewer or scraper tool to add dimension to the flower.
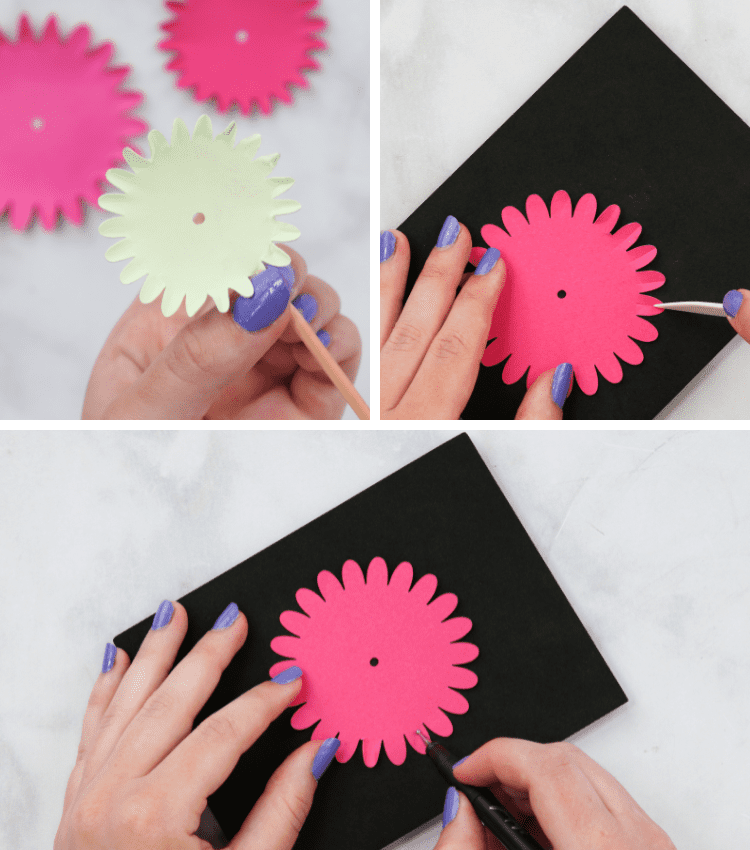
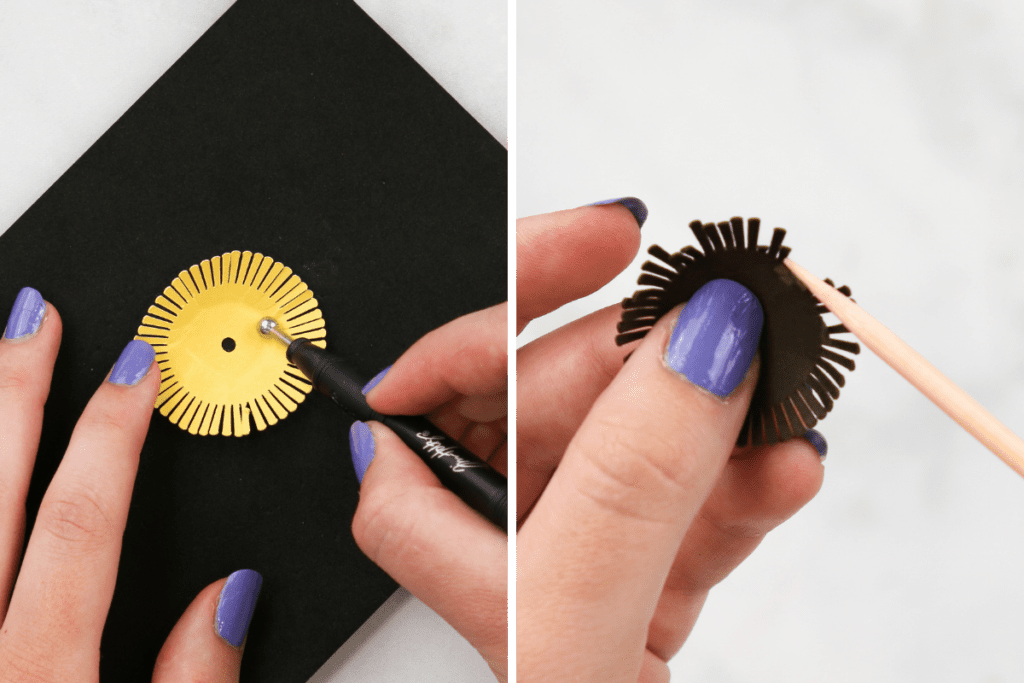
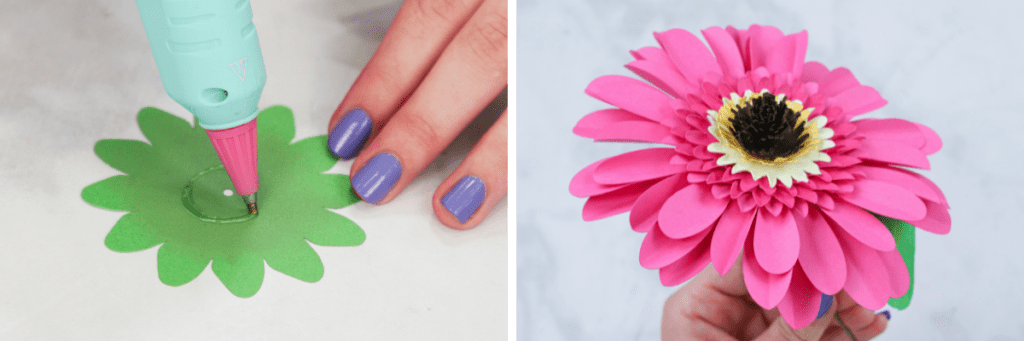
Next, place your four centerpieces (XL-S) on your Flower Shaping Mat. Use a skewer, molding tool, or small ball point tool to make the pieces look pinched at the tips.
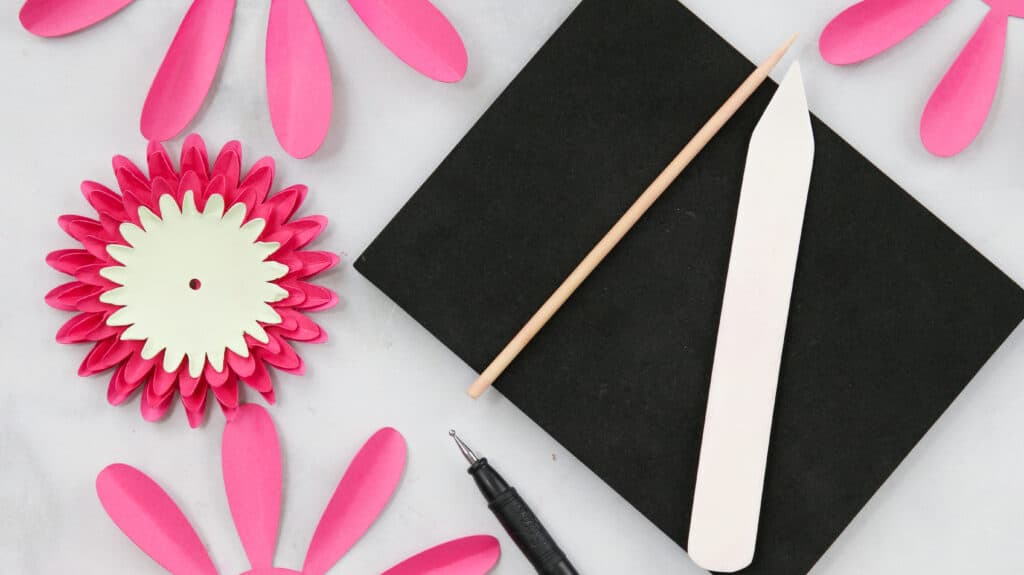
If you don't have a flower shaping mat, you can also use a soft sheet of foam, a polymailer or a yoga mat.
Next, grab your two stamen circle pieces (one smaller than the other) and use a toothpick or tweezers to make each piece of stamen stand up and flare out the fringe. Before flaring, I went in with my ball point tool and rolled in a circular motion in the centers.
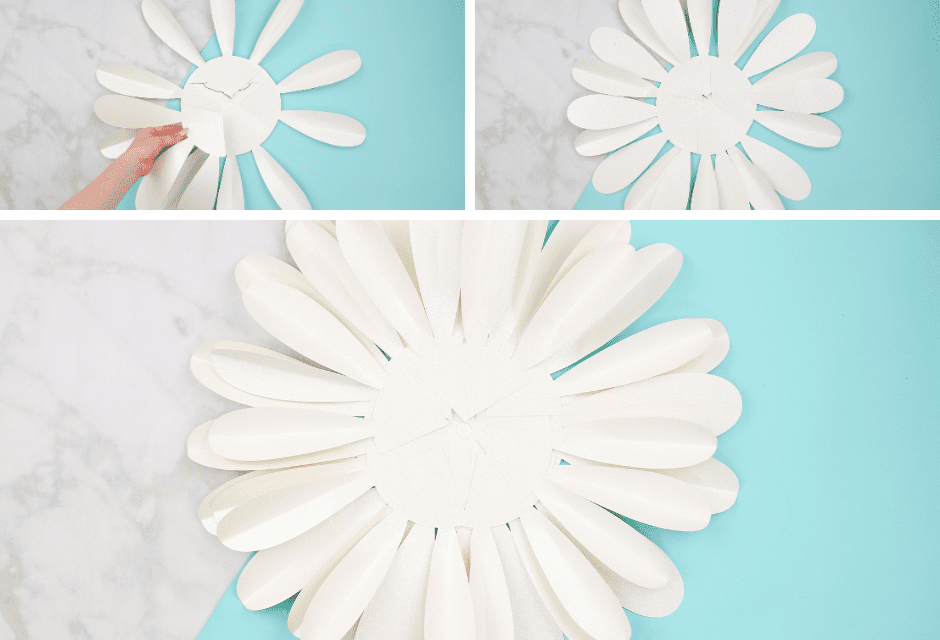
Step Four: Assemble the Daisy Flower
Take one of your two stamen strips and wire stems (Tip: use your scraper tool to curl the stamen strip.) Add a dot of hot glue to one end of the strip and place it on the top of the wire.
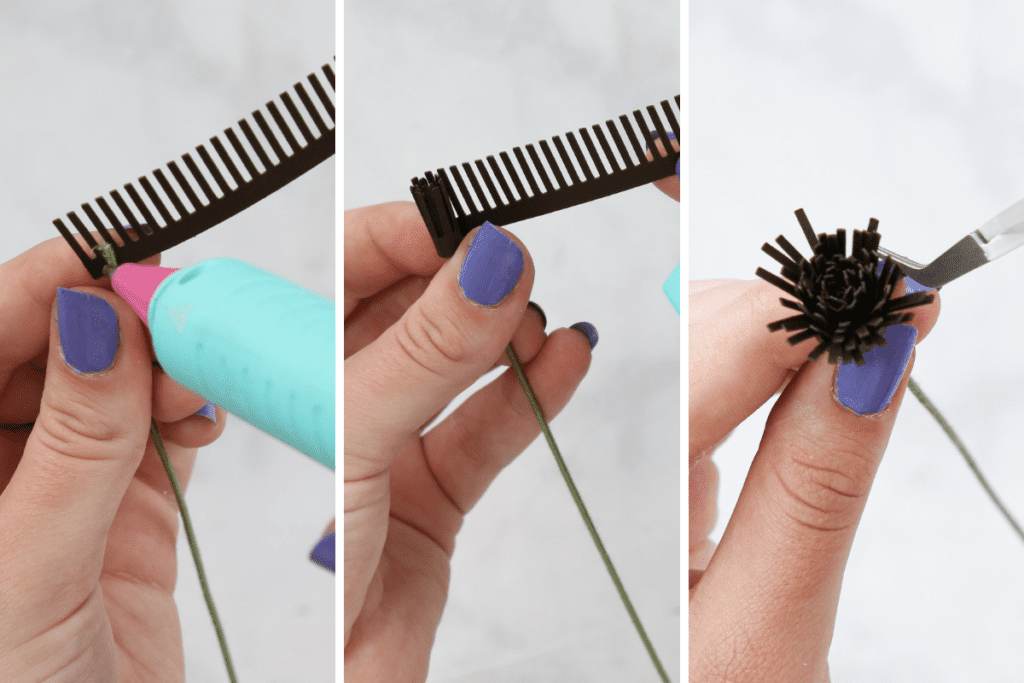
Begin wrapping your stamen around the wire and adding glue as you go. Repeat this to the other stamen piece wrapping it around the other. Once wrapped, flare it out with tweezers.
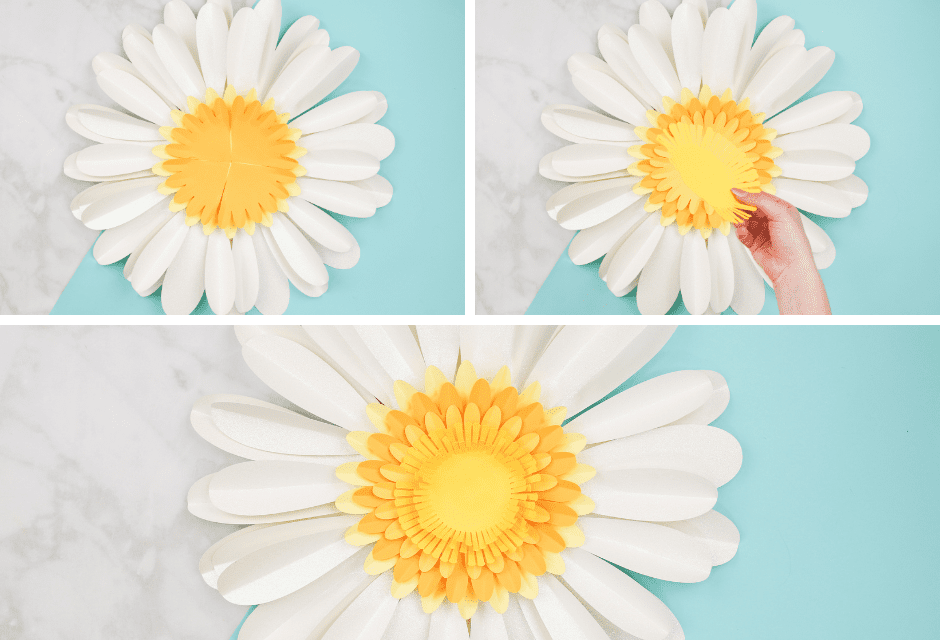
Now, add the 2 circle stamens by sliding the wire through the hole starting with the small one, and secure with glue.
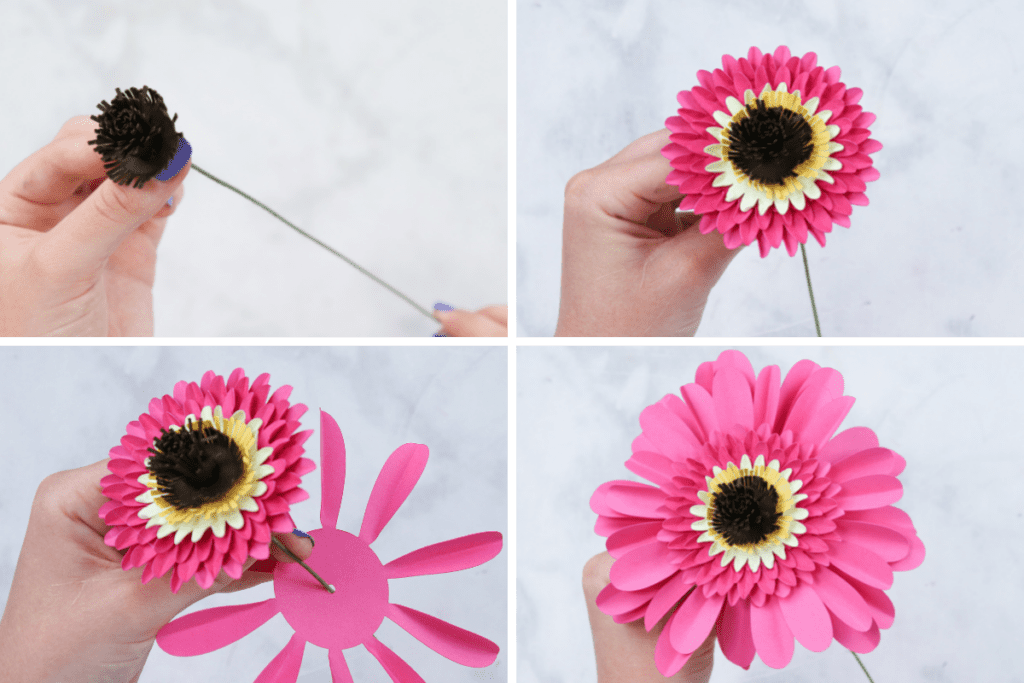
Slide the 4 centers up the wire starting with the smallest one and secure with glue.
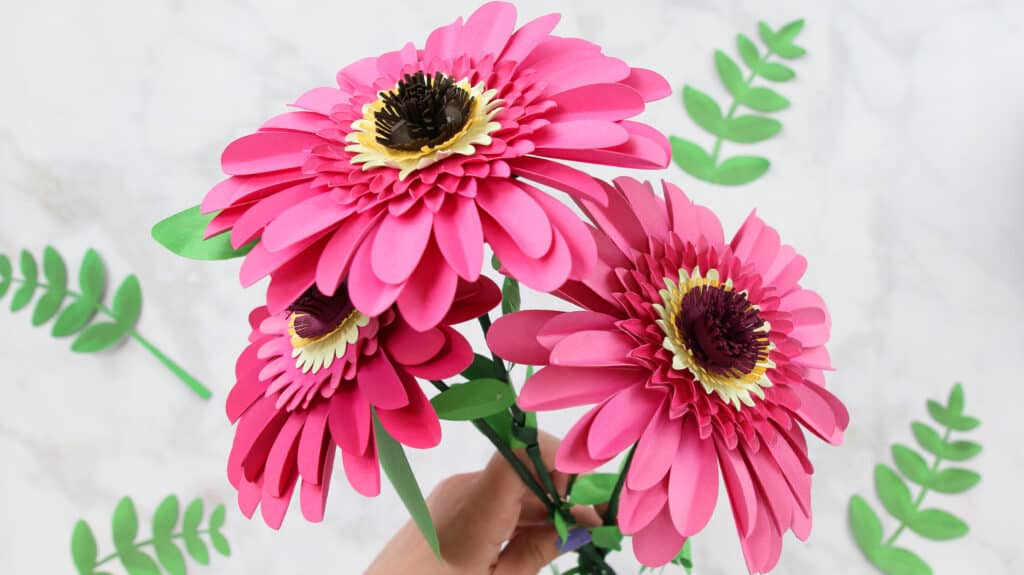
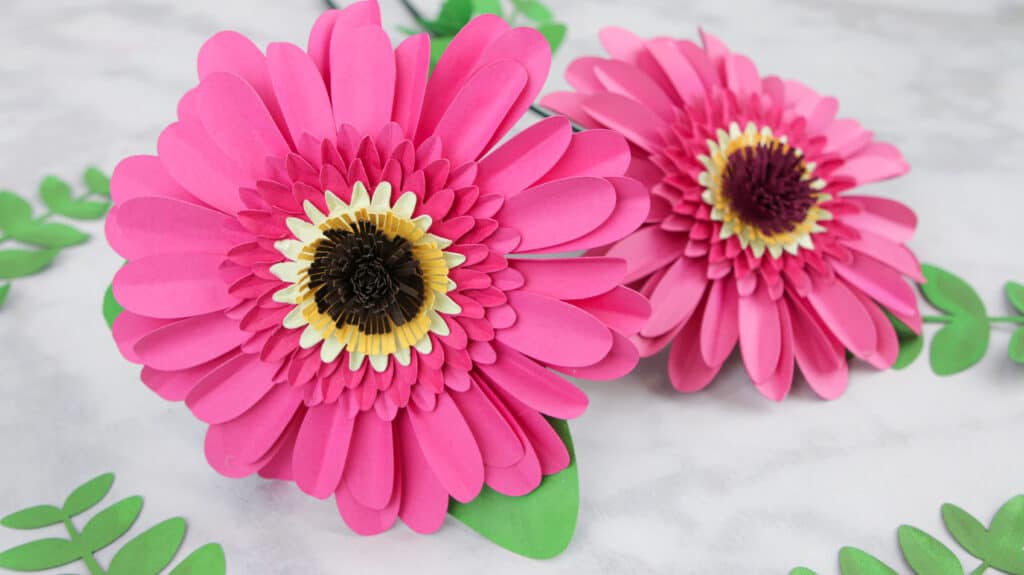
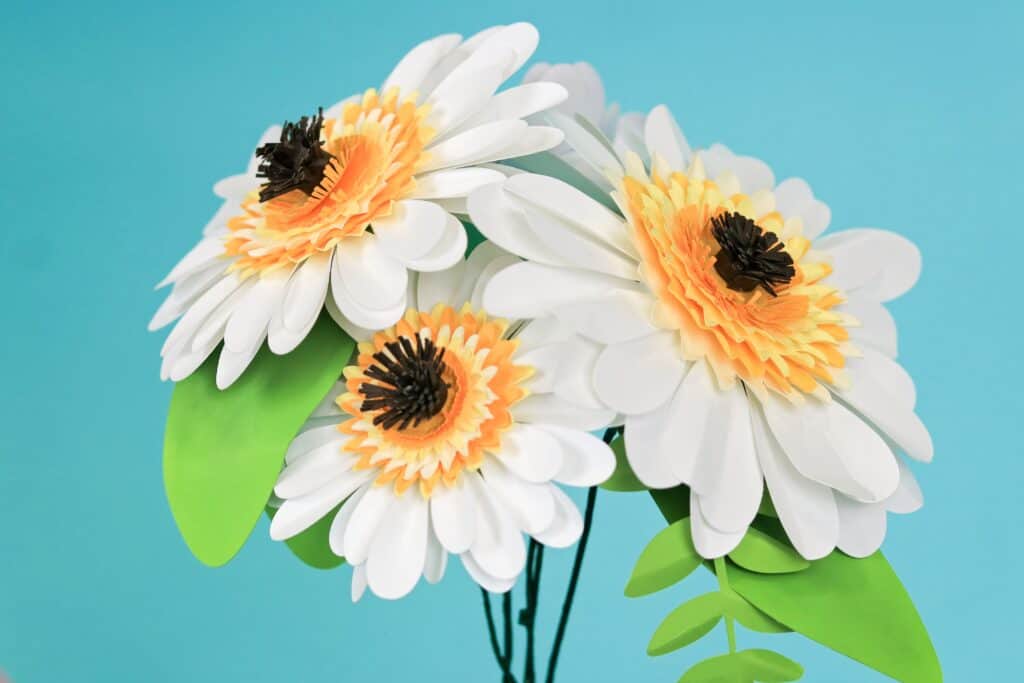
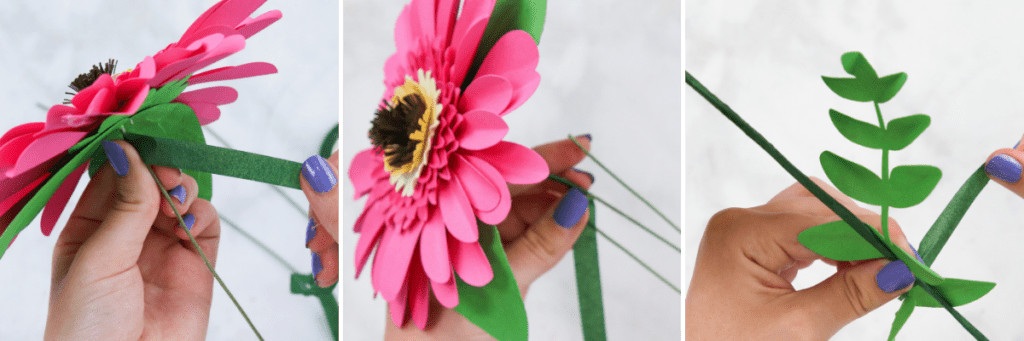
Afterward, add the 2 medium petals and then the 2 large petals.
Pro Tip: Make sure to offset your petals and secure everything with glue.
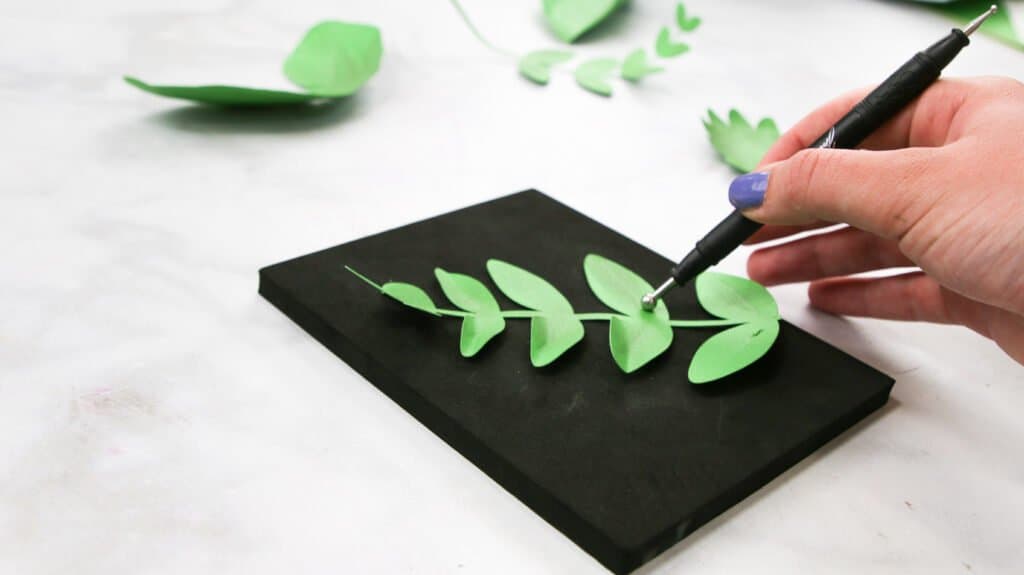
Step Five: Create Leaves
Before adding the leaves I like to shape the leaves with a scraper tool, skewer, or using the Paper Flower Shaping Tools. Use these to gently curl the edges and add score lines.
Grab the three simple leaves without stems. Using your tools, go along the blade of the leaves to add texture and curl. Run down the middle to make the middle vein, then add more veins by applying pan pastel or glide your tool from your vein to the outer edge of the leaf.
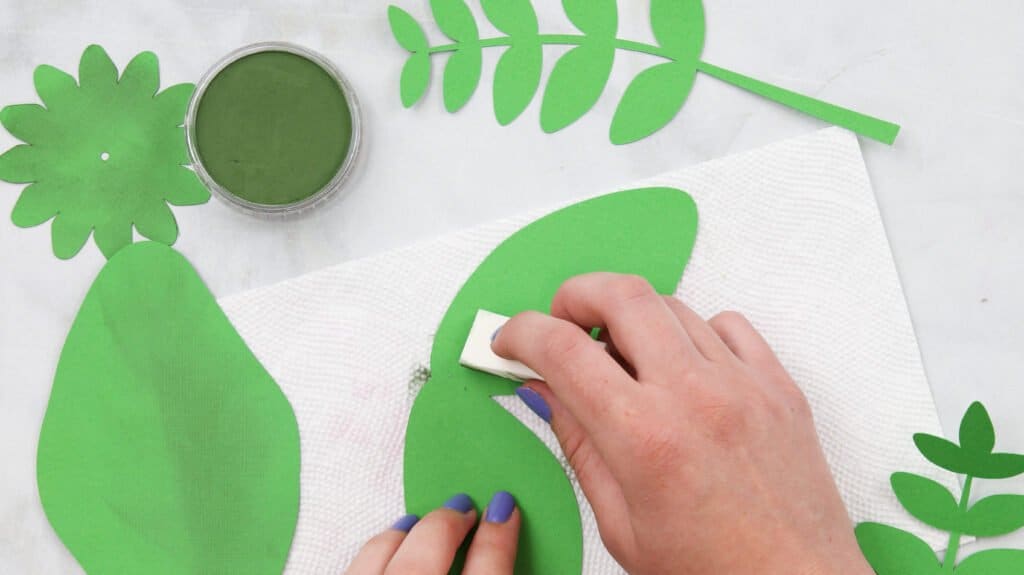
Then, take the two stemmed compound leaves. Place them on a mat and run your tool down the middle and pinch each tip of the individual leaves.
Step Six: Add your Greenery
Time to add the greenery starting with the flower base and then moving onto the leaves with circle cutouts. (Leaves are optional)
Finally, wrap the stem with floral tape starting beneath your flower
Pro Tip: make sure you hold your tape taut as you wrap while also compacting the tape. This technique helps heat up the tape and make it sticky so it adheres to itself.
Add two additional wires to create a thicker more realistic-looking stem and continue to wrap the stem with floral tape.
Optional: Stop in a place where you would like to add one of the strips of leaves to the stem. Once added, continue to wrap with floral tape.
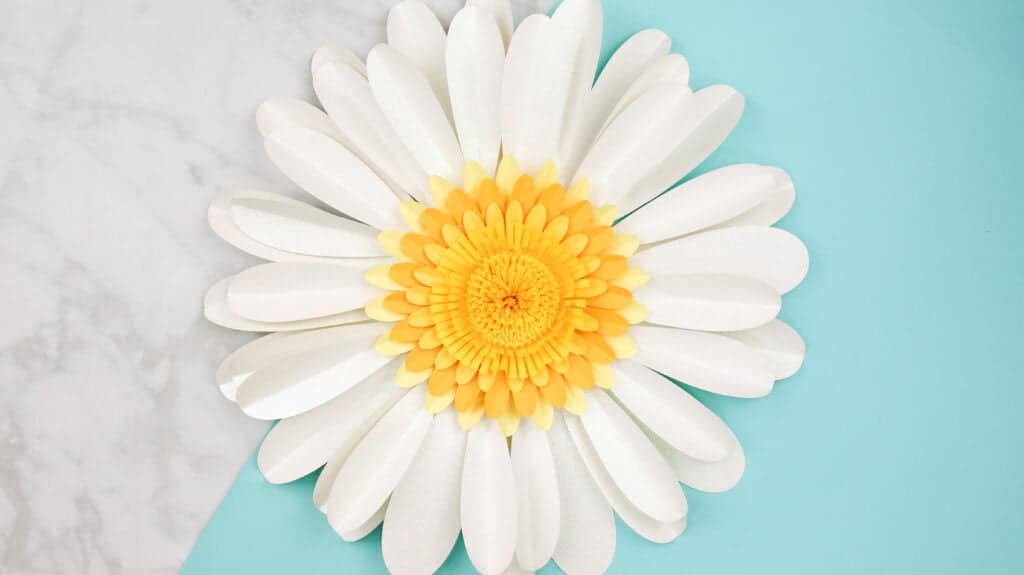
A Finished Gerbera Daisy
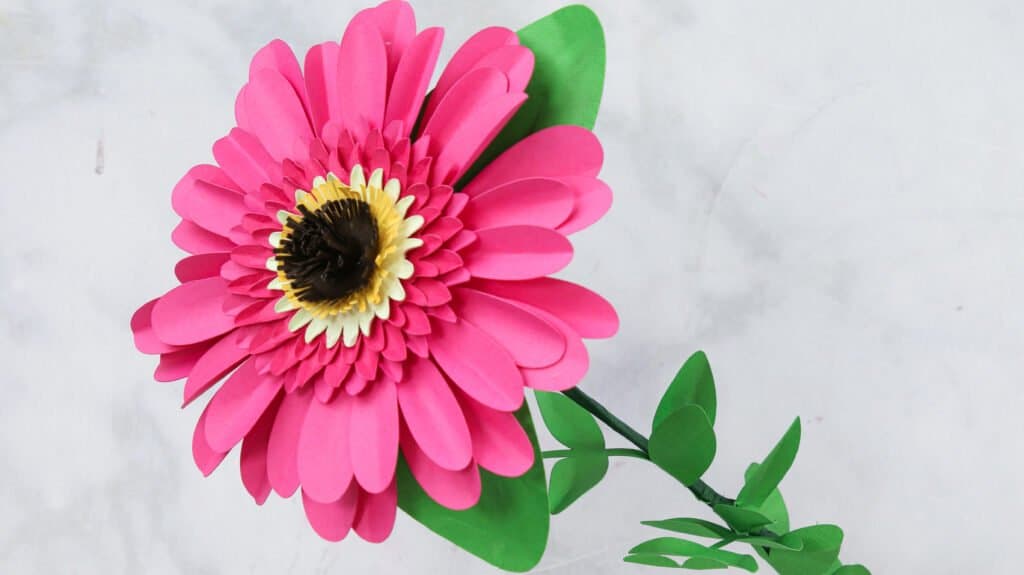
You have finished a gorgeous Gerbera Daisy! Repeat this process for the desired number of flowers you’d like. Why not award yourself with an entire bouquet!
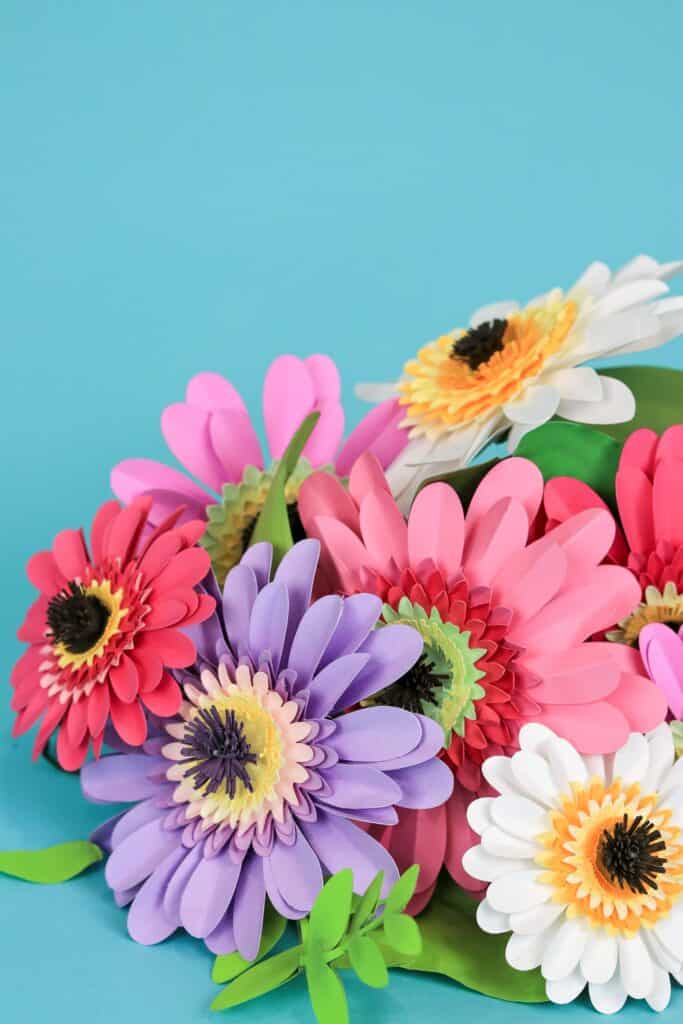
This flower doesn't necessarily need a stem. You can make this into a beautiful wall art project. There is so much you can do with this paper daisy flower design!
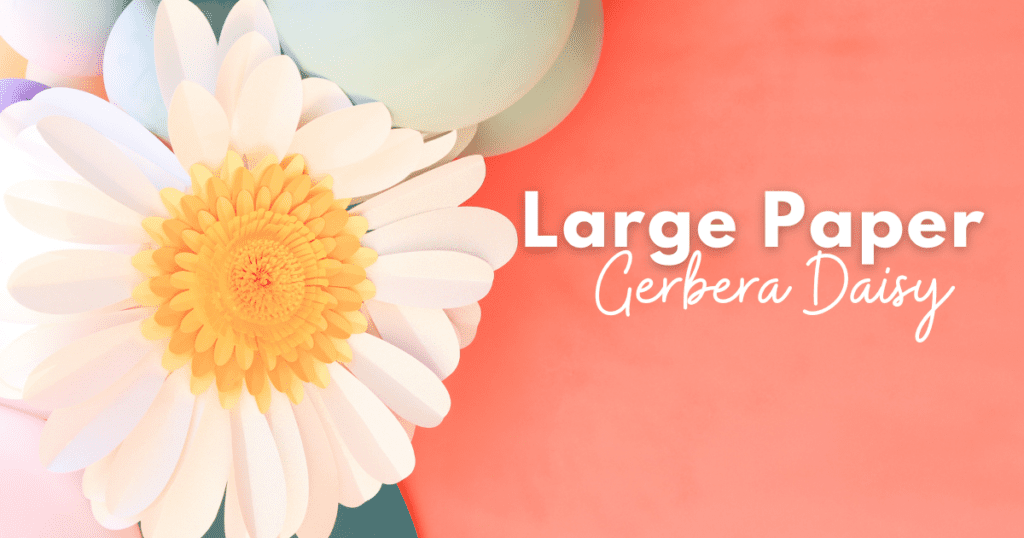
Making A Large Paper Daisy Flower
Speaking of wall art, I’m going to show you how to turn this daisy into a large paper flower to hang on your wall!
Supplies Needed
- 65 - 80 lb 12" x 12" Solid Core Cardstock - I ended up using glitter cardstock for the petals. It gave the flower a nice shimmer under the sun.
- Depending on how big you want your paper flower, grab 4-14 pieces of 12" x 12" paper. For my largest flower that measures 24 inches across, I used 14.
- Cake Board Circle
- Scissors
- Hot Glue Gun
- Hot Glue Sticks
- Scraper Tool
- Wire
- Wire Cutters
- 12" x 24" Standard Grip Cricut Cutting Mat
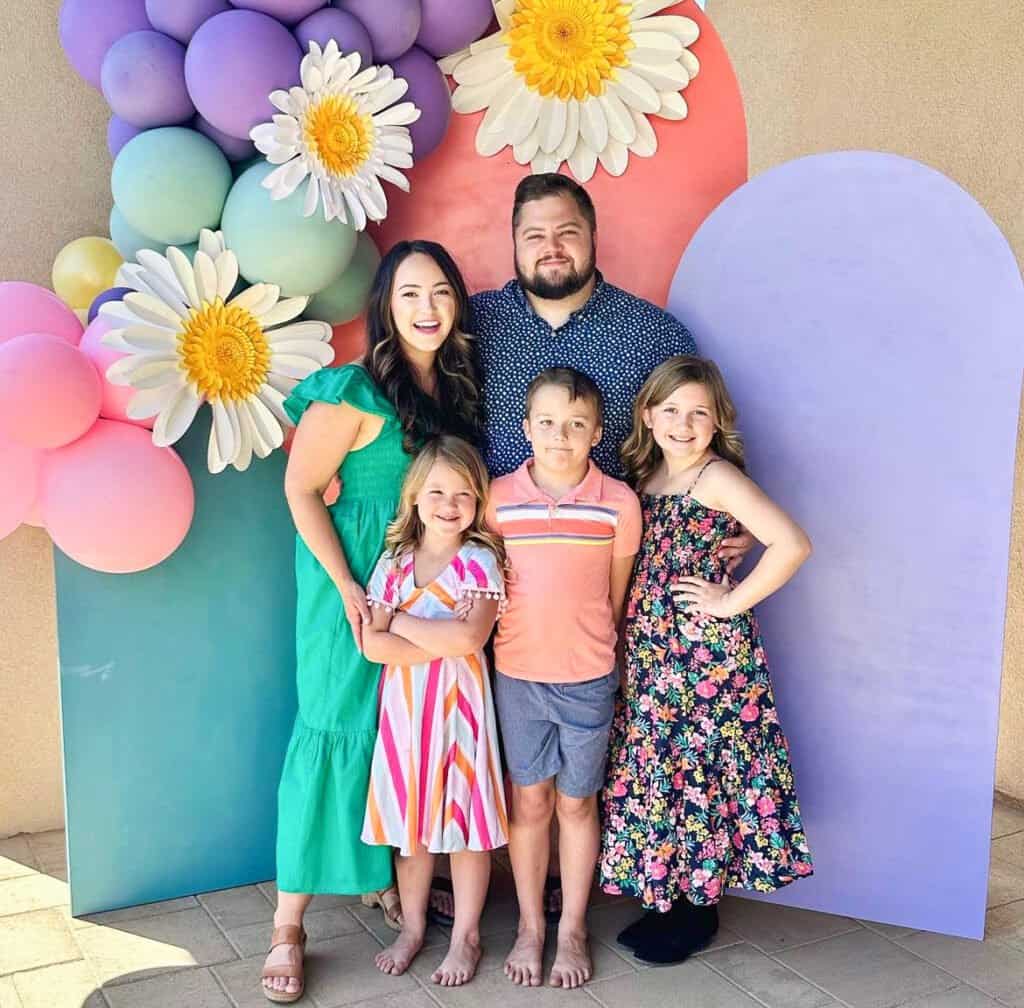
I was busy making some of these large Gerbera Daisy paper flowers and a balloon arch for an Easter brunch that we hosted. If there's enough interest, maybe I'll share a tutorial on how to make a balloon arch!
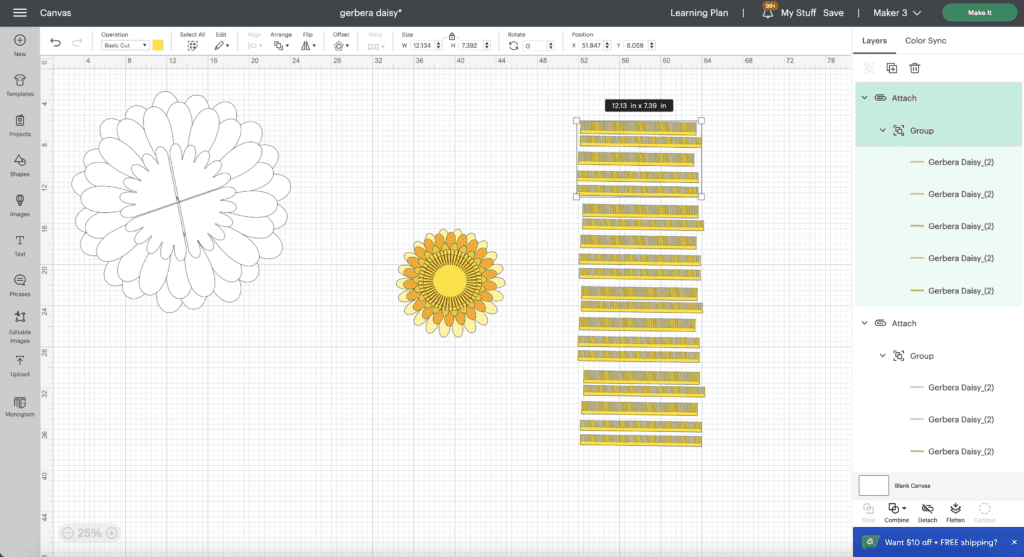
Slice Flower Pieces in Cricut Design Space
Open Cricut Design Space and if you haven’t already, upload the daisy SVG file to your canvas and Ungroup the design in the layers panel. I removed the leaves, but feel free to use them.
Take one of the petal pieces and move it over to the side. We’re going to slice this piece into quarters so that each quarter will fit onto a 12” x 12” mat. Doing this will make a huge paper flower.
Before slicing, let’s contour this flower piece to get rid of the hole in the center.
To do this, select the piece, and click Contour below the layers panel. Then, when the contour window pops up, click on the hole in the center of the piece and exit out of the window and the petal should no longer have a hole.
Contour the rest of the flower pieces.

Next, click on Shapes to the left of the canvas and select the square. In the Size panel above the canvas, click the lock button to unlock the proportions.
Stretch the shape across half of the petal piece. Afterward, select both the square and the petal piece and click Slice below the layers panel, or right-click and Slice.
Keep making rectangles and slicing until you have 4 sliced pieces.
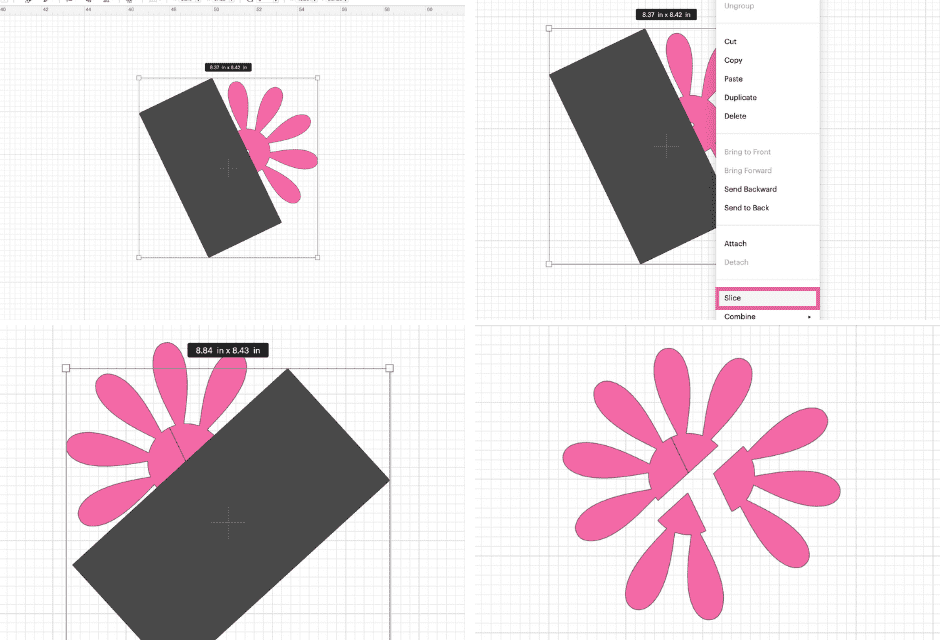
Group the quarter pieces together and duplicate the petal piece until you have 2 large and 2 medium-sized petal pieces.
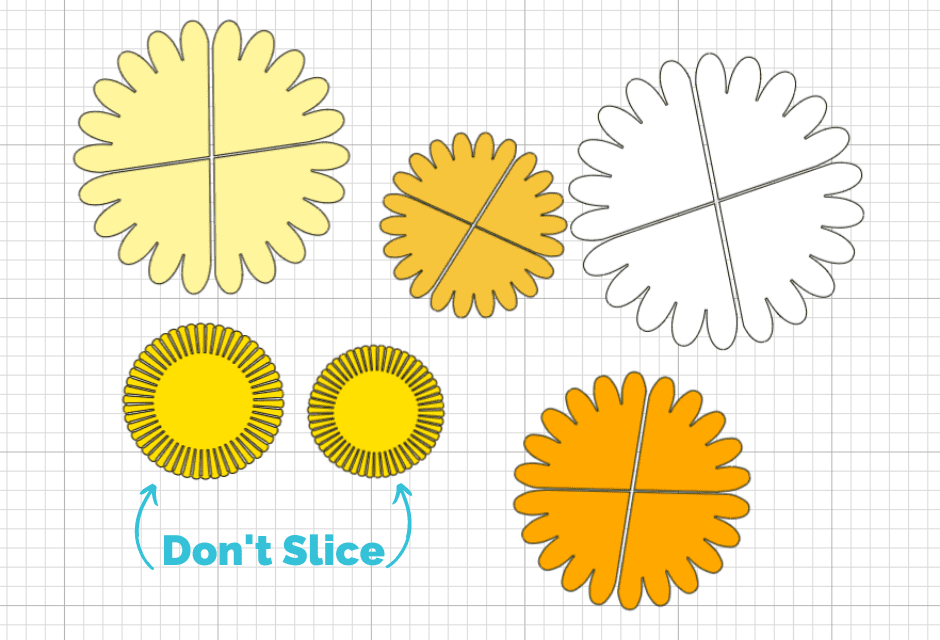
For the centers, you’re going to repeat this process. Take a square, stretch it across half of one of the flower centers, and click Slice until you have 4 quarter pieces. Do this to all four centers. Or duplicate one of the centers you sliced until you have four and resize them to XL, L, M, and SM.
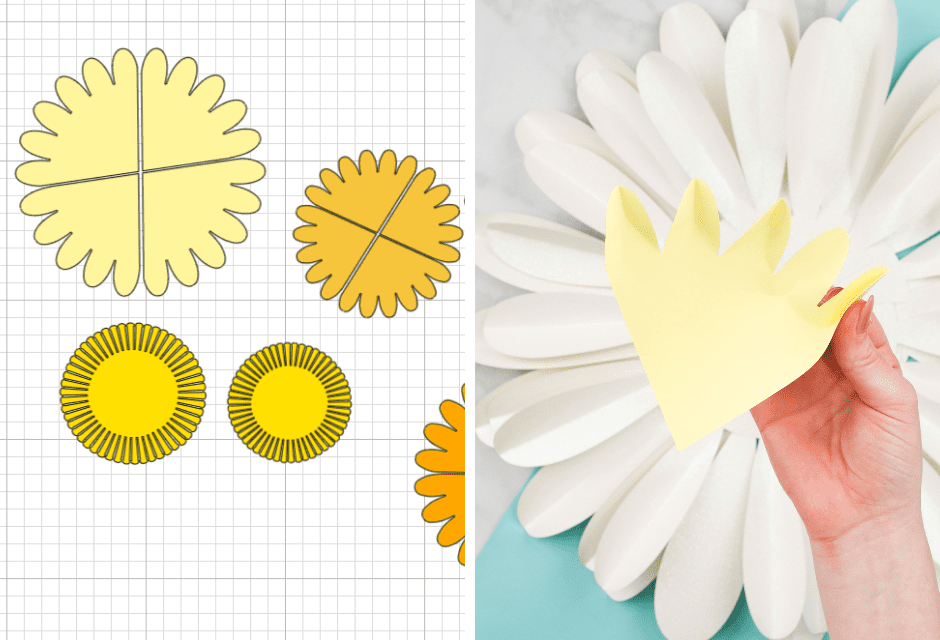
Keep the two stamen circle pieces unsliced. Later, these pieces will cover the cuts when the flower is assembled.
Then, I recommend duplicating the stamen strips to at least 20.
Cut Large Paper Daisy Pieces
Now let’s start cutting all these pieces. I continued to use 65-80lb cardstock to make these large flowers.
Load your mat with cardstock into your machine and let it do the work!
Create A Base for the Large Flower
Once all the pieces have been cut, it’s time to assemble the base for the large flower if we want to hang it on our wall.
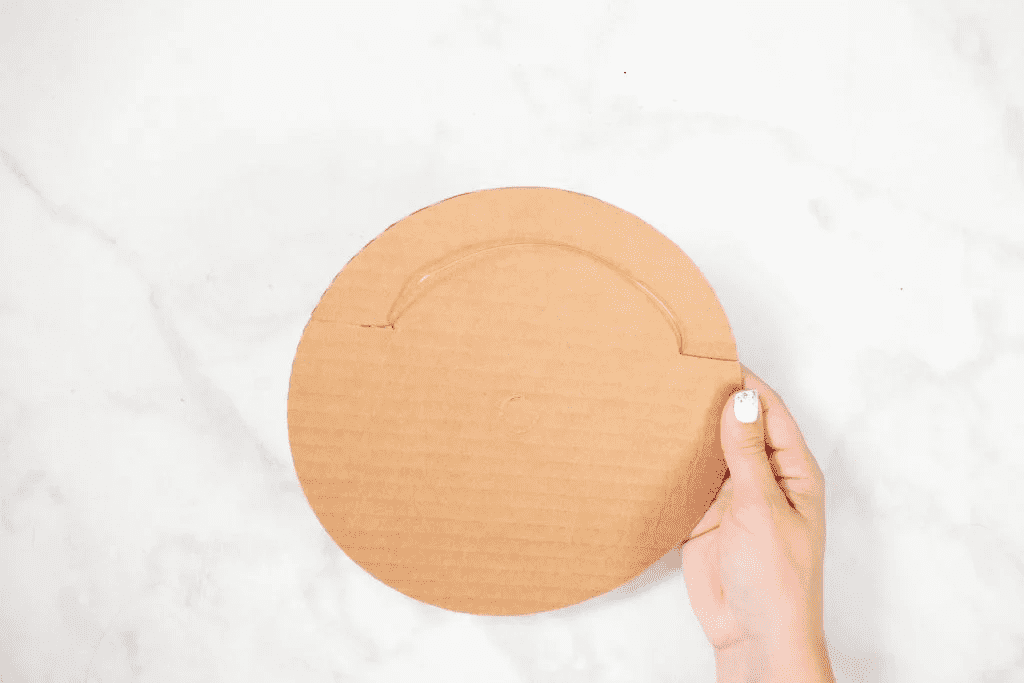
To create the base for the flower, I cut a slit that measures 2” wide on either side of a cake plate and fed a wire through the slits that created a loop for hanging. Then, tie the loose ends together and add a dot of hot glue to keep the ends in place. I also cover this in my Large Paper Flowers blog post.
Assemble Large Paper Daisy Flower
Time to assemble this large daisy flower! Use the same technique we used to shape the regular-sized Gerbera daisy flower petals earlier.
Add the large petal pieces to the edge of the cake plate following the shape. Then, continue to add the rest of the large and medium flower petals making sure to offset them as you go.
Next, add the flower centers starting from largest to smallest. Afterward, add the two stamen pieces to cover the sliced centers.
Finally, take a paper flower rolling tool and one stamen strip and roll it.
Once it’s been rolled, add a dot of hot glue at the end of the strip and attach it. Grab another stamen piece and wrap it around the assembled stamen strip.
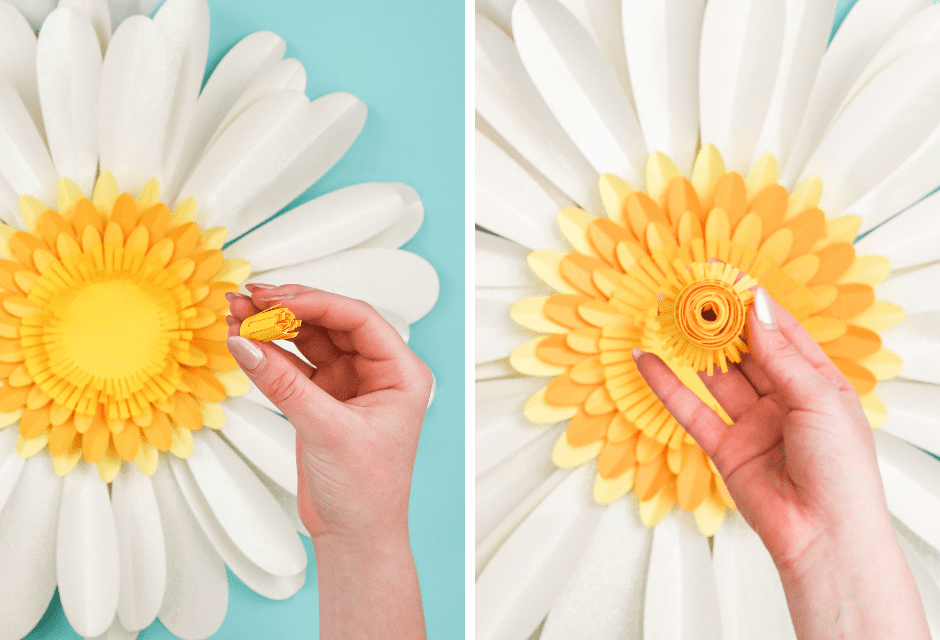
Tip: Fray the stamen with tweezers or just use your finger as you go.
Continue to do this until this stamen center fits within the stamen center on the assembled flower.
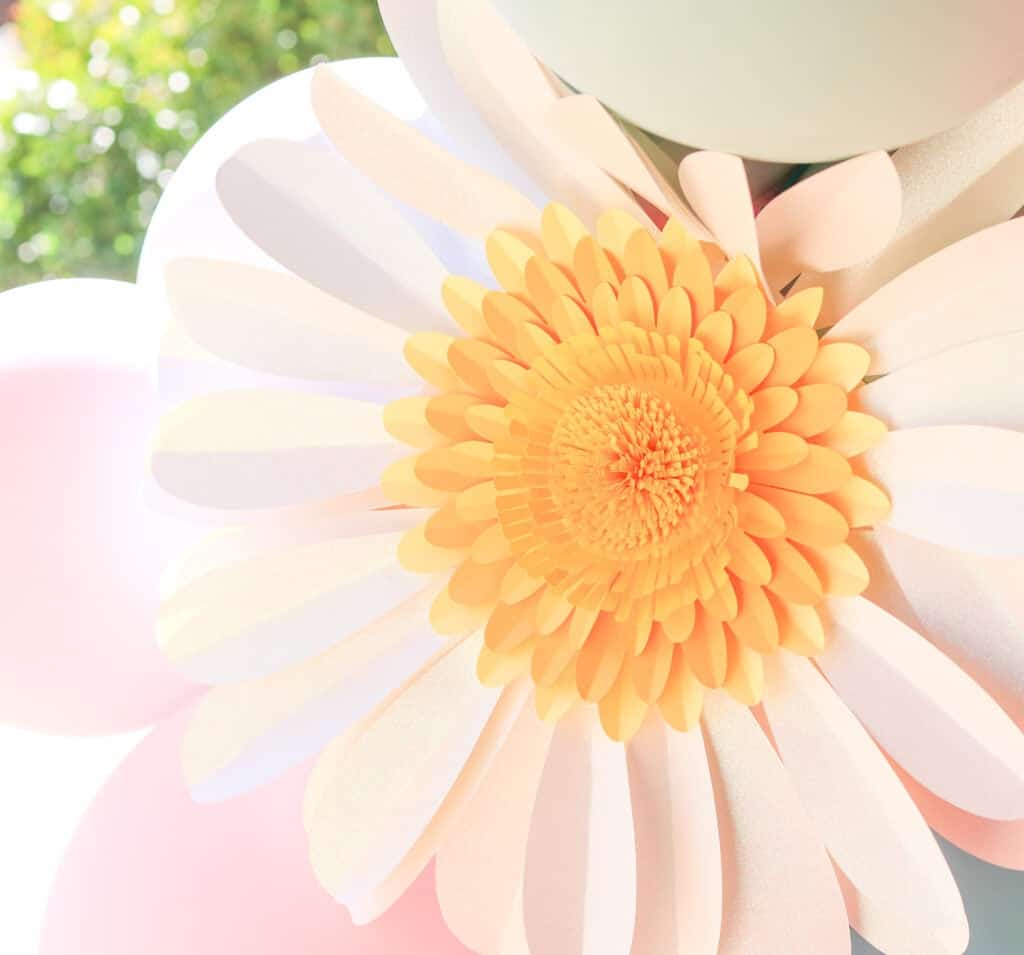
Finished Large Paper Daisy Flower
Looking for more paper flower projects? Click here!
Join my crafting and sewing Facebook group where you can show us what you’re making, ask questions, and learn from others!
Don’t want to forget about this free flower template? Save this project for later! Click here to save this project on Pinterest. Click here to save the large paper daisy flower.
Beautiful! Thank you! Fantastic post as well!
So pretty . . . surely brightens any room in the house.
All in
Such a cute craft!
It looks good.
thanks for the idea!
Very pretty!
Cute project!
Beautiful flowers and so life-like. Thank you.
Beautiful
So excited to try making these flowers! Looking for new ideas to sell at our annual recital to help the kids earn money for National dance competition!
Have you tried doing this on thinner paper? Very clear tutorial . . . thanks.
Fun project!
Gotta try this
Awesome blog craft tutorial.
Cute gift idea!
Those look amazing!
Can't wait to win this
How fun!
Thank you!
lovely flowers
These are so cute! One day when I can get a circuit I will definitely be using your videos!!!
These are beautiful! Great tutorial too.
Amazing how you come up with such cute ideas. Such imagination - real cute project.
Very pretty!
You are quite creative! May make some, at least I may not kill them!!
Very colourful and pretty. . . two thumbs up.
looks easy
I has tissue paper flower knits when I was young but this is so much better. Lovely and fun.
Such an easy creative idea....your ideas are fabulous.
I can't wait to try this idea!
Those flowers look so real . Absolutely beautiful also.
I am going to do this with my granddaughter and I bet she decorates her whole bedroom with them! Thank you!
These are so cute! My mom would really like some flowers that would last! May have to make these for her
Pretty bouquet!
Making these for my classroom wall
This is super cute and I think I may try this instead of buying faux.
Thanks
what a beautiful way to garden!!!!
These sre so pretty and look like they would be fun to make for a cheery centerpiece on the table.
Very realistic!
This looks like a fun project to try.
These Flowers were stunning. Thank you for sharing your talent with all of us.
This bouquet would make a nice gift!
What a great idea
Thank you for the effort and dedication in bringing us this amazing tutorials.
Love the tutorials!
Cool
Love the colors.
One of my favorite flowers
I love this project!
These are gorgeous!
such a cute project
So cute thank you!
thanks for the craft ideas
These are adorable and perfect for spring decorations
So pretty! Thanks!
Wow... it is so incredible what you can make with this.
So cute. What a great bouquet
They are so pretty!
These are so pretty.
These are adorable!
Super cute!
thank you so much
Such a beautiful idea for Mother's Day!
Omg how cute is this! Perfect for Mother’s Day!
Such a pretty bouquet.
They are so pretty!
I love the whole bouquet!
Love your paper flowers!
What a great idea for spring
the flowers look amazing
I need Daisys for 60's decor. These should be great !
Turned out great!!
Beautiful flowers!!
they look fantastic
Thank you for sharing such easy to follow instructions!
My daughter want5s to make these for her room
Love the colors used for the flowers!
How awesome. I want to try this. They are beautiful.
I can't believe that's just paper! Well done!
So many projects
These are beautiful!
Really cute!
You are talented AND a great teacher ~ thank you!
Beautiful!
These are beautiful!
This would make a great centerpiece.
This would make my life so simple. I make quilts and bags/purses! The cutting would help me! I have real bad arthritis and scissors are my nemesis.
I HAVE LEARNED SO MUCH ABOUT MAKING FLOWERS FROM YOUR TUTORIALS THANK YOU
a great mothersday idea
I love these. I have made many of your large flowers for baby showers, etc. you have the easiest directions to follow!
I love daiseys
Beautiful flowers you dont have to water!!
Finally flowers I could keep looking pretty! LOL
beautiful
Flowers are so fun to make. I always get inspiration from you. I like the challenge of making different flowers. Thank you for all you do to help us learn.
Very detailed instructions, all questions were answered.
What beautiful flowers
This bring crafting to the next level! Would love to make these with a Cricut!
love all your articles and advice, thanks a bunch
Flowers are one of my favorite things that I would make with a Cricut.
great ideas
I think you have a gift for making instructions that are a breeze to follow. Step by step.. you have this down pat. Even for picking the correct paper and the reasons behind your recommendations. Really it's all in the details. Thank you for doing this.
A fun project for Mother's day
I like all the colors you picked.
So cute! They almost look real!
thanks for the mothersday idea
Wow, so pretty!
Beautiful!
Looks unique
My mom would be pretty happy if I made these for her.
I love this bouquet - so many pretty colors!!
So beautiful so fun so inspiring! Thank you Thank you Thank you!
love the details on them
So nice
Just shared this with my daughter. She loves daisies of all kind!
Oh, you did some other flowers! I'm off to go check them out!
Perfect for Spring!
These paper flowers are beautiful!! I need to get some card stock so I can make some!
So pretty
Incredible! The hints and options are really helpful, too.
Thanks for the information on cardstock. The Gerbera is a pretty shade of pink. So many ideas, who knew you could do all that with paper!
I love these !
thank you
Simple yet elegant!
Fun!
Perfect for spring
great
Thank you for sharing the template.
Beautiful things!
Loved these...now going to go look how to make oversized roses.
A couple of the smaller flowers would look Cute in the baskets!
These are so sweet it it actually feels doable! Great tutorial
These are absolutely gorgeous! Thank you for the detailed tutorial and the template. It's all very inspiring.
BEAUTIFUL!!!!!
I can't wait to make this Flower! I've been having fun making your flowers.
I just love the textures on the flowers. All the fringe centers.
very cool, they look amazing
Perfect spring touch!