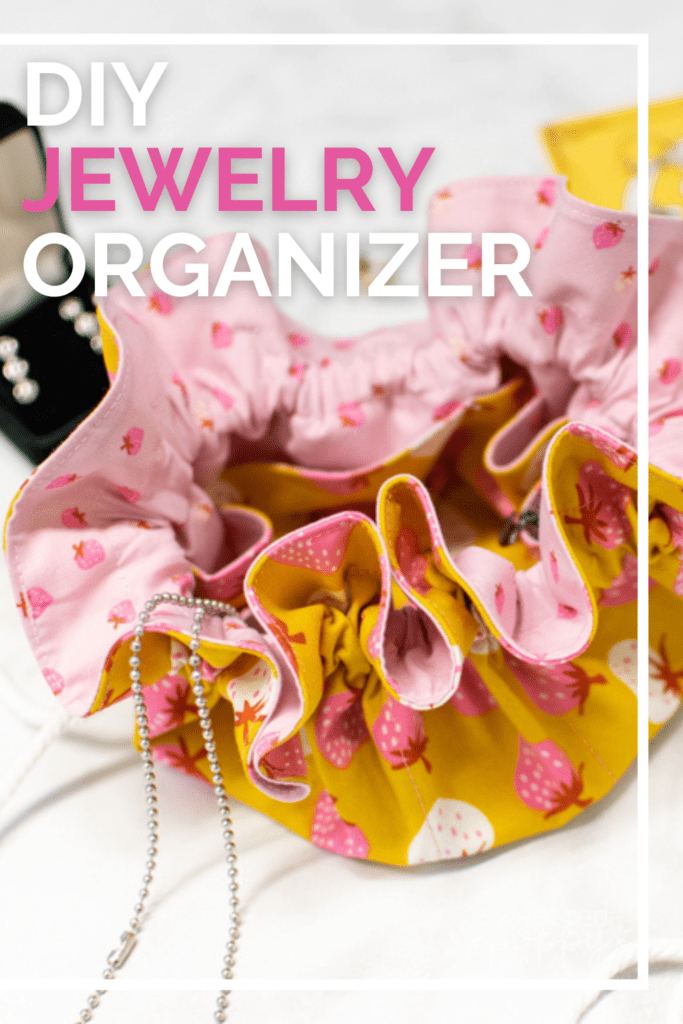
Keep Your Life Organized With a Beautiful DIY Jewelry Organizer! Grab My Free Sewing Pattern and Follow the Step-By-Step Tutorial.
If you're looking for a cute and travel-friendly way to organize your jewelry, this DIY project is for you!
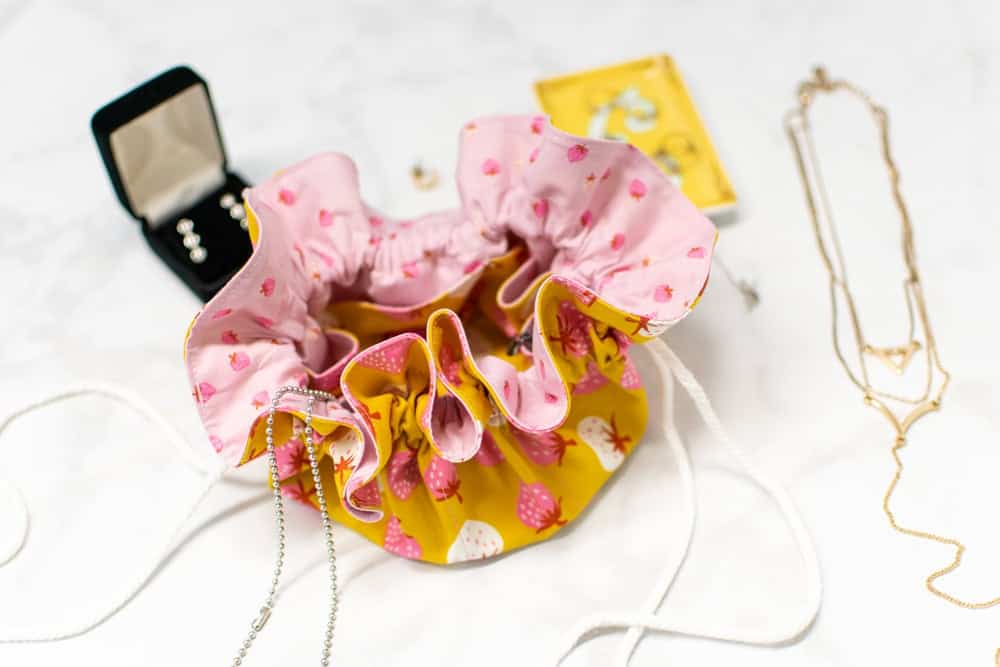
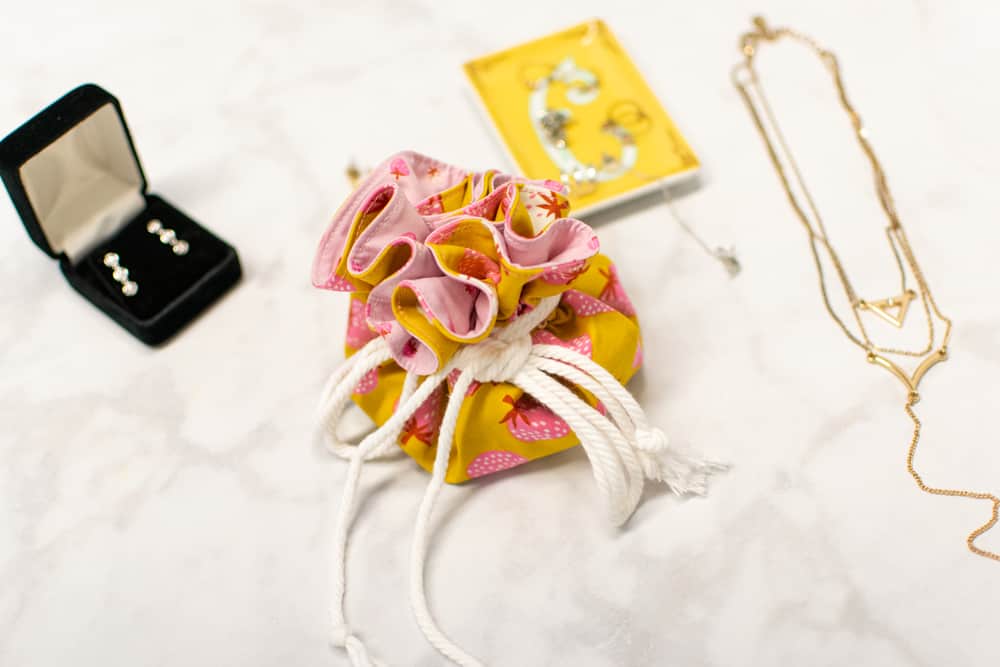
I'm sharing my free sewing pattern for this adorable jewelry organizer - a cute little circular pouch with pockets for earrings and necklaces.
Simply grab the free sewing pattern below and follow along with the step-by-step sewing tutorial (with photos!).
Table of Contents
Your New Travel Companion: A Jewelry Organizer!
I absolutely love using my jewelry organizers when I travel. It's the perfect way to keep all my jewelry for the trip contained and organized.
Throwing loose jewelry into your suitcase can cause a lot of frustration when you get to your destination and can't find the piece you want to wear! That's where the jewelry organizer comes in.
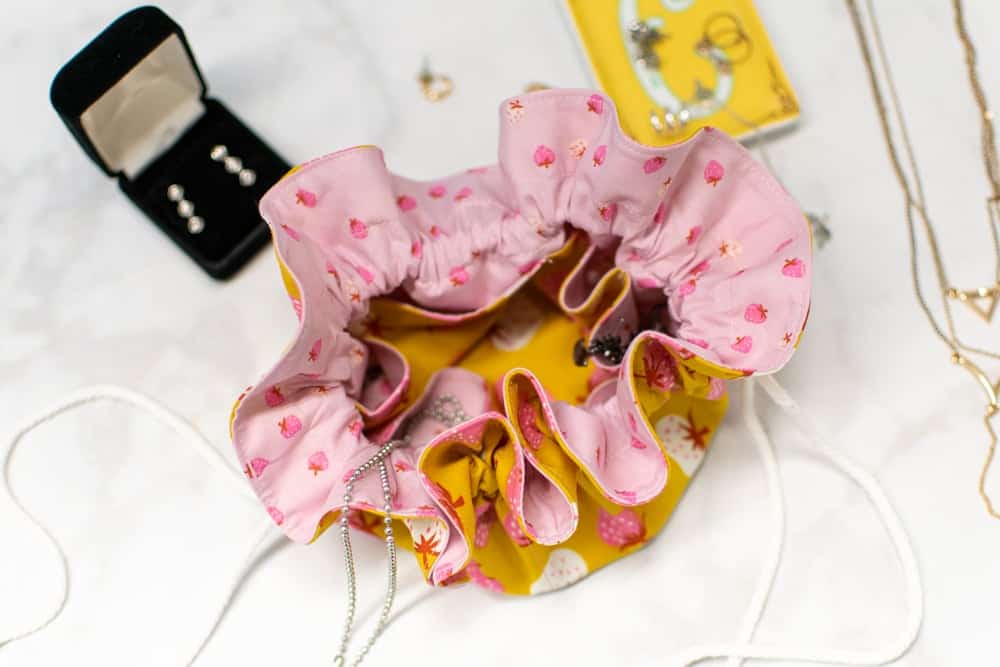
Pack your favorite necklaces and earrings into the pockets of the organizer, then close it up with the ribbon or drawstrings to keep your jewelry in place. Your jewelry will stay right where you put it, making finding the right necklace or earrings easy during your trip!
Want to learn how to make even MORE fabric bags?
Get 11 different bag patterns and gain access to a comprehensive collection of bag patterns and tutorials my All The Bags 150+ page Ebook by clicking here.
About the Jewelry Organizer Pattern
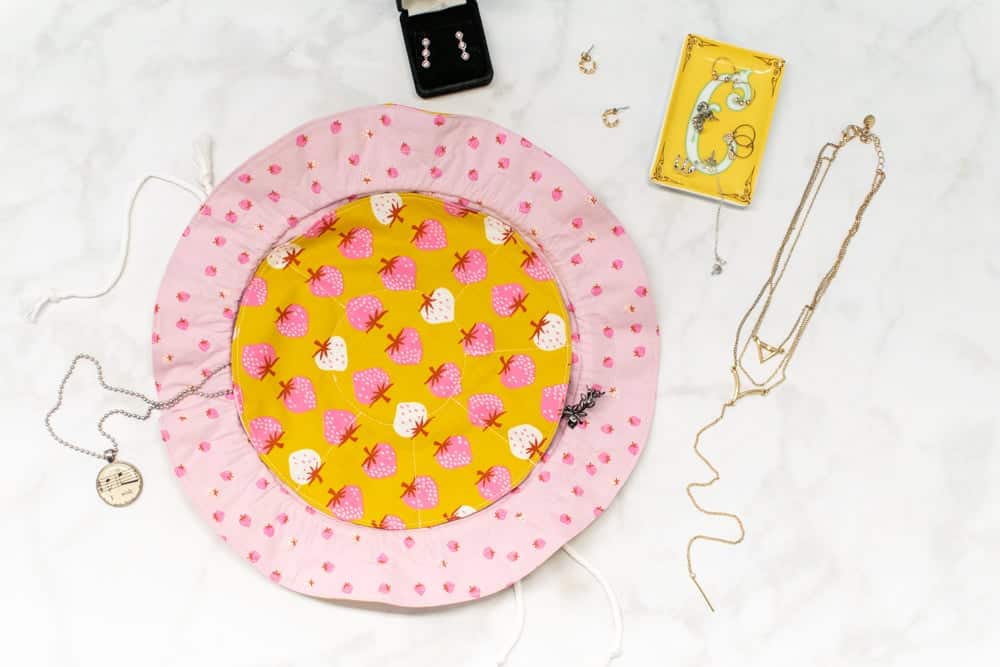
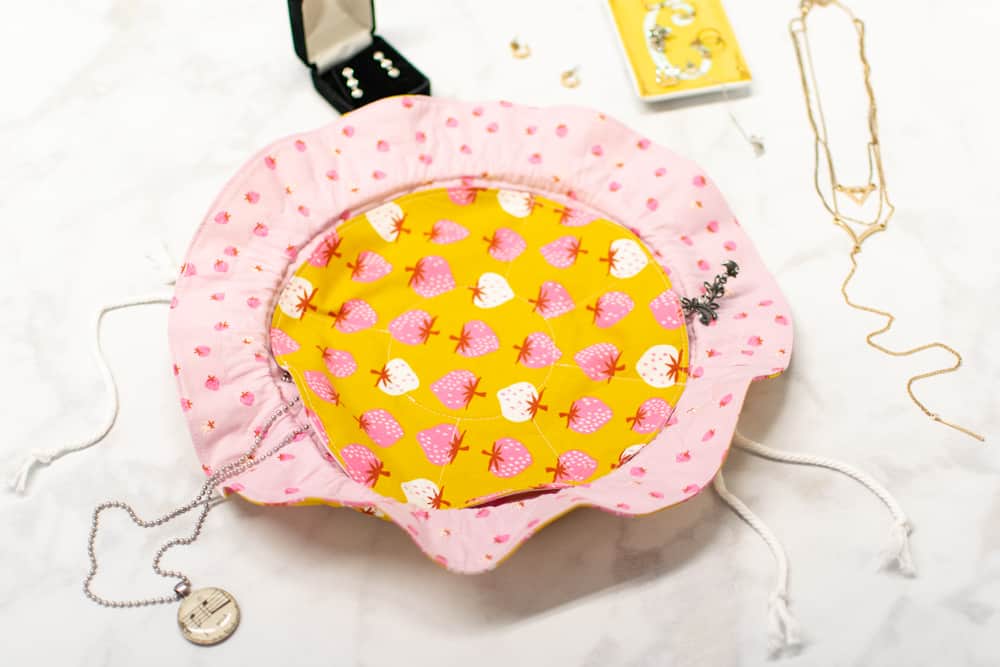
This jewelry organizer is made in a fun circular shape with a ribbon or drawstring around the top to easily open and close the bag.
The organizer features 6 pockets on the interior - 2 larger-sized pockets and 4 smaller pockets.
The small pockets are perfect for storing sets of earrings or delicate necklaces. The larger pockets are great for bulky necklaces and bracelets, as well as larger hoop-style earrings.
Fabric Suggestions for the DIY Jewelry Organizer
You can use any medium-weight non-stretch fabric to sew your jewelry organizer.
For easy sewing and lots of color options, I highly recommend using a high quality quilting cotton.
However, don't feel limited to only quilting cotton! This jewelry organizer also looks great made from decorative fabrics such as satin or even lightweight faux leather!
Why Shop Through My Links?
When you shop through my affiliate links, it doesn't cost you anything extra, but it helps me out in a big way! I earn a small commission from those purchases, and that support allows me to continue creating and sharing free tutorials and patterns for you. Thank you so much for helping me keep this creative community going! 💕
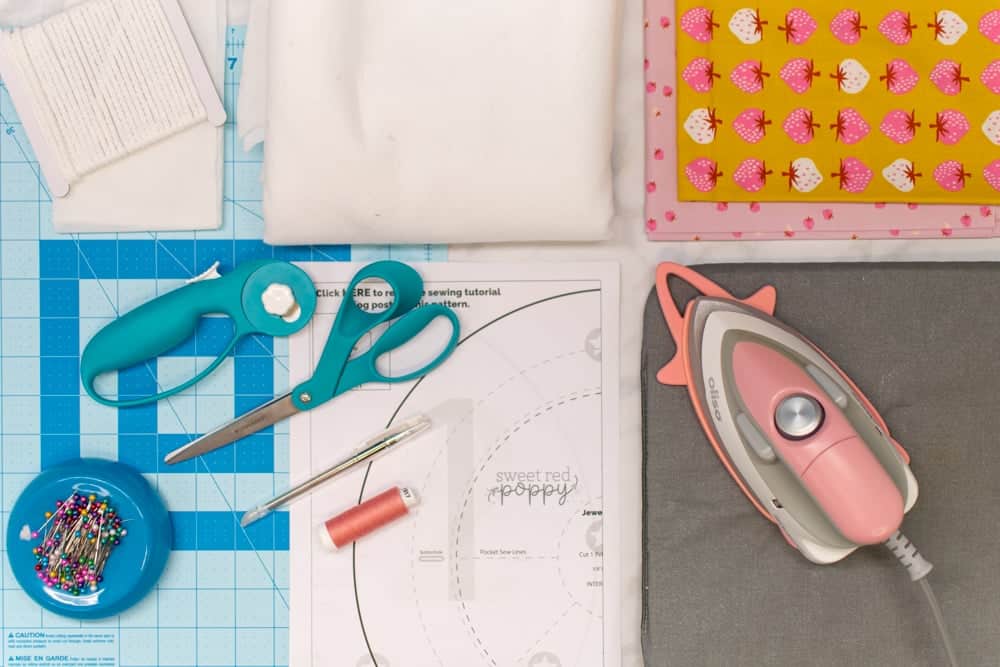
Supplies to Make a Jewelry Organizer
Here are the supplies you'll need to make your cute DIY jewelry organizer.
Shop my favorite sewing supplies here!
- 3 Fat Quarters of Quilting Cotton or 1/2 Yard 42-Inch or Wider Fabric
- 1/4 Yard 20-inch Wide Fusible Interfacing
- 1/4 Yard 20-inch Wide Fusible Fleece or Fusible Flex Foam
- 4 40-Inch Long Pieces of Ribbon or Drawstring
- Scissors
- Rotary Cutter
- Rotary Cutting Mat
- Thread
- Sewing Pins
- Iron
- Ironing Board
- Fabric Pen or Tailor's Chalk
- Measuring Gauge
- Sewing Machine
- Sewing Machine Needle
- Buttonhole Foot
- Tape
- Printer
- Printing Paper
Click Here to Download the FREE Jewelry Organizer Sewing Pattern
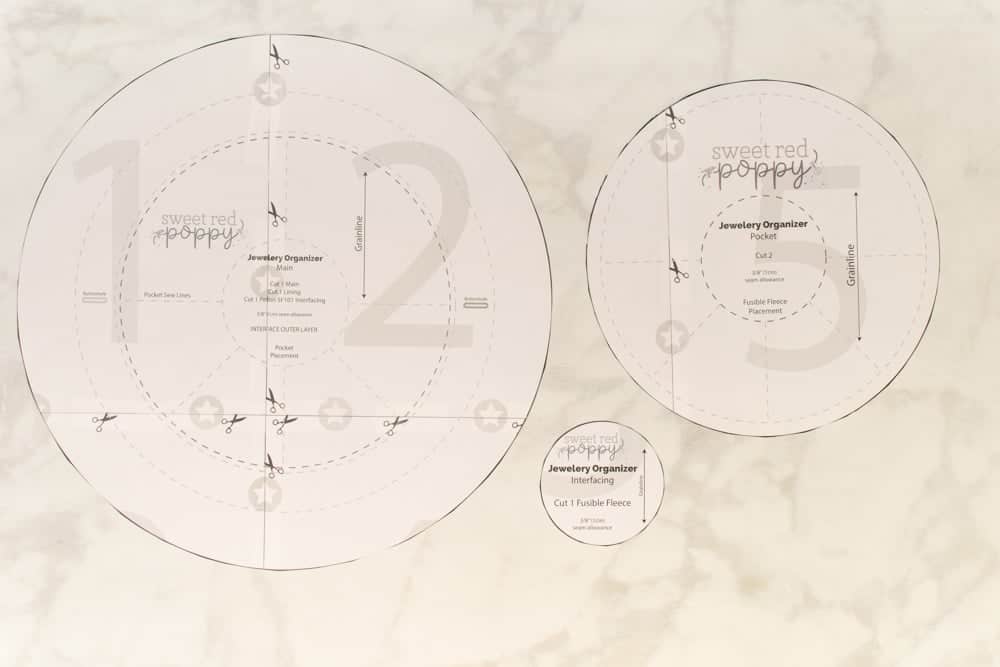
Step 1: Download and Assemble the Pattern
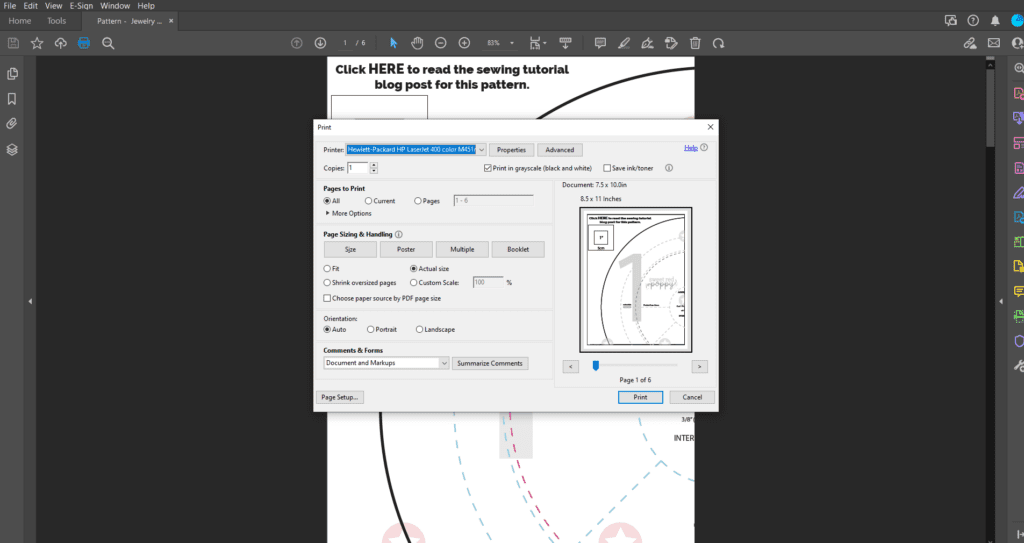
First, download the free jewelry organizer pattern to your computer. Open the pattern in your PDF reader - I highly recommend using Adobe Acrobat.
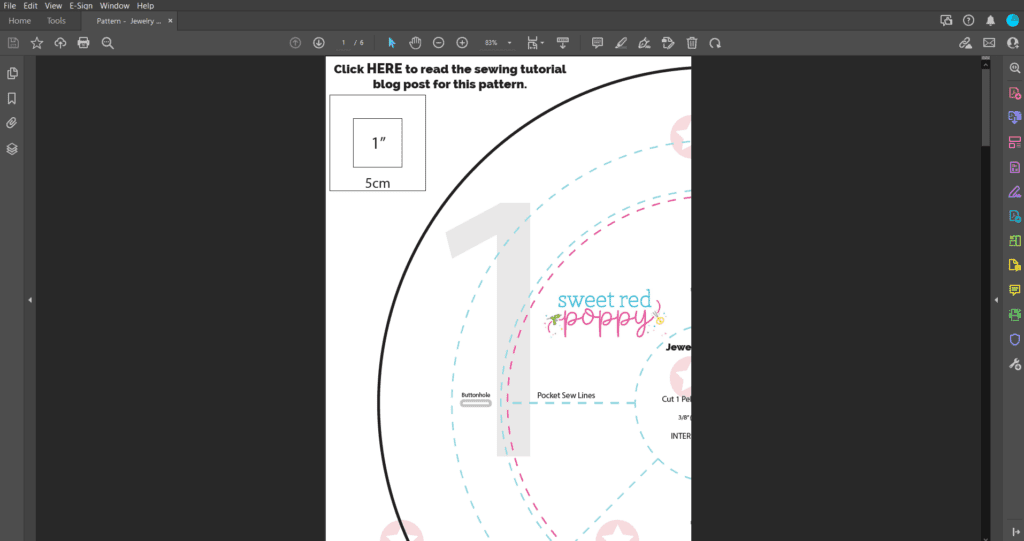
It's important to avoid printing the pattern directly from your browser because it may print with incorrect scaling and border lines. Make sure to open and print the pattern from your PDF reader!
Once the pattern is opened, click on "Print". This will open a print settings dialog box. In this box, change the scaling to "Actual Size" or "Custom Scaling: 100%".
Next, print the first page of the pattern. This page contains a 1" x 1" test square. Measure the test square.
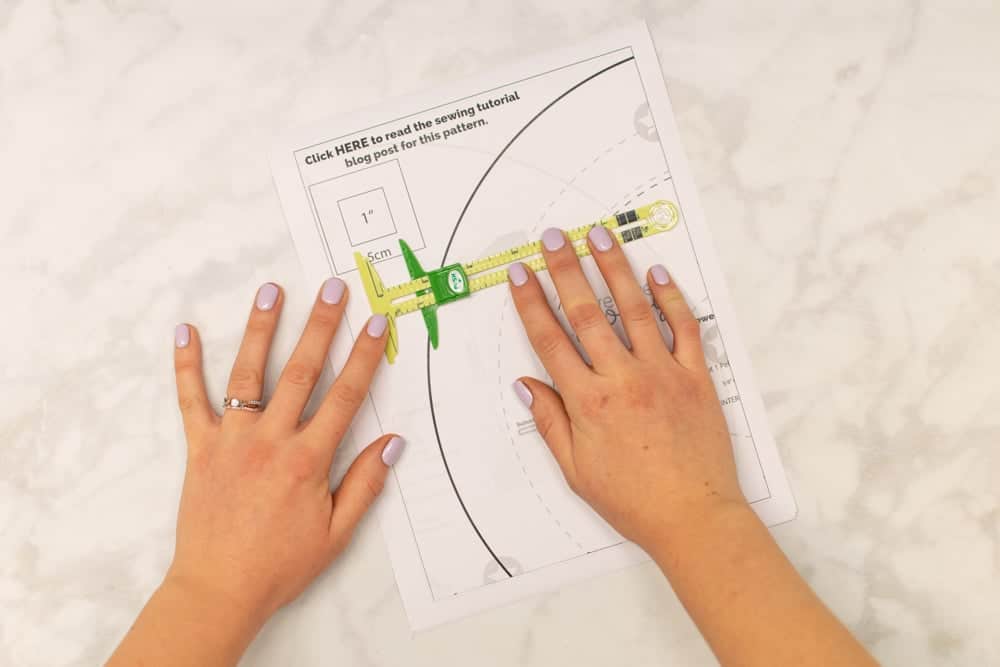
If it measures 1" x 1", go ahead and print the rest of the pattern. If it does not measure 1" x 1", you'll need to recheck your scaling in the print settings before printing again.
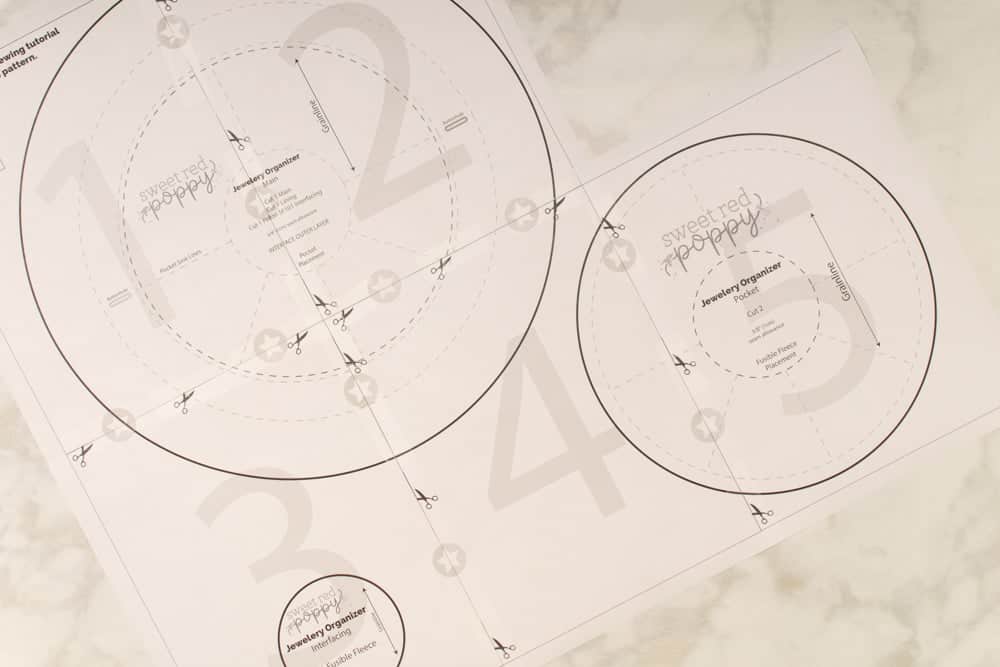
After printing the pattern, assemble and tape together the pages according to the layout chart below. Each page has a large number printed at the center to help you keep the papers in order.
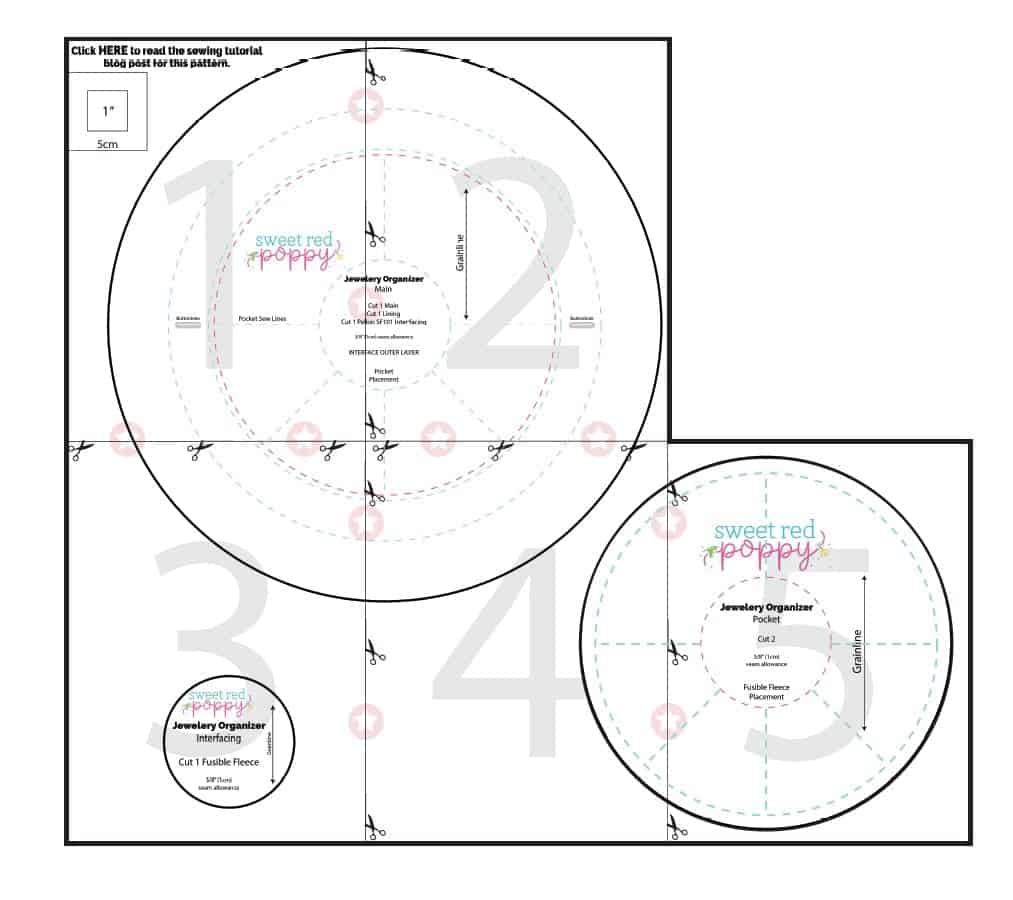
If you like, trim away the excess paper along the border lines of the pattern before taping the pages together. Or, you can simply overlap the margins. If you decide to overlap the edges, holding the pages up to a light can help you see through the paper and align the pattern lines correctly.
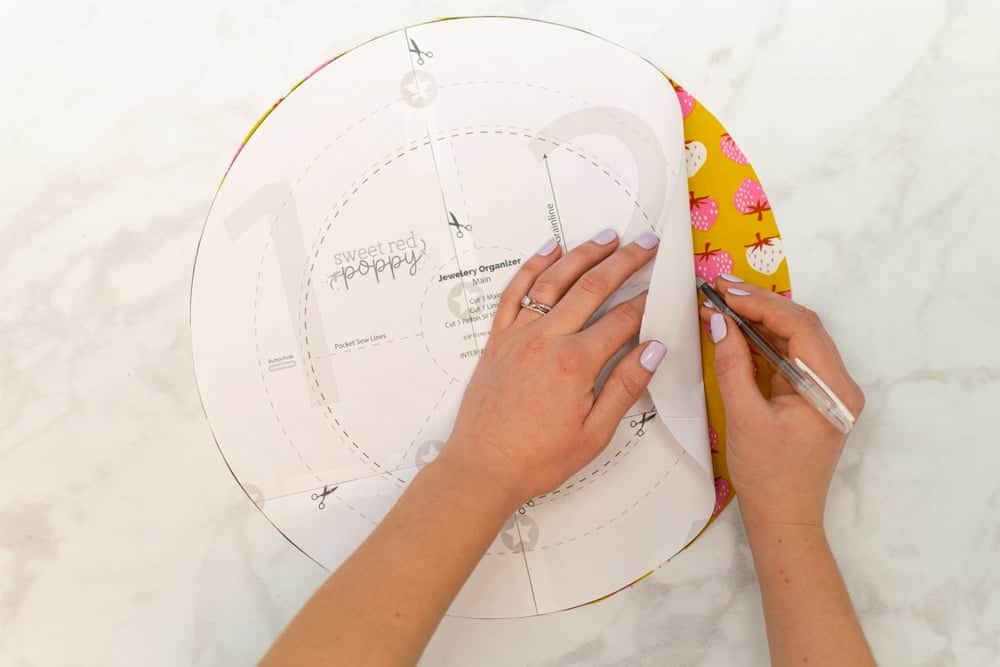
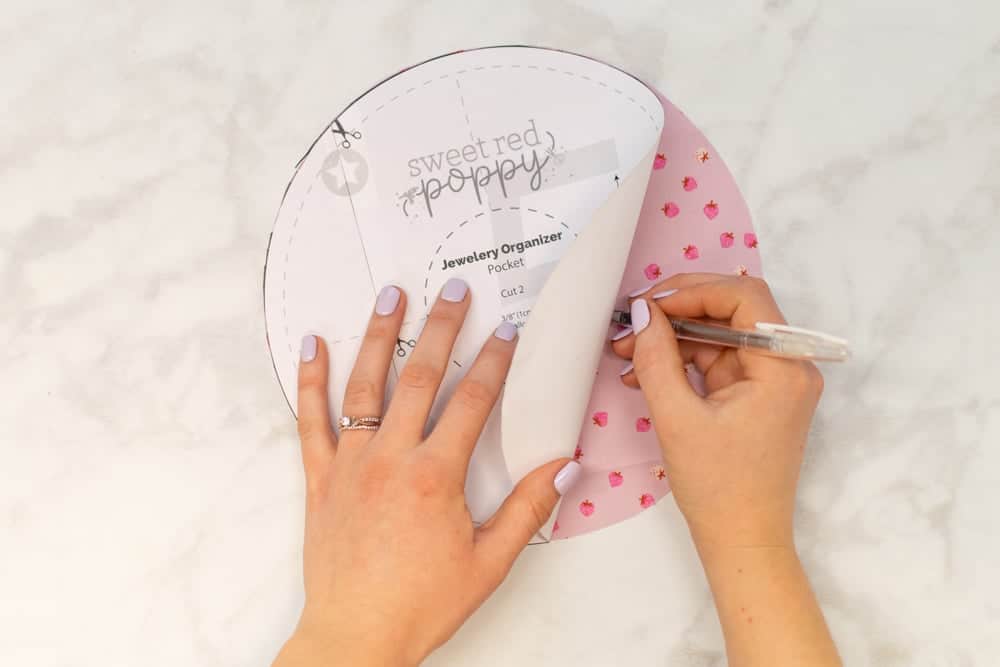
Once the pattern is assembled, cut out each pattern piece. You will have 3 pattern pieces: the Main, Pocket, and Pocket Interfacing.
Step 2: Cut the Fabric and Transfer Markings
With the pattern pieces prepared, grab your fabric, interfacing, and fusible fleece - let's get cutting!
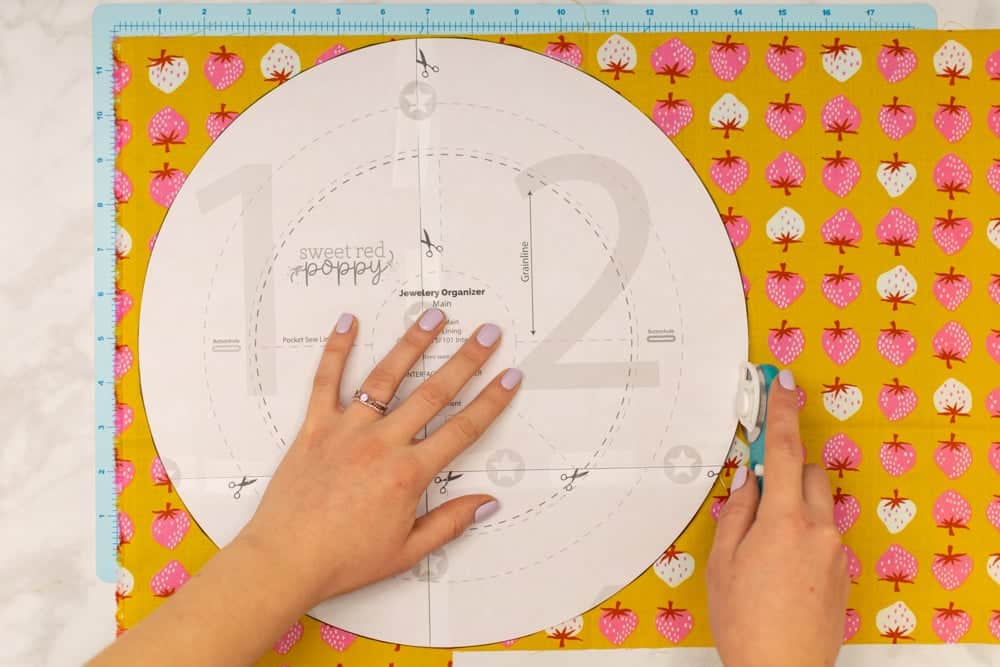
Cut the following number of each pattern piece from your materials.
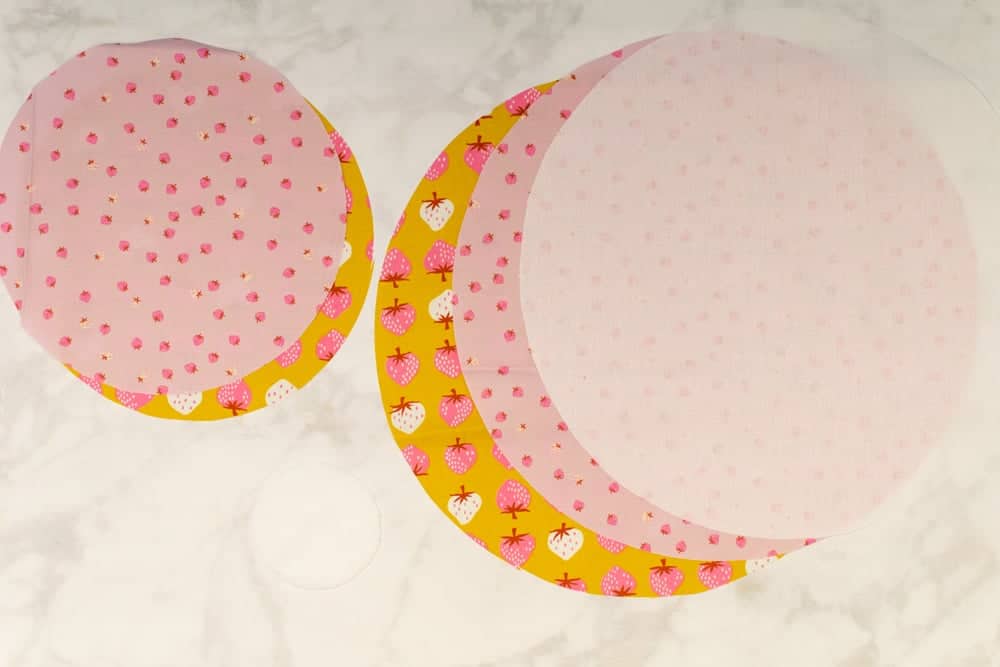
Fabric (Outer)
- Main: Cut 1
- Pocket: Cut 1
Fabric (Lining)
- Main: Cut 1
- Pocket: Cut 1
Fusible Interfacing
- Main: Cut 1
Fusible Fleece or Flex Foam
- Pocket Interfacing: Cut 1
Next, transfer the pocket placement and drawstring channel markings from the Main pattern piece to the right side of the lining fabric piece with a fabric pen.
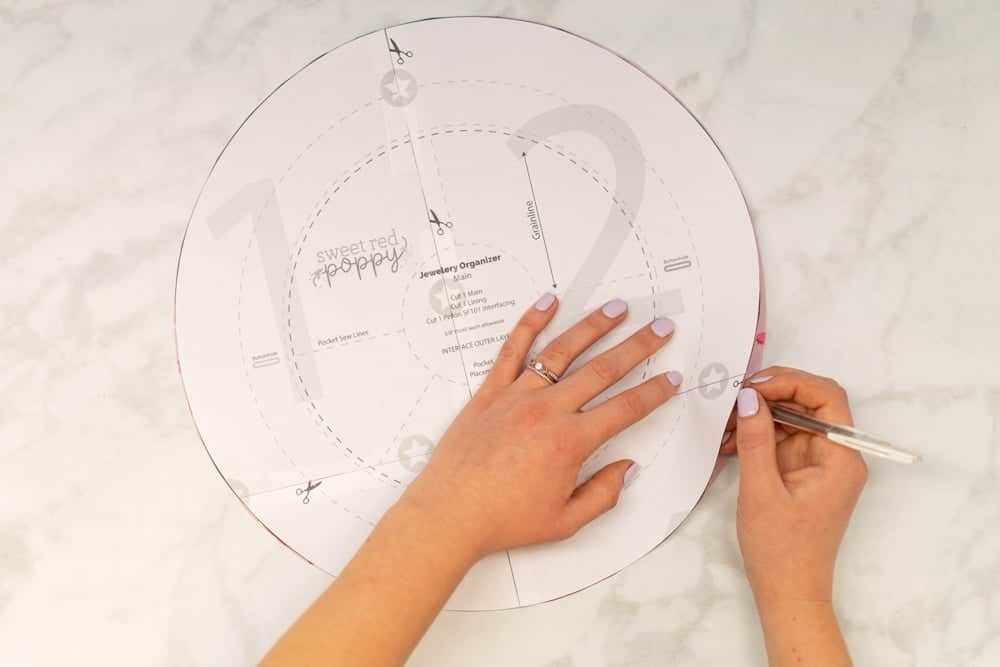
Transfer the buttonhole placement markings from the pattern piece to the right side of the outer fabric Main piece.
Then, transfer all the Pocket stitching lines from the Pocket pattern piece to the right side of one of the Pocket fabric pieces. Make sure to mark the piece that you want to be the outer (visible) Pocket piece.
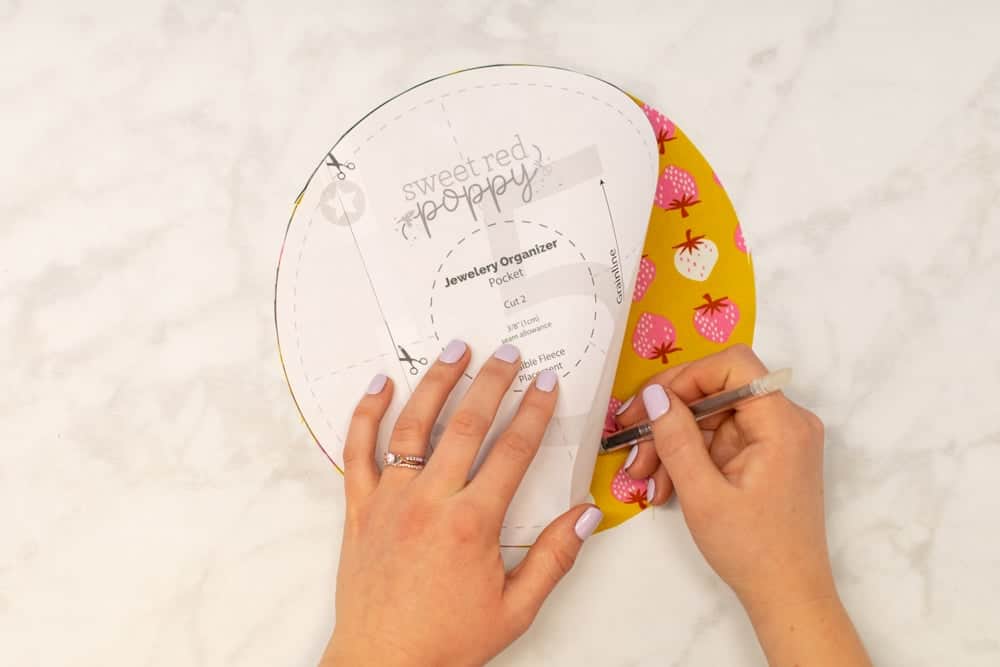
Finally, transfer the Fusible Fleece Placement marking from the Pocket pattern piece to the wrong side of the other Pocket piece.
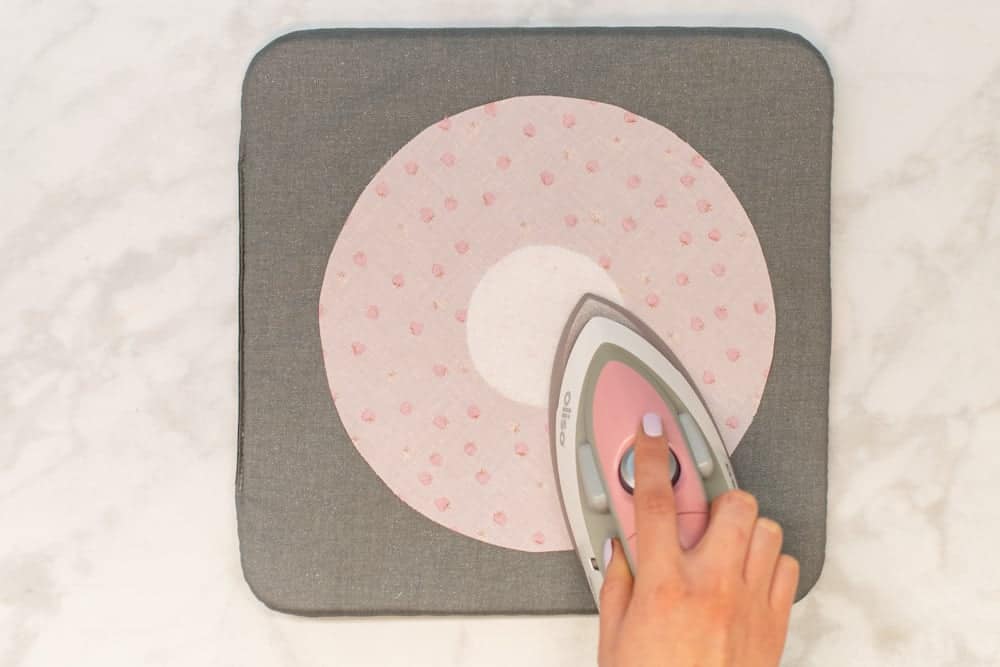
Step 3: Apply Interfacing
Once the pieces of your jewelry organizer are cut and marked, you'll need to apply the interfacing to the fabric pieces.
First, fuse the Main interfacing to the wrong side of the outer fabric Main piece.
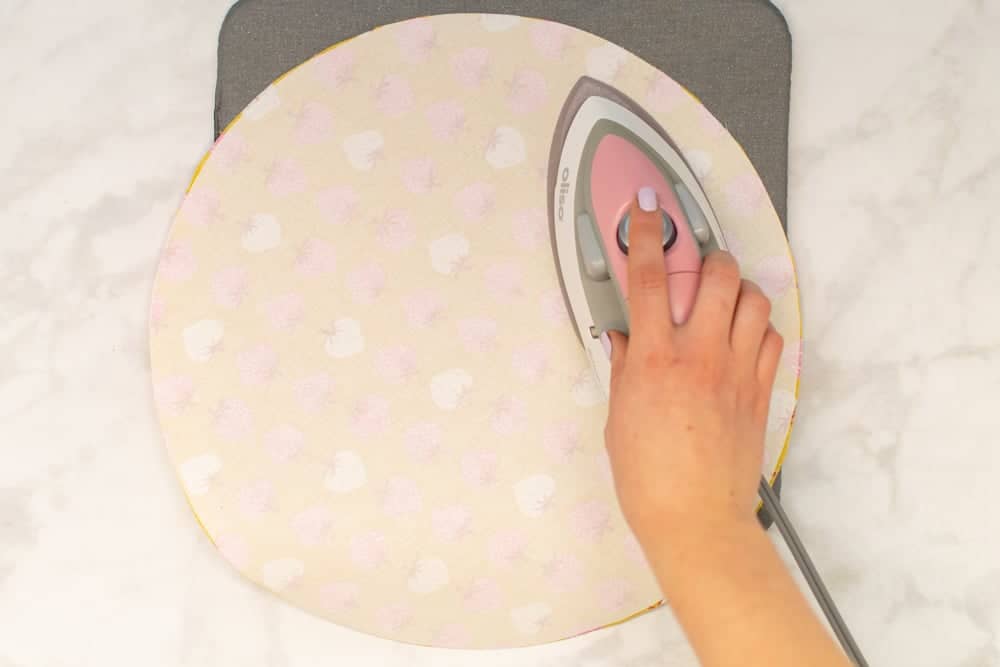
Then, apply the fusible fleece or flex foam to the center of the wrong side of the Pocket lining piece. The placement should be marked on the fabric from the previous step.
Step 4: Make the Buttonholes
Next, use your buttonhole foot to sew 2 1/2-inch buttonholes on the Main outer fabric piece. Make sure to follow the markings you transferred from the pattern to place the buttonholes correctly on the fabric.
*PRO TIP: If you have one, place a 1/2-inch button into the button tray of your automatic buttonhole foot. This makes sewing the correct size of buttonhole easy!
Once you've stitched the buttonholes, place a perpendicular pin at the end of one of the buttonholes, just before the end stitching. Then, cut the buttonhole open with a seam ripper. The pin you placed at the end will prevent the seam ripper from accidentally sliding too far and cutting into your stitches.
Repeat this process to cut open the second buttonhole.
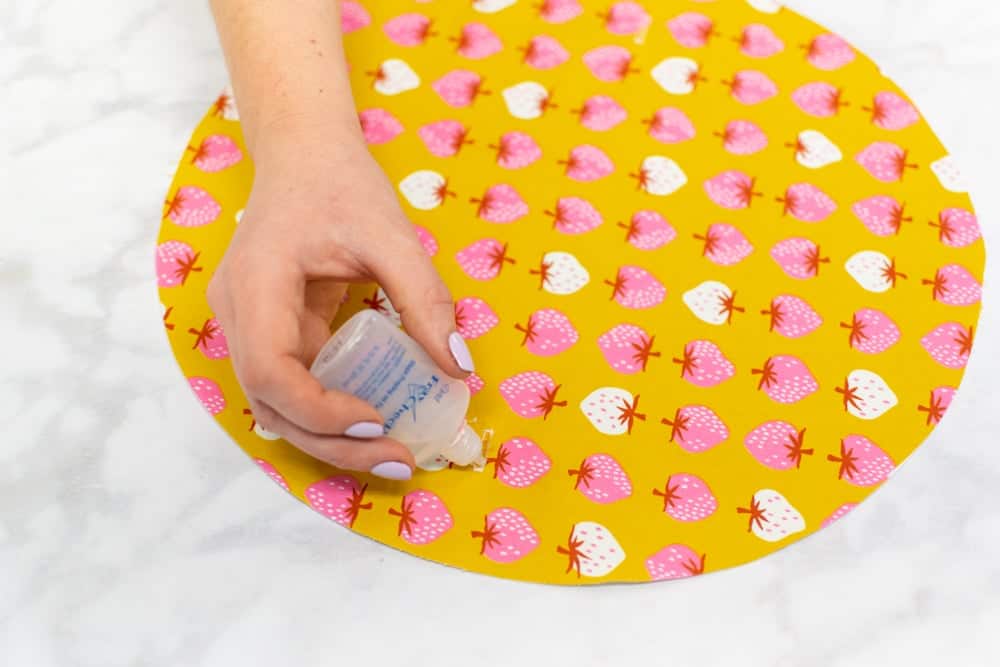
Finally, dot a bit of fray check on each buttonhole and allow it to dry. This helps keep any fraying threads at bay, helping your buttonholes to last longer.
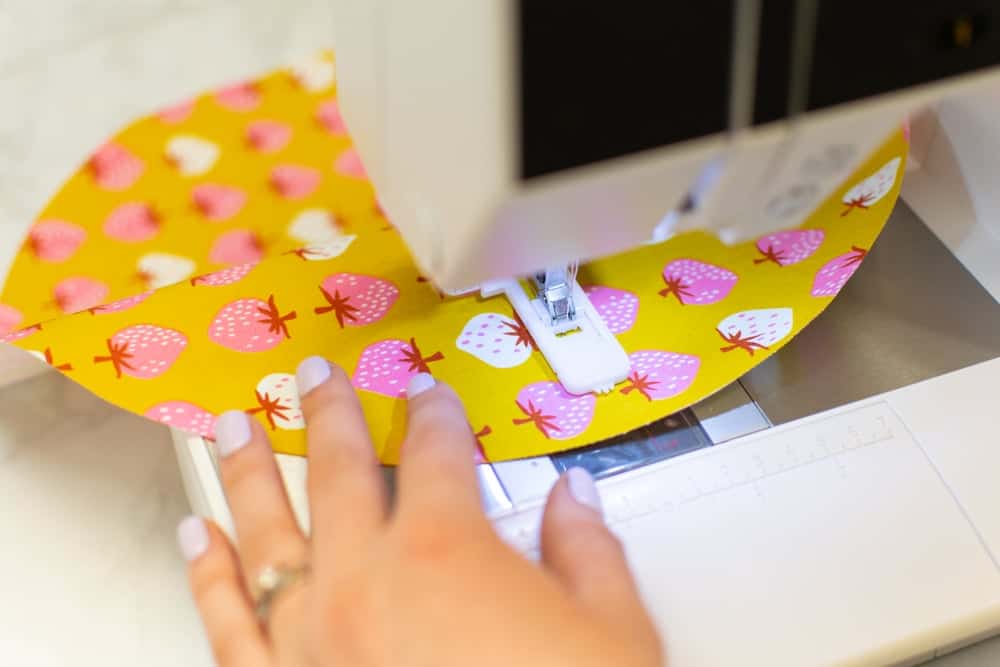
Step 5: Sew the Pocket and the Main
With the buttonholes stitched, set the Main pieces aside and grab your 2 Pocket pieces.
Place the 2 Pocket pieces with right sides together, aligning the raw edges.

Pin the Pocket pieces together all the way around.
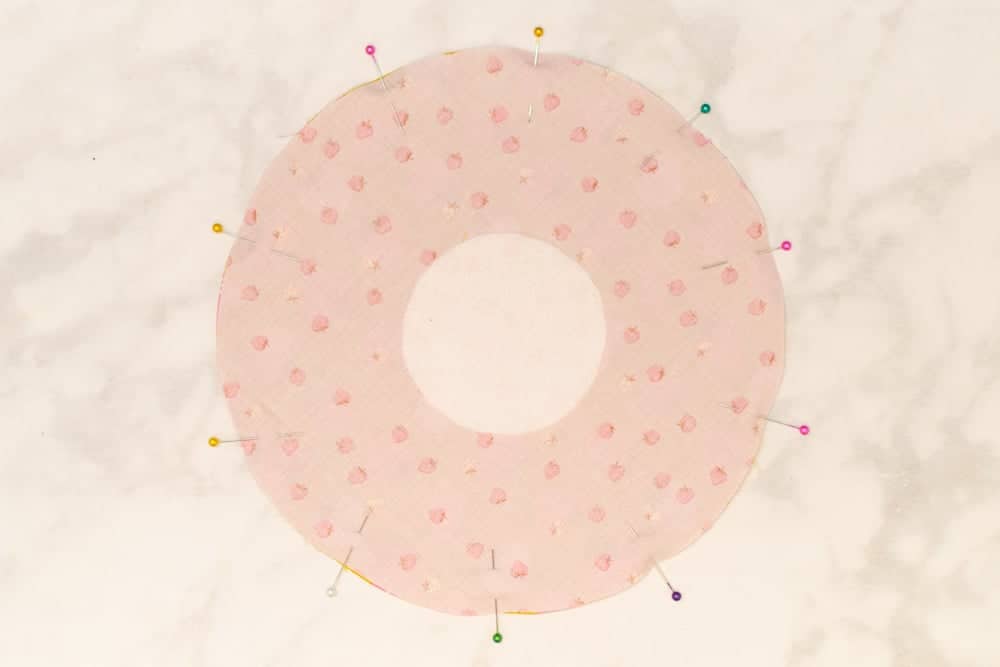
Then, stitch around the edges of the Pocket pieces with a 3/8 inch seam allowance. Make sure to leave a 2" opening to turn the Pocket through later.

*PRO TIP: If you're having trouble getting a nice, even circle from your stitching, try marking in your stitching line first with a fabric pen. Then you can focus on following the marked line while sewing. I find this to be very helpful in getting a more accurate circular shape for my jewelry organizer!
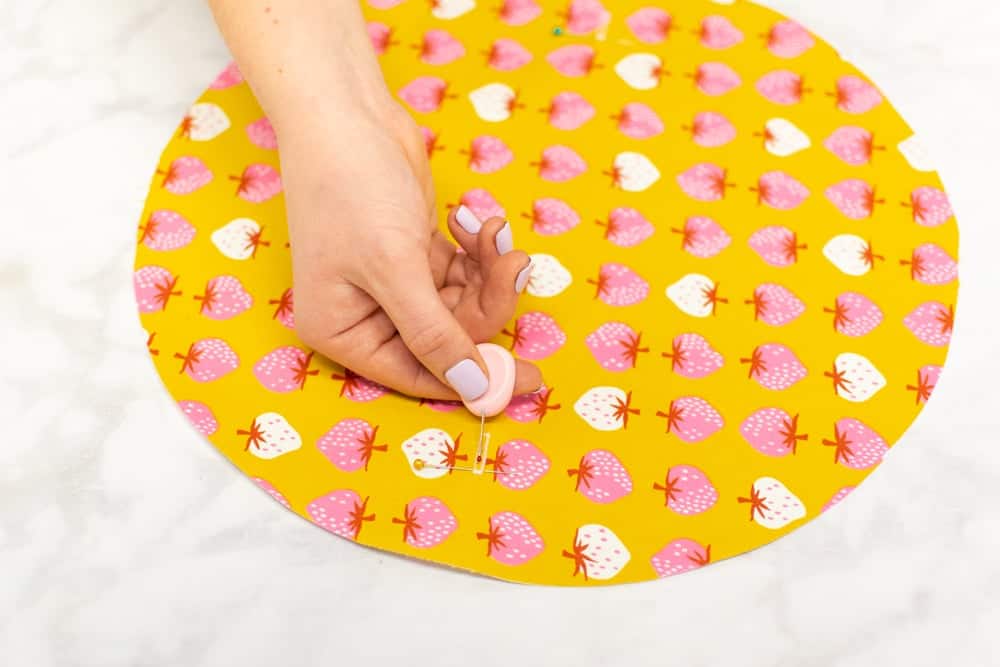
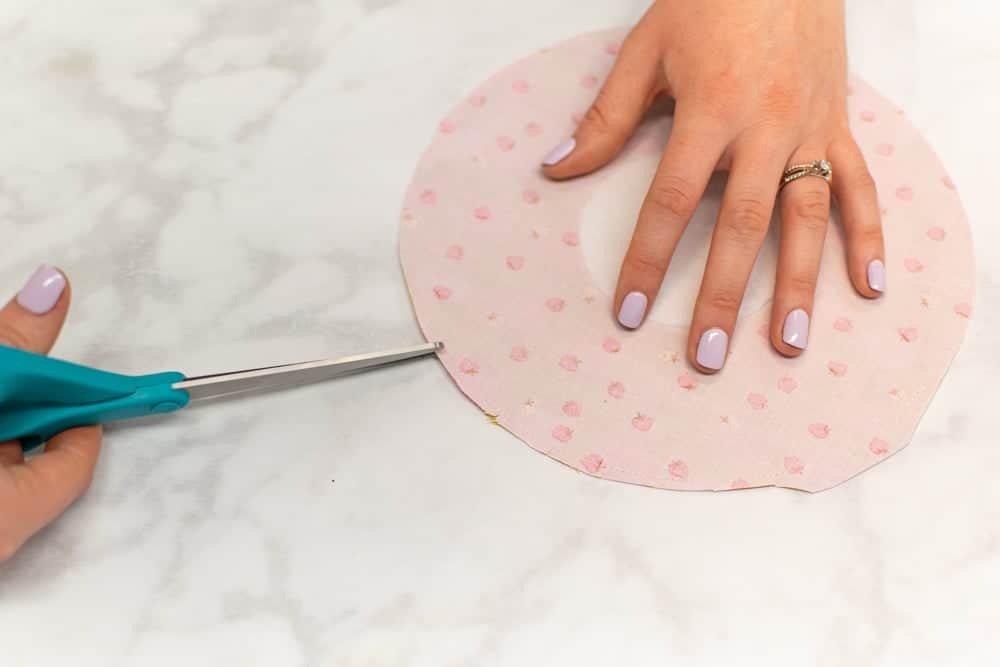
Once stitched, trim the seam allowances down by half to reduce bulk. I like to trim the seam allowance down around the entire circle except over the 2-inch opening left in the seam.
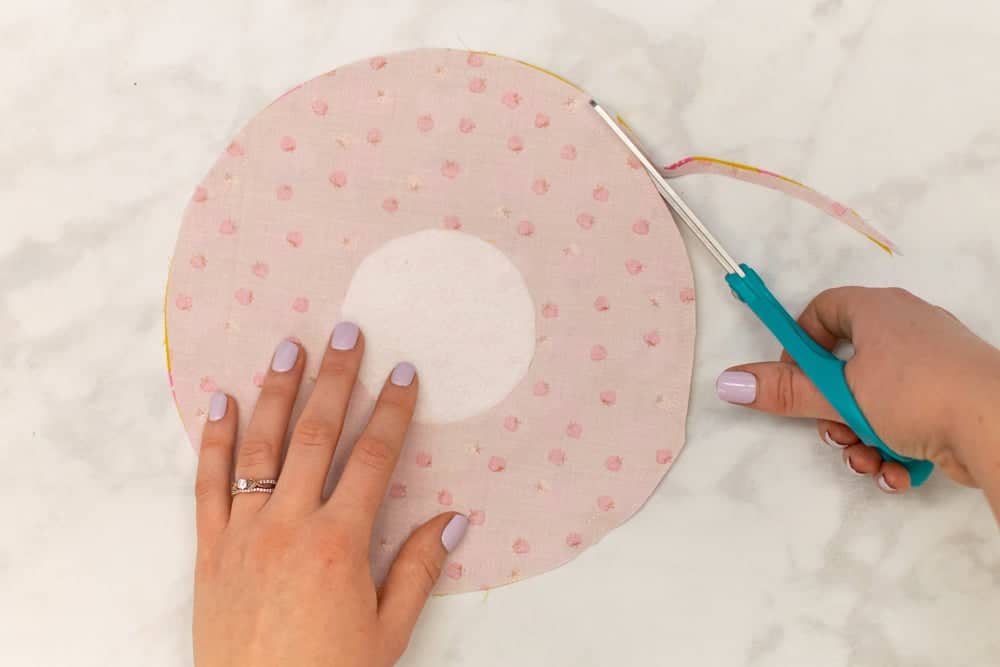
Next, clip into the seam allowances up to, but not through, your stitching. Make your clips about 1/2 inch apart around the entire circle. This will help the seam to lay flatter once the Pocket is turned right sides out.
Turn the Pocket right sides out through the opening in the seam. Push all the edges out with a chopstick or your fingers.
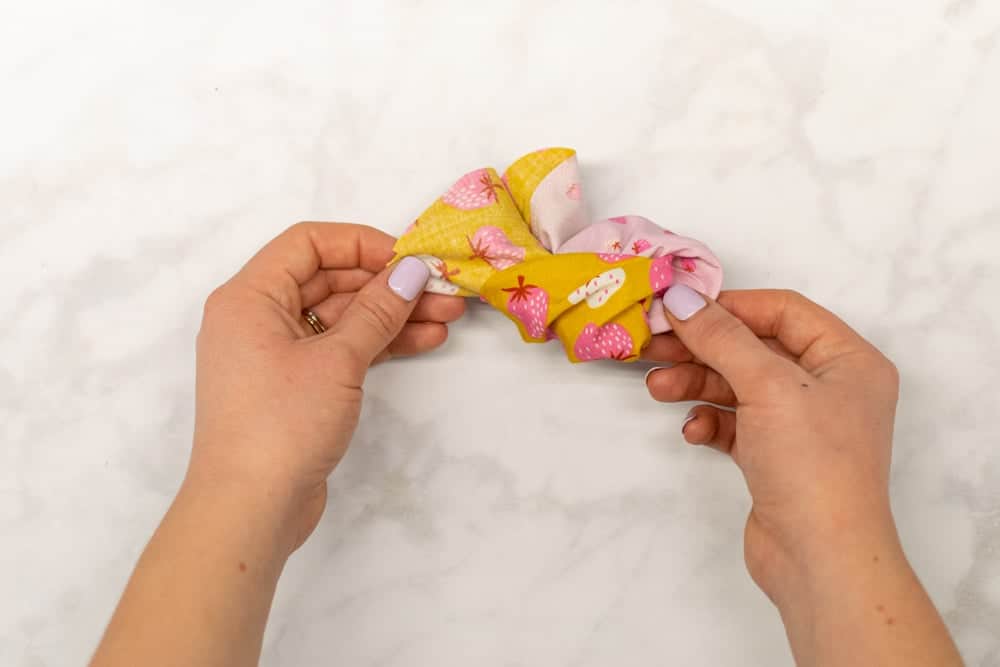
Press the Pocket flat, pressing the seam right to the edge. At the opening, press the edges to the inside to create a continuous edge with the raw edges hidden inside.
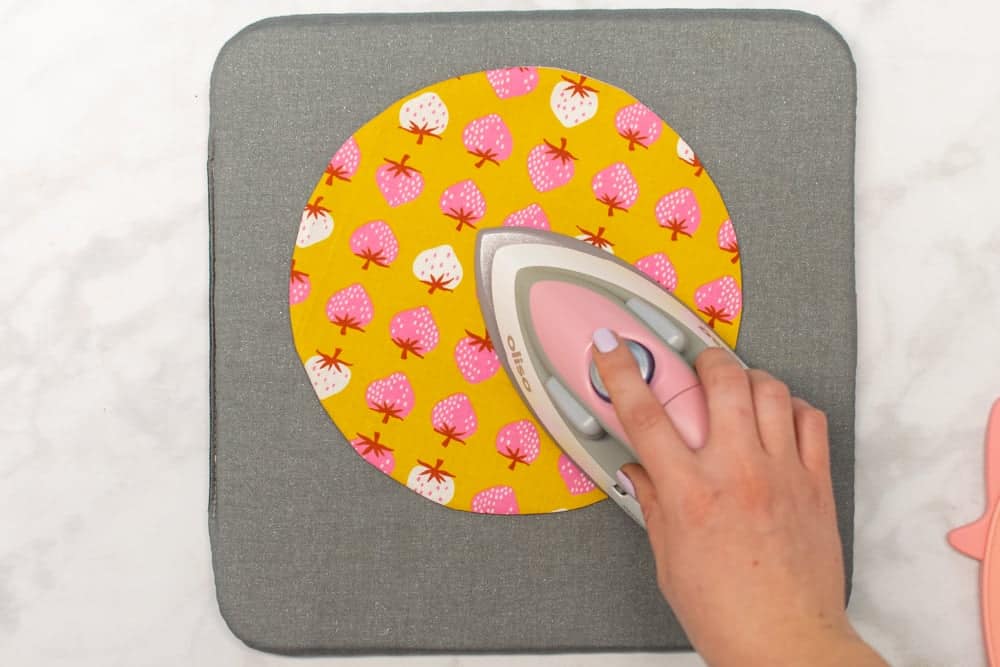
Then, topstitch around the Pocket, sewing 1/8 inch from the edge. Give the Pocket another good pressing, then set it aside for now.
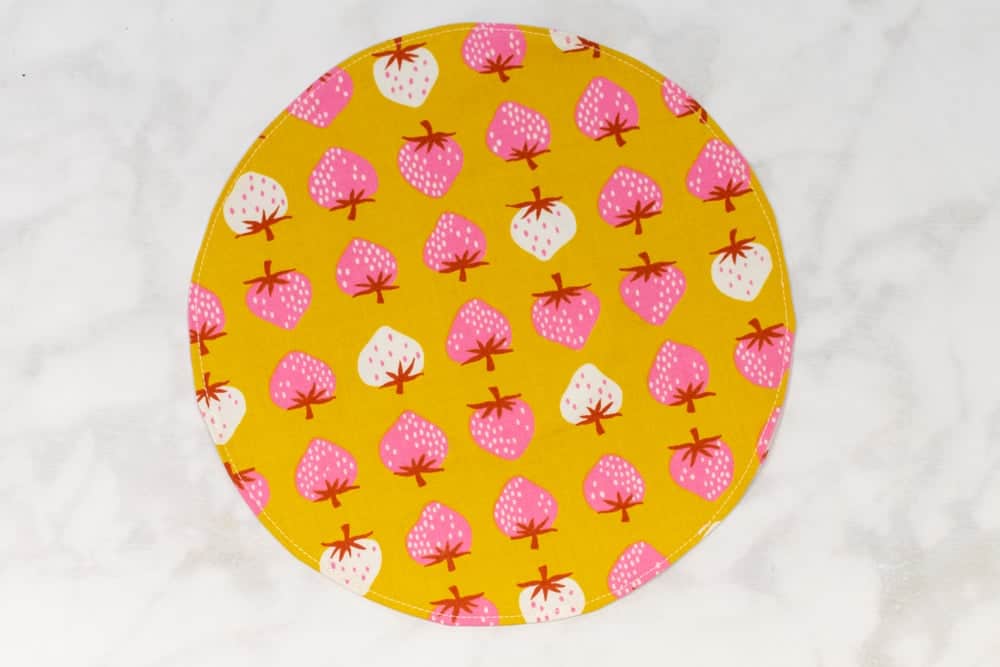
Finally, repeat this exact same process to stitch the outer fabric Main to the outer fabric Lining.
Step 6: Stitch Casing and Pocket Lines
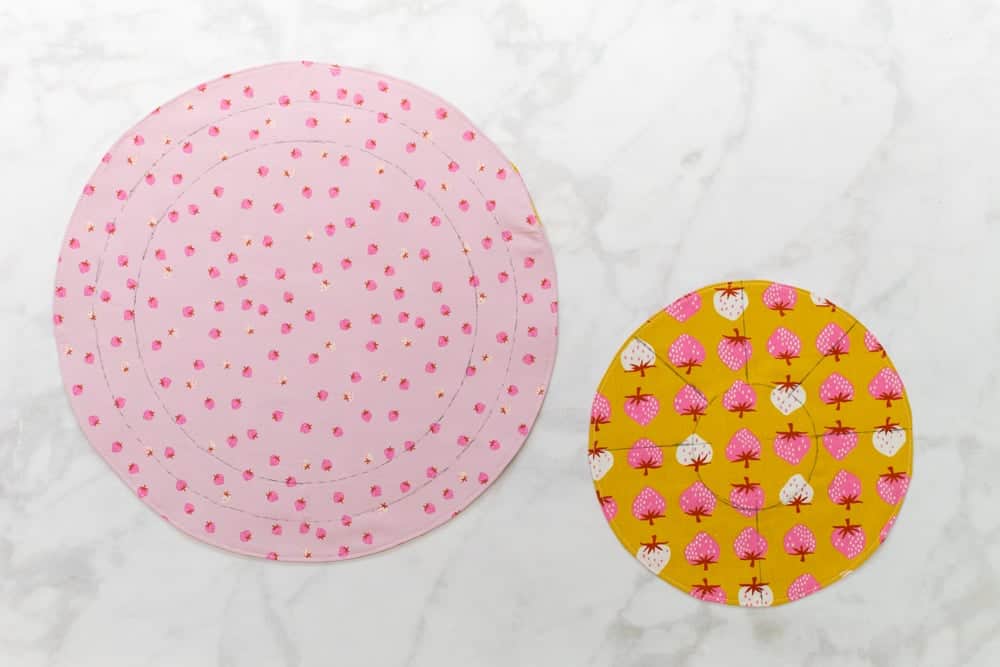
With the Pocket and the Main pieces prepared, it's time to put them together to form the jewelry organizer.
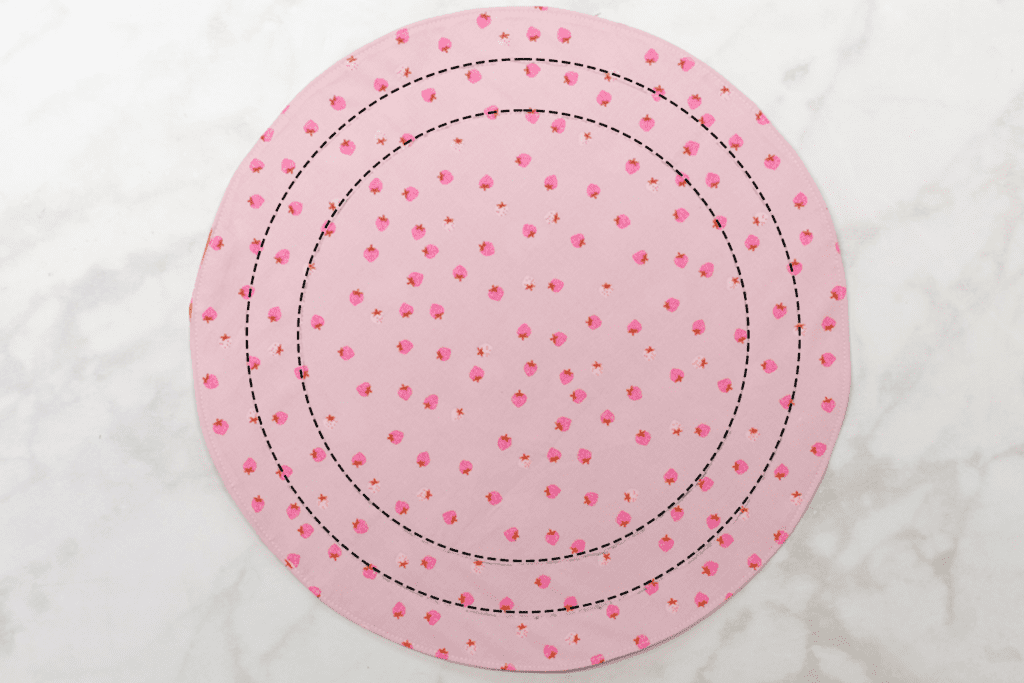
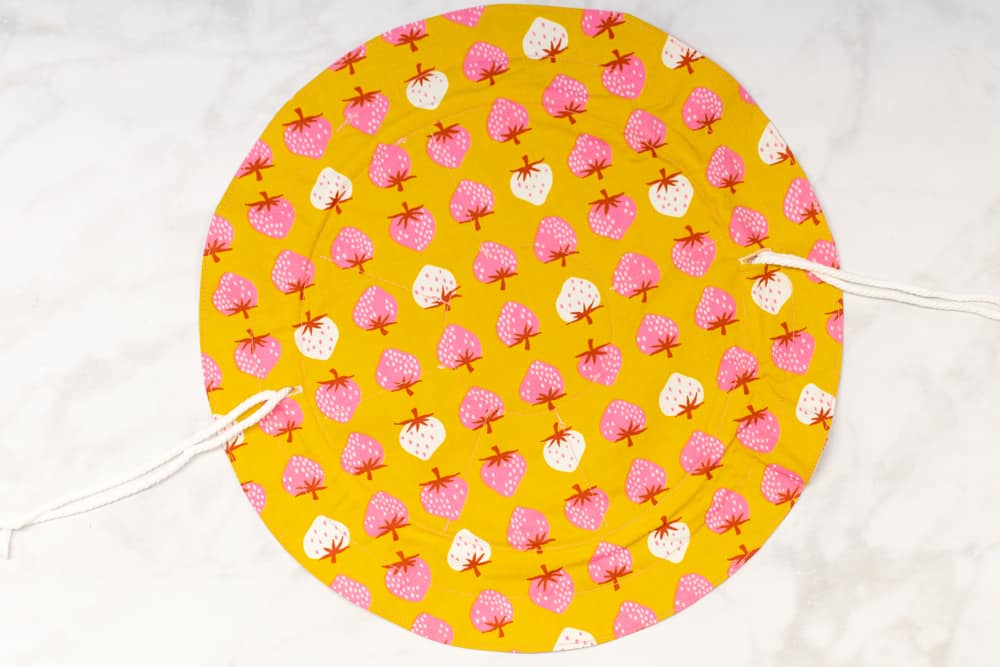
First, sew 2 lines of stitching around the Main piece, following the marked casing stitching lines. This will form the ribbon or drawstring channel. Your buttonholes should be within this stitched channel.
Next, place the Pocket piece on top of the lining side of the Main piece, centering it. Make sure that the side of the Pocket with the marked stitching lines is facing upwards. Pin the Pocket in place.
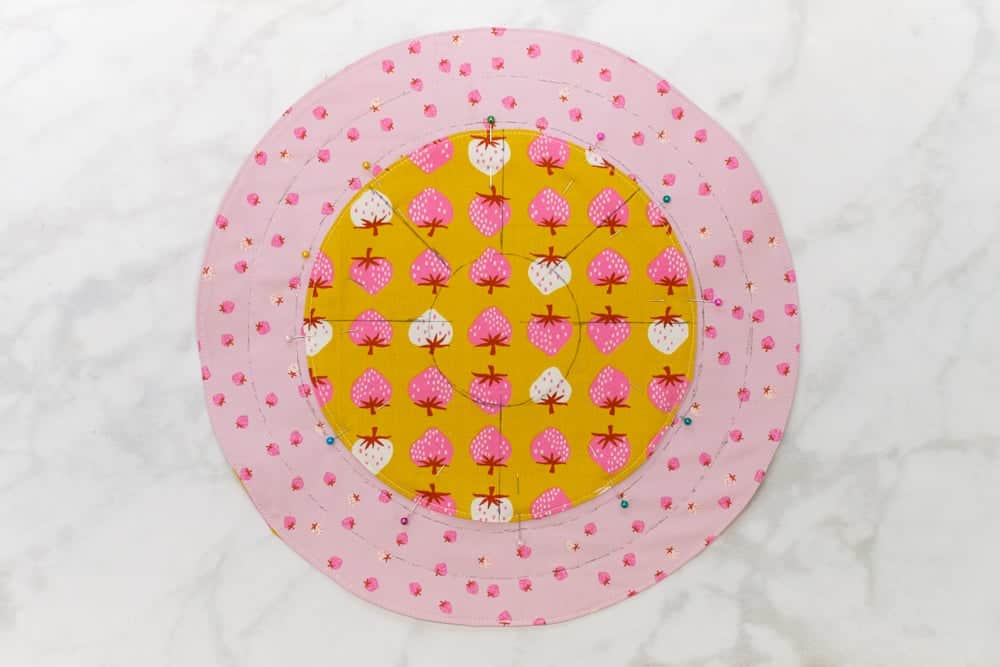
Stitch the marked small circle at the center of the Pocket. Try to carefully follow your drawn-in stitching line to get as smooth of a circle as possible. This stitching should approximately follow the edges of the fusible fleece at the center of the pocket.

Then, sew 6 straight lines going outwards from the center circle across the Pocket, following the marked Pocket stitching lines. Make sure to backstitch at the beginning and end of each line. These stitched lines will form the pockets that jewelry can be placed into.
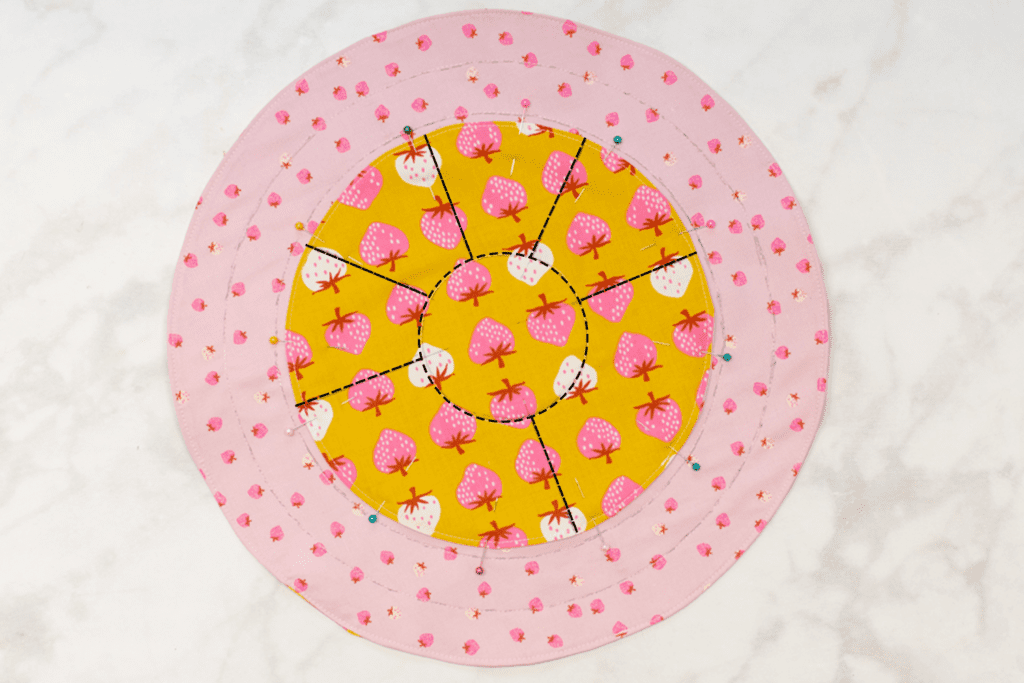
Be careful not to accidentally stitch along the outer edge of the Pocket - it needs to stay open so that the pockets are functional!
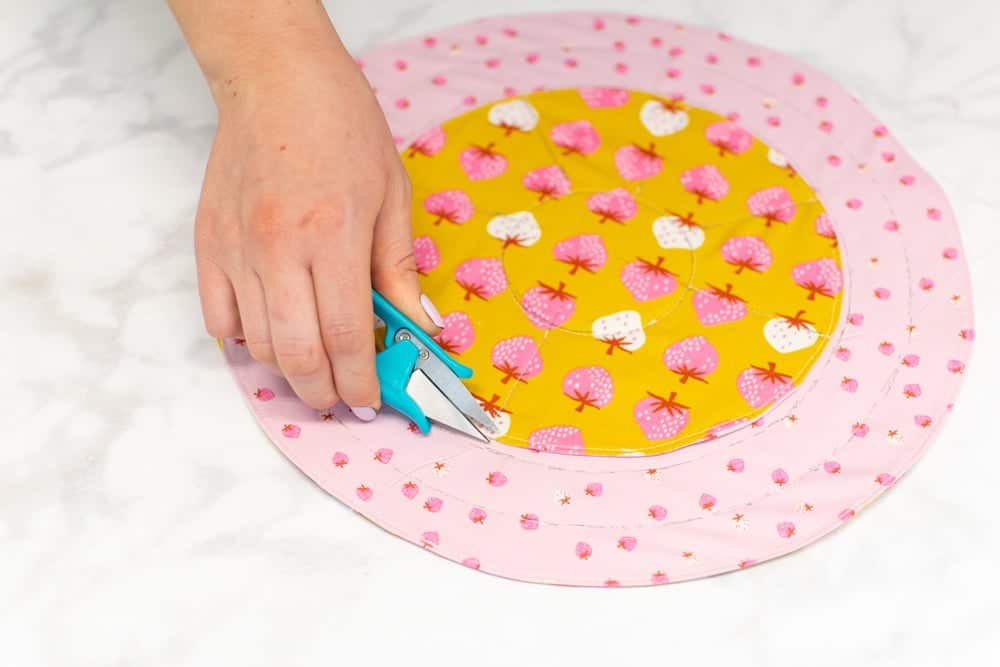
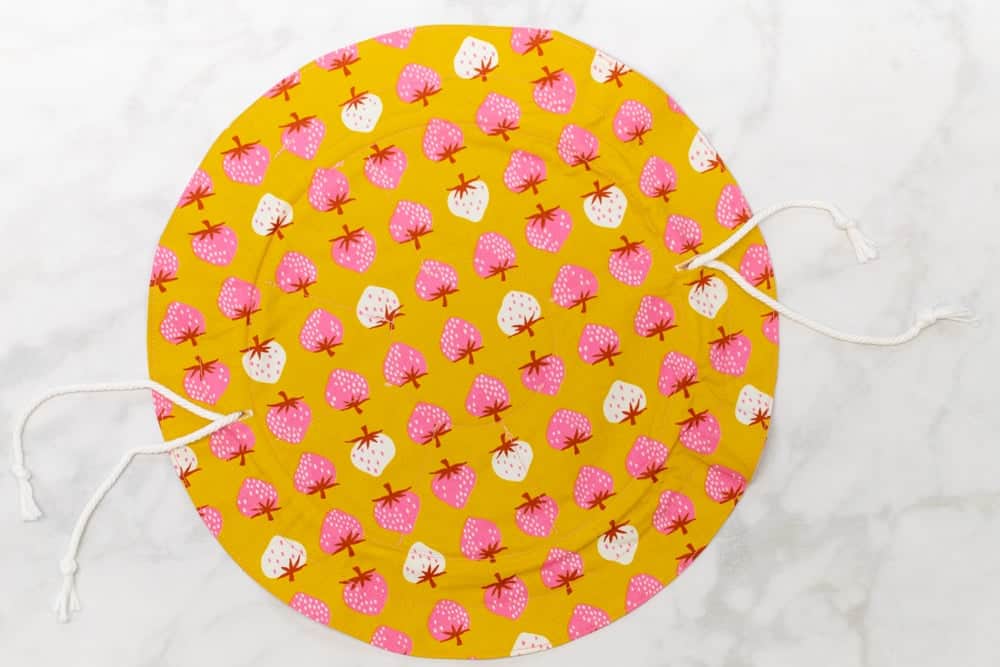
Trim away all your thread tails to clean up the stitching. Your DIY jewelry organizer is almost finished!
Step 7: Insert Ribbons and Finish Jewelry Organizer
The final step is to insert the ribbons or drawstrings into the casing. This is what will allow you to close the top of your jewelry organizer.
Start by attaching a safety pin to one end of your first drawstring, then push the end into one of the buttonholes.
*PRO TIP: Knot the end of the drawstring or ribbon around the safety pin, rather than trying to pierce the drawstring with the safety pin.
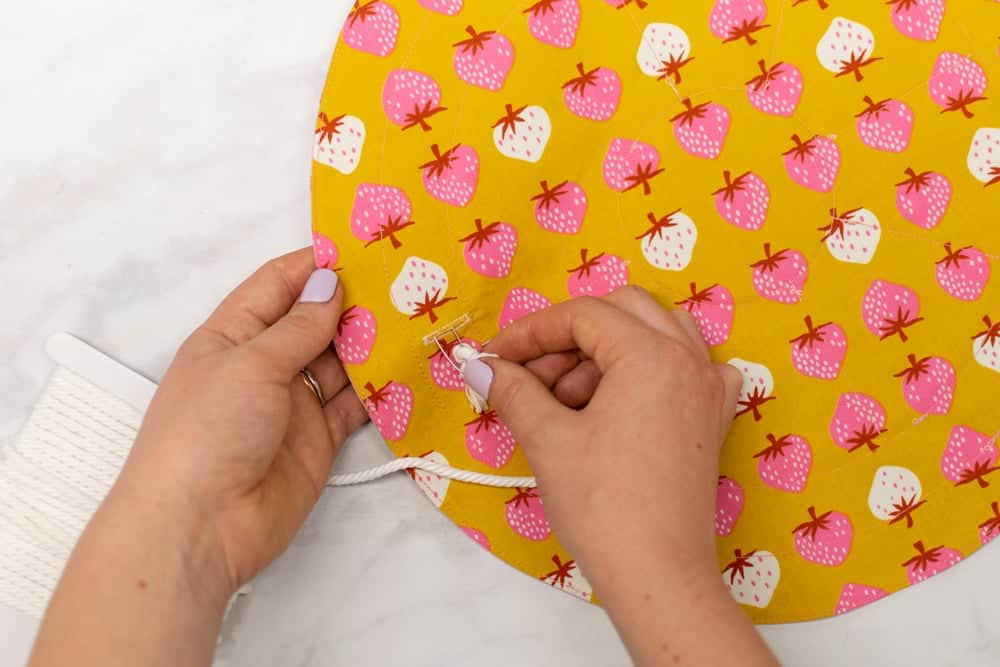
Work the safety pin through the casing by pushing it further into the casing, then pulling the bunched up fabric back over the drawstring.
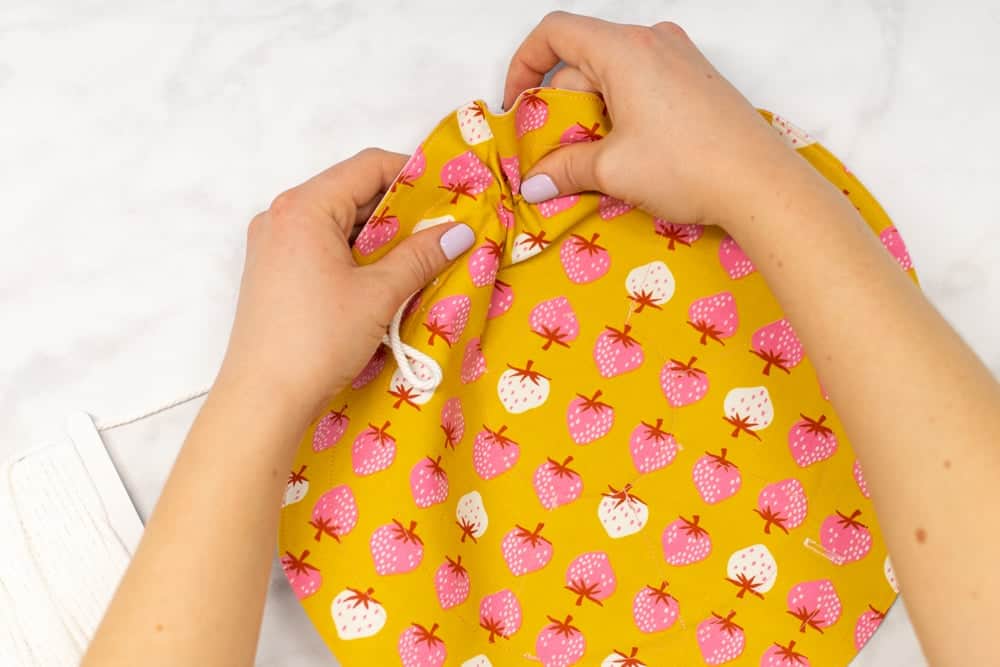
Continue slowly working the safety pin through the casing until it comes out the other side of the same buttonhole you started it through.

Remove the safety pin, then place it on one end of your other ribbon or drawstring.
Work the second drawstring all the way through the casing in the same way, starting and ending at the second buttonhole.
Pull on the drawstring or ribbon ends to even them out.
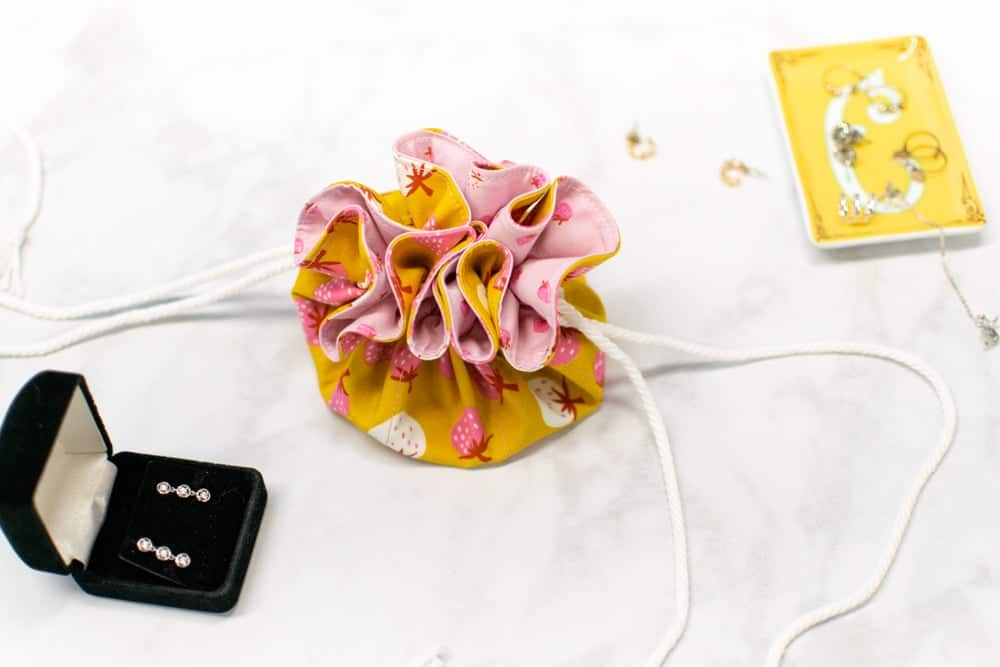
Finally, knot the 4 ends of your drawstring. This not only looks pretty, but it helps prevent the ends from accidentally disappearing into one of the buttonholes as you use the jewelry organizer.
Your adorable DIY jewelry organizer is complete! Go ahead and fill it with all of your favorite jewelry!
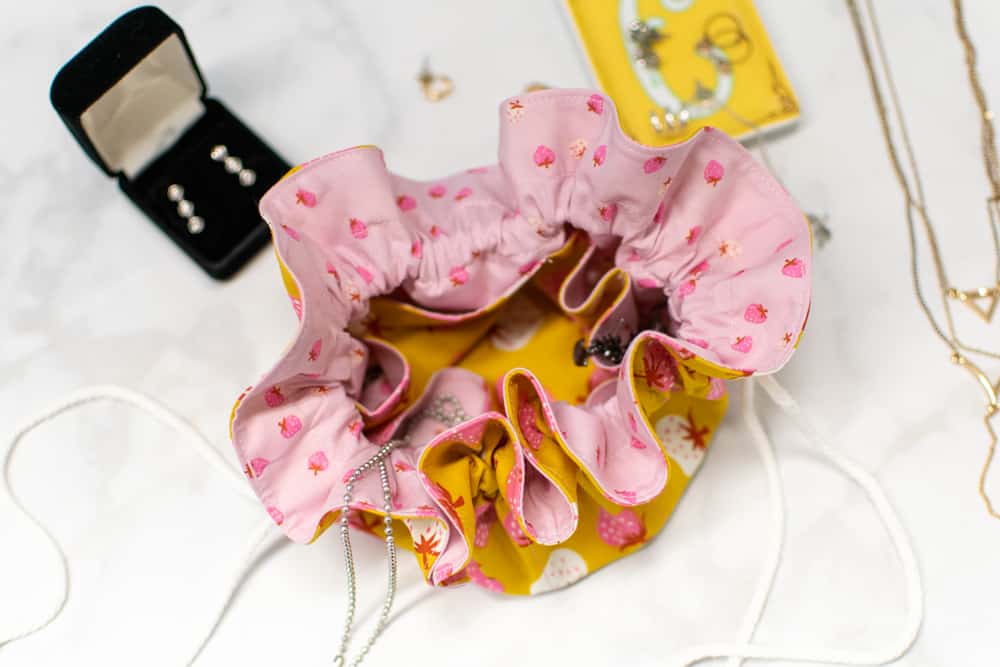
I especially love using my jewelry organizer when I travel. It keeps all my earrings and necklaces organized and in one place - no more digging through my suitcase for the missing second earring in a set!
Looking for more awesome free sewing patterns and tutorials? Try one of the patterns below!
- Tote Bag Sewing Pattern
- Free Reversible Bucket Hat Sewing Pattern
- How to Sew Fabric Storage Bins
- Clear Vinyl Zipper Pouch Sewing Pattern
Don't forget to join my Facebook group where you can show us what you're making, ask questions, and learn from others.

The project looks like fun and I would love to make it, but is there a way to print the instructions without the pictures. I am have been sewing for 60 years and can follow written instructions.
Would also request the same for the crayon/pencil roll.
Thanks
The ribbon instructions is 4- 40 inch but isn’t it 2/40 inch ?