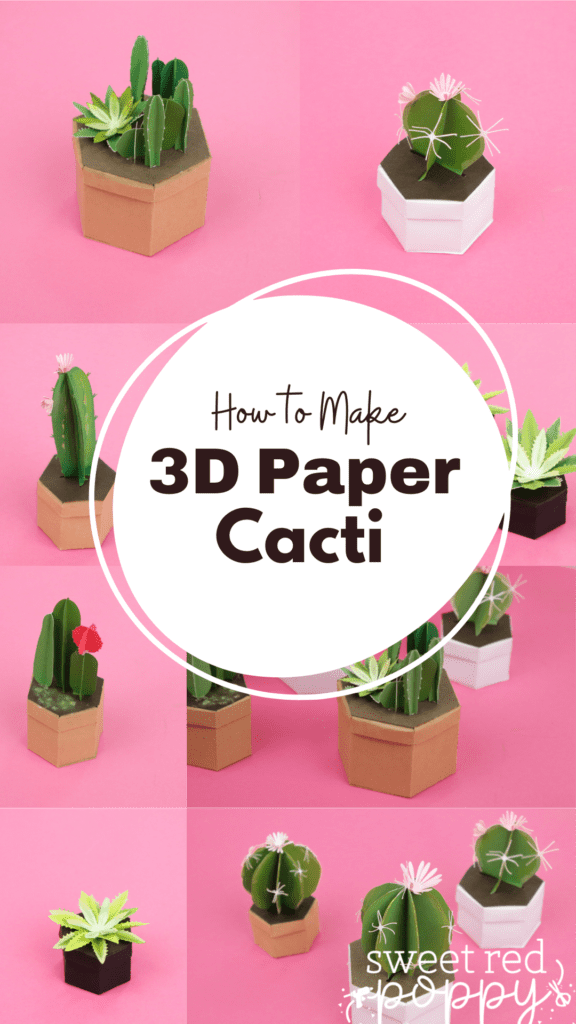
Learn How To Make Easy Cacti and Succulents Out of Cardstock with Step-By-Step Instructions and Free SVG Files!
Paper plants and cacti are gaining in popularity and they are the perfect way to celebrate that spring is almost here! I love plants, cacti, and succulents, so I made these free cacti SVG designs perfect for spring and summer.
They're easy to make, and the best part is they're even easier to care for! 🤣
These cacti are fun to make, especially if you're making them with your friends. Put on some music and craft to your favorite songs!
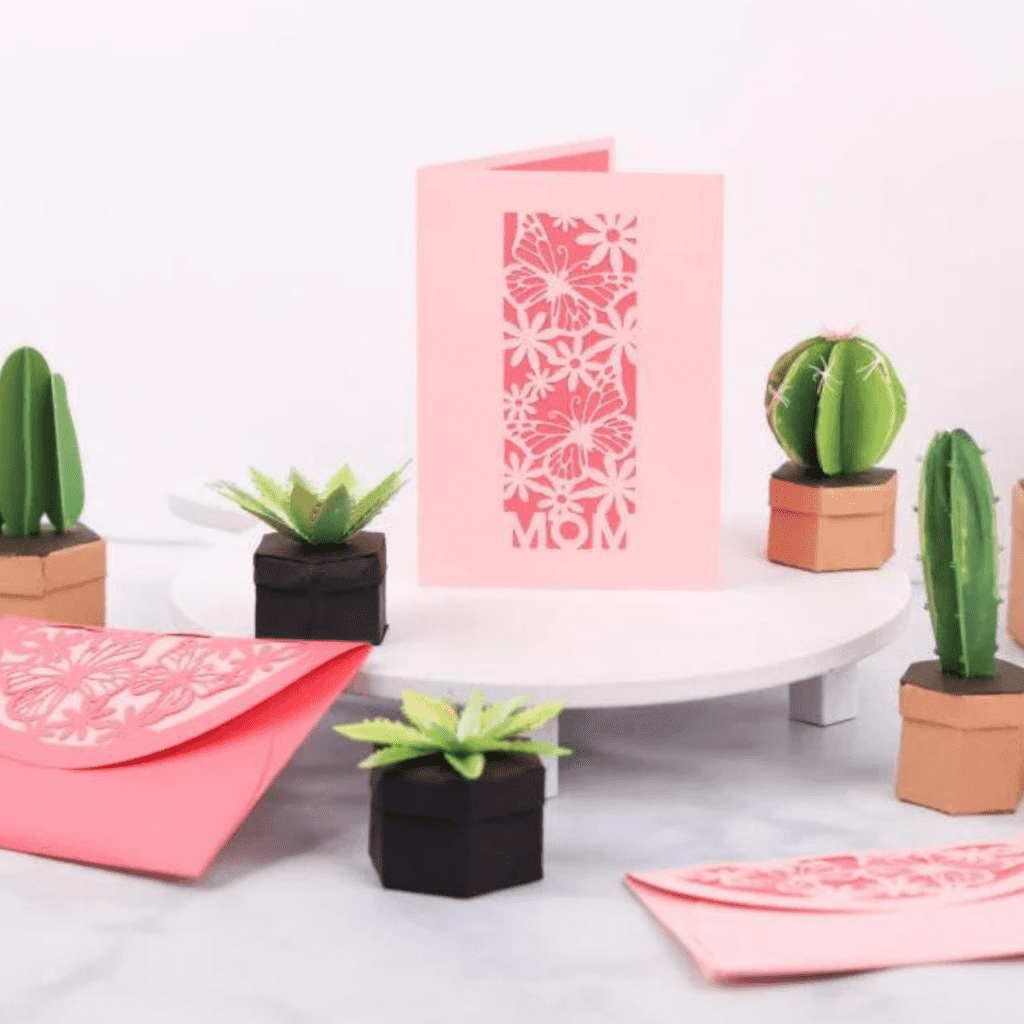
Pair these adorable 3D Cacti with a DIY layered card for a thoughtful Mother's Day gift. Click here to see the full blog post.
In this tutorial, I'll show you how to make each cactus unique and life-like with special techniques and tips, and tricks.
Table of Contents
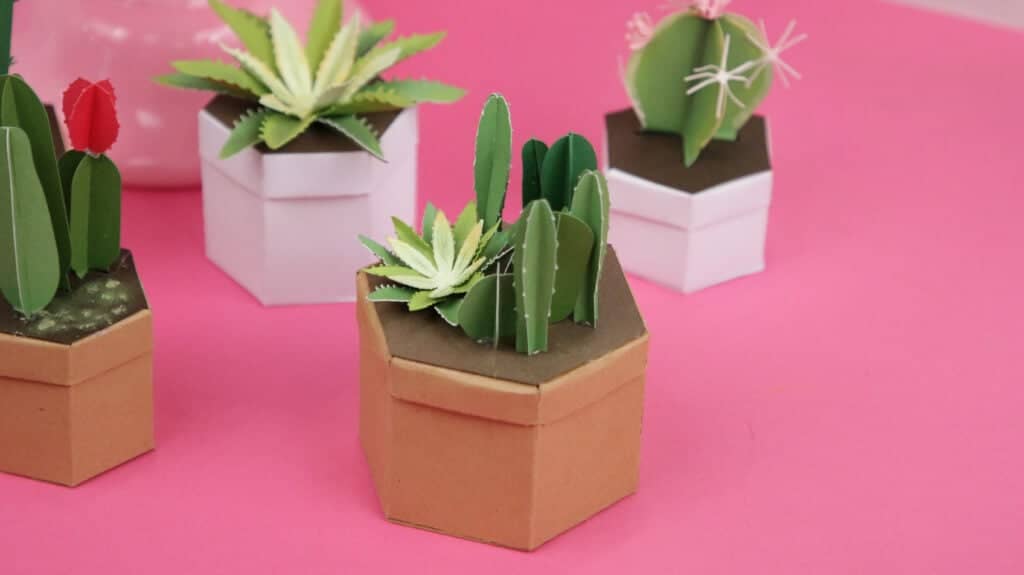
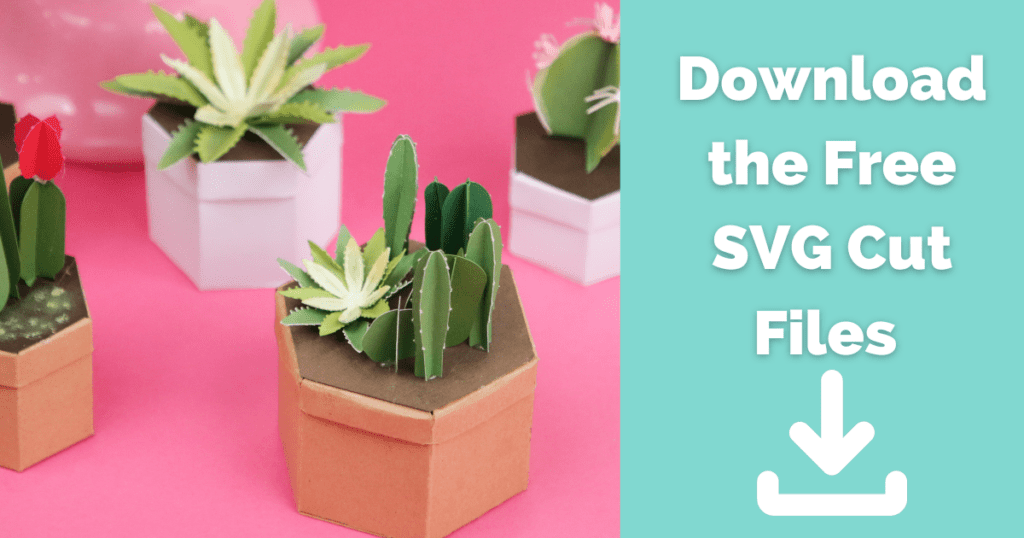
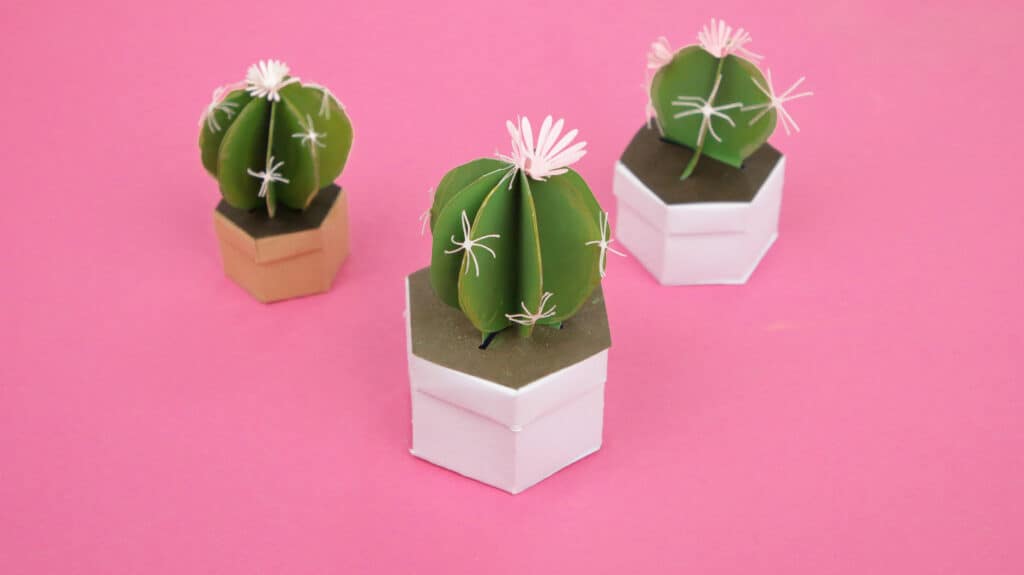
3D Paper Cacti Template and Tutorial
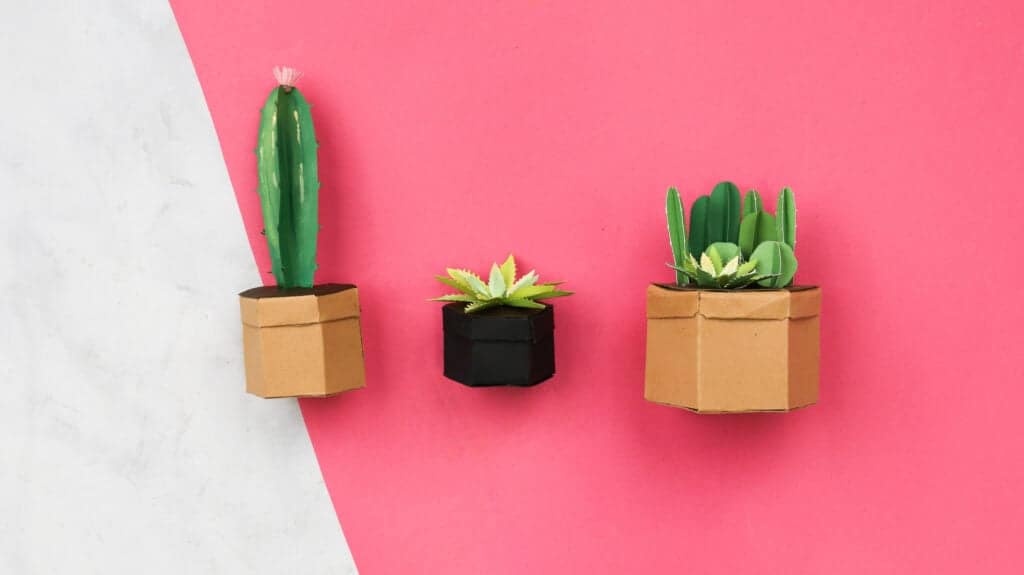
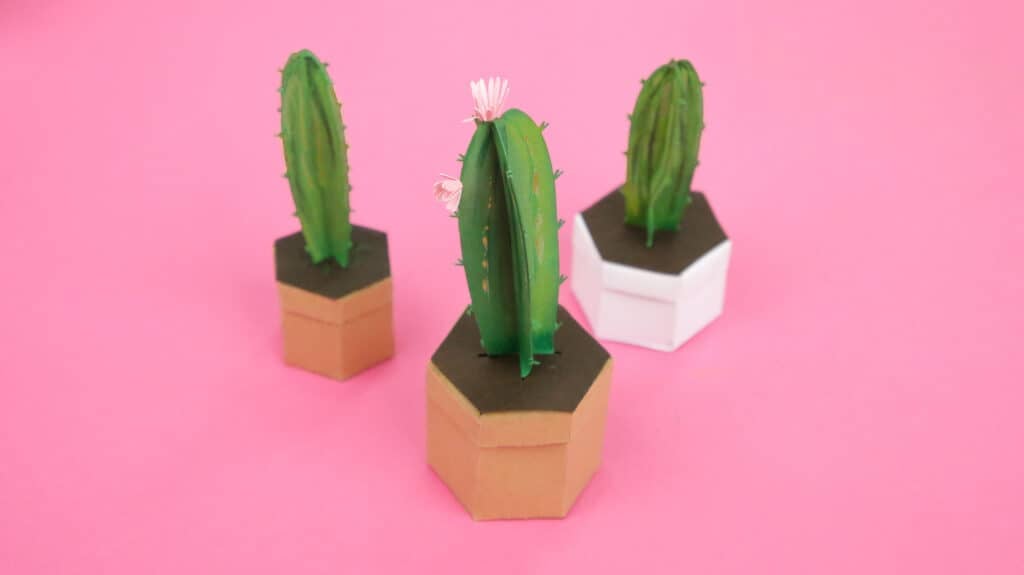
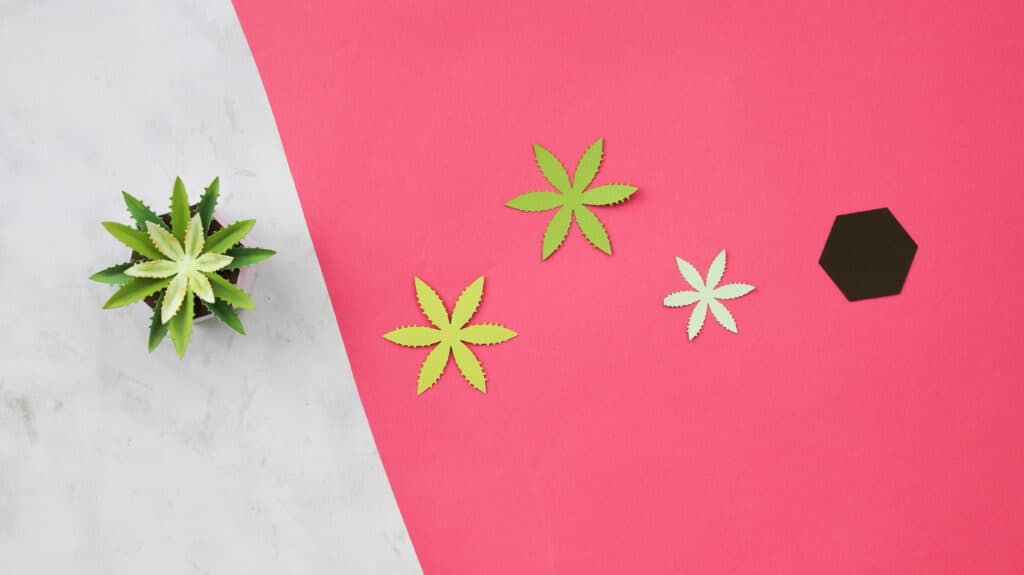
I wanted to make a variety of cacti for you to choose from, so I made four designs; Barrel cactus, Aloe Vera, a tall cactus, and a short cactus. Combine these four designs together for an adorable Cacti display!
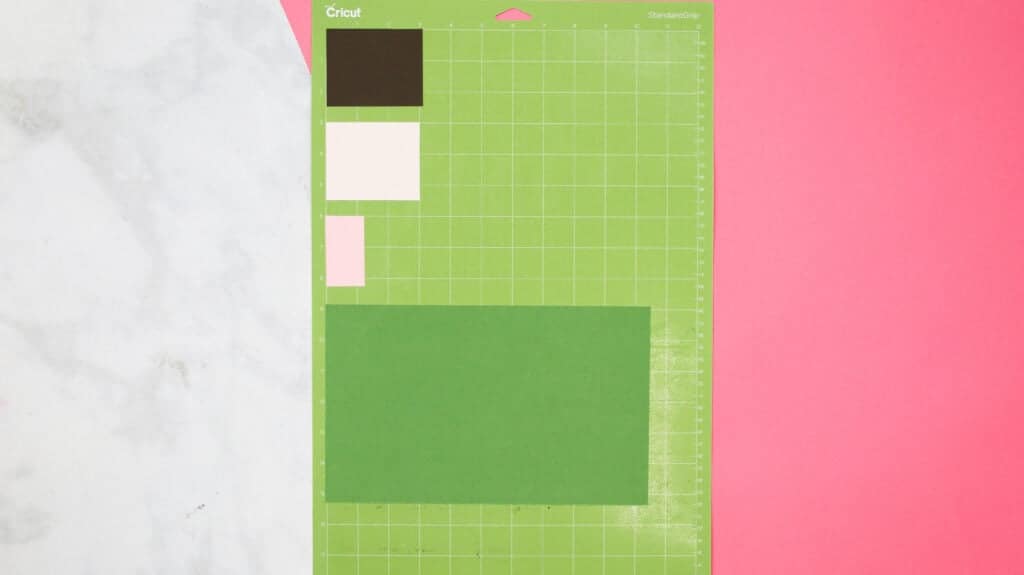
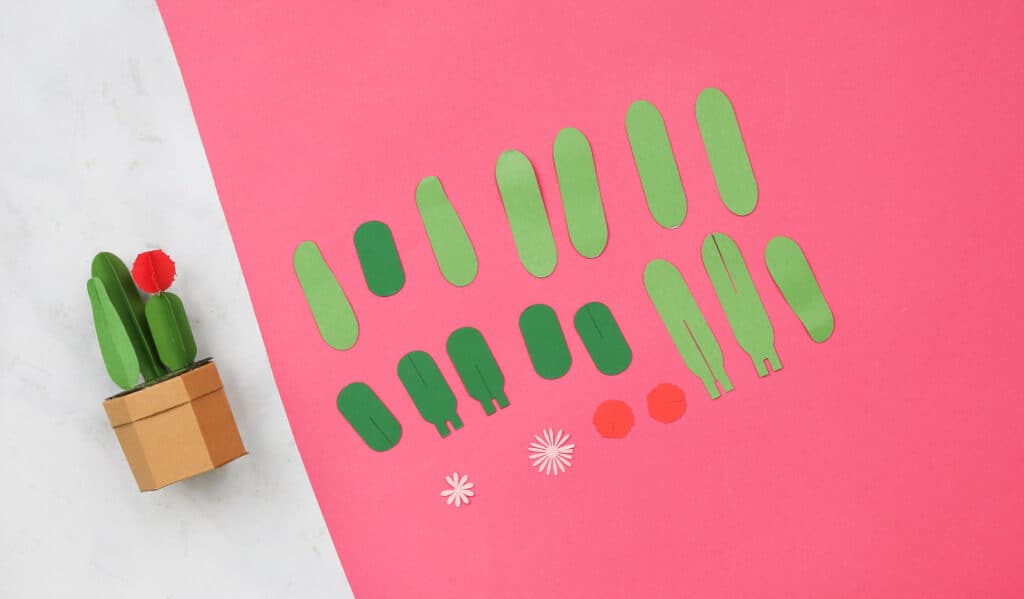
To make these paper cacti, I stocked up on supplies and grabbed a variety of green and pink cardstock from my local local craft store.
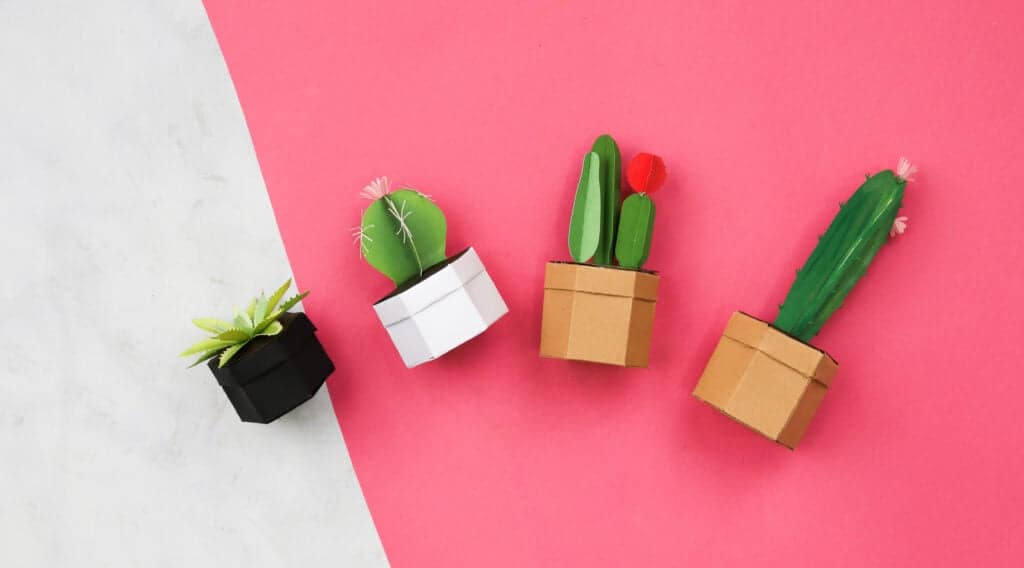
Plus, I have three different-sized pots: small, medium, and large.
The barrel cactus, tall cactus, and small cacti include cacti with and without tabs. These are great if you want the design to look clean without much glue debris.
The tabs attach to the underside of a hexagon with slots. The cacti without tabs will let you freely place the cacti wherever to fill in those empty spaces between the tabbed cacti.
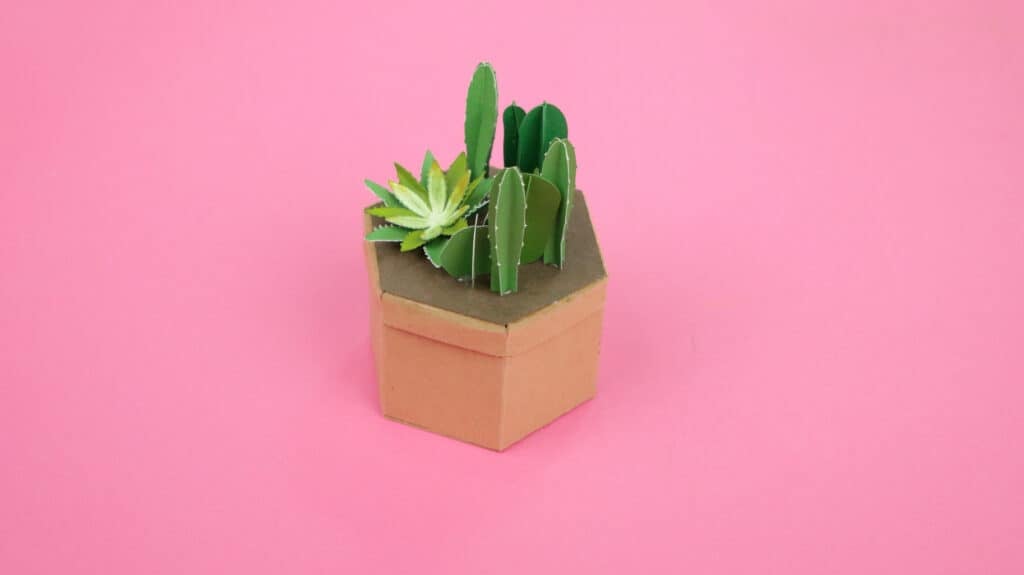
Feel free to mix and match the cacti without tabs. I made the large pot for this reason. You're able to fit more than 4-5 mini cacti all together.
What Type of Paper Should I Use?
For the pot, I used black, white, and brown Kraft board, but you could also use Kraft paper or a heavier cardstock such as an 80lb or 100lb cardstock.
For the cacti, I used 65lb green, white-core cardstock, and 65lb solid-core pink cardstock for the flowers.
You could also substitute crepe paper for the flowers-I recommend using a thicker crepe paper- make sure to load a rotary blade into your cutting machine.
I usually wouldn't use white core cardstock for paper flowers, but it works great for these cacti designs. When cut into the paper, you can see the white center peeking through on the sides which is perfect for those short prickles on a cactus.
How Much Cardstock Do I Need?
POTS: 1 Piece 12 x 12" Kraft Board
CACTUS PIECES: Variety of Green Cardstock (1-5 Pieces)
FLOWERS & DETAILS: 1 Piece 8.5 x 11" Cardstock (I recommend light pinks, yellows, or white)
What Are the Finished Sizes of the Cacti?
If you use the templates as provided without making any changes, this tutorial will create pots with a height of three inches and cacti that measure one to four inches, depending on which one you are assembling.
I'll show you how to assemble all four cacti as well as the pot. The pots are different sizes, but the assembly process is the same for each size.
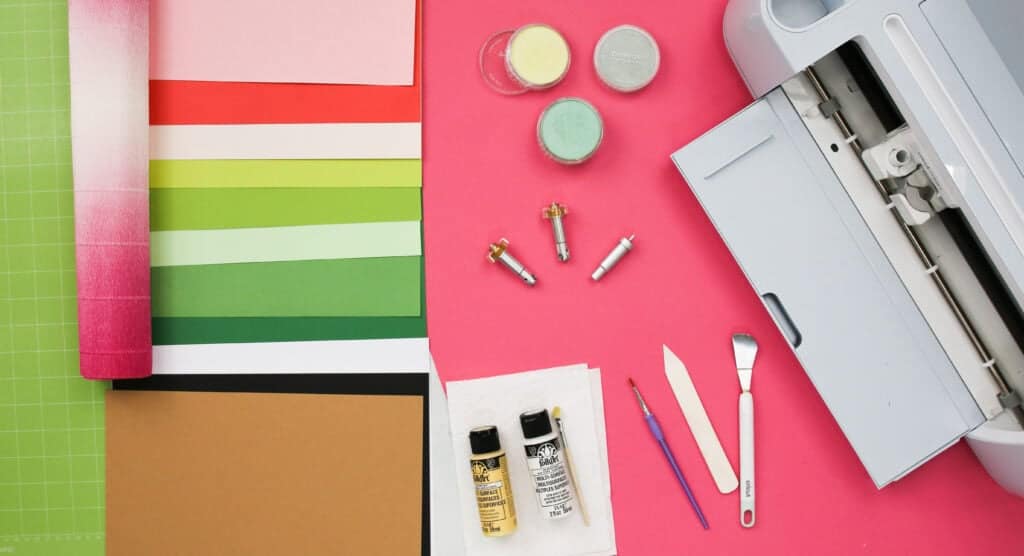
Supplies Needed
- Cricut Maker, Cricut Explore, or Other Cutting Machine
- StandardGrip Mat
- Cardstock 65-80 lbs - (Greens, pinks, & Yellows)
- 12x12” Kraft Board or Cardstock- (Black, White, & Brown)
- Fine-Point Blade
- Scoring Wheel Tip & Housing or Scoring Stylus
- Craft Glue
- Hot Glue Gun
- Hot Glue Sticks
- Scraper Tool
- Bone Folder
Optional Supplies
- Crepe Paper & Rotary Blade- Use to make the flowers
- Pan Pastels
- Acrylic Paint
- Sponges
- Paintbrushes
Why Use Pan Pastels and Paint?
I love using pan pastel to add depth to my projects. Similar to chalk- it's easy to blend but less dust to deal with and very pigmented!
Adding paint strokes to your paper plant projects is a great way to add texture, highlights and details.
Using both these mediums will make your cacti pieces look unique and realistic.
Upload 3D Cacti SVG Files
Download the Free 3D Cacti SVG Files Here
To begin, click on the link above to download the cacti SVG files to your computer.
Then, open up Cricut Design Space and create New Project.

Click on Upload to the left of your canvas and select the files you’re wanting to create from you computer.
Select the file(s) and upload it to your canvas.
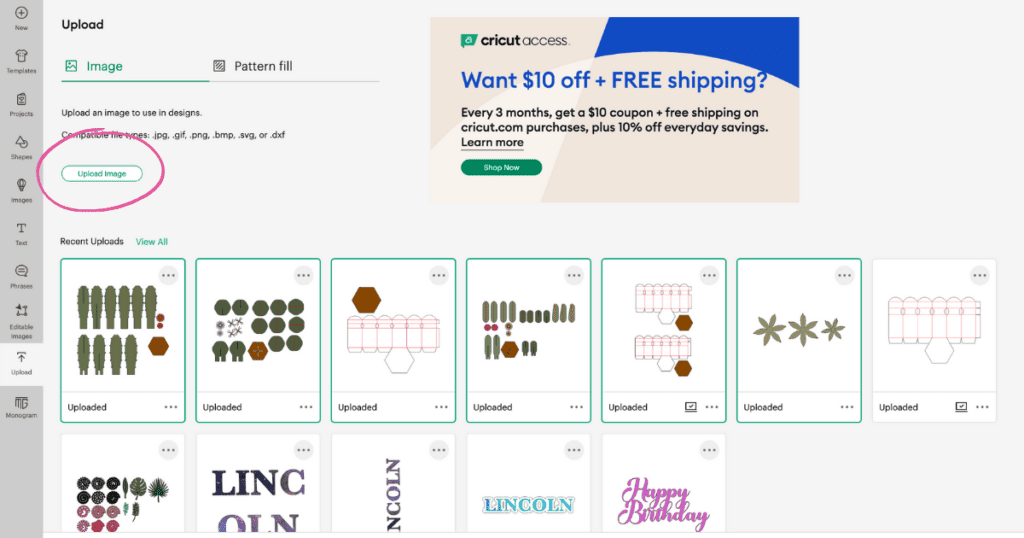
Once uploaded, select the design, and click Ungroup in the layers panel to the right of your canvas.
Then, we need to change some basic cut lines to score lines.
To do this, select the layers that only have lines (if the line's fill color is red in the Operation panel- it's a score line)
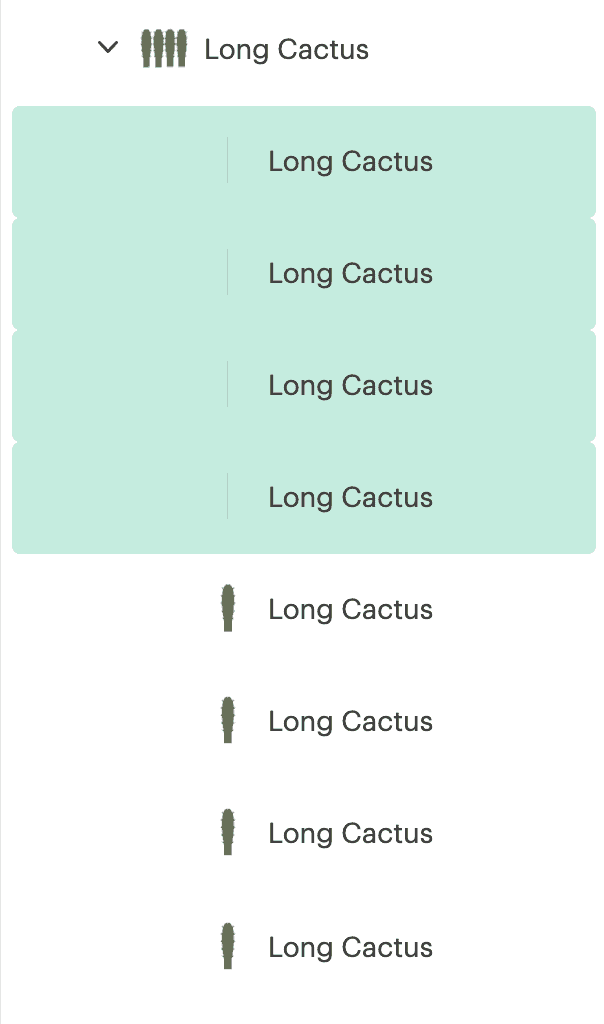
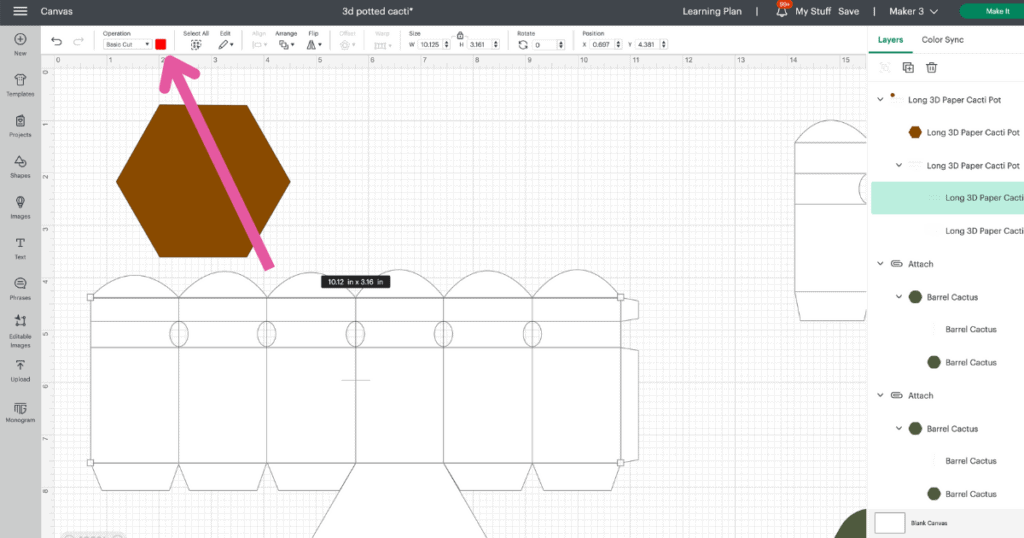
Once those layers have been selected, change the operation from Basic Cut to Score in the Operation panel.
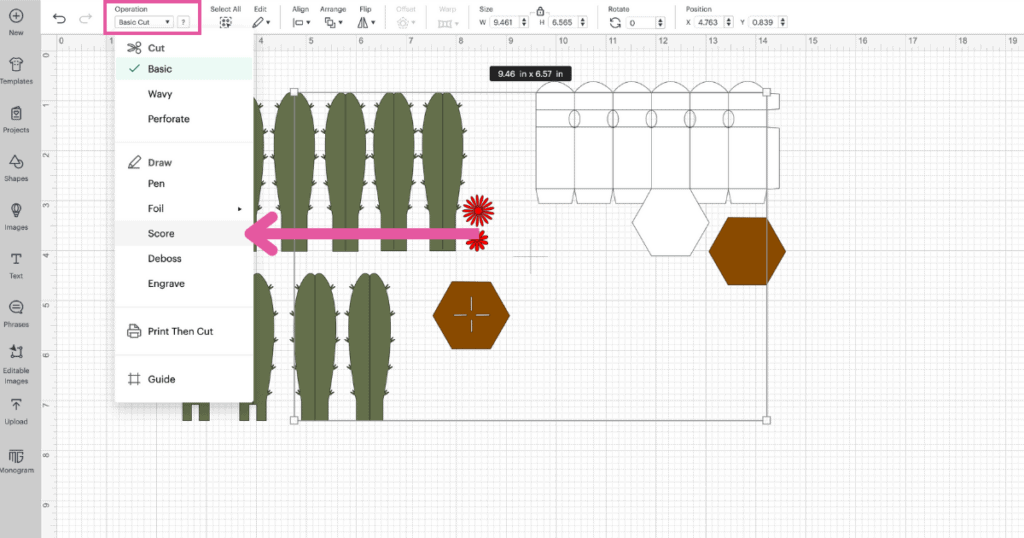
Then, attach the score lines to their corresponding objects by selecting the object and the score line layer. Click Attach in the layers panel or right-click and select Attach.
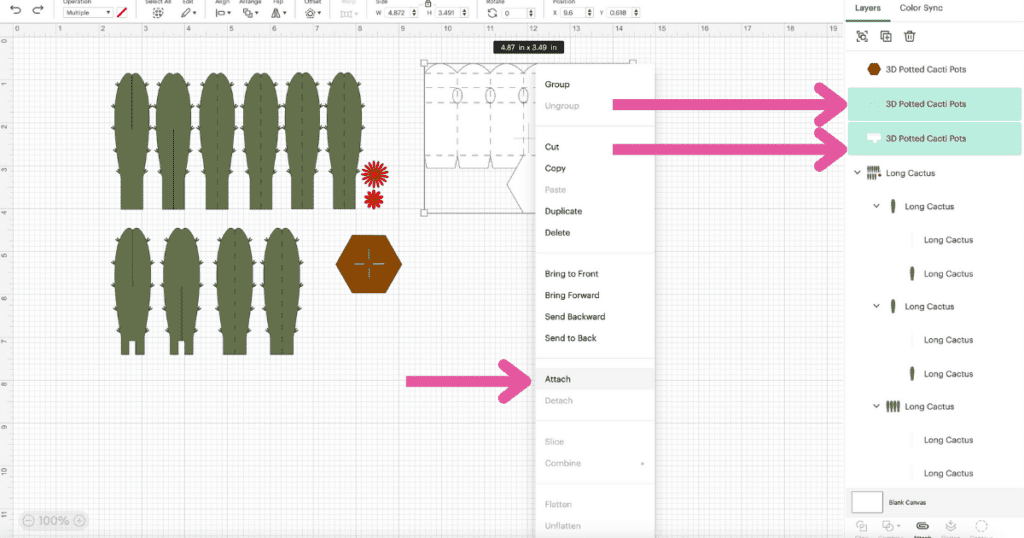
Now, go ahead and resize the pots to the sizes you desire. I'm going to resize my pot to 7.3".
Once you've resized the pots, select the cacti design you're wanting to cut and make sure to align its hexagon with the pots hexagon- this way they align when we start assembling.
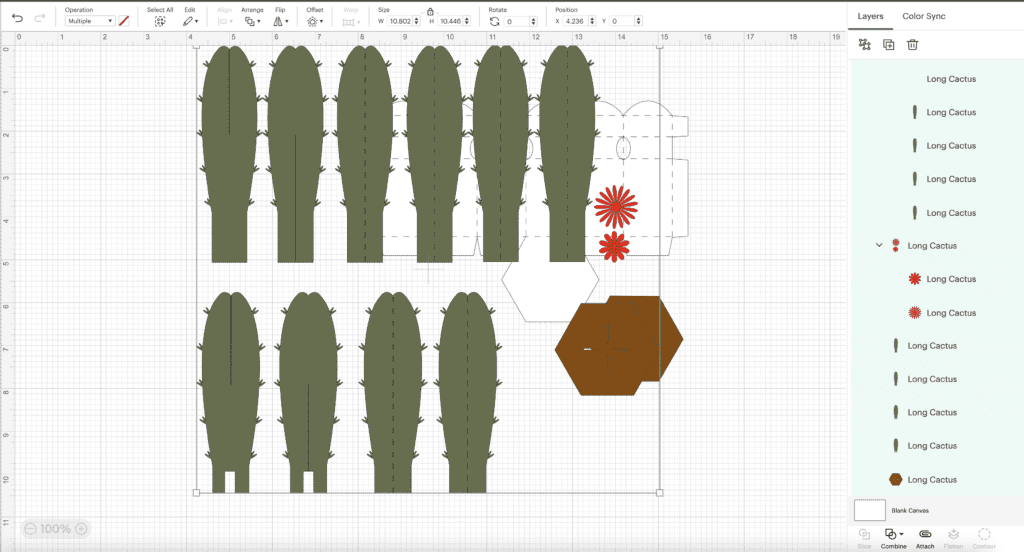
Do this to the rest of the rest of the designs.
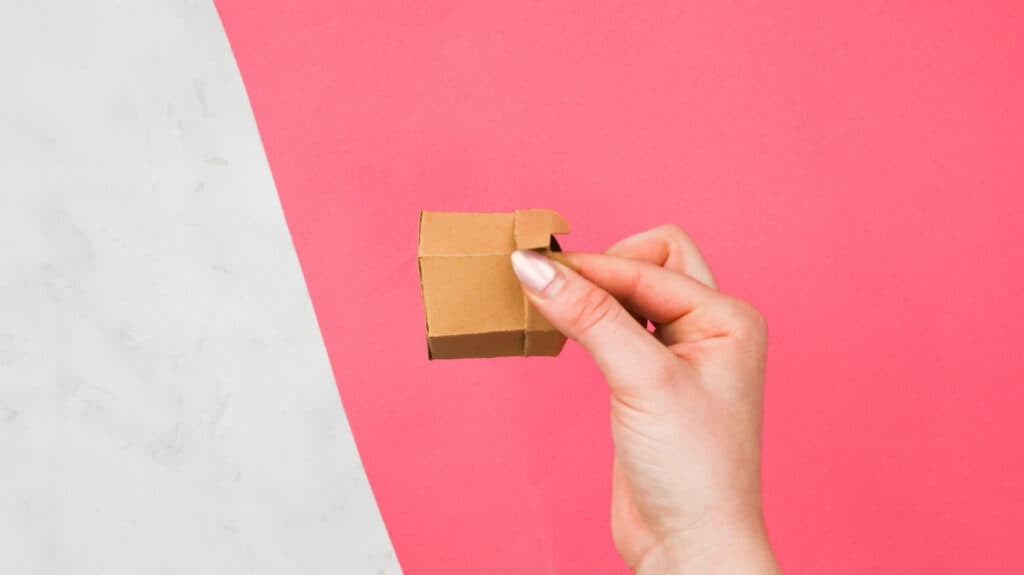
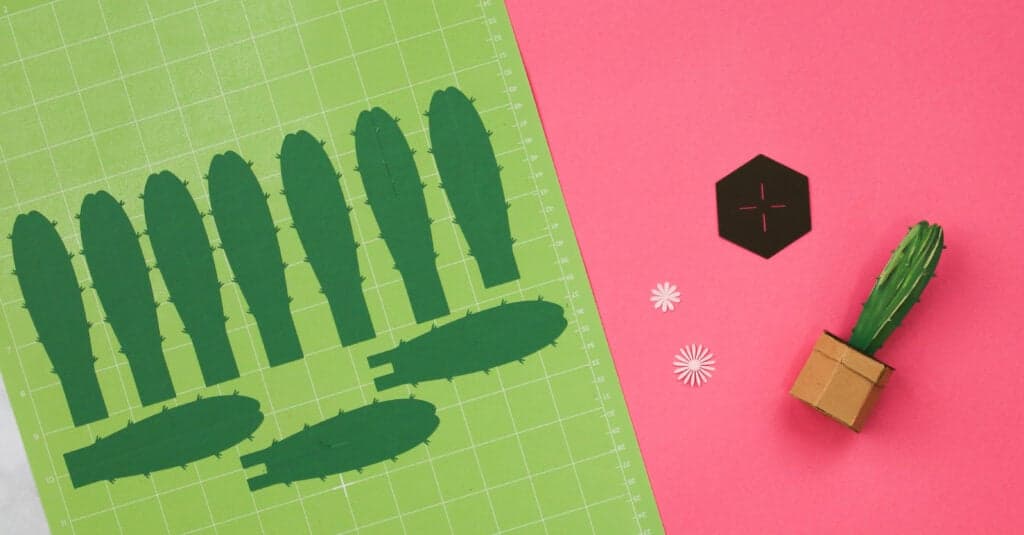
Step One: Cut Out 3D Potted Cacti Pieces
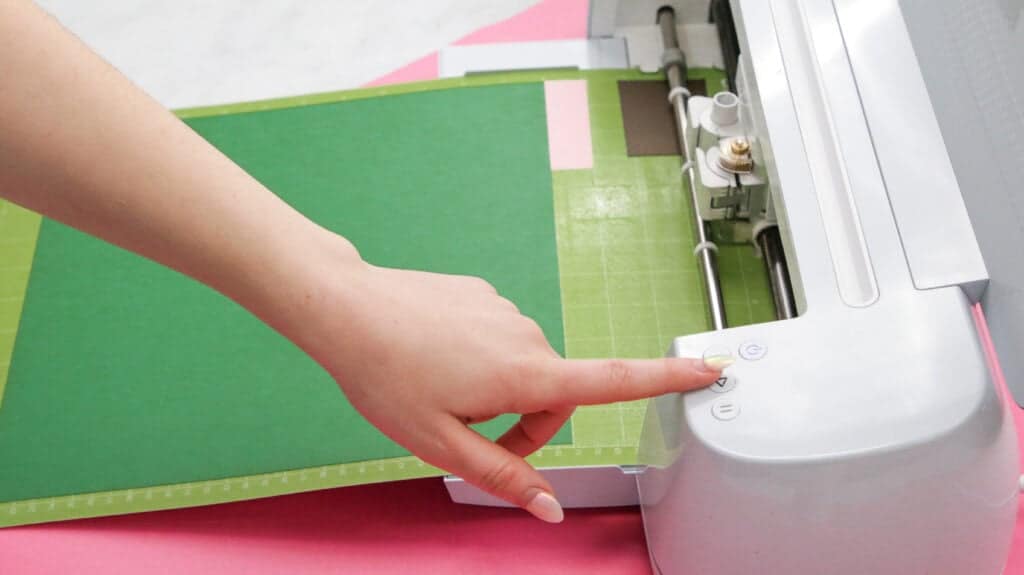
Now, let's start cutting!
Place cardstock onto your mat, and load it into your machine.
Be sure to load your scoring wheel into your cutting machine!
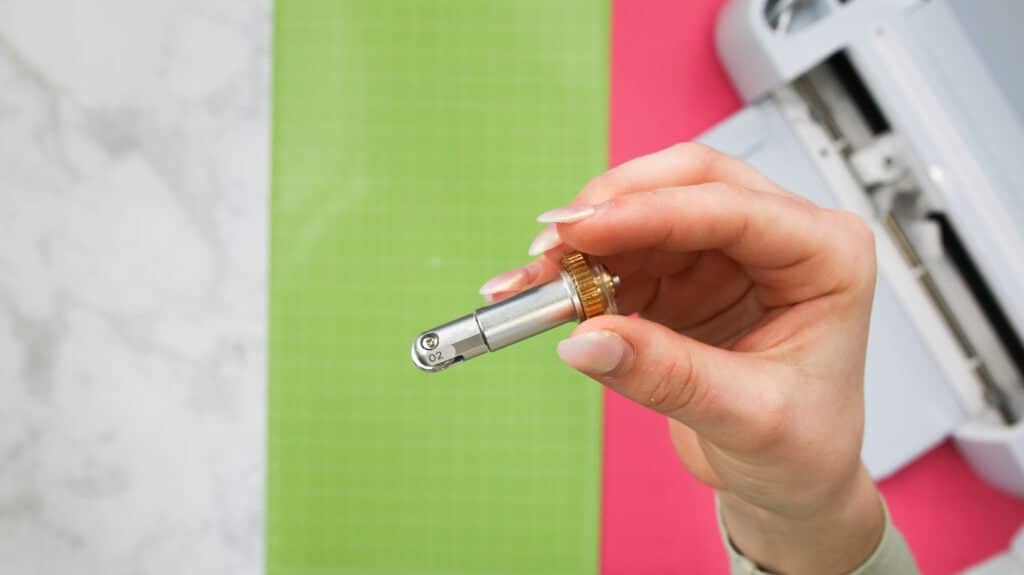
Next, load your fine-point blade and let the cutting begin! Once your machine is done cutting, unload the mat.
Once all the pieces have been cut out, it's time to assemble.
First, I'll show you how to make the pot, then I'll walk you through on how to make each cacti design.
Assemble 3D Paper Pot
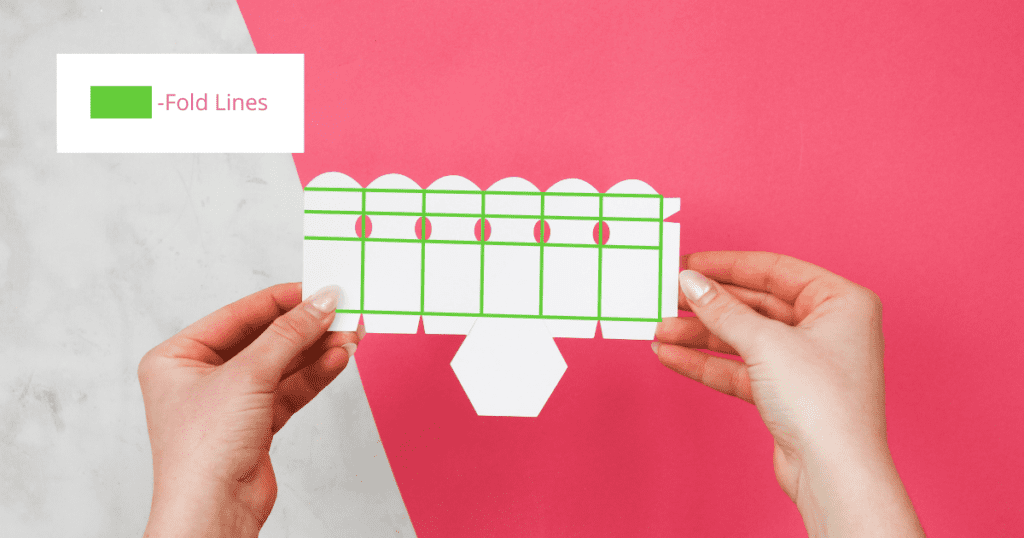
To assemble the pot, first fold the score line located below the circles towards yourself.
Next, fold the score line above the circles away from you and fold the tabs at the top.
Then, fold the the bottom tabs and inner score lines.
Afterward, it's time to glue. Apply a strip of glue to one bottom tab at a time and attach them to the sides of the hexagon.
Then, add glue to the end with the side tab, and attach the ends together. Let the pot dry completely.
Now, let's move onto assembling the paper cacti.
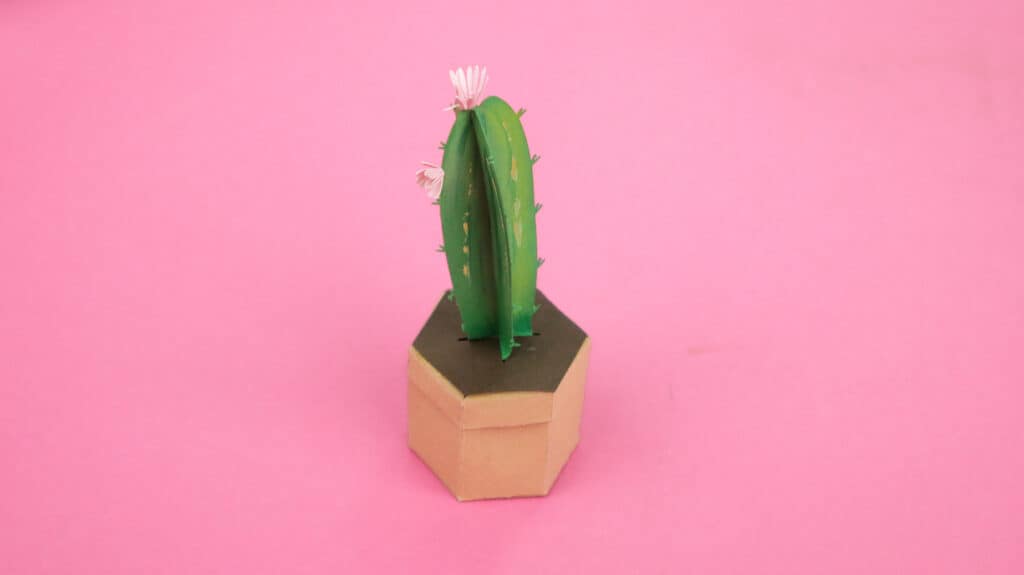
Assembling the Tall Cactus
Tall Cactus Consists of:
- 6 Tall Cactus Pieces
- 2 Tabbed Cactus Pieces with Slits
- 2 Cactus Pieces with Slits
- 1 Hexagon Piece with Slots
- 2 Flower Pieces
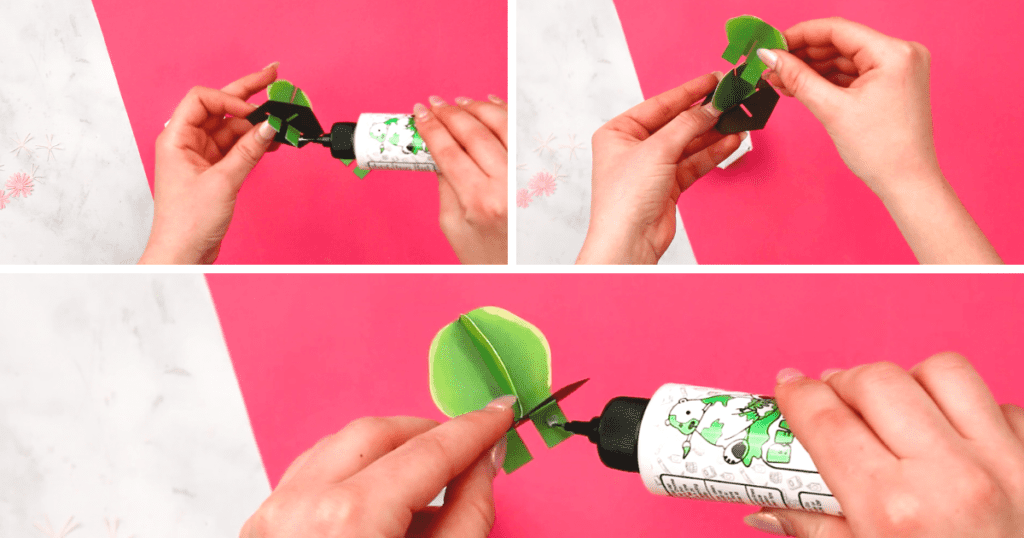
Gather the tabbed tall cactus pieces, an assembled pot, some paint, paintbrushes, pan pastel, and sponges.
First, let's add some depth and detail to the pieces. I took a sponge and stroked dark green down the middle and light green along the edges.
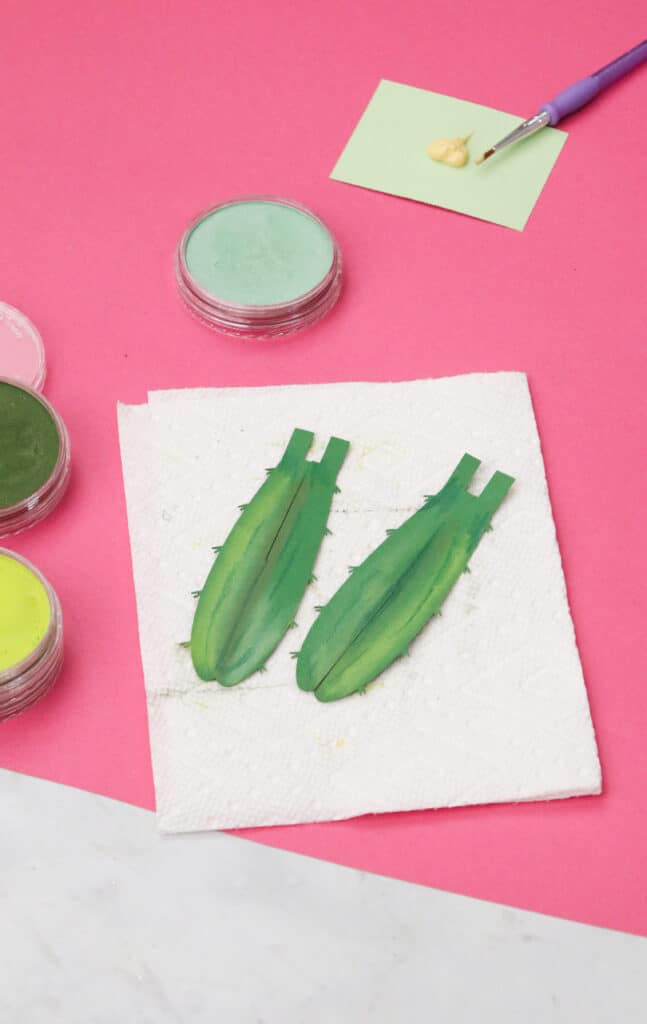
Next, add light yellow acrylic paint to highlight the spines and bristles of the pieces.
Do this to the front and back and let it dry.
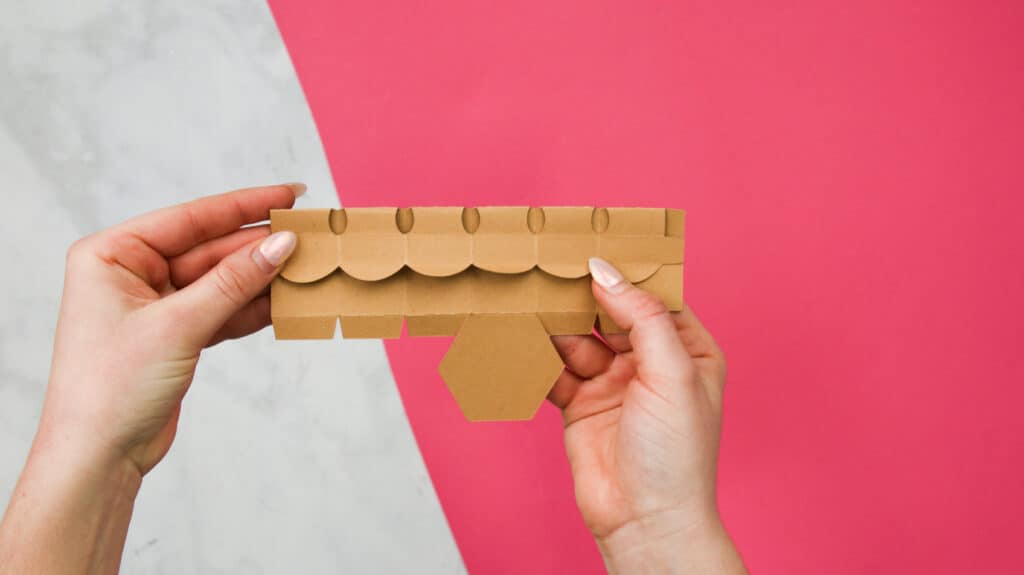
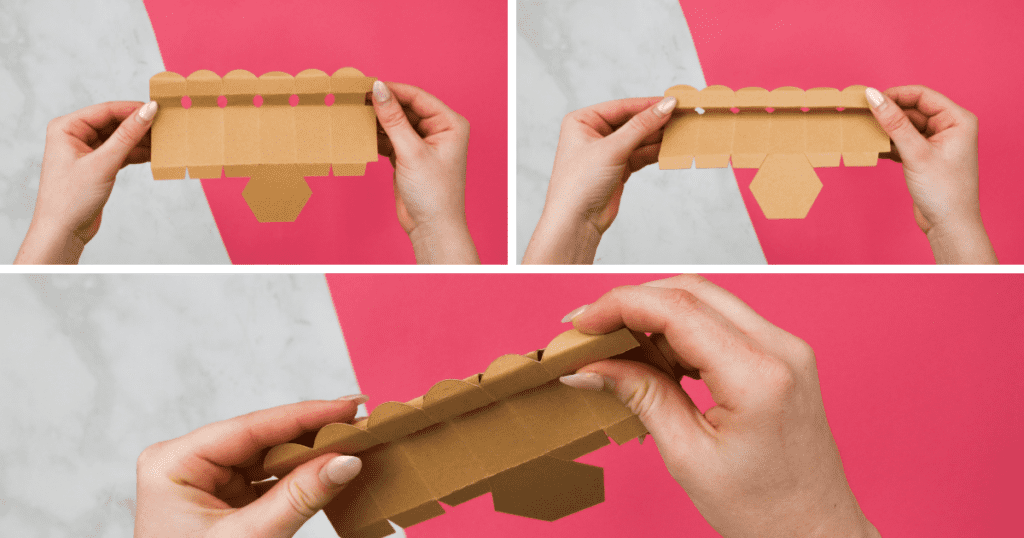
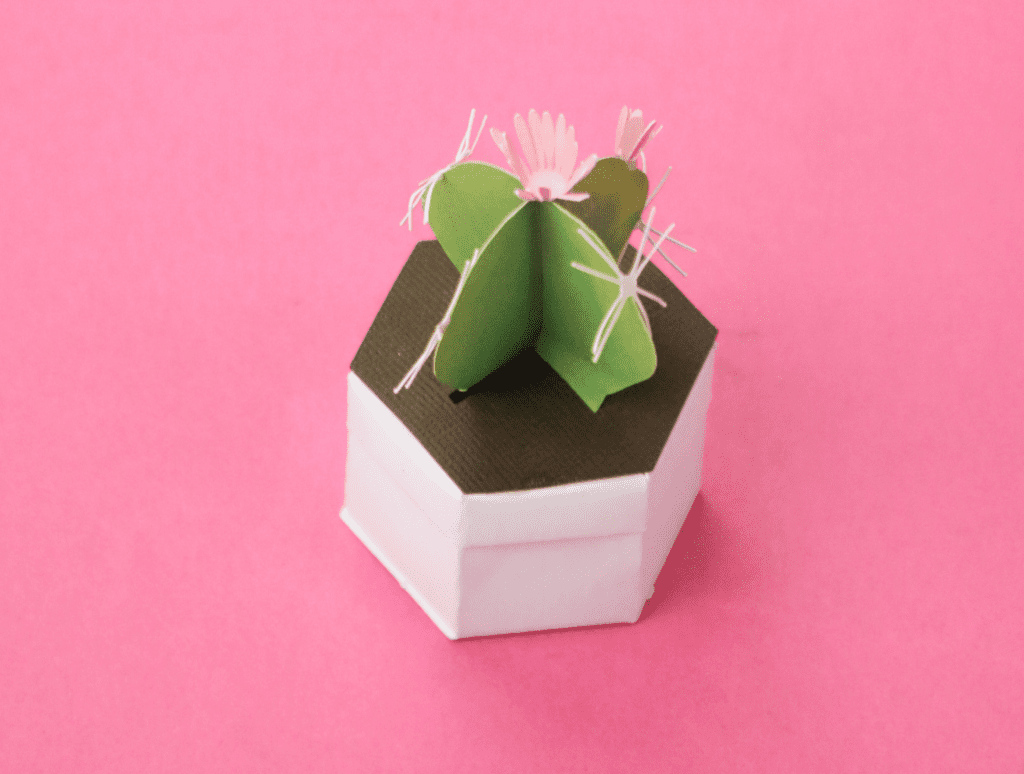
Grab the hexagon and tall cactus piece with a slit at the top.
Slide the tabs through the slots of the hexagon, fold the tabs, and apply a dot of glue to both tabs and stick it to the underside of the hexagon.

Then, grab the other tabbed cactus piece with the slit at the bottom, and slide the pieces together. Pull the tabs through the slots and glue them in place.
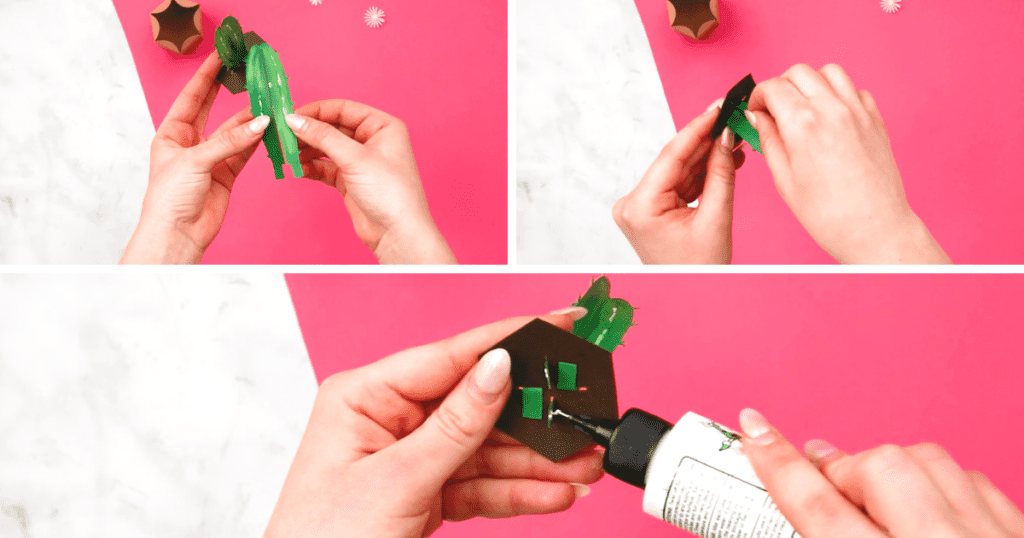
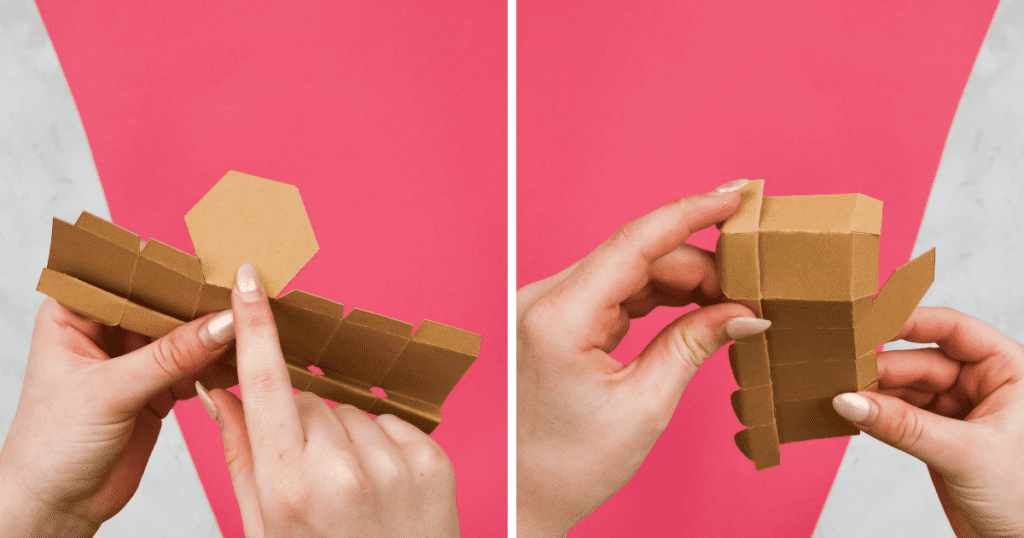
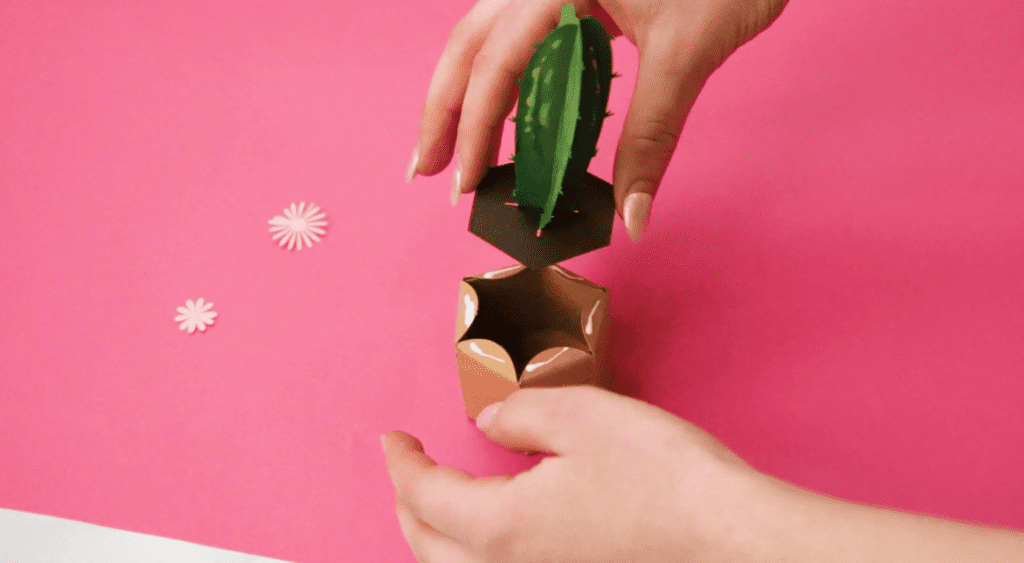
Finally, apply glue to the tabs of a pot, align and place the hexagonal shape on top.
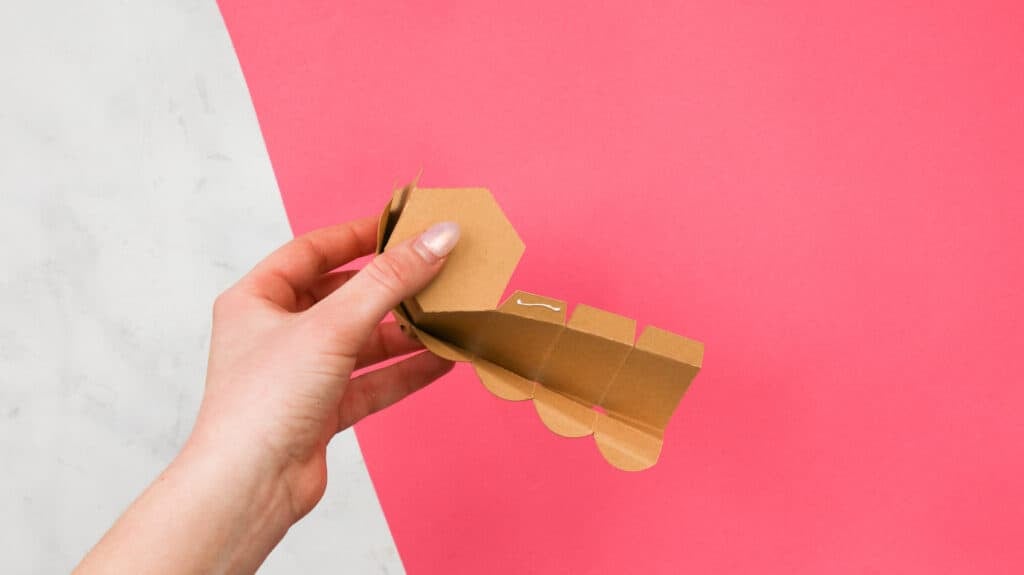
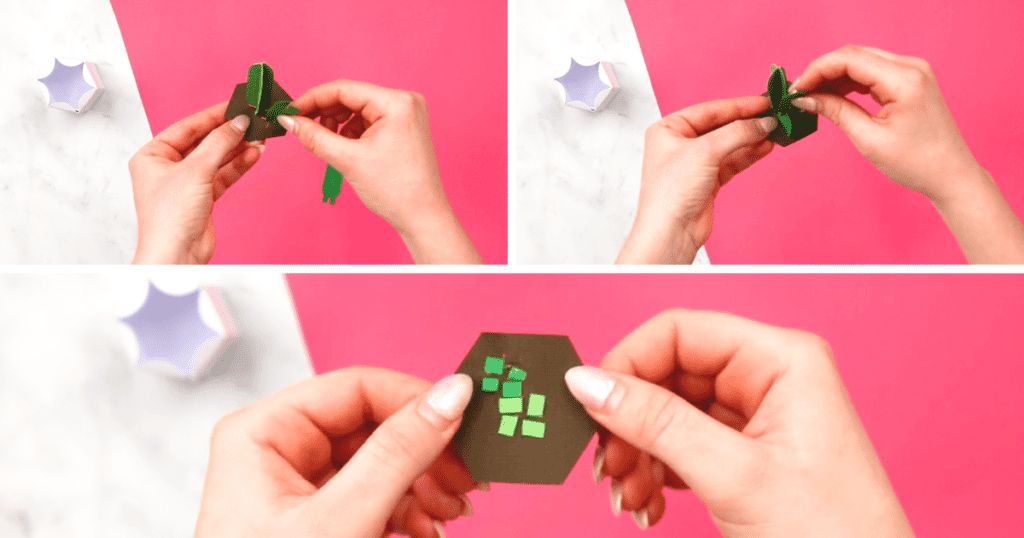
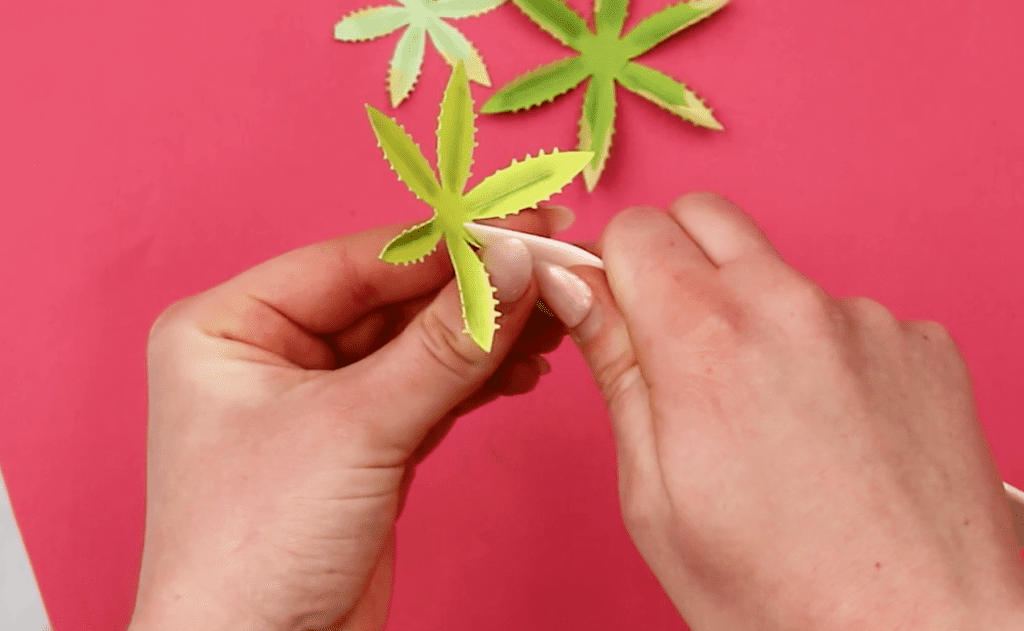
Take the flower pieces and simply pinch the petals. Then, glue one to the head of the cactus and one to the spine.
If you want your cactus to be fuller, grab the other cactus pieces without tabs or slits, fold them down the middle, and glue them to each corner of the assembled tall cactus.
Assembling Barrel Cactus
Barrel Cactus Consists of:
- 8 Barrel Pieces
- 2 Tabbed Barrel Pieces with Slits
- 2 Barrel Cactus with Slits
- 1 Hexagon Piece with Slots
- 2 Flower Pieces
- 4 Bristles

Gather the barrel cactus pieces, an assembled pot, some paint, paintbrushes, pan pastels, and sponges.
Begin by applying dark green pastel down the middle of the barrel pieces. Then, add light yellow acrylic paint to the edges.
To assemble, grab the tabbed barrel piece with a top slit and hexagon piece. Slide the tabs into one of the two slots, fold the tabs over and apply a dot of glue to each, and attach them to the underside of the hexagon piece.
Grab the other tabbed barrel piece with the bottom slit, slide the barrel pieces together, and pull the tabs through the slots, and glue them into place.
Feel free to make this barrel cactus look fuller by folding the extra barrel pieces down the middle and gluing them to each corner of the assembled barrel cactus.
Add the finishing touches by attaching the flower to the head and bristles to each spine of the cactus.
Assembling Small Cacti

Small Cacti Consists of:
- 4 Tall Rounded Cactus Pieces
- 2 Tall Rounded Cactus Pieces with Tabs
- 3 Curved Cactus Pieces
- 2 Short Rounded Pieces
- 2 Short Rounded Pieces with Slits
- 2 Short Rounded Pieces with Tabs
- 2 Flower Pieces
- 2 Prickly Pear Pieces
To assemble these small cacti, let's begin by assembling the tall rounded cacti with tabs.
Grab the tall rounded cactus with tabs and a slit at the top, and hexagon piece.
Slide the tabs through the slots, and glue the tabs into place. Then, take the other tall rounded cactus with a slit at the bottom and slide the pieces together. Glue the tabs to the underside of the hexagon, and let dry.
Next, gather the short rounded cactus pieces with tabs. Slide the piece with the top slit through the slot of the hexagon piece. Then, take the other short rounded cactus with the bottom slit and slide the pieces together.
Pull the tabs through the slots of the hexagon piece, glue into place, and let it dry.
Next, take two curved cactus pieces and fold them down the middle and apply glue to one side.
Then, attach it to the other curved cactus piece, apply glue to the bottom, and place it onto the hexagon piece.
Finally, take the two prickly pear pieces, slide them together, apply glue to the bottom, and attach it to one of the heads of the cacti.

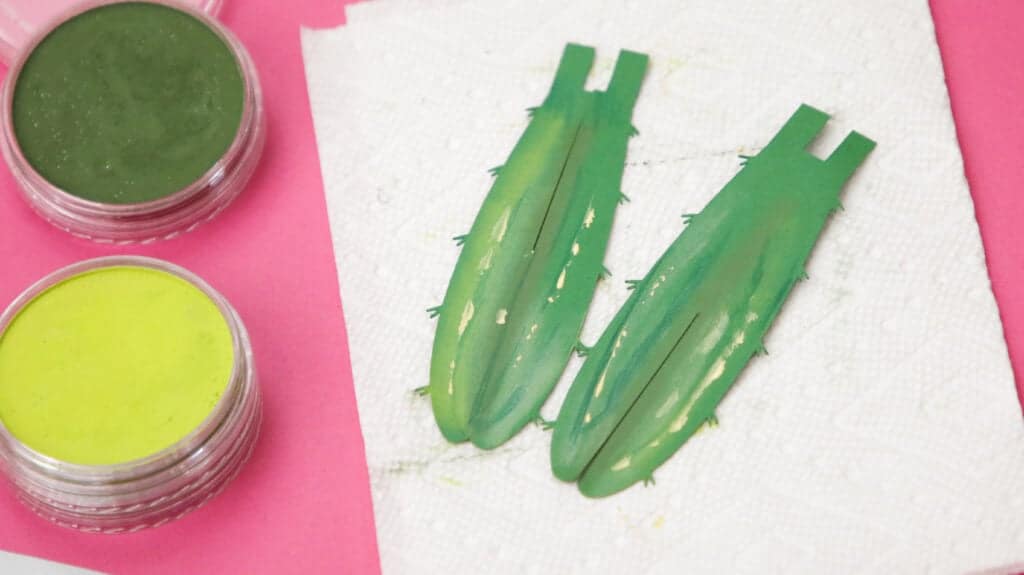
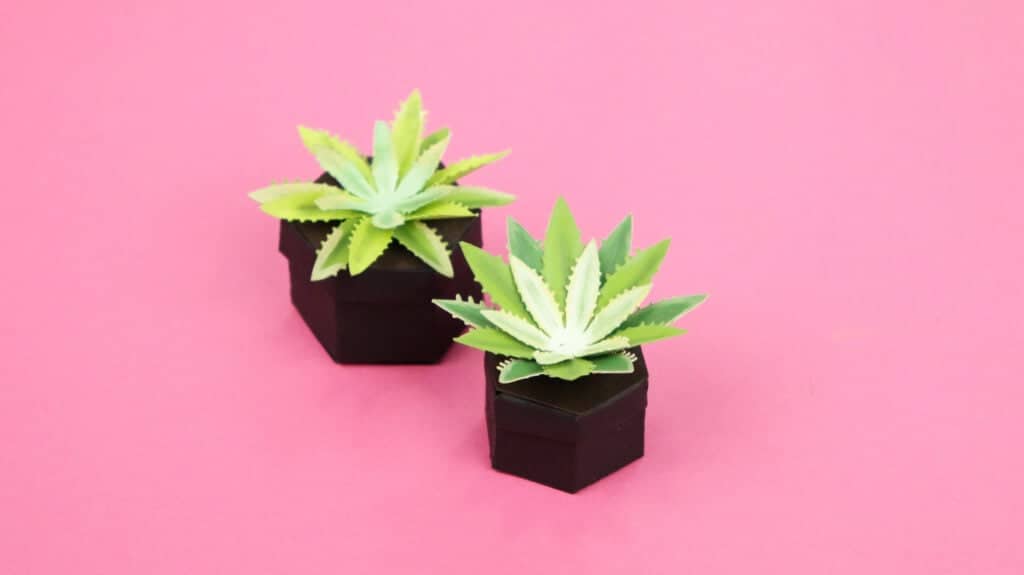
Assembling Aloe Vera
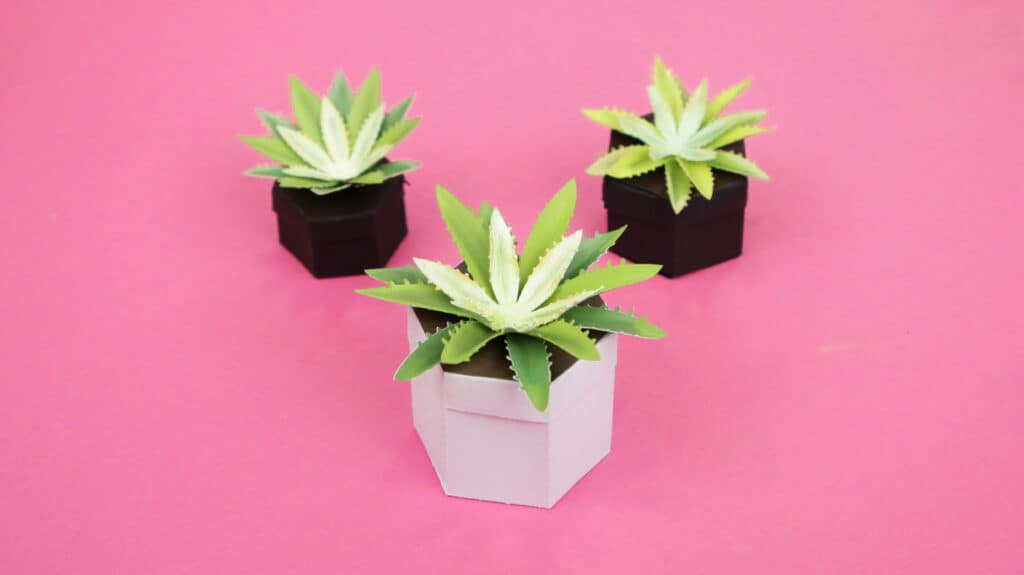
Aloe Vera Consists of:
- 1 Small Aloe Vera Leaves
- 1 Medium Aloe Vera Leaves
- 1 Large Aloe Vera Leaves
- 1 Hexagon Piece
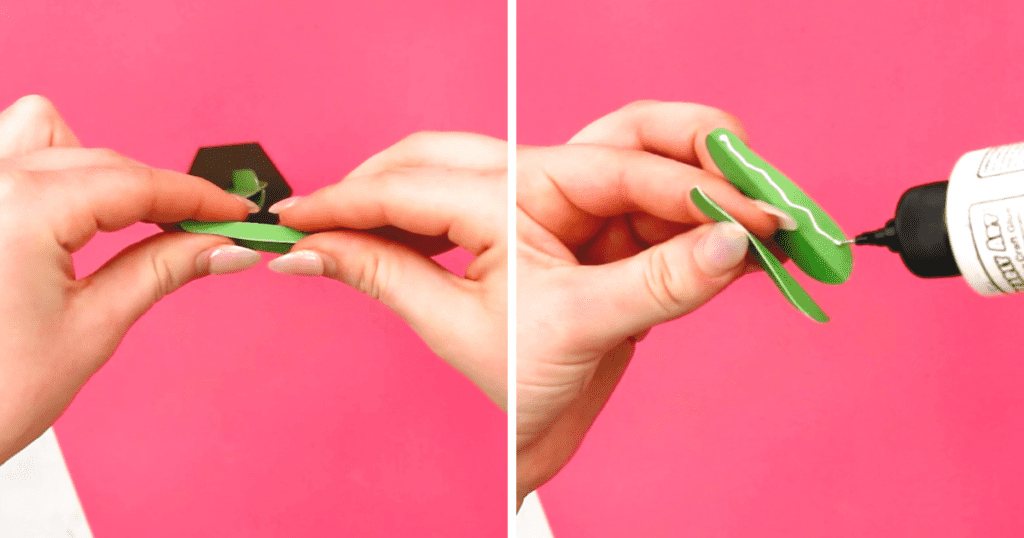
To add some depth, apply a stroke of dark green down the middle of each strip of leaf, and light yellow to the edges.
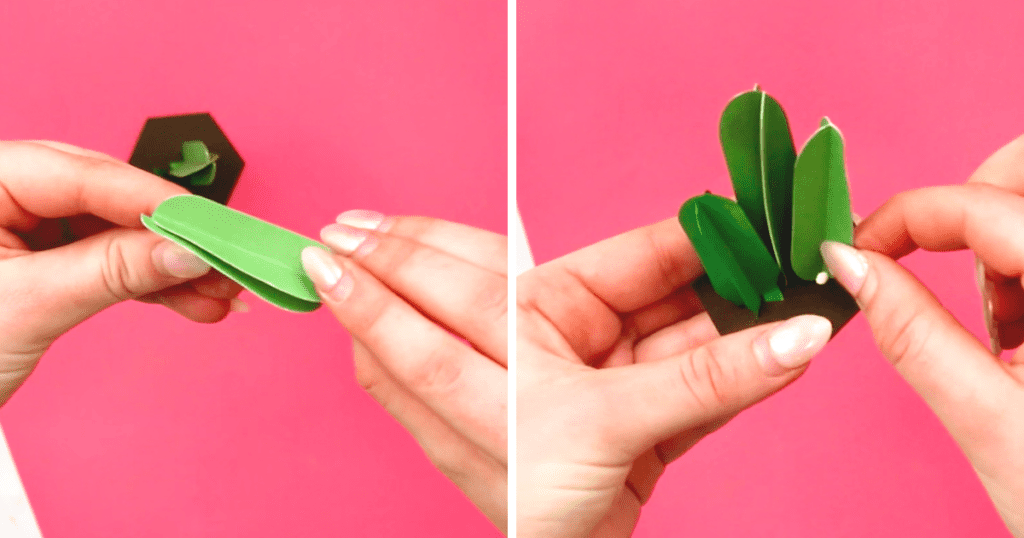
To assemble the Aloe Vera, fold each leaf down the middle to form a point with a bone folder or scraper tool.
After folding, glue the large aloe vera, the medium and the small on top of one another.
Finally, glue the assemble aloe vera to the hexagon piece and attach it to an assembled pot.
I hope you have fun making these 3D paper cacti!
Don’t want to forget about this free template? Save this project for later! Click here to save this project on Pinterest.
Join my crafting Facebook group where you can show us what you’re making, ask questions, and learn from others!
Looking for more SVG files and paper crafts? Click here!
What a great craft. Very original
Love this especially cause I can’t keep a real plant alive
love the cactus
Omg how cute!
This is so cute. I cant wait to try it.
I need to make some of these. So cute!!
Probably the only cactus I can keep alive!
So cute, I love them!!
Love your paper succulents! Can't wait to make them!
Love
These are so cute! Definitely on my "to make" list!
These would make the perfect kid's room decor! So cute.
these are adorable
Oh I am absolutely obsessed with cactus so this is definitely something I would love to work on! Thank you for the great instructions.
So cute
Love these!
I love the succulents!
My daughter fell in love with this project as soon as I showed her! Thanks for sharing!
Love these!
This would be fun to make. I like that using the acrylics makes them very realistic.
super cute idea
Great idea. Maybe I wont kill these cacti. Lol
Love this!
My granddaughter would love these!
So cute
You give such great instructions. Thanks
Those are really cute!
Perfect time for summer
Great ideas. Would love to make these.
nice
Now this I really need to try.,.
This look life like. Love it
AMAZING!!!!!
Love you stuff thank you
So cute. This would make a great gift.
Really cute cactus
Very cute
Darling
So many cool things you can do with circuit.
I like the boxes they sit in .
This is adorable for those who can’t grow anything. And they will never dry out and die.
I will have to try making these
These are perfect for someone who doesn't have a green-thumb.
Very crafty! Interesting project.
so so cute
Very cute. You make it look so easy.
So cute! What a fun idea!
Great tutorial!
Love these! I would still probably water it too much though!
You make it look easy!
You make this look so easy!
i love this cactus
thanks for the tutorial
These are so cute and looks like a fun and easy project!
So fun
Super adorable!
Those are adorable!
Love these!
looks mighty tricky for a newbie
These are so cute! A perfect little gift!
These are the absolute cutest!
I will definitely be making a few of these!
These are too cute!!
Oh my goodness these are just the cutest! I'm definitely going to attempt this. Thank you.
What a cute idea! I love these!
So cute! Plants I can’t kill!
very nice detailed tutorial and cute project!
How cute, I particularly like the aloe vera one, looks so springy. Thanks!
Would absolutely love to make these.
These are adorable!
Your posts are always so thorough and informative. Thank you!
You give great instructions.
Very cute.
Very cool idea.
Love cacti. Great project, easy to follow!
These are so cute and look realistic. Love it
These are absolutely adorable! Would be fun to make with my grandson for his mom for Mother's Day. Thank you!
So cute! Great job!
This is cool! I'm going to try it!
Cool!
Ty for this
Cool
Beautiful
very nice
This is great! I don't have to water anything!
Omg so cute. They would live forever
Adorable but a lot of work
So cute!
I wouldn't know where to put them all
Very detailed!
I kill all my real plants so these are perfect
Perfect little gift for that friend who can’t keep plants alive.
They look real! Love the card!
Very cute
Loveee these they are so cute.
These are so cute
These are stinking cute. You make this so easy to follow and create.
This is great!!!! Great gift for a young lady I know so she can make these cactus!! She loves cactus!!
These succulents are adorable!
I love paper plants!
So cute
How fun!! I can’t wait to try this! Thank you!
Will definitely try this for Mother's Day
I cannot believe how amazing these look! You are so incredibly creative!
These are adorable . I wish I was this creative.
Fun project! Thanks for sharing.
I love this idea for my desk.
I love, love, love the card. It's just beautiful!
There are so cute!
Very cute! The card is my favorite.
Great cactus centerpieces!
This is the perfect for those of us that do not have green thumbs. I love it!!
These are kinda cool! Almost realistic looking. And the best part is, you don't have to water them. lol
These are so cute! I think they are more suited for people like me that have a husband that things everything needs to be watered down at least once a week or maybe twice. LOL
Love these cacti!
cute idea
Really cute!
Really love the detailed instructions! So Cute!!
Great idea!
Love them~
The little planters are really cute.
Seems easy enough
Finally a plant we can't kill. Great idea
Such a creative idea!
Cute idea
How adorable! That's the kind of plants I need!
Really cute
Interesting and fun! My wife would love this one.
good to know
Yo no tengo maquinas de esas que te hacen la vida más fácil, el proyecto es precioso pero yo no puedo hacerlo porque las plantillas están en SVG y yo solo puedo PDF ....gracias
So cool
This would be so perfect for an office with no lighting
Fun projects!
I would rather see Star Wars stuff as I'm a big fan.
I love these. They are so cool
Great project will love to do
Lovely!
I get why people love the circuit - but I wonder how long it takes to become proficient
These are so cute!
Love the barrel cactus piece!
So cute and no watering!
Wow. They look so real.
Cute!!!
What a great tutorial, so comprehensive! Love these cacti. thank you for such a great design.
Great!!!!!
Intricate design
These are adorable!!
I need to make them.
Love this tutorial.
Super cute.
Probably too complicated for me, but absolutely lovely.
These cacti are too cute! I can’t wait to make them. Thank you for sharing the fabulous templates and tutorial.
These are very imaginative!
I am not this good at crafting
These are the style right now, cacti, not plants. They are good for desks at work, the kitchen, window seals, etc.
Fun idea!
Beautiful, so life like and no dirt or watering. Thanks for posting.
I LOVE your blog and YouTube channel! You plan and think everything out so well with the most beautiful results! I was just wondering if I need to re-size the cacti, do I just group everything and re-size? Thank you so much!
Heard some buzz about mcw.19. Decided to peek around. Layout looks pretty slick, hoping the gameplay is too! Worth a shot? Find it here: mcw.19
Was looking for a new place to play and found dangkyok9. Registration was quick and easy. Let's see if it pays off! Check it out: dangkyok9
Trying my luck with xosotailoc today. Feeling like I need to manifest some winnings! Wish me some good fortune. Site can be found here: xosotailoc
Doceniam to co robisz i to co piszesz. dziękuję Ci za zaangażowanie i wkład w społeczność blogową. Trzymaj tak dalej sukces jest na wyciągniecie ręki 🙂
Służysz społeczności blogowej, pięknie przy tym składasz frazy, przyjmij najszczersze wdzięczności moich wyrazy 🙂
http://accessbridgepharmacy.com/# AccessBridge
mexican pharmacy what to buy: AccessBridge Pharmacy - AccessBridge