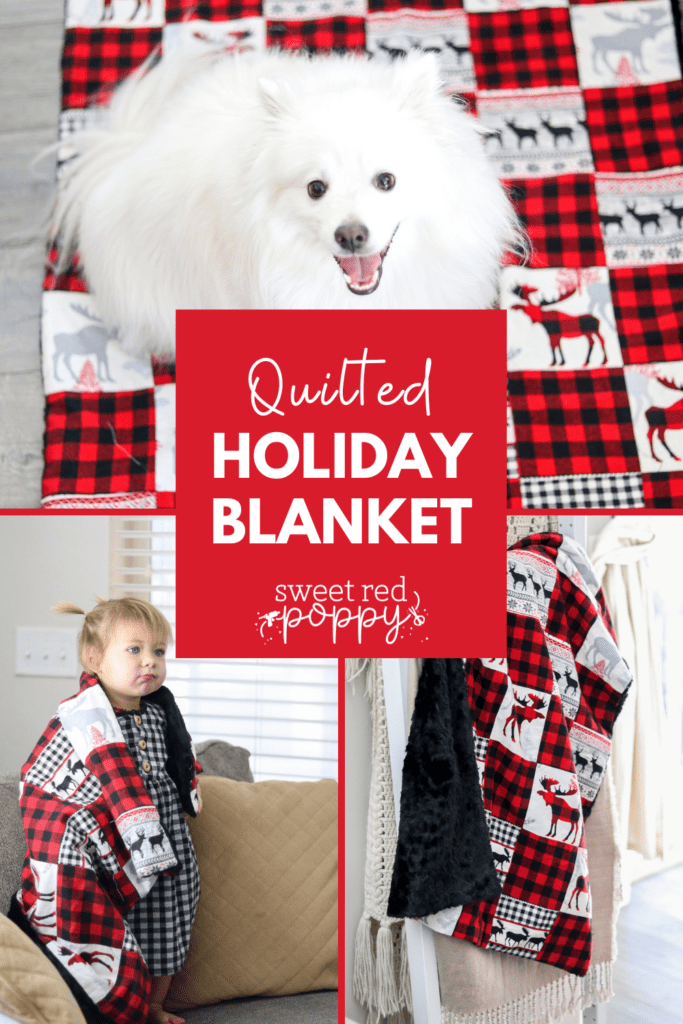
Learn How to Make an Easy Quilted Holiday Blanket With This Step-By-Step Sewing Tutorial and Video.
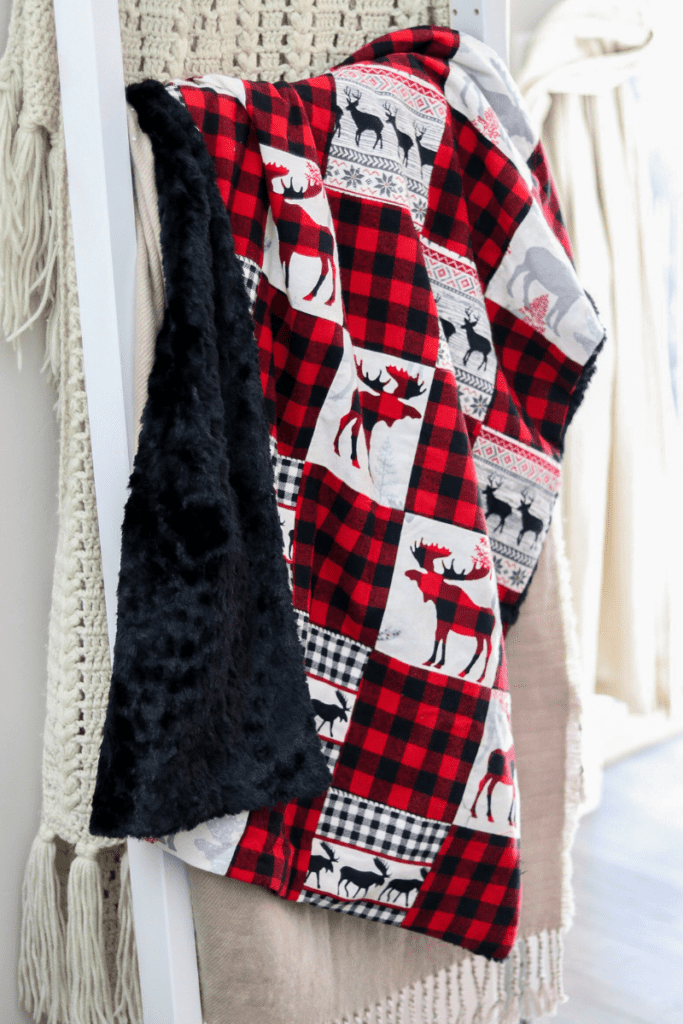
Do you want an adorable project for the holidays this year? This quilted holiday blanket is a fast and easy sew that will put a smile on anyones face! With a faux fur backing, you will want to snuggle this blanket everyday.
Looking for even more blanket tutorials? Learn how to make a faux fur blanket with this tutorial.
This tutorial makes a blanket about 35"x 41", which is a great child's size, but if you are sewing for an adult feel free to add additional squares to increase the size. Just make sure you buy more fabric!
Click here to see over 100+ free sewing patterns and tutorials.
What Type of Fabric Should I Use?
For the quilt top, you can use a variety of different fabrics like Cotton, Flannel, Fleece, Gauze etc. For this tutorial, I used flannel fabrics and did a lot of fussy cutting to get the exact print I wanted.
How Much Fabric Do I Need?
- Quilt Top: 1/2 yard Red Checkered Fabric
- Quilt Top: 1 yard Fair Isle Checkered Fabric
- Quilt Top: 1 yard Novelty Print
- Backing: 1 yard Faux Fur
Table of Contents
Materials Needed:
- 1/2 yard red checkered fabric
- 1/2 yard fair isle checkered fabric
- 1/2-1 yard novelty print (If using a striped or novelty print, get extra material for fussy cutting)- Similar
- 1-yard Faux Fur
- Fabric Fuse glue
- Sewing Pins or Craft Clips
- Sewing Machine
- Thread
- Sewing Machine Needle
- Scissors
- Rotary Cutter
- Cutting Mat
- Iron
- Ironing Board
- Seam Ripper
Step One: Cut Your Fabic
Lay out your rotary mat and place your two checkered fabrics on top of each other matching corners. (PRO-TIP: this cuts time in half by stacking your fabric and cutting the squares at the same time)
Cut these two checkered prints into 6"x6" in squares. You need 14 of each fabric. Set those two fabrics aside and lay out your novelty print.
Fussy cut (PRO-TIP: fussy cutting means to cut the graphic out intentionally wherever it may be in the fabric) the moose out so it is centered in the 6x6 inch square. You need 14 squares.
Lay out the fabric squares in the order you want the quilt top to be. You can create a pattern or randomly place them. You will do 6 squares across and 7 squares down. This blanket has 42 squares total.
Step Two: Sew Quilt Top
Time to get that sewing machine out and thread it!
You are now going to sew six squares together to make long rows. Sew the squares by placing right sides together. I used a 1/2 inch seam allowance for this quilt top.
You will end up with 7 strips that have 6 squares in each row. Once all 7 rows are sewn together press the seams down. You want the quilt top to lay flat.
You are now going to sew the rows together using a 1/2 inch seam allowance.
(PRO-TIP: Make sure the seams are flat and don't fold when you sew over them. Also pin your seams together so that your lines match up)
Remember to sew with the right sides together. To make sure you don't sew out of order, start with the top and leave the pieces laid out until you need them.
Once all the rows are sewn together PRESS ALL THE SEAMS DOWN. Your quilt top is now done!
Step Three: Cut Backing Fabric
Get your rotary mat back out and scissors. Lay out your faux fur on top of the mat and place your quilt top over it matching the corners. Cut out your faux fur using your quilt top as a guide.
(PRO-TIP: Throw your faux fur in the dryer after you cut it to get rid of all that excess fur floating around everywhere.)
Step Four: Sew Backing to Quilt Top
Pin or clip the quilt top to the faux fur with right sides together. Using a 1/2 inch seam allowance sew the sides together. Make sure to backstitch to really secure the seams. On the last side, leave a 2" opening to turn the blanket.
Clip the corners. Turn the blanket right side out by pulling the corners through. Push out the corners so they are rounded out.
Step Five: Close Opening
To close the blanket, get our your fabric fuse out. Finger press your opening so you know exactly where to glue. Glue down the seam and clip it together with your craft clips. It dries clear so don't worry if it gets on the blanket!
Let it dry and enjoy your Holiday Snuggle Blanket!
Join my crafting and sewing Facebook group where you can show us what you’re making, ask questions, and learn from others!
Looking for more blanket tutorials and projects? Click HERE!
Save this project on Pinterest by clicking HERE.
Fun
So warm,soft, and cuddly this would be
Sounds like a fun time
This project is SO cute! I would love to make one and use as a tree skirt!
I love this blanket but can't sew at all. I would like to learn
Love this quilt! Definitely going on my (long) list of things to make!
Very pretty!
Cute!
Great fabric choice..I think even a beginner sewer like me could make this.
My granddaughters would love these! Might make them as Xmas gifts.
Cool
I tend to hand-sew. This would be--interesting--to try that way. Might keep me from murdering my housemates, though!
That is beautiful and it doesn't look that hard.
You do beautiful work
I will definitely be doing this!!! I can’t wait to and I will take a picture of it and post it on here for you all to see!! Thank you for the awesome gift idea also!
So warm and cozy for babies or fur babies....or larger for your Sweetie!
Looks like a beginner can try this!
What a treasure to create and keep forever.
Thanks!
I would like to have an adult size one of these.
I absolutely adore this blanket! Love the colors and the fabric.
my Golden Doodle would love this
so cute
Love love! If only I could sew
I need to learn how to sew because there are so many amazing things to make.
Thank you for the tutorial.
Very cool!
Would be great as a pillow slip cover, which would be easy to store after the holiday
My mom loves quilts. This is a great gift idea for her!
Cute
It is adorable. Will be added to my to-do list.
This would be perfect for camping! Maybe not with the faux fur backing but with a cute fleece or flannel it would be great! I'm going to make a couple for our camper and a couple for my brother and his family to take in their's. Thanks for sharing!
Oh I love the faux fur on the back! Such a great idea
Looks cozy
Beautiful thank you
Need to break out the sewin g machine and give this a go!
Love it!
I've never made a quilt before. These instructions seem simple!
This stern would work great year round by just changing.out the fabrics!
Very cute blanket and you make it look so easy.
Excited to make this
I would love to make a quilt this pretty-I can’t sew a button on though! Maybe I’ll learn one day.
I would love to make one of these!
This would make an excellent Christmas present
Love the faux fur on the bottom! So cozy
Love this holiday blanket
Couple of matching pillows and you would have a cute set!
Thanks for this tutorial. This is a nice gift idea for babies.
Yes!!
Very cute
Love this! Will make it soon
Love it!! Must try
Lovely Christmas idea.
Maybe I can learn to sew. This looks like a great project to start with
This would go great at my son's country home!
I love this and have my fabric ready to go!
Love this so much I miss not having what I need to make my crafts I need to find a way to get all my supplies that I lost in the house fire back
So excited to try and make something like this. I’ve copied a pattern of yours before and the ease of the directions were great! I am a novice sewer so hope to do more of your patterns.
Make one for a gift or yourself!
Such a great idea! Love the colors!
Looks pretty easy; something I can do.
What a cool blanket for a gift thanks for the idea
This looks pretty easy to do and I love the moose print too
I love the colors of this quilt. Such a festive design! And your instructions are so detailed.
These would be cute for baby dolls too!