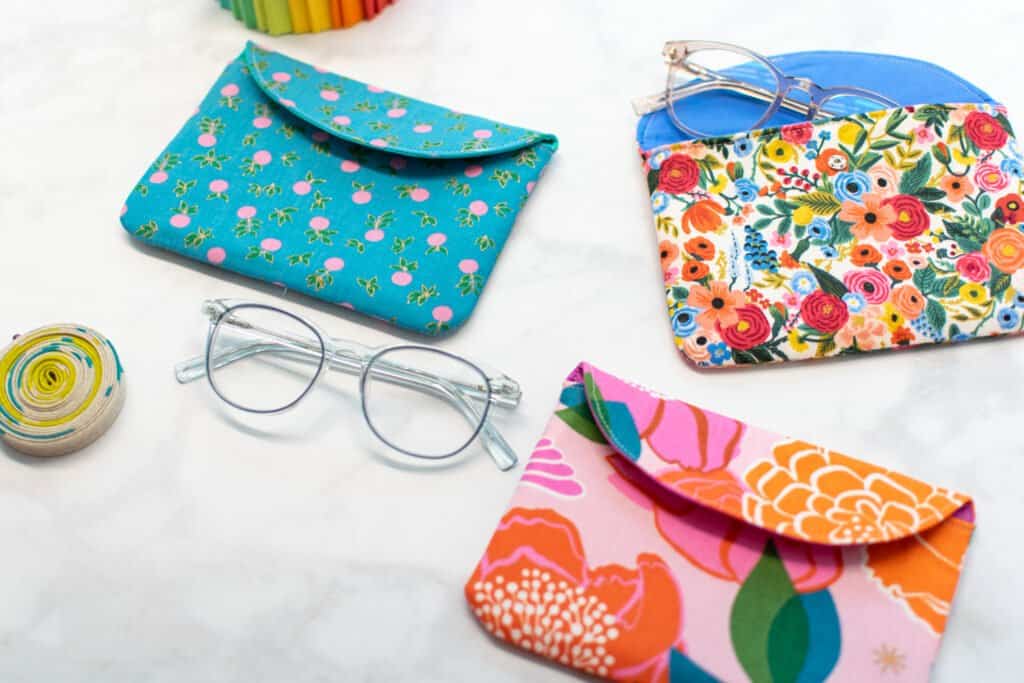
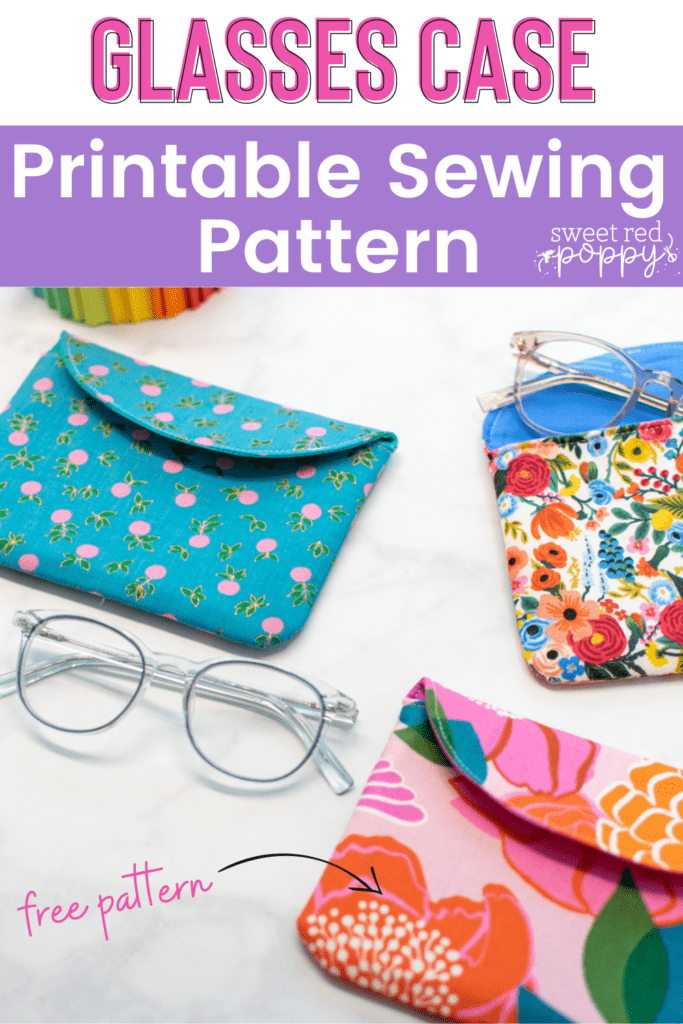
Carry your glasses in style by sewing your own DIY glasses case with this free downloadable sewing pattern and step-by-step tutorial.
Without a travel case to protect your sunglasses or eyeglasses, they can easily become scratched or smudged. That's no fun!
With this easy-to-follow sewing tutorial and free pattern, you can sew your own carrying pouch for your glasses.
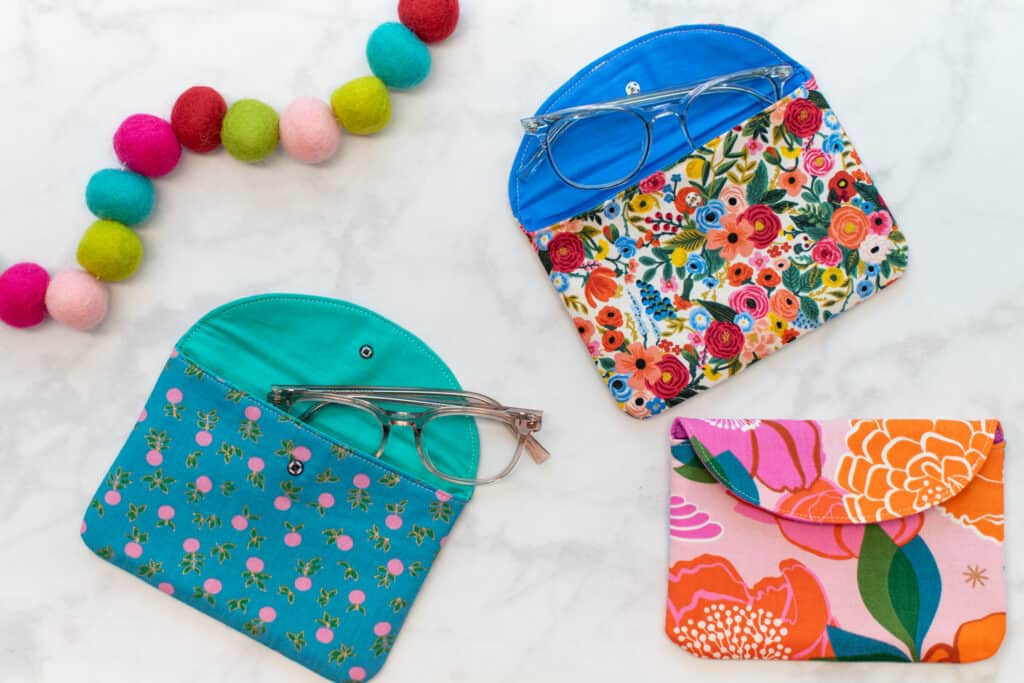
The best part? You get to choose the fabric, making your new glasses case as fun and unique as you are!
Table of Contents
Why Make Your Own DIY Glasses Case?
A good glasses case always comes in handy. You'll probably want one in every space you frequent - think your home, work, and car - so you're never without one!
But why make your own? There are quite a few reasons!
- You can choose your favorite fabric, so your new glasses case will fit your unique style.
- It's cheaper! This DIY glasses case requires very little fabric and other materials to sew, making it a very inexpensive project to take on.
- It's easy (and fun!) to sew. If you're a beginner sewer or just someone looking for a simple, quick-win project - this is a great pattern for you!
- They're fast to make. Sewing this glasses case will take you an hour or less, especially once you get the hang of it. And once you've made all the glasses cases you need, you can make some as gifts for friends!
Want to learn how to make even MORE fabric bags?
Get 11 different bag patterns and gain access to a comprehensive collection of bag patterns and tutorials my All The Bags 150+ page Ebook by clicking here.
About the DIY Glasses Case Sewing Pattern
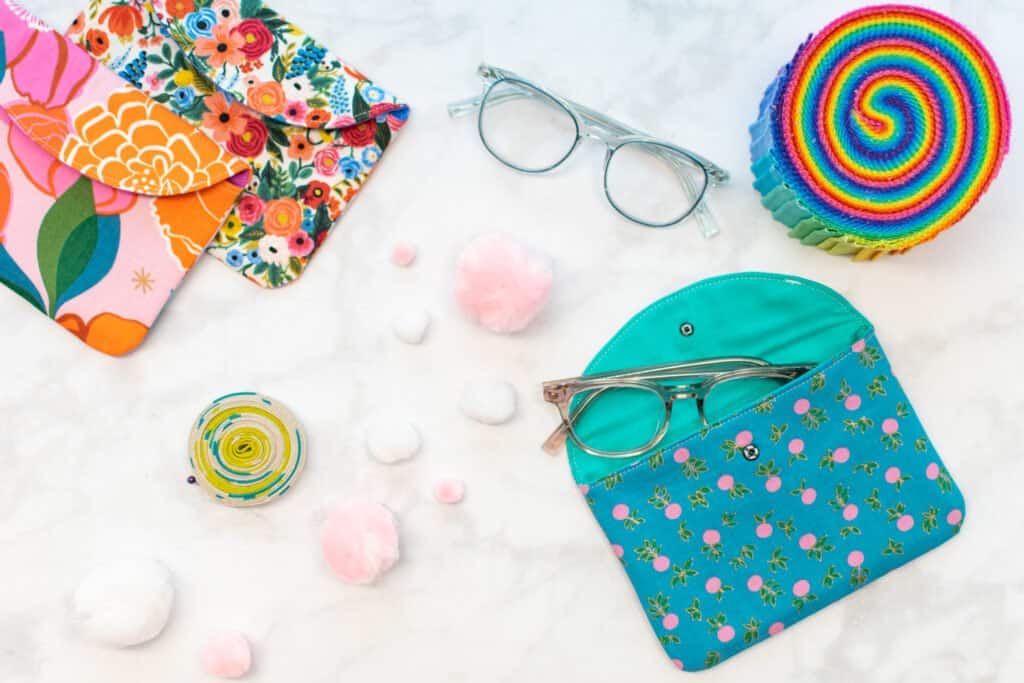
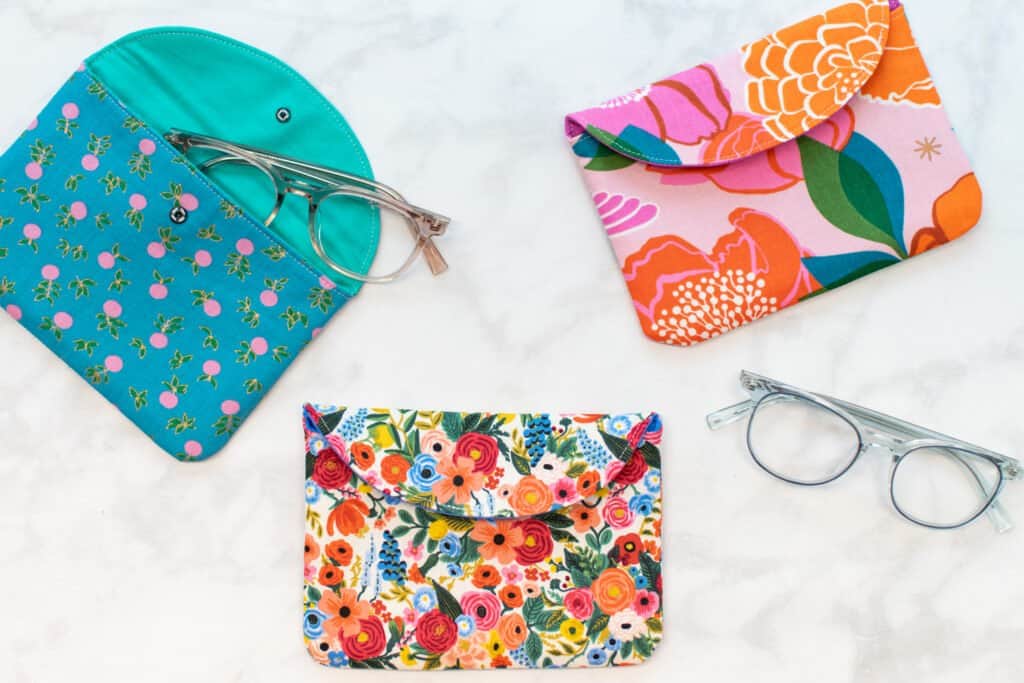
This free glasses case sewing pattern creates a versatile 6.5 x 4.5 inch pouch - a great fit for almost any size of eyeglasses or sunglasses.
The pouch is fully lined and padded with a layer of fusible fleece. This extra padding helps to protect your glasses in case the pouch gets dropped or hit against something.
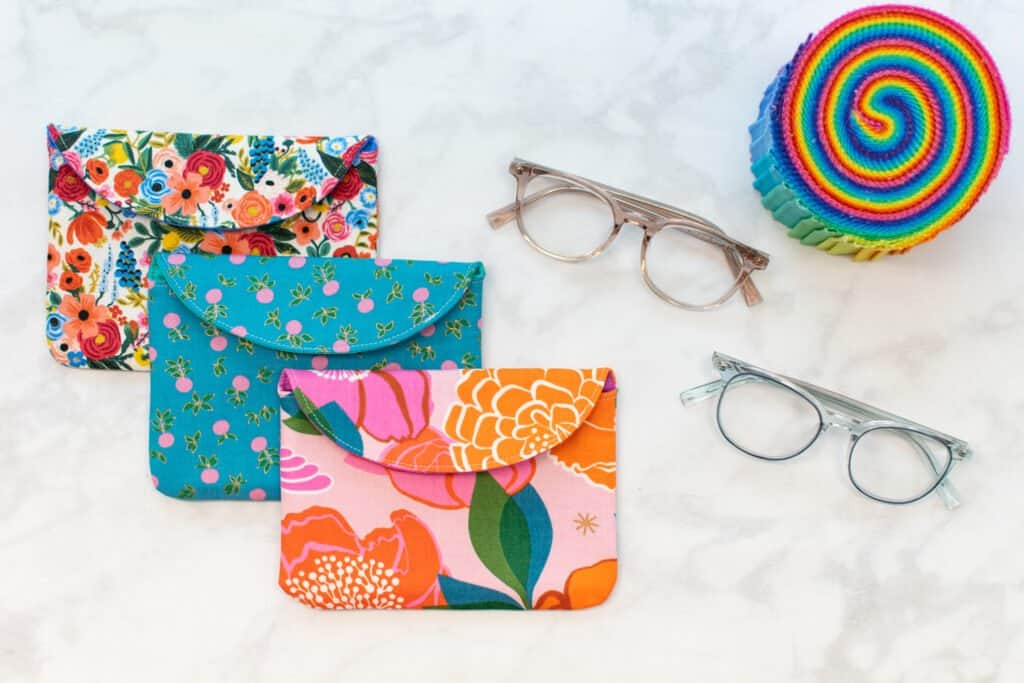
The glasses case has a flap along the upper edge that secures with a snap to easily open and close the pouch.
It also includes a topstitching detail around the upper portion of the pouch. This gives it a professional, well-made look.
Best Fabric For a Glasses Case
When choosing fabric for your glasses case, the most important thing is to choose a light to medium weight fabric that won't scratch your glasses.
Go with a fabric that is smooth or soft, rather than one that is rough. A great, basic fabric option is quilting cotton. It has a smooth finish, is easy to sew, and comes in a lot of great colors and prints.
If you want to be a little more adventurous with your glasses case, you might try a specialty fabric such as silk, faux fur, or velvet. Just keep in mind that these fabrics are more challenging to work with than quilting cotton.
For padding your glasses case you can use fusible fleece or flex foam. Fusible fleece is easier to work with, but is a bit thinner than flex foam. If you prefer a very structured, thickly padded look, go for the flex foam!
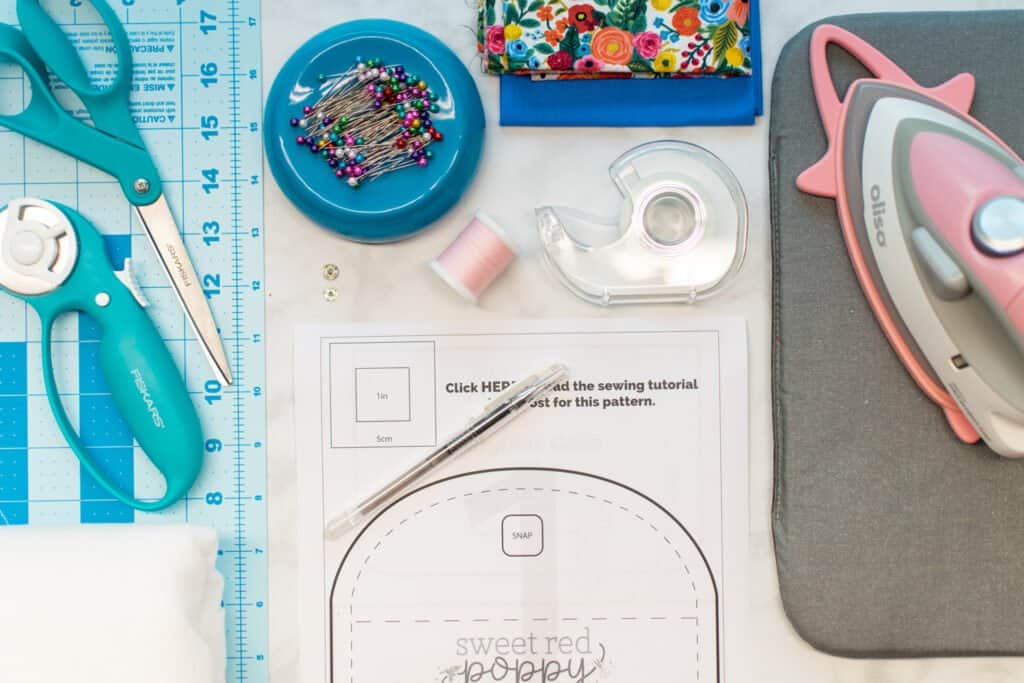
Supplies to Sew a DIY Glasses Case
Here are the supplies you'll need to have on hand to make your DIY glasses case.
- 1 Fat Quarter Main Fabric
- 1 Fat Quarter Lining Fabric
- 1/4 yard 45-Inch Wide Fusible Fleece
- 1 Snap Set (Can Use Sew-On or Press-On)
- Snap Setting Kit (for Press-On Snaps)
- Scissors
- Rotary Cutter
- Rotary Cutting Mat
- Thread
- Sewing Pins
- Iron
- Ironing Board or Mat
- Fabric Pen
- Sewing Machine
- Sewing Machine Needle
- Hand Sewing Needle
- Tape
- Printer
- Printing Paper
Shop my favorite sewing supplies here!
Why Shop Through My Links?
When you shop through my affiliate links, it doesn't cost you anything extra, but it helps me out in a big way! I earn a small commission from those purchases, and that support allows me to continue creating and sharing free tutorials and patterns for you. Thank you so much for helping me keep this creative community going!
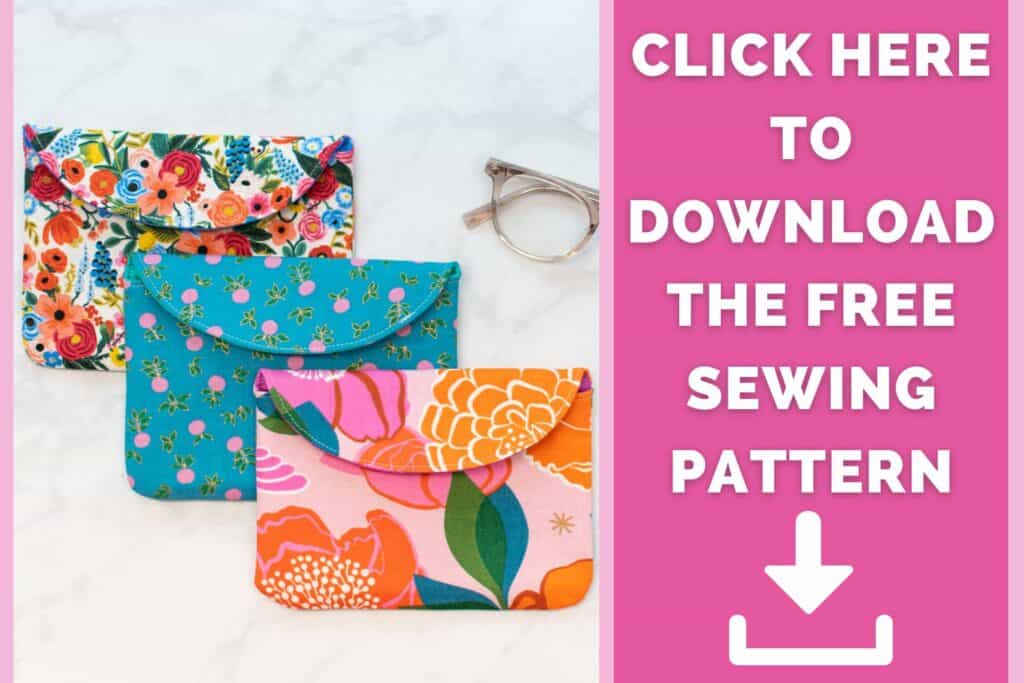
Download the FREE Glasses Case Sewing Pattern Here
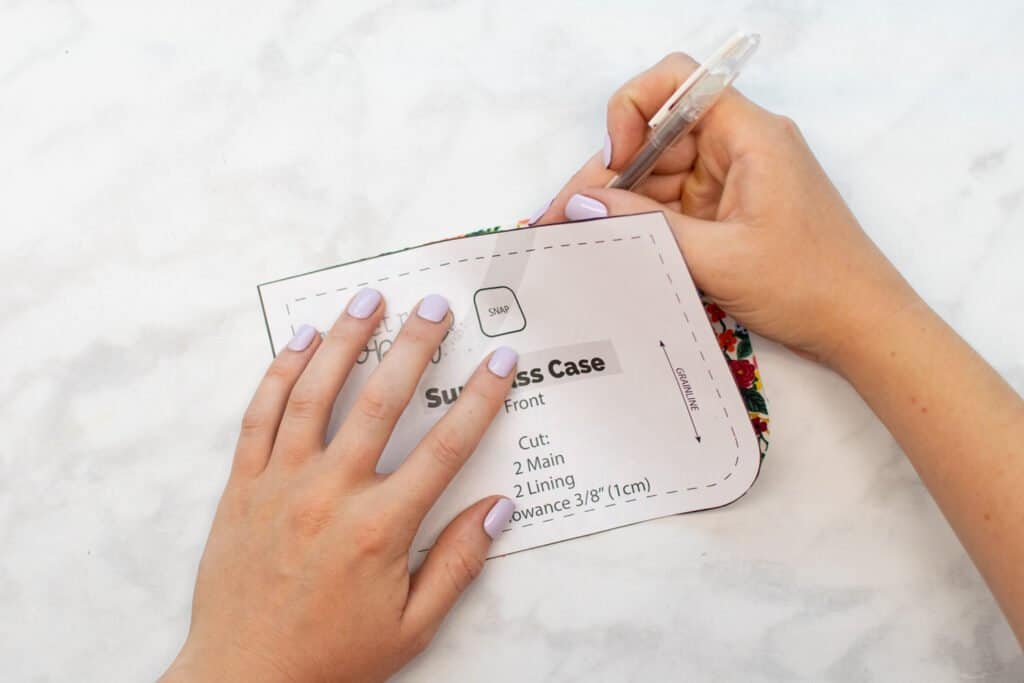
Step 1: Download and Cut Out the Pattern
First, download the free glasses case sewing pattern to your computer. Open it in your PDF reader - I recommend Adobe Acrobat.
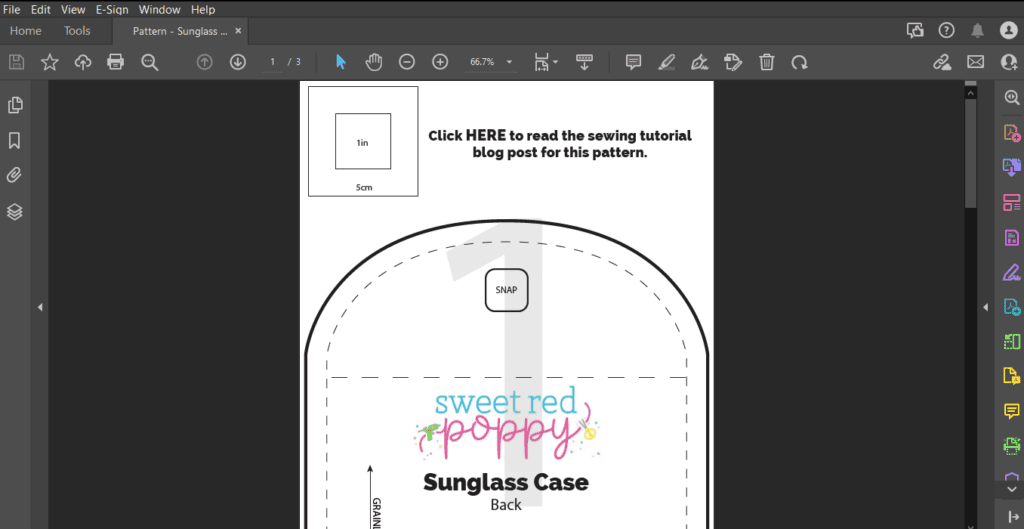
It's important to avoid printing the pattern directly from the browser because it can cause issues with the scaling.
Next, click on "Print". This will open the print settings dialog box. In this box, set the scaling to "Actual Size" or "Custom Scaling: 100%".
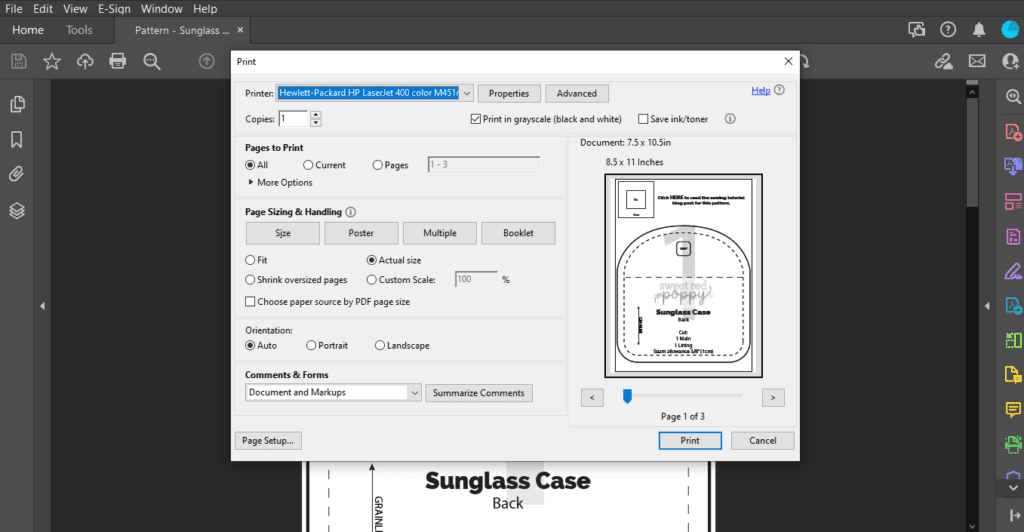
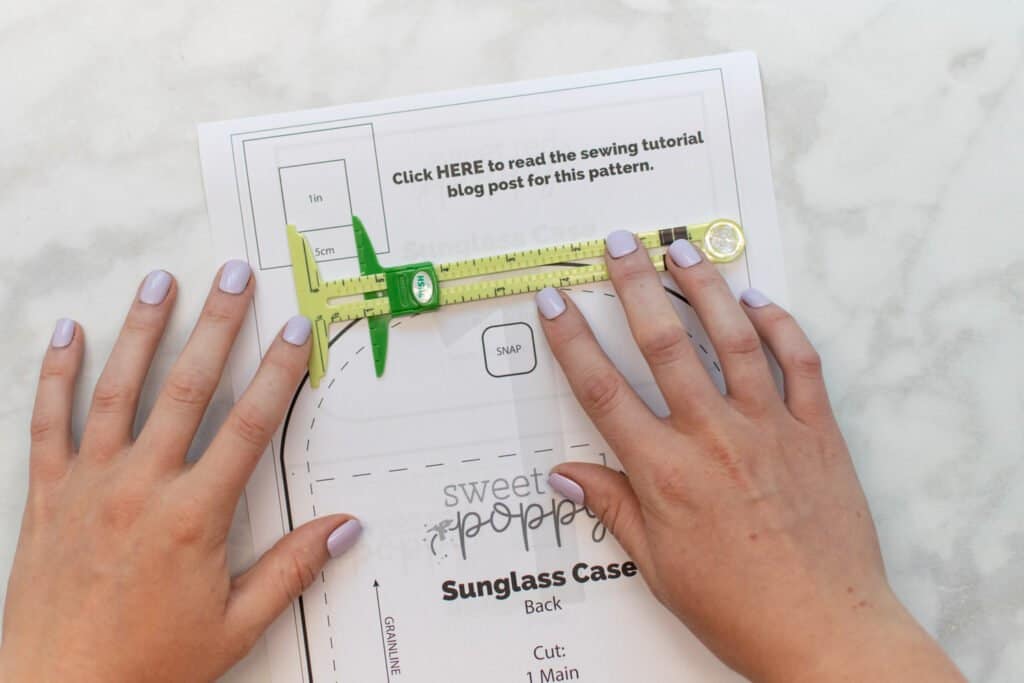
Then, print the first page of the sewing pattern. This page has a 1" x 1" test square. Measure the test square to ensure that it is the correct size.
If the test square measures 1" x 1", you can print the rest of the pages of the pattern. However, if it does not measure the right size, you will need to double-check your print settings and reprint.
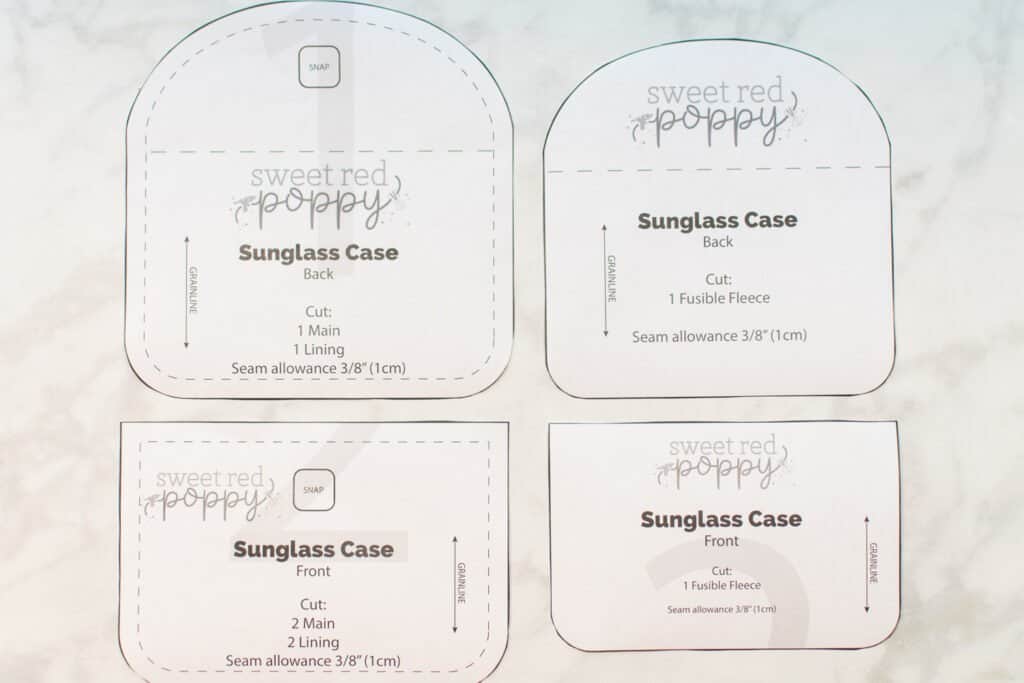
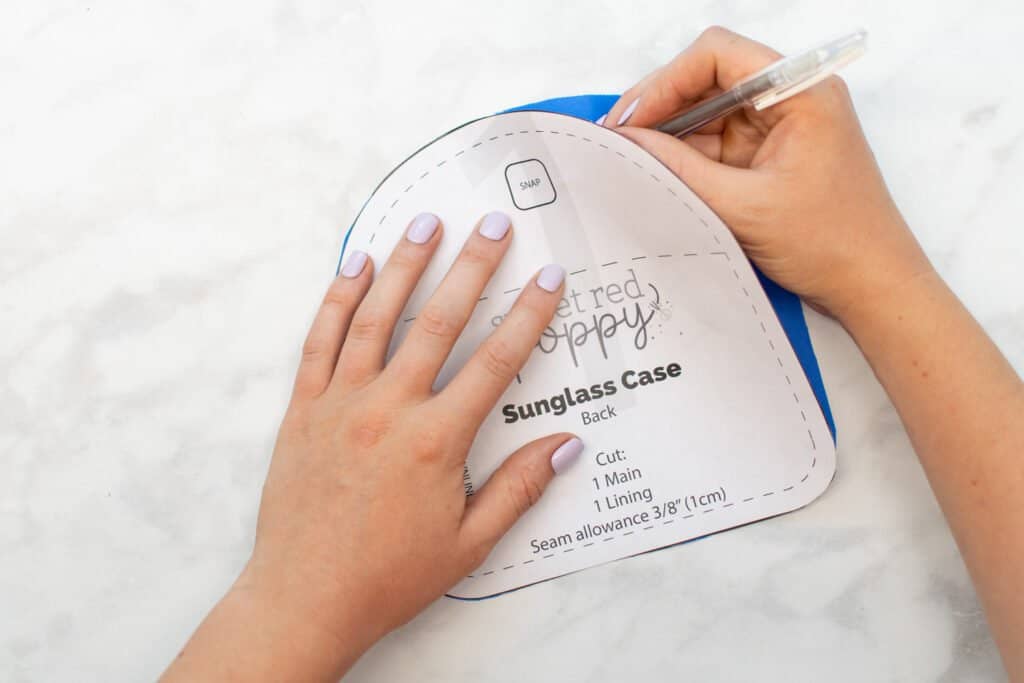
Once printed, cut out each of the 4 pattern pieces. You should have these pieces: Front (Main/Lining), Front (Fusible Fleece), Back (Main/Lining), and Back (Fusible Fleece).
Step 2: Cut Out Fabric & Transfer Markings
With the pattern pieces prepared, use them to cut out your fabric pieces. Cut the following number of pieces from your fabric, lining, and fusible fleece.
Fabric (Outer)
- Front: Cut 1
- Back: Cut 1
Fabric (Lining)
- Front: Cut 1
- Back: Cut 1
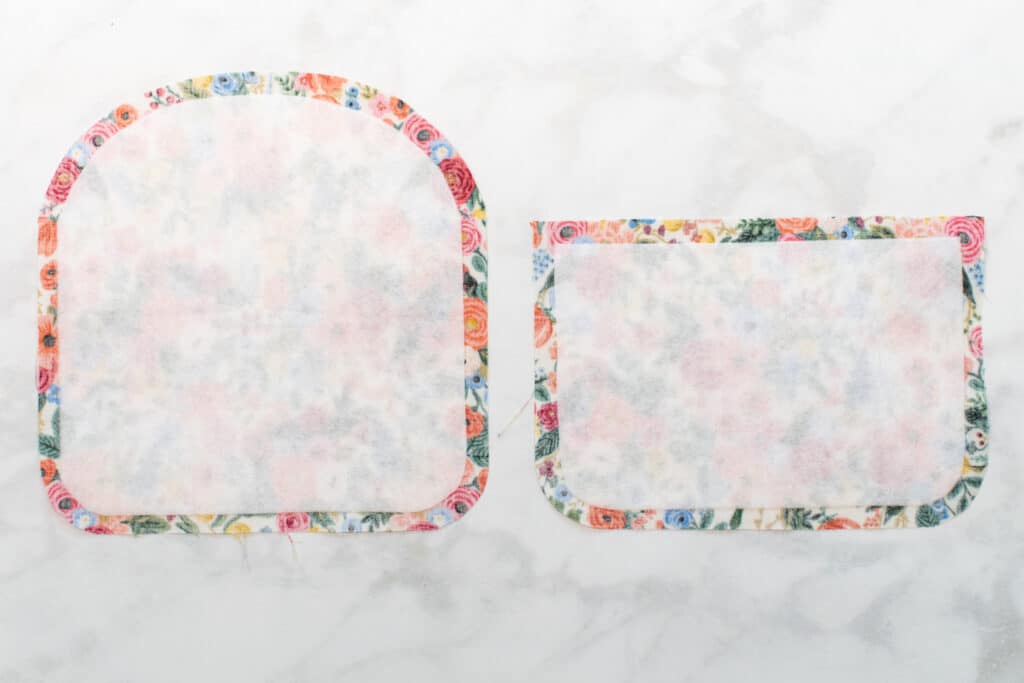
Fusible Fleece
- Front (Labeled Fusible Fleece): Cut 1
- Back (Labeled Fusible Fleece): Cut 1
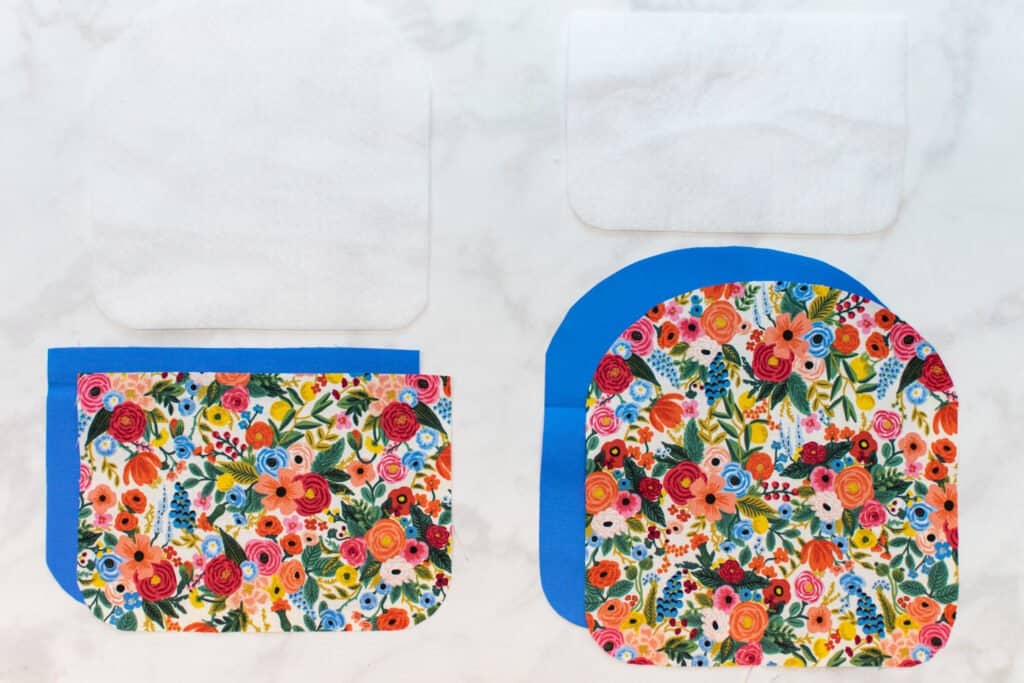
Once the pieces of your glasses case are cut, you'll need to transfer the pattern markings to the fabric.
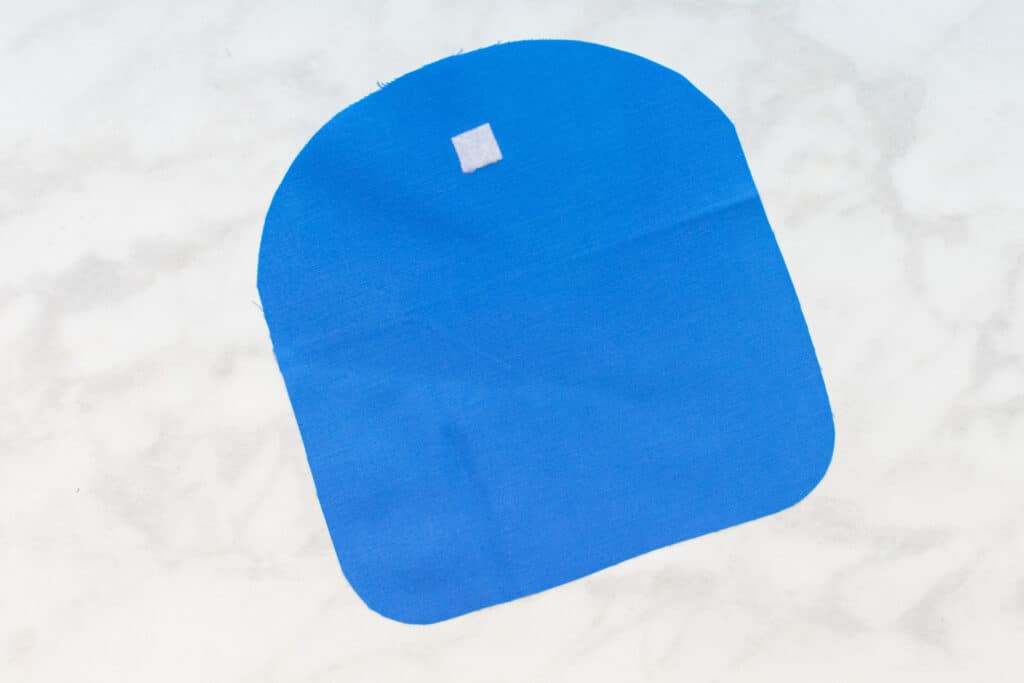
Transfer the snap placement mark from the Front pattern piece to the right side of the outer fabric front piece.
Next, transfer the snap placement mark from the Back pattern piece to the right side of the lining fabric back piece.
Step 3: Apply Fusible Fleece
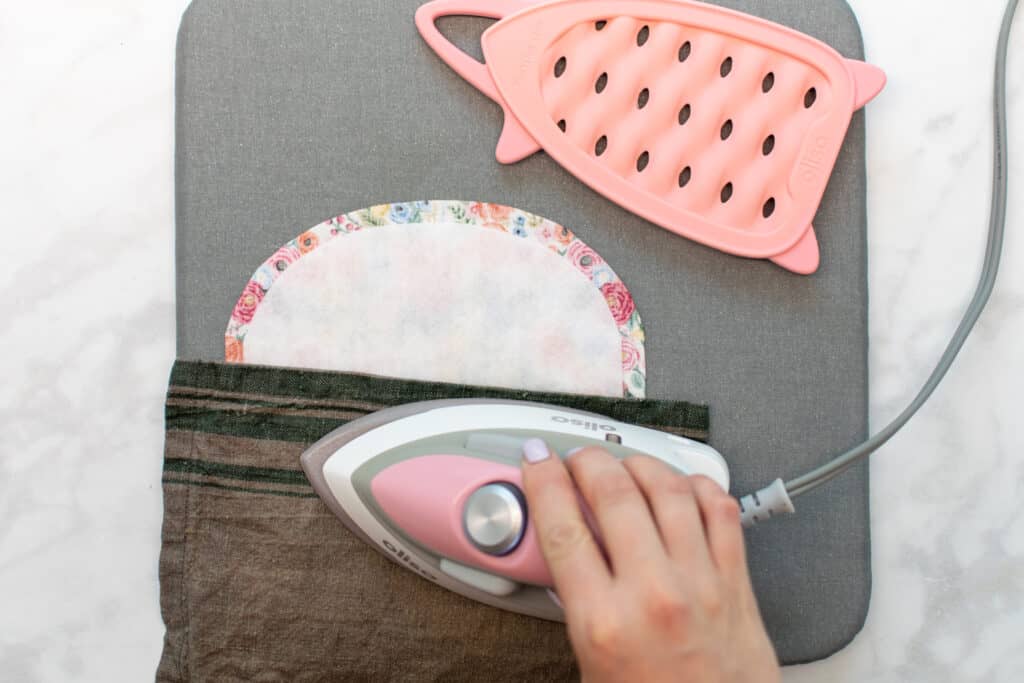
The final step to prepare the fabric pieces for sewing is to apply the fusible fleece.
Center the 2 fusible fleece pieces on the wrong side of the 2 main fabric pieces. Make sure that the rough side of the fleece with the adhesive is placed down against the fabric.
Next, follow the manufacturer's instructions to fuse your fleece to the fabric pieces.
Finally, cut a 0.5 inch square of fusible fleece and place it on the wrong side of the lining front piece directly over the snap placement mark. Fuse this square in place to add extra stability for the snap.
Step 4: Place the Snap
Next, grab your outer fabric front piece and place it right sides up on your table.
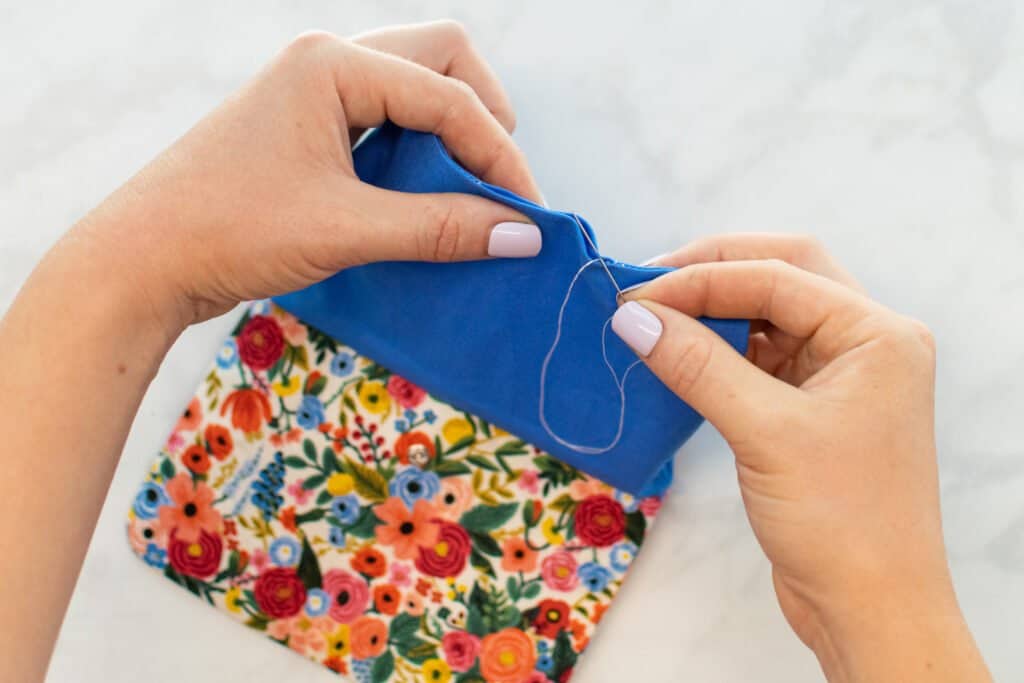
Attach one side of your snap over the snap placement mark. If you're using sew-on snaps, stitch it on with a hand sewing needle and thread. If you're using press-on snaps, use the tool that came with your snaps to apply it to the fabric.
Then apply the other half of your snap to the right side of the lining back, placing it over the snap placement mark.

Step 5: Assemble the Body of the Glasses Case
With the snap applied, it's time to start sewing!
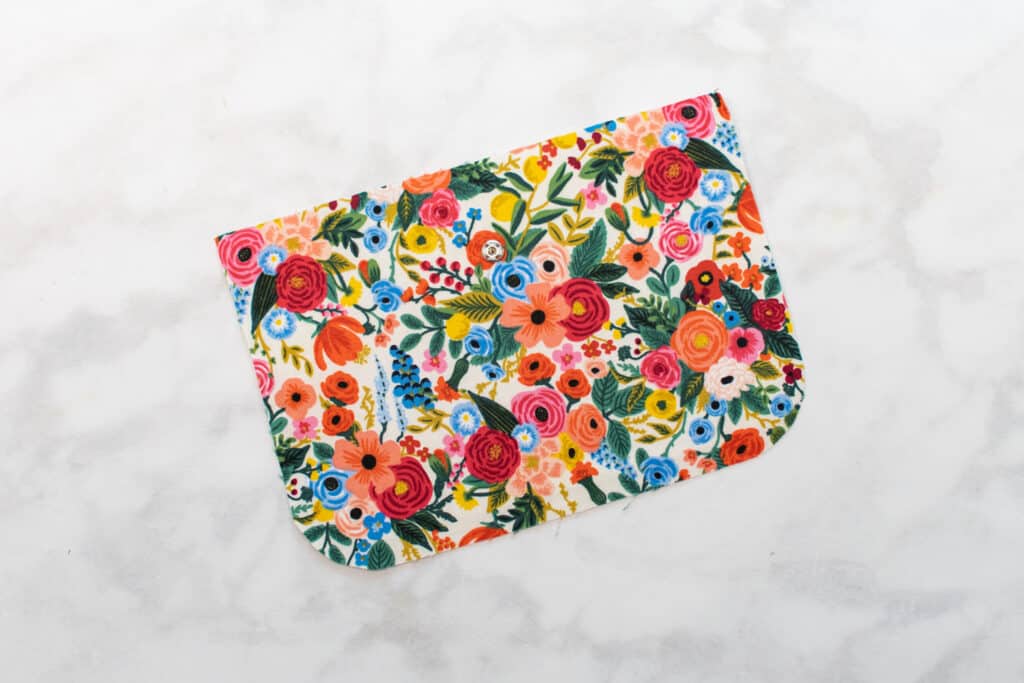
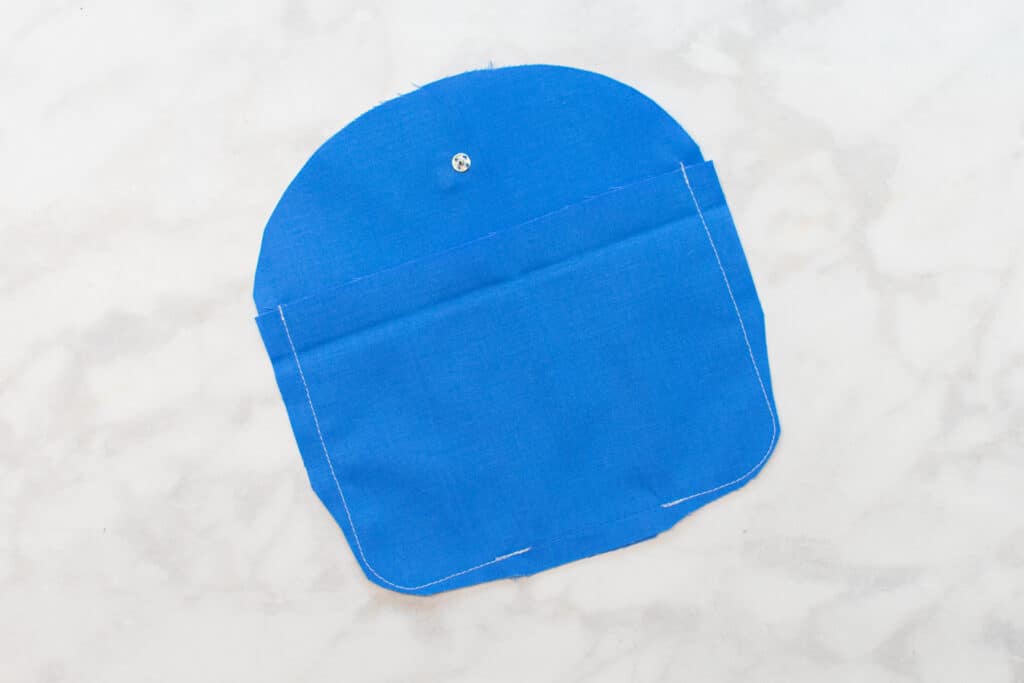
Start by placing the outer fabric front and outer fabric back with right sides together. Line them up along the bottom and side edges and pin them together.
Stitch the outer fabric pieces together along the sides and bottom edges with a 3/8 inch seam allowance.
Trim the seam allowance down to about 1/8 inch around the corners. This will help to avoid puckering in the corners when the pouch is turned right sides out.
Next, turn the main fabric pouch right sides out and press it flat.

Repeat this process to stitch the lining front to the lining back with right sides together. In the lining pouch, leave a 2.5 inch opening in the bottom edge to turn it right sides out through later. Make sure to backstitch at the beginning and end, as well as on either side of the opening.
Again, trim the seam allowance down around the corners of the lining pouch. Leave the lining wrong sides out for now.
Step 6: Attach the Lining to the Main Fabric
You should now have 2 separate pouches - one from the outer fabric and one from the lining.
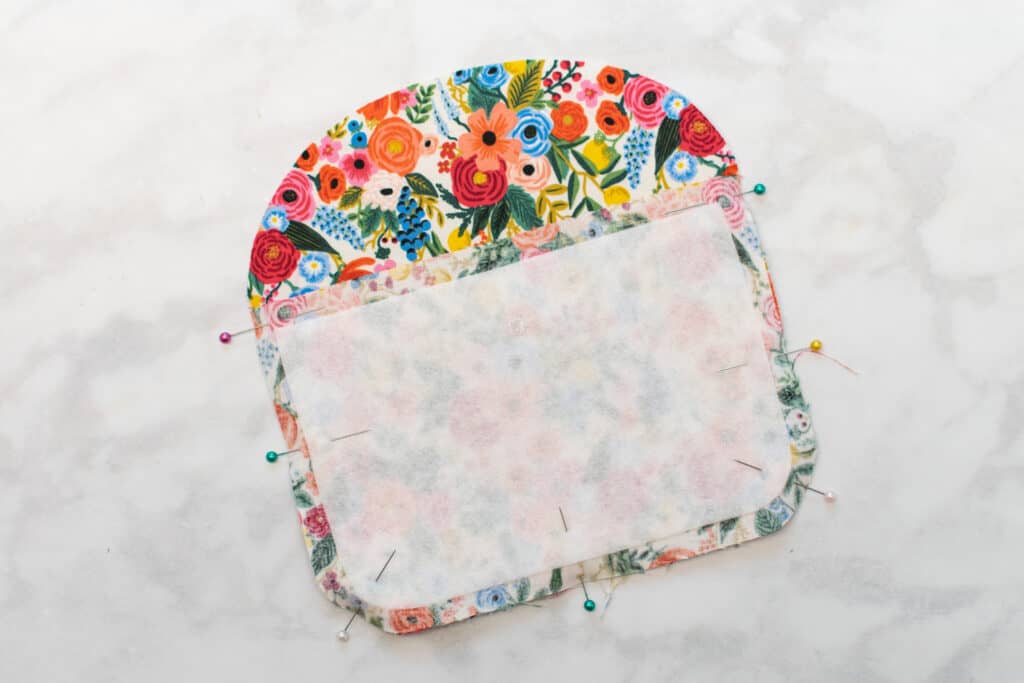
Place the outer fabric pouch inside the lining pouch so that they are right sides together.
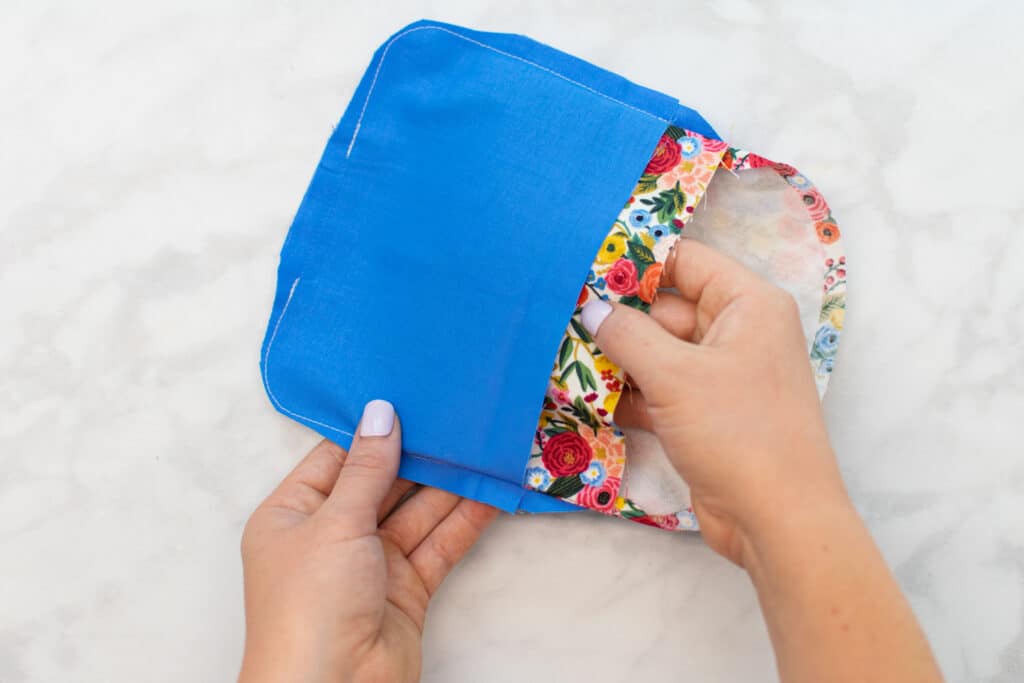
Line them up around the top edge and the flap. Make sure that the side seams are lined up, pushing the seam allowances towards the front. Pin these edges together.
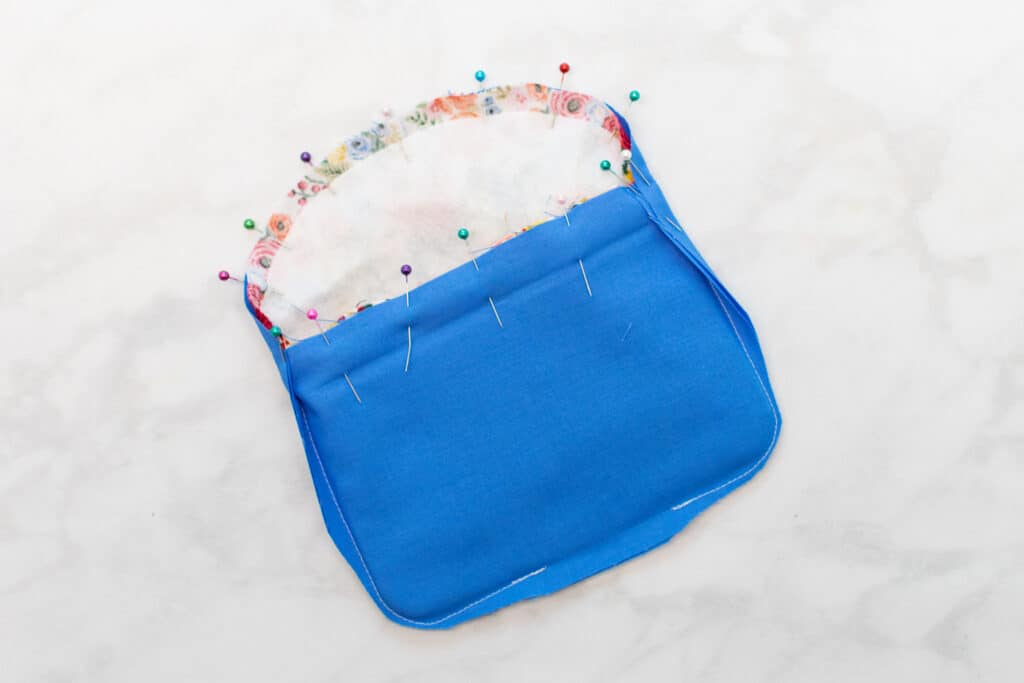
Then, take the pouch to your sewing machine and stitch the lining to the outer fabric across the top edge and around the flap with a 3/8 inch seam allowance. I find it easiest to stitch from the outer fabric side during this step and slowly rotate the pouch as I sew.
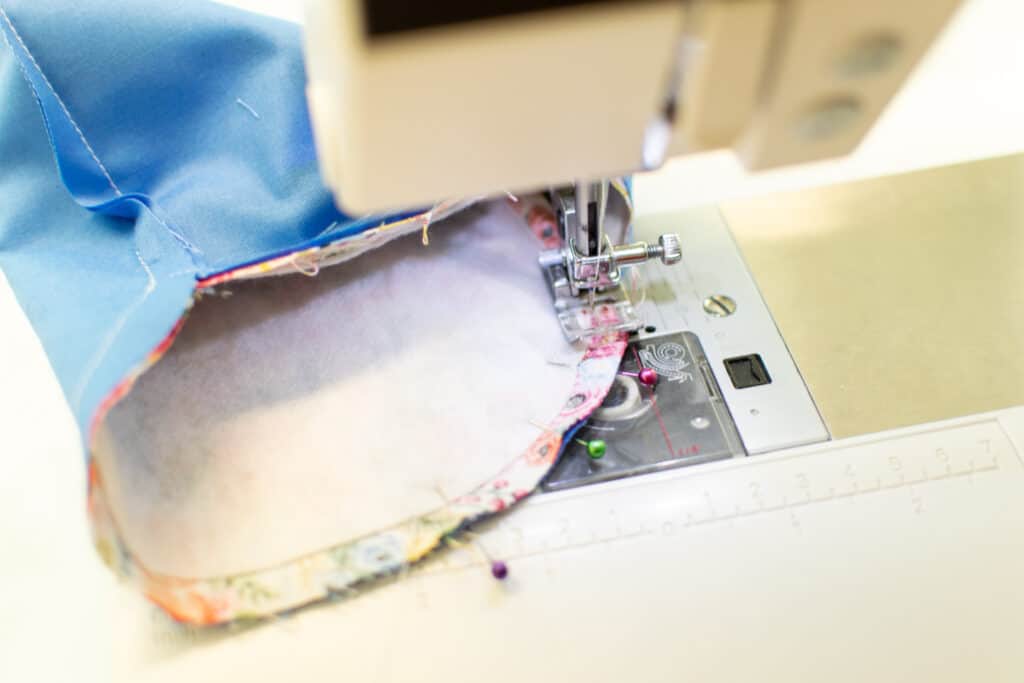
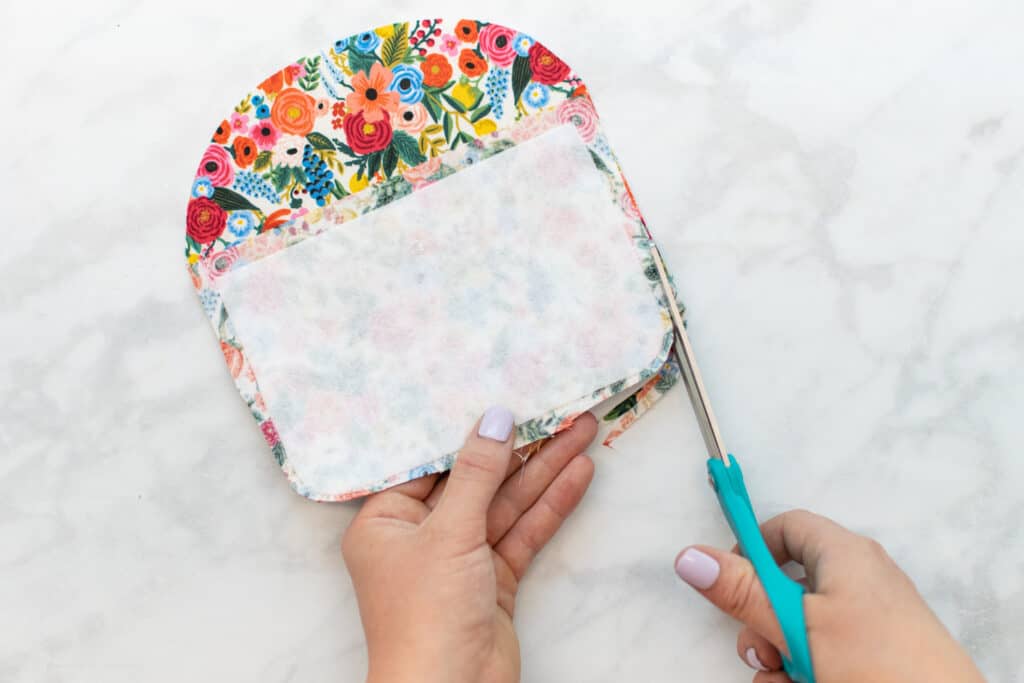
Once stitched, clip into the corners at either side where the flap meets the front. This will help the flap to move more freely and avoid puckering. Be careful not to clip into your stitching!
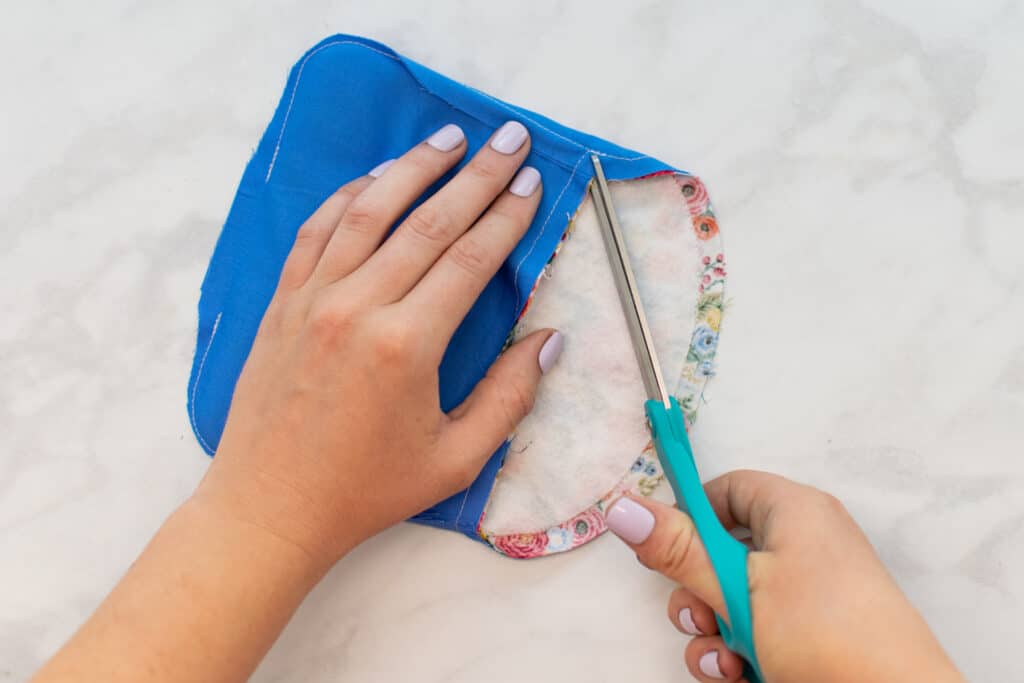
Next, trim the seam allowance down to 1/8 inch around the curve of the flap.
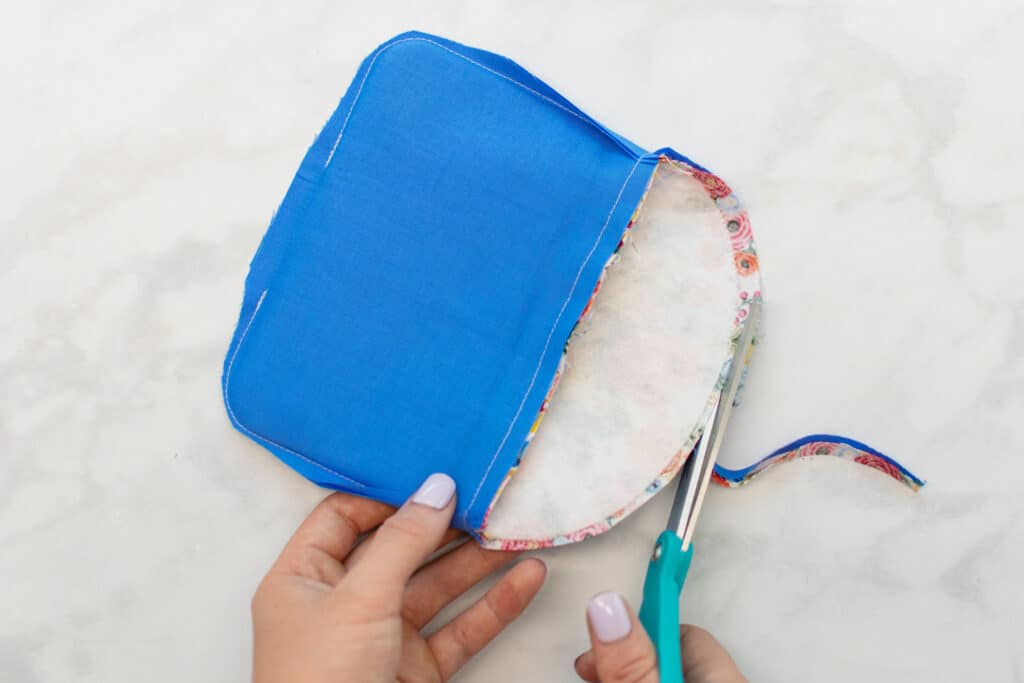
Step 7: Turn and Topstitch
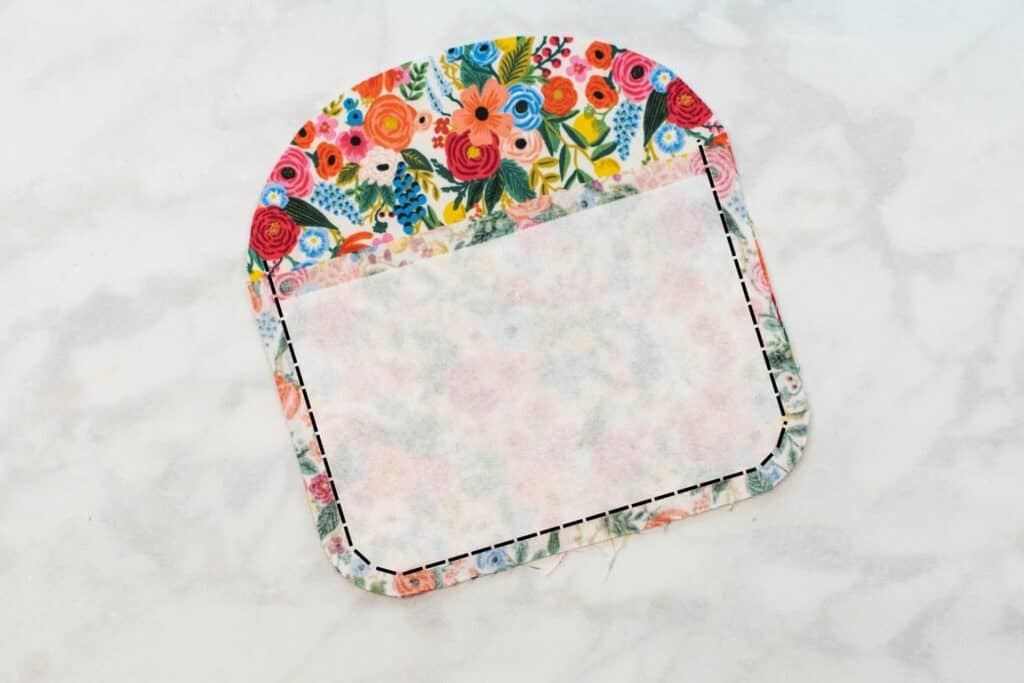
With the lining and outer fabric stitched together, turn the pouch right sides out through the opening in the bottom of the lining.
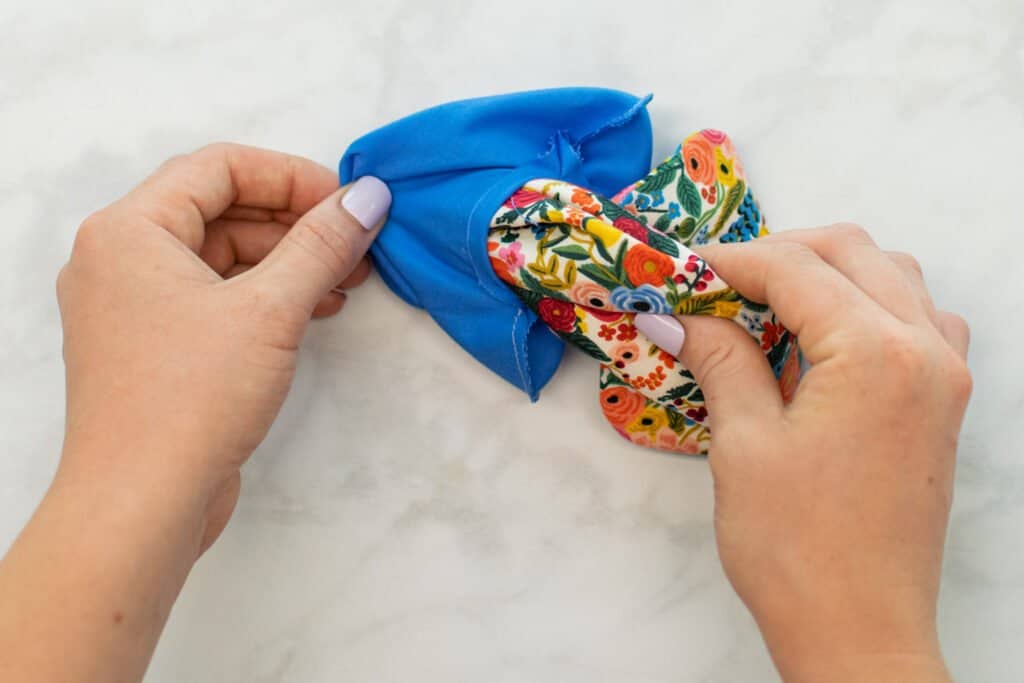
Once turned, close up the opening in the lining with a ladder stitch. Check out this tutorial for detailed instructions on how to sew a ladder stitch.
Push the lining to the inside of the glasses case and press the pouch well. As you're pressing, focus on making sure the seam is right at the edge or slightly rolled to the lining side. This helps ensure that the lining doesn't show through on the right side.
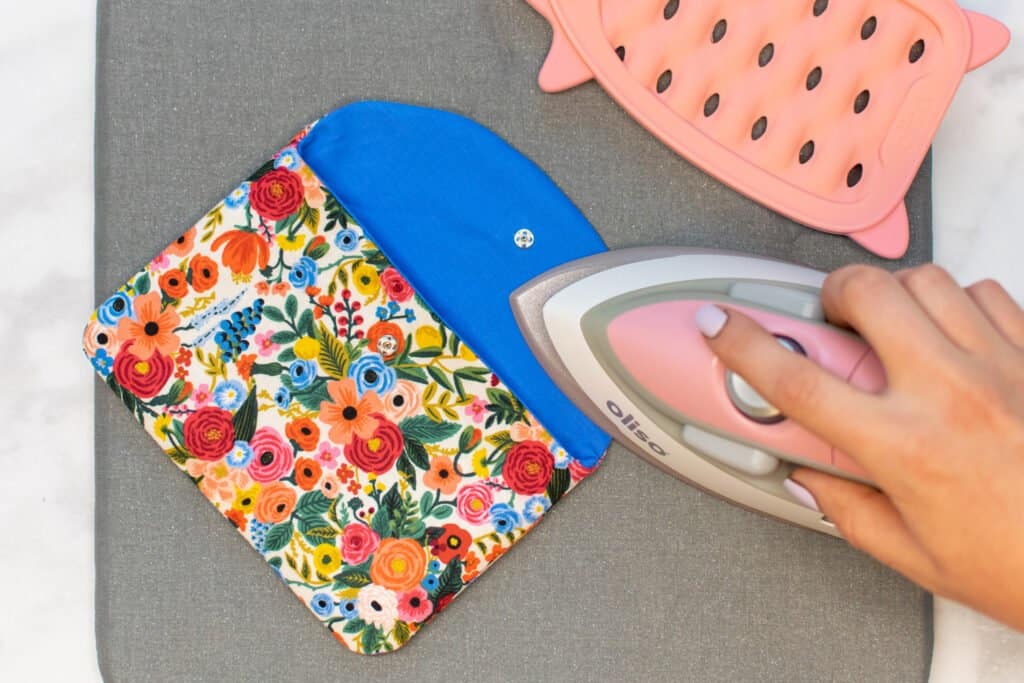
Finally, topstitch 1/8 inch from the edge across the top of the front and around the flap.
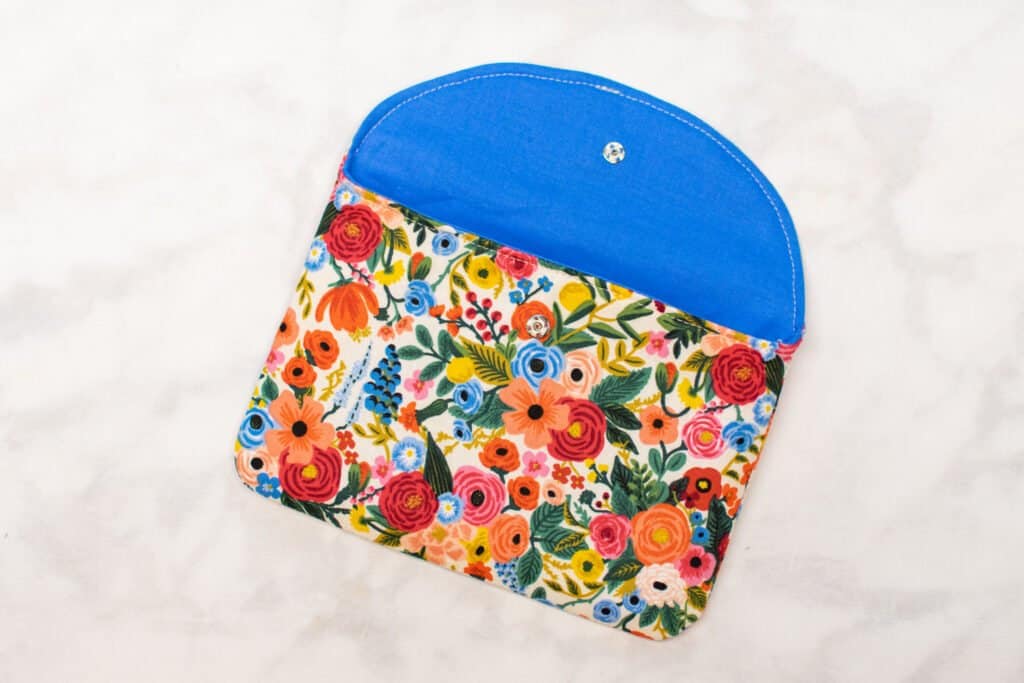
Your fun new glasses case is finished!

Did you try this pattern out? Post a picture on Instagram with the hashtag #sweetredpoppy - I would love to see how it turned out!
Looking for more awesome free sewing patterns and tutorials? Try one of the patterns below!
- Tote Bag Sewing Pattern
- Free Reversible Bucket Hat Sewing Pattern
- How to Sew Fabric Storage Bins
- Clear Vinyl Zipper Pouch Sewing Pattern
Don't forget to join my Facebook group where you can show us what you're making, ask questions, and learn from others.
Don't forget about this free sewing pattern! Pin it to your favorite Pinterest sewing board by clicking HERE.
Wow. these are amazing.
The "Front" labeled piece states to cut 2 Lining. Is this correct?
I did that as well. I think it’s an error.
I'm guessing, but I think there is an error on the front pattern piece that states 2 main and 2 lining. However, in the blog instructions, it says cut 1 front and 1 lining. I am assuming that the correct number is one. Otherwise, your directions are perfect.
Як я подружилася з мультиваркою
До недавнього часу мої стосунки з кухнею були, м'яко кажучи, напруженими. Я часто псувала продукти або перетворити макарони на клейстер. Тому, коли на день народження мені подарували мультиварку, я подивилася на це скептично.
Перші два тижні я обходила її стороною. Вона стояла на стільниці, чорна та блискуча, наче літаюча тарілка. Але їсти хотілося завжди, і настав момент істини.
На [url=https://receptidlyamultivarki.icu/]https://receptidlyamultivarki.icu/[/url] найпростішим рецептом виявилися "Ліниві голубці". Назва мене розсмішила. Я просто покидала в чашу фарш, капусту, рис і залила це томатним соком. Вимкнула страх і натиснула кнопку "Гасіння" — і затамувала подих.
За годину квартирою поплив такий запах, що чоловік визирнув із кімнати в подиві: "Невже ти готуєш?".
Коли я відкрила кришку, то очам своїм не повірила. Це була нормальна готова вечеря! Пахуча, гаряча і дуже апетитна! Ми уплітали за обидві щоки.
Тепер ми з мультиваркою - друзі. Вона рятує мене щоразу: у ній нічого не горить і не втікає і олія не бризкає на всі боки. Я розібралася з усіма кнопочками — мову таймерів і режимів. І хоч друзі посміюються, що я не готую, а "натискаю кнопки", я знаю: справжня магія починається саме тоді, коли ти перестаєш боятися спробувати.
I don't think the title of your article matches the content lol. Just kidding, mainly because I had some doubts after reading the article. https://accounts.binance.info/es-MX/register?ref=GJY4VW8W
Wow! It looks so beautiful. I love it and geometry dash 3d which is interesting.