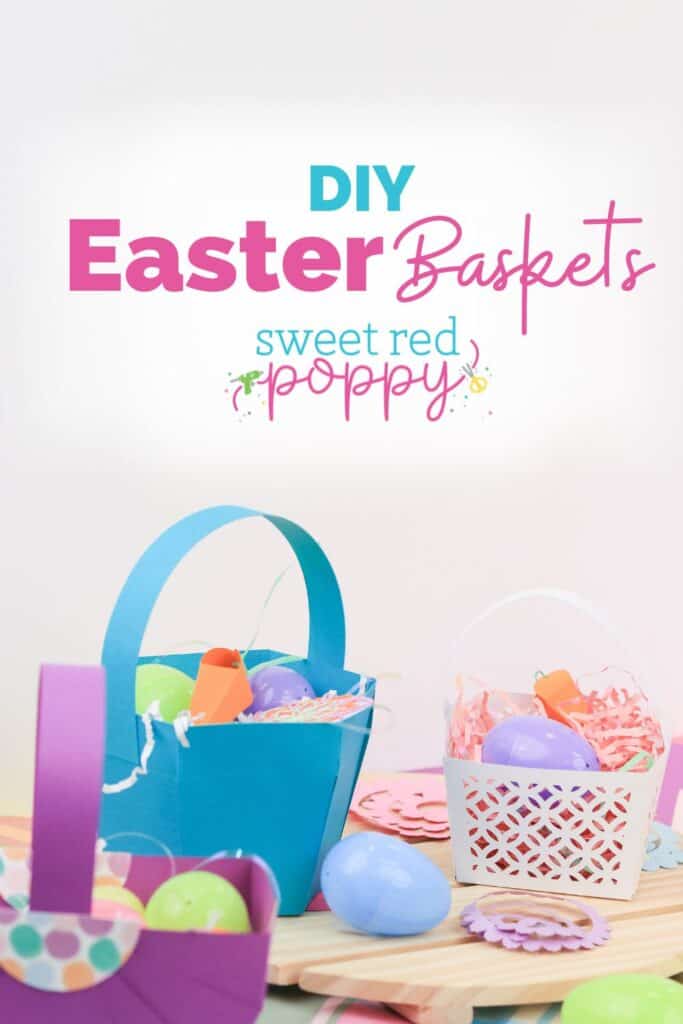
Learn How to Make 3 Paper Easter Baskets with a Cricut Machine. Read on for the Step-by-Step Tutorial, Video, and FREE SVG File Easter Basket Templates.
Easter is just around the corner, and I'm sharing the perfect tutorial to get you ready for an Easter celebration!
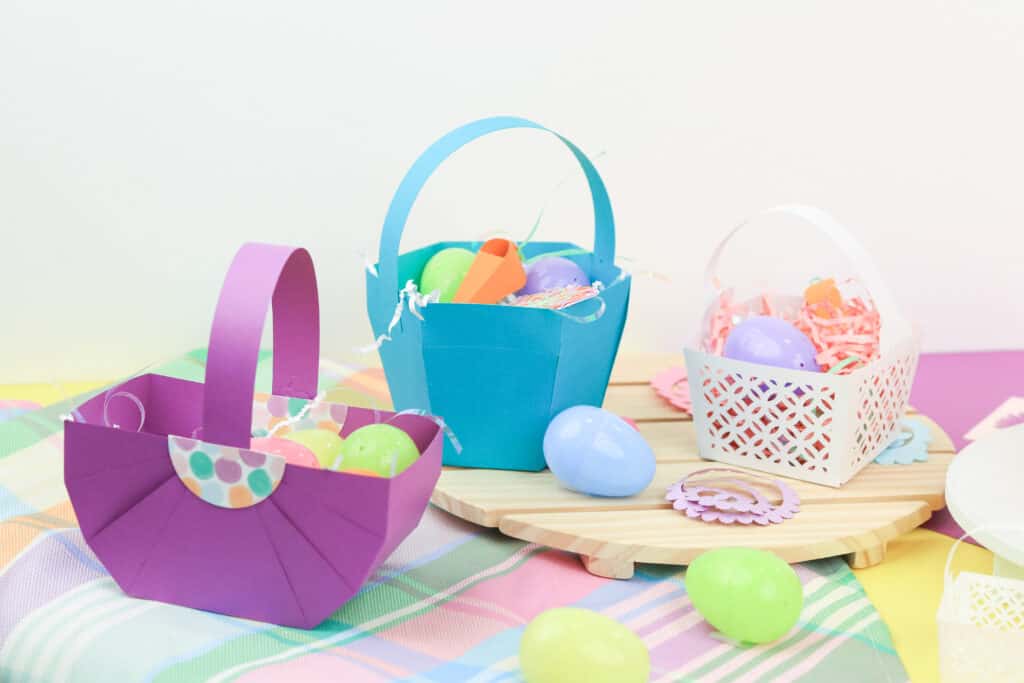
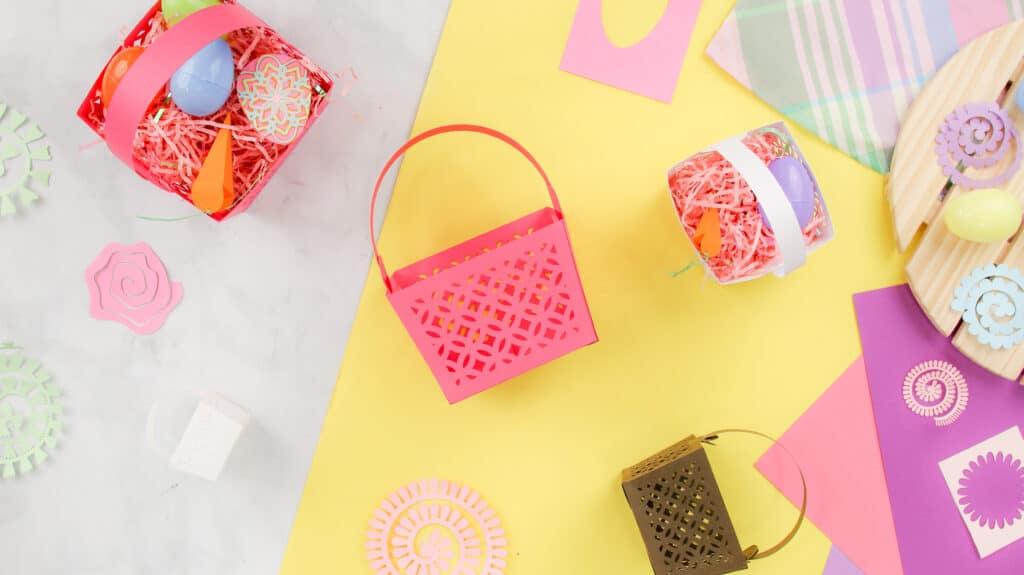
In this tutorial, I'm showing you how to make three types of Easter Baskets using cardstock and a Cricut machine.
Making your own Easter baskets allows for more customization and personalization. Wouldn't this be such a fun activity to do before Easter?
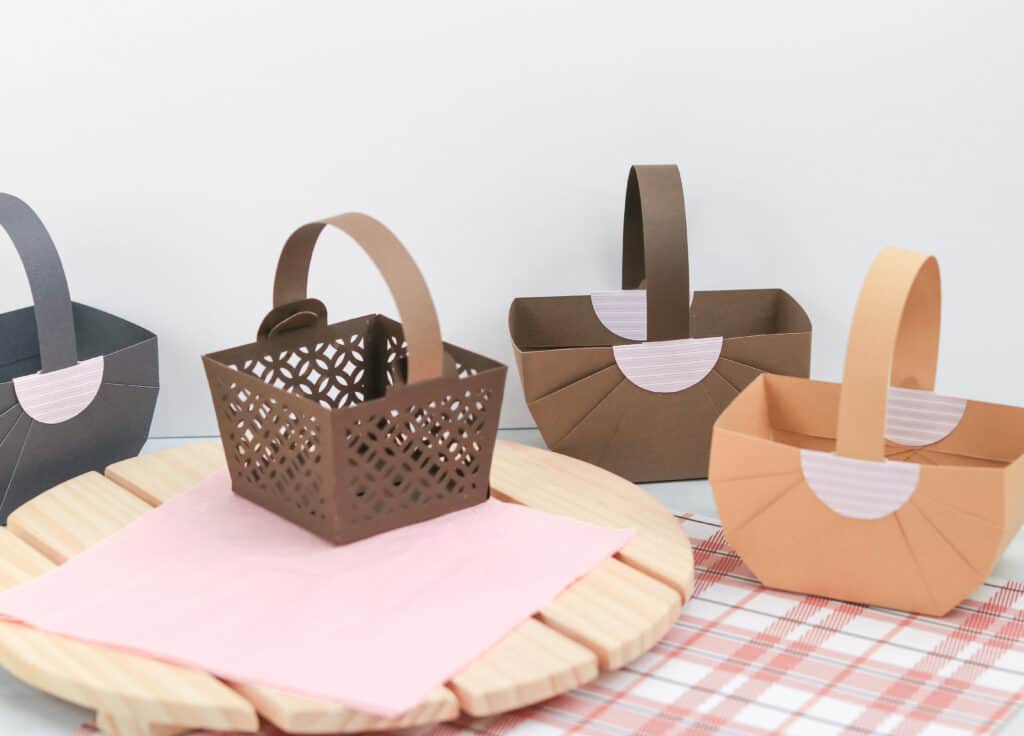
These baskets are so fun to make and the best part is you can make as many as you want...I may have gotten carried away and made 13. 🤣
Table of Contents
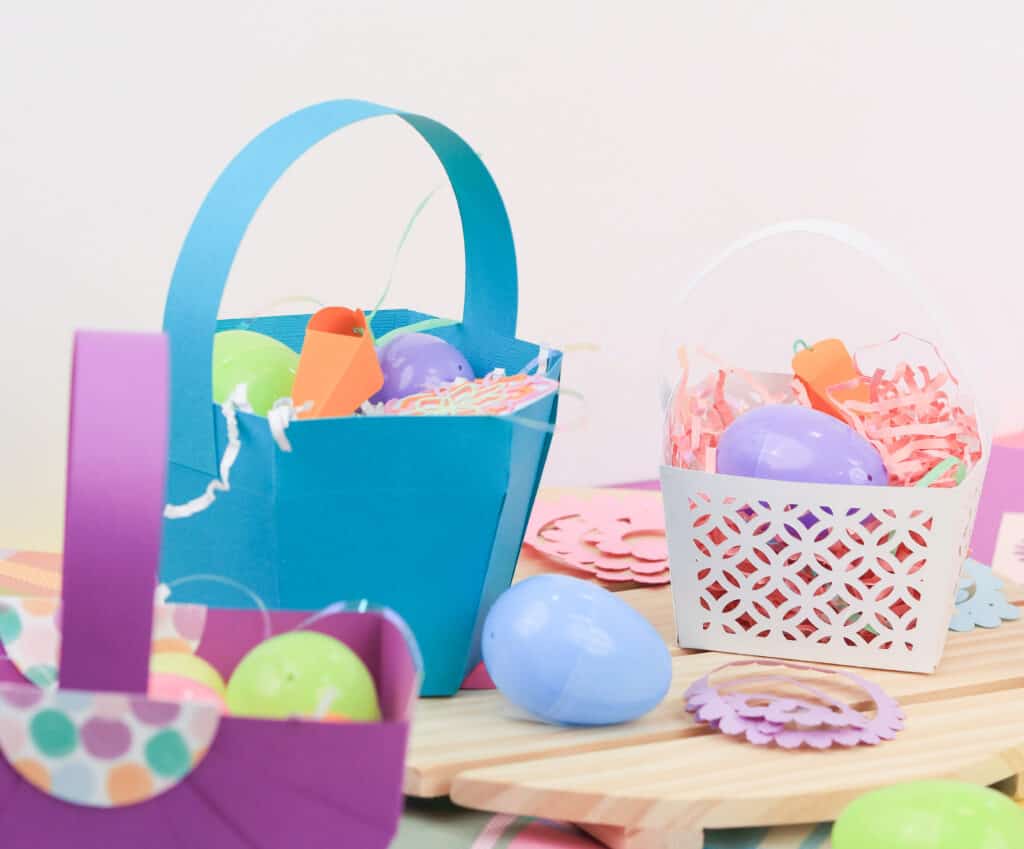
Ideas of What to Put Inside Your Easter Basket
You can fill them with toys from the dollar tree, candy, or arts and crafts from your local craft store.
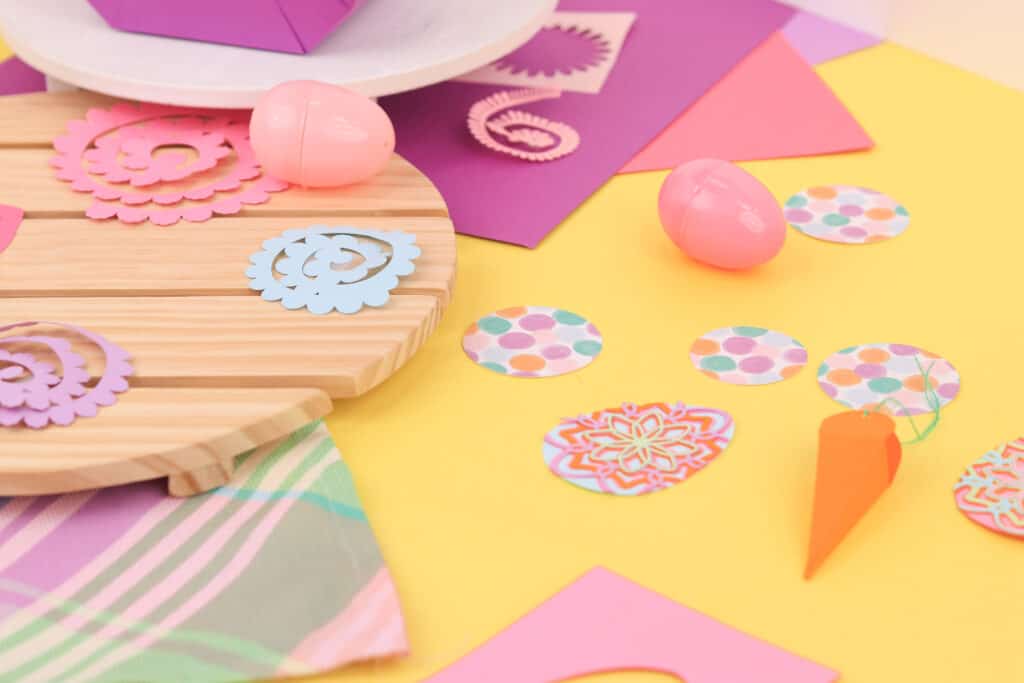
I filled mine with Easter grass, eggs, Mini Easter Egg Mandalas, and Paper Carrot Treat Boxes filled with candy.

What's Included in the Easter Basket SVG Files?
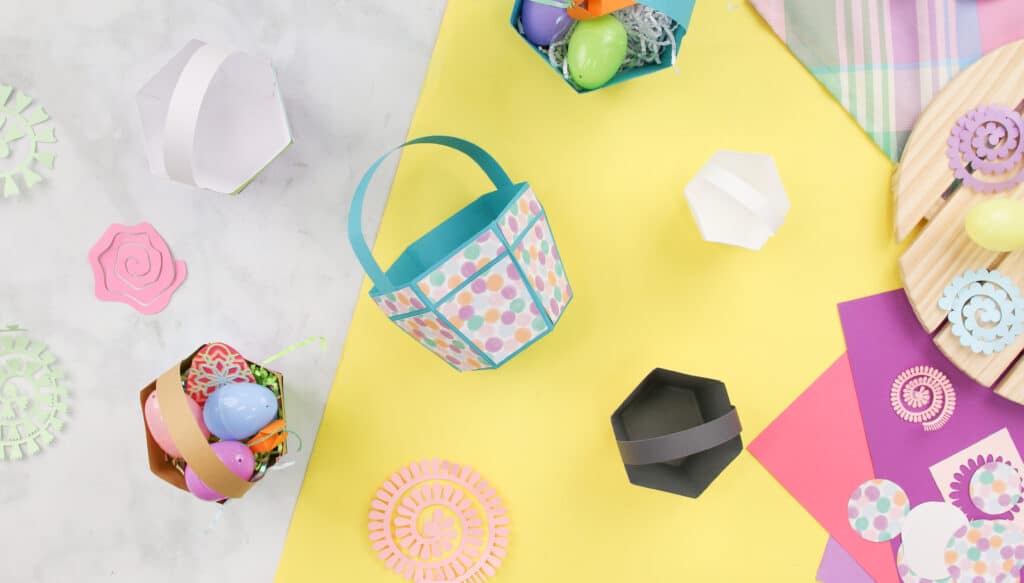
Three basket designs are included: A berry basket, a polygon Basket, and a cute rectangular basket.
These baskets are not just for Easter, you can also use them as gift baskets for any small gift throughout the year!
What Type of Cardstock Do I Need To Make These Baskets?
Make these baskets using classic Easter colors (pastel pinks, blues, purples, and yellows) or neutral colors. I chose to go with a brighter color pallet to make the baskets really pop.
Really, any type will do. If what you’re putting into the basket is heavy, I would recommend making these baskets out of heavier cardstock.
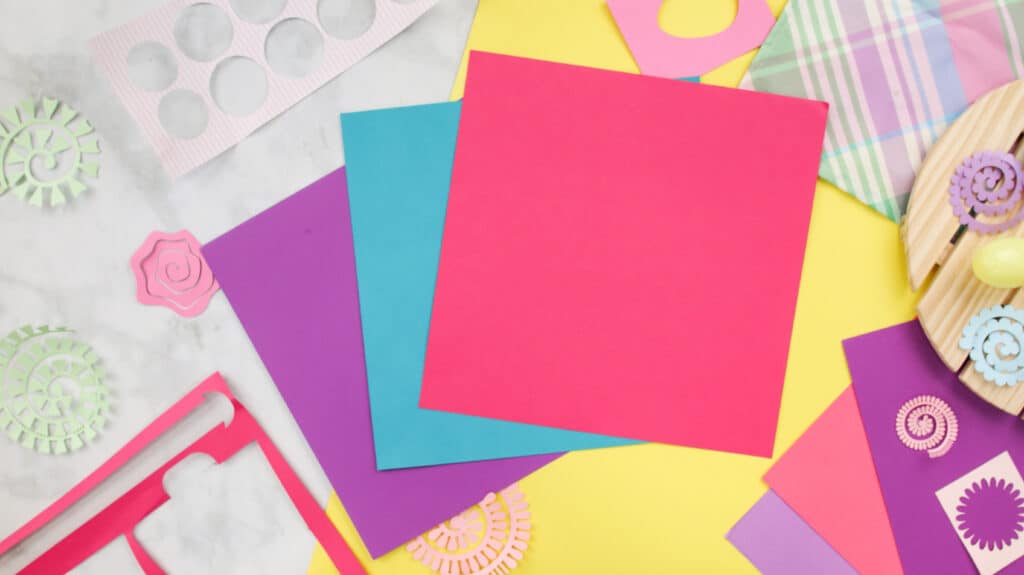
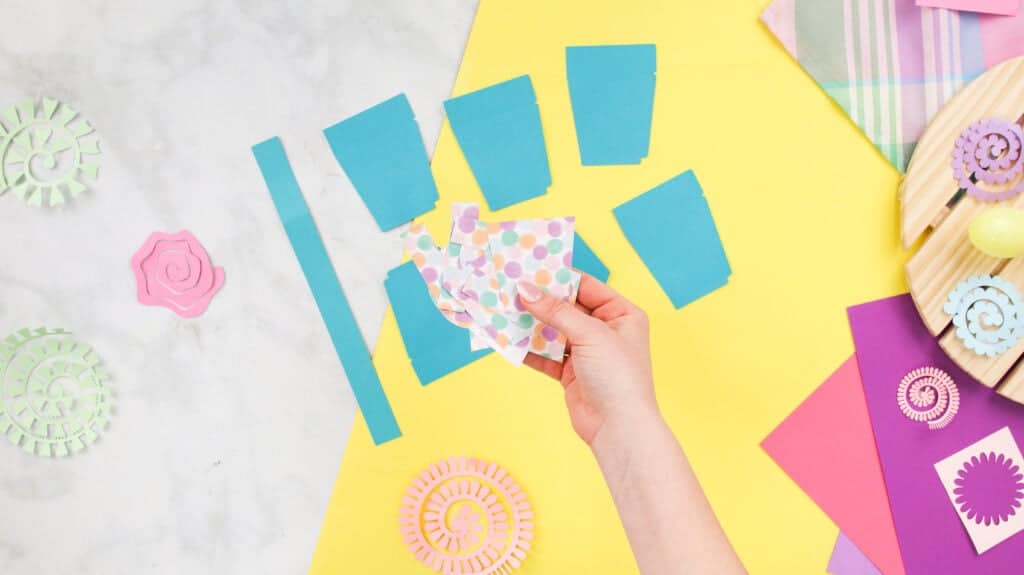
I made mine using 80lb cardstock and set my material to Cardstock (For Intricate Cuts) in Cricut Design Space. Additionally, I used patterned paper- that went with the color pallet I chose- for the detailed cuts.

If you want these baskets to look like woven wood, I recommend using Kraft board paper.
What Can I Do To Customize My Easter Basket?
There are so many ways to customize these baskets and make them yours.
You can add paint strokes to your baskets to impersonate wood or add a name to the basket for an extra touch of personalization.
Another idea would be to add some paper flowers, mini Carrot Treat Boxes, Easter Egg Mandalas, and a cute bow to top it all off.
Check out the flowers I made for these Easter baskets using some of my SVG files here!
Supplies Needed:
- Cricut Maker, Cricut Explore, or Other Cutting Machine
- StandardGrip Mat- I recommend using a 12x24 mat if you plan on cutting these designs all in one go
- Easter Basket SVG Files
- Fine-Point Blade
- Scoring Wheel Tip & Housing or Scoring Stylus
- 80lb Cardstock: pastel pinks, blues, yellows, or neutral colors
- Patterned Paper- I used Amy Tangerine patterned sheets of paper. This paper is similar to what I used.
- Weeder Tool
- Bone Folder
- Glue or Tape-
- Bearly Arts Craft Glue (This is my favorite tacky adhesive) Use the code SRP10 to save 10%

Optional Supplies:
- Carrot Treat Box, Paper Flowers, Easter Egg Mandala SVG Files
- Stuffers: confetti, Easter grass, candy, toys, etc.
Download Easter Basket SVG Files Here!

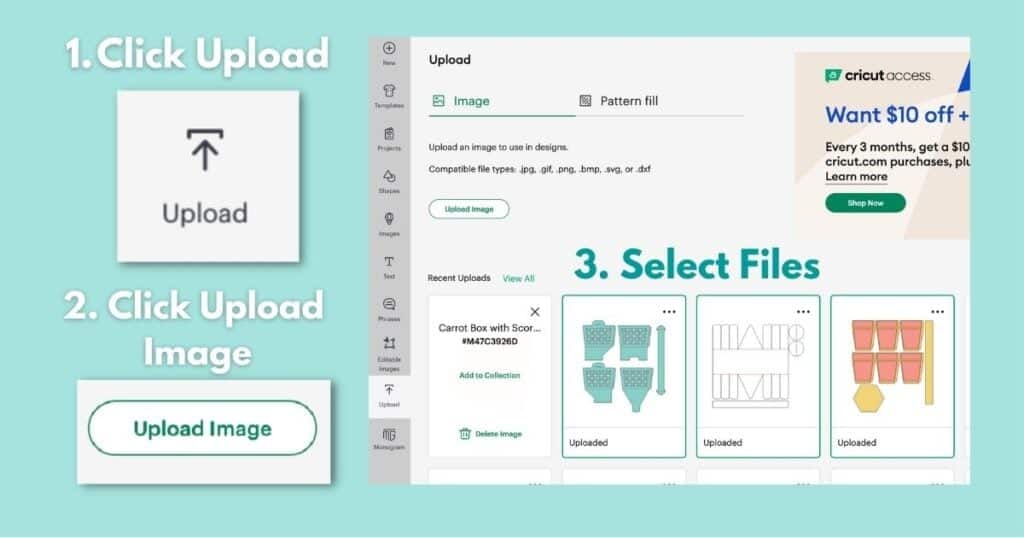
Uploading Easter Basket SVG Designs
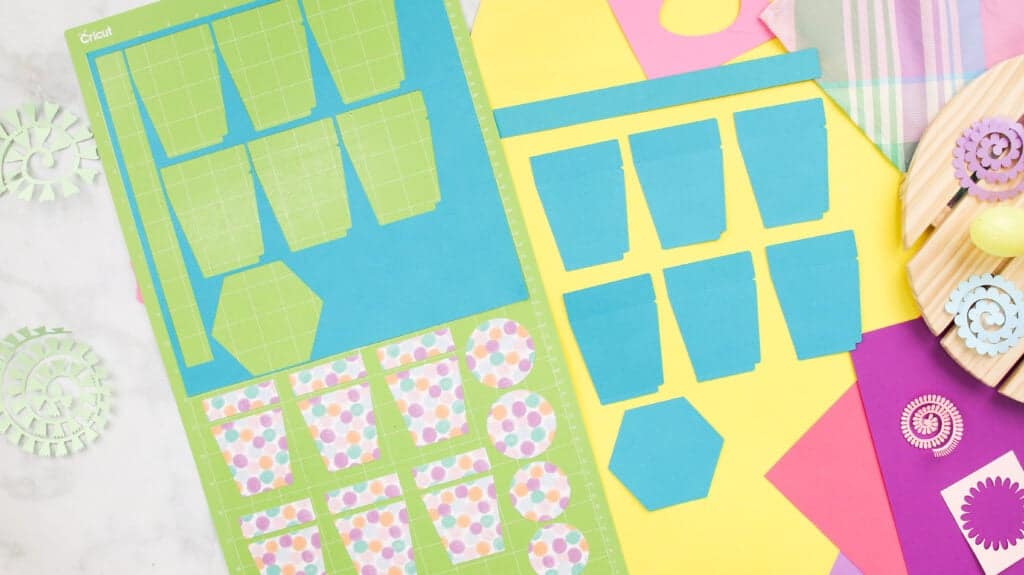
Upload to CDS or cutting software- create New Project, click upload, select the files, and upload them to the canvas.
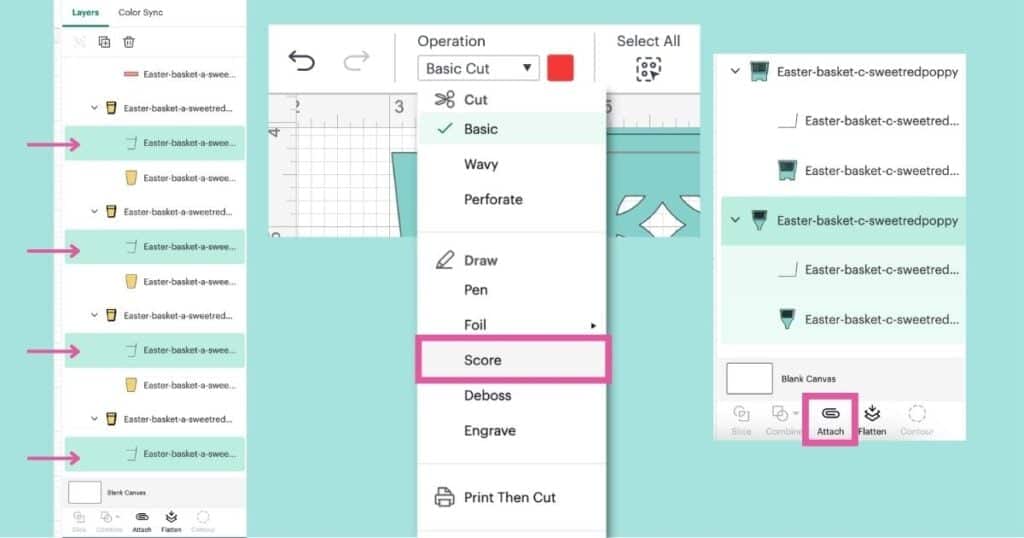
Select and change red cut lines in the layers panel from Basic Cut to Score in the Operation panel.
Example: Select a layer in the layers panel, and locate the color swatch in Operations- if the swatch is red, it’s a score line. If it's not red, it's not a score line.
Afterward, attach the score lines to their respective pieces.
Now, it’s time to cut the Easter baskets.
Cut Out All Easter Basket Pieces
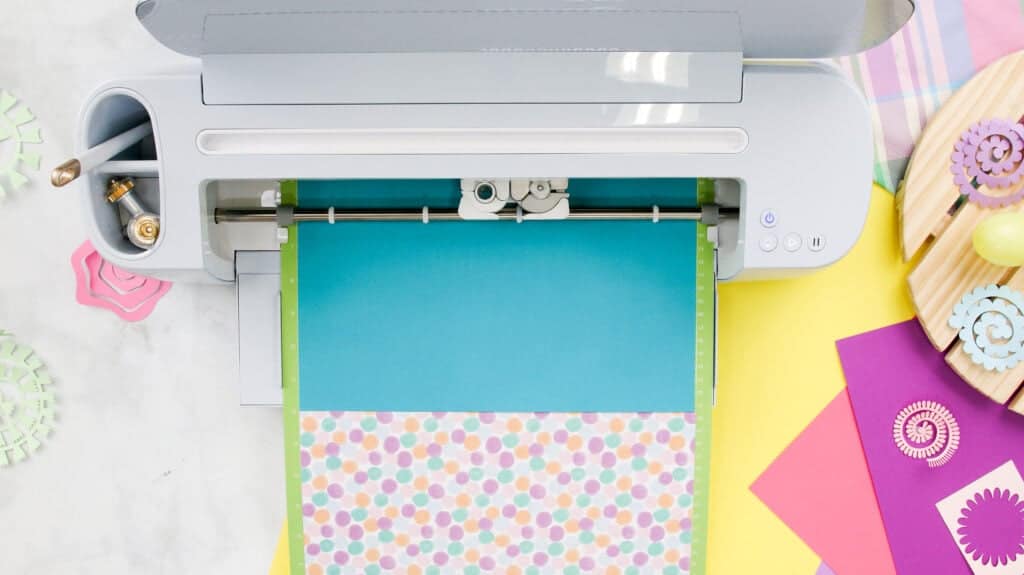
Click Make It, and select your material- I selected Cardstock For Intricate Cuts. I think this setting is best when using 80lb cardstock because the machine does three passes during the cutting process.
Place cardstock onto a standard grip mat and load it into your cutting machine.
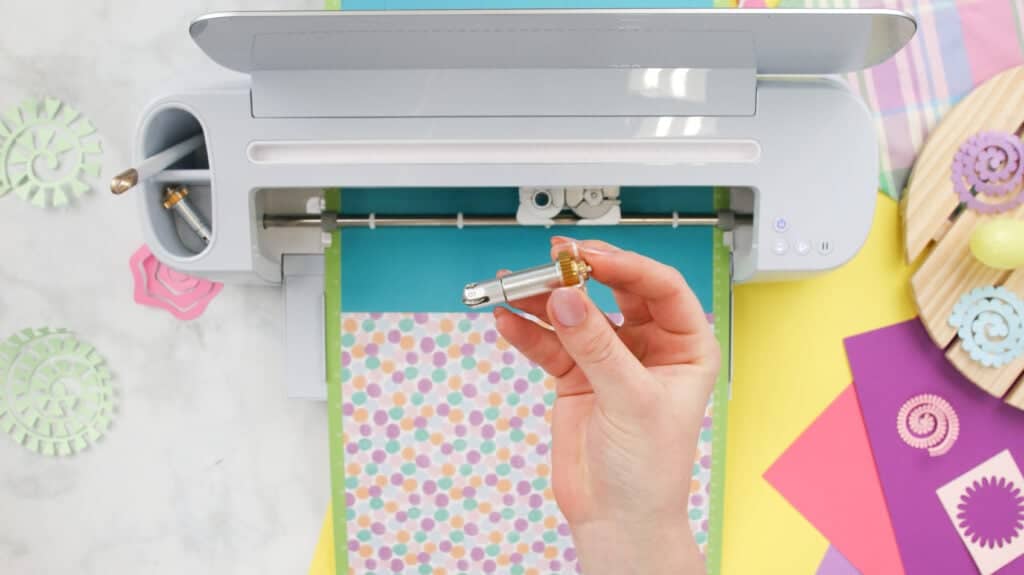
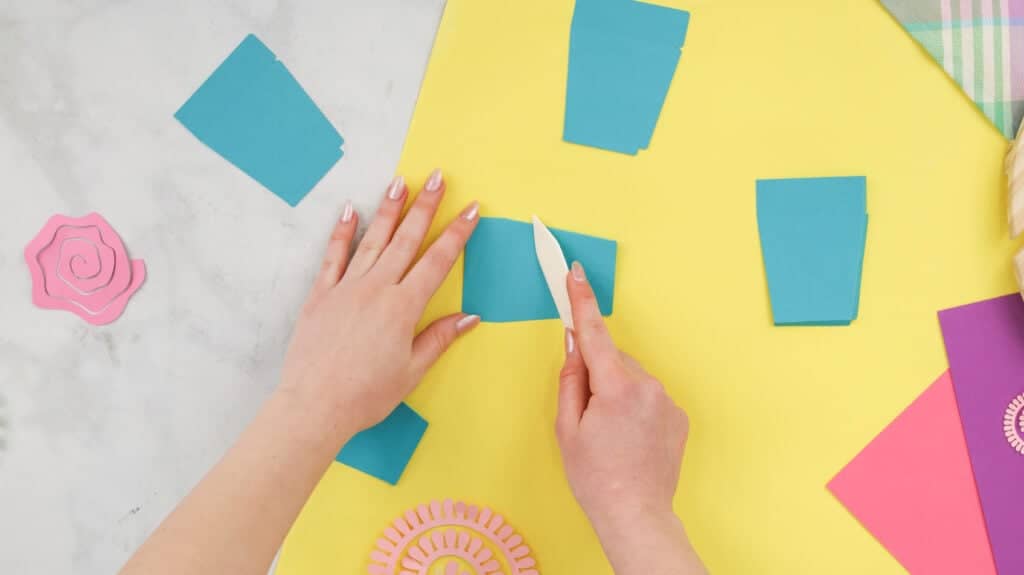
Load a scoring wheel or stylus into the cutting machine.
When the cutting software says it’s time to cut, press start- or if you’re using a Cricut machine press the “C” or the arrow button.

Let your machine do the work!
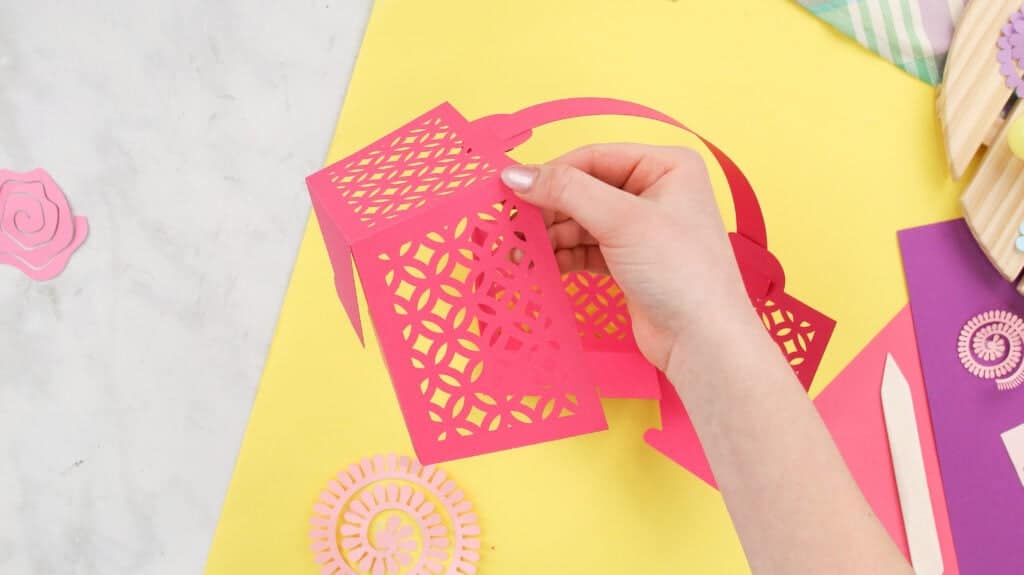
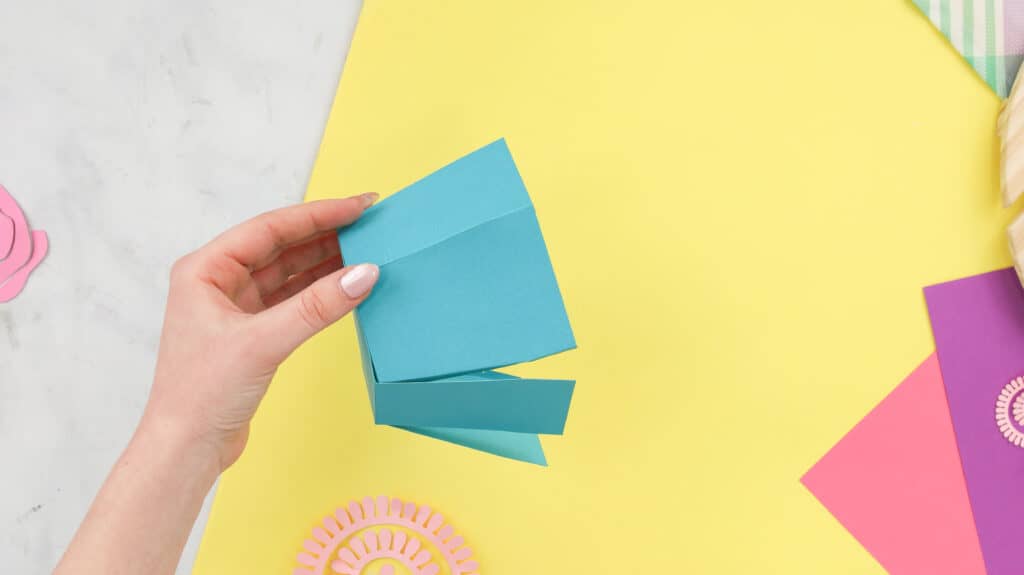
Berry Basket
Included in the Berry Basket SVG File:
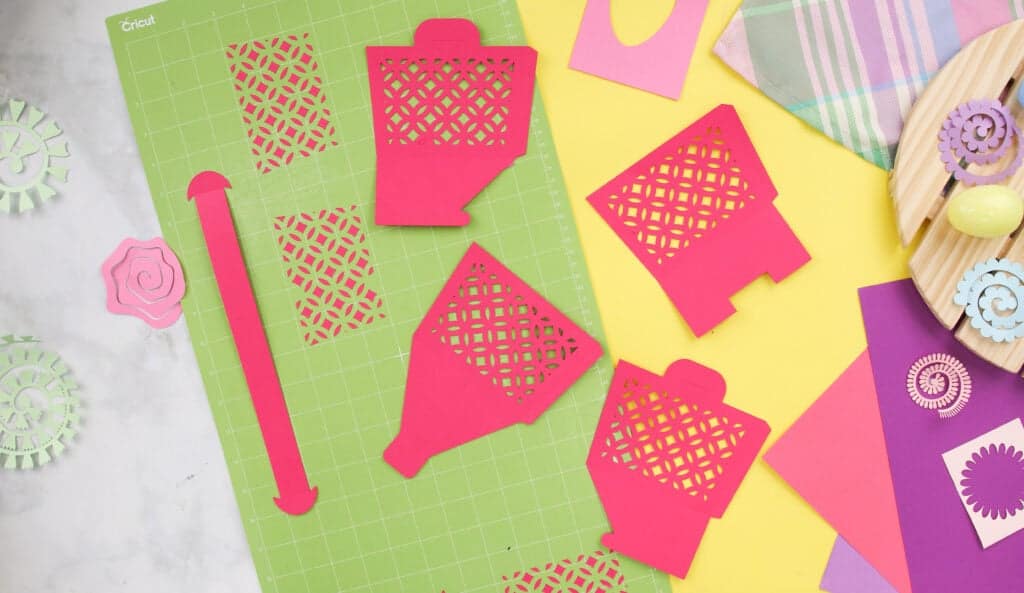
- 4 Basket Pieces
- 1 Handle
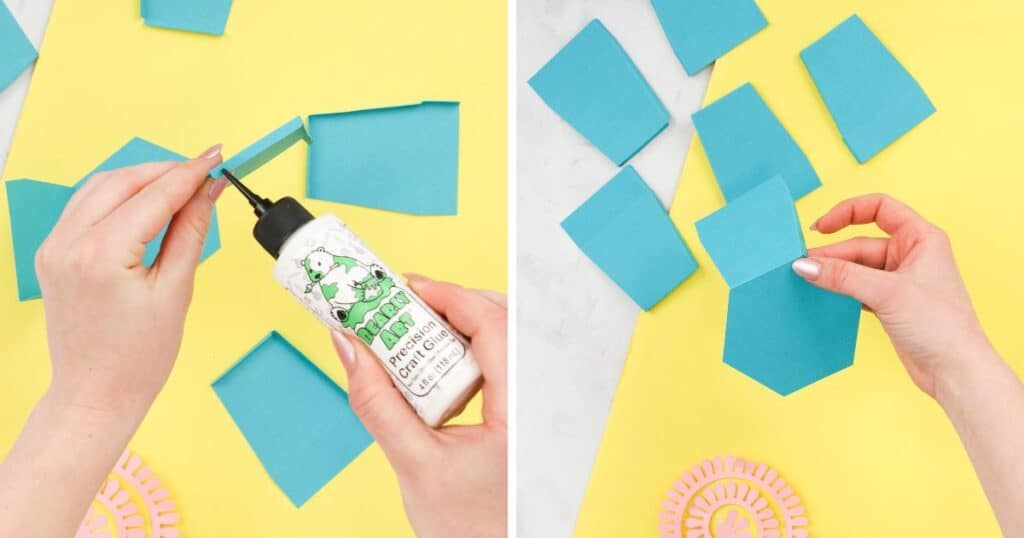
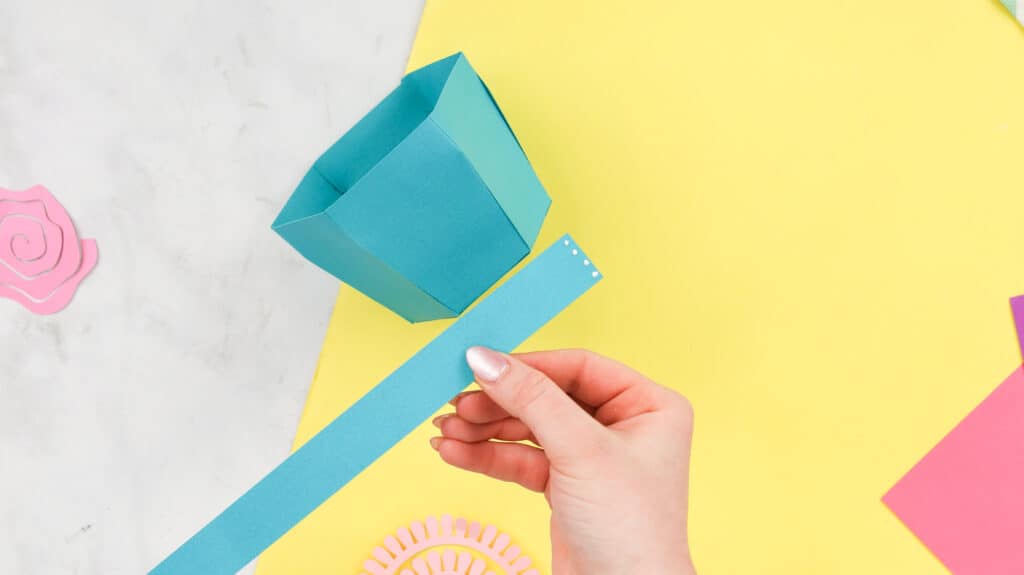
Start by gathering and folding the tabs on the basket pieces.
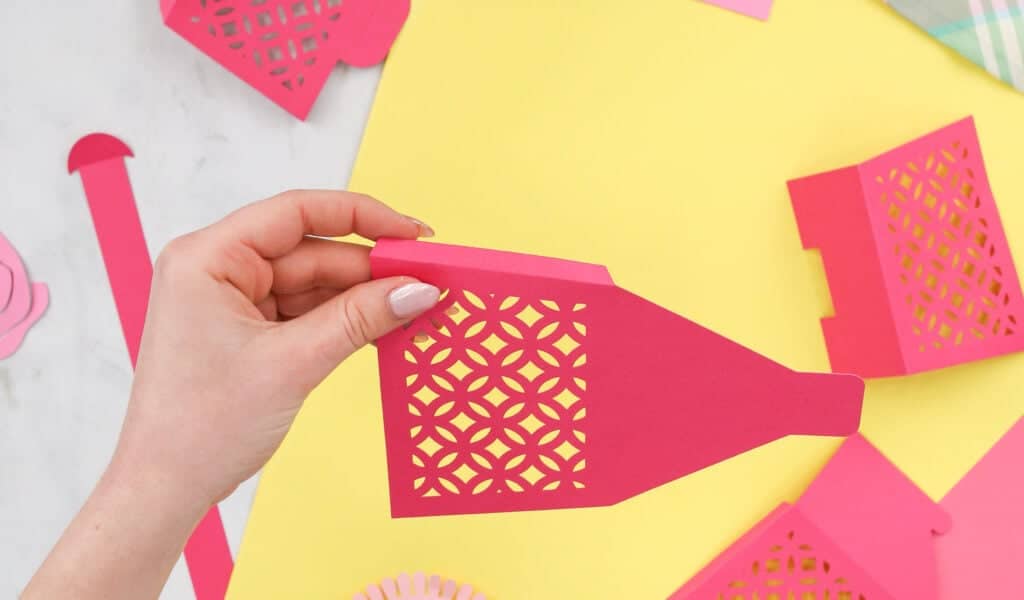
Grab the handle piece and the two basket pieces with slots at the top.
Fold each end of the handle piece. Doing this shapes the handle to fit it into the slots on the two basket pieces.
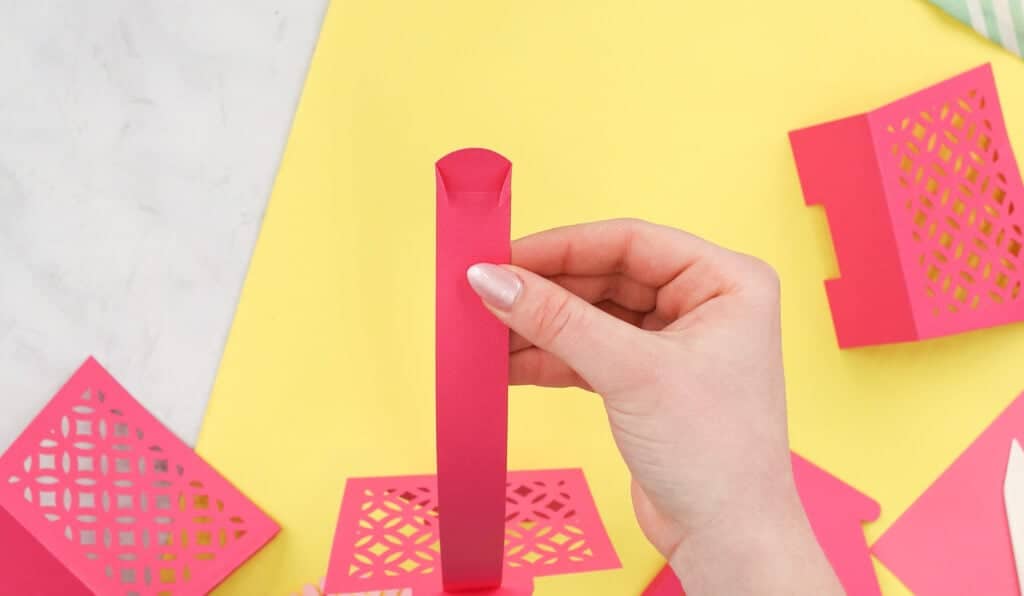
Slide one end of the handle through the slot of one of the basket pieces. Repeat this to the other side.
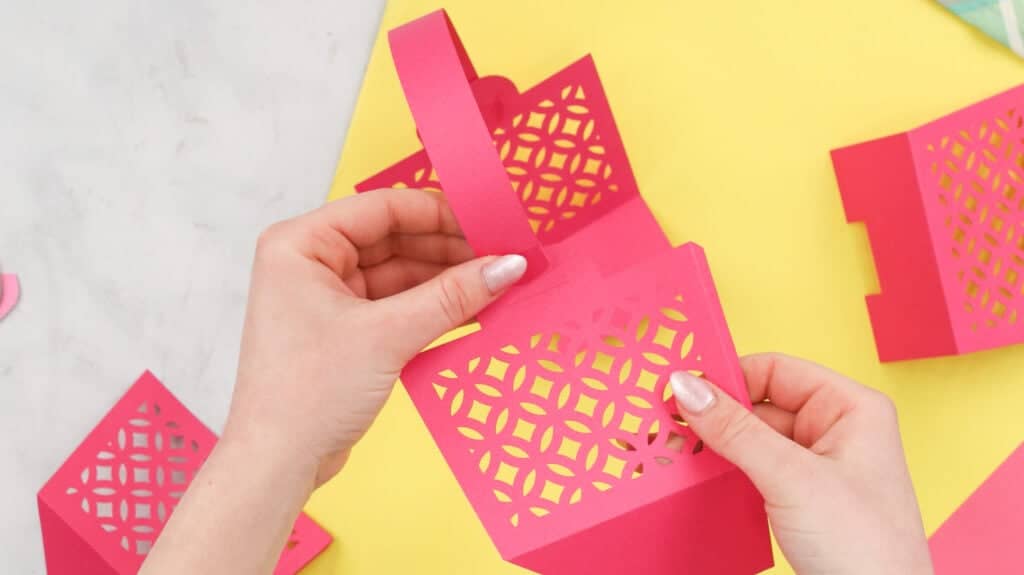
Tip: You want the side tabs of the two basket pieces opposite from one another and have the two circular bottom tabs facing the same direction.
Apply glue to one of the side tabs, align one of the basket pieces without a tab, and attach.
Now, glue the other side tab to the other basket piece.
Then, glue the remaining two side tabs.
Once all the pieces have been glued, your basket is close to being done!
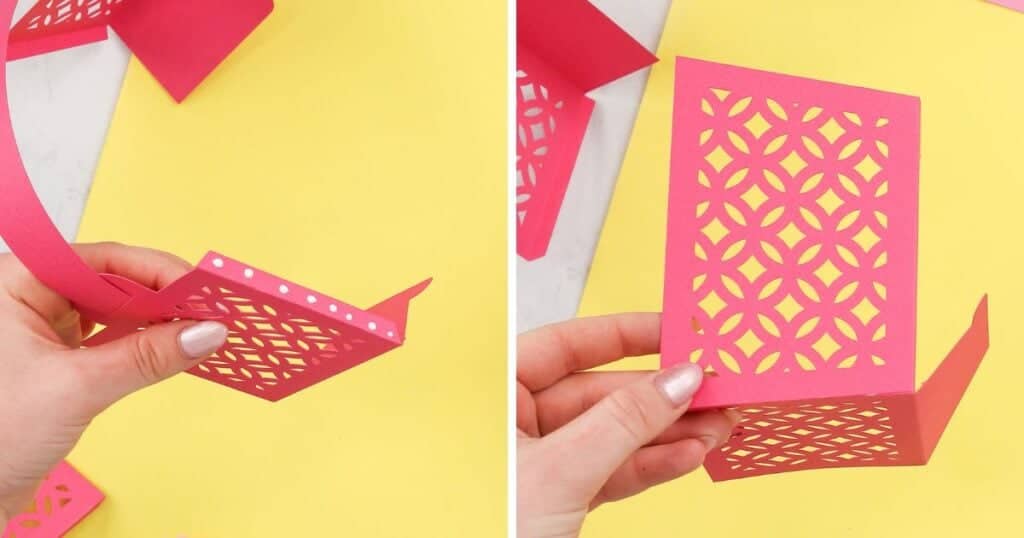
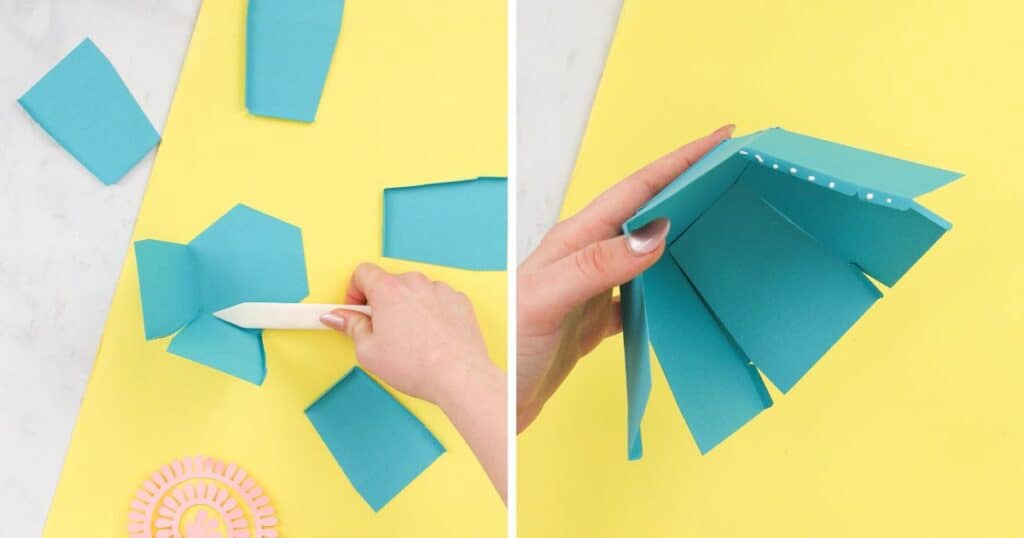
Now, we need to fold the bottom tabs.
Comparable to how to close a take-out box, first fold down the tab with a rectangle cutout. Next, fold down one of the tabs with a rounded point, and place the circular end underneath the rectangle cutout.
Slide the other circular end underneath the rectangle cutout. Finally, gently slide the end of the last tab through the same slot.
Look at this cute basket!
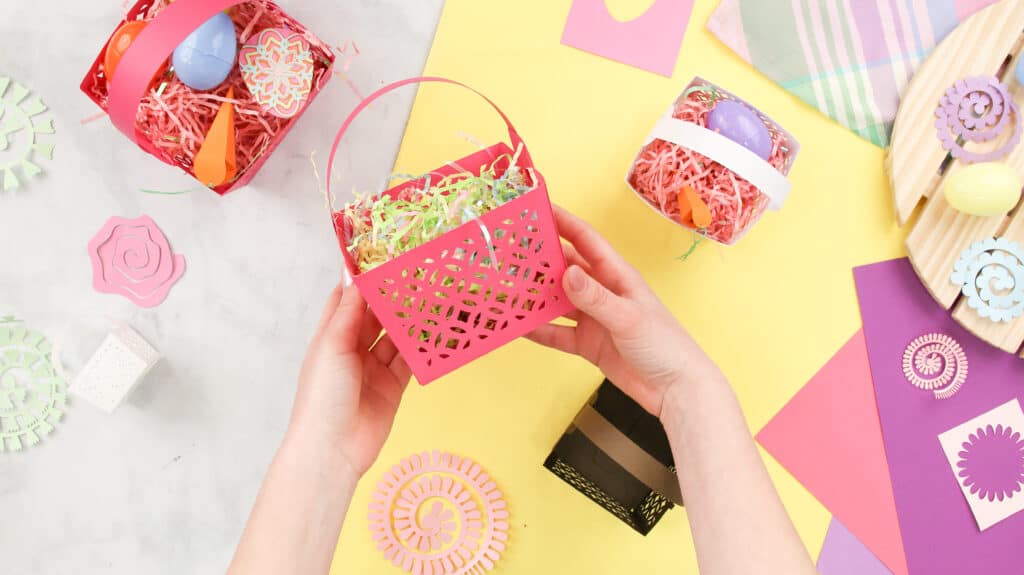
Let's hop on over to the next basket.
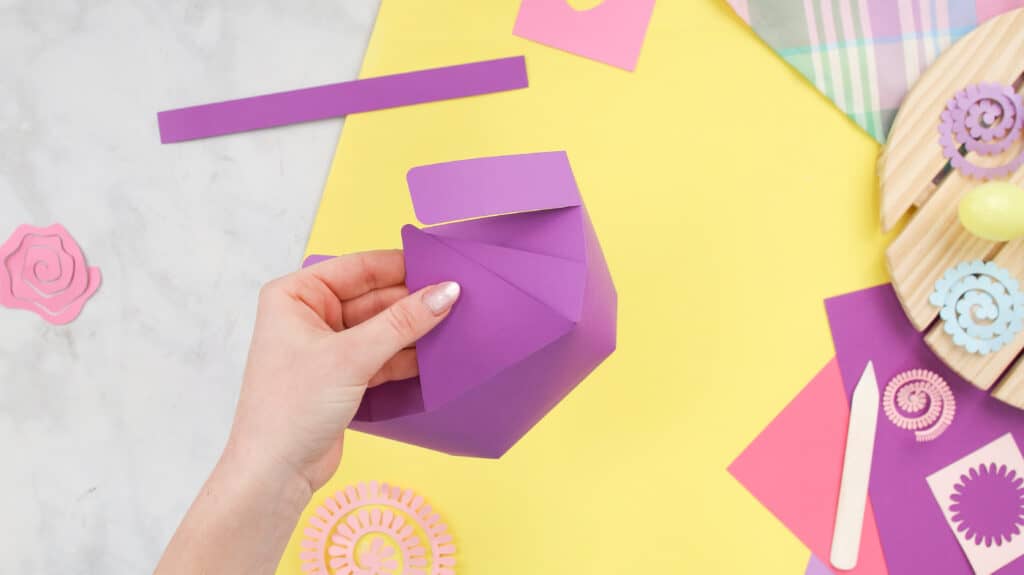
Polygon Basket
Included in the Polygon SVG File:
- 6 Basket Pieces
- 1 Polygon Piece
- 1 Handle
- 6 Trapezoid Cutouts
- 6 Rectangle Cutouts
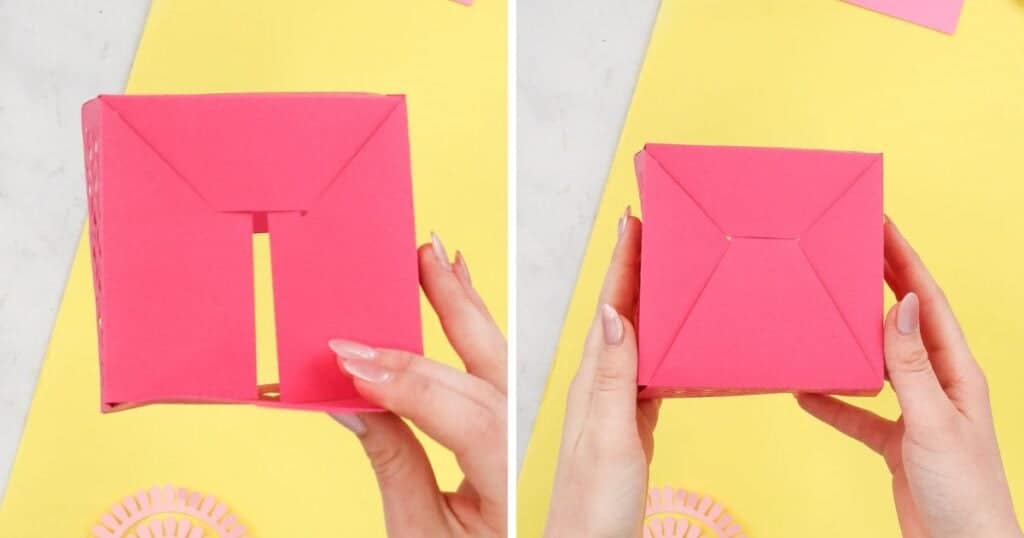
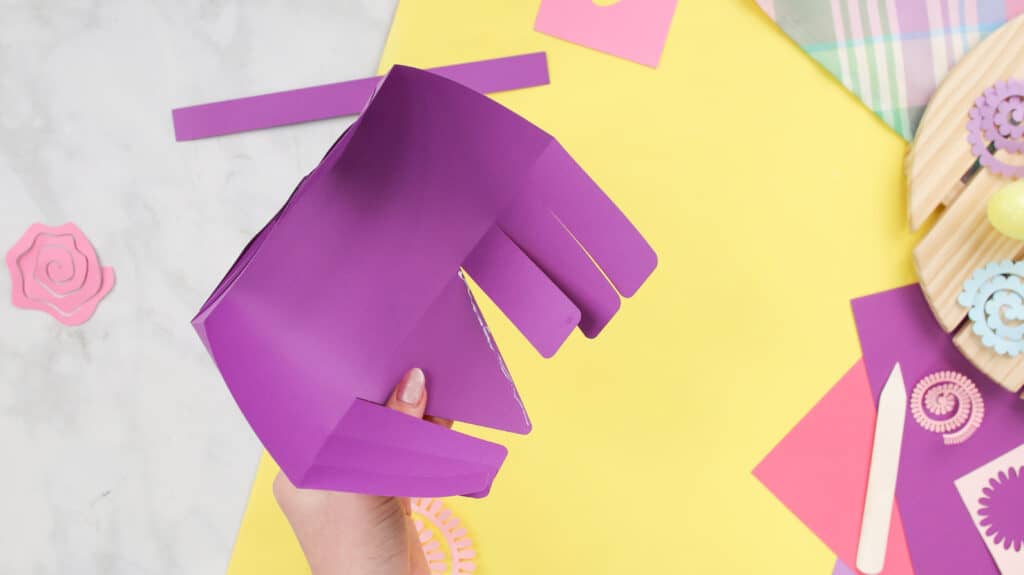
A terra-cotta pot look-a-like. Gather the basket pieces with side tabs, and the hexagon piece, and set the rest aside.
You should have six basket pieces on hand.
Start by folding the side and bottom tabs of each piece.
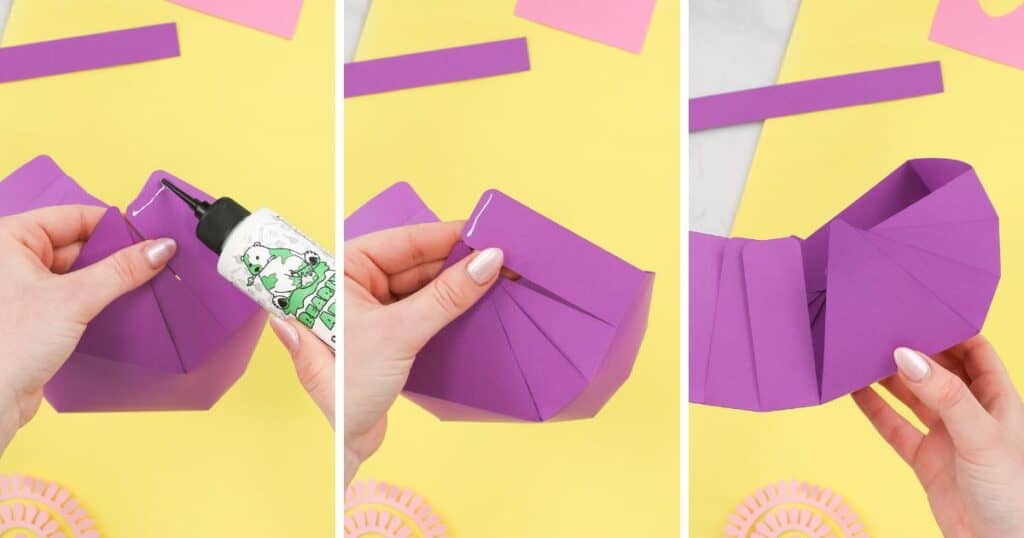
Afterward, apply glue to a bottom tab of one of the basket structure pieces and attach it to an edge of the hexagon piece.
Next, apply glue to the side tab of the piece you just attached to the hexagon. Grab another basket structure piece, apply glue to the bottom, and attach it to the glued side tab and hexagon edge.
Tip: Use a scraper tool, bone folder, or weeder tool to help keep the bottom tabs in place while it dries to the hexagon piece.
Continue gluing the pieces onto the edges.
Tip: As the glue dries, mold the tabs to fit the hexagon
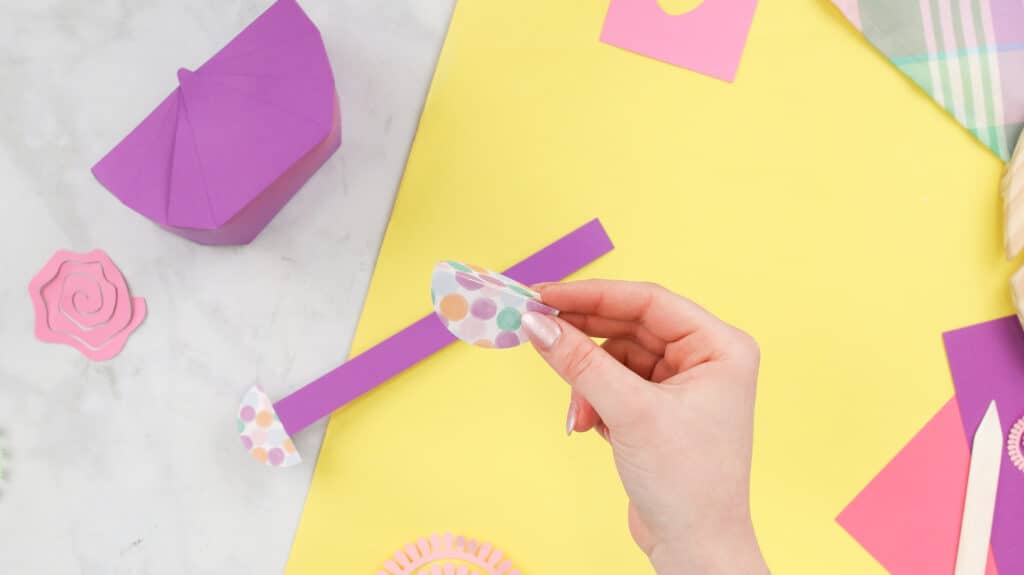
Next, take the handle and glue one end to the top of the basket structure just above the score line.
Gather the pieces we set aside earlier because it's time to glue them to the basket.
Take the rectangle cutouts and glue them to the top of the basket while aligning them just above the score line.
Then add to the design and cover up the ends of the attached handle.
Then, glue on the trapezoid shapes aligning with the structural shape of the basket.

Next, we are going to assemble the frame basket.
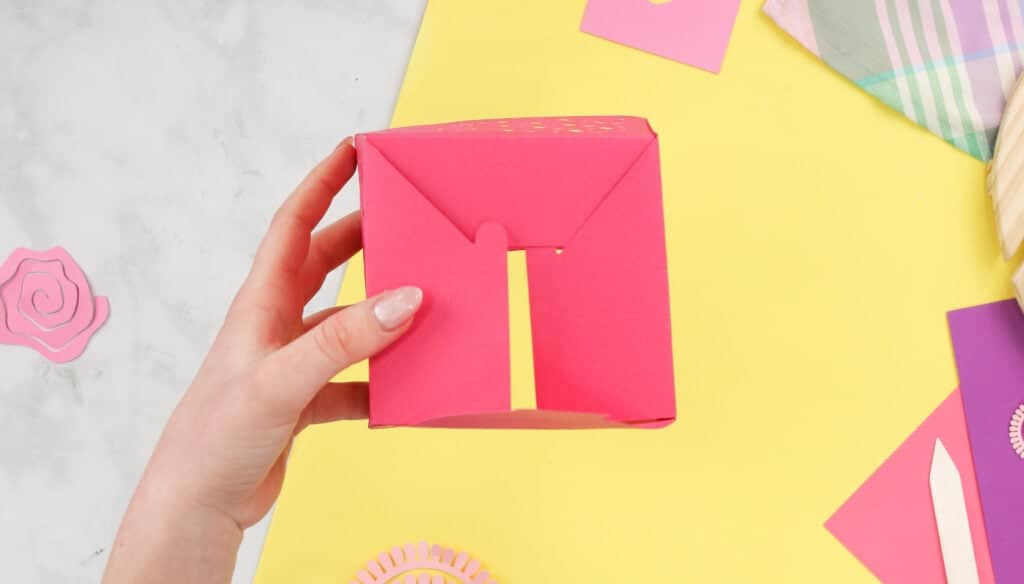
Frame Basket

Included in the Frame Basket SVG File:
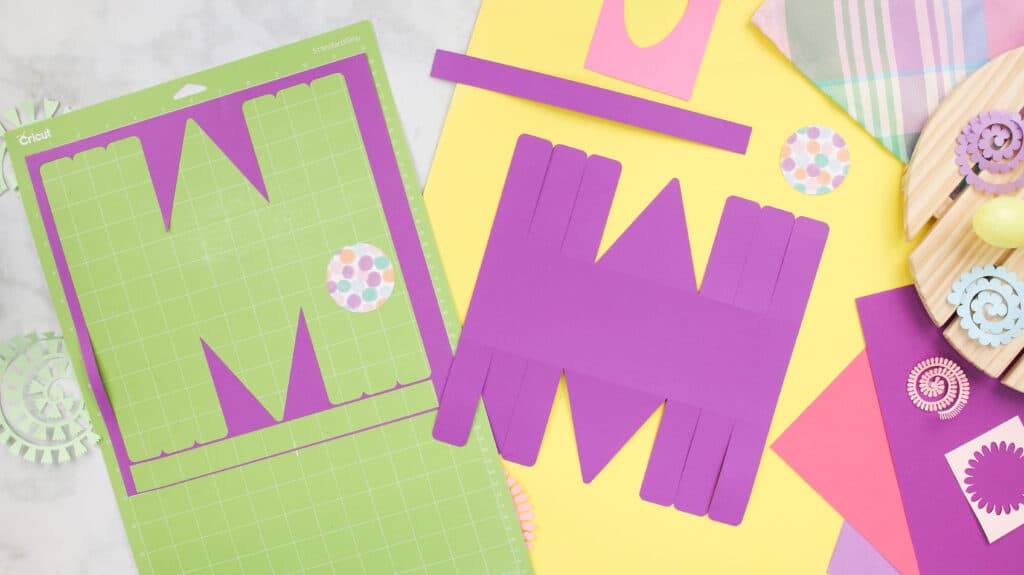
- 1 Basket Base
- 1 Handle
- 2 Circle Cutouts
I like to call this one the flower basket. To assemble this Easter basket, gather the pieces, and fold them along the score lines. Fold it so that the rectangles and two triangle pieces are standing up.
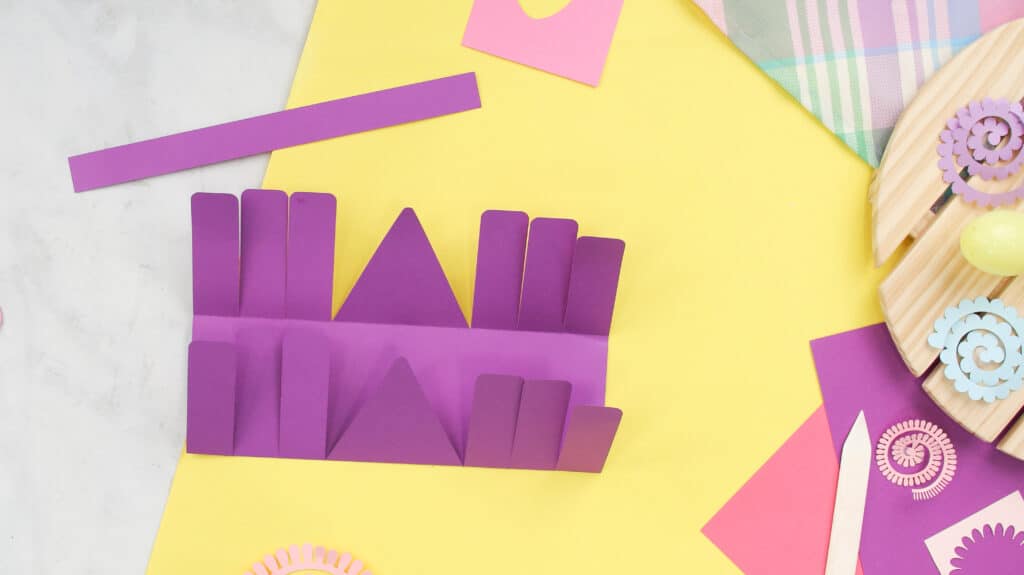
Start with the right side of this structure and apply a glue to the inside edge of the triangle shape.
Grab the rounded rectangle closest to the triangle, pull it in until it aligns with the angle of the triangle until you can no longer see an empty space between the two.
Grab the next rounded rectangle shape, apply glue to the top and pull it in until it aligns with the top of the triangle. At this point you should start to see a curve. Continue this process to each rectangle piece and repeat to the other side.
Tip: When you do this, make sure the opposite side lines up with the other.
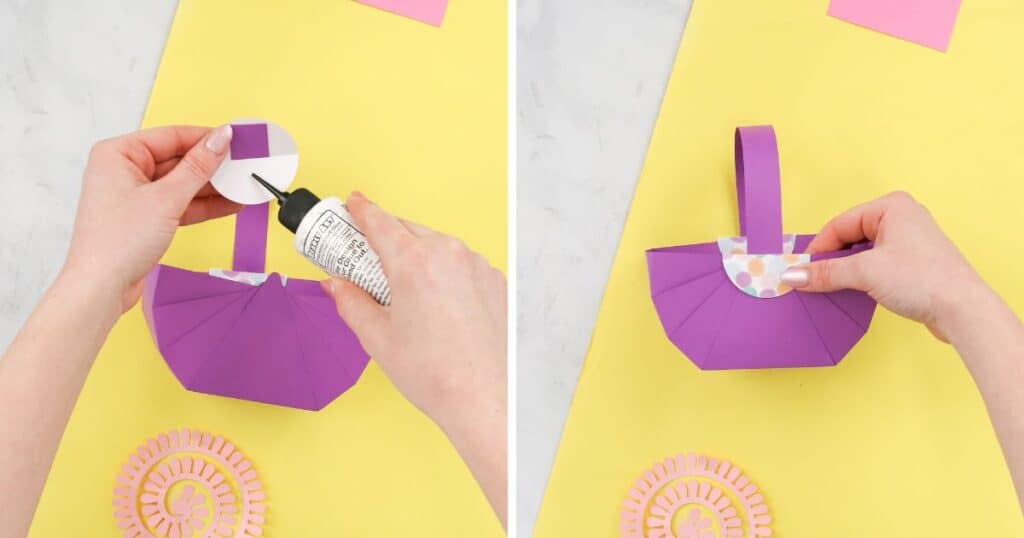
Once you've finished the structure of this basket, it's time to add the handle.
Next, fold the circles in half horizontally.
Then, slide one of the handles through the slot of a circle.
Dot glue to the end of the handle and attach it to the inside.
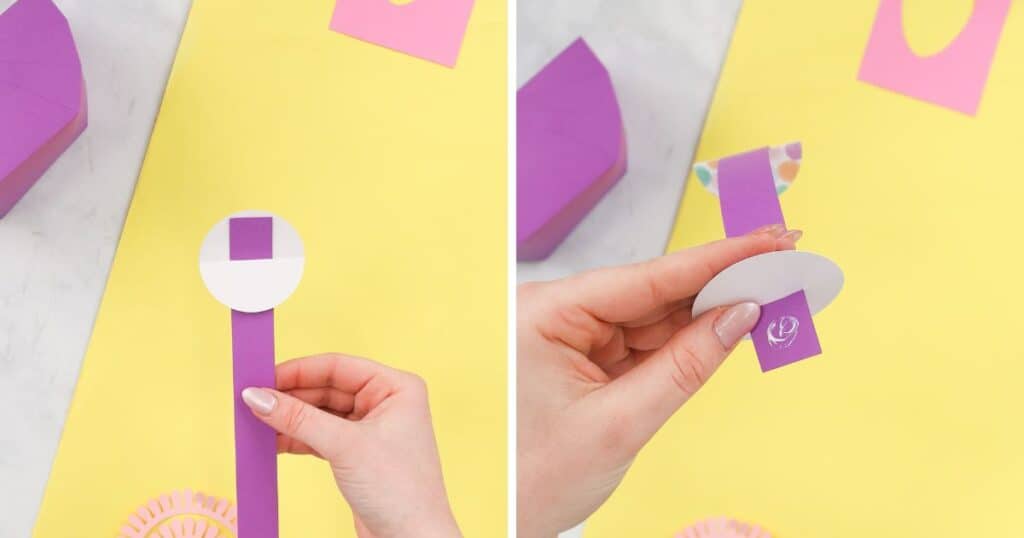
Take the assembled handle, apply glue to the inside of the circle, and place the folded circle over the basket structure where all the points meet.
Repeat the steps to the other side.
And you're done!
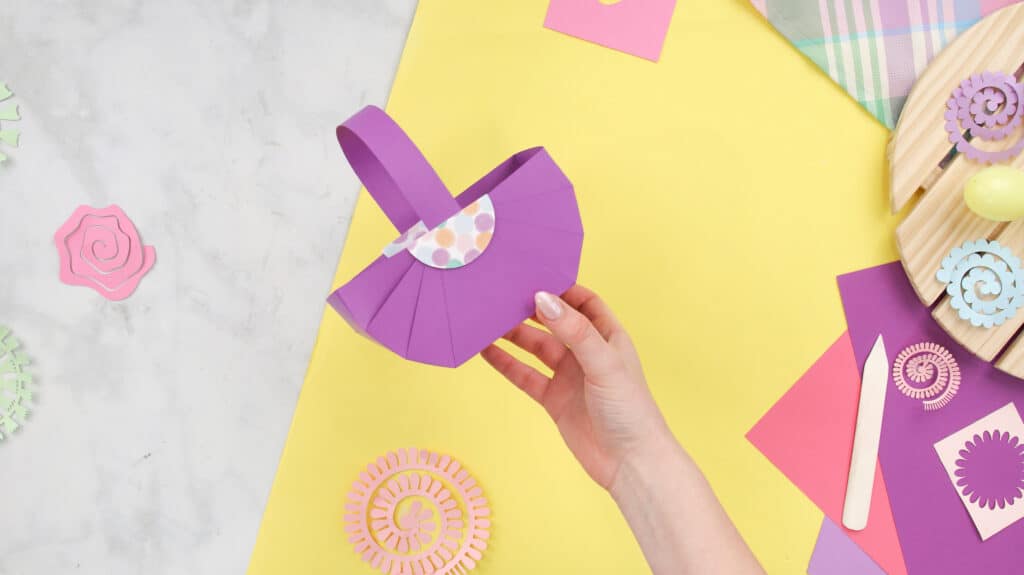
These baskets are definitely one of my favorite paper projects to assemble! There’s so much you can do with these baskets!
Add a bow from my Birthday Explosion Box, A 3D layered Easter Egg Mandala, rolled paper flowers from my Rolled Paper Flower Wreath, or Paper Carrot Treat Box to your 3D Paper Baskets!
Join my crafting Facebook group where you can show us what you’re making, ask questions, and learn from others!
Your SVG files are great and I would love to follow your crafts, but unfortunately, no Cricut yet. I am a beginner sewer, and looking at your tutorials, I think I’m becoming a beginner crafter as well. Love your work, keep it up and prayerfully I will join all the way one day! Be blessed!
These are such cute Easter crafts and created with the Cricut. I need to get one of these so that I can make wonderful crafts too.
Very cute. I really like the berry basket
Definitely Goin to try these with my daughter!
I will try these out.
I love that you include the little tips and tricks! I liked the berry basket best and learned a few things about basket building! Thank you!
Great tutorial! Love the pattern!
So cute! Wish I cold make but I only have a cricut joy! Love you videos and tutorials!
It all looks so exciting! If I win the contest, I could actually do this!
Adorable!
Super cute, love this!
So cute’
So cute - I could make a set for my cats
That’s adorable!
Love these!
These are all super cute I think the berry basket is my favorite!
Great craft. Fun to customize for my kids!
Love these! So cute!
Cute idea for Easter!
So cute!
cool idea for easter
Cute project to try with my girls!
these are so cute! Love this!
Seriously adorable!!! Love the cut out basket!!
So cute
Love the Berry Basket!
These are so cool and I love the different basket options.
These do look kinda easy to put together
Thank you for these crafty tips!
Cute
perfect idea for the season
These are so cute I can see why you made so many of them
Very cute for Easter, spring and Mother’s Day thank you for the files
So cute, can't wait to make these.
Love this tutorial, thank you!
I Love the variety... some of these baskets are sooo cool.
Beautiful!
Cute little buggers!
very good tutorial
Cute baskets!
I love this DIY❤️
If I win this contest I could make things like these.
Love this tutorial
Love the Berry Basket
I love the polygon basket!
So cute
very cool ideas
I like the frame basket looks. Very creative.
so cute
thanks so much for the design
This are absolutely adorable! I love the time and thought that goes into making these!
Looks like they would be easy to put together
Such a cute idea & your directions are so simple, easy! Can’t wait to try
This would also be cute for center pieces for birthday parties !
I bet this would be fun to do with my daughters.
Your tutorial is very informative.
What a great gift to give out to neighbors, friends and family!
Easy to follow tutorial!
thank you so much for the ideas
I must show this to my granddaughter, she actually owns A cricut machine.
The baskets look like such fun to make.
So cute
Great tutorial. Instructions are easy to follow. This would be fun to do with my granddaughters.
Thanks, I would love to try this
great tutorial
All three are cute!
Great Tutorial. Thanks for sharing.
fantastic, thanks so much
Thank you for the easy to follow instructions!
These are such a sweet, inexpensive favor for any party or shower. I can think of endless possibilities in colors and embellishments.
It was so hard to choose a favorite
So fun!
thank you for all the great ideas
I love this project!
Looks like so much fun
great ideas
You have so many cute ideas!
The berry basket is my favorite of the bunch and I will definitely be using it for gift baskets in the future!!!
love the berry basket the best.
I would love to make Easter baskets. Children would love them.
These baskets are so cute. Will definitely make some.
Great tutorial.
Great idea and quick to make!
My granddaughter likes this project too!
Great ideas!!
Love these cute baskets! I wish my Joy could cut these! Might have to upgrade☺️
Adorable! These would make great nut cups for showers!
Those are super cute - just need a little glitter
Sooo cute!!
So cute. Than you.
So creative
So cute! I am going to make these next year for Easter
Cute! These would make nice party favors too!
These are so amazing.
How cute
thank you so much for all your great ideas
Great patterns. Need to get me a Cricut now so I can use all you great ideas
These are so cute and versatile, not just for Easter. I like that you show them in neutral colors as well as colors and prints.
Adorable
IF I win I could make cute things like these.
My daughter would have loved to make these
looks good, thanks for the ideas
My daughter is so hoping we win as she wants a cricut in order to make these
Such a great idea for party favors and gifts, all year round
thank you
I love the papers you chose for the baskets
I love the cut out basket!
Great spring arrangement
Im sure I would love this file but I cant find the download button can someone help me ?