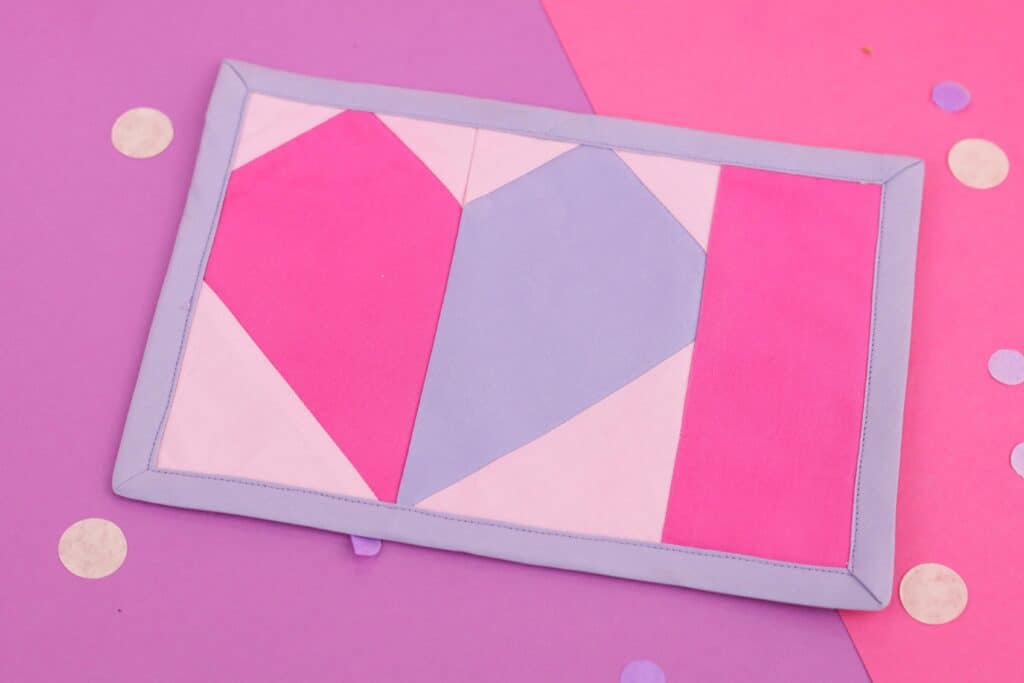
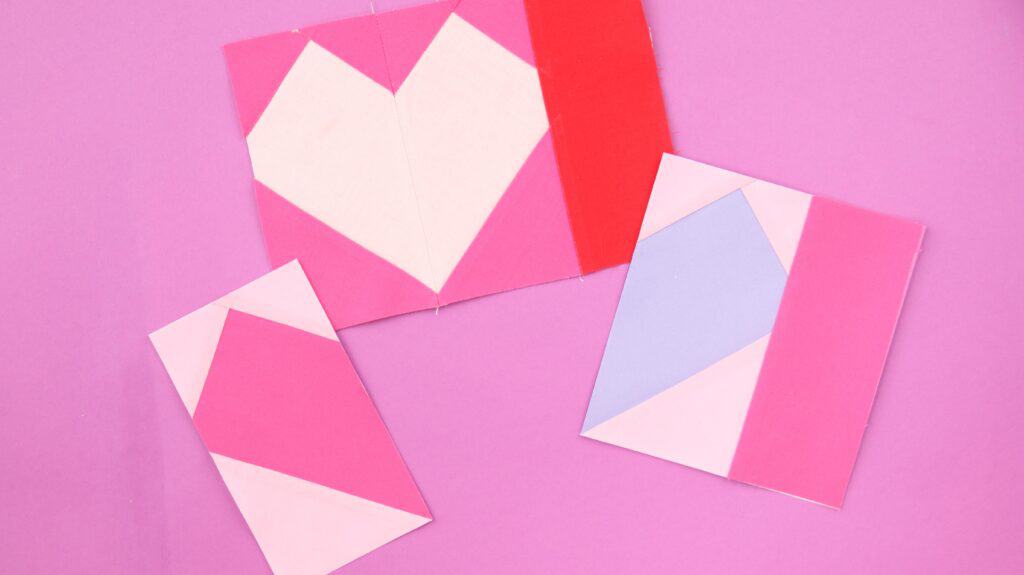
Learn How to Make a Valentine's Heart Mug Rug With This Free Foundation Paper Piecing Sewing Pattern. Create a Cozy Spot for Your Morning Cup of Tea or Coffee With Plenty of Space for a Tasty Treat.
With Valentine's Day quickly approaching, I wanted to sew something fun to celebrate and enjoy this holiday season.
Mug rugs have quickly risen in popularity over the past few years, and you know I just can't help myself when a fun new trend pops up! Of course, I had to try it out and put my own Sweet Red Poppy colorful spin on it.

Table of Contents
What is a Mug Rug?
Now, you might be scratching your head, wondering what in the world a mug rug is. Allow me to introduce you! Coffee, meet your new best friend!!
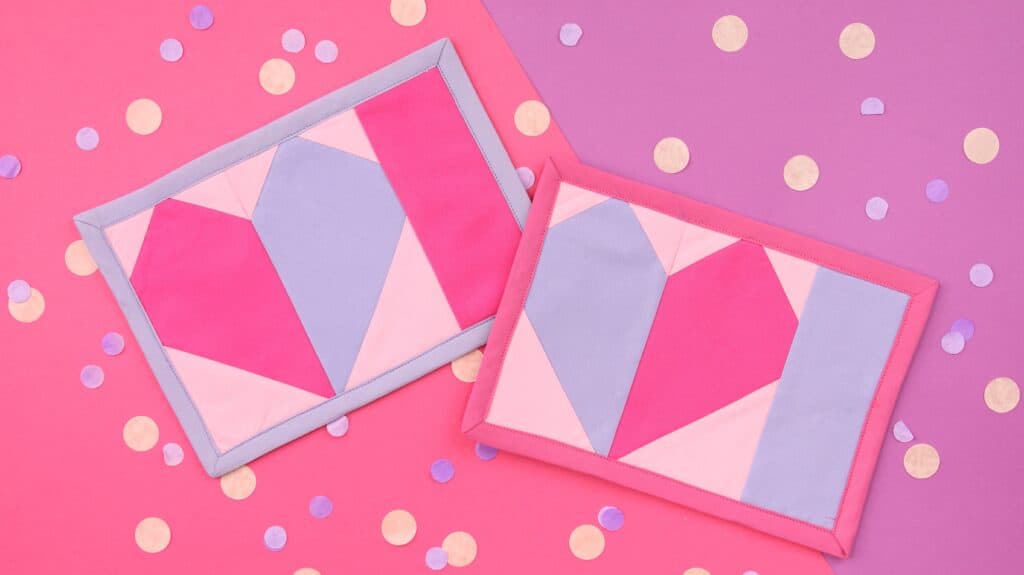
A mug rug is a fabric coaster or mini-sized placemat. Mug rugs are made from quilting cotton, layered with batting, and finished with bias tape for some added interest.
It’s larger than a standard coaster so that you can fit your mug and a snack.
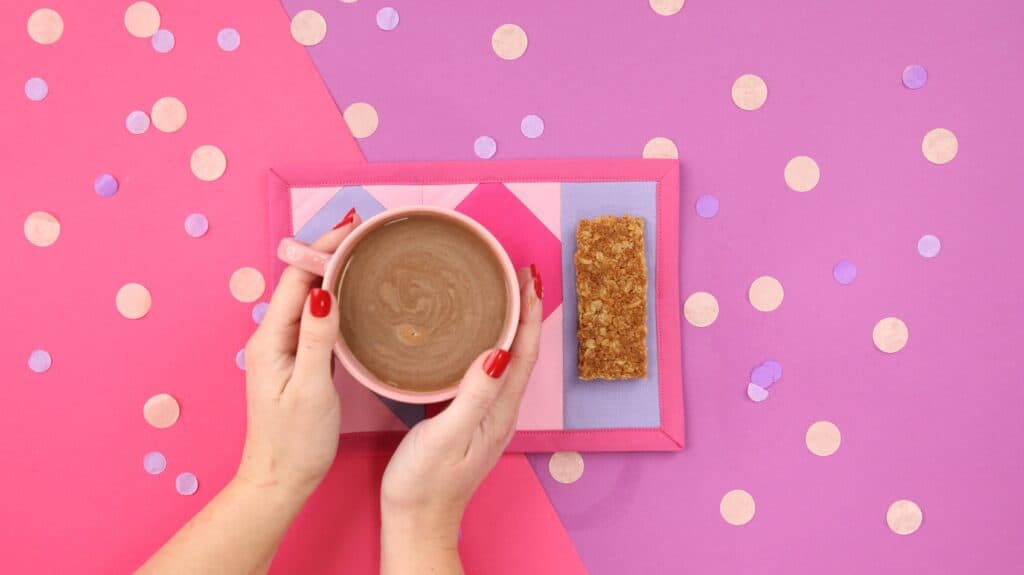
Mug rugs are ideal for protecting your tables from heat and moisture. It also keeps crumbs and spills from ending up on your table.
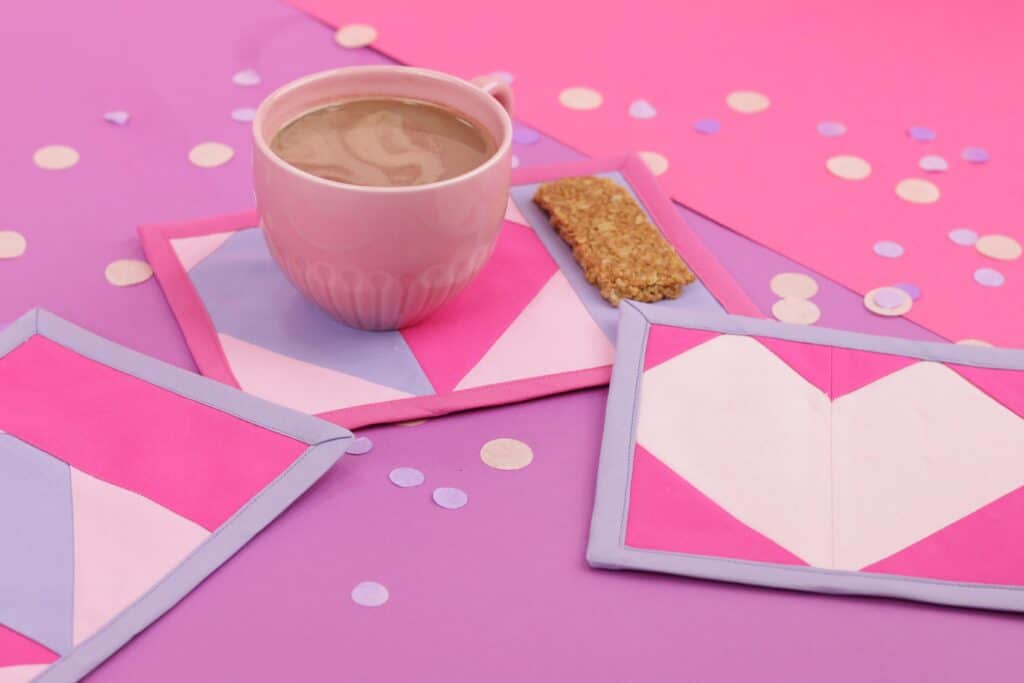
While they are functional, they also add a pop of color and a bit of whimsy to your decor. And if you know me, you know how much I love sewing projects that are both functional and pretty!
How Big Is a Mug Rug?
It’s large enough to hold a mug as well as a snack. Mug rugs typically measure 4" x 9", 6" x 9" or 12" x 18".
This pattern will create one mug rug that measures 6" x 9". It's the perfect size for an oversized cup and a small snack. It's my favorite size for a mug rug that's not too big and not too small.
Mug rugs are the perfect way to use up your leftover quilting cotton scraps. I know you probably have a giant pile of them just begging to be used!

What's a Mug Rug Swap?
Mug Rug swaps have been gaining in popularity lately, and after making a few, I can see why! This is a fun project to sew and a great handmade item to gift that will definitely bring a smile to any recipient's face!
The best part about a mug rug is that it can be made for any holiday using different patterns. You can even use scraps to create your own mug rug!
This tutorial features a mug rug that's bound with double-fold bias tape and can easily be laundered in case of any spills. Because let's be honest, spills are bound to happen!
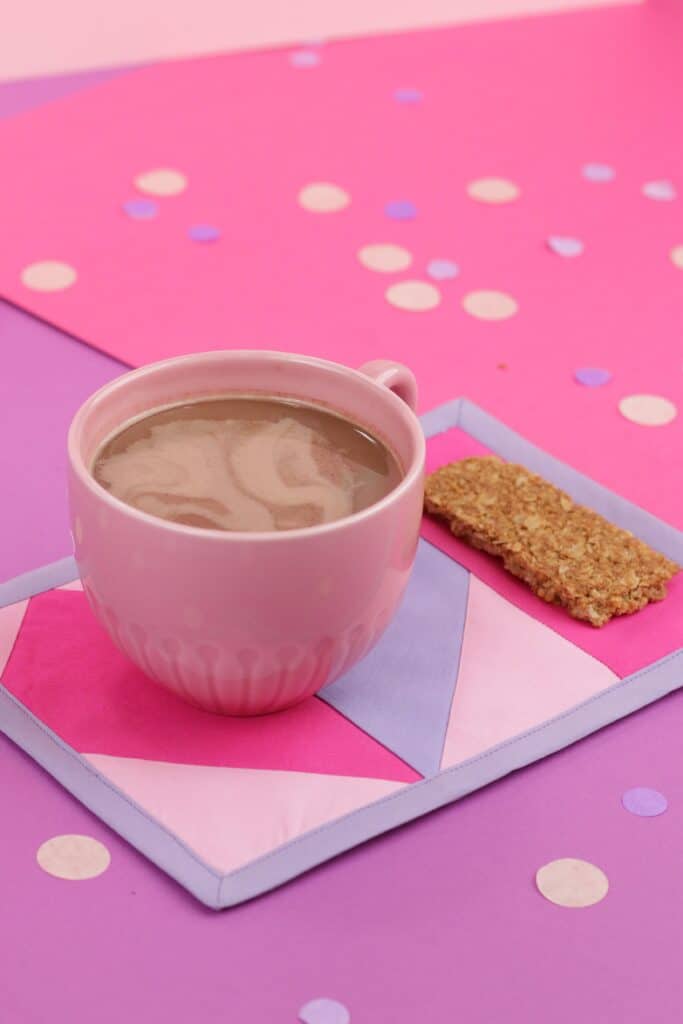
I enjoy using my mug rug for an afternoon cup of cocoa and a snack while I read a book.
What Supplies Do I Need for a Mug Rug?
Quilting Cotton
Quilting cotton is the ideal fabric for creating a mug rug! It's a natural fabric that's absorbent, can handle heat, and can be easily washed in case you have a spill.
You can purchase fabric specifically for your mug rug or use quilting cotton scraps to make your mug rug.
I'm using Kona Cotton in a variety of different shades. You can purchase them here or in-store.
Cotton Batting
You'll want to layer cotton batting on the inside of the mug rug for two reasons. This gives the mug rug some weight allowing it to protect your table from heat, and it makes it more absorbent in case you have condensation or steam from your cup.
Bias Tape
To finish your mug rug, you'll want to use a double-fold bias tape. I like to purchase premade bias tape from my craft store. They always have a great selection of different colors so I can find exactly what I'm looking for.
Foundation Paper Piecing
For this mug rug, I will be using a technique called foundation paper piecing.
If you haven't tried this technique before, don't be afraid! I'm going to let you in on a little secret; this is actually the first time I've tried this technique!! I was amazed by how easy it was to get perfect-looking designs using this method.
Can I Use This Heart Template for a Quilt?
Yes, of course! I've been dreaming of making a quilt using this heart template.
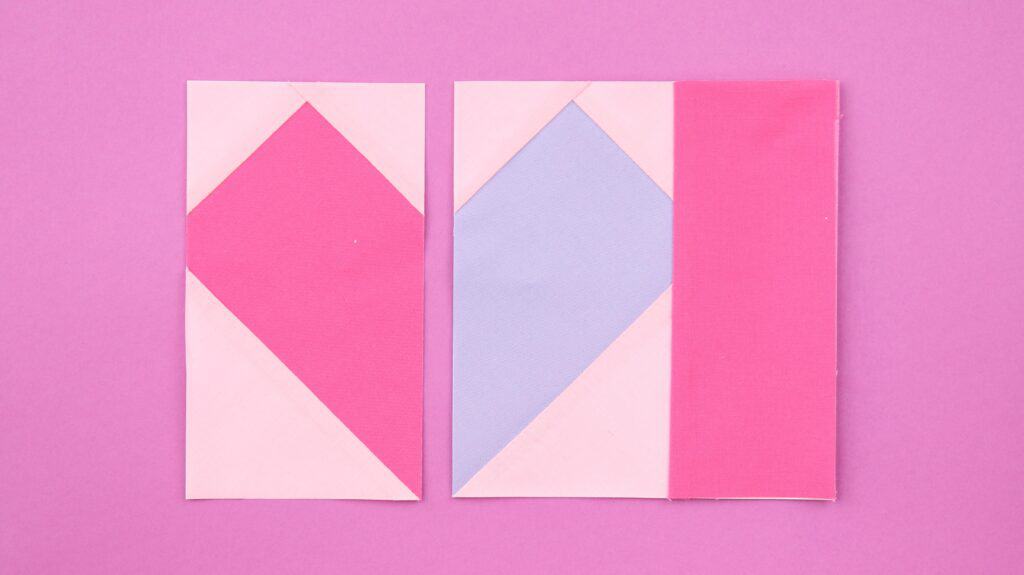
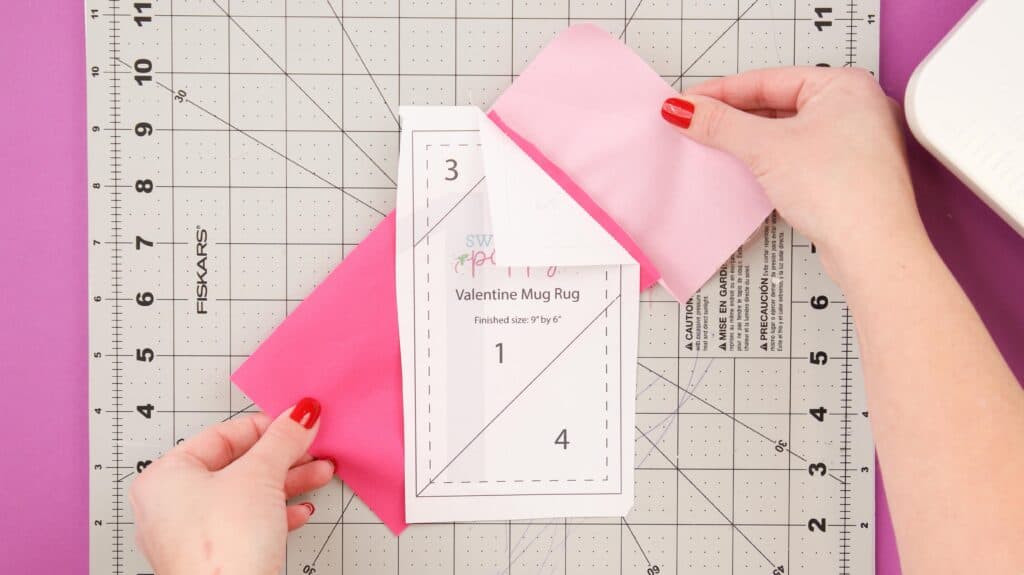
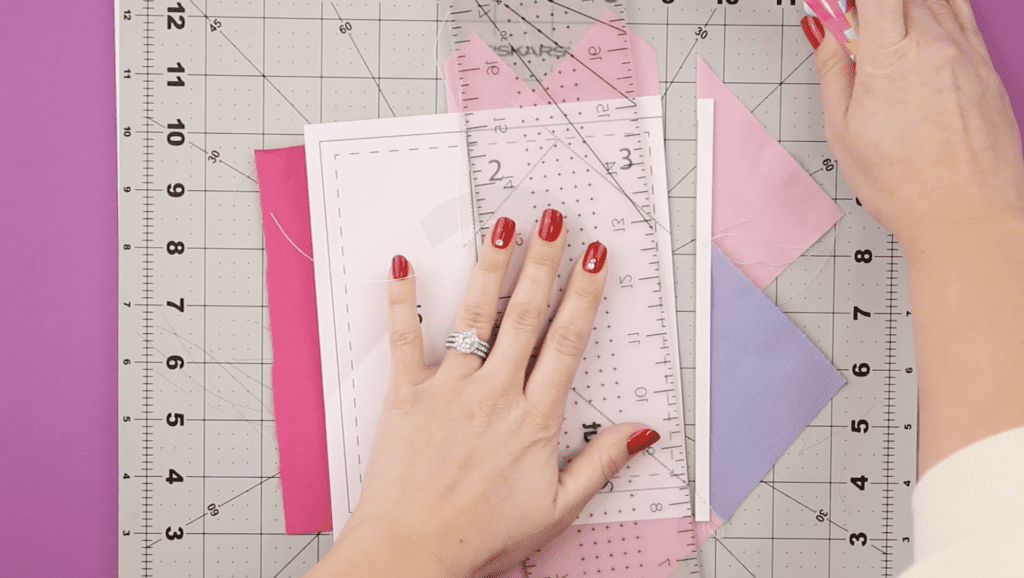
On pattern piece number one, trim along the dotted line on the right-hand side. Next, trim off block five from pattern piece number two.
This will give you two identical mirrored images to create your blocks.
Let's get started!
Why Shop Through My Links?
When you shop through my affiliate links, it doesn't cost you anything extra, but it helps me out in a big way! I earn a small commission from those purchases, and that support allows me to continue creating and sharing free tutorials and patterns for you. Thank you so much for helping me keep this creative community going! 💕
SUPPLIES
Shop my favorite must-have sewing supplies here!
- Quilting Cotton Scraps (fat quarters work well for this project)
- 1/4 Yard Cotton Batting
- Bias Tape
- Sewing Machine
- Rotary Cutter
- Rotary Cutting Mat
- Acrylic Ruler
- Thread
- Pins
- Iron
- Ironing Mat
- Sewing Machine Needle
- Fabric Pen
- Printer
- Printing Paper
Shop my favorite sewing supplies here!
Download the Free Oven Mitt Sewing Pattern Here!

Watch the video tutorial below!
Valentine Heart Mug Rug Sewing Tutorial
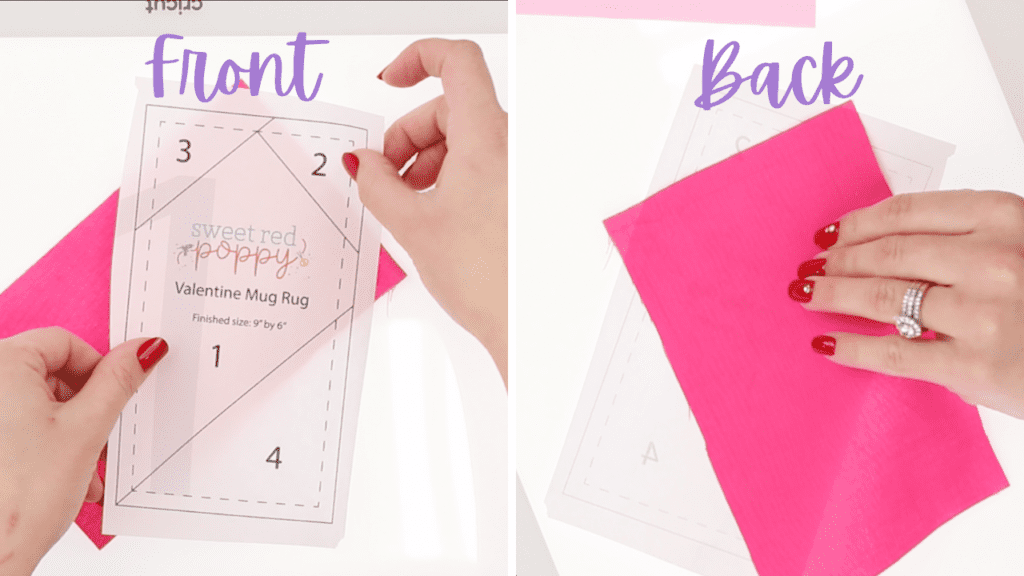
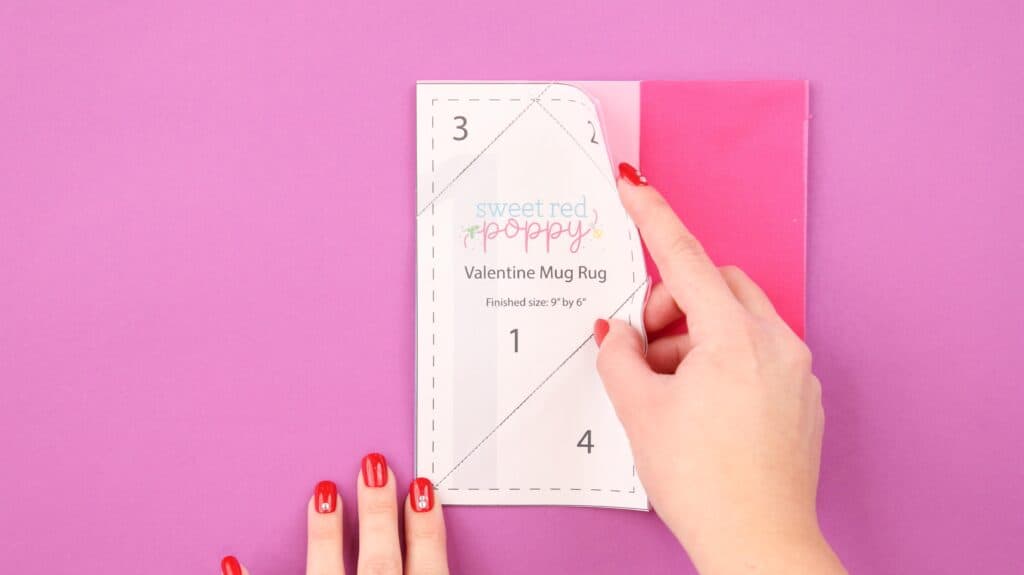
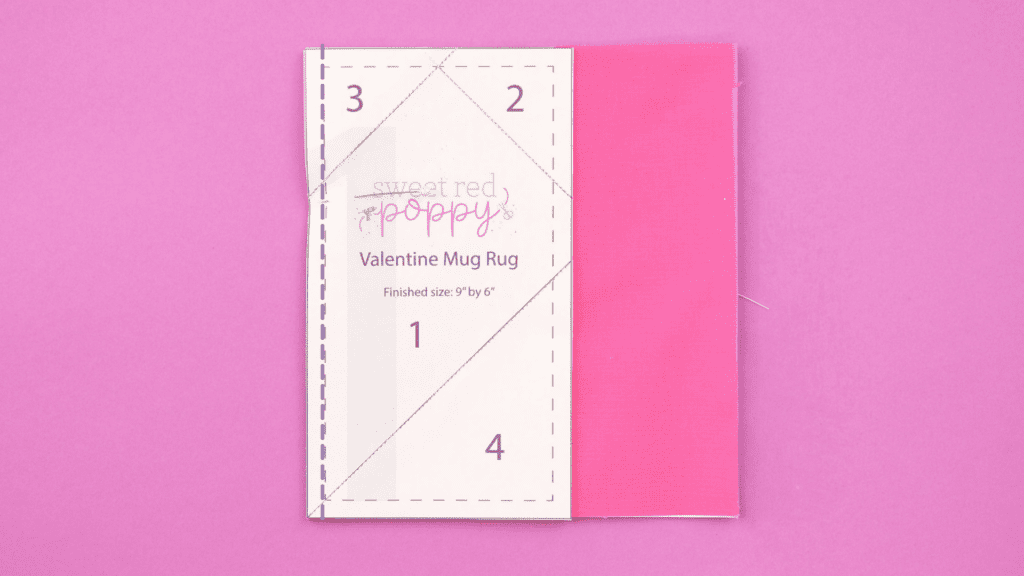
To begin, print off your mug rug pattern. You should have two pieces labeled one and two.
You will need one set of patterns for each mug rug you want to make, so if you plan to make multiple rugs, print off a few extra patterns. You won't be able to reuse the pattern once you sew it.
You'll notice that the pattern has numbers on each section. The numbers tell you the order in which you should sew the fabric pieces together. The dark black lines are your stitching lines.
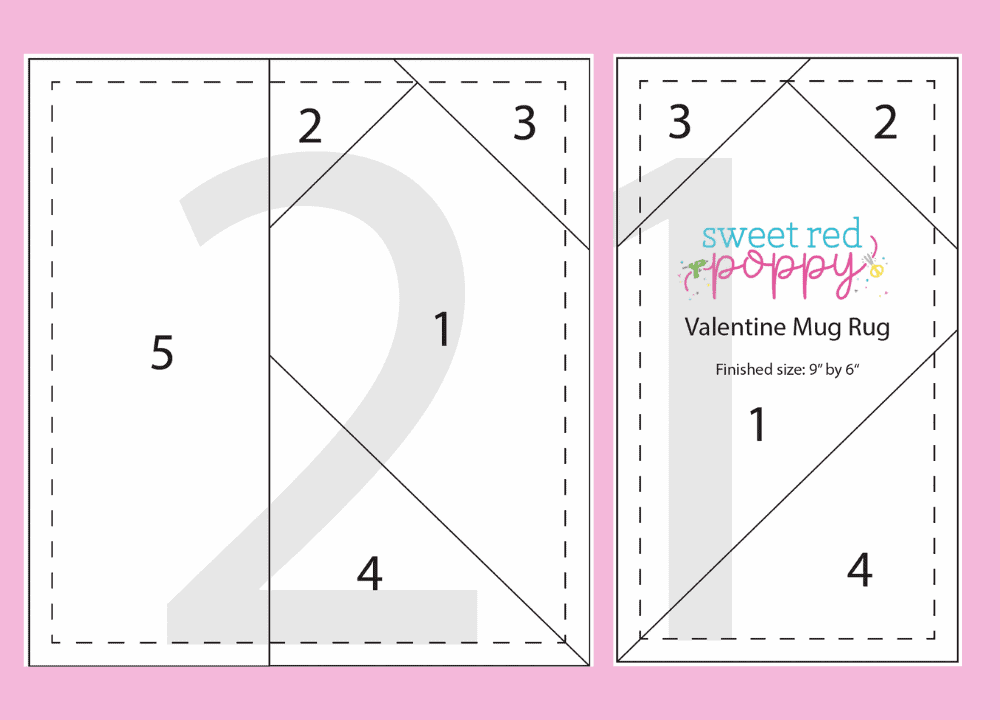
With Foundation Paper Piecing, you attach the fabric pieces together by sewing along the lines. This gives you perfectly square blocks that always match up. I'm still in awe of how amazing this method is!
Typically with Foundation Paper Piecing, you use a variety of scraps to create your design.
Personally, I really like to be told exactly what to do (I'm a bit of a control freak) so I created a quick reference cut chart to make sure each of your scraps is large enough in case you're like me.
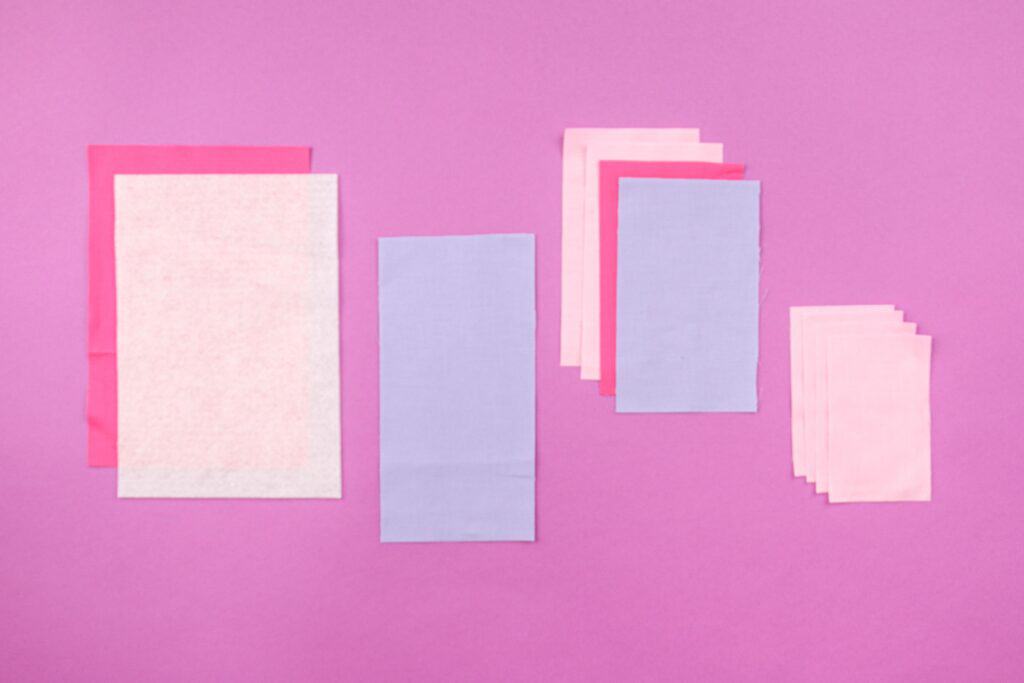
CUTTING CHART
- #1: CUT TWO - 4” x 7”
- #2: CUT TWO - 5" x 3"
- #3: CUT TWO - 5" x 3"
- #4: CUT TWO - 7" x 4"
- #5 CUT ONE - 4" x 8"
- Backing: CUT ONE - 9.5" x 6"
- Batting: CUT ONE - 9.5" x 6"
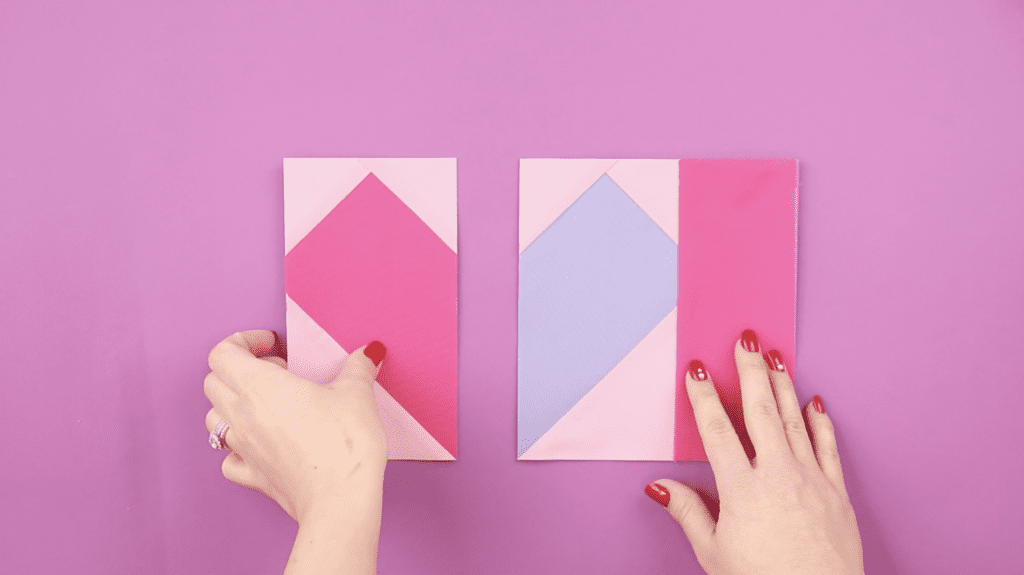
Create the Heart Blocks
SECTION #1
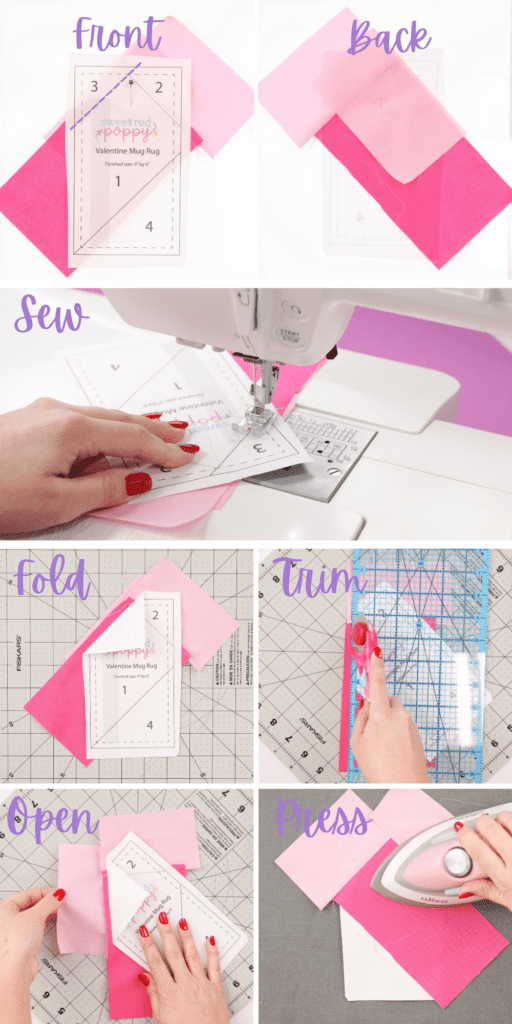
Start with your first piece of fabric for section #1. It should be placed on the BACK of the paper pattern piece. Make sure that the WRONG side of the fabric is facing the WRONG side of the paper.
Overlap the section you will be sewing by about an inch on all sides.
Raise your paper and fabric up to the light, (I like to sew near a window as I do this) to ensure that you’ve placed your first piece of fabric in the correct position.
*PRO TIP - I like to use my Cricut Brighpad so that I can see through my paper to make sure my fabric is where it needs to be. You can use any lightbox to do this.
Place a pin through the fabric and paper to ensure it doesn’t shift around.
SECTION #2
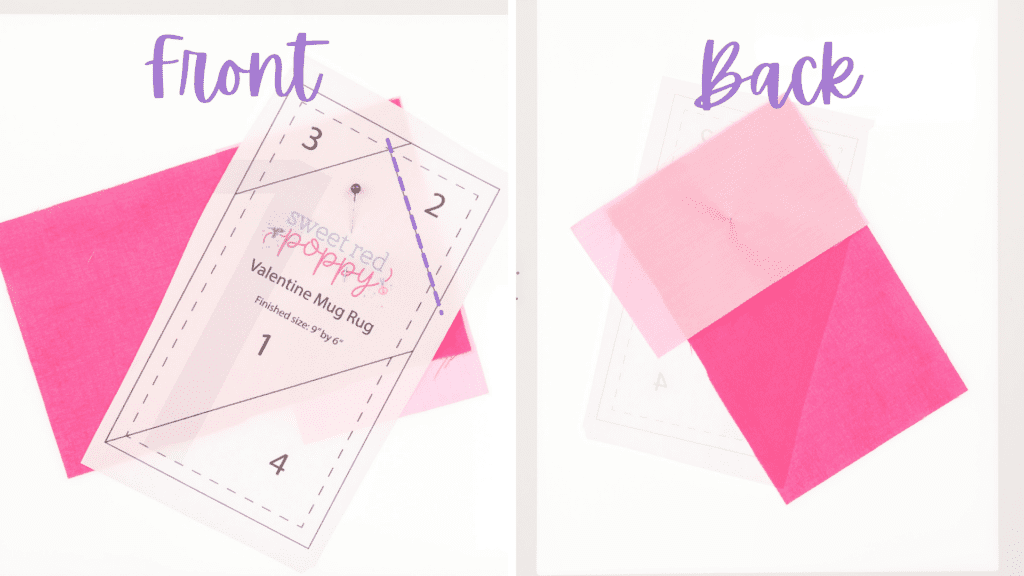
Now it’s time to move on to the fabric for section #2. Your fabric should be large enough to cover block two and extend about an inch over the sewing lines.
Fabric number two should now be placed on top of fabric number one. The right sides need to be facing together.
This fabric will be placed so that it's overlapping the sewing line for section two, but it should NOT be placed on the side for section two. This might seem counterintuitive at first. But remember that once it's sewn, it will be opened up placing it on the side of section two.
Place a pin through the fabric to hold everything in place.
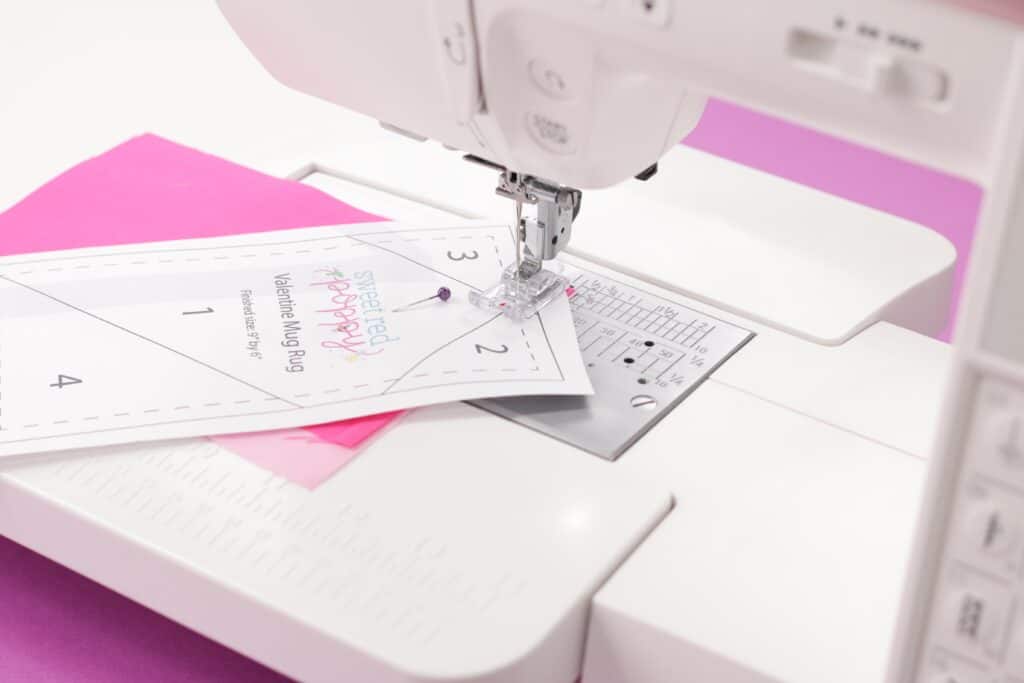
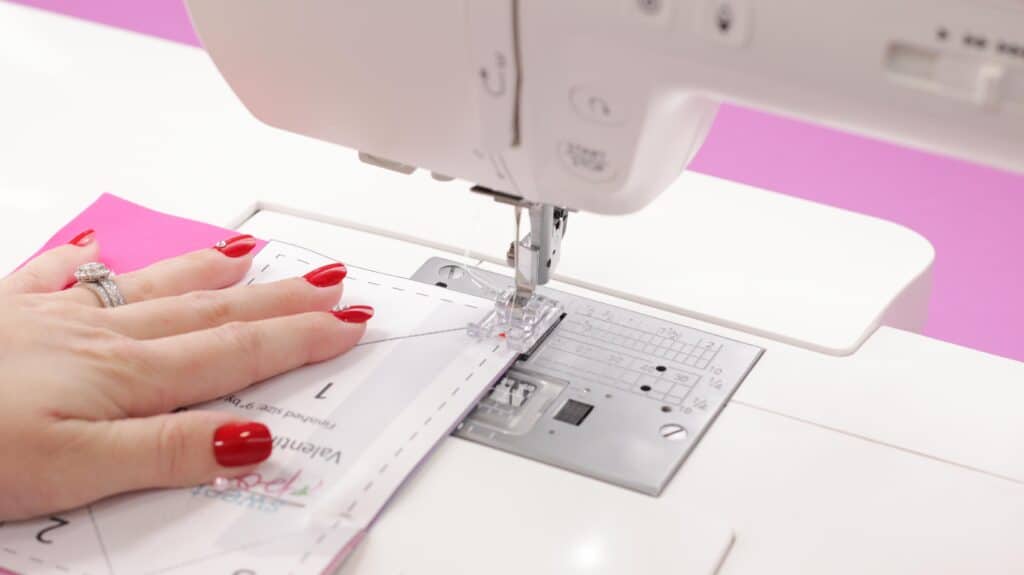
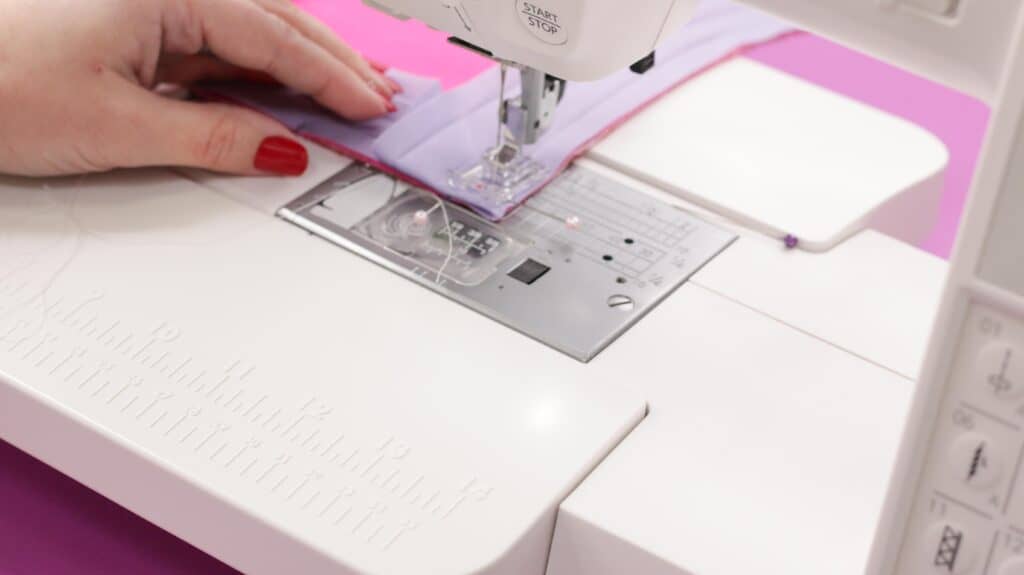
Now it’s time to sew our first very section!
I like to decrease my stitch length to a 1. This gives you nice small and consistent stitches and it makes it easier to remove the paper from the fabric at the end.
Flip the fabric so the paper is facing upwards and sew along the black line between section #1 and section #2. Start sewing a few stitches before the black line begins and stop a few stitches after the black line ends.
Now it’s time to trim our first section.
For this part, you will need a cutting mat, rotary blade, and a ruler.
With the paper side facing upwards fold the paper away from the fabric onto itself along the stitching line.
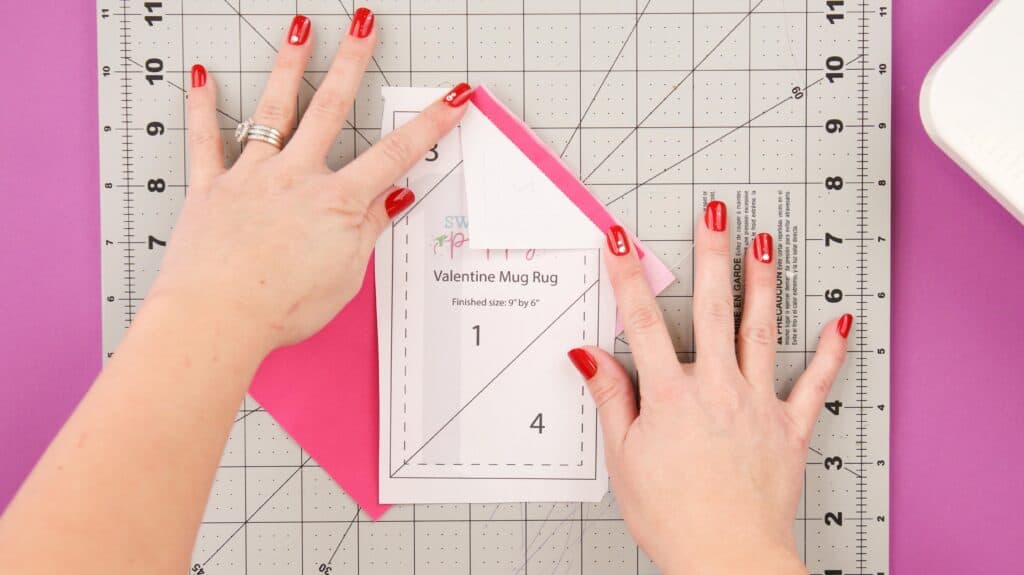
Place your acrylic ruler over the fold line by 1/4” and trim the excess fabric with a rotary blade.
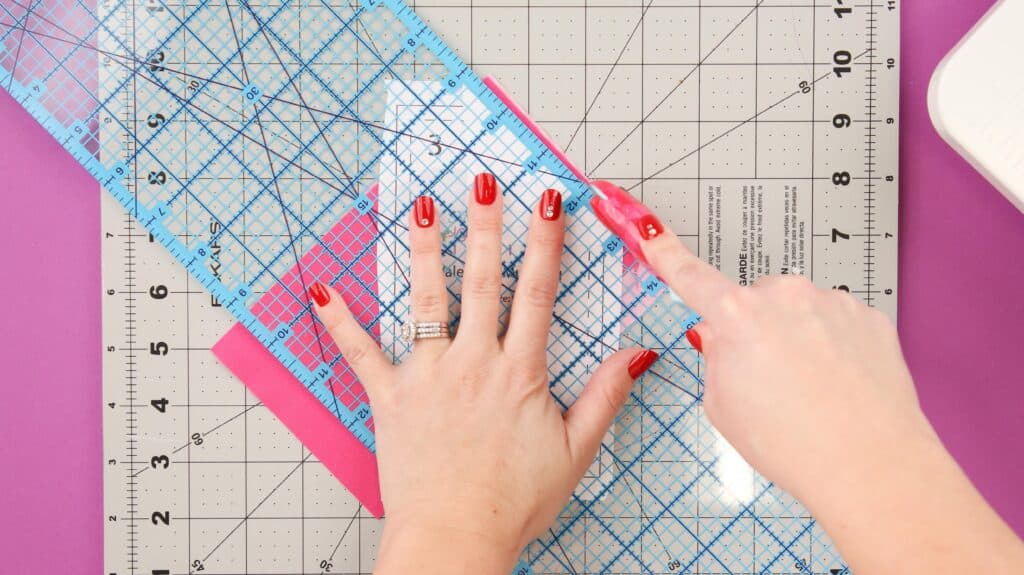
Pull section #2 away from section #1 and unfold your pattern.
Finger press or iron with no steam to set the seam.
Continue with this process until all of your sections have been sewn together.
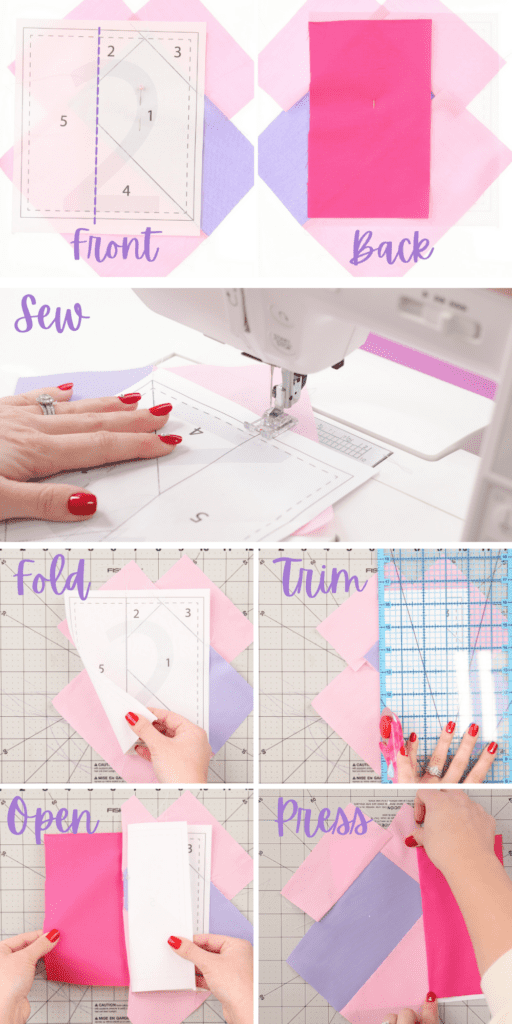
Below is a quick reminder on how to create each section.
- Place fabric with right sides together extending over stitching line. Pin and sew.
- Fold template back along stitching line, cut excess fabric to 1/4" seam allowance.
- Open seam and press.
I've included visual guides for each of the sections below so you know exactly what to do.
Section #3
Section #4
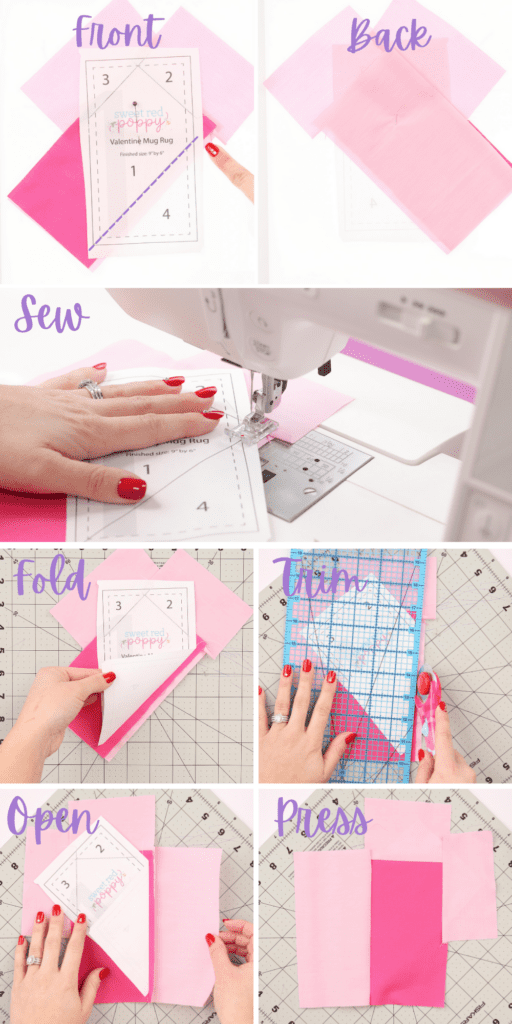
Section #5 (This step only applies to the pattern piece marked with a large 2)
Sew the Blocks Together
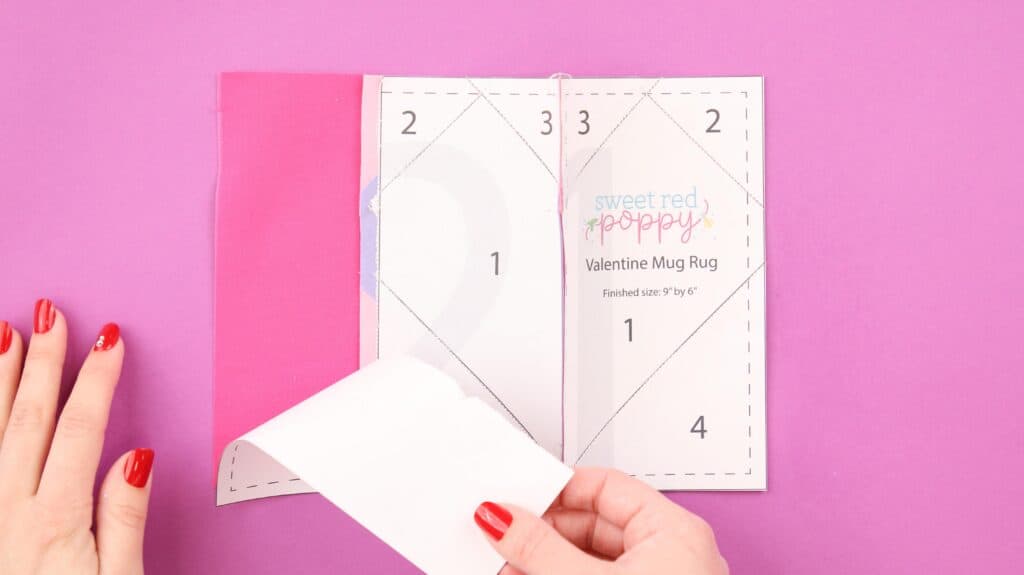
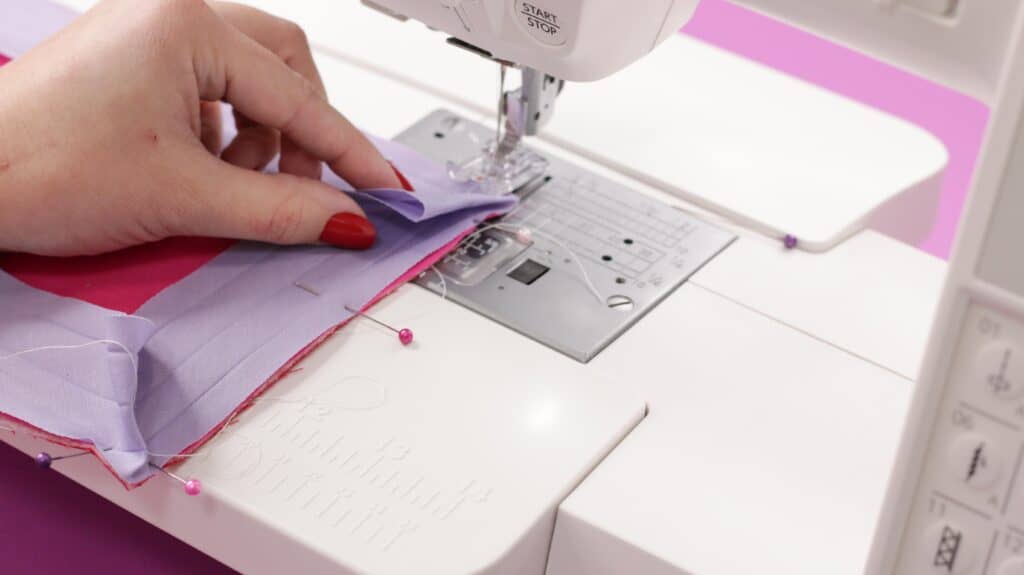
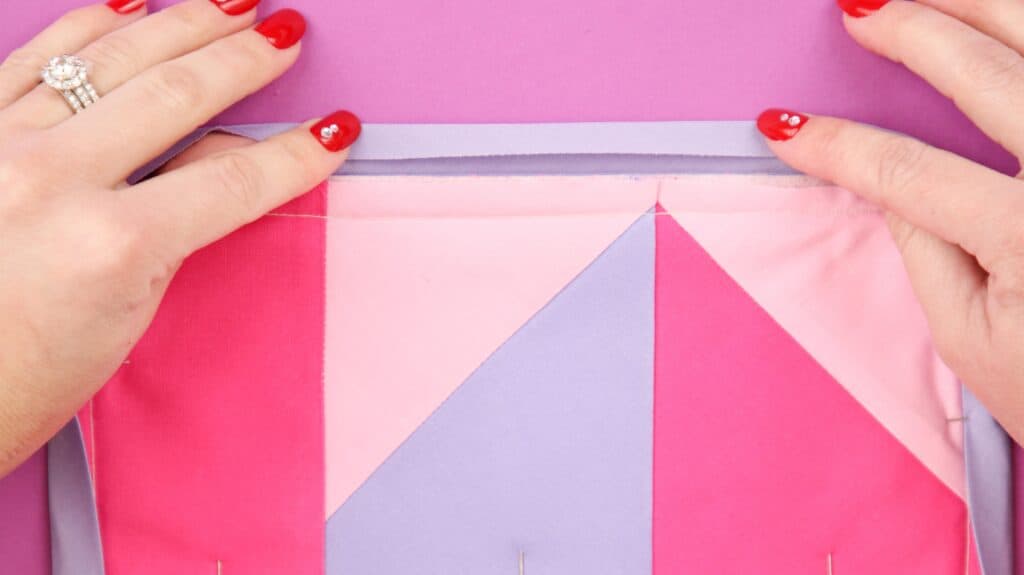
Once you’ve created both of your blocks it’s time to trim them on all four sides following the solid black line on the outside.
Now you should have two rectangles. Place them with the right sides together. Pay close attention to lining up your seams.
I find keeping the paper attached for this step helps to stabilize everything so I can line it up more easily.
Sew the pieces together along the dotted line with a 1/4" seam allowance.
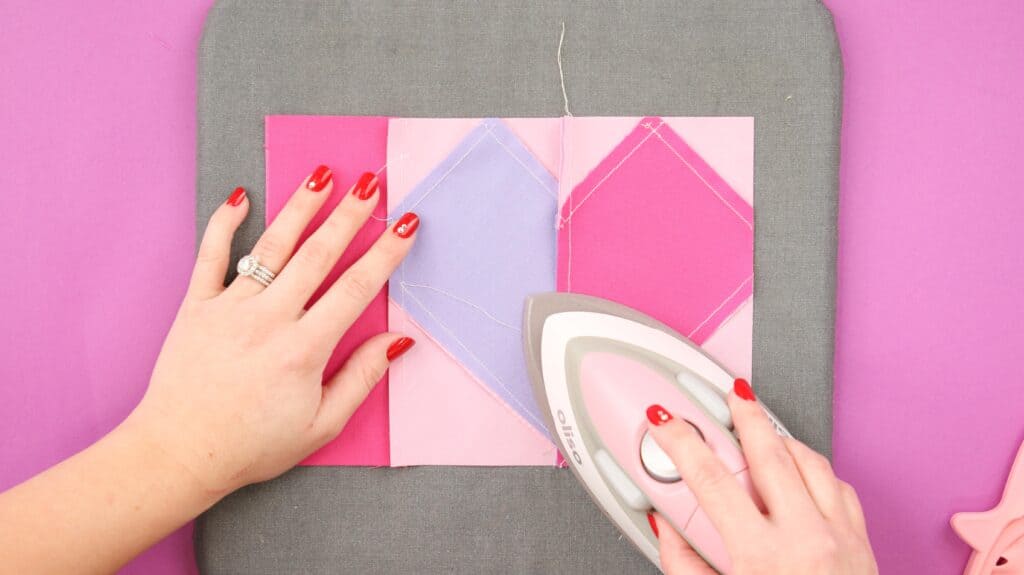
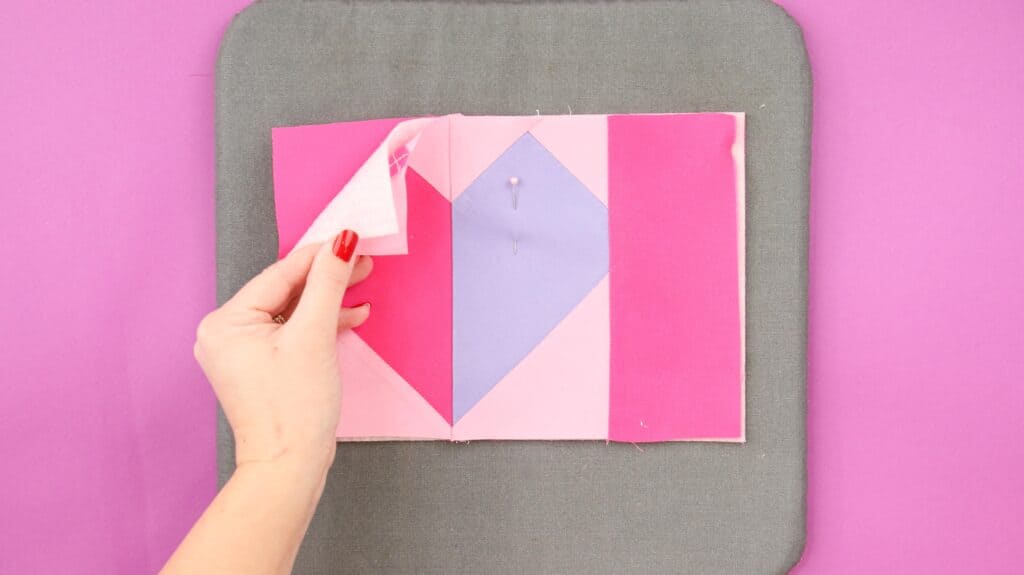
Once the block has been sewn together it's time to remove the paper.
Gently tear the paper away from the fabric. You can spray it with a small water sprayer if needed or use a seam ripper to gently remove the small pieces of paper from the fabric.
Press all of the seams of the block with a hot iron. I like to spray my block with a bit of heavy starch to give it more stability and help it to keep its shape.
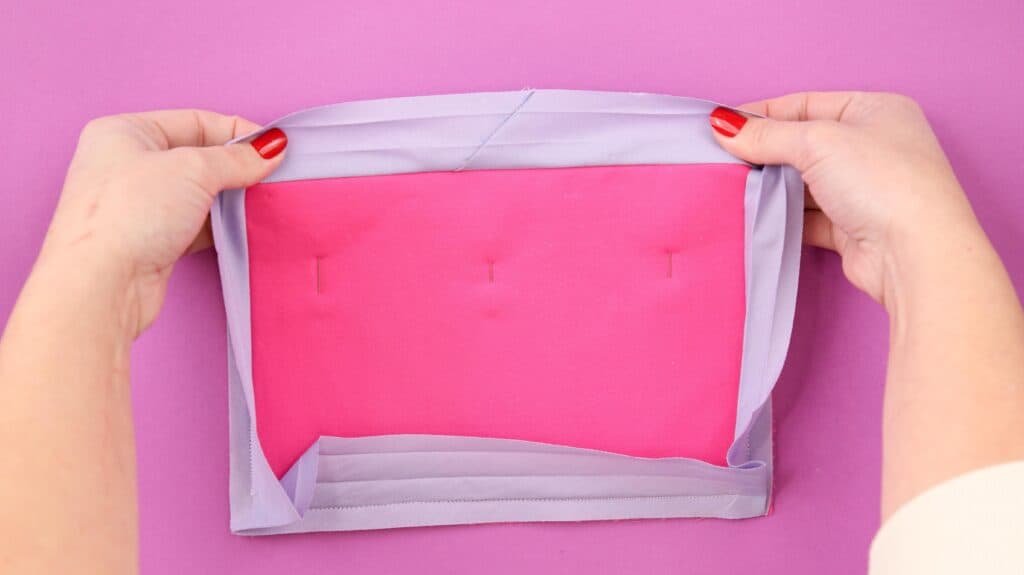
Layer Heart Block
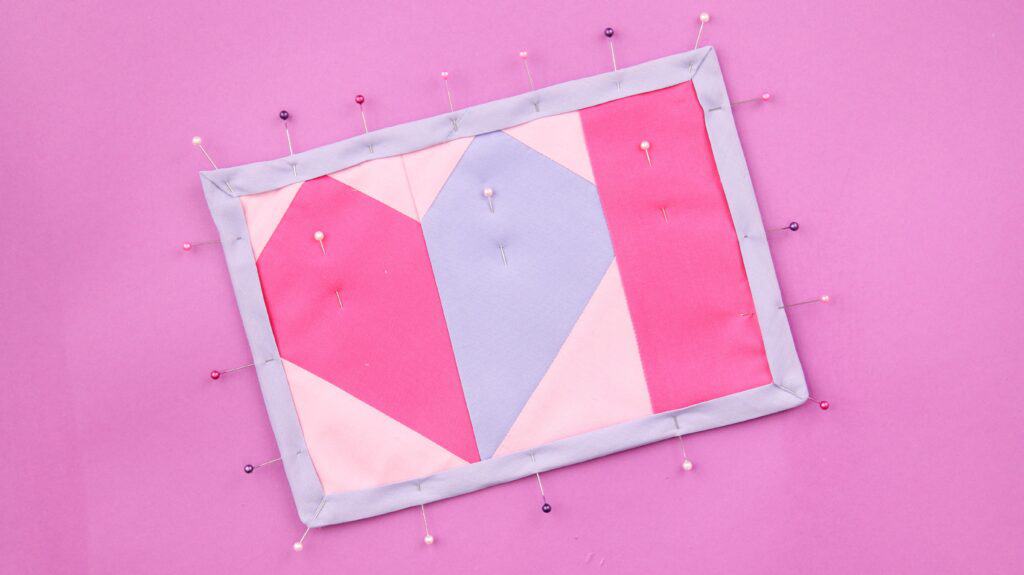
It's time to prepare the block for binding.
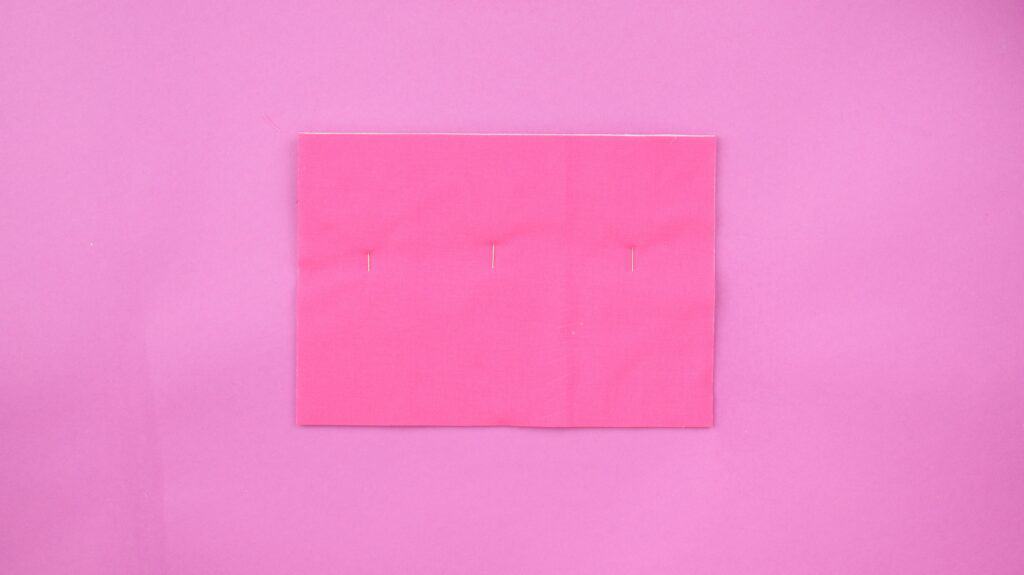
To do this layer the backing with the wrong side facing up followed by the cotton batting and finally the heart block on top with the right side facing upwards. Pin everything together.
If needed, you can use a rotary cutter and mat to square up your fabric if anything looks off.
Bind Heart Block with Bias Tape
For this project, I will be using double-fold bias tape that I purchased at JOANN. You can opt to make your own if you have a fabric that you want to use.
I like to cut a 35-inch piece of bias tape which will give you a little bit extra to create a diagonal seam at the end.
Begin by opening up the double-fold bias tape. You can lightly press it with a warm iron to help it open (without completely flattening the fold lines) which makes it more manageable.
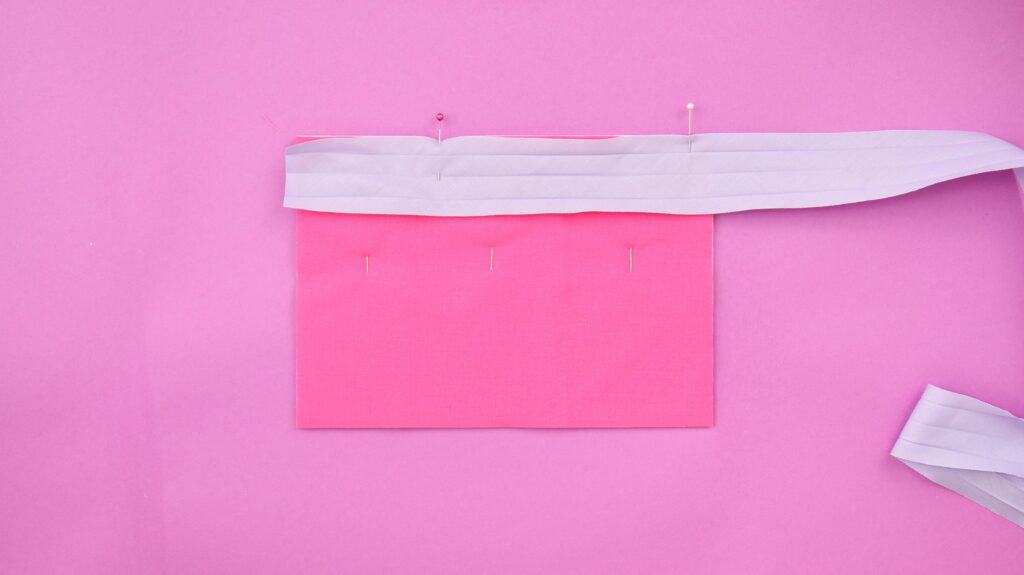
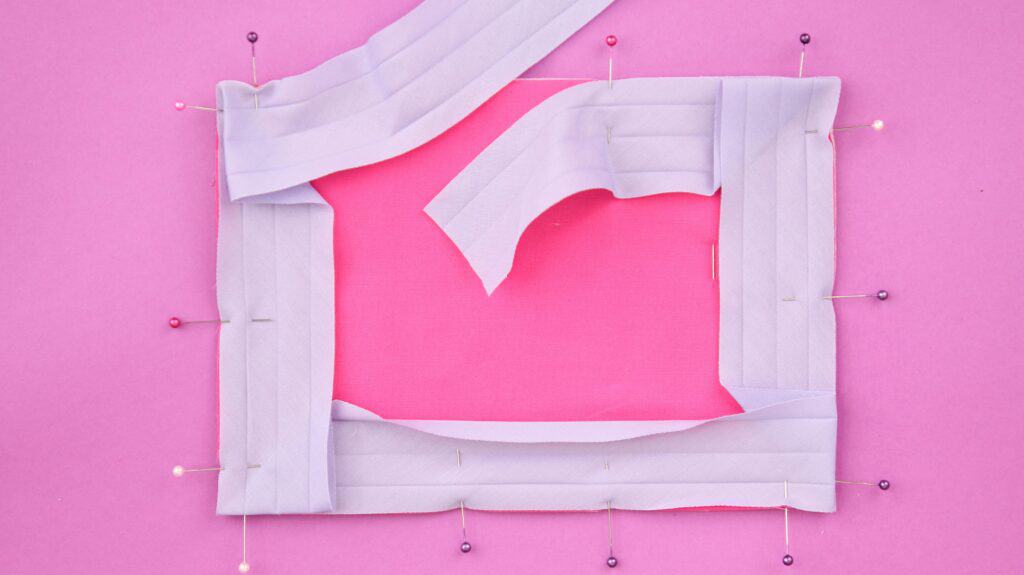
If you look closely, you'll see that one side of the bias tape is slightly narrower than the other. This side should be pinned along the raw edge of your mug rug backing.
Pin the bias tape in place on the back of the mug rug leaving a 2-3” tail at the beginning unpinned.
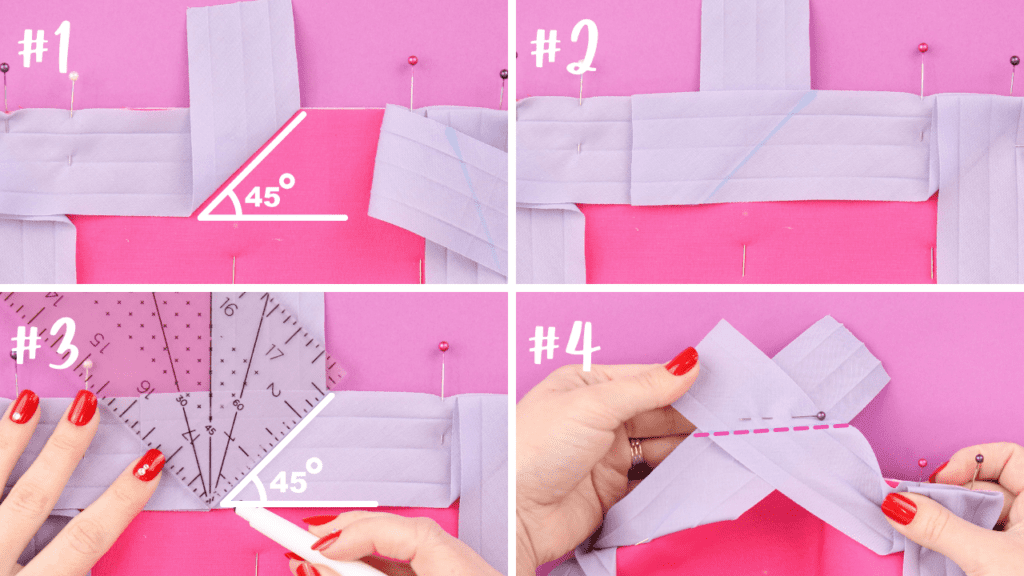
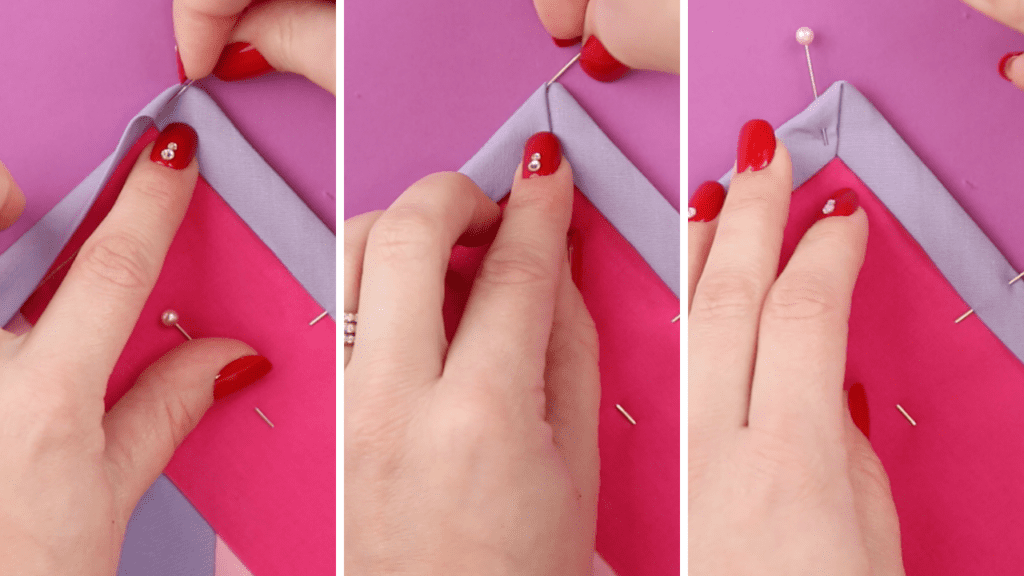
#1 Stop pinning 1/2” from the first corner.
#2 Fold the bias tape upwards to create a 45-degree angle.
#3 Next, fold the bias tape back down, aligning the fold of the bias tape with the raw edge of the fabric.
#4 Pin the bias tape in place.
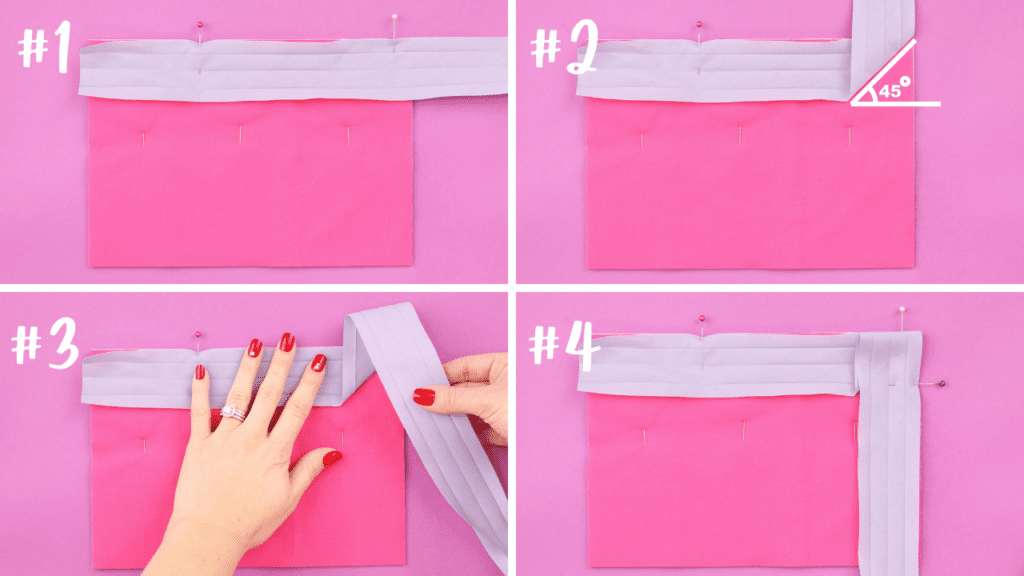
Repeat this process on each corner until you reach the beginning of the bias tape.
Now it's time to join the bias tape ends together. I'm going to show you my favorite method of joining them on the diagonal to minimize the amount of bulk from the seam.
This technique gives you a seam that lies flat and doesn't draw any attention.
You should have a tail of bias tape at the beginning and the end of your mug rug.
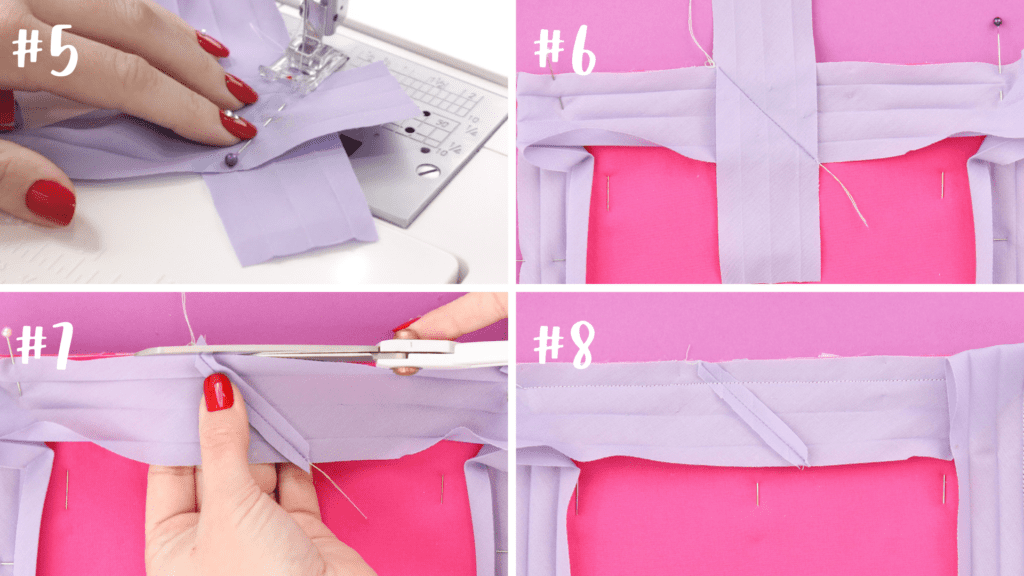
#1 Take the end of the bias tape and fold it upwards to create a 45-degree angle. Press the fold to set it. This will serve as a stitching guide.
#2 Place the beginning of the bias tape over the folded bias end. Make sure the bias tape is nice and tight. It shouldn’t have any extra ease.
#3 Use a ruler and a fabric marker to draw a 45-degree line along the beginning of the bias tape.
#4 Place a pin through the bias tape keeping everything aligned and gently pull the bias tape away from the mug rug.
*PRO TIP - The middle fold of the top bias tape should be perfectly aligned with the middle fold of the back bias tape. You can stick a pin from the front fold through to the back to double-check this.
#5 Sew along the marking making sure that the bias tape doesn't shift.
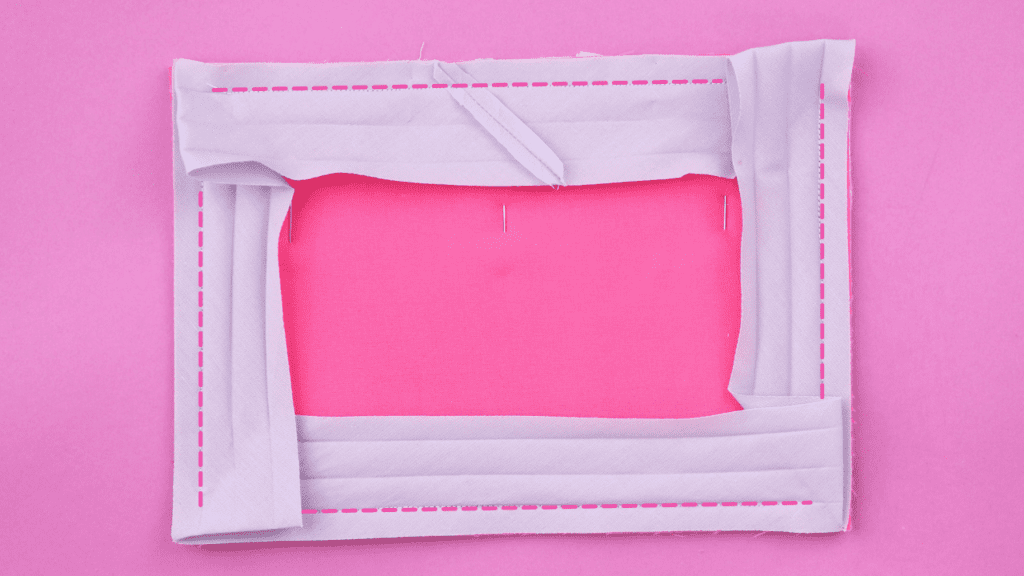
#6 Press the seam open and trim the bias tape seam allowance to 1/4".
#7 Trim away the excess bias binding from both sides of the seam.
#8 Pin the bias tape to the mug rug.
Now you have a beautiful seam that won't add any bulk to your mug rug! This technique can be used on any bias-bound project.
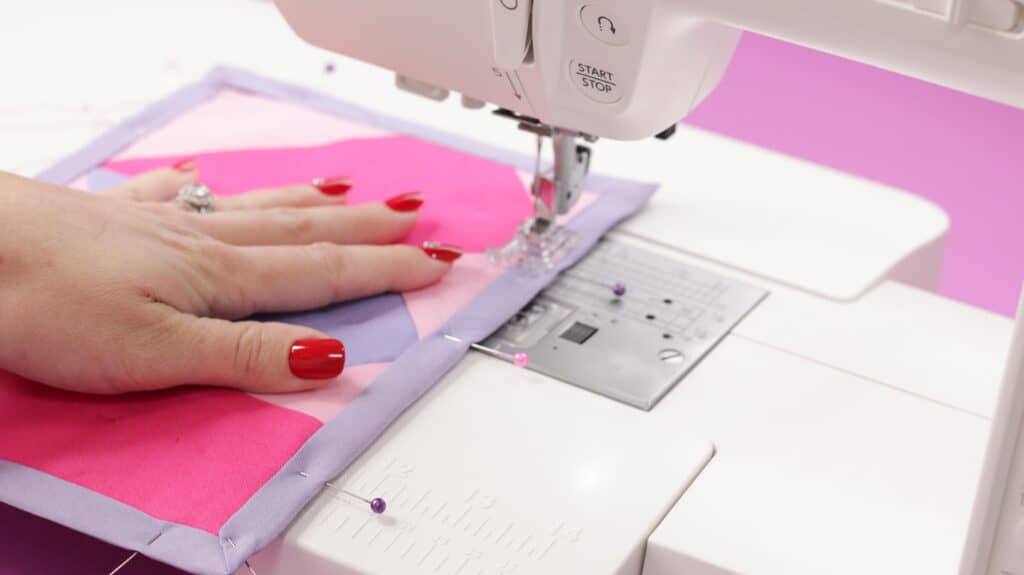
The next step is to sew the bias tape to the mug rug. To do this, sew along the innermost fold closest to the raw edge.
Stop sewing 1/4" from the corner and backstitch to secure your stitch. Lift the presser foot and needle and pivot the fabric.
Push the bias tape corner away from the area you are sewing and start sewing on the other edge 1/4" from the corner.
This will leave the very corner of the bias tape unsewn.
Now it’s time to flip the bias tape to the front of the mug rug.
Fold the outermost edge of the bias tape inward towards the mug rug.
Fold it over a second time sandwiching the mug rug's raw edge in between the bias tape.
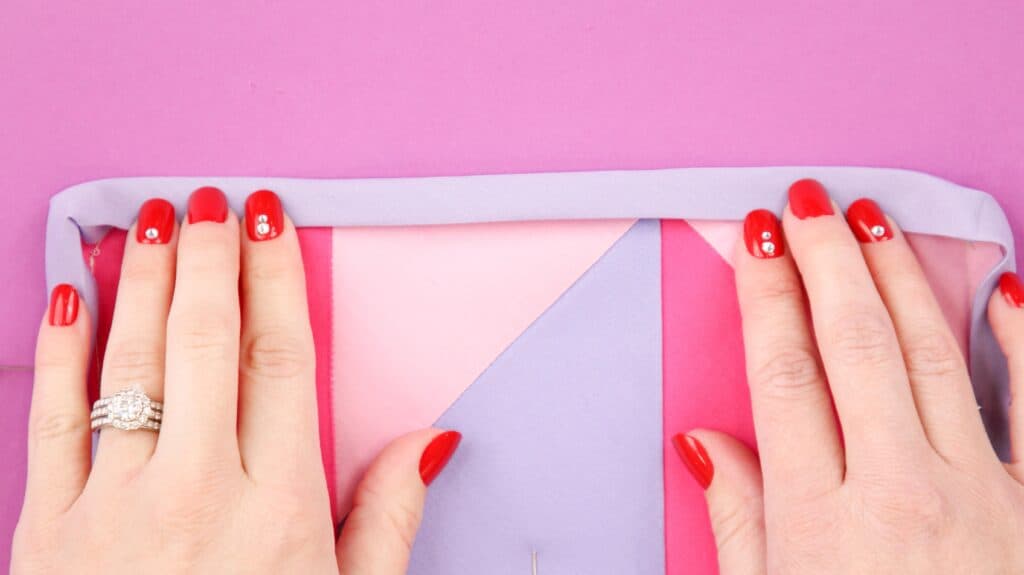
Prepare all of your corners for sewing by folding them into a mitered corner and pinning them in place.
Pin the bias tape to the mug rug making sure the folded edge of the bias tape slightly overlaps the stitching line.
Stitch 1/8" from the folded edge of the bias tape from the front of the mug rug to attach the bias tape.
As you approach a corner, put your needle in the down position, lift your presser foot, pivot the fabric, lower the presser foot and continue sewing. This technique will give you nice sharp corners.
Give your mug rug a good pressing and trim any remaining threads!
I hope you enjoyed this tutorial! If you make this project, be sure to share it with me!
Don’t want to forget about this pattern? Save this project for later! Click here to save this project on Pinterest.
Looking for more free sewing patterns? Check out this Easy Oven Mitt Pattern or this Mommy & Me Apron Pattern. You'll love this Easy Half Square Triangle Quilt.
Join my crafting and sewing Facebook group where you can show us what you’re making, ask questions, and learn from others!
Sounds nice.
I wish I could download it as a PDF...
You have brought up a very good points , thanks for the post.
I love this! Now I "need" one for St Patrick's Day!