Learn How to Use Offset in Cricut Design Space to Create a Shadow or Outline Around Your Image or Text to Make It Pop!
Cricut recently released a highly anticipated feature, Offset, and I’m here to teach you all about it!
How to Use Offset
What is Offset in Cricut Design Space?
The Offset tool in Cricut Design Space creates a larger or smaller layer of your design. It is perfect for adding a shadow around your image, making your text pop, or giving your design an outline. I love using the offset feature to create my own custom stickers, cake toppers, and t-shirts!
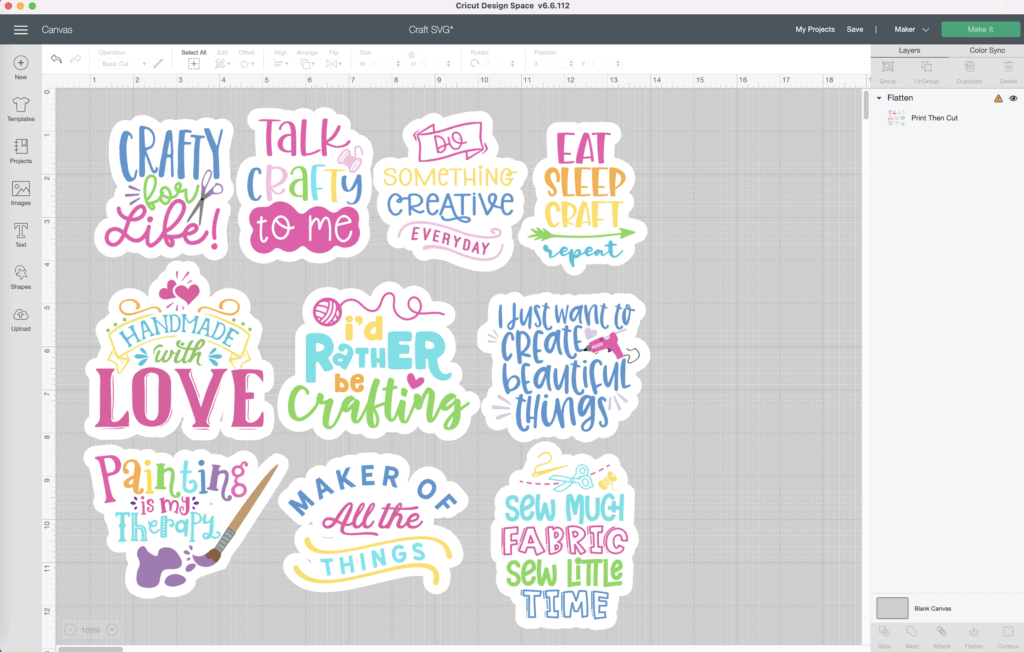
Offset creates multiple offset layers to make a bold design with added dimension!
Another common name for Offset is shadow since it creates a shadow (or outline) around your design.
The Offset feature can be applied to text or images.
To use the Offset feature in Cricut Design Space, be sure that you are running Window 10 (64-bit only) or higher, or macOS 10.15 or higher.
- To upgrade your Microsoft Windows read this article: https://www.microsoft.com/en-us/store/b/windows?activetab=tab:shopwindows10&rtc=1
- To upgrade macOS on Apple click here: https://support.apple.com/en-us/HT211683
Offset is only compatible with Design Space when used in the Desktop app.
DOWNLOAD 10 FREE SVG FILES TO USE WITH THIS TUTORIAL!
STEP 1: IMPORT IMAGE INTO DESIGN SPACE
Begin by inserting an image or a text into your Design Space Canvas. When using the offset feature you can select a single layer, multiple layers, or multiple objects.
STEP 2: SELECT OFFSET
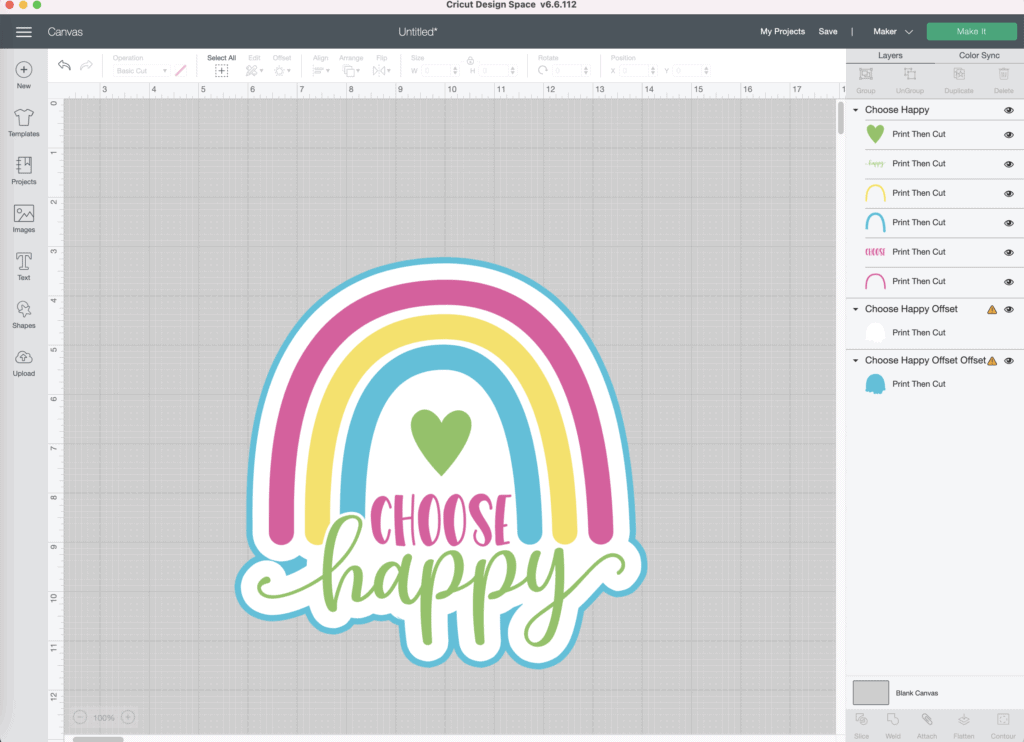
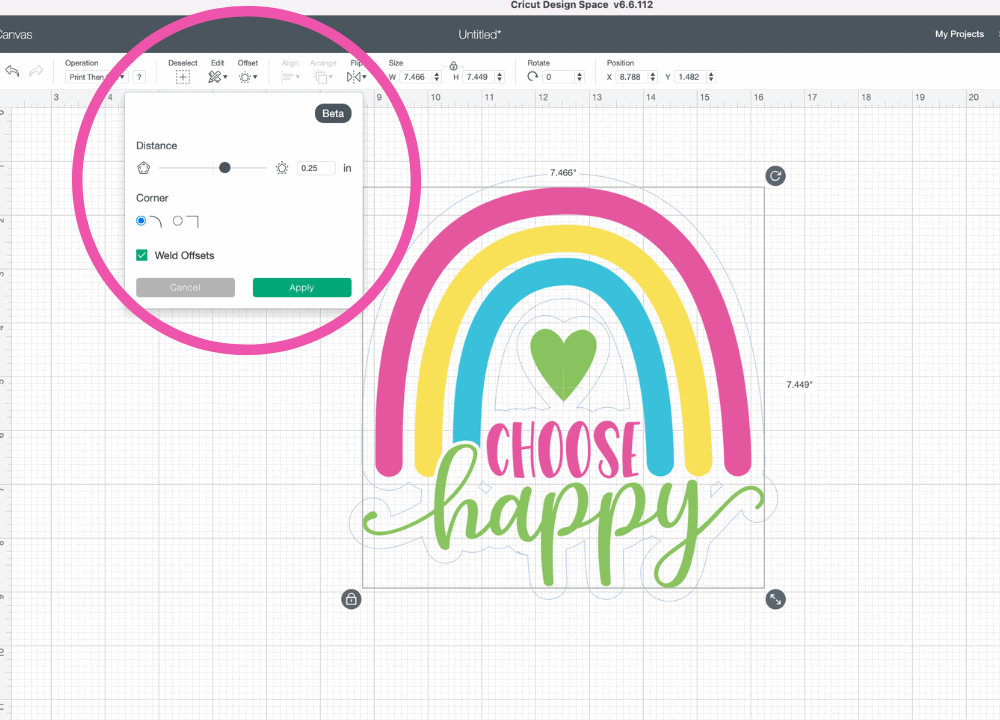
With the object(s) selected, click “Offset” at the top of the screen. This brings up a slider with multiple options to control the size of the offset as well as the option for a rounded or angular corner.
Slide the distance bar to adjust the size of your offset design. You can also adjust this by manually typing in your dimensions.
The light-colored line around the image gives you a preview of the offset design.
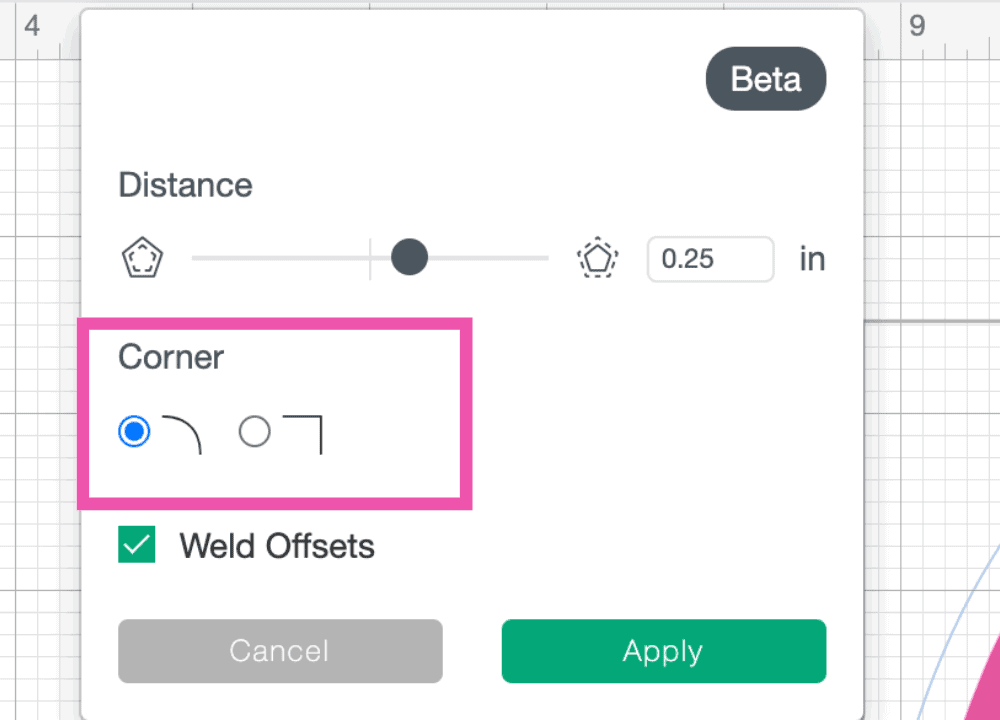
STEP 3. SELECT CORNER STYLE
Select either the rounded or angular corner style for your offset. I almost always use rounded corners, but feel free to choose whichever style you like best!
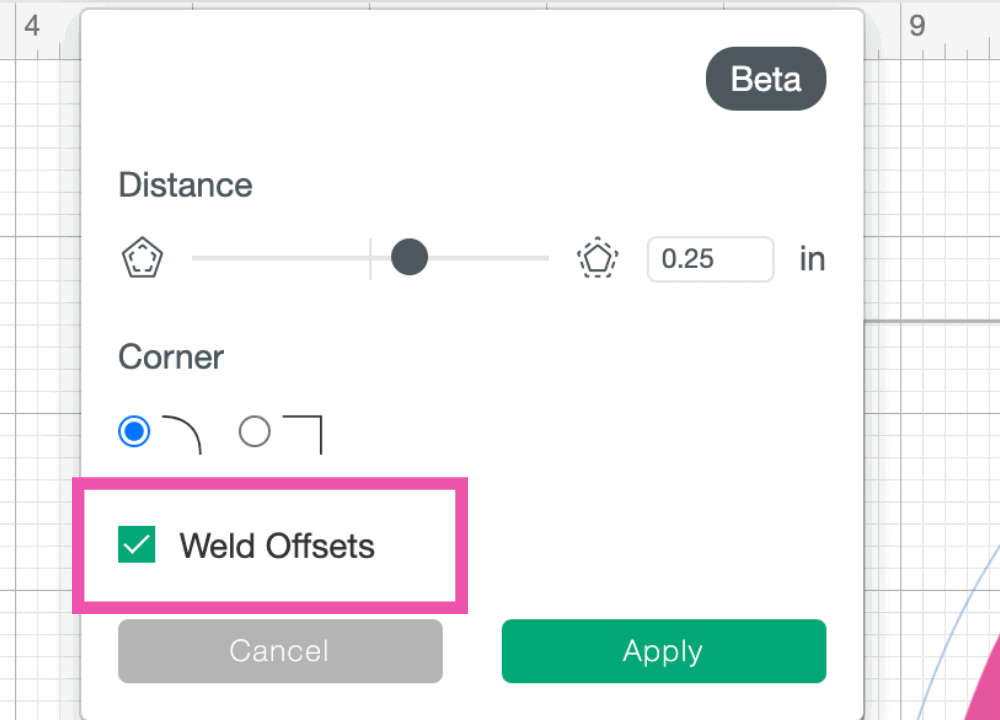
STEP 4: SELECT OR DESELECT WELD
Select or de-select “Weld Offsets.” Weld Offsets is automatically selected, enabling the offset images to be merged so they act as a single layer. If you would like to work with the layers separately de-select "Weld Offsets.”
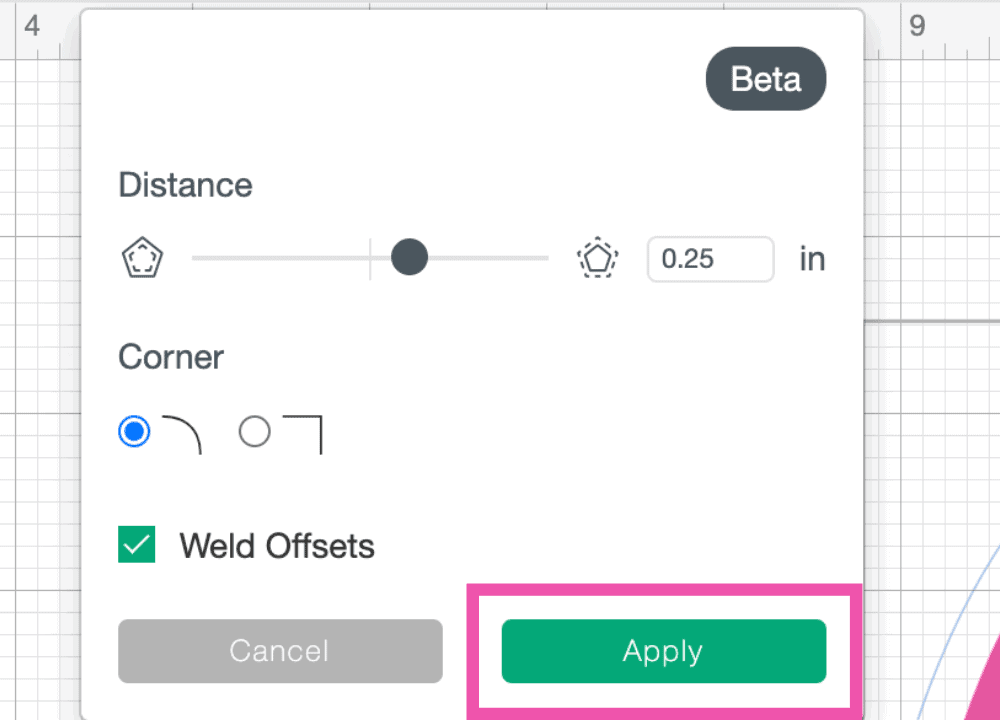
STEP 5. SELECT APPLY
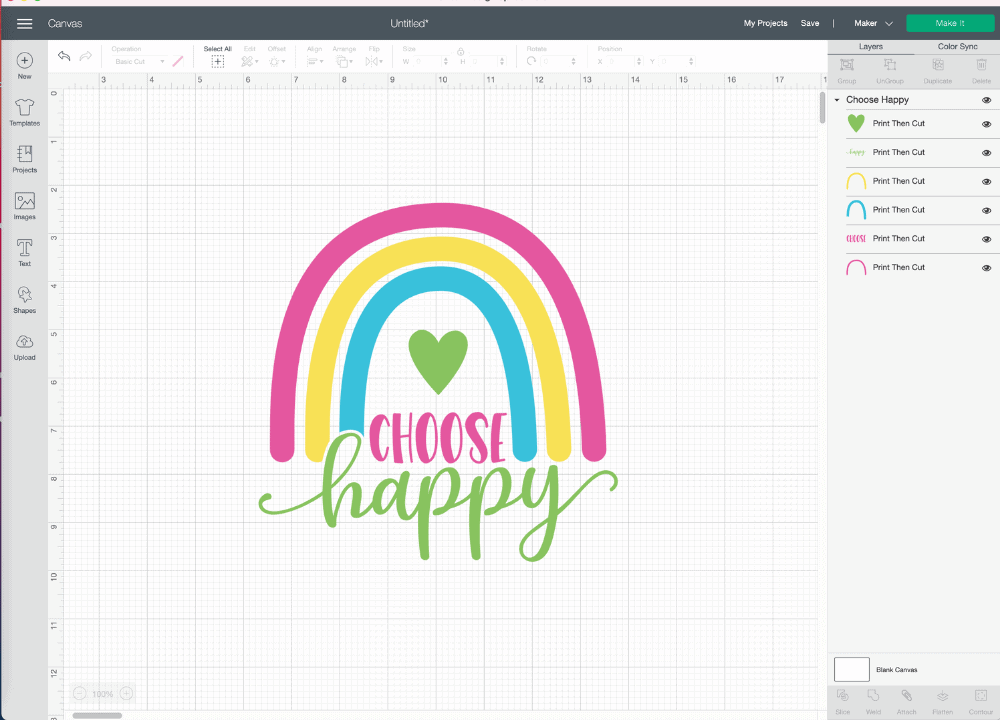
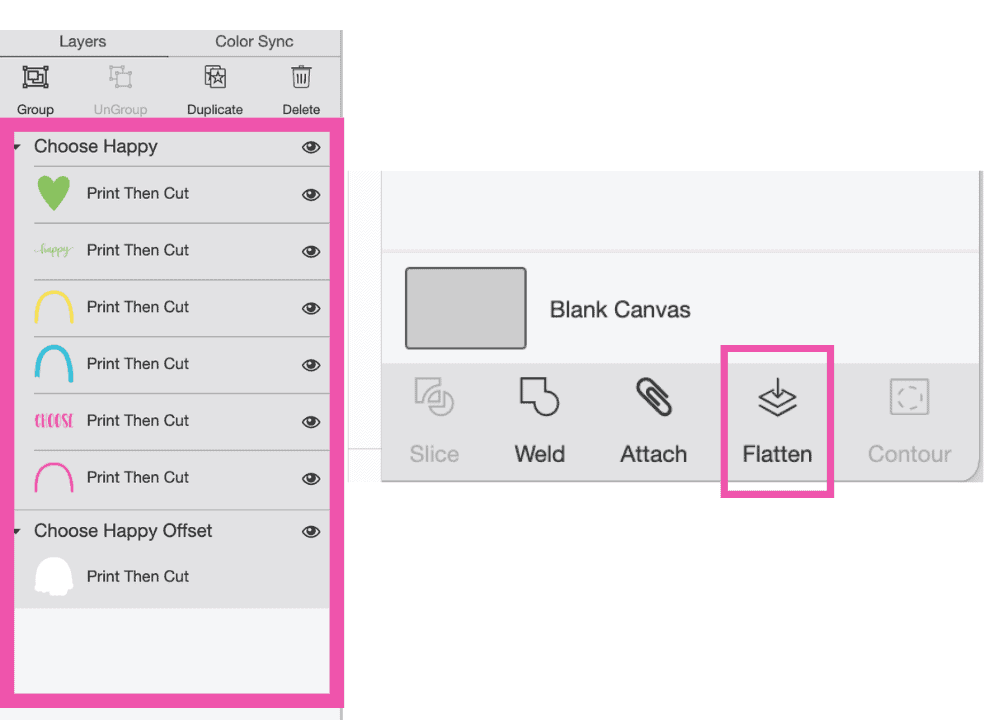
Select “Apply” to finalize your offset design. In the layers panel a new layer will appear.
STEP 6. CHANGE COLOR & CONTOUR
Select the offset layer to change the color of your offset. If you're wanting to remove negative space from your offset image, select the "Contour" button in the bottom right-hand corner.


Optional - Select your offset layer and select the offset button to create an additional border for an extra pop of color!
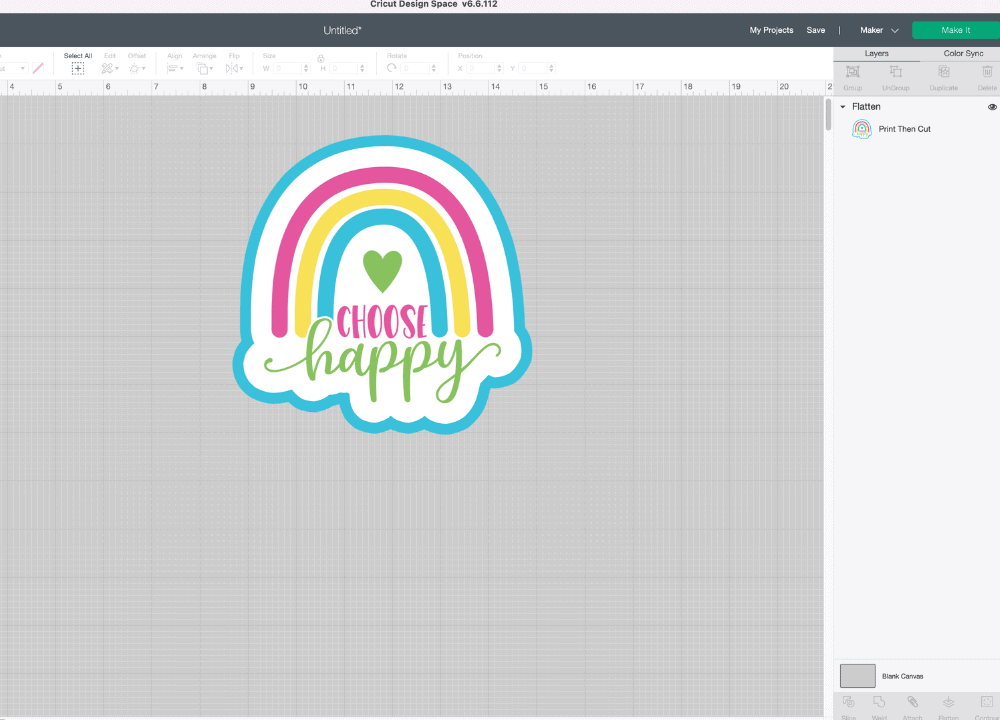
STEP 7. (OPTIONAL) FLATTEN FOR PRINT THEN CUT
To use as a Print Then Cut image, select all layers and hit "Flatten."

FREQUENTLY ASKED QUESTIONS - CRICUT OFFSET
WHY DO I NOT HAVE THE OFFSET TOOL?
To use the offset feature in Cricut Design Space be sure that you are running Window 10 (64-bit only) or higher, or macOS 10.15 or higher. Your Design Space app may also need to be updated.
HOW TO USE OFFSET WITH PRINT THEN CUT
The offset layer is not grouped automatically with the original layer. You need to flatten the object layer to the offset layer before printing it.
CAN I APPLY OFFSET TO MULTIPLE OBJECTS AT THE SAME TIME?
Yes! Offset can be applied to multiple objects at the same time. Simply select all of your objects and hit "Offset" to add an offset layer to all of the selected designs.
“Weld Offsets” is automatically selected as the default; de-select this to work with each offset individually.
DOES OFFSET WORK ON ALL IMAGES?
While you can technically use offset on all images, it works best when it’s used with an image with a closed path. That means it should be used on images with continuous lines instead of those with a clear starting or ending point.
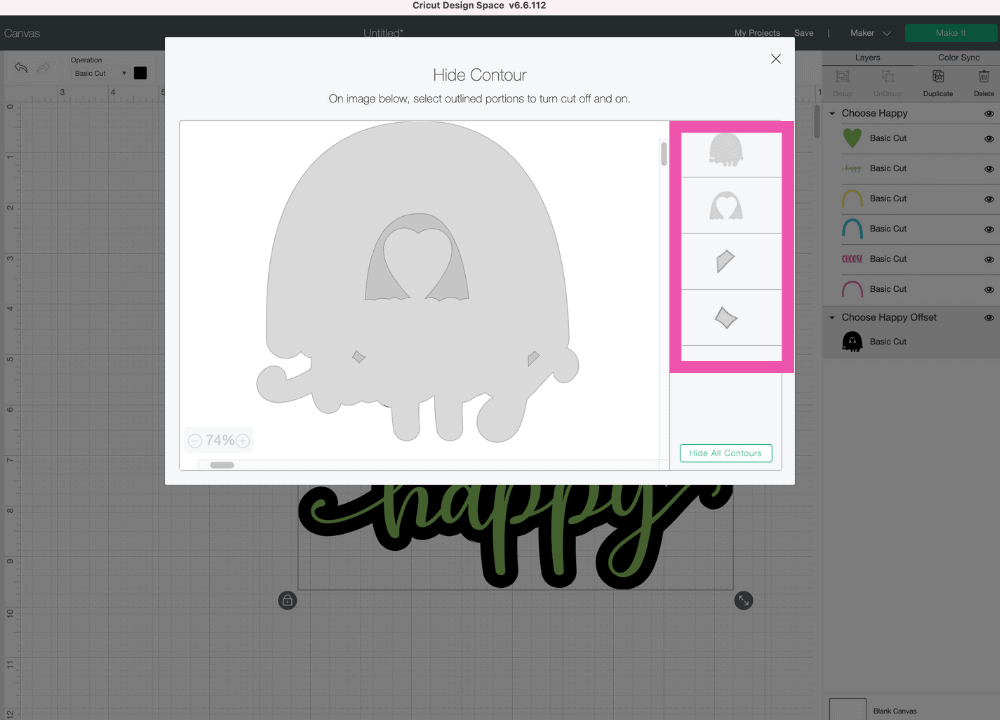
MY OFFSET LAYER HAS OPENINGS, HOW CAN I REMOVE THEM?
You can remove openings within the offset by using "Contour." The Contour tool is located in the layers panel. It enables you to remove parts of your design that you do not want to be cut out.
HOW CAN I CHANGE THE SIZE OF MY OFFSET?
Once you’ve created the offset you can not adjust the size of it. You will need to create a new offset with your desired size.
HOW LARGE OF AN OFFSET CAN I CREATE?
The maximum size of an offset from all edges of the design is 1 inch.
I can not wait to see what you create with the new Offset tool in Cricut Design Space!
Don’t forget to join my crafting Facebook group where you can show us what you’re making, ask questions, and learn from others!
Don't want to forget how to Offset in Cricut Design Space? Click here to save this post to Pinterest!
Do you have any other questions on how to use offset? Let me know in a comment below!
Thank soooo much for your excellent tutorial training for creating outlines!
I have the offset button, but it is not creating a shadow on design??? I have all requirements needed on pc and cricut??
I am having the same issue and have not found any info on why this is. I have all the requirement needed as well as having the offset button there but no shadow appears around the word. Something I did notice, everyone else has an option for the canvas style (new or classic) this option is not offered to me. So this might be why it does not work for me... Not sure. Hope you are able to find a solution this feature seems pretty neat to have.
Hi Gloria, dis you get this resolved ad I have the exact same issue?
Thanks Katherine
I found that when opening the off set box- I have to type the dimension number in, then Click somewhere else in the box, and then press apply. If I don’t click elsewhere in the box for some reason mine doesn’t save the dimension and it appears to have done nothing. Hope it’s a simple trick that helps!
How does this cut? I'm pretty new so I've only cut 1 color decals so far. Do you have a tutorial for that? Thank you in advance!
This is game changing for me. I used to have to trace and create a new layer around my designs with procreate on my iPad to create stickers. Love this update!
Thanks for the update! Looking forward to using it
Followed your steps to the dot, and I still can't get the contour button to work. It is greyed out. please help. Thanks
Help desk confirmed my system is adequate and cricut is updated and works, but the offset button doesn't do anything. It's there, just doesn't work.
Yes...greyed out for me as well...any solutions?
I use a laptop. Does the offset option work on that? I've updated everything and still can't get this option. It's frustrating. Please help
Do you have a print option for this?
Hi. I'm not sure how to word this so it makes sense. If I type something, like my name, and then I add an image, is there a way to offset both? I tried typing my name then adding a bee. I hit the offset but when it printed, the entire image/text was just black. I hope this makes sense.
is this an updated version or a pervious version?
I have the offset tool however it is not functioning the way described. It is not creating the shadow. Help!!
I have the same issue as other people. Offset button visible, but not creating a shadow. Pleeeease help. I'm going nutty!
When you get the offset done and go to cut will it automatically have you change colors and then how do you put them together. Very new to this
Hello!
I am new to using Cricut Design Space. I currently use it on my ipad. When I attach my images that have offsets, for some reason the offset color changes from white (preferred) to mirroring the colors that are on my image.
For example: If I try to create a white offset around clipart of a blue fish, I flatten both layers and it looks fine until I try and print. Once I print the white offset changes to the color of the blue fish instead of white. I made sure the offset was set to basic cut and not print then cut, but this still happens. Any idea as to why this might be?
I cant seem to find any tutorials or help topics on this.
Best!
Is there any way to make a clear offset to use with the clear sticker paper? I've tried to change the color as light as I can, but would like for the offset to be clear. I don't think you can, but thought you might have an idea.