Learn how to make a magnetic photo frame for any occasion with this step-by-step tutorial and download the FREE Father's Day SVG Files.
Personalized photo frames are a great way to showcase your favorite memories with loved ones. For Father's Day, I created a magnetic photo frame that can be displayed on a fridge or whiteboard. The best part? I’m sharing these free photo frames and Father’s Day files with you so you can make one yourself!
What I love most about this project is personalizing the photo frames with the recipient's name, favorite colors, sports, hobbies, and more! It can be decorated for any holiday, occasion, or event such as Valentine’s Day, Father's Day or even birthdays.
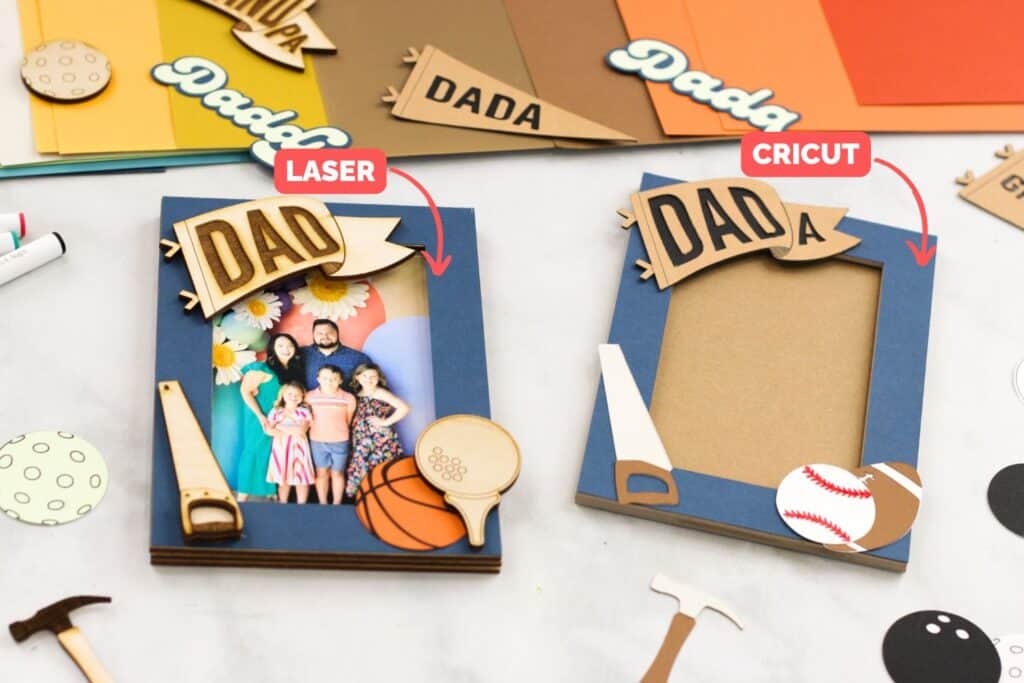
In this blog post, I’ll share what’s included in the Father’s Day Photo Frame bundle, its compatibility with laser or cutting machines, and share step-by-step instructions for assembly using a Glowforge and Cricut machine.
Customize for Any Holiday
You can easily modify this project to customize it for any holiday! I've included blank banners in case you want to change the words. You can cut the pieces out of different material colors to match the theme (green and red for Christmas), or customize the blank banners to say phrases like "Happy Holidays", "Be Mine", "Happy Birthday", or "Happy New Year!"
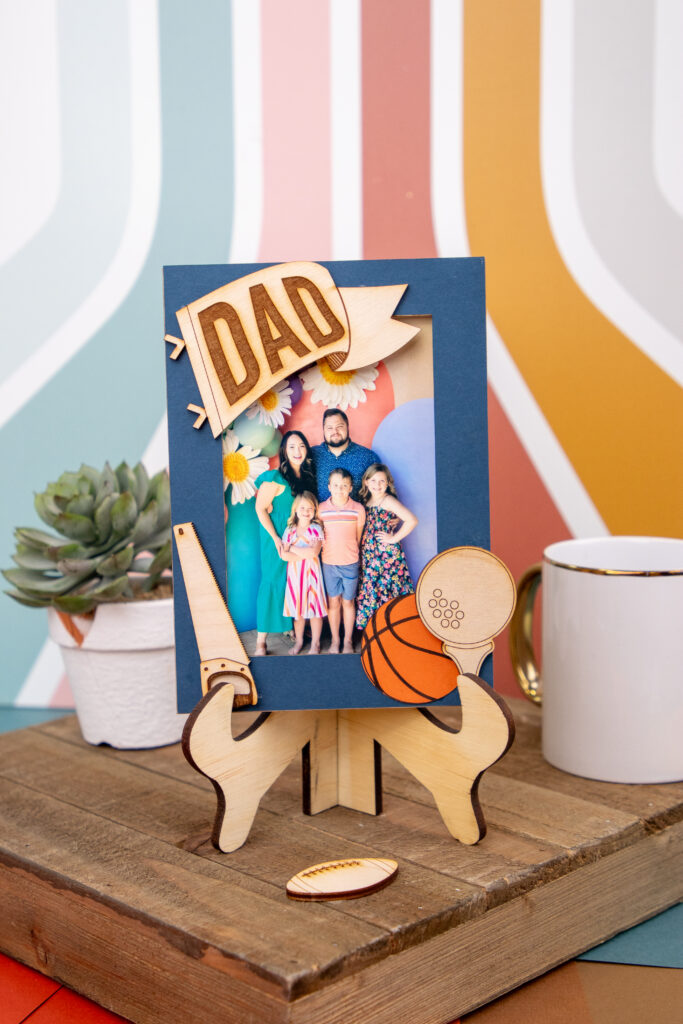
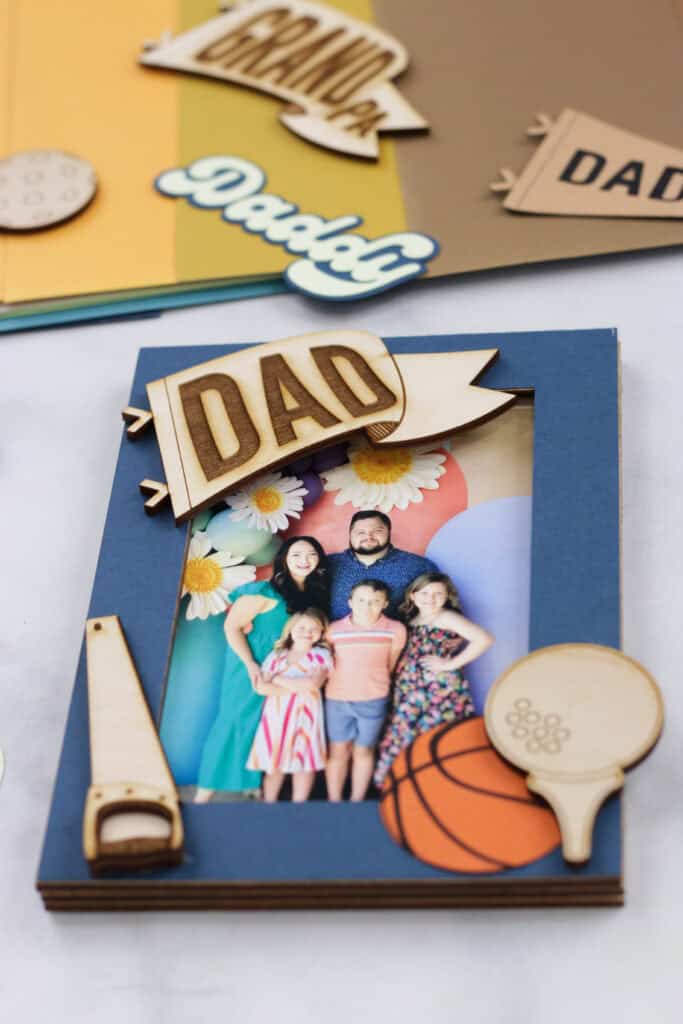
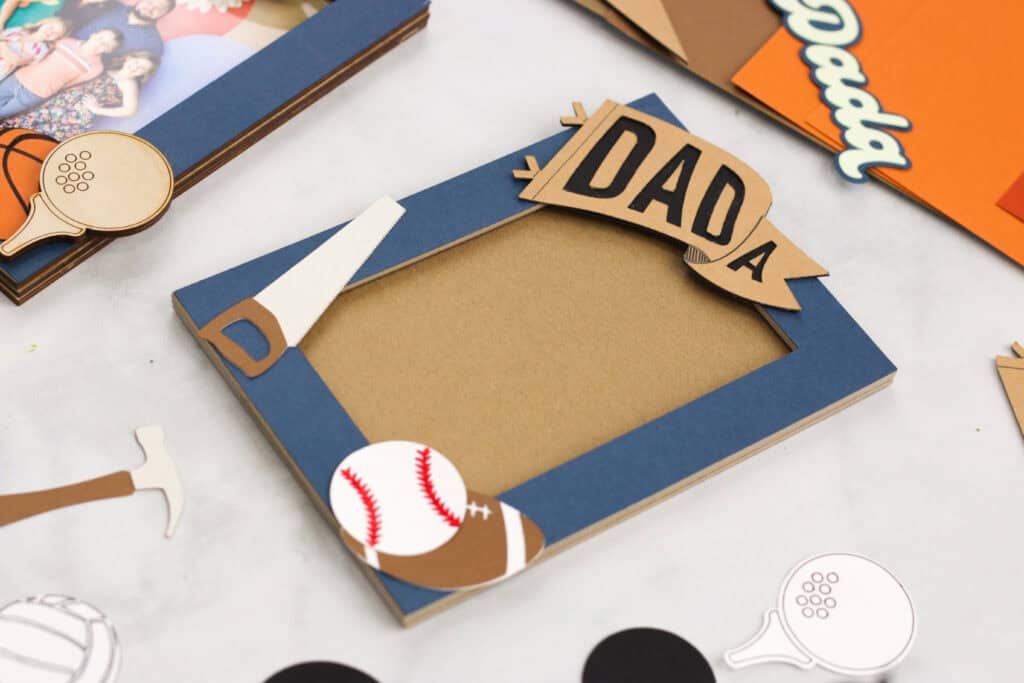
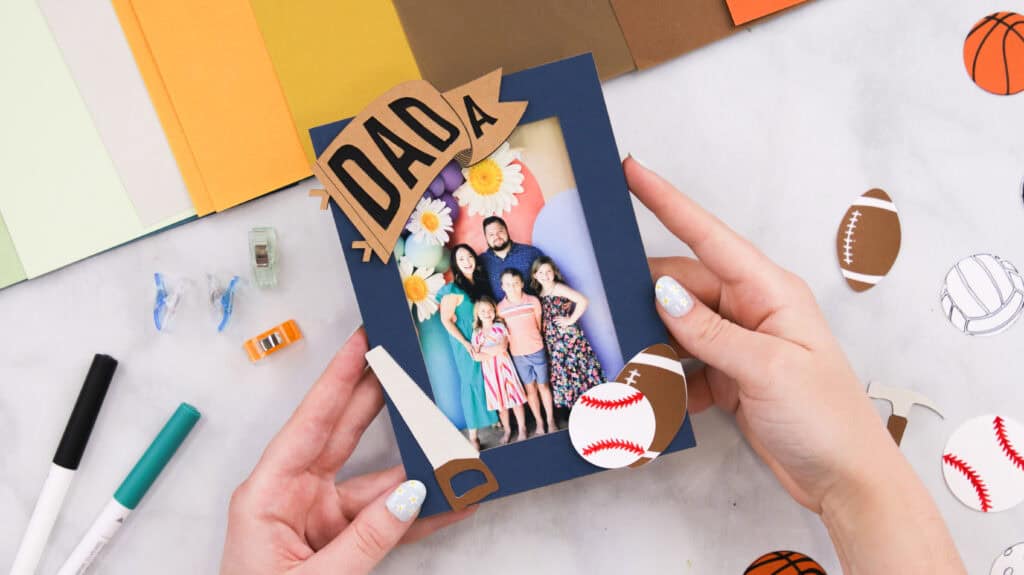
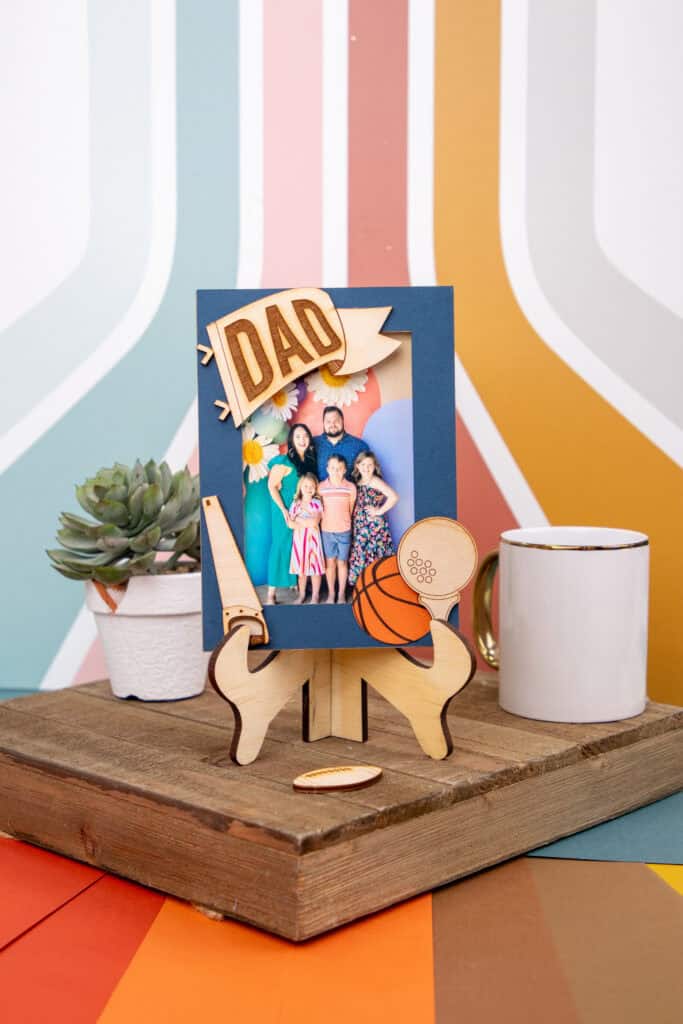
For my frame, I decorated it with a banner and a couple of sports balls for Father's Day. Isn't it cute?!
Inspiration
If you do a quick search on Pinterest, you'll find all kinds of DIY photo frame ideas for inspiration. Many people are creating mixed-media frames with bold and bright colors to add to their home decor. You can use this file as a base and add whatever material, pattern, or accessories you want layered on top!
I was inspired by the retro color scheme of my cardstock paper. To match that theme, I chose a sporty retro font and designed vintage banners that I think make a great Father's Day project.
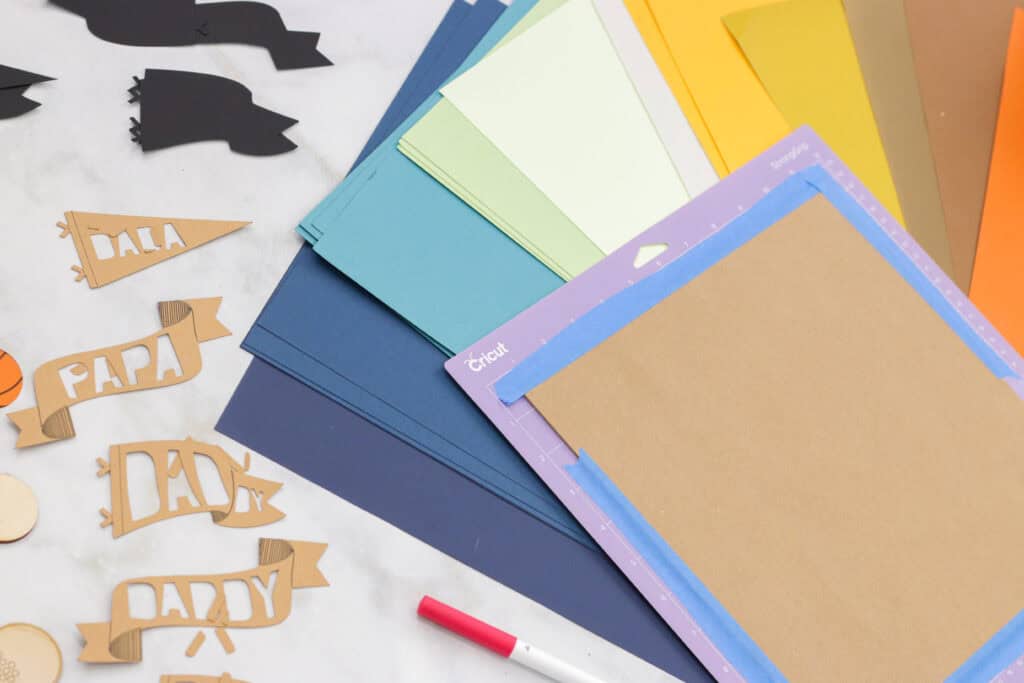
Table of Contents
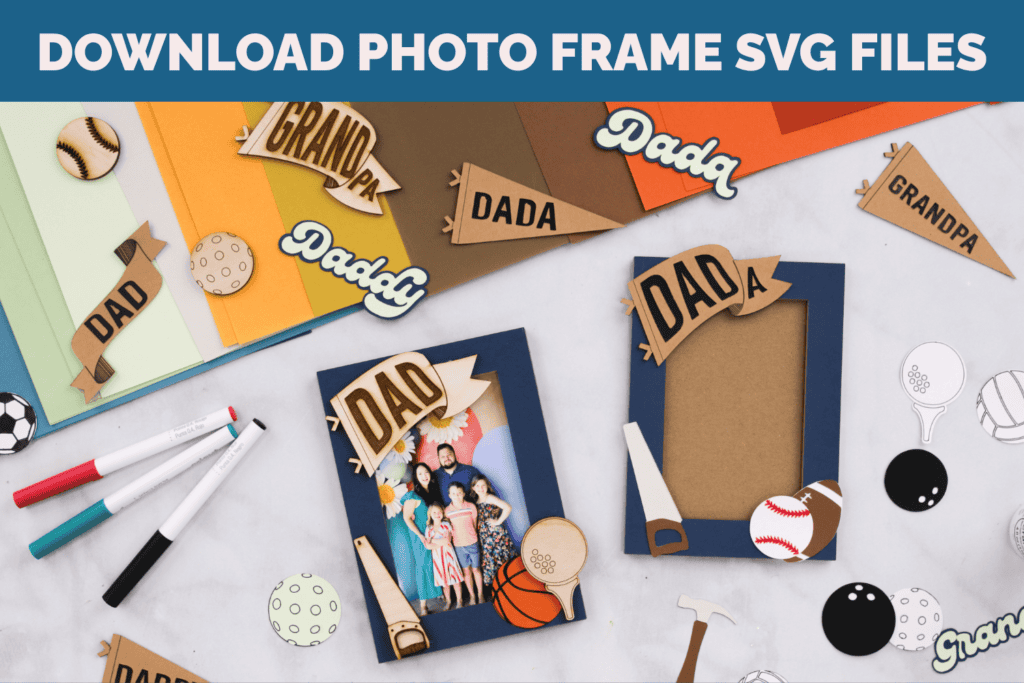
What’s Included in the Father’s Day Photo Frame Bundle?
You can download the Father’s Day Photo Frame bundle below which includes:
- Vector Files for Cricut and Laser Cutting Machines
- A Photo Frame that fits a 4 x 6-inch photo
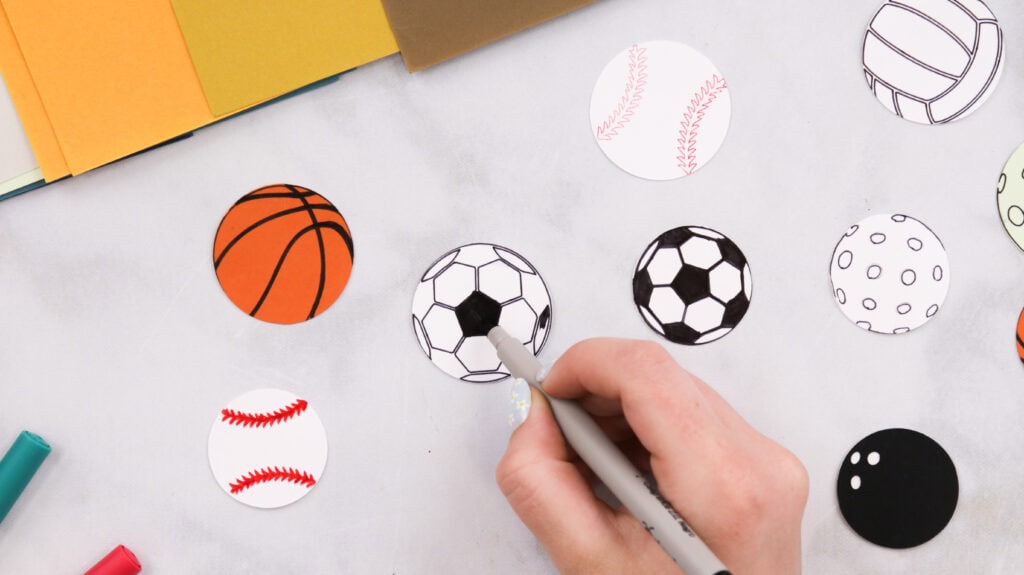
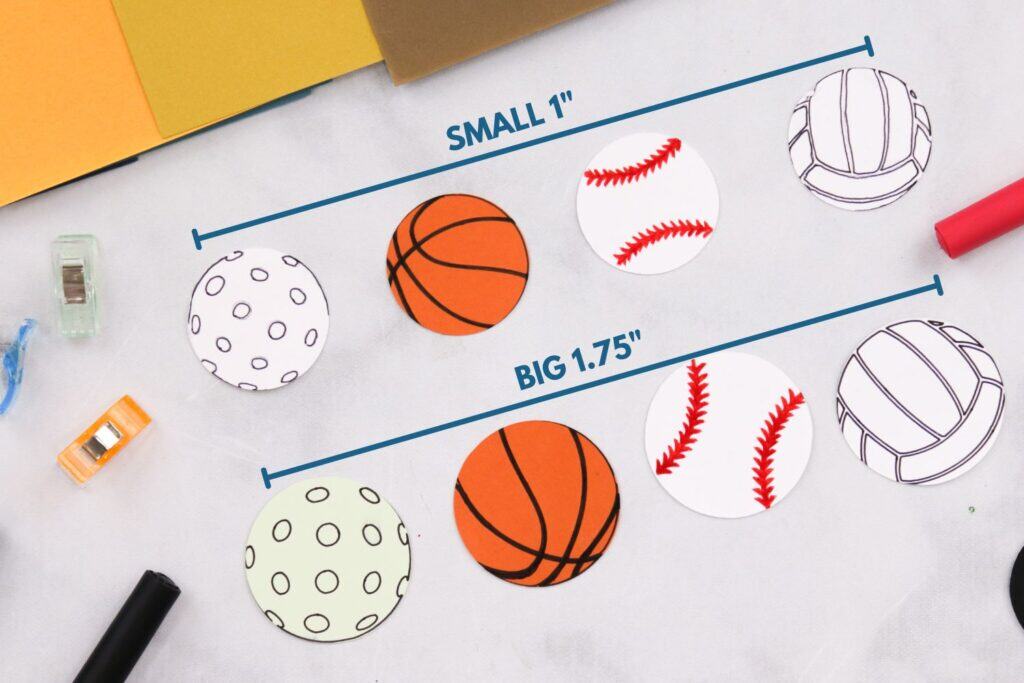
- Eight Sports Balls- soccer, baseball, golfball, pickleball, bowling ball, basketball, volleyball, and football.
- Two Tools- Saw and Hammer
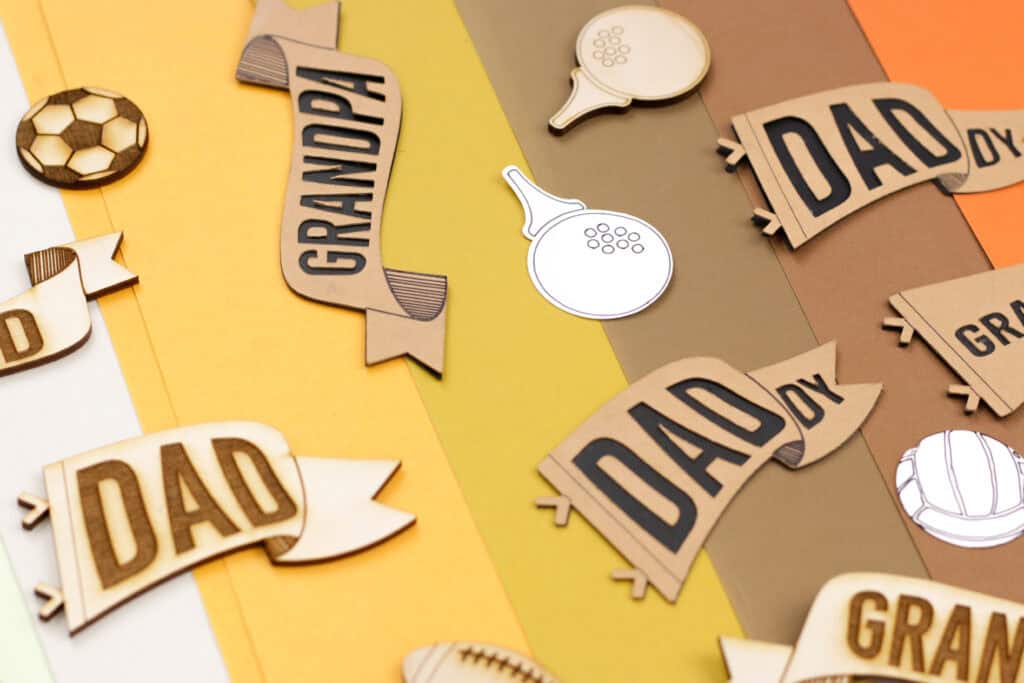
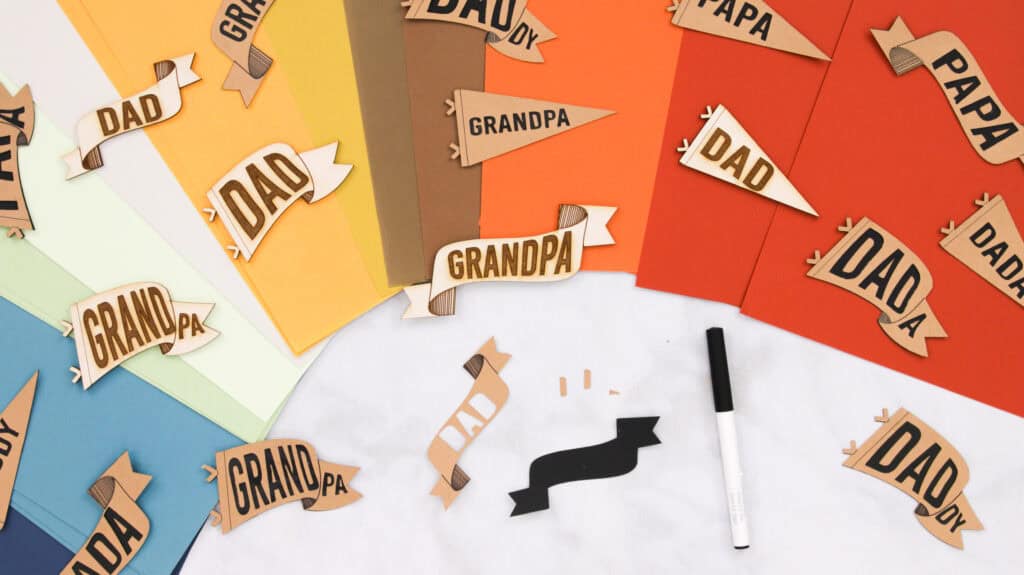
- 18 Banners- 3 styles of banners that include names: Dad, Dada, Daddy, Papa, or Grandpa
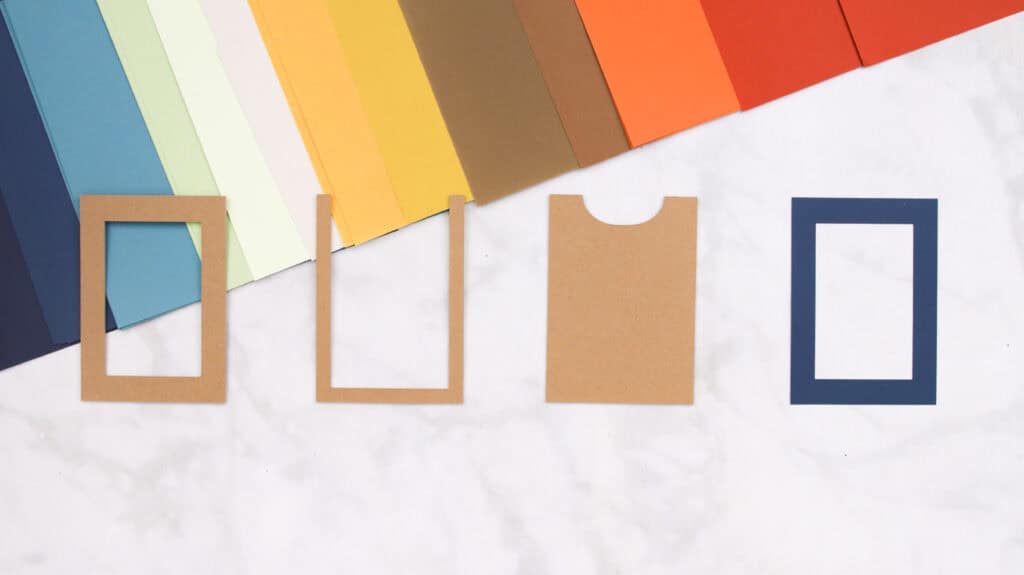
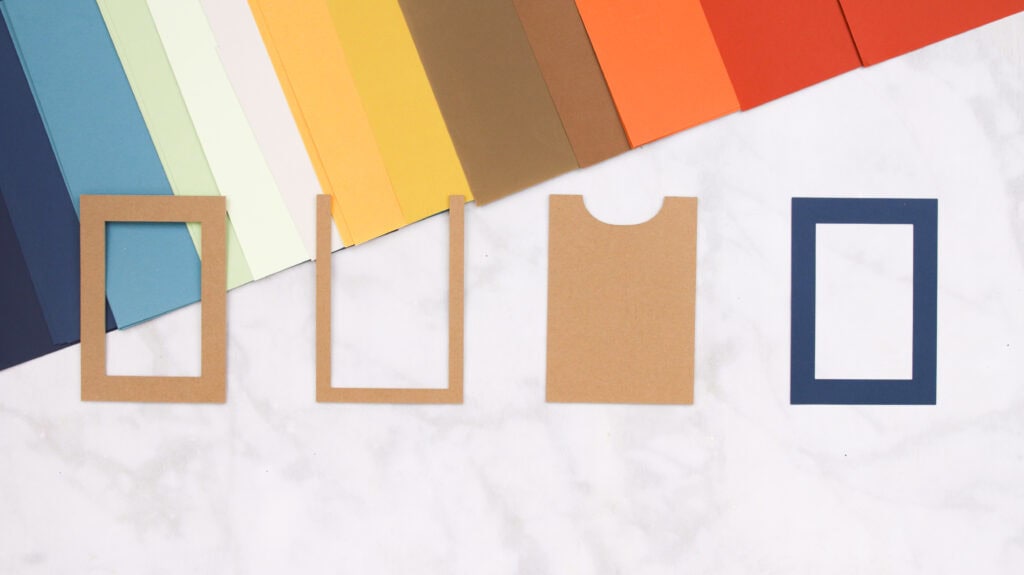
Photo Frame Layers
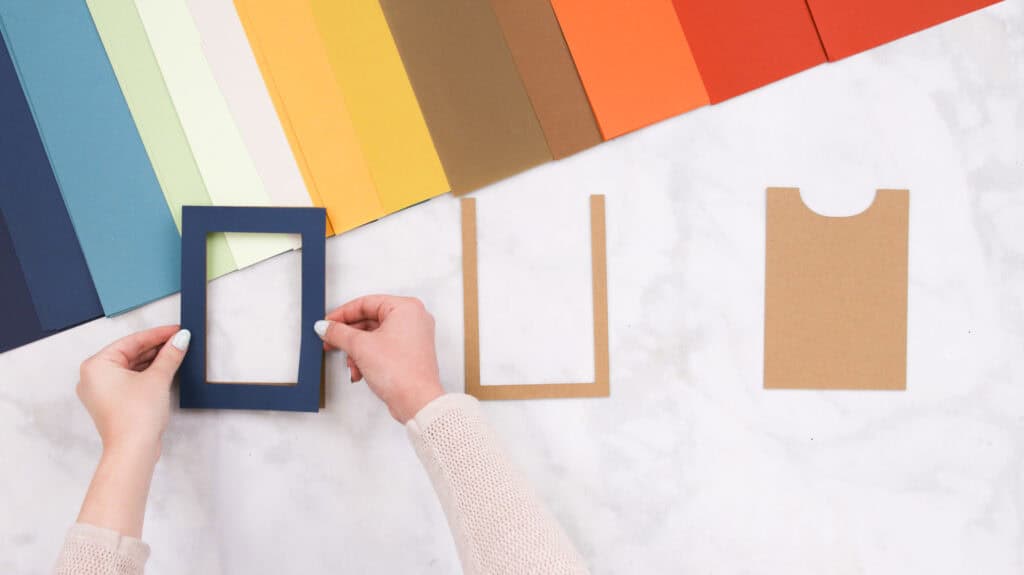
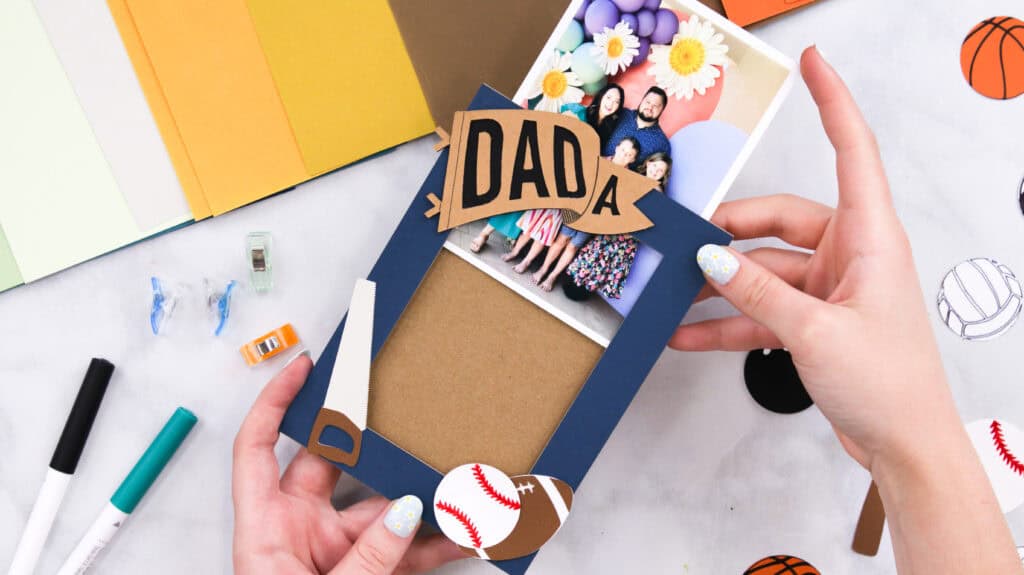
The photo frame measures 5 inches by 7 inches and consists of three layers: a front frame layer, a middle layer that holds the photo in place, and a back layer. The middle layer only has sides and a bottom, creating a gap between the bottom and top layers so the photo can easily be inserted.
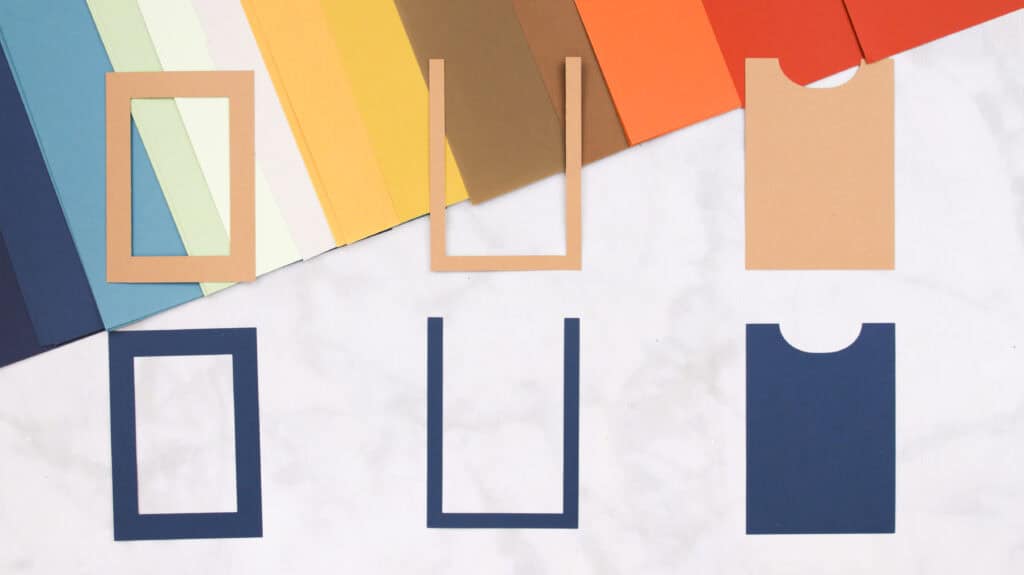
Banners
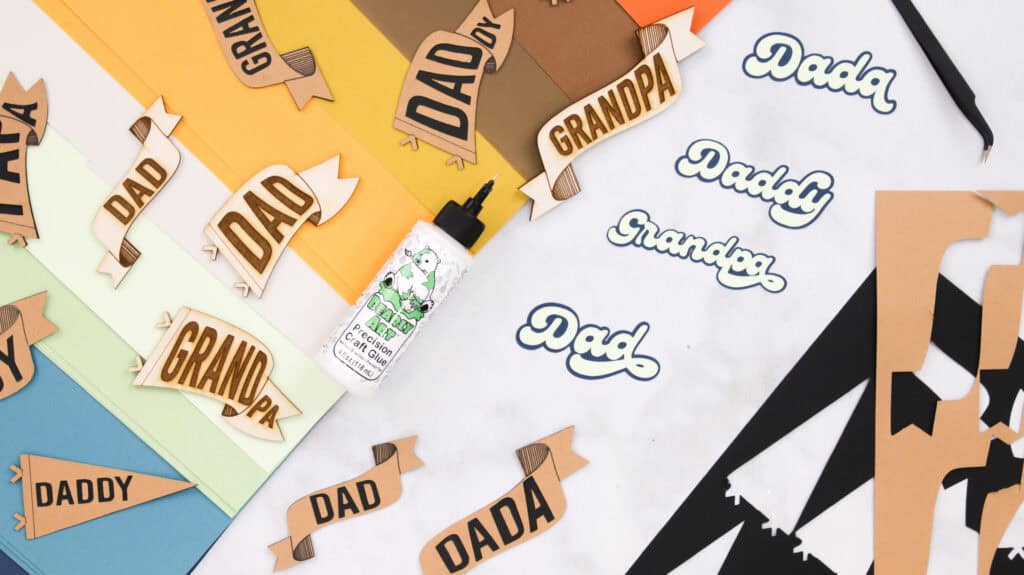
There are 3 banner styles that measure 4-5 inches in width: a ribbon banner, a curved flag, and a pennant.
Each style of banner includes names Dad, Dada, Daddy, Papa, or Grandpa. If you would like to customize a banner with a different name, blank banners are included in the bundle.
Sports Balls
The sports balls come in two sizes: small and large. The small measures 1-inch and the large ones measure 1.75-inches. If you plan on cutting out multiple balls, select one of each size so they can stack on top of each other for a layered look.
What Softwares Are the Files Compatible with?
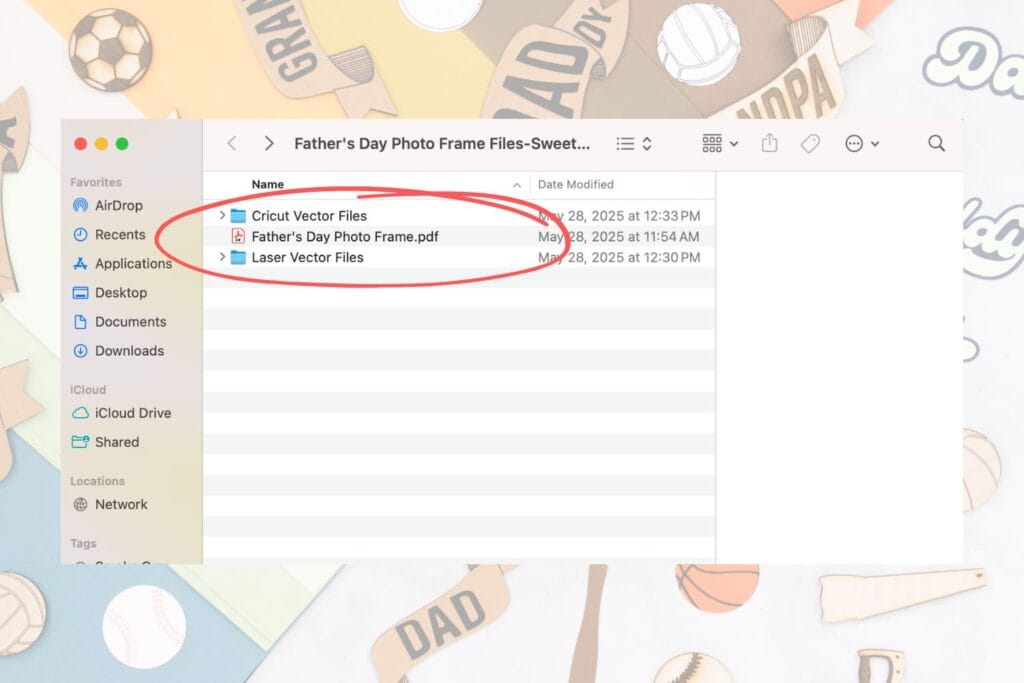
The files are compatible with Cricut, Silhouette, and laser-cutting machines such as Glowforge and Aeon. Inside the Father’s Day Photo Frame Folder, there are 2 subfolders: the Cricut Vector Files Folder and the Laser Vector Files Folder.
If you're using a Cricut or silhouette machine, select the files from the Cricut folder; If cutting with a laser cutting machine, choose the files from the Laser folder.
If you don’t have an automatic cutting machine or prefer to cut by hand, you can print out the Father’s Day Photo Frame PDF. The sports balls aren’t included, but you can find images online or in Cricut Design Space, cut them out, and attach them to the frame as you like.
Recommended Materials
Recommended Materials for Automatic Cutting Machines (Cricut or Silhouette)
When cutting the photo frame out with a Cricut machine or other cutting machine, I recommend a heavier material such as Kraft cardstock or Chipboard. These materials will provide a sturdier base and more space to insert your photo into your frame.
You can layer a 65 lb piece of cardstock on top of the craft paper to add some color, or apply acrylic paint, or use Posca Paint Markers to create some doodles and patterns.
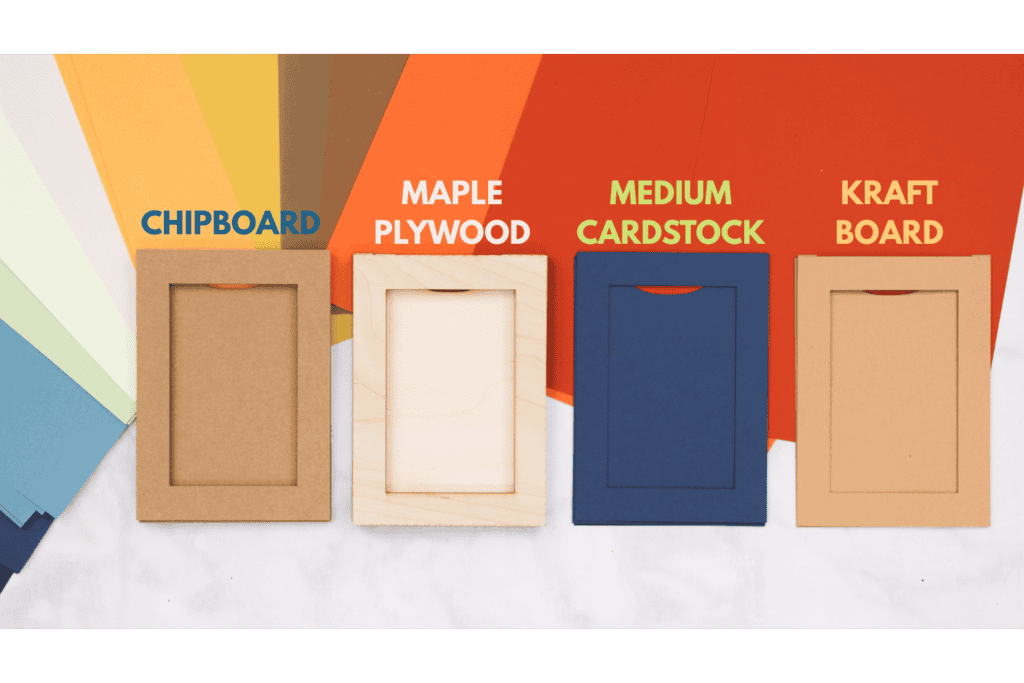
Recommended Materials for Laser Cutting (Glowforge, Aeon, Etc.)
If you're cutting this project out using a laser cutter, I recommend cutting the designs out from Maple Plywood or Baltic Birch. I cut mine out of 1/8-inch Light Maple Plywood using my Glowforge Pro. But keep in mind that this project can be cut using any Glowforge machine. This would also look great cut out of acrylic material!
Material settings I used on my Glowforge Pro:
Cut Settings:
- Speed: 251
- Full Power
- Passes: 1
Engrave Settings:
- Speed: 950
- Power: 80
- LPI: 270
- Passes: 1
Score Settings:
- Speed: 415
- Power: 51
- Passes: 1
Supplies Needed
Cricut
- Automatic Cutting Machine
- Fine-Point Blade
- (Optional) Cricut Knife Blade- if cutting Chipboard
- 12 x 24-inch Standard Grip Mat
- Strong Grip Mat- If using Chipboard
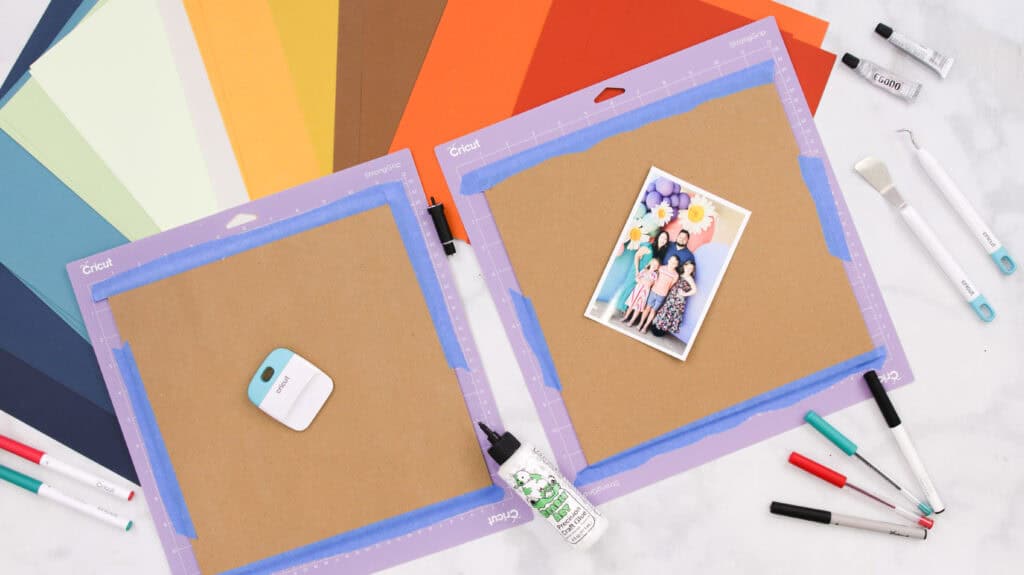
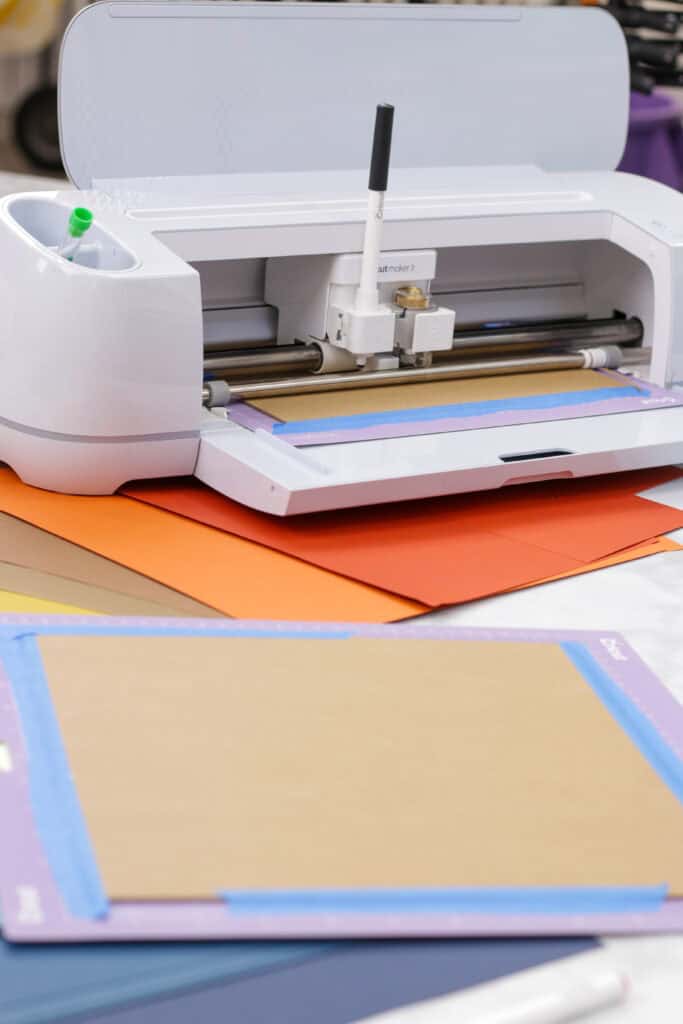
- Light Cardstock in a variety of colors
- 2 Sheets of 12 x 12-inch Kraft Board or Cricut Chipboard- for photo frame layers
- Bearly Arts Glue
- Cricut Fine-Point Black and Red Pens
- 4-inch x 6-inch Photo
- Weeder Tool
- Tweezers
- Scraper Tool
Laser
- Laser Cutter
- 3 12 x 24-inch Sheets of 1/8-inch Light Maple Plywood or Birch
- E6000 or Gorilla Wood Glue
- 4-inch x 6-inch Photo
Step 1: Download the Father’s Day Photo Frame Bundle Here!
Step 2: Upload Files
Uploading Files to Cricut
Open up Cricut Design Space, click “New Project”, and select “Blank Canvas.” Click Upload in the side panel, “Upload Image,” and select a file you want to upload. Repeat this process until you have all the files you want to cut.
Once everything has been uploaded, select the recent uploads and click “Add to Canvas” in the bottom right-hand corner of the upload screen.

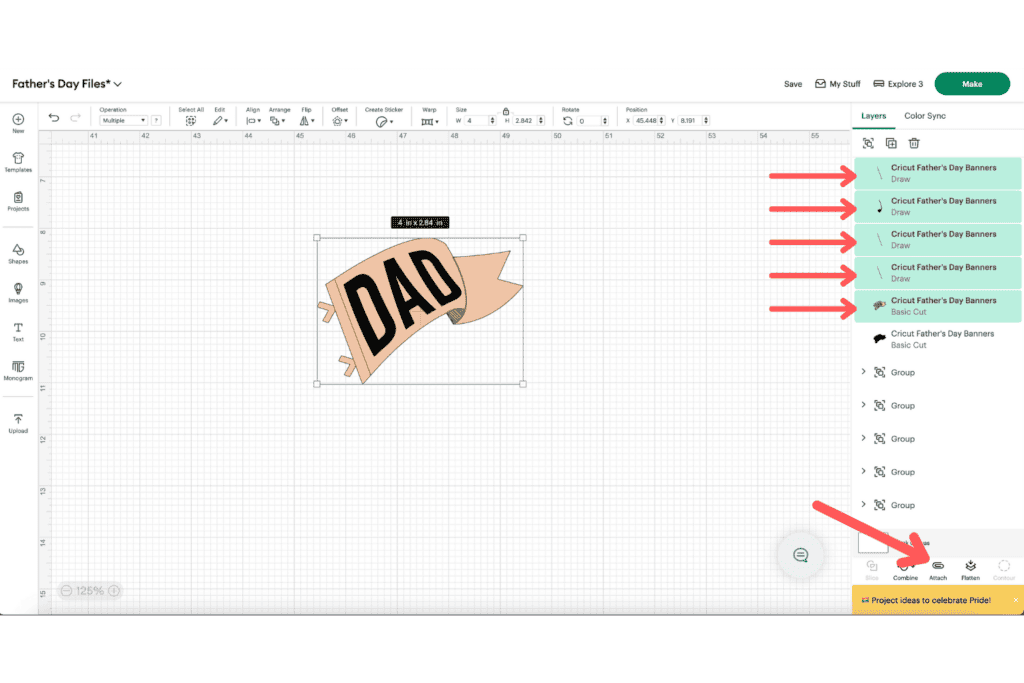
Ungroup Designs
On your canvas, ungroup everything by selecting the designs, and click “Ungroup” in the layers panel.

The photo frame design layers are ready to be cut. But the sports balls and banners need to be prepared to be cut.
Select the sports balls you don’t want to cut and delete them by pressing delete on your keyboard or by clicking on the trash can above the layers in the layers panel.
Change Operation to Pen
The sports balls have two layers: a top layer and a bottom layer. I’m going to select the top layer of each ball and change the operation from “Basic Cut” to “Pen” in the dropdown menu above the canvas.
Next to the operation, I’m going to click on the square and change the pen to "F-Fine Point (0.4mm)" and pick the color black.
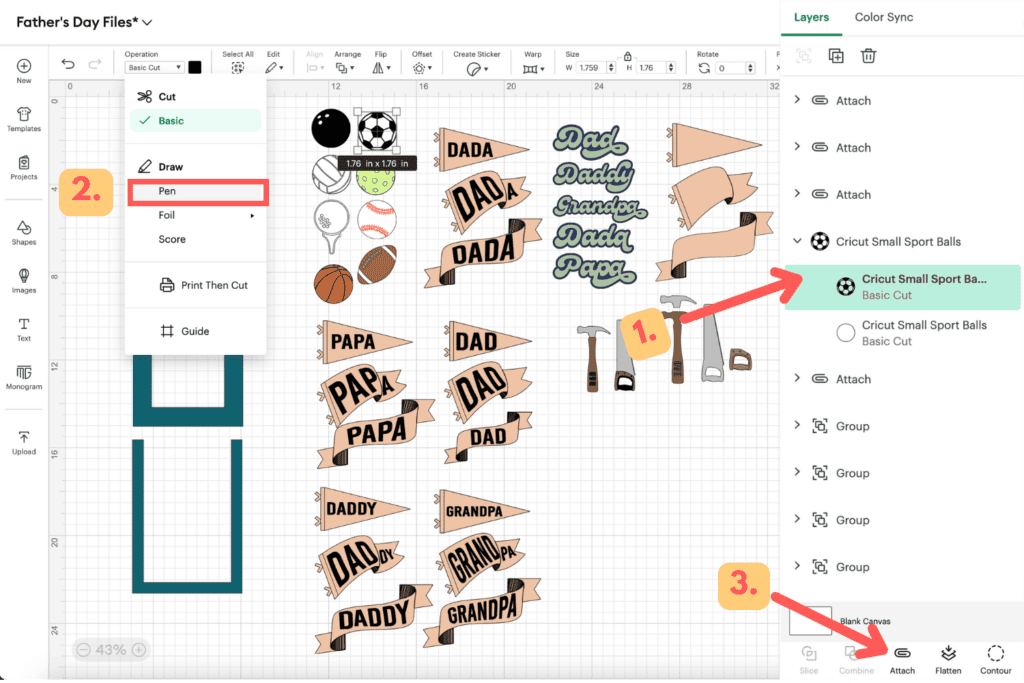
Now, it’s time to attach the top layers to the bottom layers. Select both layers and at the bottom of the layers panel, click “Attach.”
You can also click and drag across both layers and then click "Attach."
The sports balls are ready to be cut! T
he banners consist of two layers: a front with the name cutout and a backing. The banners also have layers that need to be changed from Basic Cut to Pen.
Similar to how we prepared the sports balls, ungroup the banner designs, and select the layers that are made up of just lines. Change their operations to Pen. Attach these layers to the banner piece with cutouts and leave the black bottom layer alone.
Do this to the rest of your banners if you plan on cutting out more than one.
Your designs are ready to be cut! Select "Make" in the top-right corner, connect your machine, select your material, and follow the prompts. Skip down to step 3 to learn how to cut out the photo frame pieces from chipboard.
About Laser Files
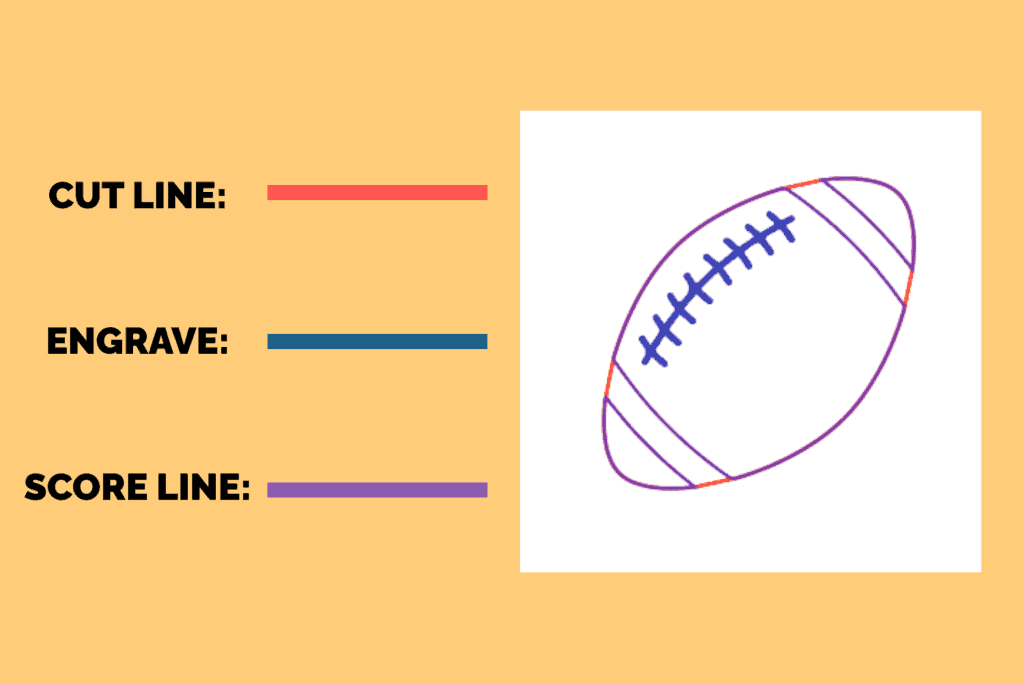
Before uploading the files to your laser software, let's go over what to engrave, cut, and score.
Taking a look at the file, the red outlines indicate cut lines, the blue strokes are for engraving, and the magenta lines are score lines.
Uploading Files to Glowforge
Sign in to your Glowforge account here. In the top left corner of the screen, select "Create a New Design" and "Upload a File."
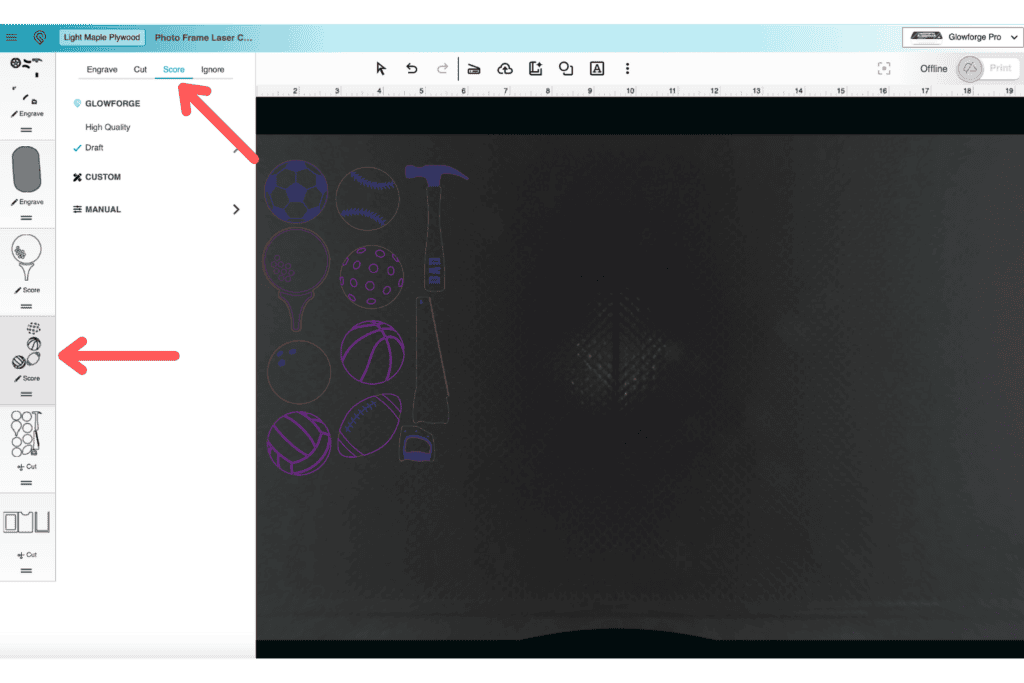
Once the file has been uploaded, select your material, and set the bases to "Cut." For banners or sports balls, the engravings are blue. Be sure to change the score lines from "Cut" to "Score" for the pickleball, golf ball, basketball, volleyball, and football.
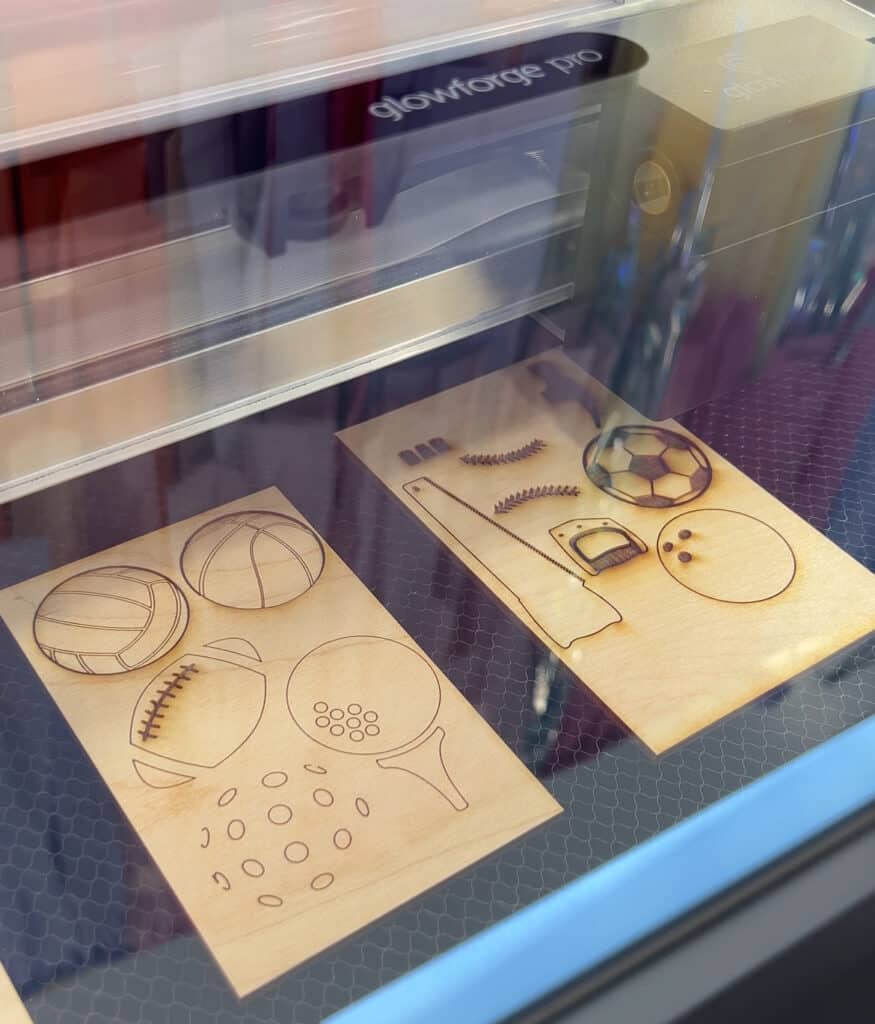
Load your material into your machine and click "Print" in the top-right corner. My Glowforge Pro cut all the photo frame pieces within 20 minutes.

Step 3: Cut Photo Frame Pieces
If you are cutting out the photo frame from the Chipboard using your Cricut machine, place the chipboard onto a Strong Grip Mat and tape it into place with masking tape.

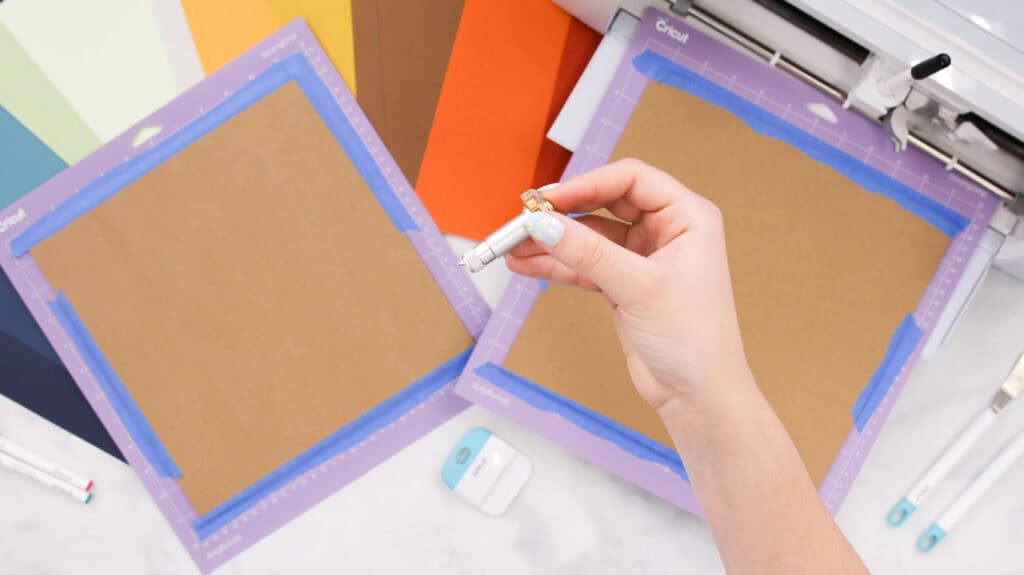
Then, replace the fine-point blade with a Knife Blade. You may need to perform a knife-blade calibration on your Cricut machine before cutting. Afterward, load the material into your machine, and start cutting!
Pro Tip: It can take about 10 minutes to cut the chipboard because the Cricut does 17-20 passes to cut through the thick material. To help pass the time, I recommend cutting out the banners and sports balls first so you have something to assemble while the machine cuts the chipboard.
Step 4: Assemble Photo Frame Pieces
Finally, it's time to assemble the frame!
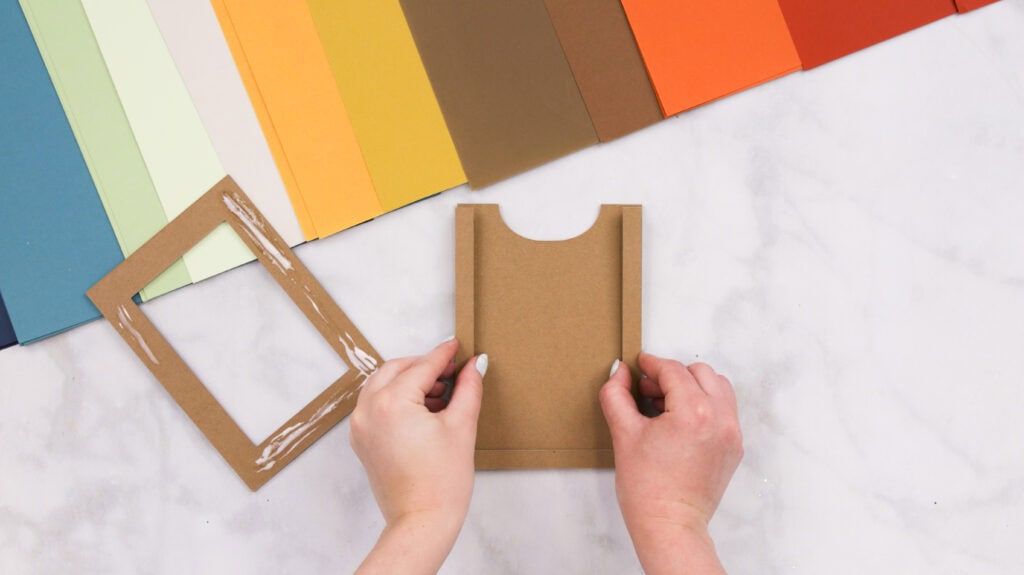
Starting with the frame, grab the top, middle, and bottom layer. Optional, but I cut out an extra frame piece to glue on top of the chipboard pieces to add some color.
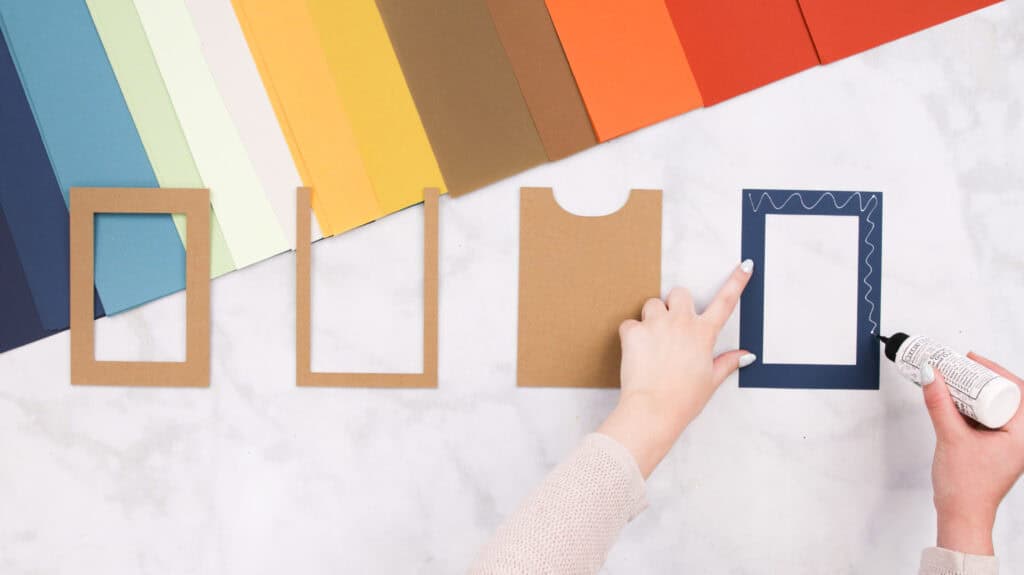
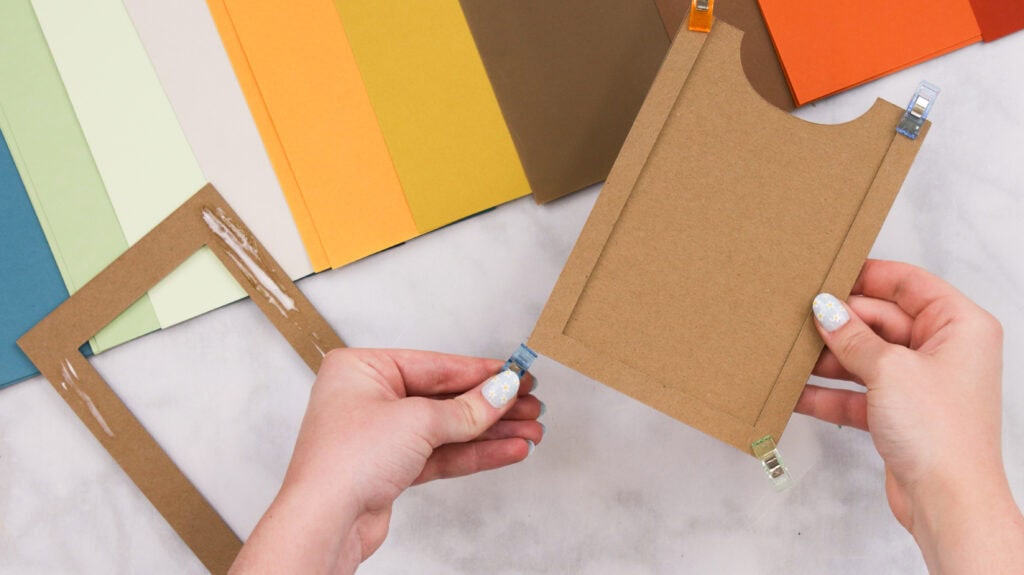
Apply glue to the middle layer and adhere it to the bottom layer. With some clover clips, clip the pieces together and let them dry. (I used Gorilla wood glue to adhere my chipboard frame pieces together and Bearly Arts Glue for lighter pieces of cardstock.)
Next, apply glue to the middle layer and place the top frame piece on top.
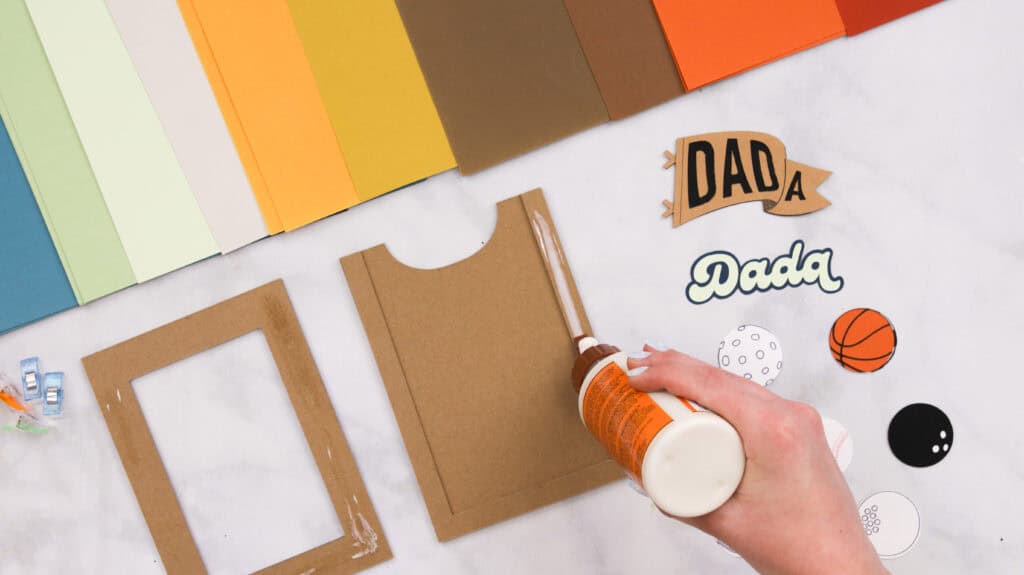
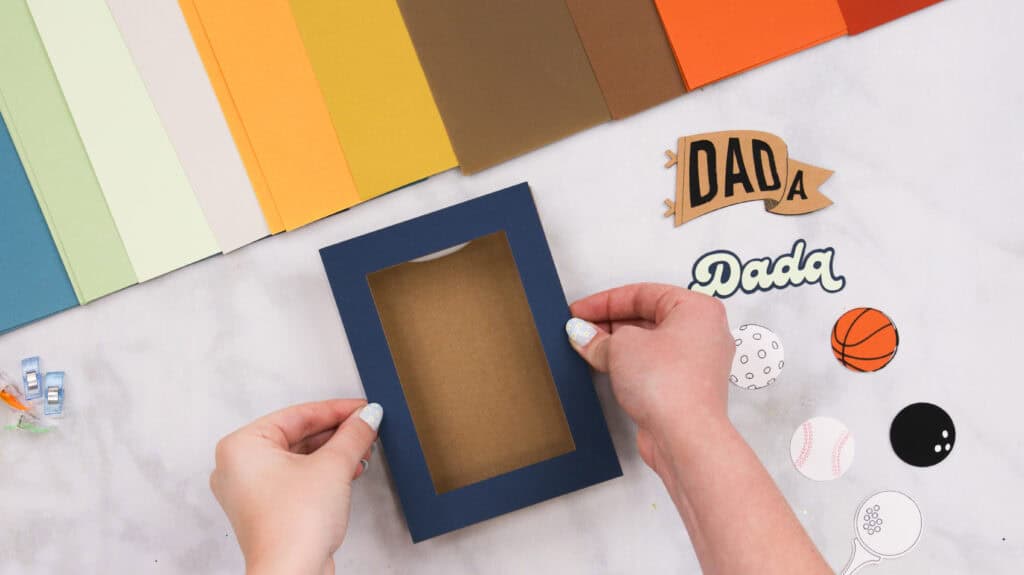
The photo frame assembly is complete! Now, take your favorite banner and glue it to your frame. I glued mine to the top of the frame at an angle.
Step 5: Final Touches and Display Tips
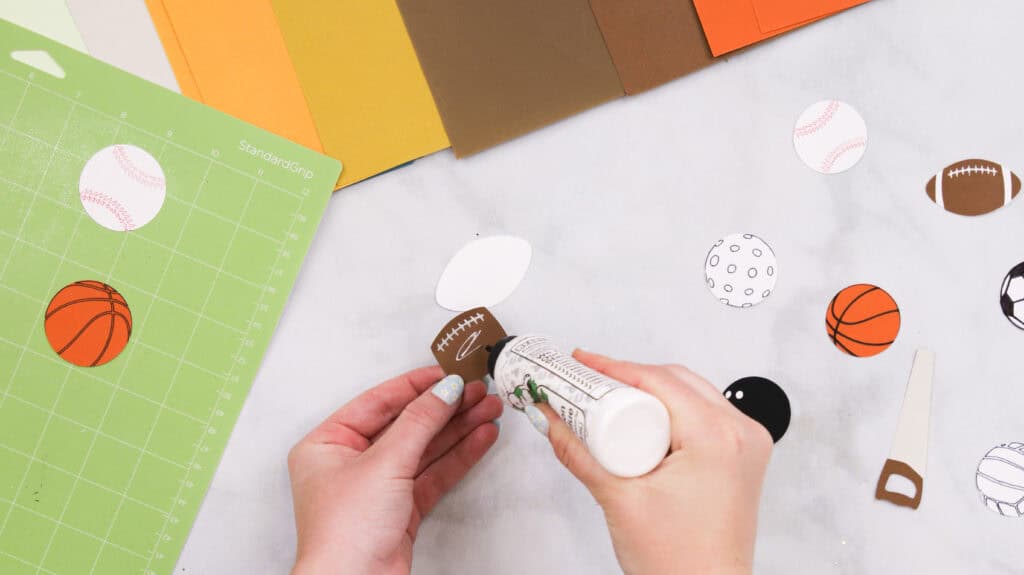
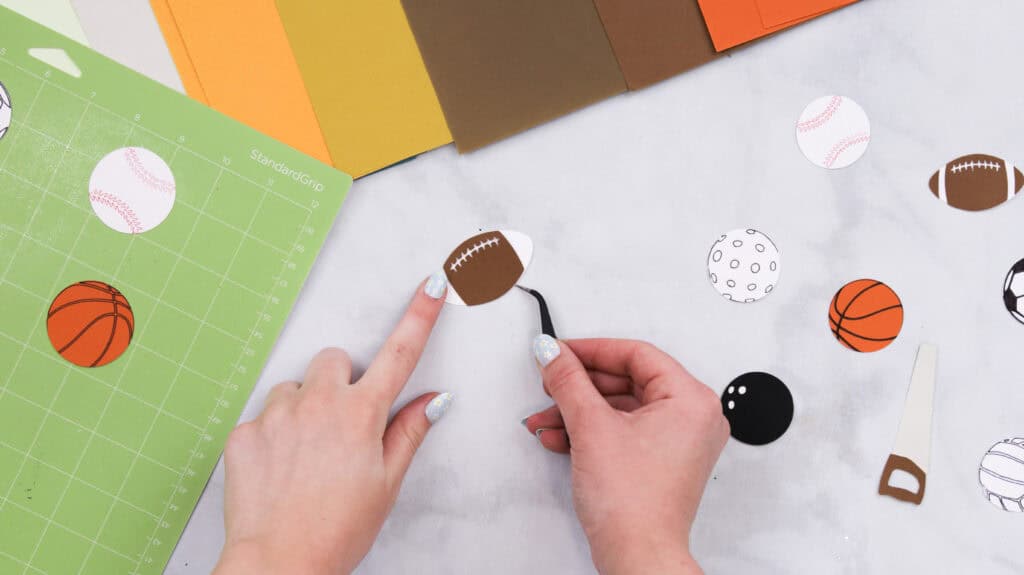
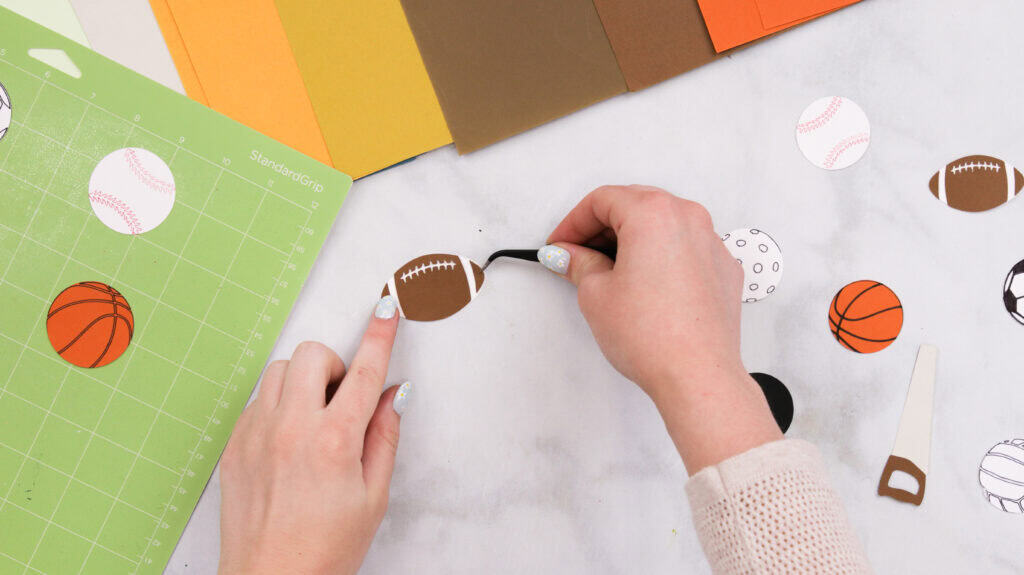
Next, assemble the sports balls by filling in the drawn lines with a pen and gluing the pieces to their corresponding bases.

Glue the sports ball to the frame. A little tip is to layer the small sports balls over the big ones to fill up space.
Finally, insert your photo into the frame, and your photo frame is finished! Isn't this such a cute Father's Day gift?! I'm so happy with how it turned out!
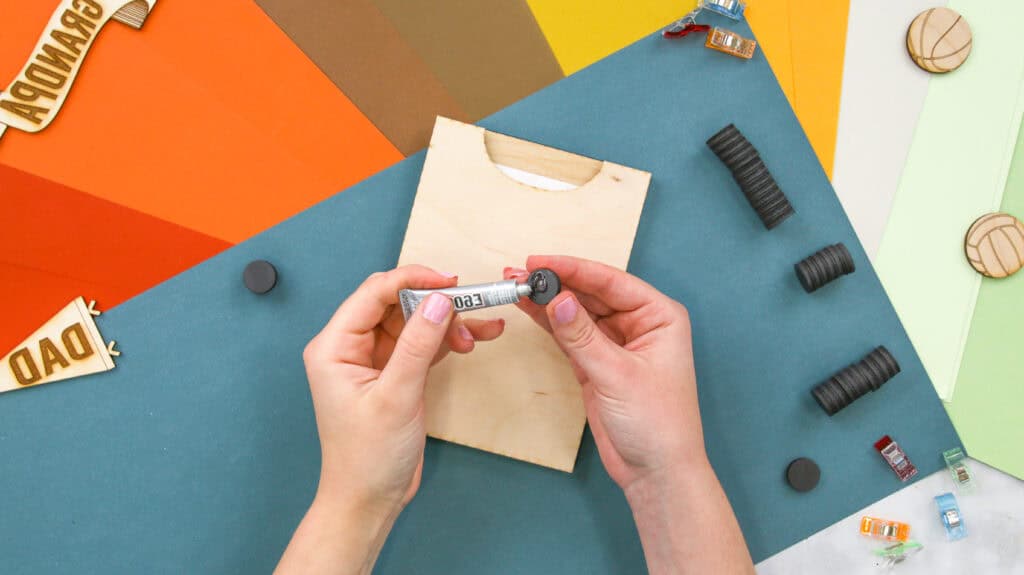
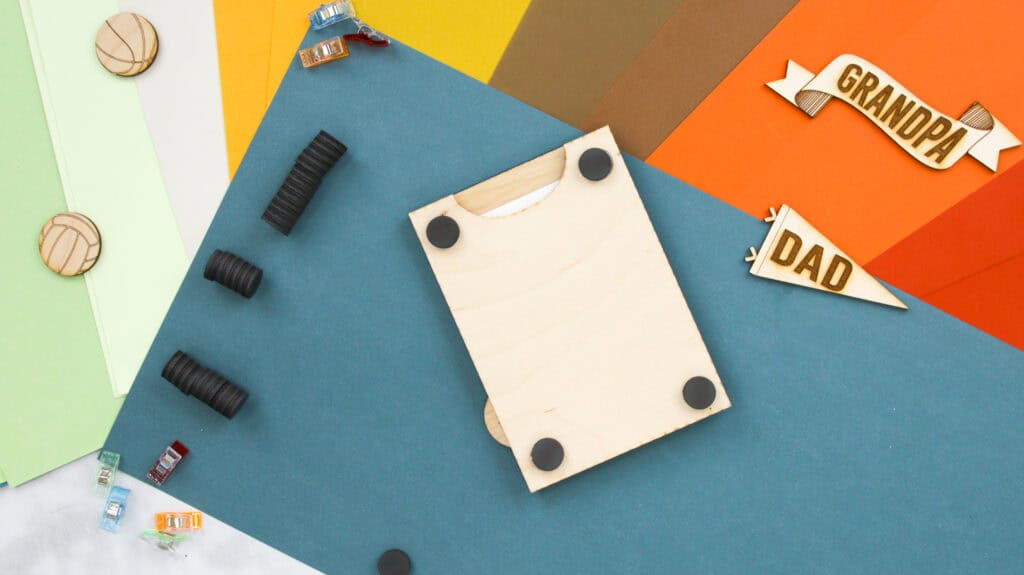
Display the frame by adhering magnets to the back of the frame with E6000 and proudly display it on the fridge. I hope you have a lot of fun with these files and enjoyed this tutorial! Don't forget to tag me on Instagram if you've made a project with these files. Would love to see what you create!
Looking for more tutorials? Click here for more Father's Day projects, Laser-cutting projects, and Cricut Projects!
Join my crafting Facebook group where you can show us what you’re making, ask questions, and learn from others!
Don’t want to forget about this free template? You can save this project for later! Click here to save this project on Pinterest.

Leave a Reply