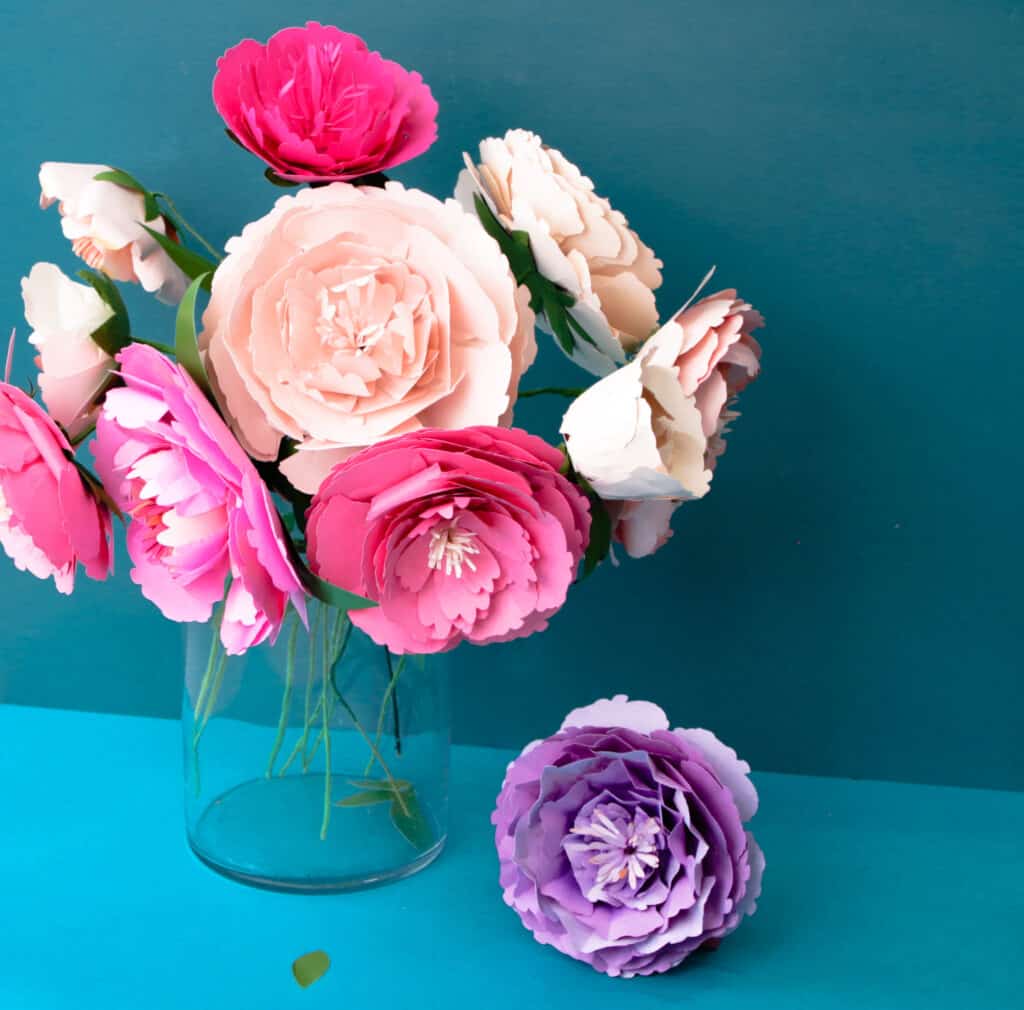
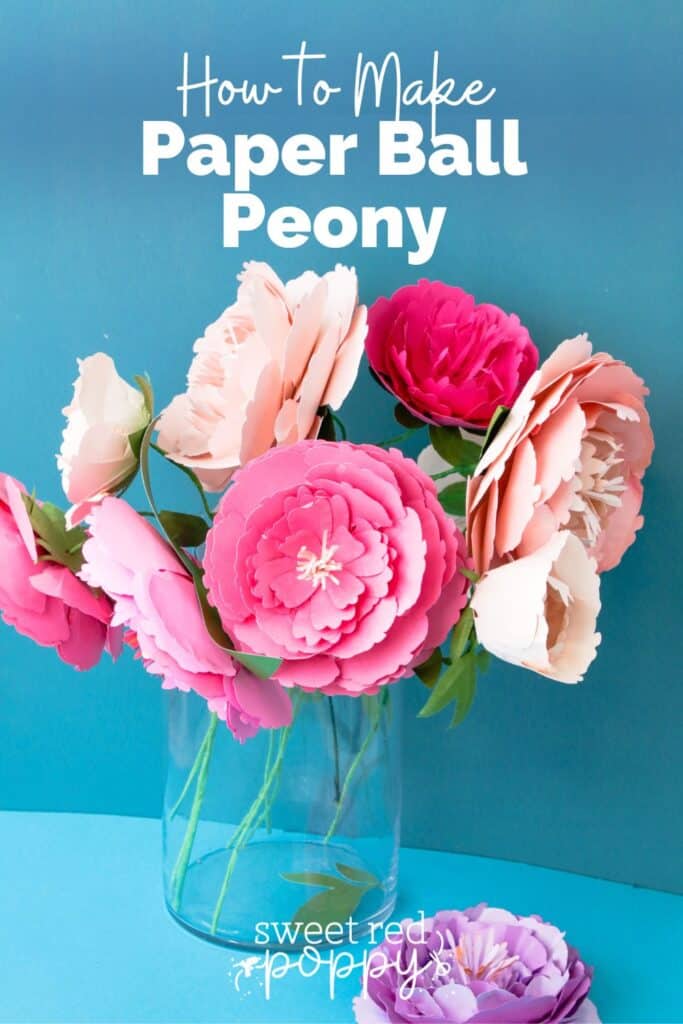
Create realistic ball peony flowers out of paper using a cutting machine, free SVG files, and these easy step-by-step photo instructions.
There are many types of peony flowers, and I love them all which is why I'm bringing you yet another peony paper flower tutorial!
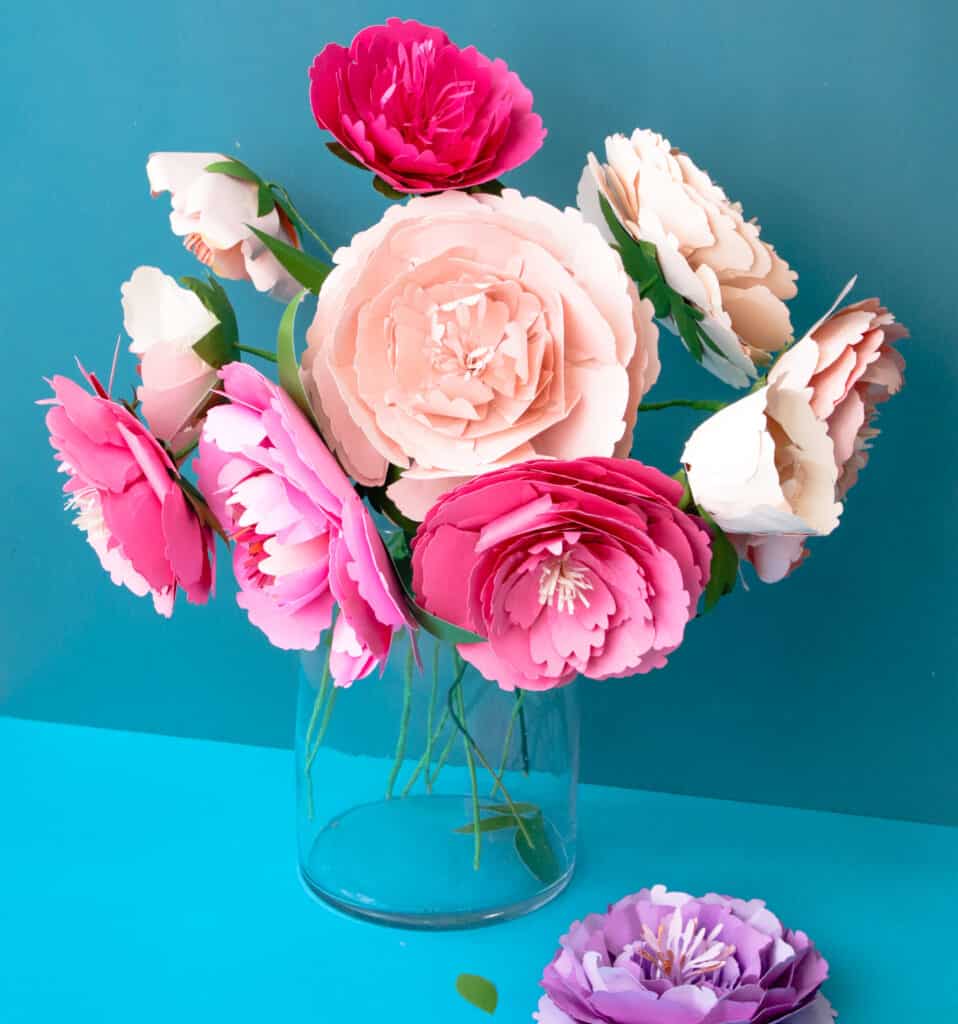
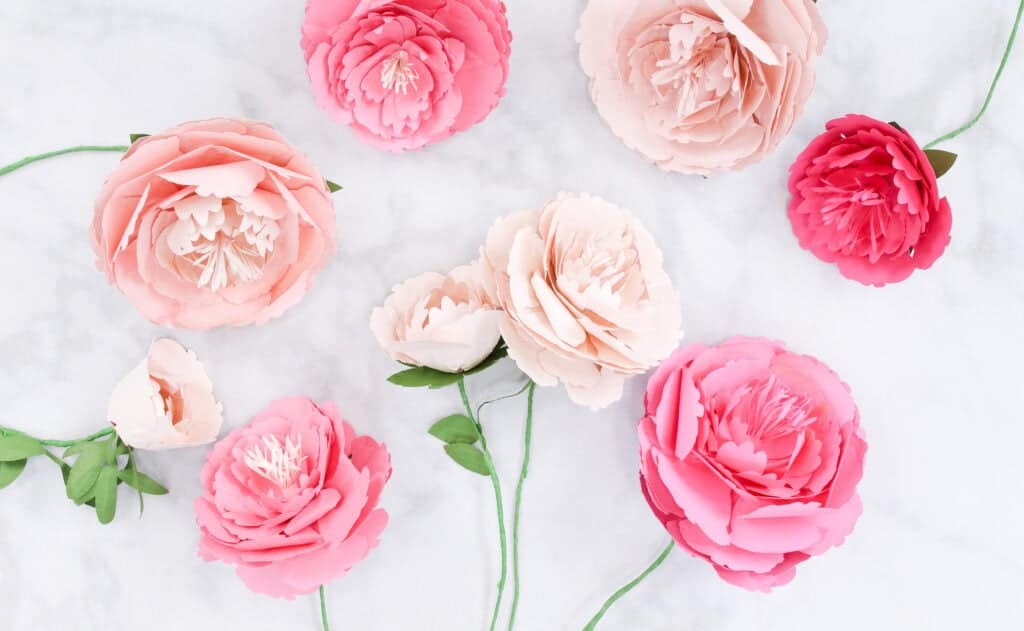
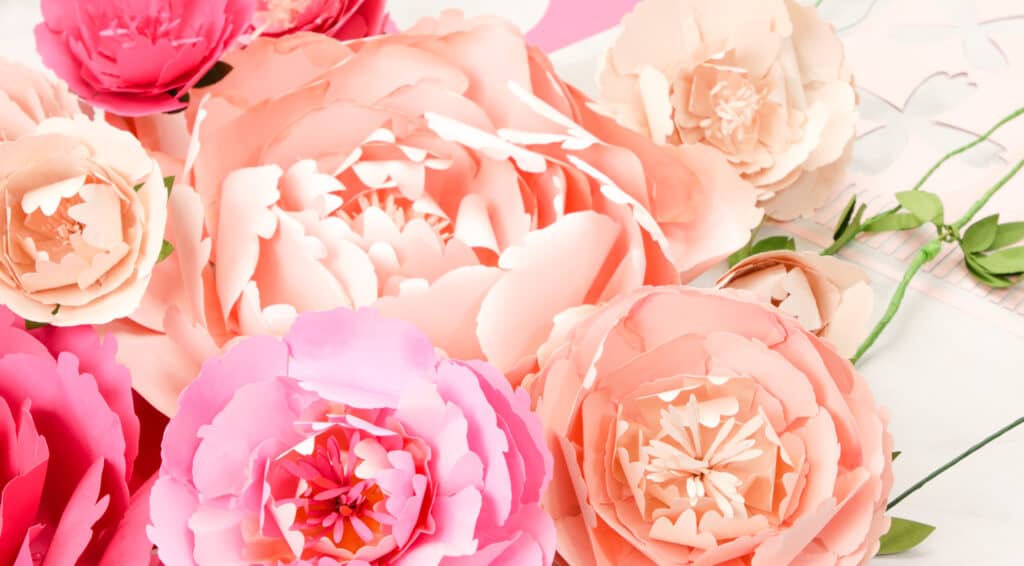
In this tutorial, we are making the ball peony flower! This is a fluffy peony with tons of volume and lots of petals. I'm going to show you how to make paper semi-double or full-double peony flowers with and without a stem.
Click here to see all of my paper flower tutorials.
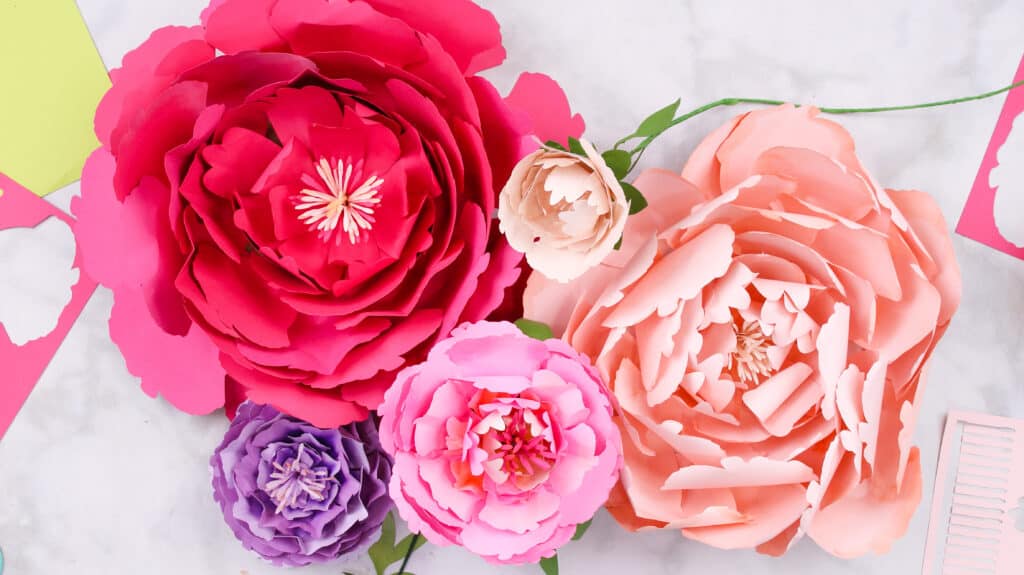
You can make this flower in a real-life size or upsize it to create jaw-dropping wall decor perfect for parties, baby or bridal showers, and wedding receptions.
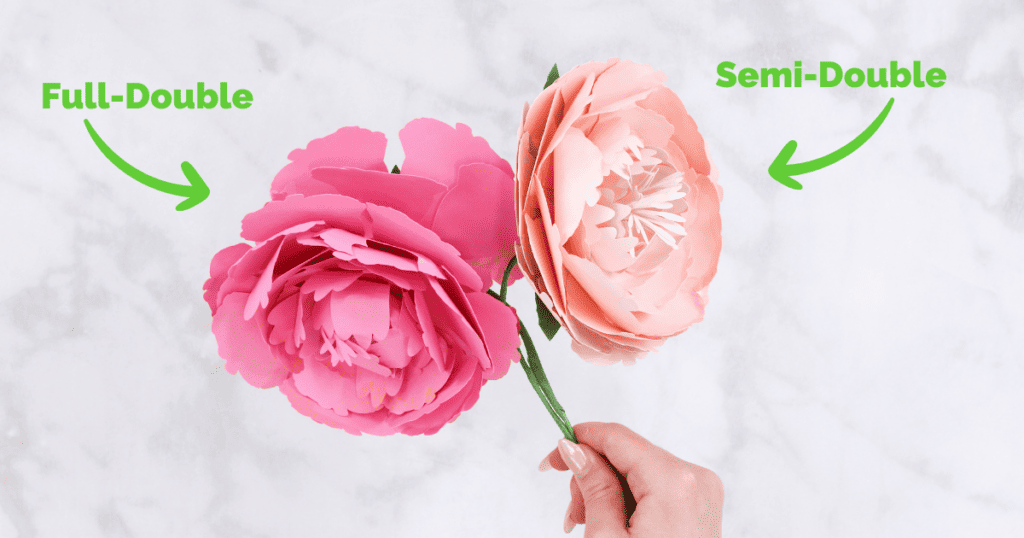
You may be wondering what makes a peony a semi or full double flower. I'll go over this later during the assembly process.

This beautiful state flower of Indiana makes a beautiful flower arrangement. They're easy to grow but can take years to blossom. While you're patiently waiting for yours to grow, you can make them yourself in just under an hour.
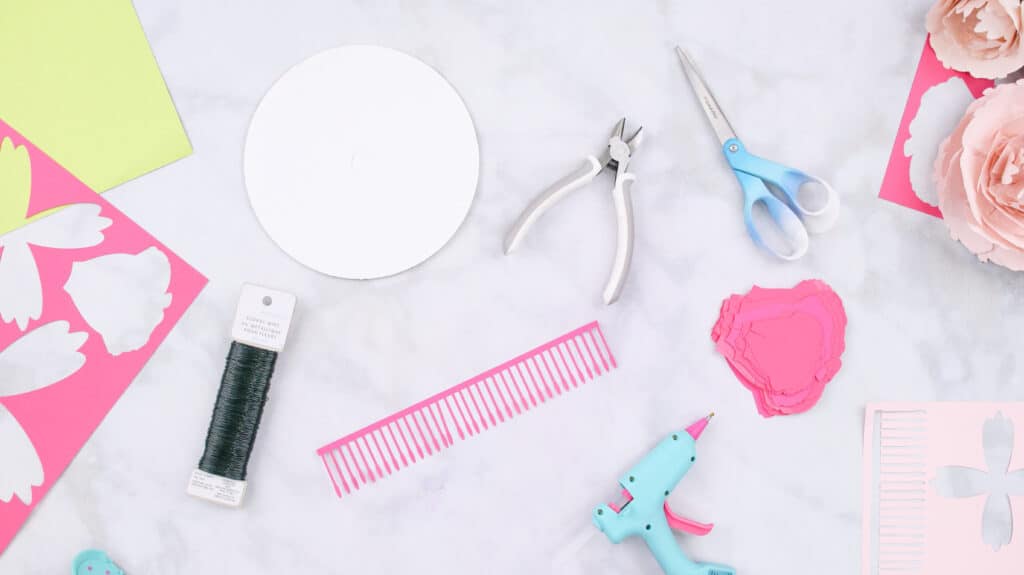
With a few pieces of 12 x 12" card stock, floral stems and tape, and other craft supplies (I will list these down below) you'll have yourself a beautiful ball peony!
You will occasionally see the ball peony flower bouquet at weddings and other events most likely because of their beauty, but also because the flower symbolizes good luck, fortune, and wealth. This is why making a paper ball peony flower bouquet is a great way of saying good luck and congratulations!
If you've been following along over the past year, you know I obviously love to do my research on flowers because I love them so much! During the assembly process of making this flower, I'll share tips and tricks on how to make a beautiful, semi-realistic peony. Plus, share some of the characteristics, and fun facts.
Check out this DIY Paper Peony Flower Tutorial I made last year!
Characteristics of Ball Peony Flower
Peony flowers bloom an array of colors (yellows, whites, oranges, and rarely purple) and can grow up to 3 feet in maturity. When in bloom, take on the shape of a sphere and grow fluffy petals. Some peony flowers have stamens (semi-double), and some peonies have stamens that transform into petals (full-double).
This particular paper flower design measures 6.5-7 inches across and includes centers, a stamen, large, medium, and small petals, and greenery.
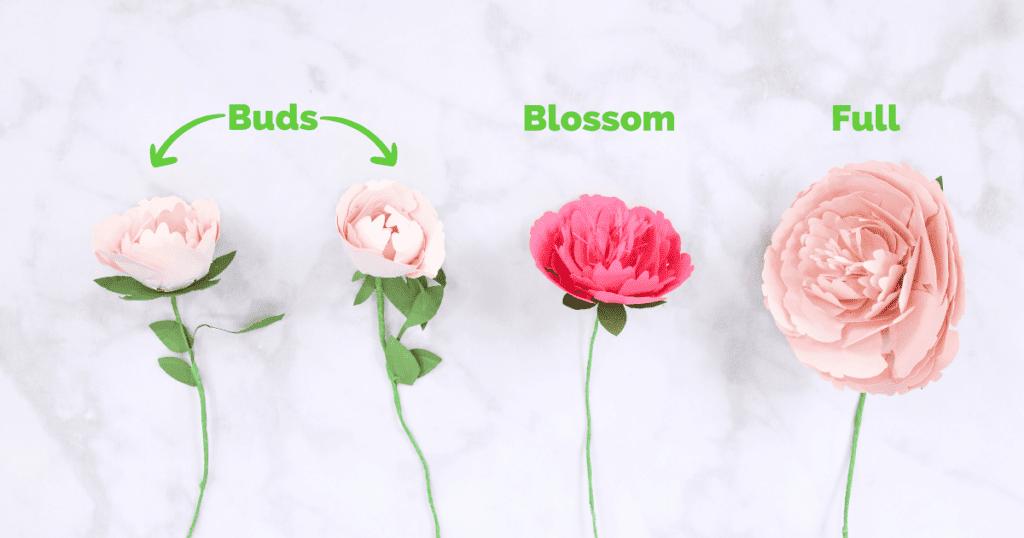
You can make a bud, blossom, and a full paper flower using the pieces provided in the SVG.
What Type of Paper Do You Recommend?
I recommend 65 lb solid-core card stock. Lightweight card stock is great for paper flowers because of how easy it is to shape and manipulate and you want to make sure it's solid-core so you don't see white peeking through the edges of the card stock.
How Many Pieces of Paper Do I Need?
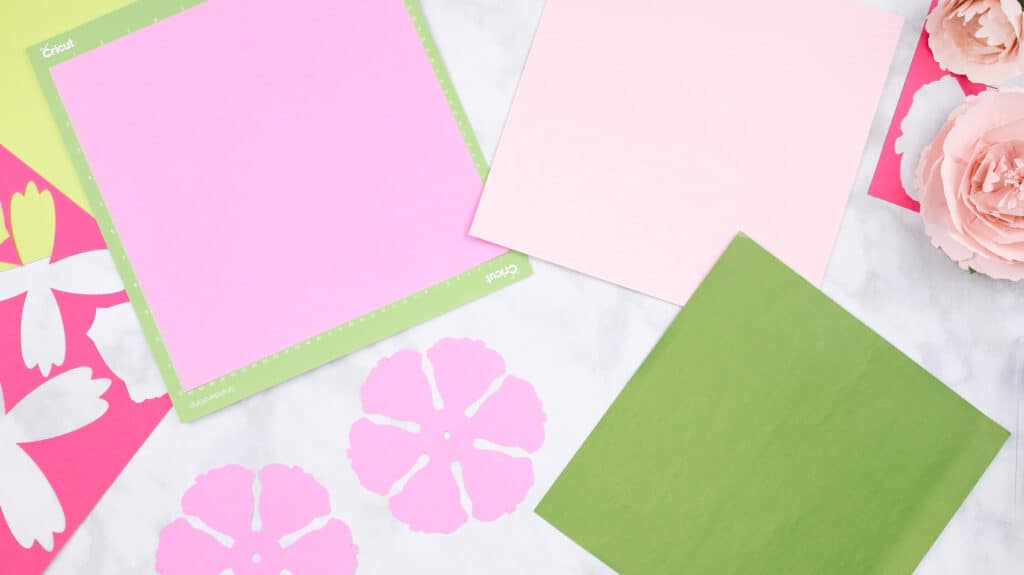
6.87" x 6.85" Flowers W/ and W/O a stem: I suggest grabbing 4 pieces of card stock for the petal pieces, 1 piece for the centers, 1 piece for the stamen, and 1 piece for the greenery.
18.44" x 18.16" Large Ball Peony Flower: 2 Pieces for the stamen, 16-18 pieces of card stock for the petals, and 1-2 Pieces of card stock for the centers.
Table of Contents
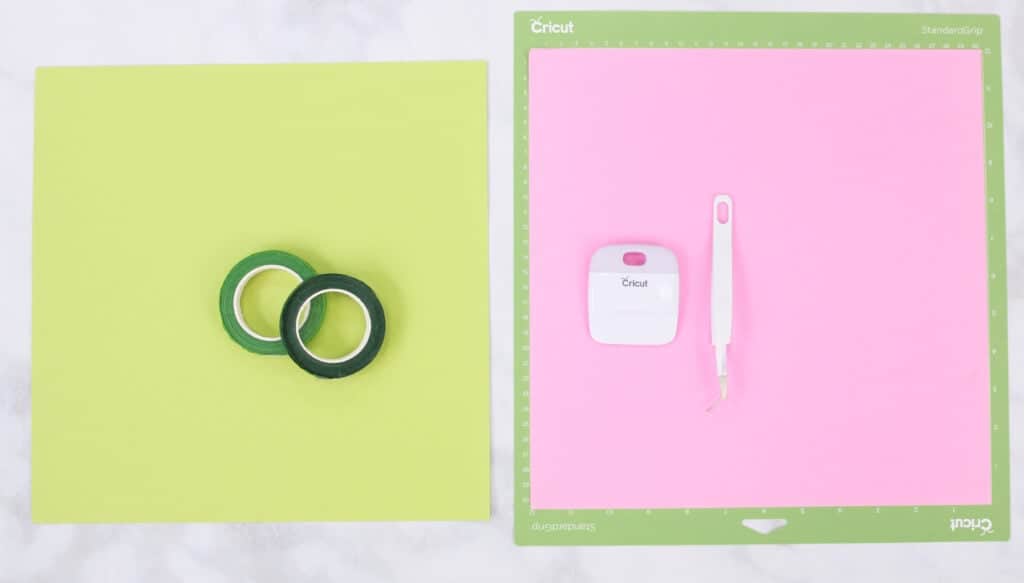
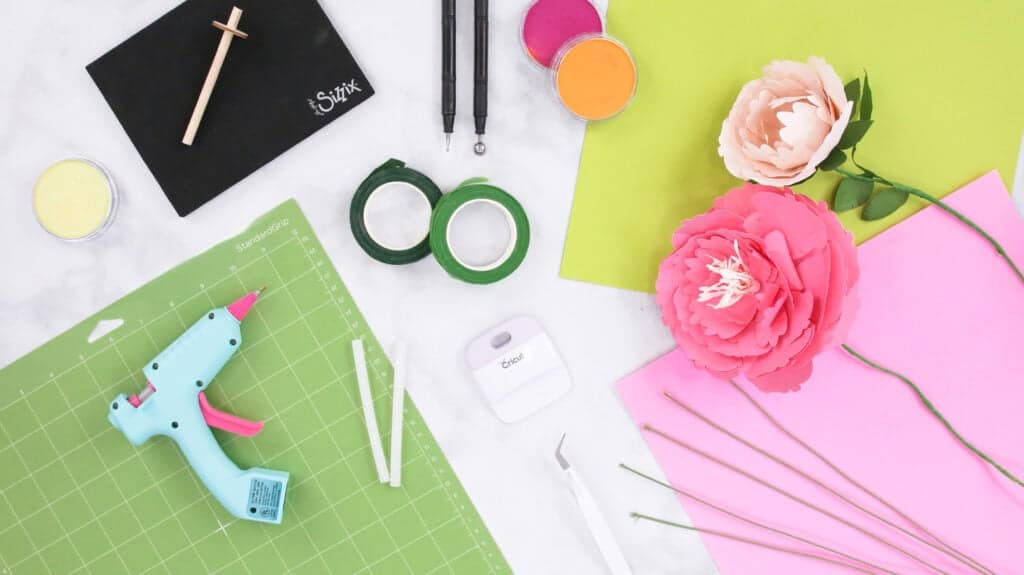
Ball Peony Craft Supplies
- 12" x 12" 65 lb Solid Core Cardstock: (Pink, Yellows, Whites, Oranges, Purples)
- Cricut Cutting Machine
- Standard Grip Cutting Mat
- Hot Glue Gun
- Hot Glue Sticks
- Scraper Tool
- Floral Tape
- Wire Stems
- Quilling Tool, Chopstick, or Pen
Extra Supplies for Large Paper Ball Peony Flower
Optional Supplies
- PanPastels
- Watercolors & Paintbrush
- Blossom Shaping Tool or Kit
- Foam Balls- About the size of golf balls. This is used later to create a peony bud.
Why Use Pan Pastels or Watercolors?
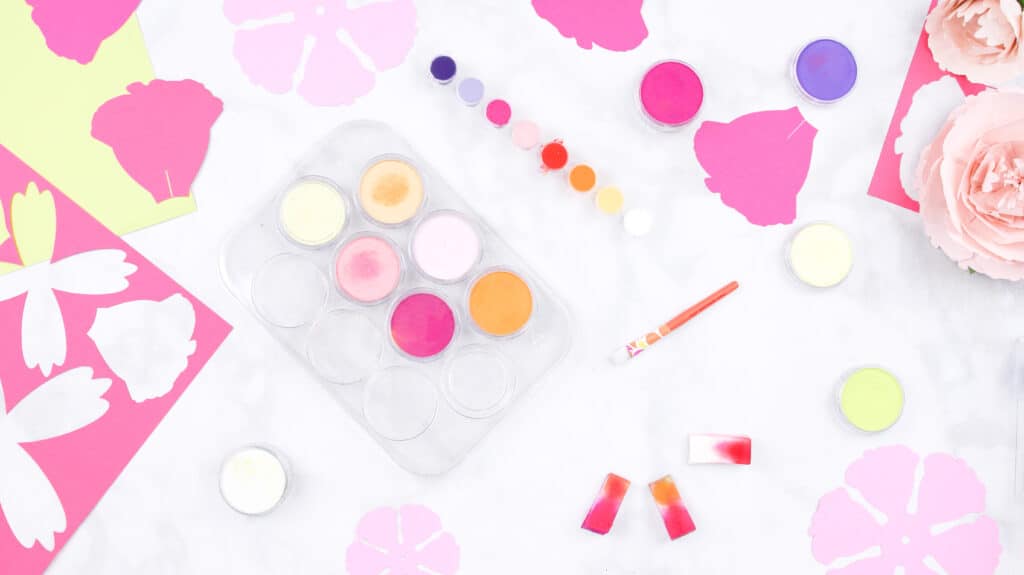
For the petals, I used pan-pastel and watercolors to give my flowers a more realistic touch. It's also a fun and relaxing step.
Pan pastel is chalk-like dust compacted into a dish that provides bright, opaque colors that you can apply to your paper flower projects by stroking the product with a sponge to add contrast, gradients, and a pop of color.
Using watercolors won't be as vibrant (depending on the brand) as the pan pastels, but it helps with shaping the petals in a more organic way once it dries.
Tip: You can apply water to the pan pastels to make the same effect watercolor does on paper.
If you want a vibrant pop of color to add to your flowers, I recommend pan pastels; If you want to add subtle colors and organic shapes to your flowers I'd go with the watercolors.
Download SVG Files Here
What's included in the SVG Cut Files?
The first step is to download the SVG files. Included are three files; One is for a wire stem- this is ideal if you would like to make a bouquet. The other is for without a wire stem- doesn't have a circular cutout in the centers of the petals and leaves; And one is a large paper ball peony SVG cut file- If you would like to hang it on your wall.
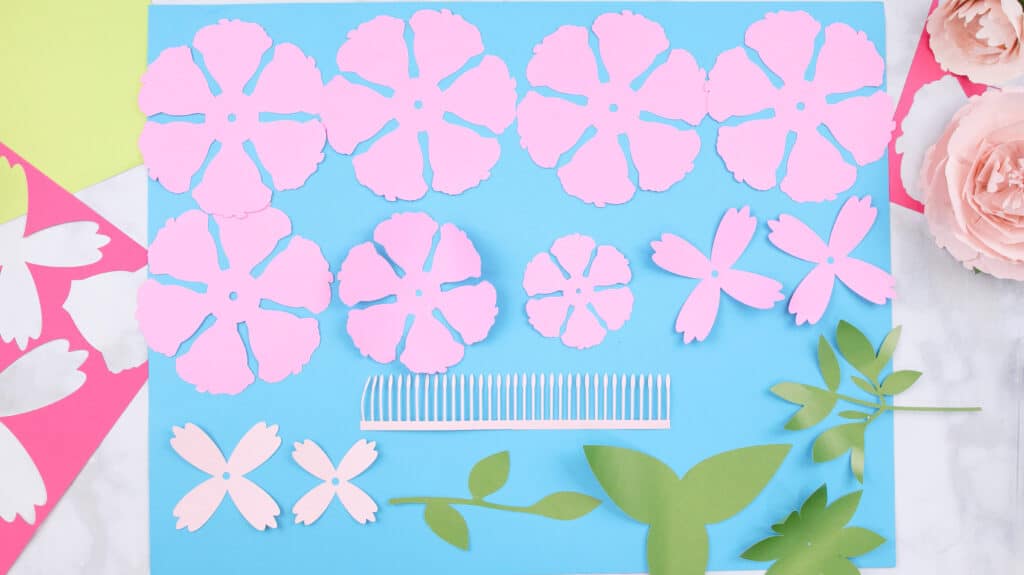
W/ Stem and W/O Stem Files Include:
- 5 Large Petal Pieces (Guard Petals)
- 1 Medium Petal Piece
- 1 Small Petals Piece
- 4 Center Pieces
- 1 Stamen Piece
- 4 Greenery Pieces
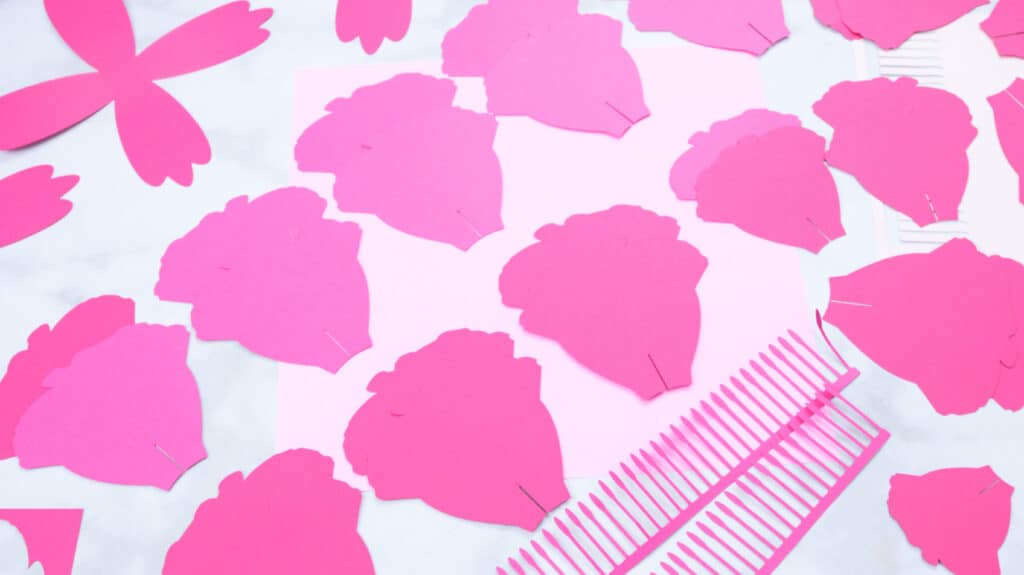
Large Ball Peony Flower File Includes:
- 30 Large Individual Petals (Guard Petals)
- 6 Medium Individual Petals
- 6 Small Individual Petals
- 4 Center Pieces
- 1 Stamen Pieces
How to Upload SVG Files to Cricut Design Space
Once you've downloaded the SVG files, open up your cutting design software-I'm going to be using Cricut Design Space.
In Cricut Design Space, click New Project in the upper right corner. It should direct you to your canvas.
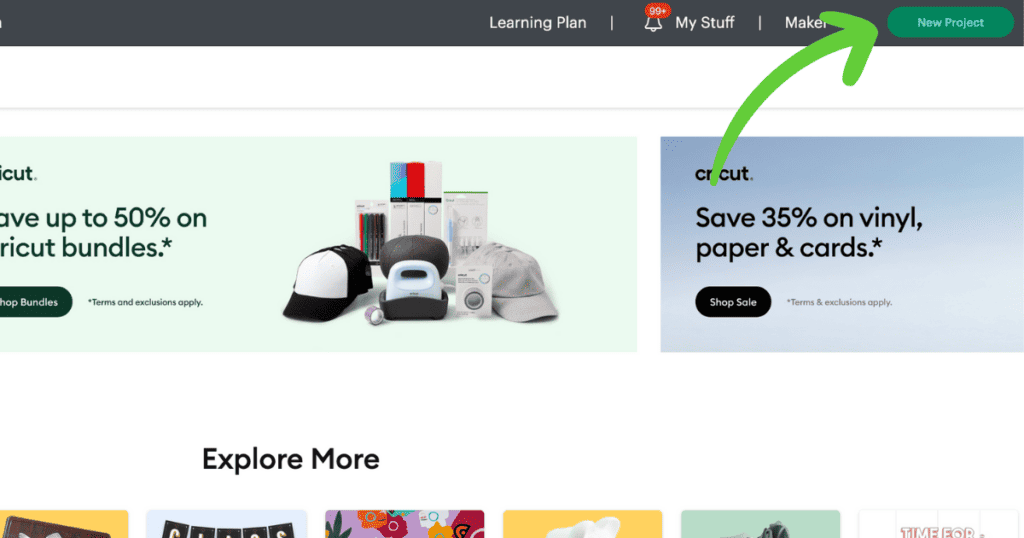
Next, click Upload on the left-hand side and Upload Image.
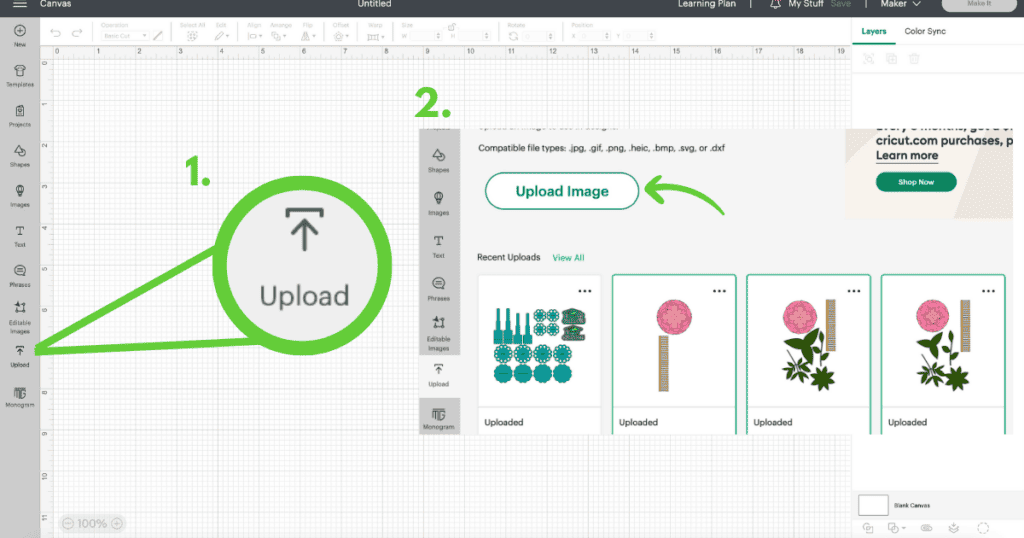
Select the files from your Desktop or Downloads folder and continue to upload to your canvas.
Flower W/ and W/O a stem in Cricut Design Space:
This paper peony flower measures 6.87" x 6.85", but if you would like to adjust the design to make it smaller or bigger in size, I suggest doing so before ungrouping. You can adjust the size by clicking on the design and dragging the anchor points or clicking on the arrows in the Size panel above the canvas.
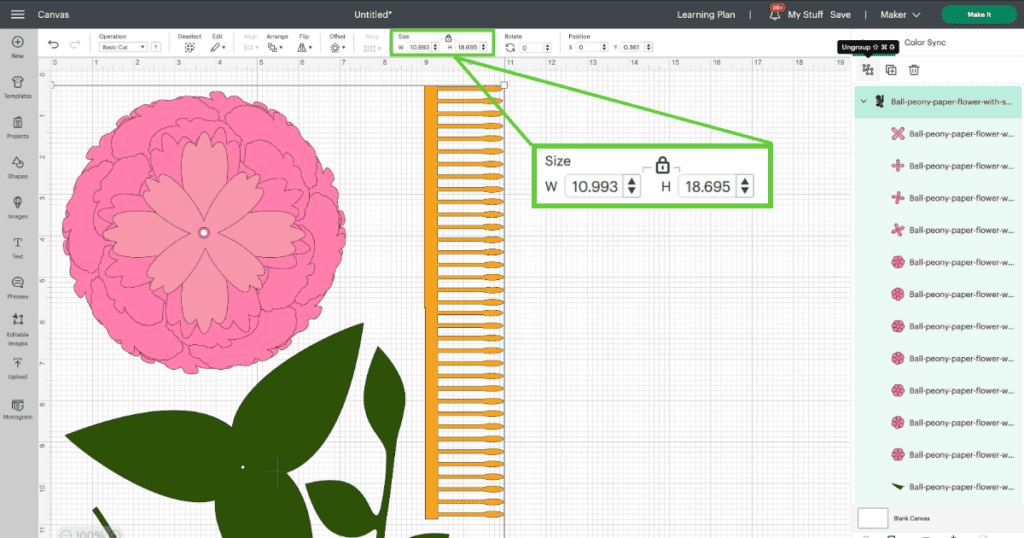
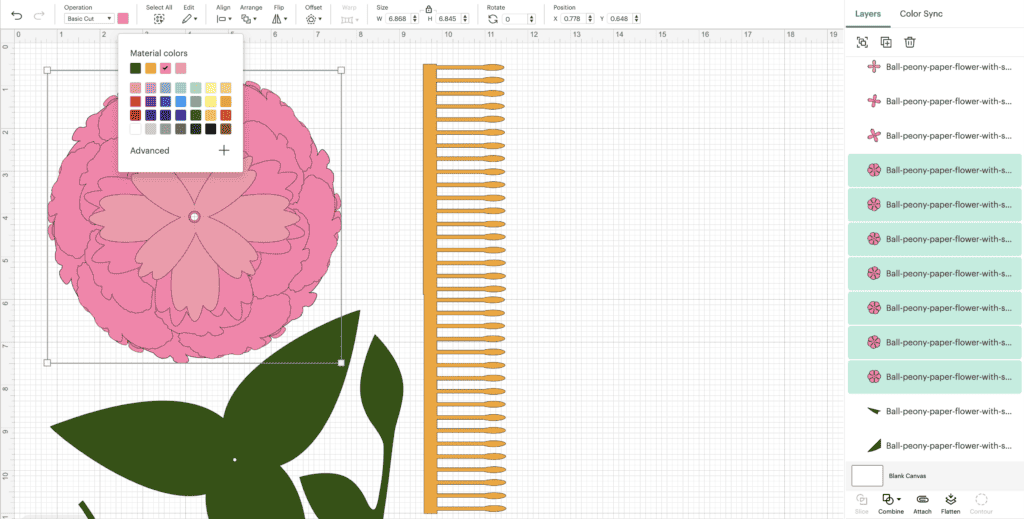
Once the design has been uploaded to your canvas, you then want to Ungroup the design in the layers panel on the right-hand side of the canvas or Command->Shift->G (Mac) or Ctrl->Shift->G (Windows) if you're wanting to change the colors.
If you're wanting to change the colors, select a layer or multiple by holding down shift and clicking on more than one petal, and clicking the color swatch above the canvas in the Operation panel above the canvas.
When you're happy with how everything looks, go ahead and click Make It, and select your Material Size ( I Suggest using a 12" x 24" StandardGrip Mat- this enables you to load more than one piece of card stock at a time), rearrange the objects on the prepare mats if needed, then click Continue.

Finally, select your Cricut Device, material, and begin the cut!
Large Ball Peony Flower in Cricut Design Space:
Once the large ball peony flower has been uploaded to Cricut Design Space, Ungroup the project in the layers panel on the right-hand side of the canvas.
Next, click and drag across the peony flower pieces- try not to select the stamen piece- and resize the flower to make it bigger. I was able to resize the flower petals to 18.44" x 18.16" and my centers to 7.25" x 7.32" in Design Space. Feel free to make yours bigger, just make sure the individual petals aren't bigger than a 12" x 12" piece of card stock.
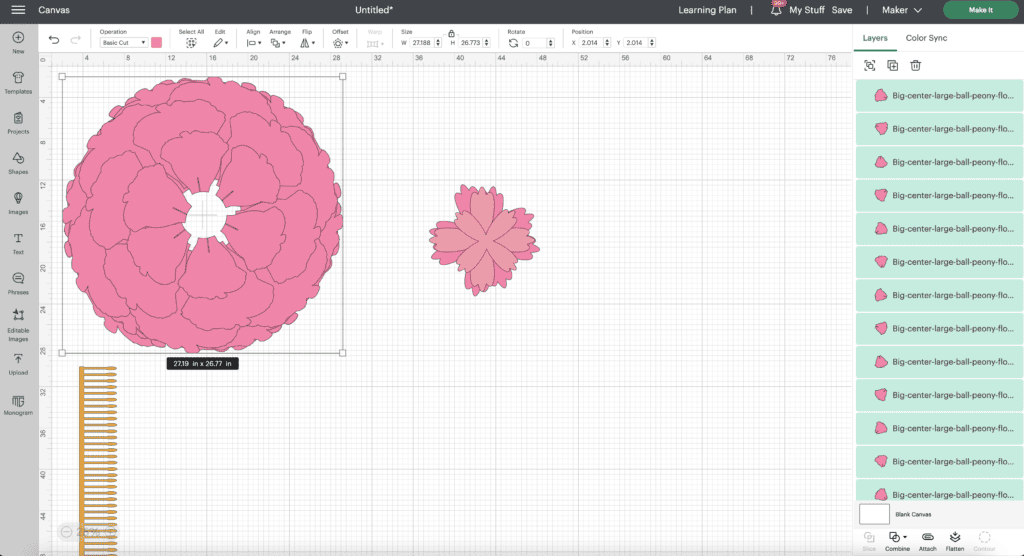
Then, I duplicated the stamen piece four times without making any adjustments to its size.

Finally, cut out all the large ball peony flower pieces by selecting Make It, rearranging the objects on the Prepare screen, then connecting to your Cricut device, selecting your material, and beginning the cut!
Assembling Ball Peony Flower
Now, I will go over how to assemble the flower with and without a wire stem. Plus, how to make a large ball peony flower to hang on your wall!
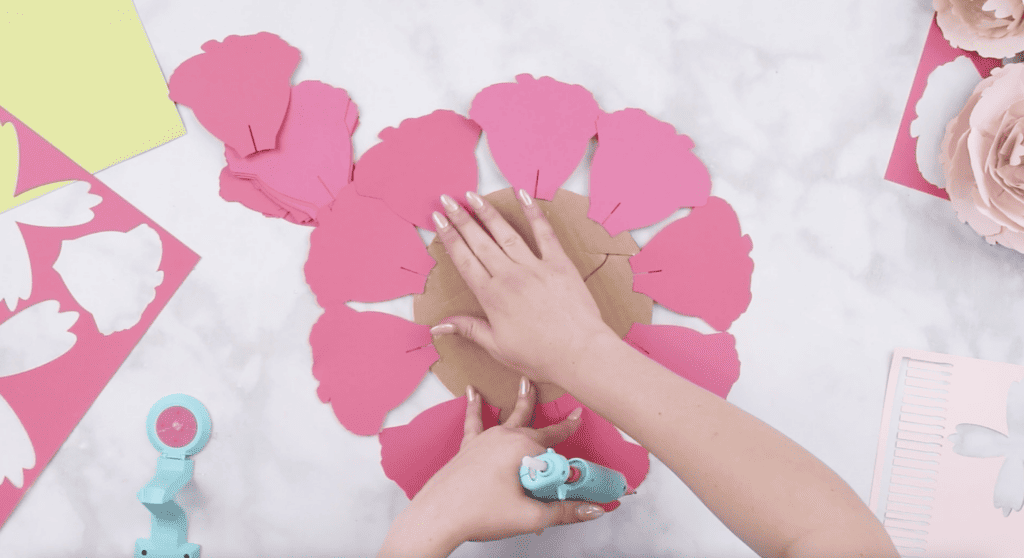
When assembling this flower, the effect we are trying to go for is a ball sitting on a plate. There are the inner petals that form the ball and the large petals (Guard Petals) along the outside that lay flat forming a contrast between the two.
Let's start assembling the flower with the wire stem first.
Assembling Ball Peony Flower with Wire Stem
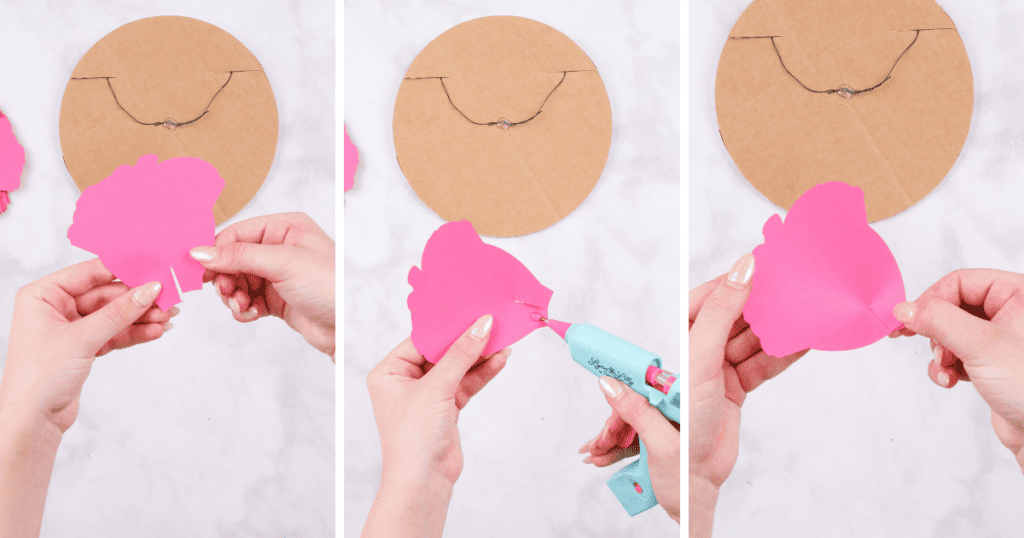
To assemble a Ball Peony Flower with a wire stem, first, cut out all your flower pieces by following the Cricut Design Space instructions above.
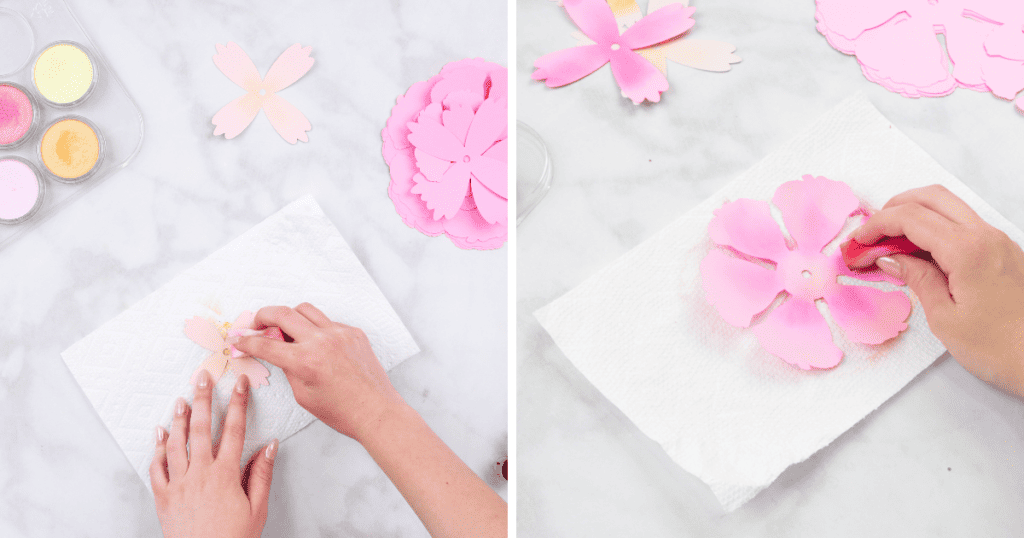
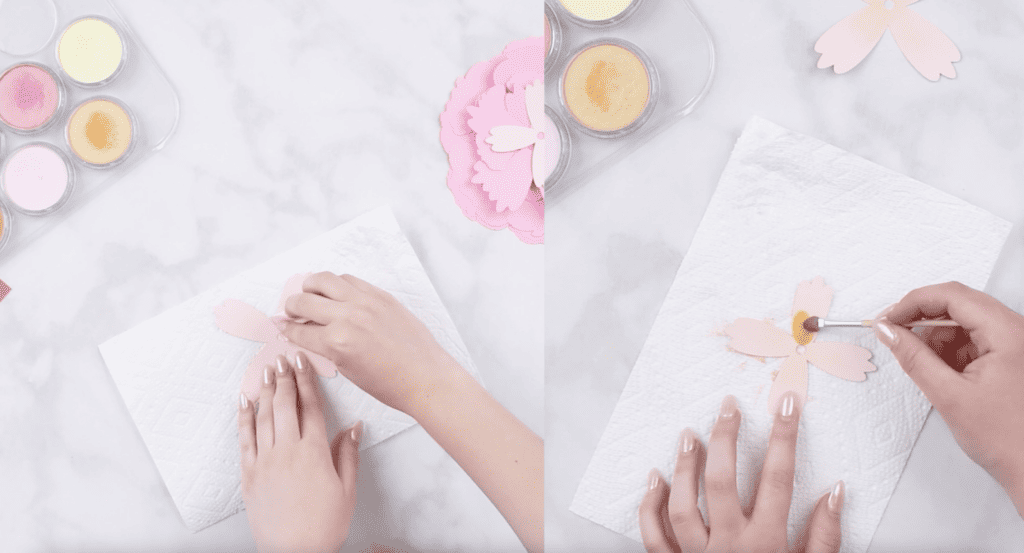
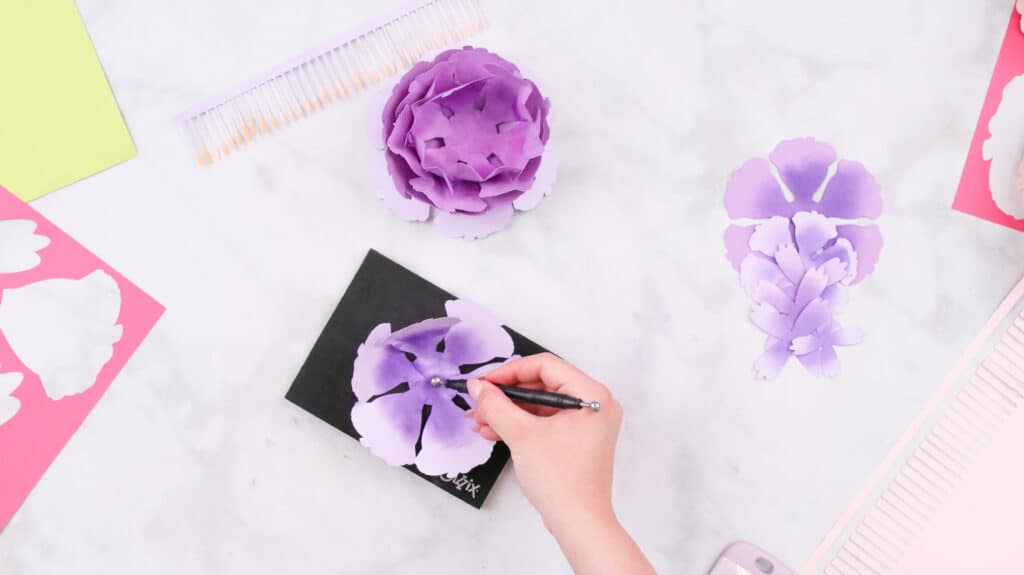
Next, apply pan pastel or watercolor to the center and outer edges of each flower petal.
Pro Tip: Adding water to the outer edges and centers of the pieces will curl the petals inward as it dries.
Shape your petals and leaves with a blossom shaping tool rolling in a circular motion. Take one of your large petals and shape it downwards, shape the rest upwards.
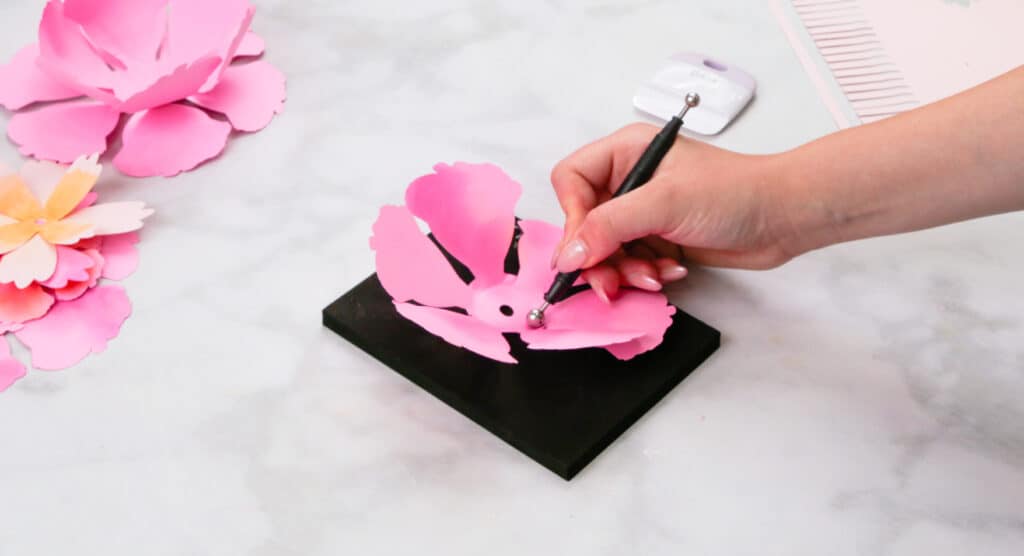
Slowly cup the petals tighter and tighter as you go.
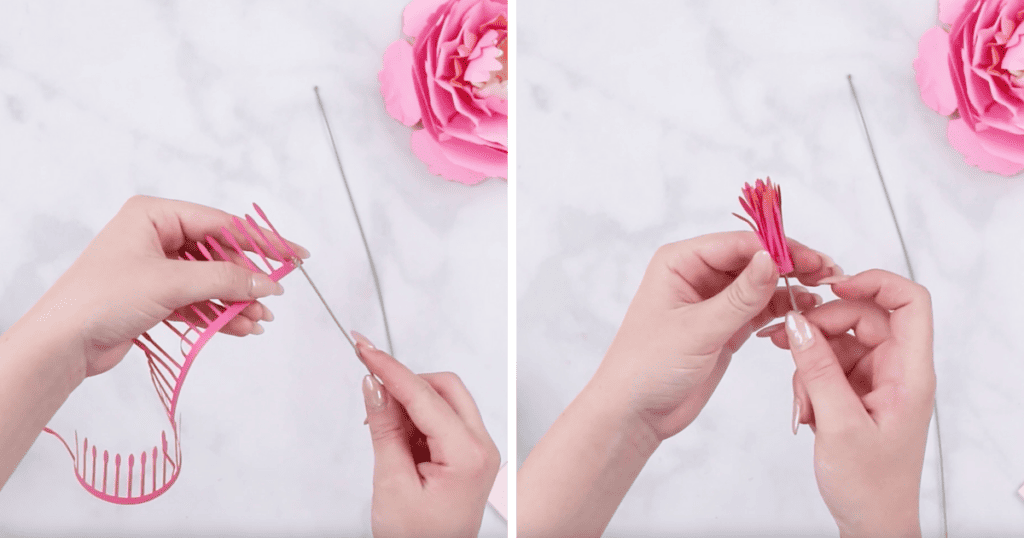
Grab the stamen and a floral wire. Wrap the stamen around the wire securing it with glue as you go.
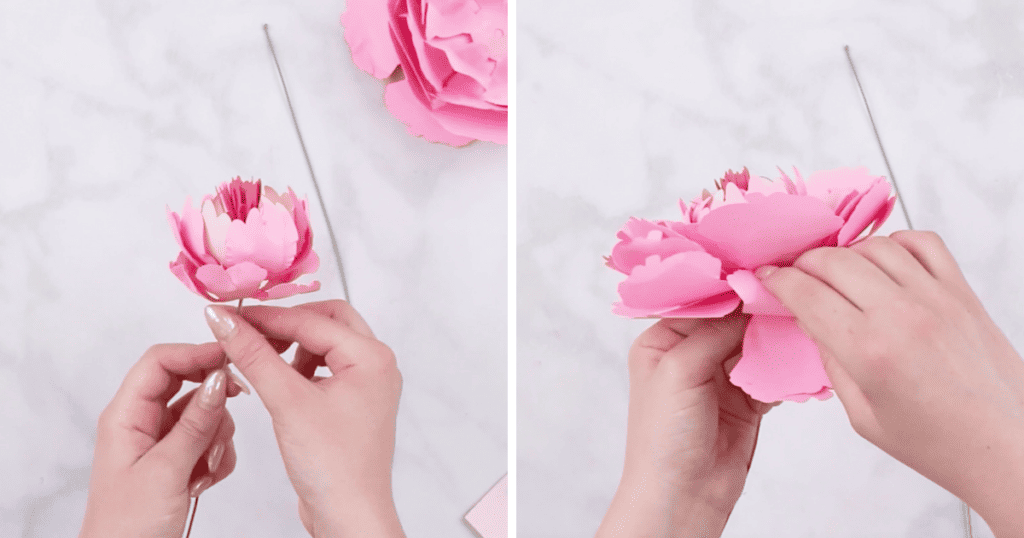
Next, grab your shaped petals and centers. Slide the wire through the circular cutout of the smallest centers and secure it with glue. Continue to stack the petal pieces starting from smallest to largest. Make sure your petals don’t lose their shape. At this point, your flower might look similar to a ball on a plate.
Pro Tip: Fold some petals inward to add more volume to the flower.
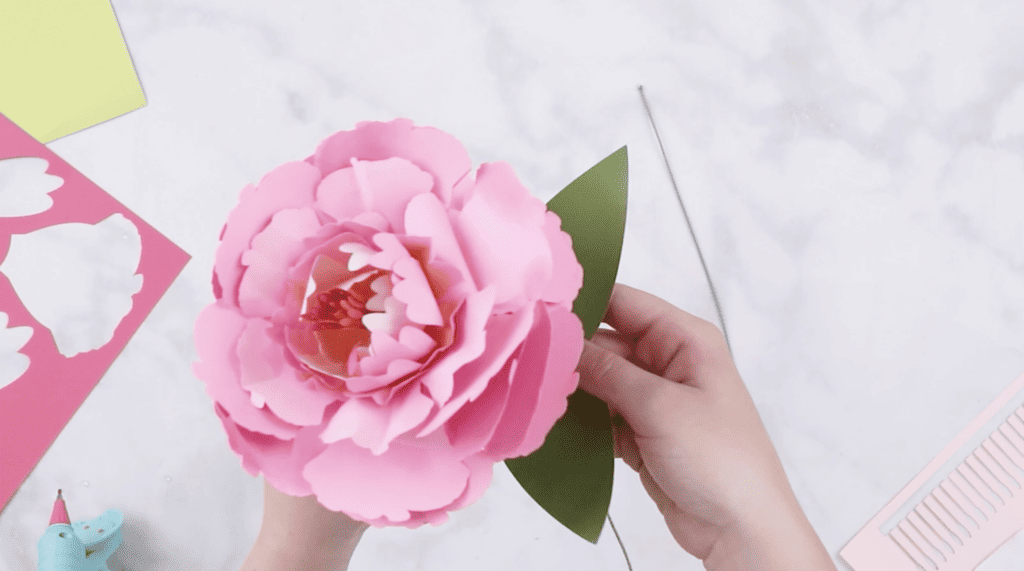
Glue the flower base underneath the flower along with the three-leafed base.
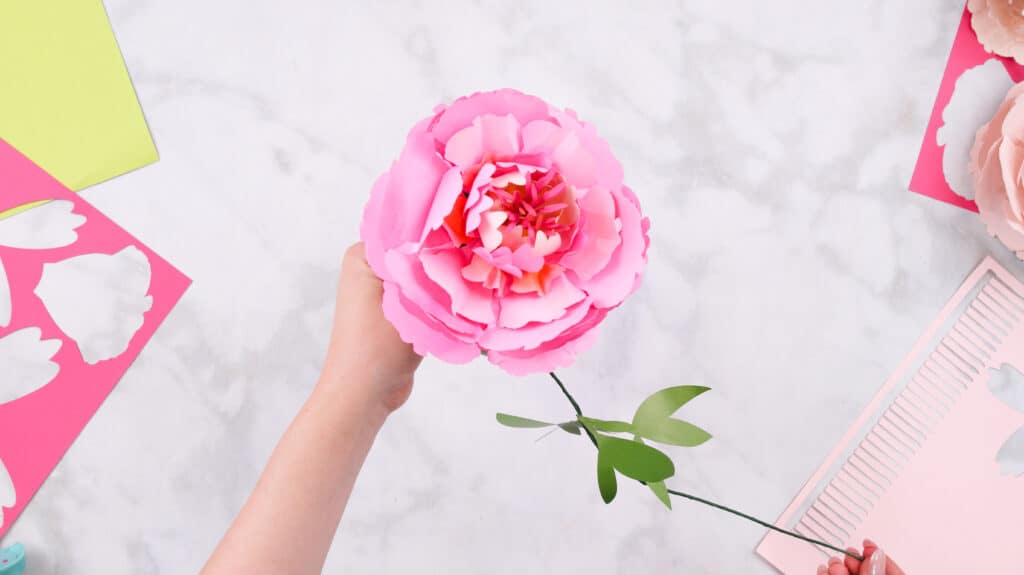
Once you add the flower base, add another wire to the stem to help keep the flowers upright because it can get pretty heavy. Then, continue wrapping with floral tape.
Pro Tip: When wrapping floral tape around the wire, it's helpful to keep the floral tape taut as you're wrapping- this activates the tape so that it becomes tackier and adheres to the wire easily.
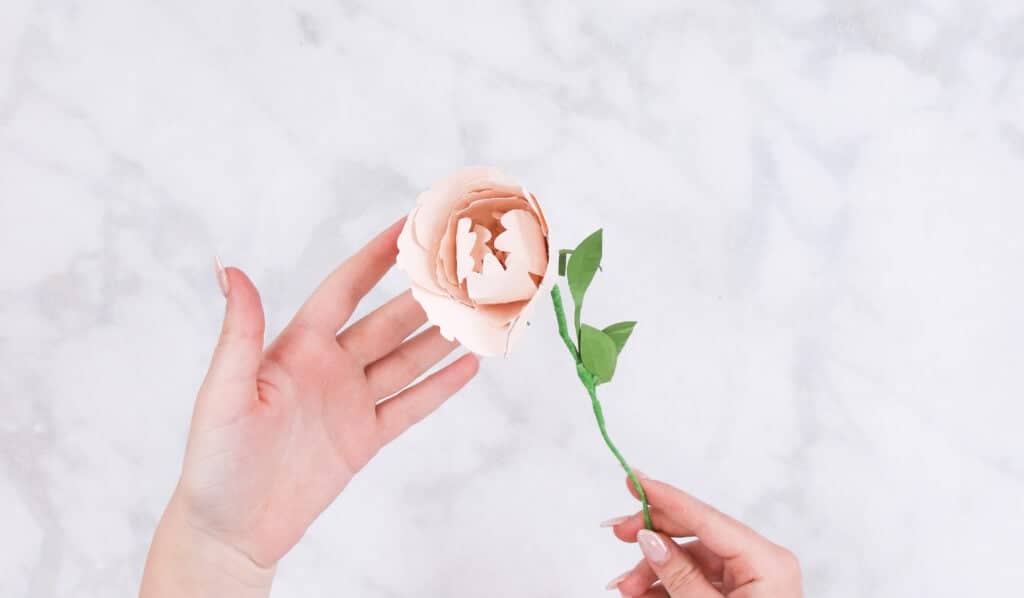
Finally, glue the rest of the greenery around your flower
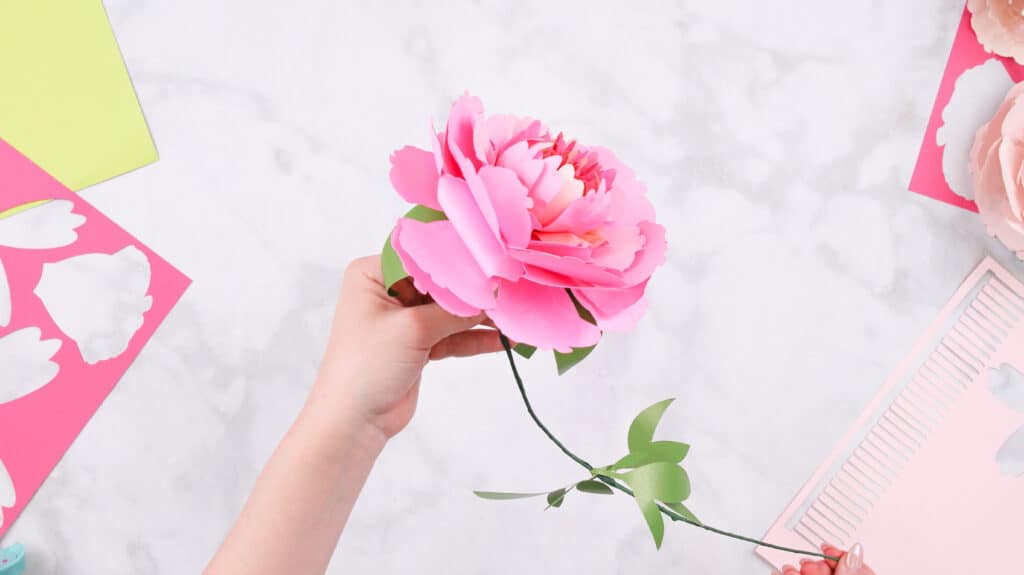
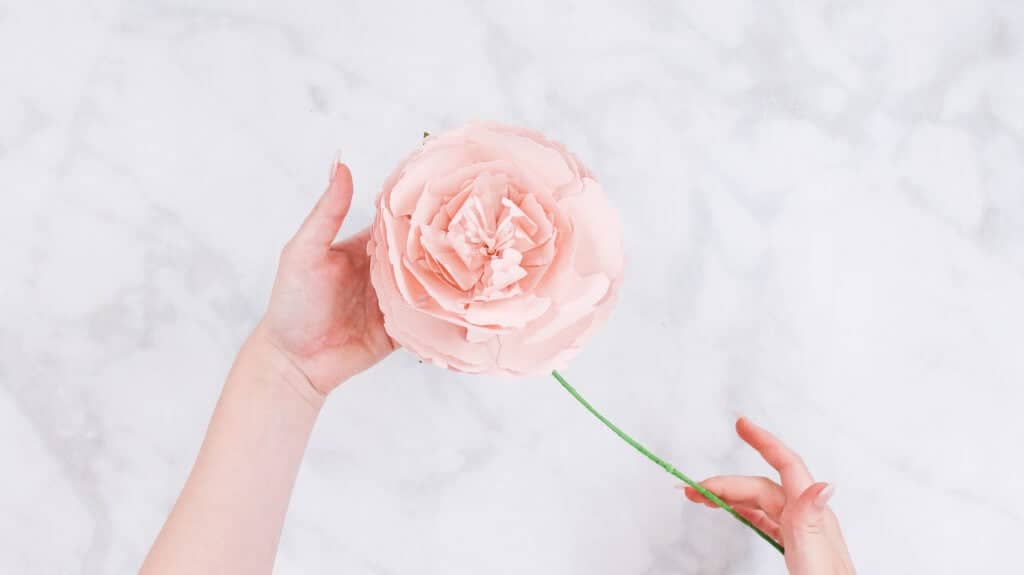
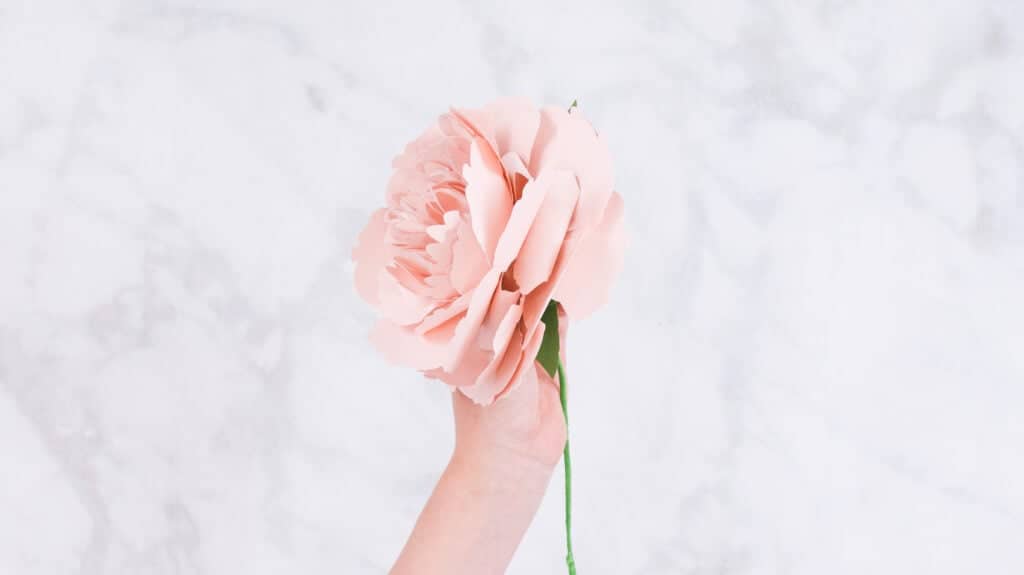
You’ve made a beautiful Ball Peony flower!
Assembling Ball Peony Flower without Wire Stem
Similar to making the Ball Peony Flower with a stem, cut out your flower piece, and start shaping your petals and leaves with a blossom shaping tool rolling in a circular motion. Take one of your large petals and shape it downwards, shape the rest upwards slowly cupping the petals tighter and tighter as you go.
Grab the stamen piece and wrap the stamen using a chopstick or quilling tool securing it with flue as you go.
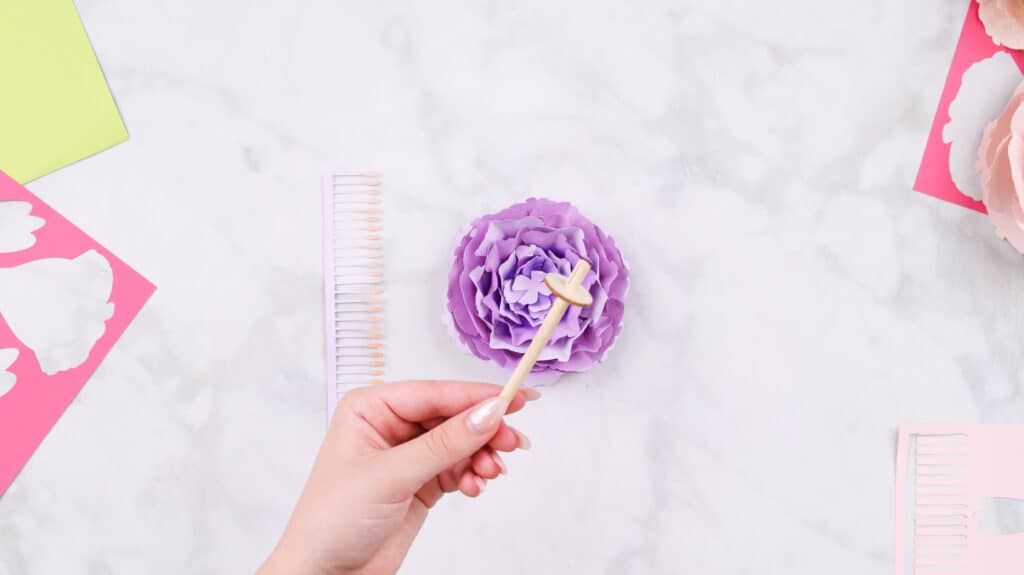
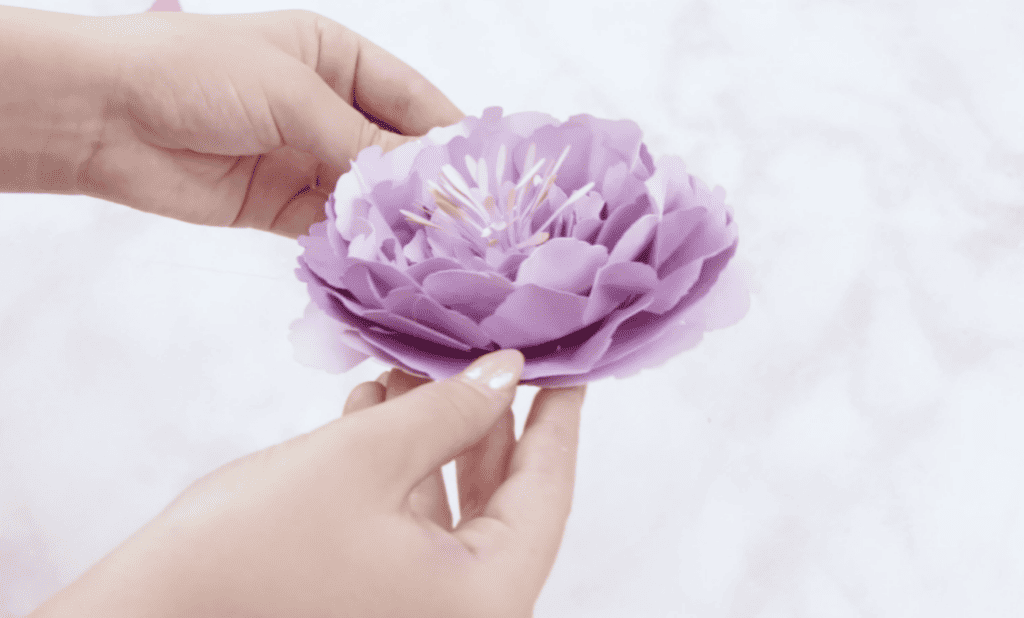
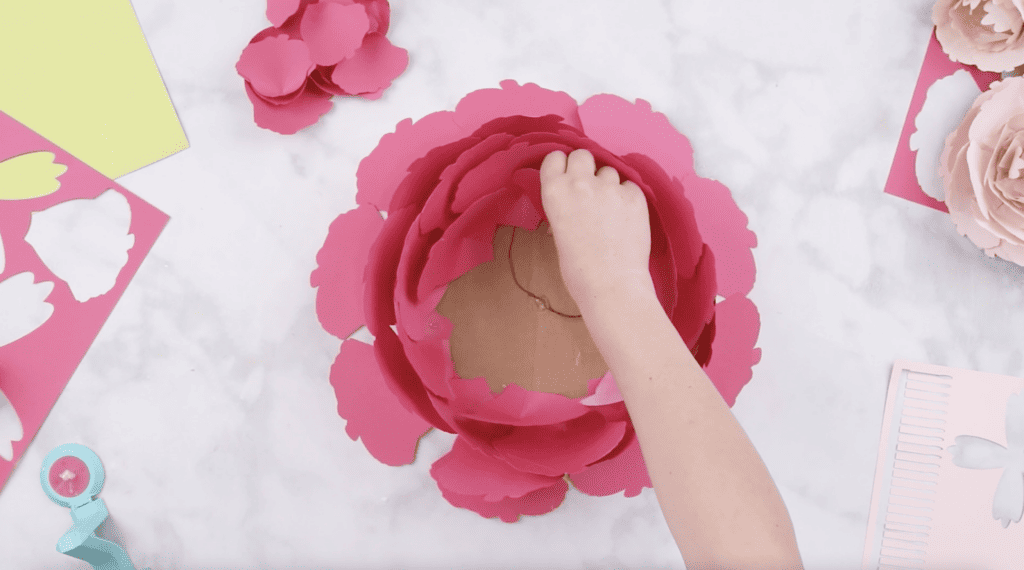
Next, grab your shaped petals. Stack and glue the petals starting with the large petals and ending with the smallest one on top. Make sure your petals don’t lose their shape.
At this point, your flower might look similar to a bowl.
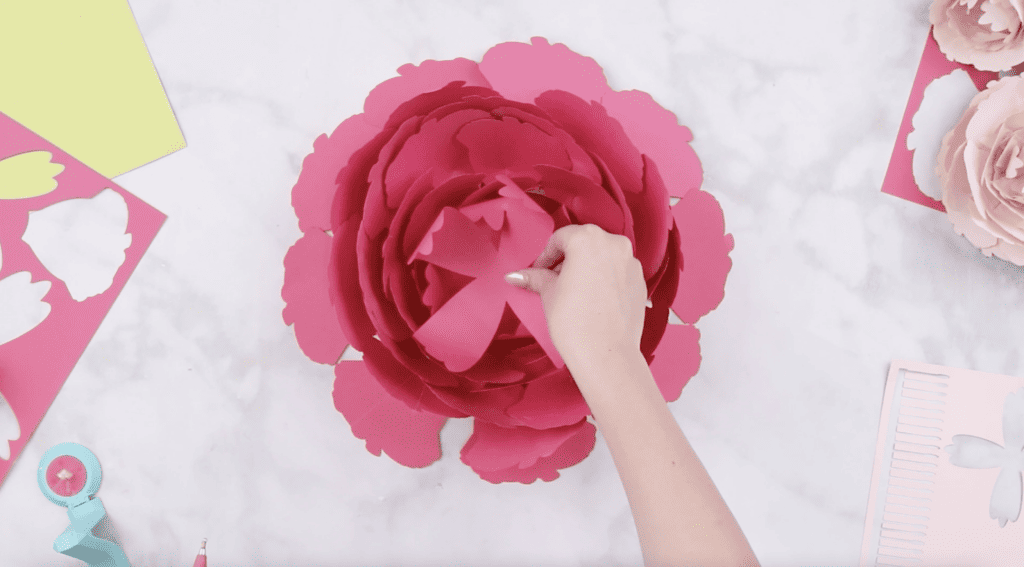
Glue the four Centerpieces starting with the largest one.
Then, the stamen in the middle of the flower (feel free to duplicate another center if it’s not thick enough) and attach the flower base underneath the flower along with the three-leafed base.
Finally, glue the rest of the greenery around your flower
You’ve made a beautiful Ball Peony flower without a stem!
How to Make a Peony Bud
Add variety to your bouquet by making buds. To make a peony bud I suggest cutting out 2 large petals and 2 medium petals.
Peony buds are no bigger than a golf ball, but when they bloom, they're 3x larger than their anticipated size. Wow! Keep that in mind when making these.
I added the stamen piece to my peony buds, but you don't have to. Use the same techniques used to shape the petals, but continue to shape the inner petals into a ball until the stamen piece becomes less obvious.
Tip: Another way to do this is to take a styrofoam ball and glue the petals onto it. Then, stick a floral wire through the styrofoam and secure it with hot glue.
Now that we know how to make these flowers with and without a wire, let's move on to how to create a large paper peony flower you can hang on your wall!
Large Ball Peony Flower
To assemble a Large Paper Ball Peony Flower, grab a cake plate and cut 1-2” slits on each side of the round.
Next, cut a piece of Floral Wire (I used 22 Gauge Floral Wire by Ashland), pull the ends of the wire through the slits, tie the ends together, add a dot of glue to the back of the round, place the tied ends into the dot of glue, and let it dry.
Once it dries, gather the large petals, fold one end over the other, and glue it in place. Doing this will round the petal. I didn't do this to my first layer of petals because I wanted that ball-on-a-plate look.
Glue the folded and shaped petals to the cake round.
Add the medium petals and glue them to the round in front of the large petals.
Continue to layer the small petals.
Now, grab the 4 centers and glue them on top of the petals. This should cover the empty space in the middle of the round.
Finally, roll the stamen piece with a chopstick, pen, or quilling tool. I recommend duplicating the stamen pieces 3 times in DS. Once the stamen piece has been rolled, glue it to the center, and fluff it out.

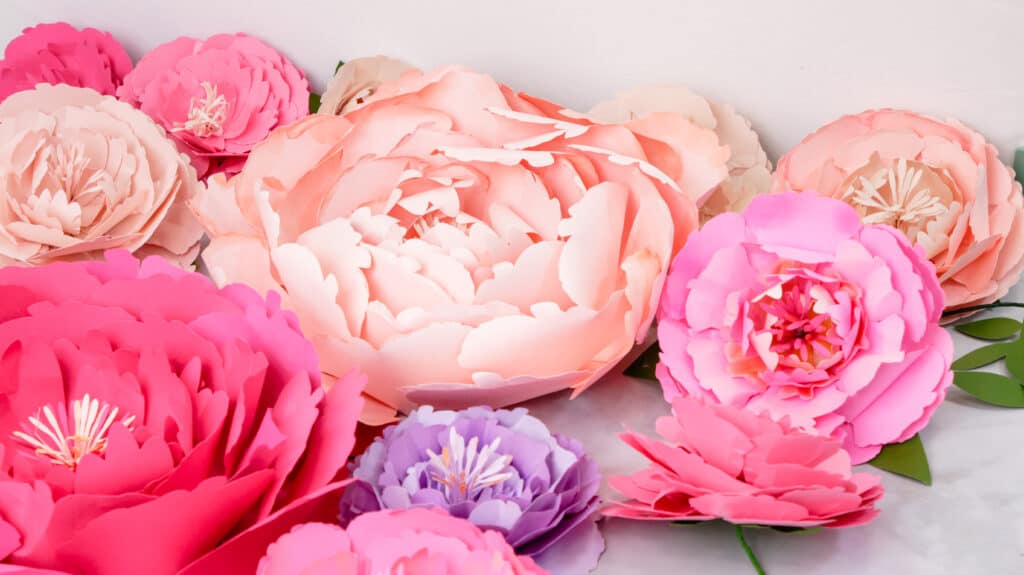
Finished Paper Peony Flowers!
To turn these flowers into full-double peonies, get rid of the stamen piece altogether and continue to layer just the centers and petal pieces on top of one another cupping, and fraying them as you go.
Looking for more paper flower tutorials? I have many! Click here to take a look at all my paper flower designs and tutorials.
Wanting more paper crafts? Click here.
Click here to save this flower template to Pinterest!
These are absolutely beautiful! I can't wait to make them. Thanks so much for sharing the file and for the detailed instructions. My only question is, you mentioned there were three SVG files, but I only saw two (with and without wire). Is the third, which is the large flower, just using the other SVG files, but enlarging them?
These are stunning. Ive just downloaded and cut them out. Thanks for making the instructions so easy to follow.