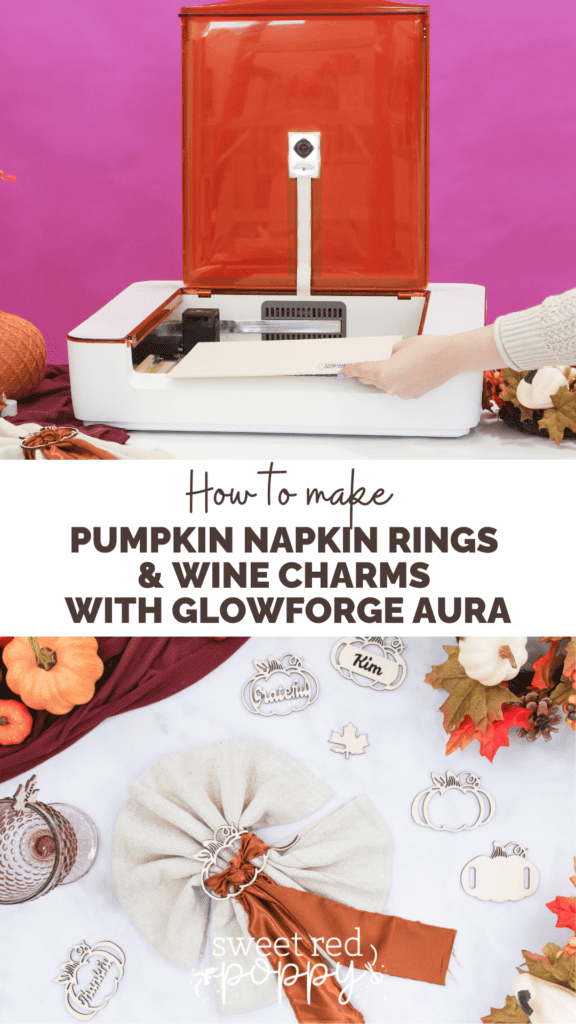
Learn How to Make Pumpkin Napkin Rings & Wine Glass Charms with the Glowforge Aura™ with this Step-By-Step Tutorial and Free SVG File!
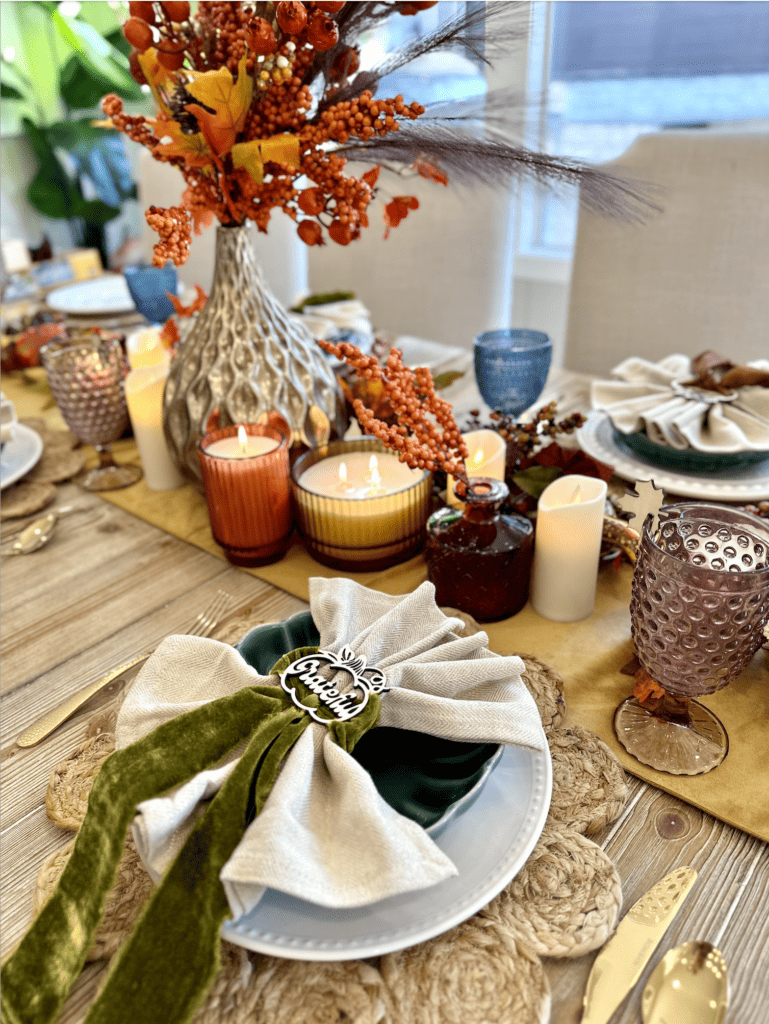
I am so excited to host a Friendsgiving celebration this year! To add a special touch, I added these cute wooden pumpkin napkin rings, made using my Glowforge Aura™.
This is a sponsored post written in partnership with Glowforge®. Glowforge provided me with this machine in order to review it. All thoughts and opinions are my own.

Learn more about the Glowforge Aura here!
These pumpkin napkin rings are perfect for a touch of personalization and make your guests feel extra special. Just look at how adorable and elegant these are! I'm also sharing how to make wine charms towards the end of this blog post! 😍
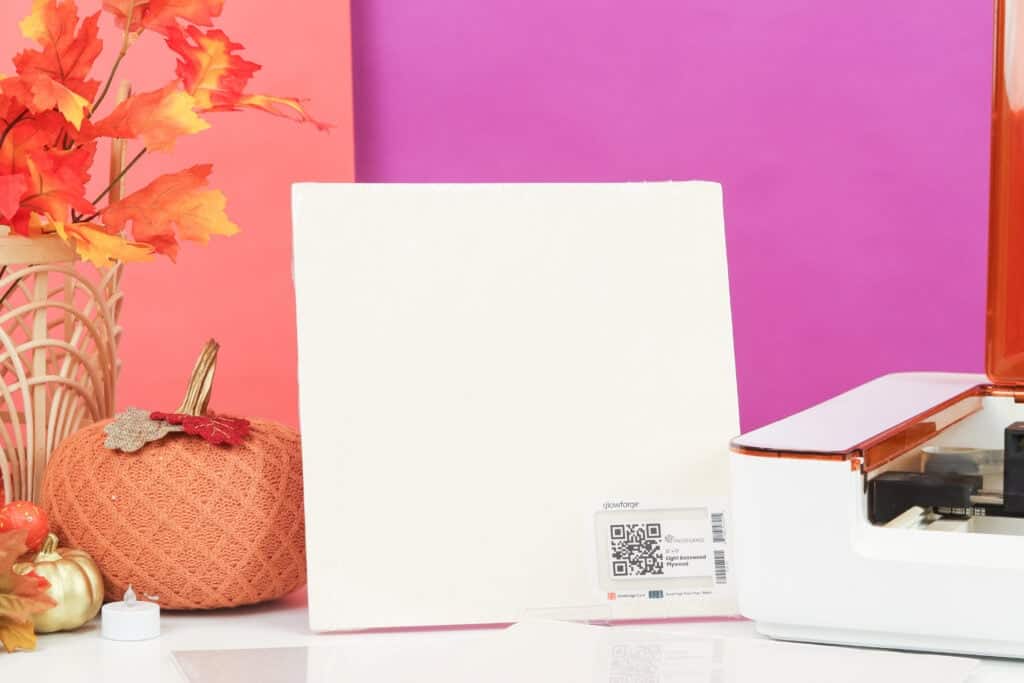
I used Glowforge Proofgrade® Light Basswood Plywood to make these napkin rings, but you can use a different light material. I recommend using Proofgrade materials with your Glowforge Aura.
Why Use Proofgrade Materials?
Glowforge offers laser-compatible Proofgrade materials that measure 12" x 12" for high-quality results.
The Proofgrade materials have a useful QR code on the front of the material that the machine reads and automatically adjusts its settings for perfect results.
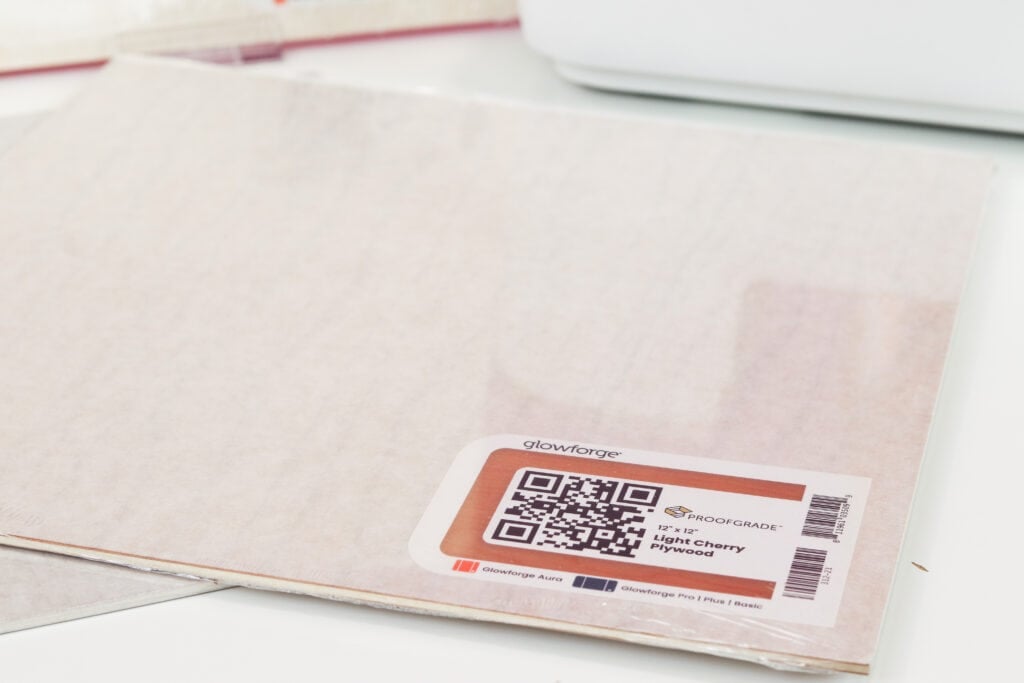
Glowforge Proofgrade materials are also covered in protective masking that can be taken off once the machine is done printing, so your projects are clean and burnt-mark free!
Find out more about Proofgrade materials here.
Let’s go over the supplies needed to make these napkin rings.
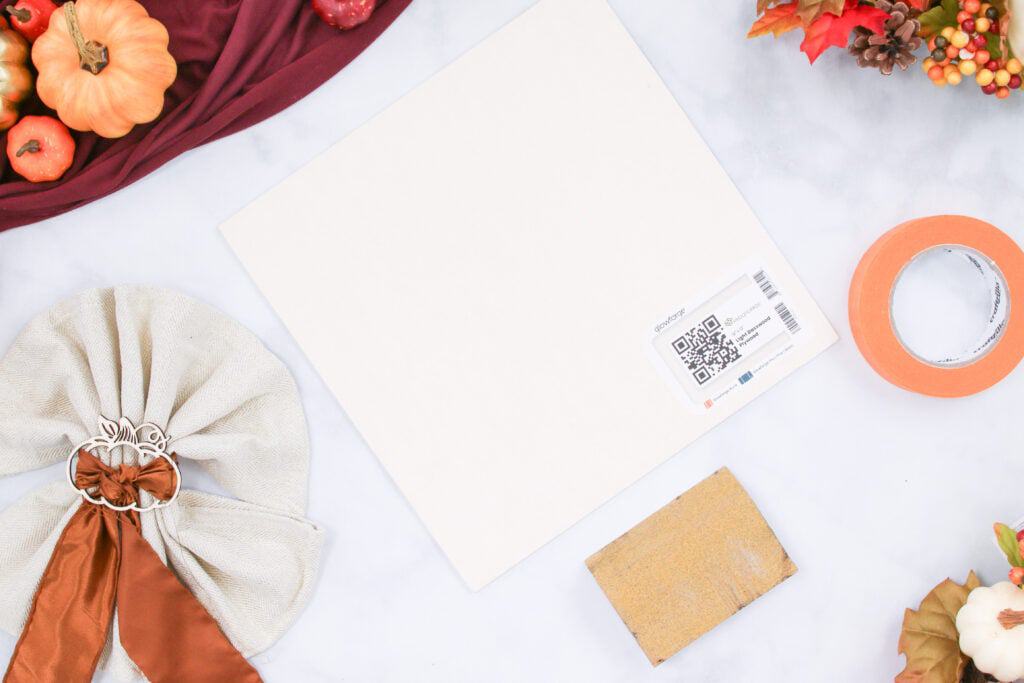
Table of Contents
Supplies Needed
- Glowforge Aura
- 12” x 12” Proofgrade Light Basswood Plywood or any Light Proofgrade Material
- Ribbon
- Napkins
- Sand Paper
Optional Supplies
What does the SVG Include?
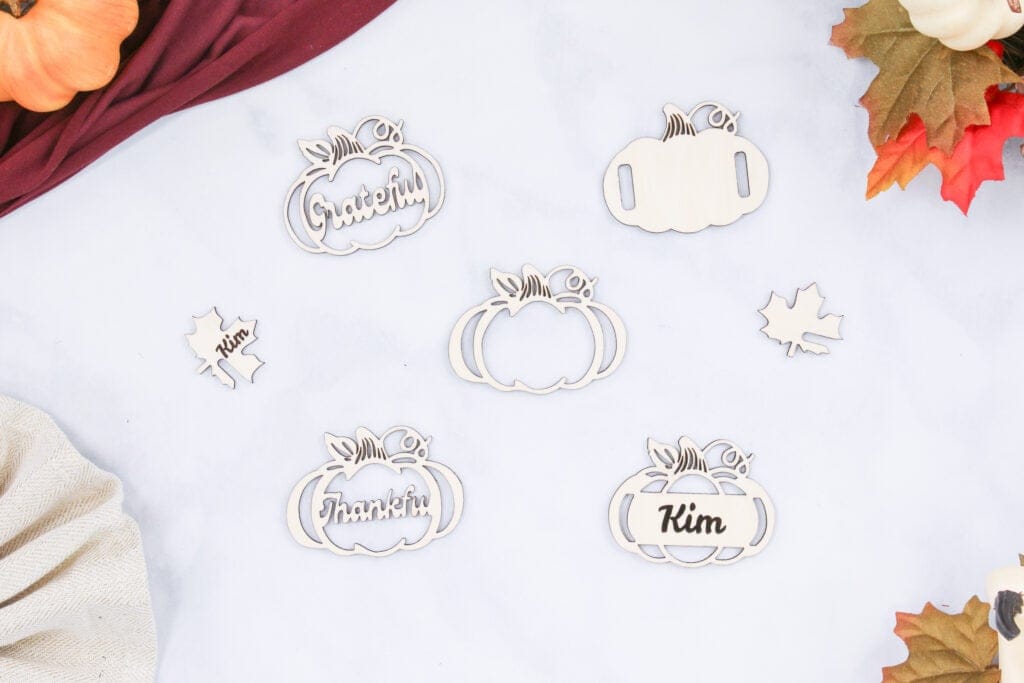
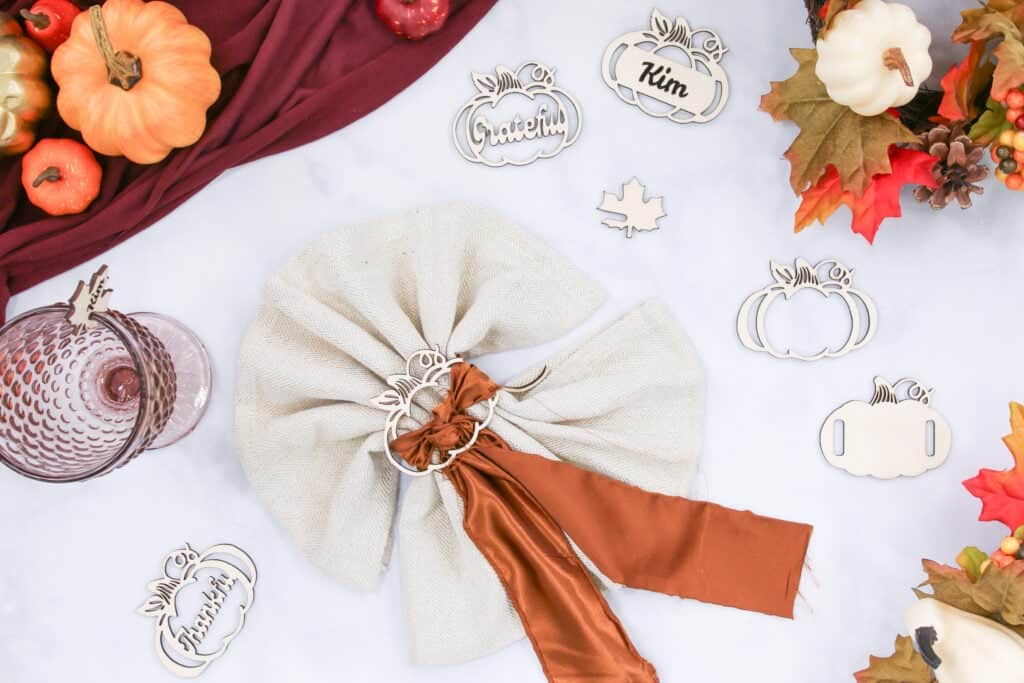
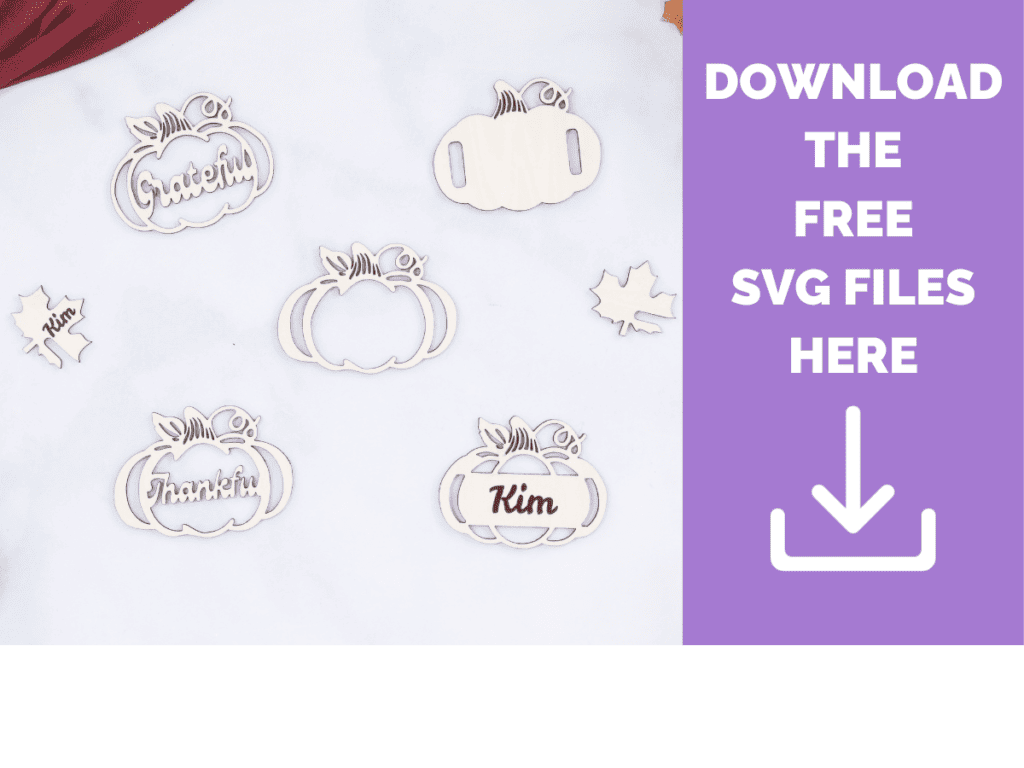
This SVG file includes 5 pumpkin napkin ring designs to choose from- 1 Grateful, 1 Thankful, and 3 other pumpkin napkin ring blanks.
If you don’t have a Glowforge Aura, this SVG file is also compatible with Cricut machines.
Download the FREE Pumpkin Napkin Ring SVG files here!
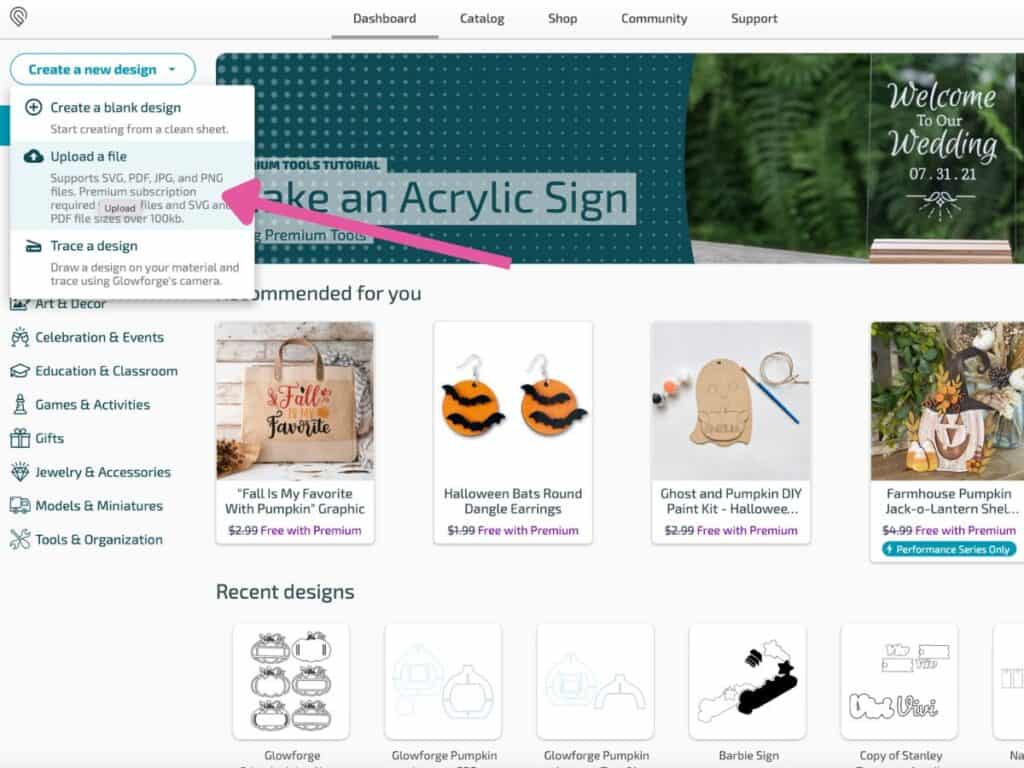
Uploading to Glowforge
The first step is to upload the SVG file to the Glowforge app. Head over to app.glowforge.com after downloading the SVG file. Sign in and click Create a New Design, select Upload a File from the dropdown menu, and upload the SVG file.
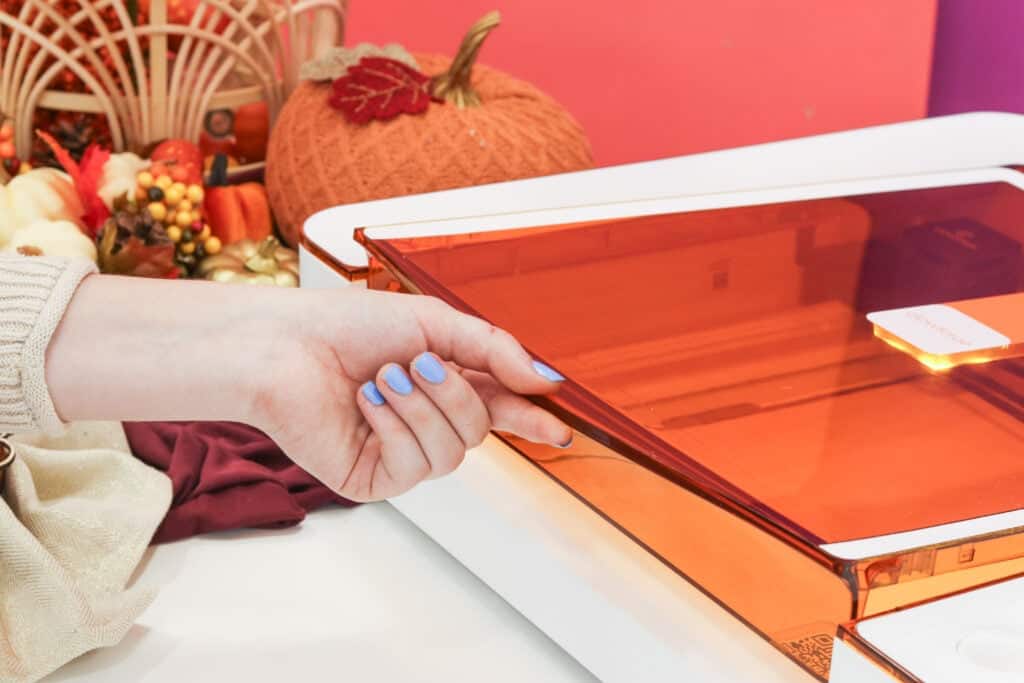
To start, place the material you intend to use into the Glowforge Aura machine. Then, position the design in any available space on your screen.
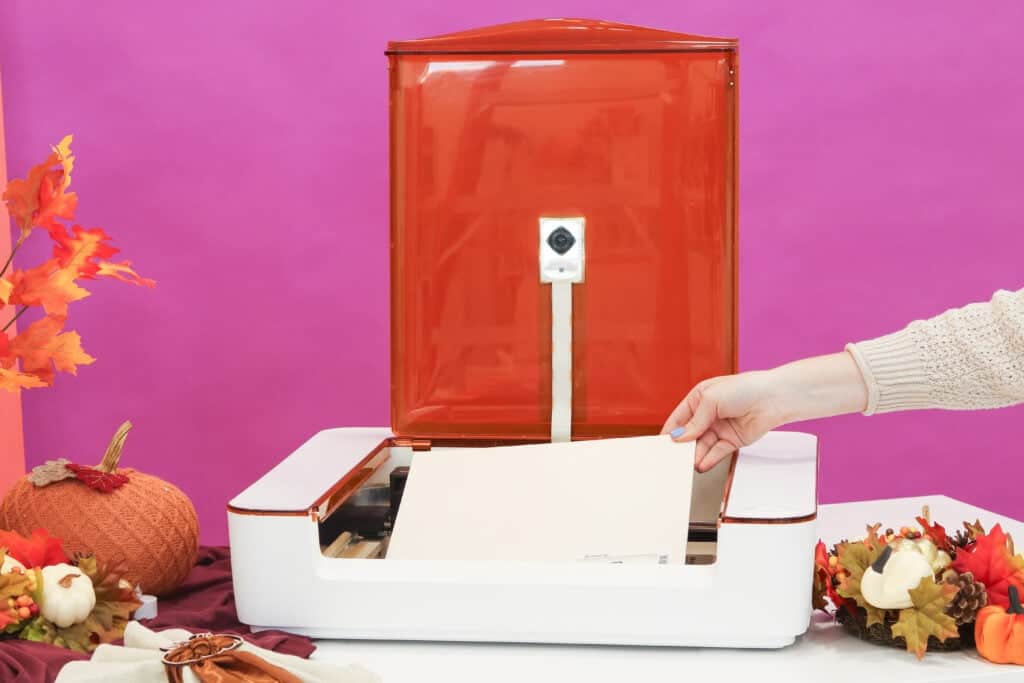
Simply, close the lid of the Aura. The machine will automatically read the QR code sticker on the Proofgrade material and identify the material you are using.
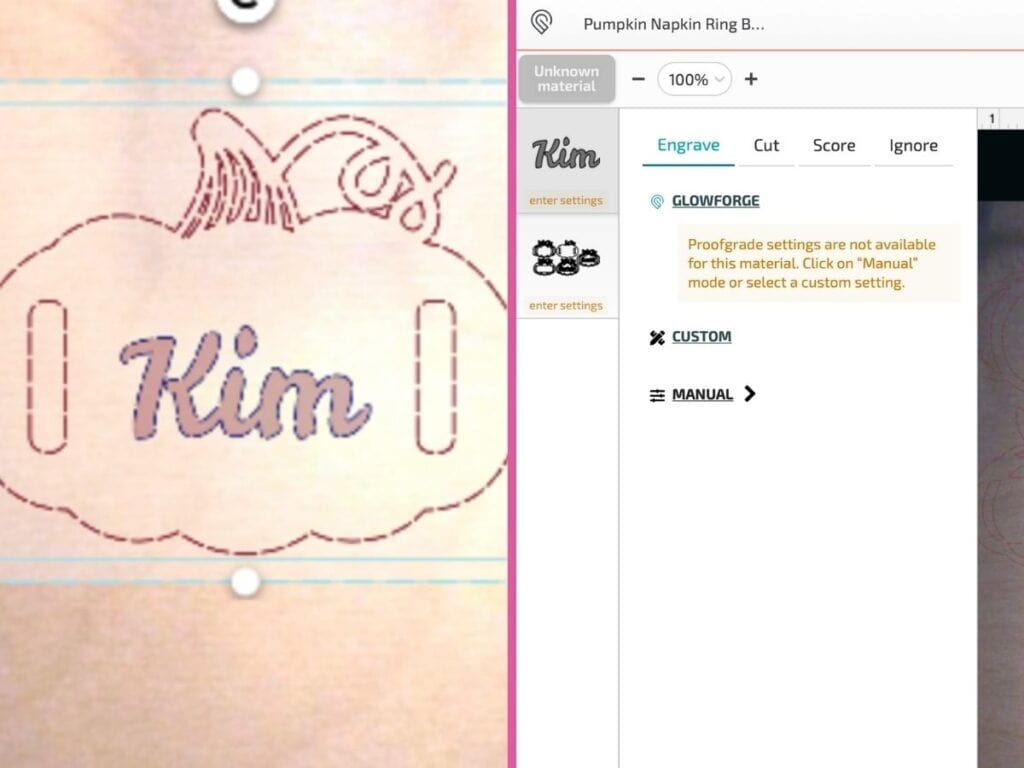
Now, change the layer type from Engrave to Cut.

You can add names to the pumpkins if you want. If you only want to engrave a name, use the ones without an opening in the middle If you want to combine a name with one of the other pumpkins, I'll explain how to do that below!
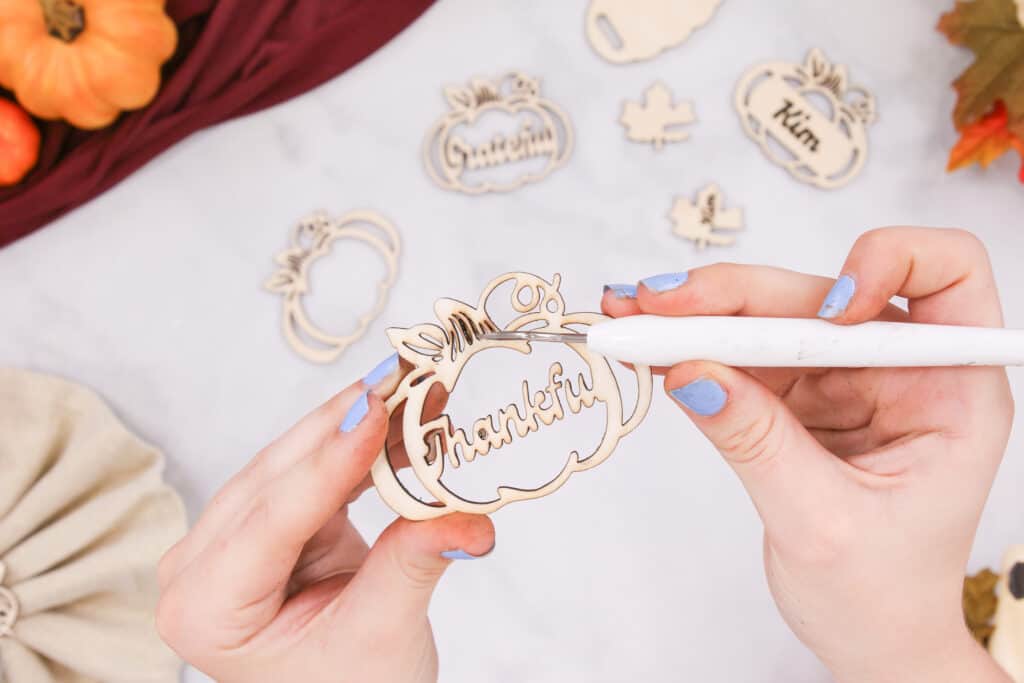
How to Engrave Names onto the Pumpkins
To do this, select the text tool and type whatever you want in the “Your Text Here” box. Then, change the font and size, drag it onto the pumpkin piece, and change the layer type to Engrave.
How to Combine Text with One of the Pumpkin Designs
If you want to include a name on one of the pumpkin designs that has an open space in the middle, you will need to merge it with the design.
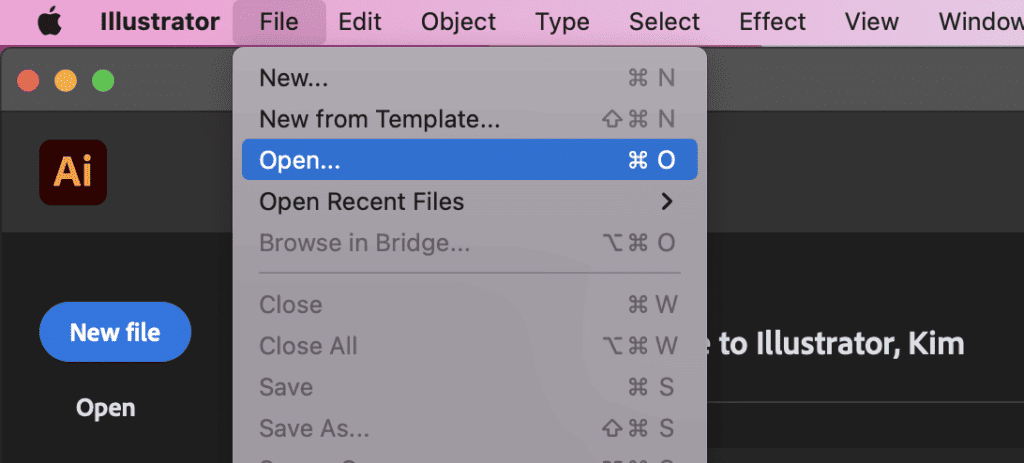
Unfortunately, this cannot be done in the Glowforge App. To achieve this, you will need to import the SVG file into a design program of your choice such as Illustrator or Inkscape.
I will guide you through uploading the design to Illustrator.
Create Text Layer
- 1. Open Illustrator and open the SVG file by going to File->Open in the menu bar above Illustrator.
- 2. Once the pumpkins are in your workspace, select the pumpkins you don’t want with your Selection tool (V) while holding down shift to select multiple and press delete on your keyboard.
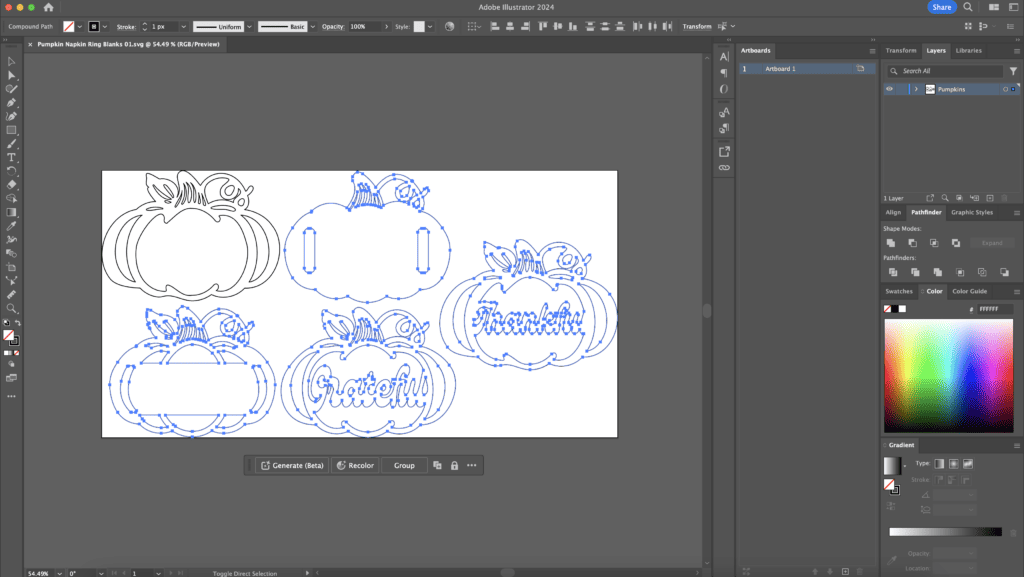
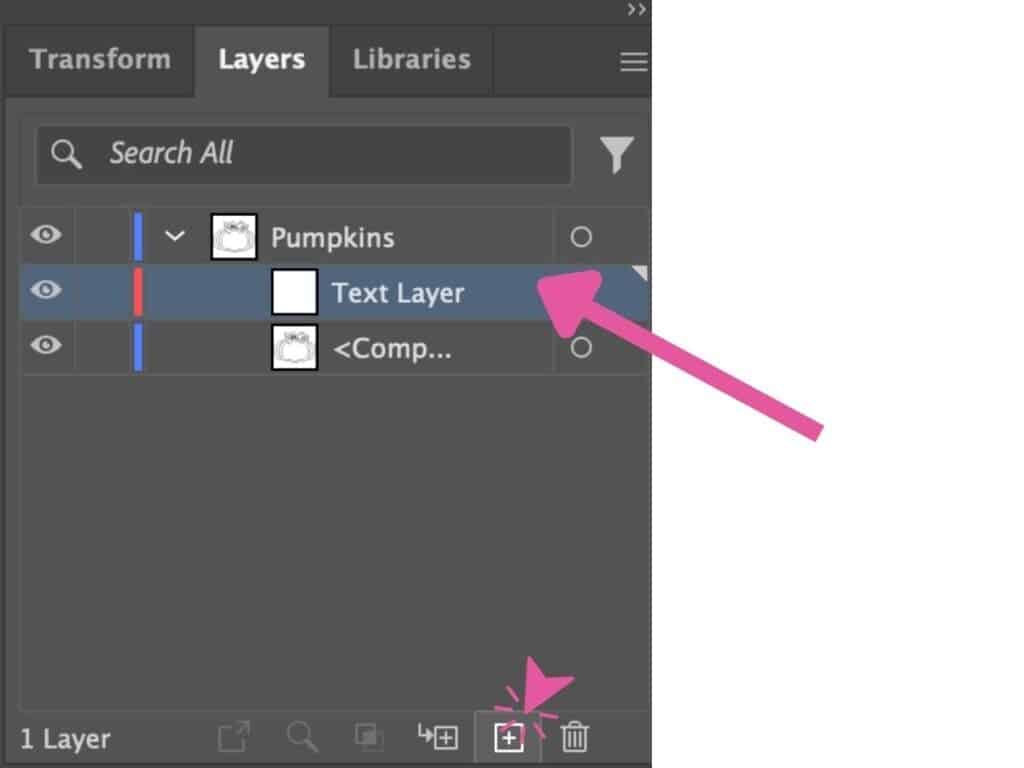
- 3. Next, in the Layers window (if you can't see your layers panel, go to Windows->Layers), click Create a New Layer at the bottom of the layers panel. This layer is going to be our text layer.
- 4. Select the T for Type Tool in the toolbar to the left of your artboard and type a name or word. Change the font and size of your text in the window below your text or the Character panel above the artboard. I chose the font Semibold SignPainter.
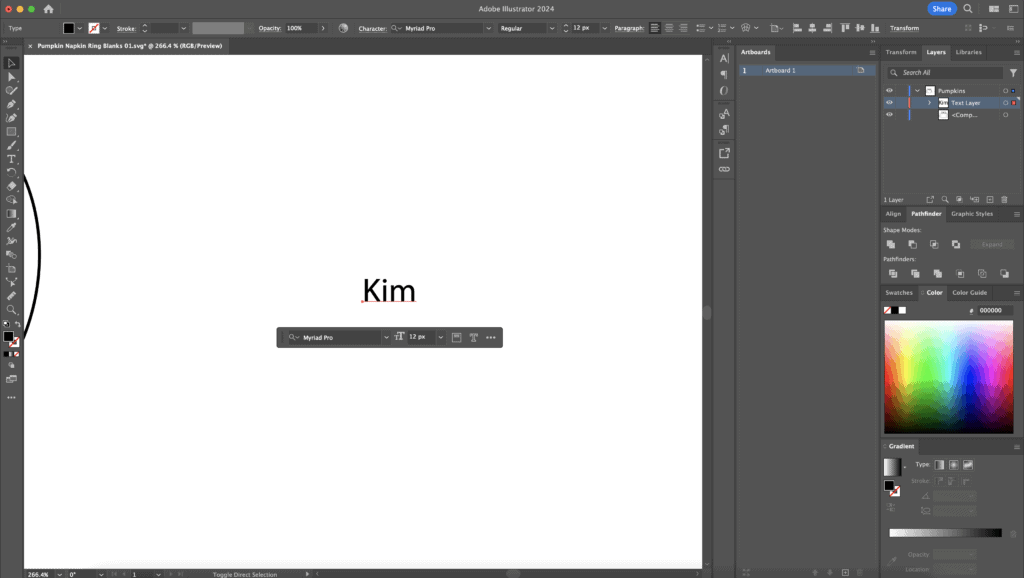
Tip: When choosing a font for cutting, it's important to select a thick font to avoid breakage or difficulty cutting.
Turn Text into an Object
- 5. With the Selection tool, drag the text over to the pumpkin design and place it in the middle.
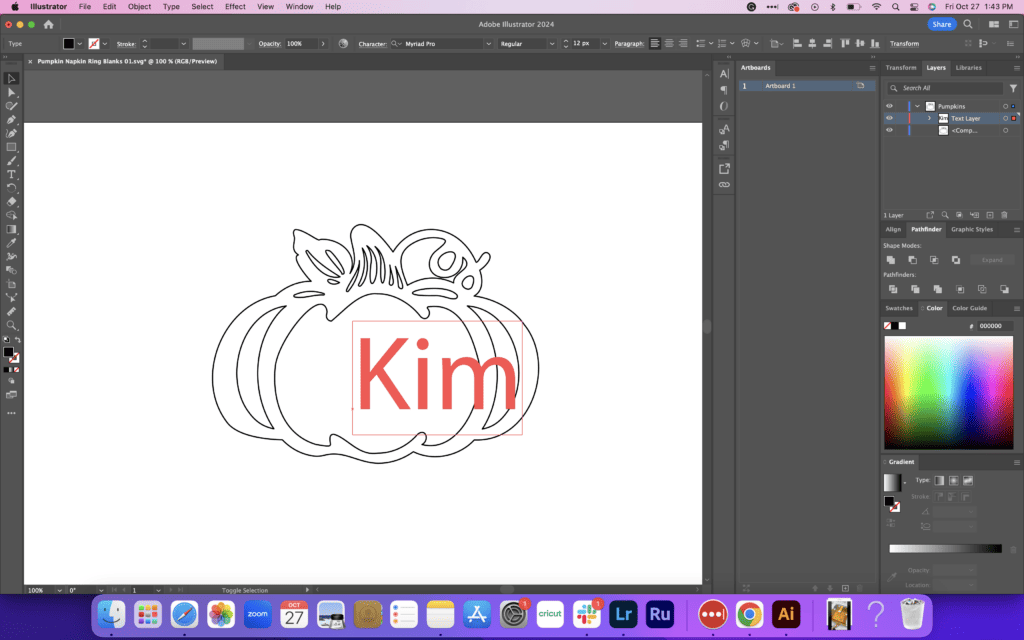
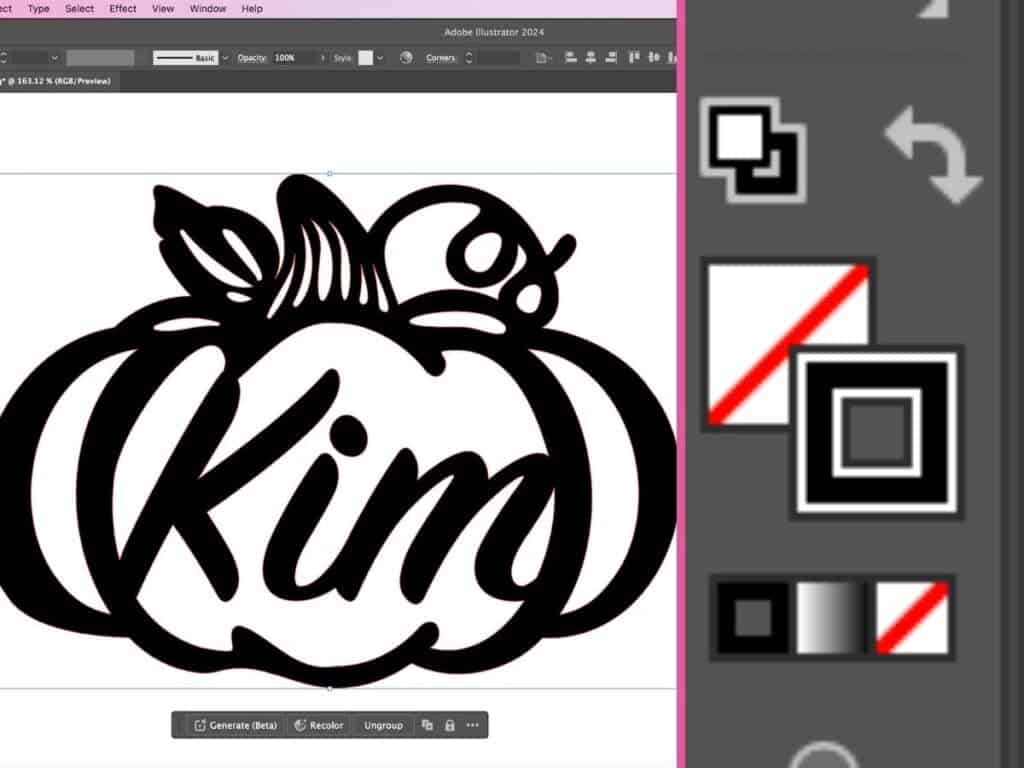
- 6. Click and drag one of the handles on the white bounding box of the text to fit onto the pumpkin, and make sure some of the text is overlapping parts of the pumpkin- you will find out why soon.
- 7. Once you’re happy with the placement of the text, click on Type in the menu bar above Illustrator and select Create Outlines. This will convert your text into an object.
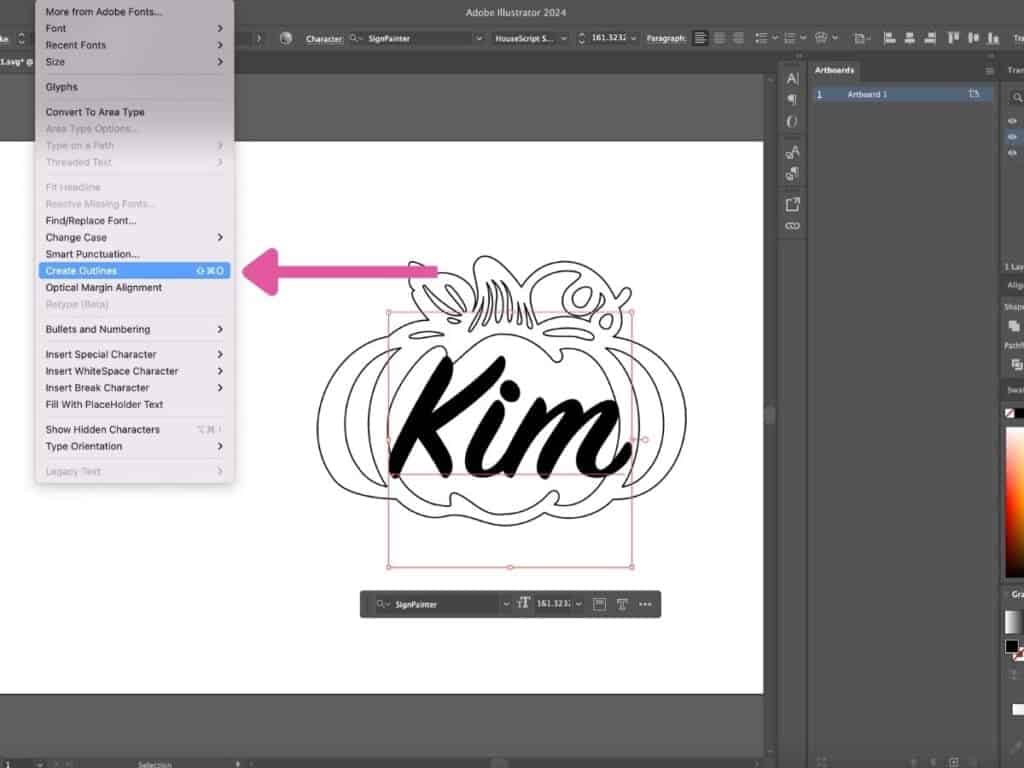
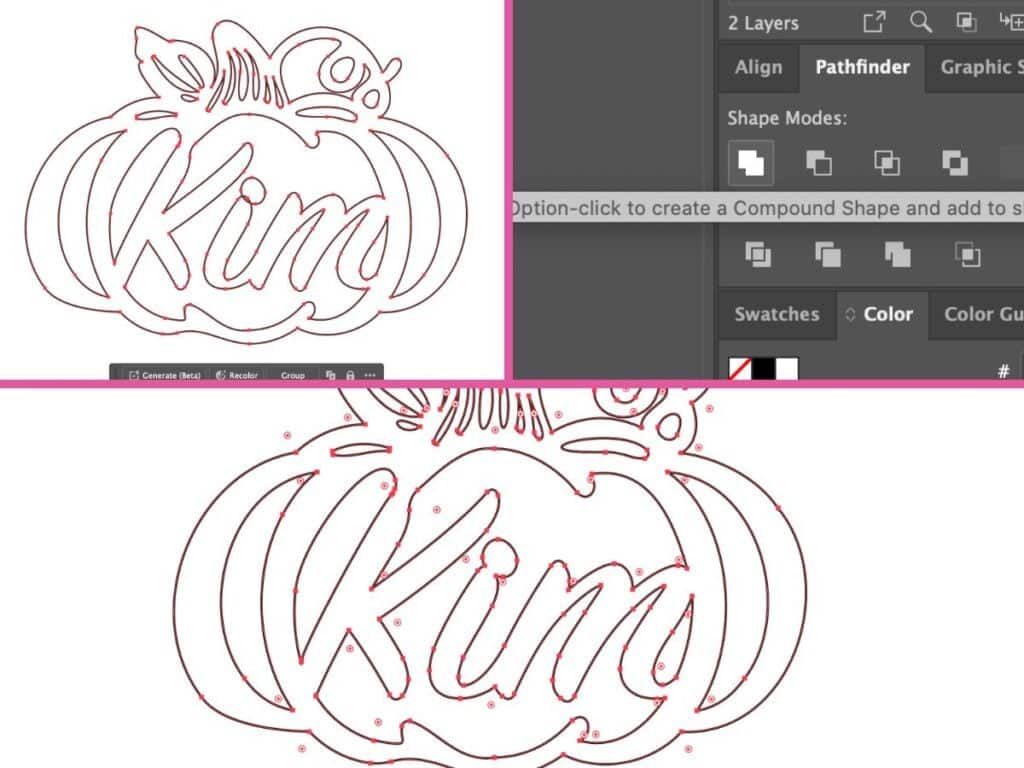
- 8. Select your text or now object, and click Unite in the Pathfinder panel (Window->Pathfinder).
Unite Design
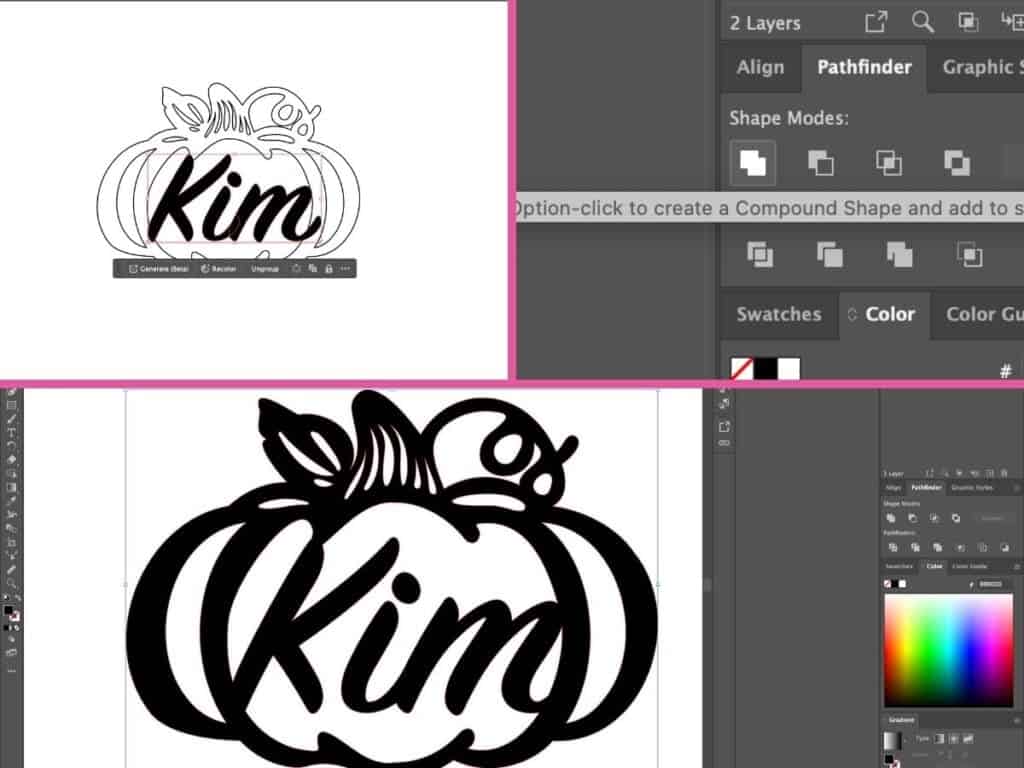
- 9. Then, click and drag to select both the pumpkin design and your text object, and click Unite once again in the Pathfinder window. You can change the color of the fill or just leave it as a stroke.
I like to zoom in and use the Direct Selection Tool (A) to delete unwanted nodes. Click on the unwanted nodes and just keep pressing delete on your keyboard until it's gone.
- 10. If you have an "i" in the word you used, you need to combine the dot of the i with the rest of the design. To do this, Ungroup (Cmd->Shift->G) the pumpkin design.
- 11. With the Selection Tool, select the dot of the “i” to move it to a place where it will overlap a part of the design. Select everything, and click Unite in Pathfinder.
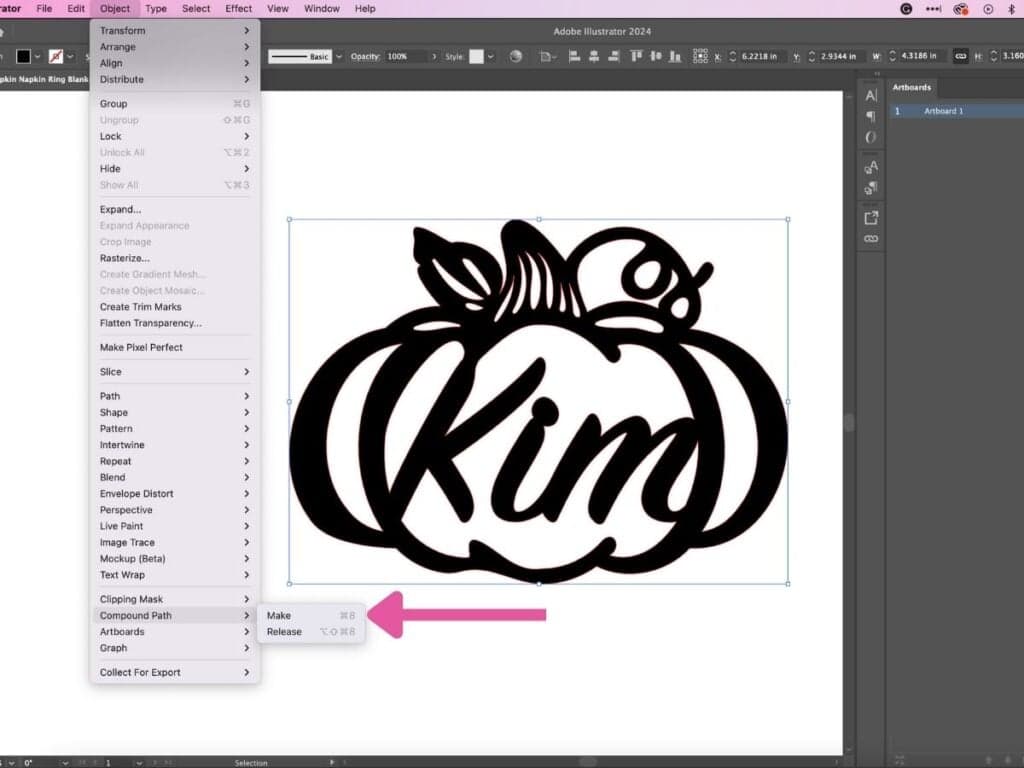
Make Compound Path
- 12. Finally, select the object and make it a compound path by going to Object->Compound Path->Make or keyboard shortcut Cmd-> 8. Doing this will group the paths of the object.
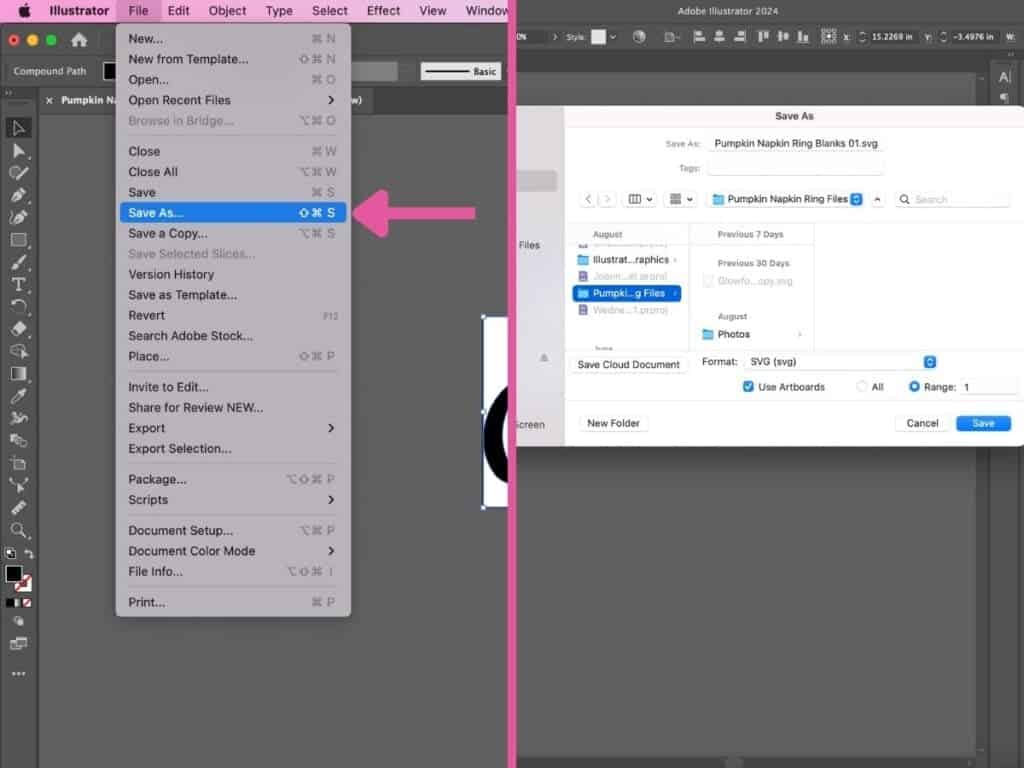
Save as SVG
- Repeat these steps if you want to make more pumpkins with names.
- 13. Once finished, go to File->Save As, name it, change the Format to SVG, and click Save. Yay! Now upload your Pumpkin Napkin Ring Design to the Glowforge app.
Cutting Pumpkin Napkin Rings
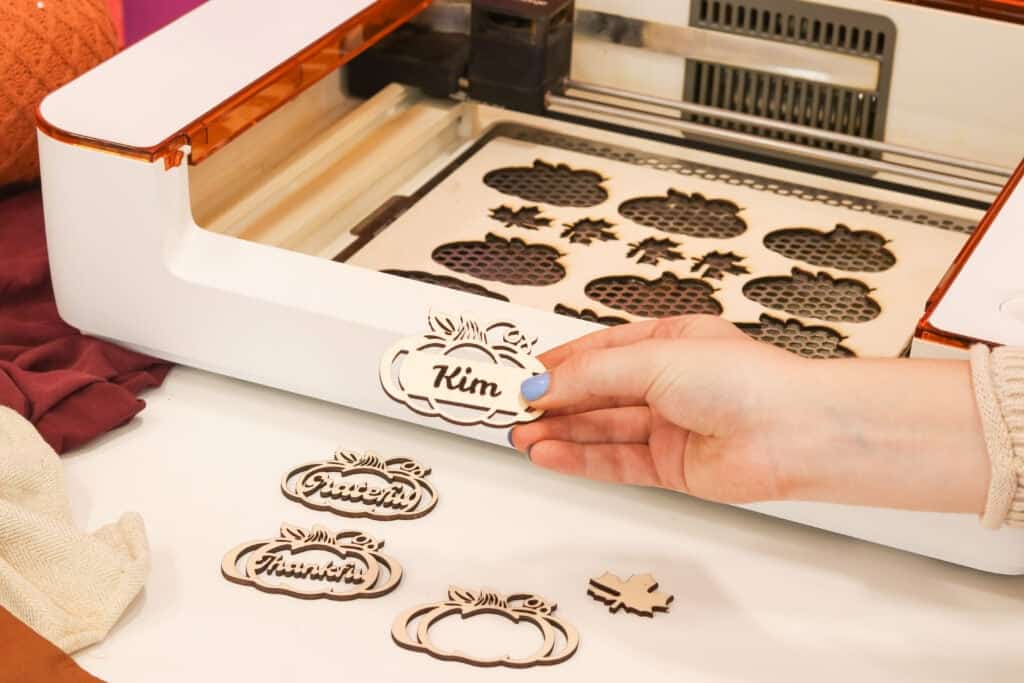
After uploading the design to the Glowforge app and the material has been placed inside the Glowforge Aura, you can start cutting!
Click Print in the upper right corner of your screen.
It may take a couple of minutes, but wait until the Glowforge Aura light flashes blue. Press the flashing button, and let the machine do the work.

When done cutting, wait a few minutes for the fumes to go down. Open the lid when the fans of the Glowforge unit fans turn off.
Glowforge Personal Filter
**I have attached my Glowforge Aura to a Glowforge Personal FilterTM. If you do not have a Personal Filter, make sure to exhaust outside. Before doing so, please check your local regulations regarding air quality and always double-check the exhaust setup to prevent fumes and smoke from escaping. To learn how to set up the Glowforge Aura, click here.**
Remove the now-cut material from the machine.
Assembling Napkin Rings
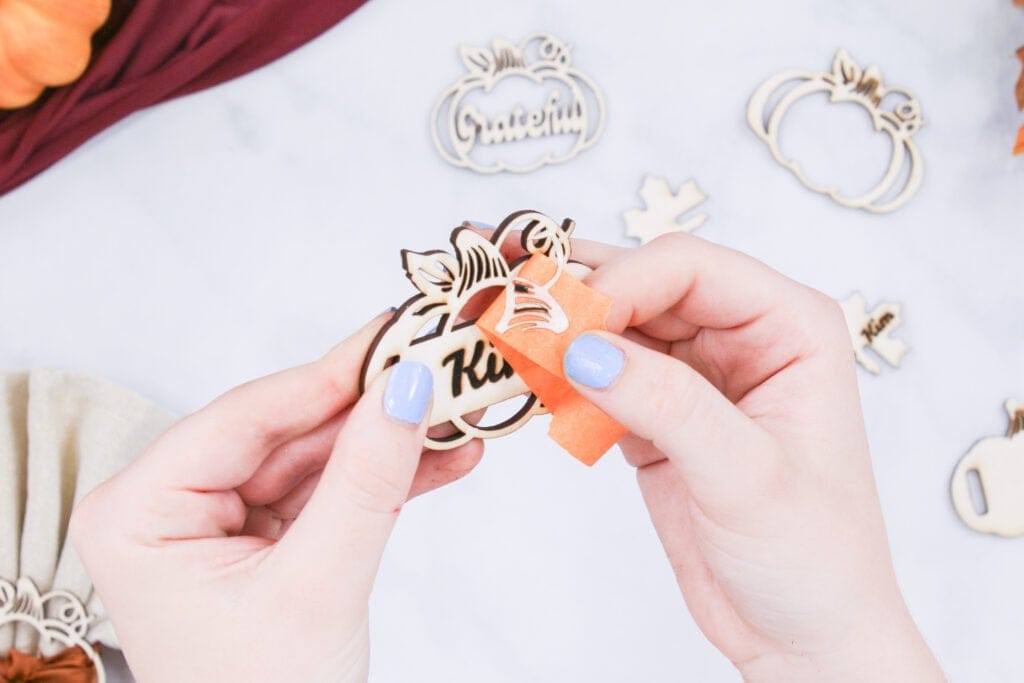
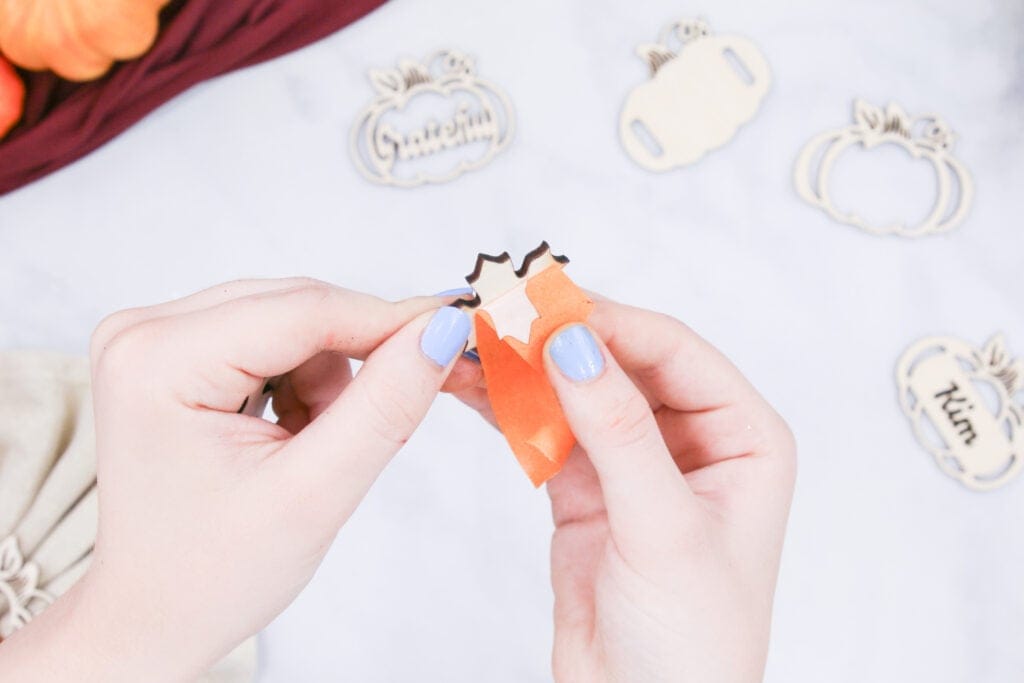
Remove the cut pieces from the material and remove the masking.
Pro Tip: Stick duct tape onto the cut piece and gently pull the masking away from the cut piece.
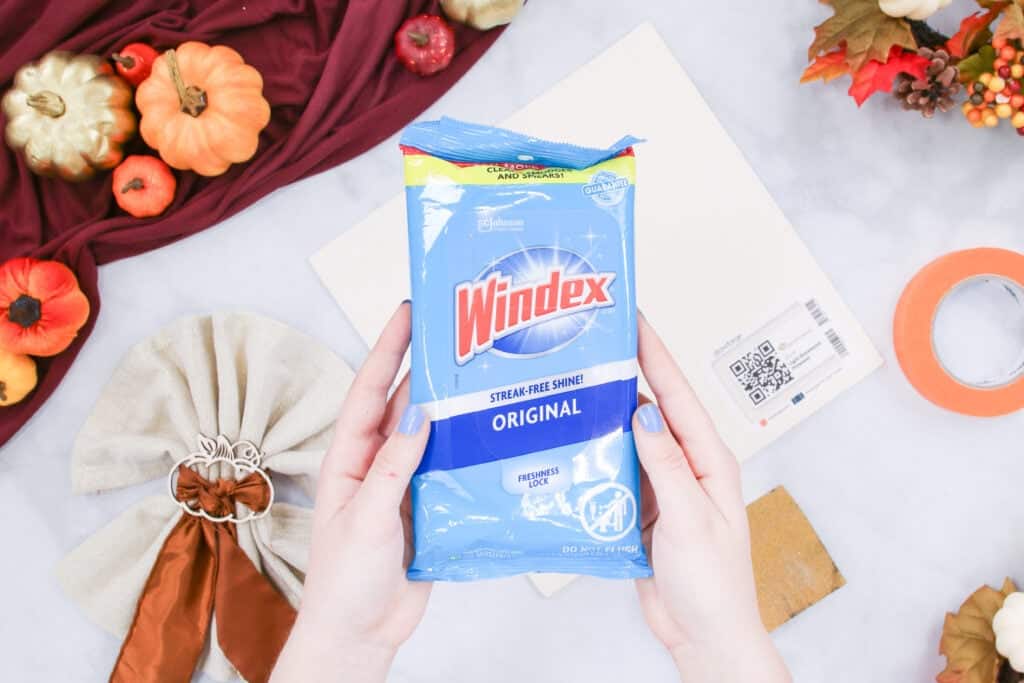
Pro Tip: Use a Windex Wipe or or other cleaning wipe to remove the burn marks.
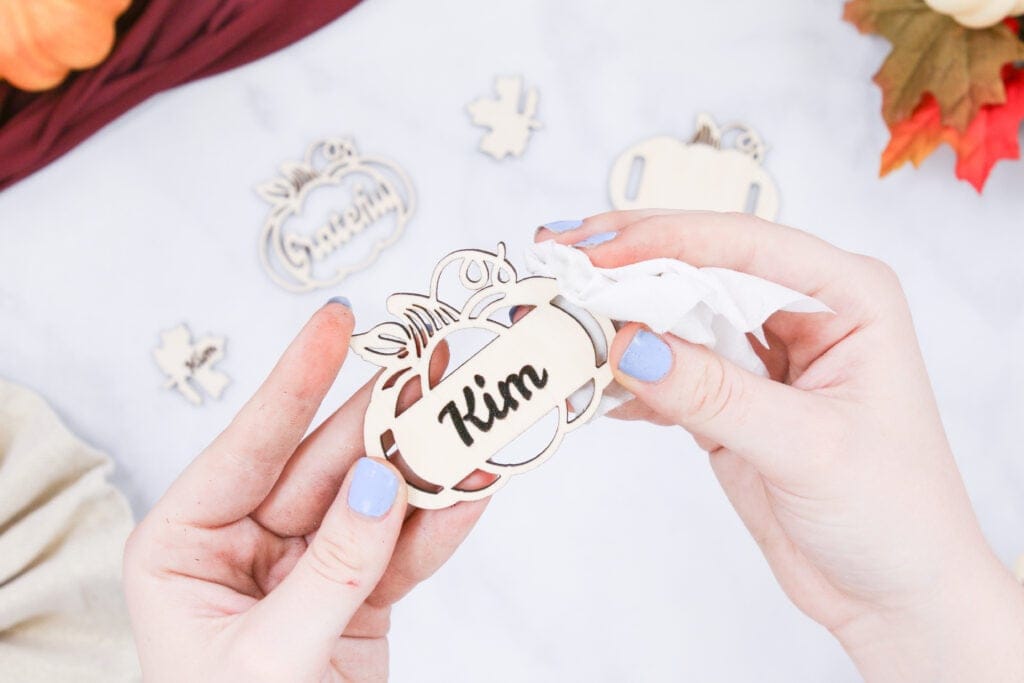
The stem of the pumpkin is pretty detailed, so I like to take a weeder tool to remove small cuts from the pumpkin.
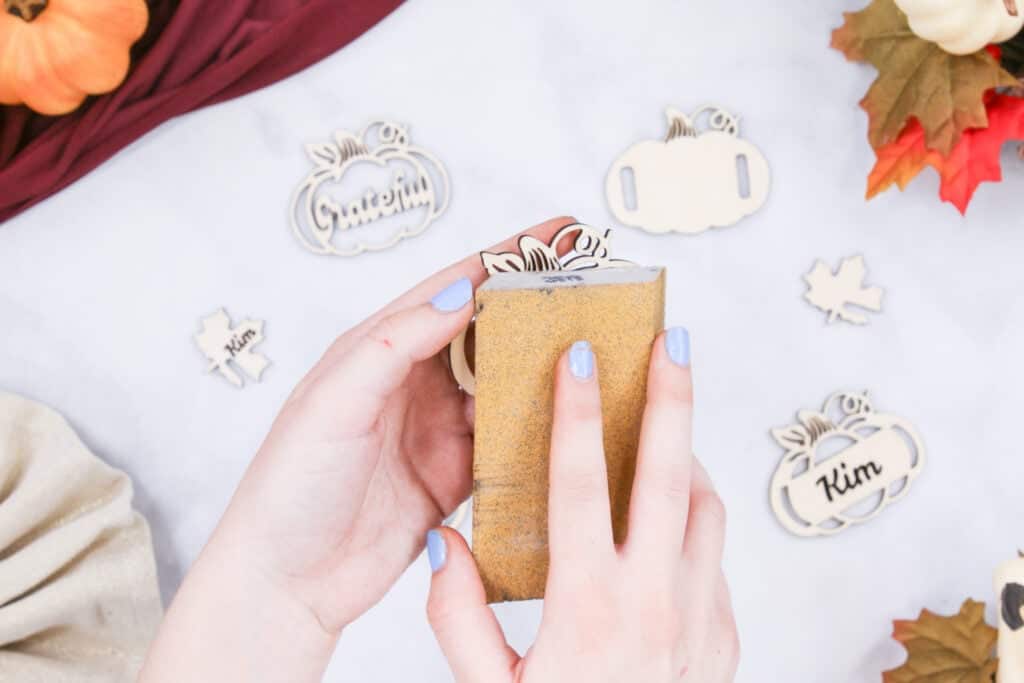
Next, sand down your pieces. You can paint them, add rhinestones, or just leave them as is. I think the unfinished wood is the perfect look for a fall tablescape!
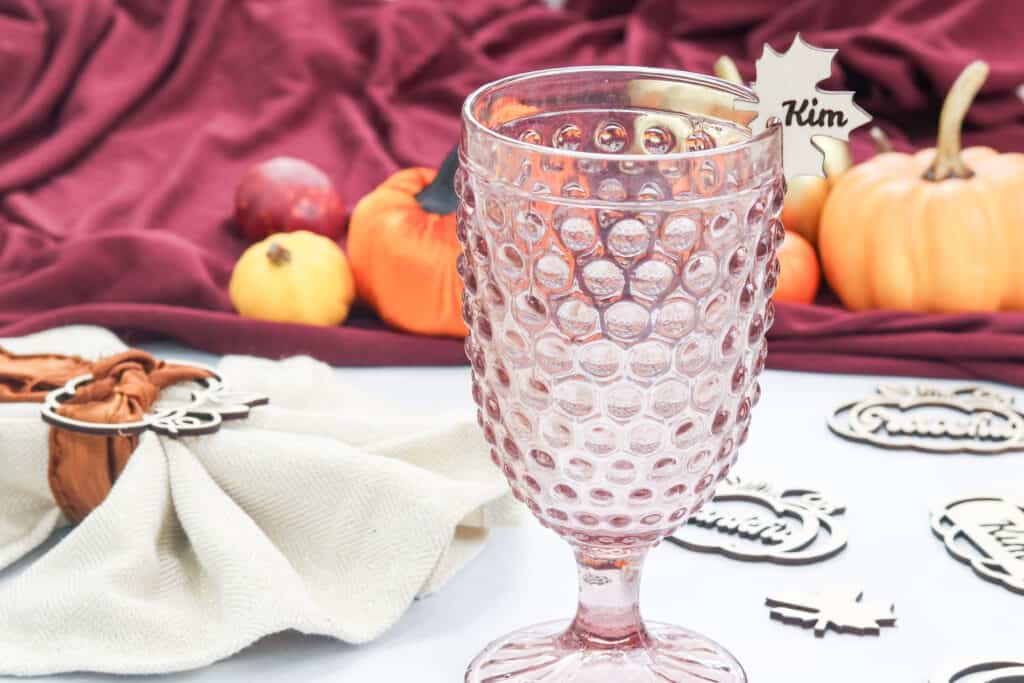
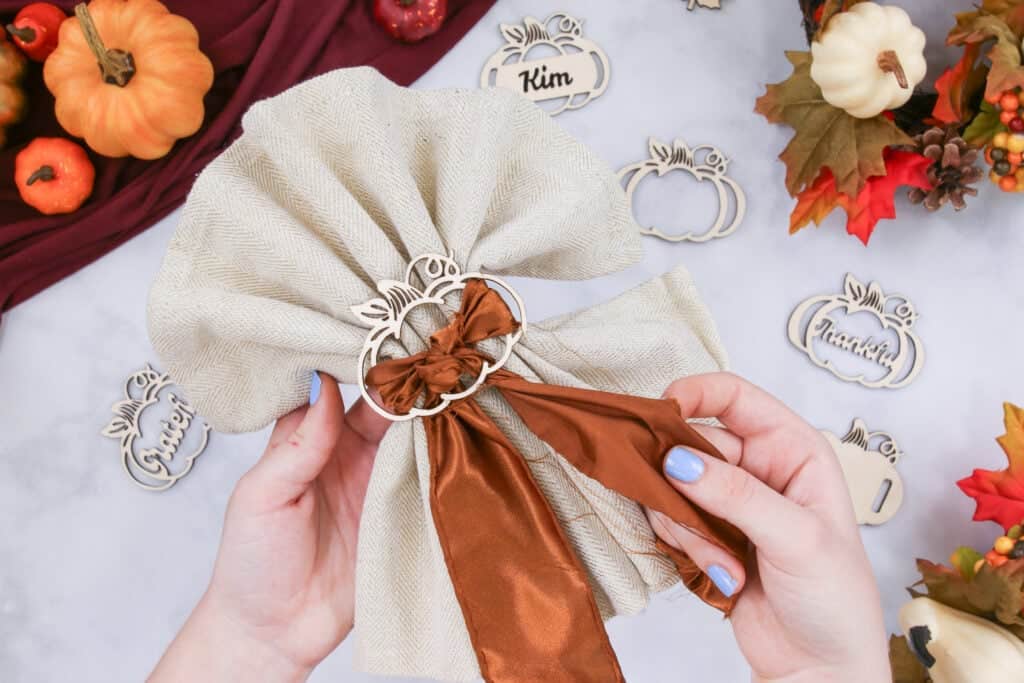
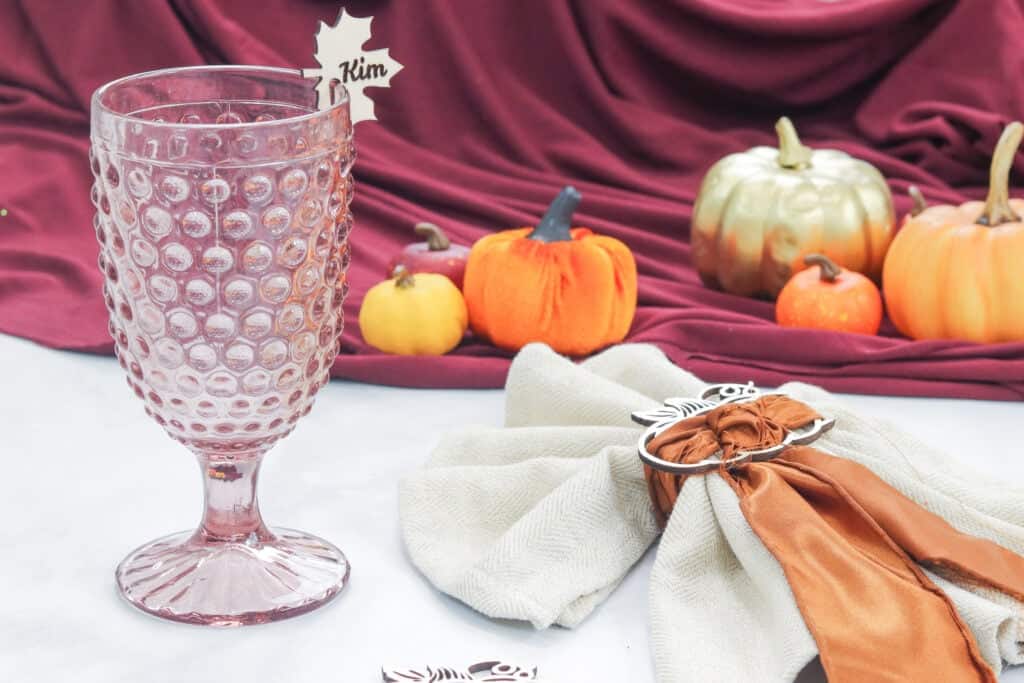
Finally, grab your napkin and ribbon. Wrap the ribbon around the napkin, add one of the pumpkin napkin rings. Slide the ribbon through the loop slots, and tie the two ends together.
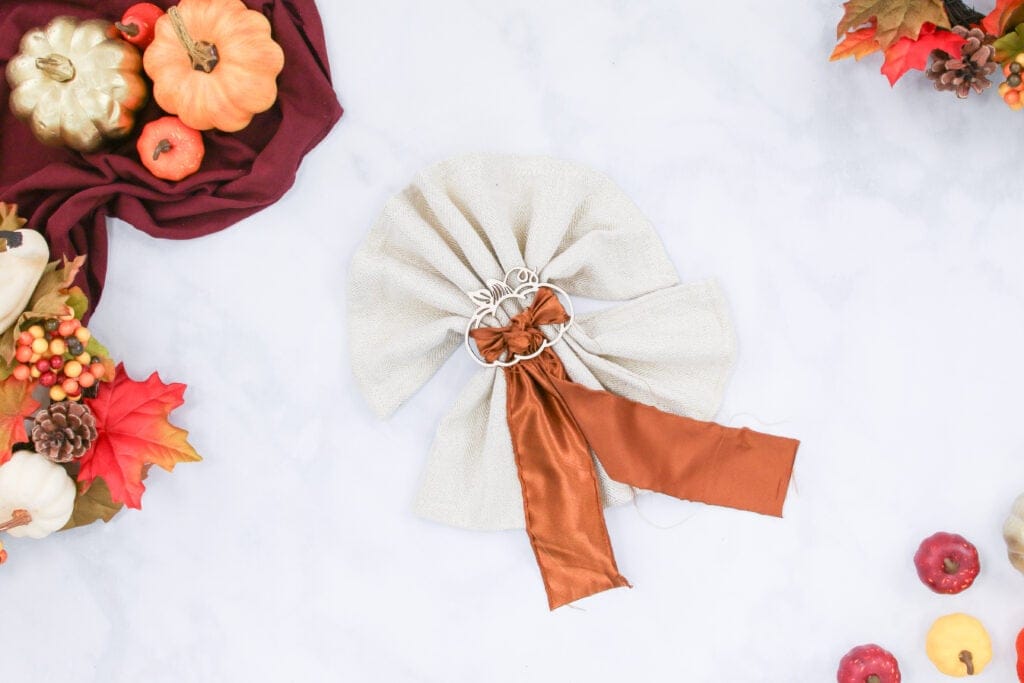
There you have it! An adorable yet elegant pumpkin napkin ring!
Finished Pumpkin Napkin Ring
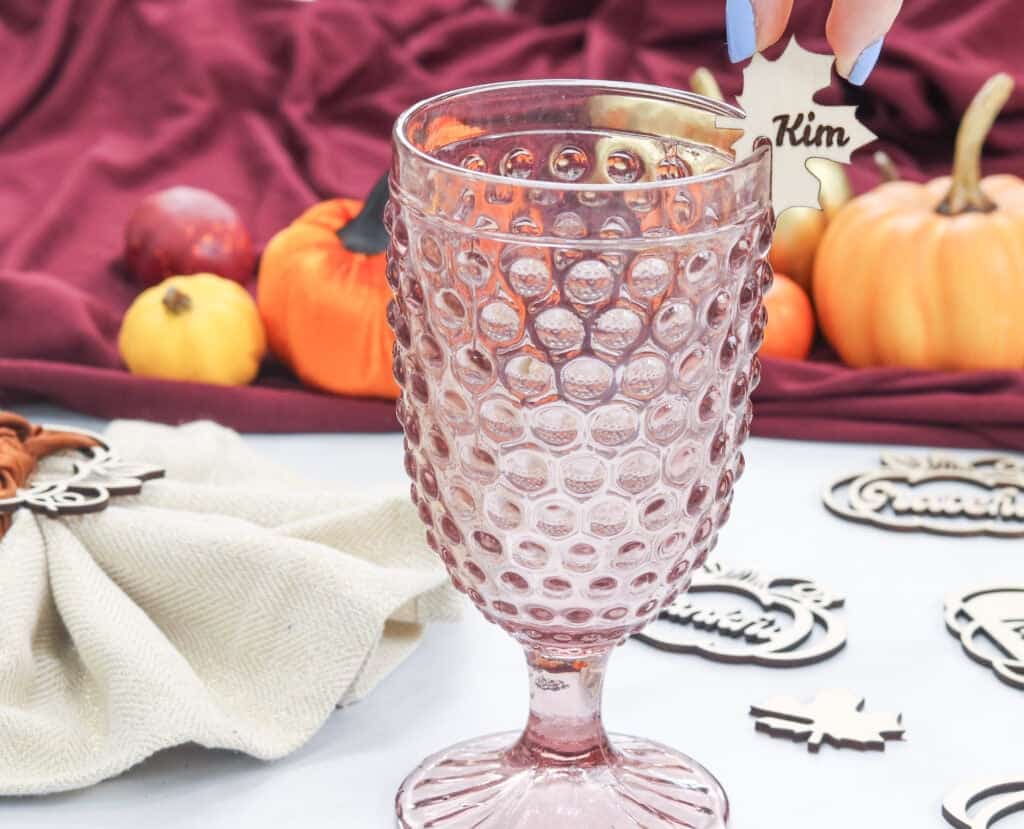
Download the Free Wine Charm SVG File Here!
How to Make Drink Charms
These wine charms are the cherry on top! They will bring a smile to the faces of all who come to your formal dinner party, casual get-together, or anything in between.
To make these, you first need to upload the SVG file by going to app.glowforge.com, logging in, clicking Create a New Design, and selecting Upload a File.
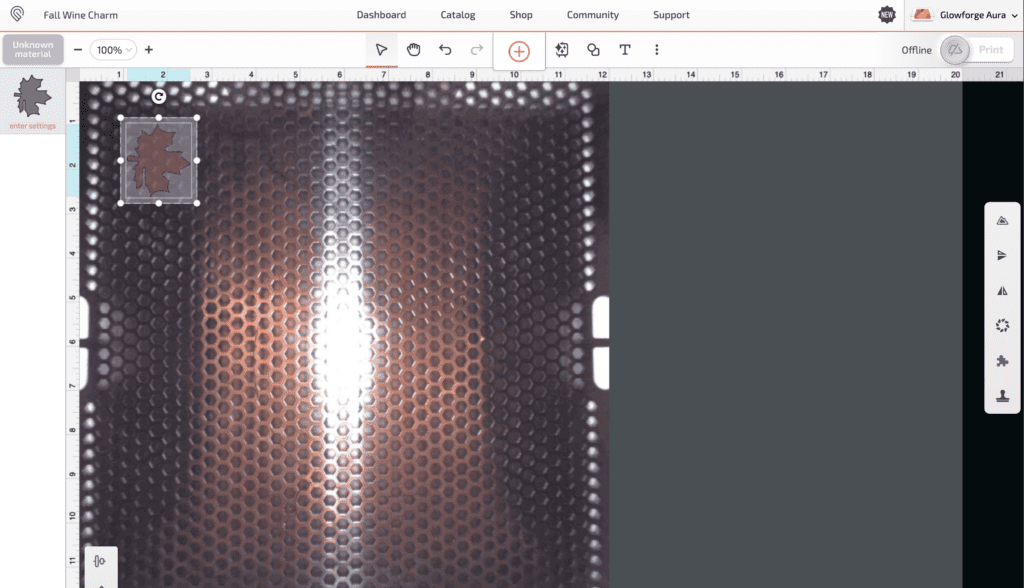
Upload the Wine Charm SVG file, and once it's been added to the Glowforge workspace, change the layer type from Engrave to Cut.
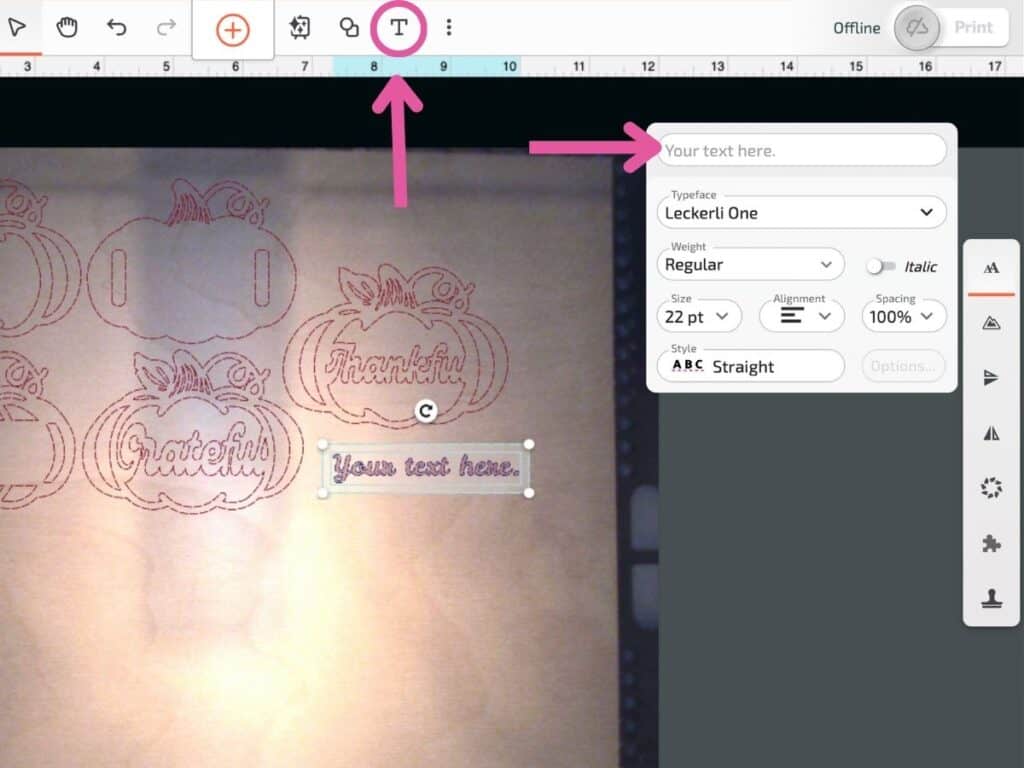
Adding Text
Next, let's add text. Click on the T in the bar above the workspace, and type in the text you want to add into the Your Text Here box. I'm using the Leckerli One font.
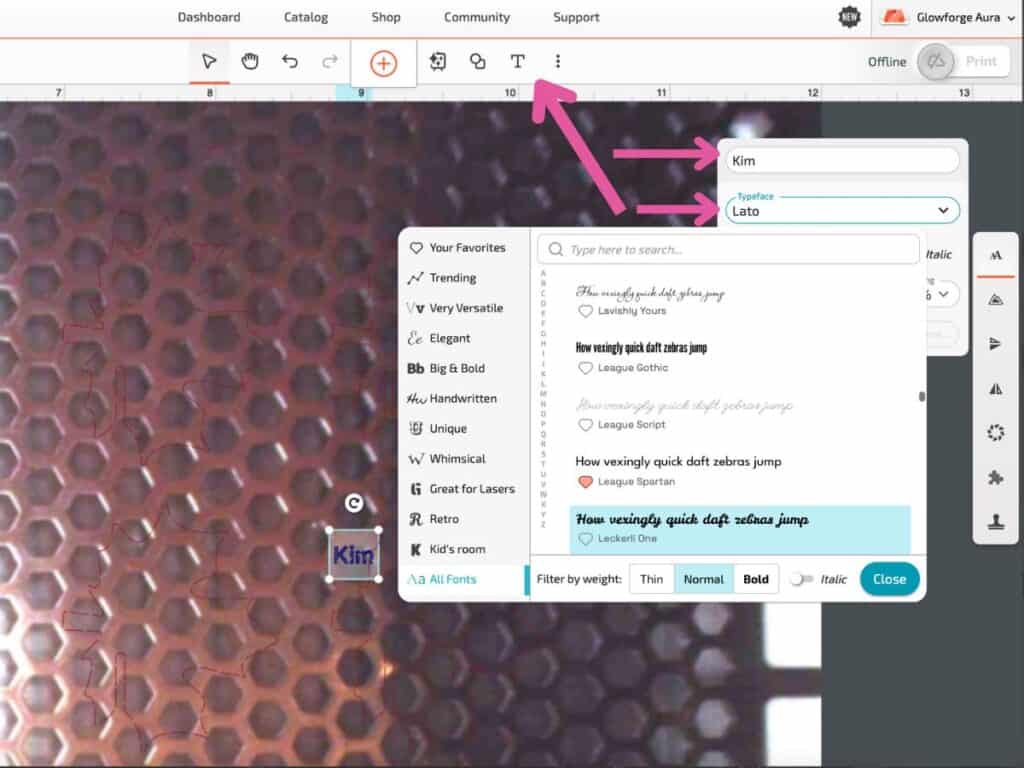
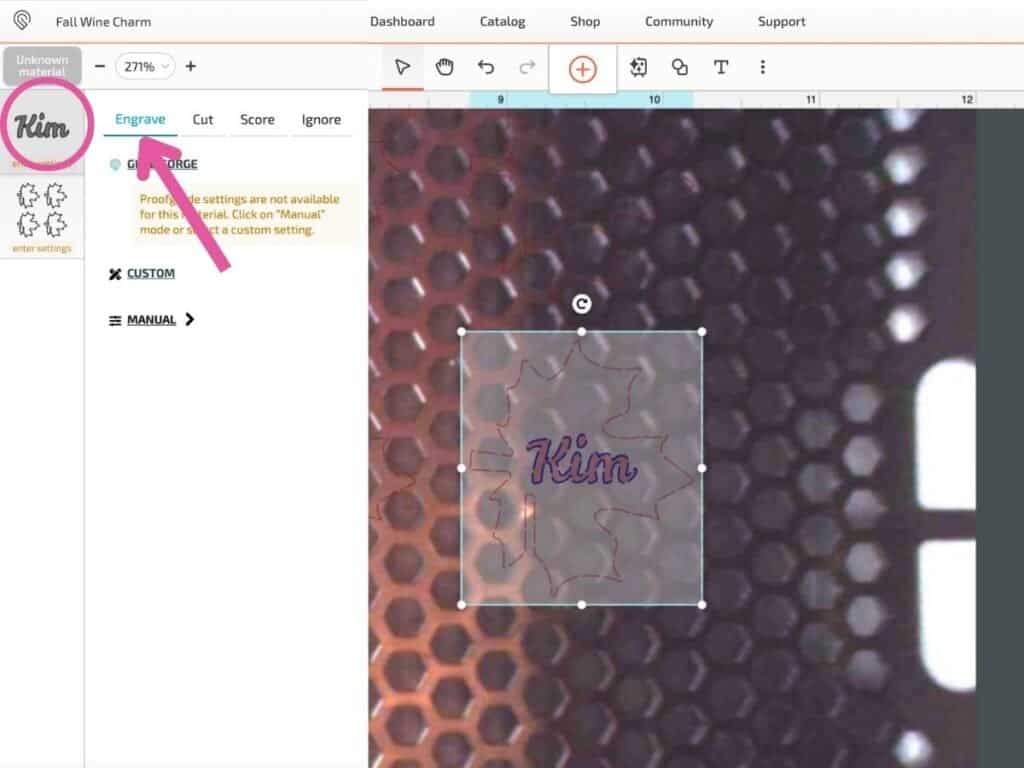
Then, change the file type to Engrave in the layers. Group the leaf and the text by selecting both, and pressing Cmd->G on your keyboard.
To make more, duplicate the leaf piece by hitting Cmd->C to copy and Cmd->V to paste. I duplicated my design four times and repeated the steps above.
Cut Out Wine Charms
When you're ready to cut, turn on your Glowforge unit, and let it connect until you see the Online in the top right corner.
Finally, click Print in the top right corner, place the material into the machine, close the lid, and wait for the blue flashing light on the Glowforge Aura.
When the blue light flashes, press it, and let the machine do all the cutting!
Once it has finished cutting, wait a few minutes for the fumes to go down and the fans to turn off. Take out the material, plop out the leaf pieces, and take off the masking.
Pro Tip: Use Windex Wipes to remove unwanted burn marks.
Finished Drink Charms
After sanding down the charms, you can paint them, decorate them, or just leave them as is.
Simply slip the charms onto the stem of your glass, and voila! You'll never have to worry about losing track of your drink at a party again.
I hope you have a lot of fun with this project, and a big thanks to Glowforge for sponsoring this blog post!
If you don’t want to forget about this tutorial, save it to your Pinterest here!
Join my crafting and sewing Facebook group where you can show us what you’re making, ask questions, and learn from others!
Do you have any questions? Let me know in the comments below!
Glowforge takes crafting to a whole new level!
I love how limitless this machine makes crafting feel! I can't wait to get my hands on one and learn!
I would love a Glowforge and your project is so inspiring!!!
So simple but very adorable! I want one of these machines so bad
Wow!
I NEED this machine in my life! Glowforge takes Crafting up to a Whole New Level! These Napkin Rings & Wine Glass Charms are Beautiful!!! They're not only Functional, but could also serve as little Party Gifts Guests could take & krep as a reminder of the Amazing Time they had! ~~
Wow! The Glowforge is amazing!
Great tips and cute project.
Love this idea
Amazing! So fun!
Such a great idea
Super cute and fun to make
Great idea! You can make so many amazing things with this machine!
Such a beautiful idea.
what a super cute idea, love these.
This makes me want a glowforge.
I need one!
I NEED this machine!!!!!!
I would love to have one of these machine. These are so cute.
Those are really nice - lots of options for variety & I LOVE that they will store flat without the "ring" to attached to the back (a reason I no't normally keep them). One o these days I hope for the machine in mean time am thinking of trying the svgs on decoration/heavy card stock
what a fabulous idea.
Awesome!!
Great idea!
I’ve been pining for one of these! Santa, how good do I need to be?? I can negotiate, lol!
I love how these napkin rings turned out, only adding to my itch to have one!
I really need to get one
I really like what this is able to do. I wish it was affordable.
These are so beautiful!
Kim, this is such a cute idea.
Wonderful and amazing
Love this! ❤️
I would love to have a glowforge. I could have so much fun with it.
Glowforges are so cool!
Love this and can truly work on any occasion
These are absolutely stunning
The Glowforge is amazing
I am so obsessed with this printer.
So pretty! A really nice addition to any table!
It’s really cute and unique perfect for a gathering for the holidays
These are so stunning. You have the best creative ideas. I would love to get this creative
I would love to have a the Cricut Maker 3!
Thank you for the chance to win.
This machine is awesome.
Given me some great ideas
That is AMAZING!
So pretty
Such a fun, and festive idea! Love this!
I was wondering what the wipes were for in the video. These turned out great.
yessss
I'm definitely trying this next year.
Look so cool love it.
This brilliant! You are so creative
I love your napkin rings they give a nice personal touch and a gift to take home as well.
Wanting to host a party now.
that's crazy.
awesome ideas!
This machine looks so fun to use, endless creations.
SO creative
My husband is the creative one - he would have some fun with this!
These are so cute! Thanks for the SVG files!
Definitely want to be a host like this. Absolutely breathtaking
OBSESSED
Love all of your ideas and can’t wait to pick my next craft
Such an awesome idea. I love it!
Loving the idea!
This is so satisfying and this machine is so awesome
Love this!
The napkin rings are so cute. I didn't know it was possible to make something like those.
Just downloaded the files. Thank you so much! I love the pumpkins!
Absolutely beautiful and so festive
I am so interested in starting projects with this machine.
Wow, thanks for the excellent step by step instructions.
A glowforge is on my wish list
Now I want one.
I would love to have a laser cutter, but I can't even work my (not so) smart phone. It also took me a month to set up my printer until my grandson told me that a Pc had to be hooked up via cable instead of Wi-Fi. Not technologically adept.
cute
I think I need an Aura. You do such beautiful work on it!
I want one of the glow forges so much!
All I can say is Wow!
These napkin rings are absolutely adorable.
Your napkin rings are Beautiful.
The glowforge is so neat and can do alot. I love the way wood looks when you make different prodjects cant wait to get one
This machine is amazing
These are so elegant and pretty. Would really dress a holiday table up.
absolutely amazing
Soo cute!
The Glowforge is on my Christmas wishlist! I love how their materials have the QR code to take the guessing out!
Love love love!!
Beautiful designs! I've made napkin rings out of cardstock, but I don't yet have a Glowforge. Maybe in the future..... 🙂
Would love to have one of these machines. So many things you can make with it.
Beautiful! Would be awesome to be able to make things like this!
These are so cute & Glowforge provides endless opportunities for creativity!
These pumpkin napkins are the cutest idea ever!!!!!
These are adorable!
Oh I am dreaming of a Glowforge Aura Christmas!!! Love this.
❤️
I could do so many things with a Glowforge Aura!
This is such an amazing project!
So many options with these machines! Would love to have one!
I need a Glowforge in my life!
Love this. I wish I had this cutting machine the possibilities are endless. Great content per usual!
So cute!
Love this site
Keep saying this is my next investment!
I love the simplicity of these! So pretty.
These are so pretty and this post is so informative! Now I need a Glowforge!
So amazing!
Love the addition of the velvet. these are gorgeous!
So pretty.
I love the napkin rings you made with the Glowforge. It would be awesome to have one of these machines to take my crafting to a whole new level.
What a great addition to a crafter’s tools!
You can do so much with a glowforge!
I have a friend that has one of these and I would love the chance to have one....all the ideas in my head could come true!!
These are so pretty
This would take my crafting from a hobby to another level! I plan on saving money for one! Thanks for showing me the 'How To's"!
It's good to know that when I get a Glowforge I can come here to learn!
Very cute!
The napkin rings are so elegant. The Glowforge is awesome.
It's amazing what can be done with a Glowforge. The napkin rings are amazing!
What beautiful napkin holders and the charms are a great addition!!
The glowforge would be awesome to own!!
Looks like such an awesome craft tool. In the someday wishlist!
These are stunning!
They really complete the whole look of the table settings.
I've been wanting a Glowforge for years! I never knew this model existed.
Very elegant. So festive!
This Glowforge machine is soooooo nice, would LOVE to own it..
Wow...such beautiful creations with a Glowforge!
I would love to have a glowforge!! The crafts and gifts to make just like the ones you buy in the store!!
Loving these glowforge projects!
I would love to try using this. My friend makes great things with hers.
I WISH I had a glowforge
I would love to combine this with our 3d printer the possibilities are endless!
Love it! ❤️
Love it!
You can do so much with an Aura! This gives me so many ideas! Thanks for sharing with us ❤️
You make it look so easy to make these awesome napkin rings.
I would love to try them!!
It's all so pretty!!
So simple but makes a statement
These are so cute and Festive!!
Those are really cute!
Beautiful - I need this!
Great idea. Perfect for the family.
Great idea for the Thanksgiving table!
Your instructions are always so detailed and easy to follow. Thanks!
great napkin rings! Thank you so much for sharing!
These are too cute
there are so many things you could make with this!
I adore this project. The napkin rings with ribbon is genius. Your ribbon choices could take your take decor from whimsical to elegance! Just brilliant! With Glowforge Aura, the ability to use in smaller craft spaces is a dream come true. Thanks so much for sharing. ♥️
Endless possibilities with the Aura! And you make it all look easy and beautiful. ❤️
i'd make so many reusable gift tags!
wish i could do this
Would be so blessed to win such a wonderful machine! Thank you for the chance
They would make awesome gifts for after the party.
I love what this wonderful machine can do. I would love love love to have it.
A Glowforge would be great to have.
Love these napkin rings. A Glowforge would be fantastic to have!
WoW! There are endless possibilities you can do with this!
So cute
Wow, so many things can be done on a Glowforge, if only I could afford one. ❤️
Perfect for holiday table settings!
This is such a great tool, I didn't realize so many things could be made with this product.
Love it
These are cute!
I want a glowforge!
I want a glowforge and a maker3
Nice!
Soooooo cute
I would make Christmas trees now
Would love to have one for my newly retired husband!
I think this would be pretty nifty. Lots of cool things you could do with this.
Would love one of these machines
That is a great machine. Thank you
This machine looks amazing
I like this printer
i would love to have one of these!
I would love one of these machines but not in the budget but the files I will try them with my cricut
Very detailed instructions. Thanks
What a fun way to add character to a table. You could do this with so many things!!
a quick and easy one, love it!
So cool
I want one
I am fascinated by these machines! I have wanted one for a long time but just can't afford one. Oh the things I would love to make like the ones you show on your site. I am also a Creative Fabrica member and they are now posting a lot of projects meant for the laser machines. Oh to dream.
My friend has one of these machines and the things they make are soo beautiful! Love this idea and would love to try this if I had a machine!
What variety! Nice!
I would just love to make the napkin rings! How beautiful!
How cute
You make it look effortless!
What an awesome idea I wish I had one of these machines maybe someday I will
I love the final look. So elegant!
I'd love to learn how to work with the machine and materials!!!
Love it!
Thanks for this great introduction to the Glowforge.
What a great machine!
Wow! I love watching people craft and it was my most favorite thing as a child. I can’t wait for some me time to be able to buy myself this machine. I had never seen a 3D printer before! The QR code being read it so genius.
Love it so much
They are so pretty.
Can't wait to get one of these.......
I love how detailed your instructions are. I know I could make these, if I had a Glowforge.
Adding Glowforge to my Christmas list! Thanks for sharing.
These are so cool!
I wnt this machine!
So obsessed
Too cute
Thanks for the know how you share on all of these projects! I am really going to need to get myself a Glowforge. What a great addition this would be for my small crafting business. Thanks for the chance to win!!!
Would love to use this machine, need an upgrade!
Beautiful addition to a fall table setting. Napkin ring and seating arrangement. Perfect. I’m thinking I need a glowforge.
i love all these wonderful ideas
Love that you can make so many projects with this machine.
Wow! That looks great! I love that GlowForge materials are covered in a protective coating that you can remove when you are done, because you just never know what's gonna happen!
These are so easy to make and they actually make wonderful gifts!
I like that it's not a huge machine.
Very nice!
so cool!
This is the coolest machine.
I love your tutorials! It's so easy for me to follow along.
Very talented!
Love, love , LOVE these pumpkin rings. A Glowforge machine is officially on my dream wishlist!
I love these!
Great tutorial. Thanks for sharing. I'm absolutely amazed at the tools we can have in our home craft rooms today compared to a few years ago. This baby is amazing!
I love how in-depth these instructions are it is very rare that you see some where you can understand each step!
Thank you so much for the step by step east to follow guide to make these stunning napkin rings.
Absolutely stunning! Thank you for sharing your creations. I love these napkin rings! ❤️
The glow forge is amazing!
amazing work!!
The Glowforge Aura seems like the perfect tool for my crafting goals.
I would love an Aura.