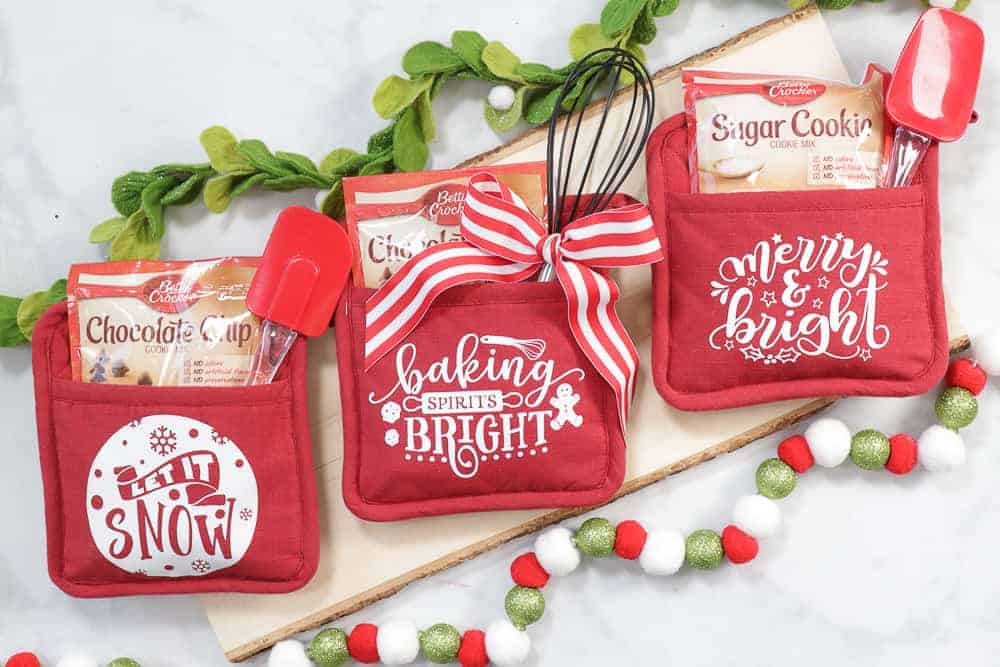
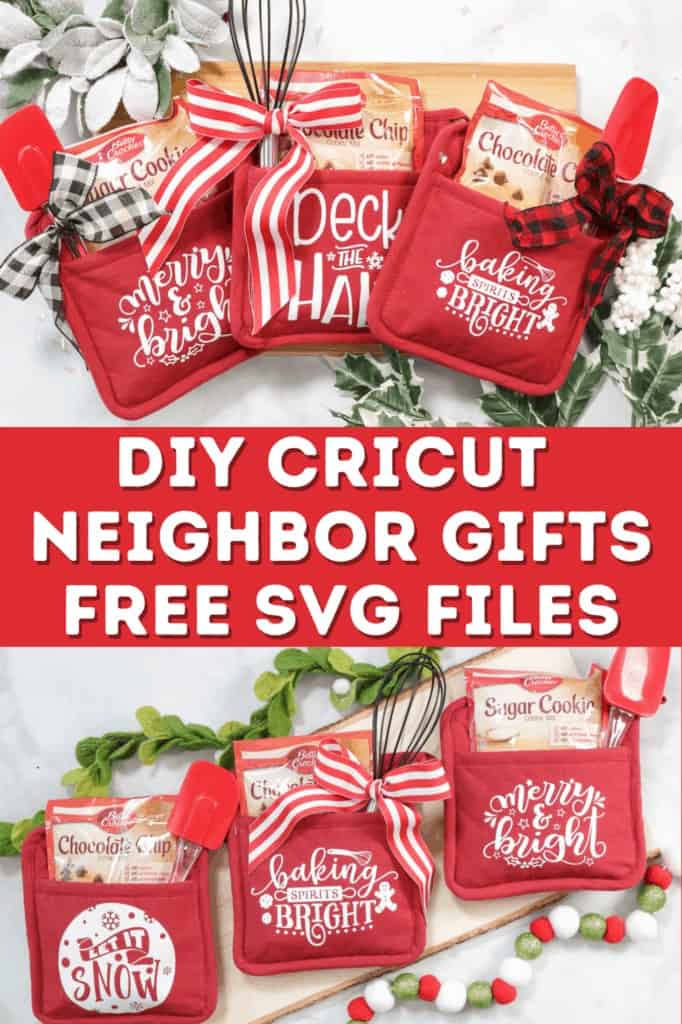
Learn How to Create a Personalized Pot Holder Using a Cricut, Dollar Tree Supplies, and FREE SVG Files
Today we are going to be making these adorable DIY Holiday Pot Holder Gift Sets with the Cricut Explore Air 2 and Everyday Iron-On.

When I first got my Cricut Explore Air 2, I was blown away by all of the adorable crafting projects I could make. I am always looking for new ways to personalize holiday presents for my friends and family. This project is easy to make and it's affordable, so it's perfect for staying on budget this holiday season.
Now let’s get started on our project.
Table of Contents
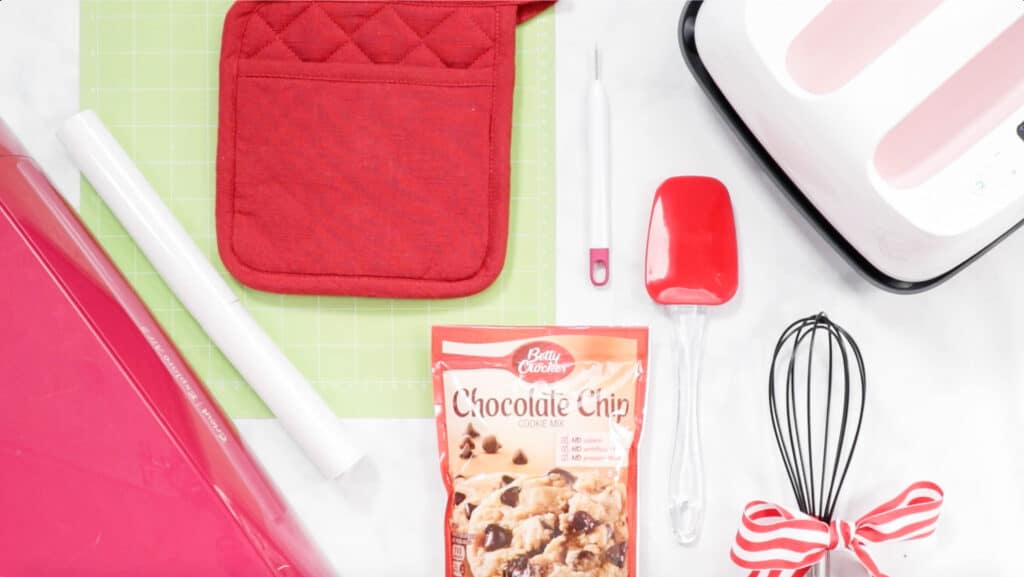
Supplies needed for your personalized Pot Holder:
- Cricut Everyday Iron-On
- Red Pot Holders that I got from the Dollar Store
- Cricut Explore or Cricut Maker- You can also get these on Amazon
- Green Standard Grip Mat
- Cricut EasyPress or an Iron
- Weeding Tool
- SVG File
Download SVG files here!
Step 1: Download and Upload SVG files
To get started on your project, go ahead and open up Cricut Design Space.
Download SVG files here!
You can also use a few of Cricut’s Design Space images. Just use the search bar to find a few sayings you like. I love using Cricut’s Design Space images since they are easy to use and super cute.
I’m going to be making these 5 designs, but feel free to make whatever designs you like.

In order to get the right size for each of my designs, I am going to measure my potholder and create a rectangle the same size as the potholder for reference.
Click on shapes
Then, Select square
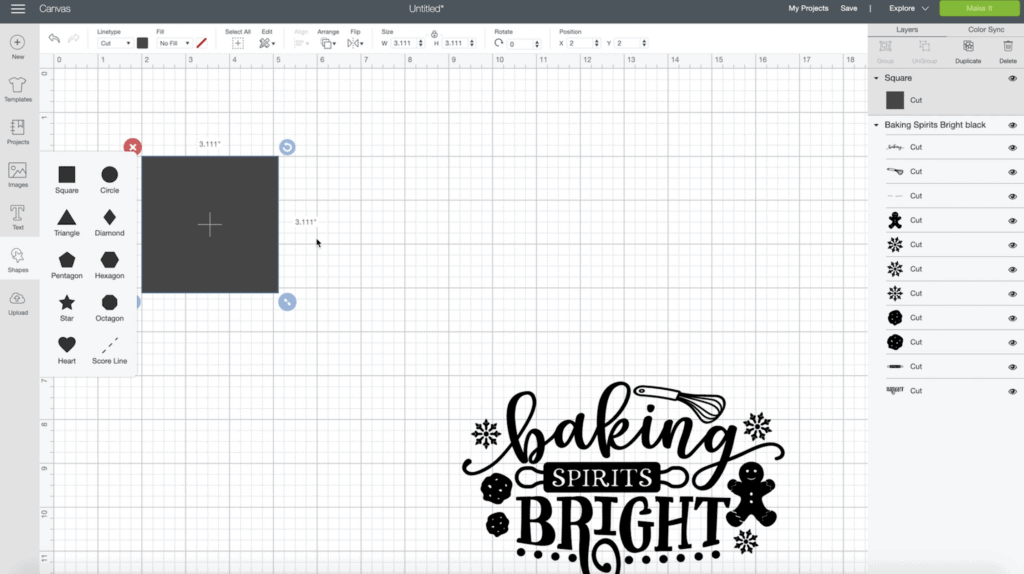
Unlock - this allows me to input my exact dimensions. My potholder is 7.25" x 5.5” so I’m just going to type that in.
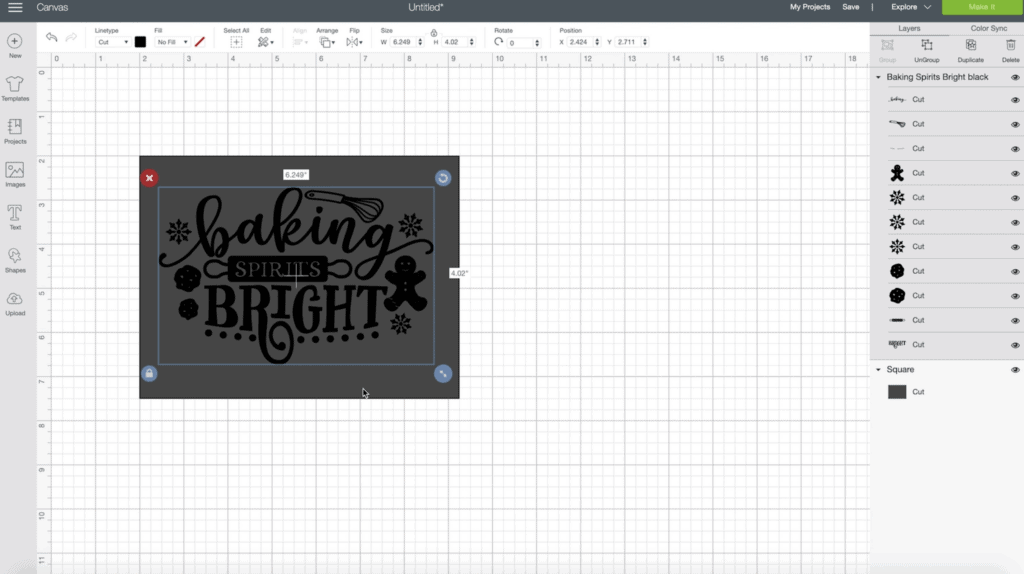
I’m going to use this to make sure each of my designs is sized correctly. Once I have everything sized, I’m going to delete the rectangle.
Step 2: Cut Iron-on Pot Holder Designs Using a Cricut Cutting Machine
Once you have your design ready, click “Make It” in the top right-hand corner to view the preview screen.
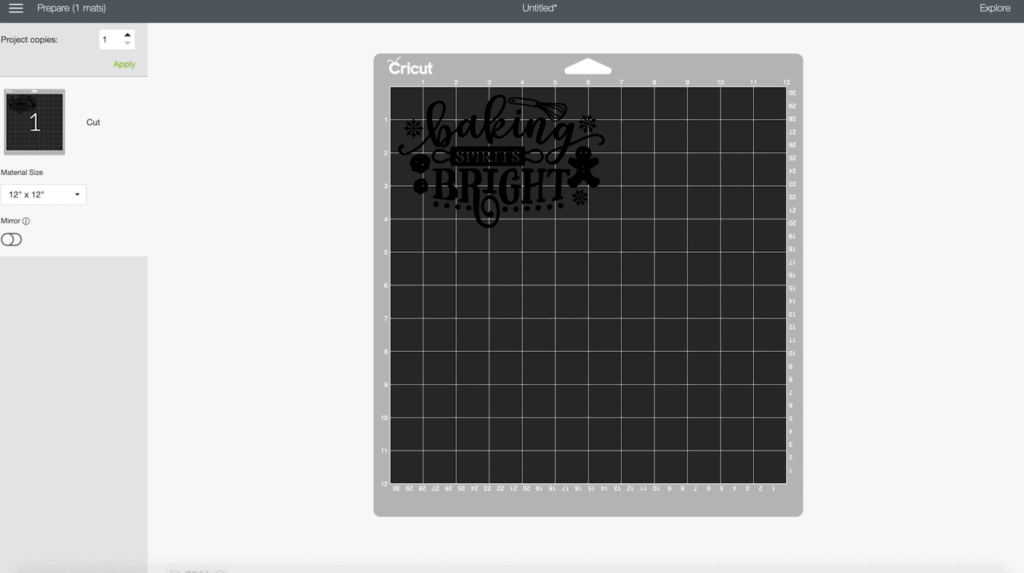
Be sure to mirror your image, that way it is cut the right way for iron-on. If you don’t do this, your image will be backwards when you iron it onto your potholder. So, before you cut, double-check that your image is mirrored.
After clicking continue, the screen prompts you to select the material you are using. For this project, I am using Everyday Iron-On. To find my material quickly, I like to use the search bar. If you use this material frequently, save it as one of your favorites.
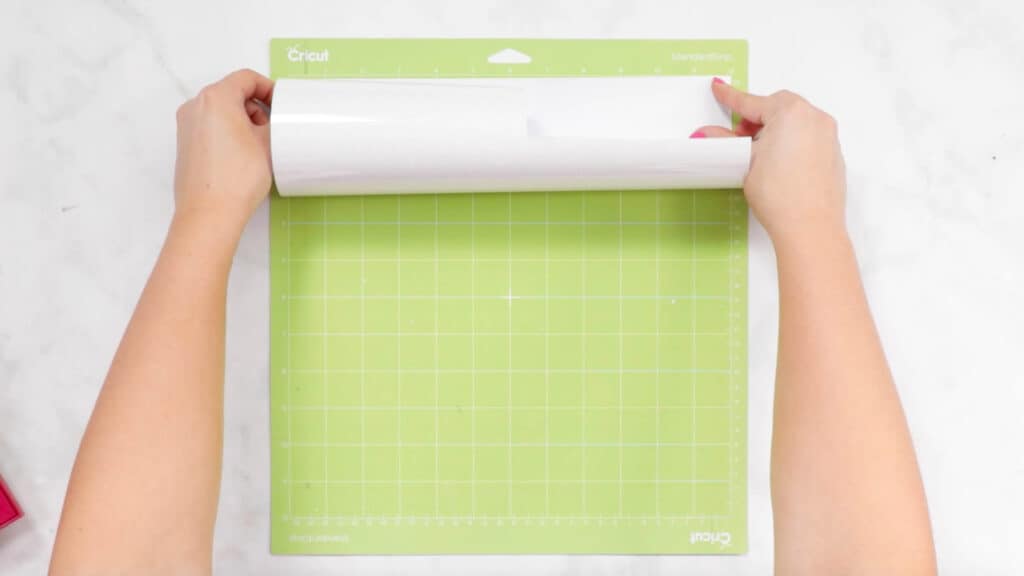
Place your Iron-On shiny side down on your green mat.
Make sure that your Cricut is loaded with the fine point blade.
Next, insert your mat into either your Cricut Maker or Explore machine.
Press the blinking Cricut “C” button and your Cricut will start cutting.
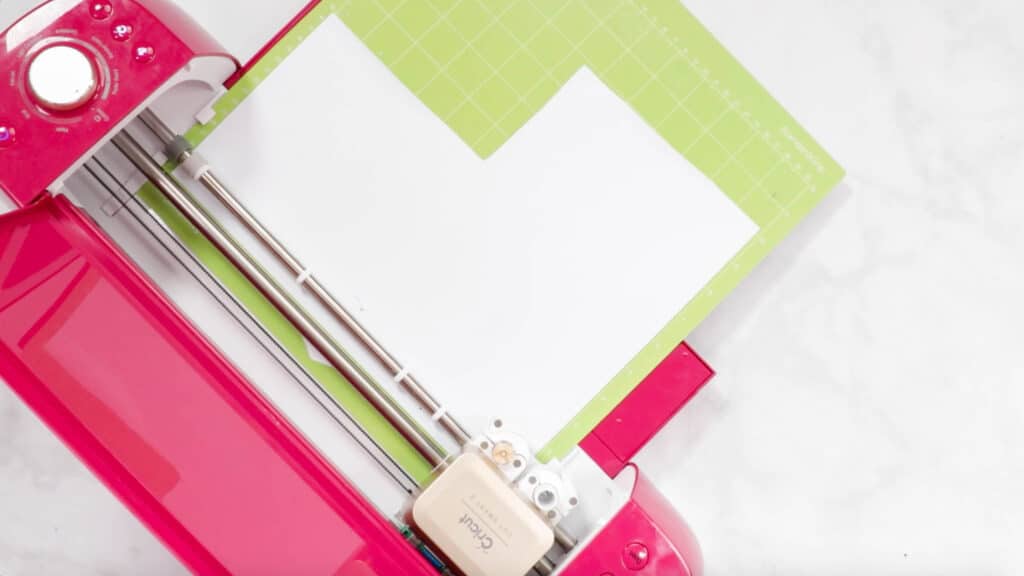
Once it is finished cutting, press the arrow button to release your Cricut Mat.
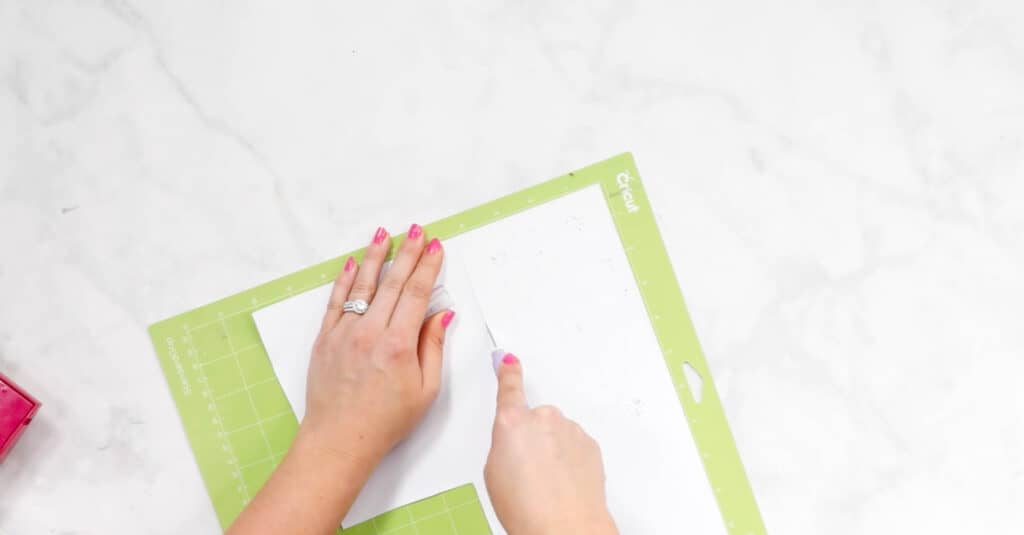
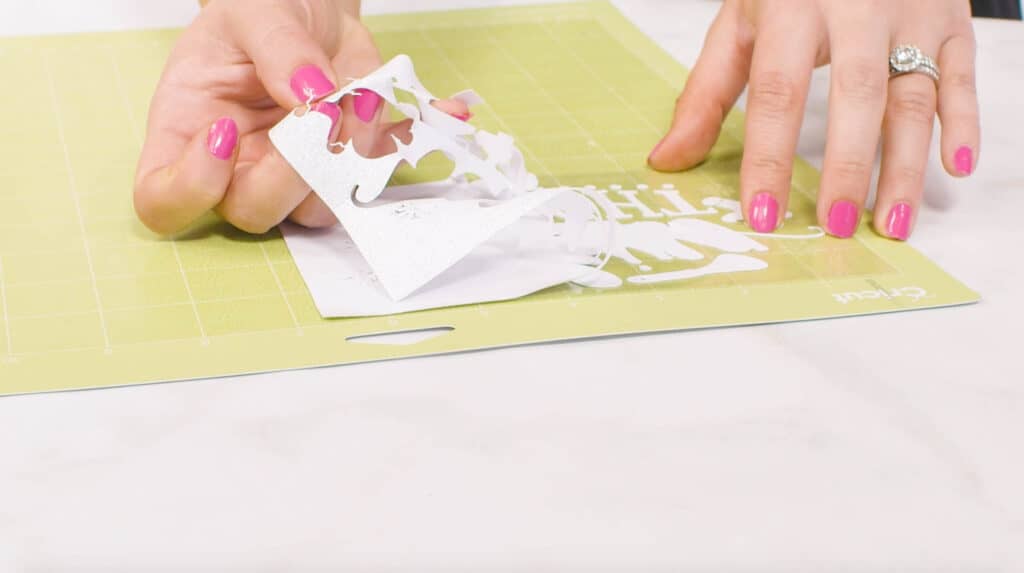
Now that my cut has finished, it's time to start weeding my project.
Step 3: Weed Cut Pot Holder Designs
I am going to be removing all of the Iron-On that I do NOT want to transfer to my project. But first I’ll use my Cricut true control knife to carefully cut away the material that I didn’t cut. I really like to save all of my material and have as little waste as possible.
I like to start weeding in the corner of my project. You can use your weeding tool to make it easier to pull the Iron-On away from the backing. Once I have the corner up, I like to use my fingers to gently pull away the Iron-On.
Use a 45-degree angle to slowly pull the excess Iron-On away from your project, being careful not to rip anything in the process.
I like using my weeding tool to get the more intricate parts of my design up, like the insides of letters.
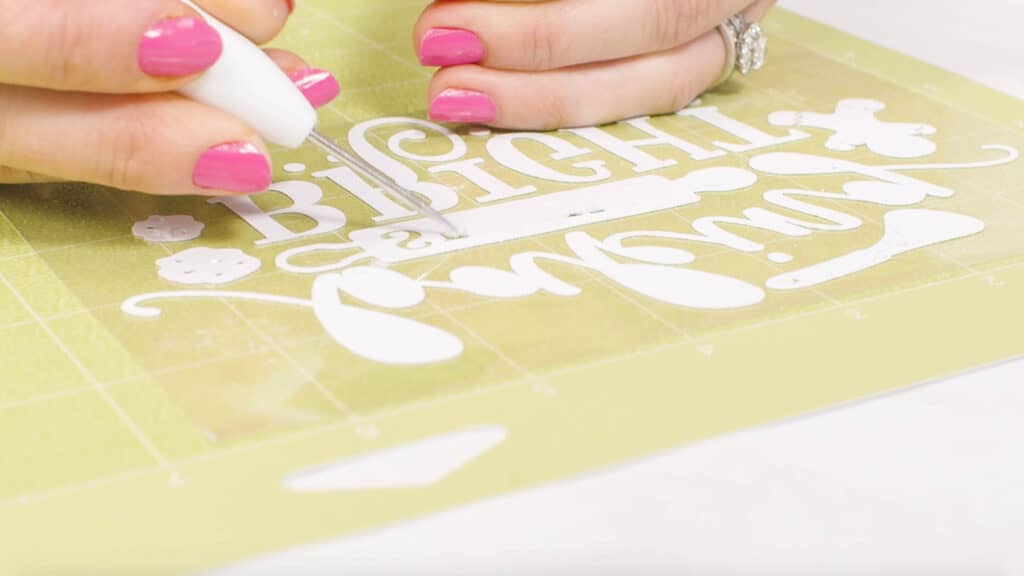
If you need help seeing which parts of your design you need to weed, you can either hold it up to the light or use a BrightPad. The light shows through the cracks, making it easier to see (especially on more intricate projects)
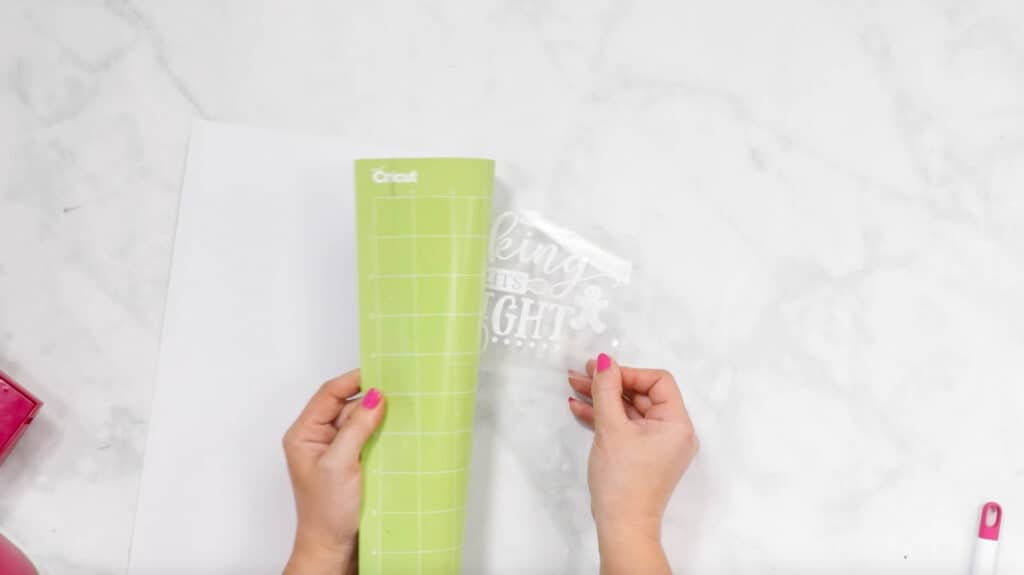
Flip your mat right side facing down and gently peel the mat away from the design.
Flip over your design to make sure everything looks perfect. Now is the perfect time to see if you weeded everything correctly.
I’m going to cut around each design so I can easily adhere them to the potholders.
Step 4: Use Easy Press or Iron to Adhere Iron-On to your Pot Holders
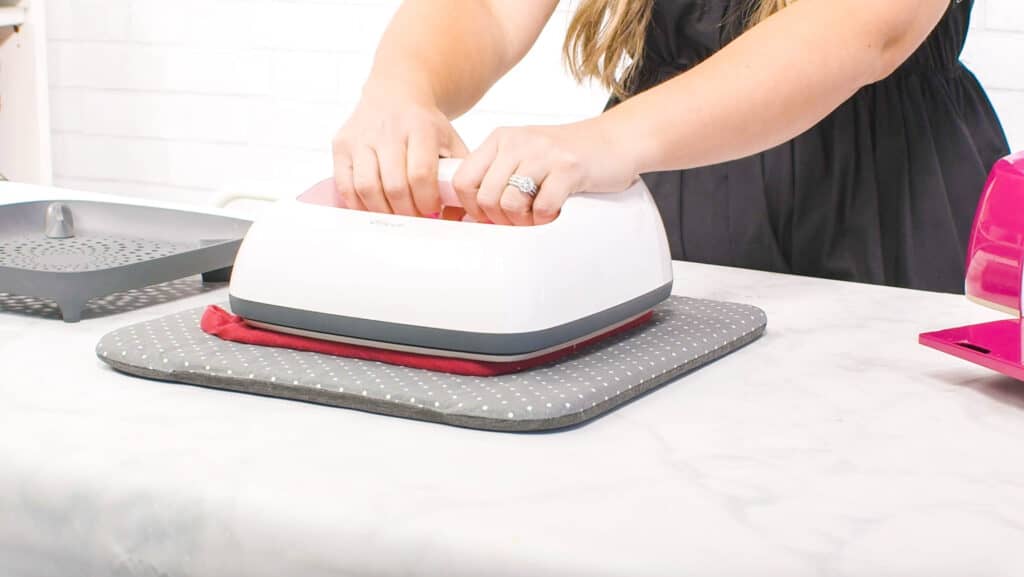
Now that our design is ready to go, it’s time to heat up either your Easy Press or iron. I like using Cricut’s Easy Press since it has a large surface area, heats up to an exact temperature and has a timer so I know exactly how long to press my project for.
If you are using an iron, set it to high heat with zero steam. Make sure the water basin is completely empty, otherwise the steam could ruin your transfer.
Now, you’ll notice that the bottom of the iron and Easy Press are different. The Easy Press has a large, flat surface while the iron has little holes for steam on the bottom. This causes the iron’s heat to not be as evenly distributed as the Easy Press. Since the tip and sides of your iron are going to be the hottest, try to position the center of your iron on your project.
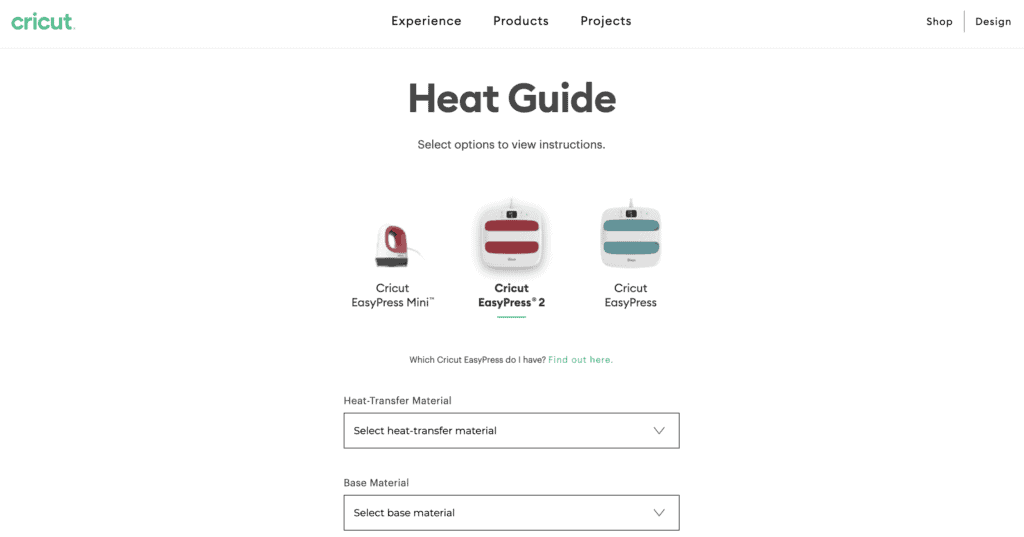
Cricut has an amazing online guide to tell you exactly what temperate, time and pressure you need to press your iron-on at. The exact settings vary depending on the type of Iron-On you are using and the material you are transferring it to.
Also, be sure to check if your Iron-On is warm or cool peel - this lets you know whether you should peel your backing sheet when it is warm (just a few seconds after pressing) or cool (about 1-2 minutes later). Cricut has spent time researching what works best, so I always stick with their recommendations.
For this project, we are going to be heating the Easy Press to 315 degrees and pressing for 30 seconds.
Before ironing-on my design, use a lint roller to remove any lint, dust or strings from your pot holder.
Next, you’re going to want to preheat your potholder. Preheating it removes moisture, flattens it and ensures it is ready for iron-on application.
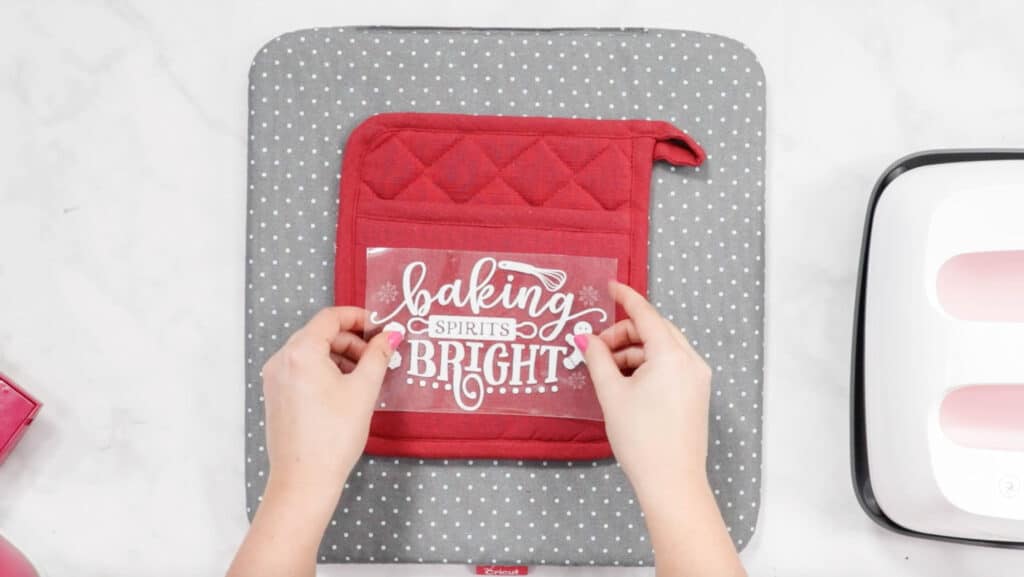
Next, you’re going to place your decal sticky side down.
Once you are happy with its placement, press your design.
Be sure to check that your Easy Press is heated to the correct temperature before you begin pressing.
While some people like using a layer of parchment paper between their Iron-On and Easy Press or iron, it's really just a preference since the backing provides a protective layer between the Iron-On and your press.
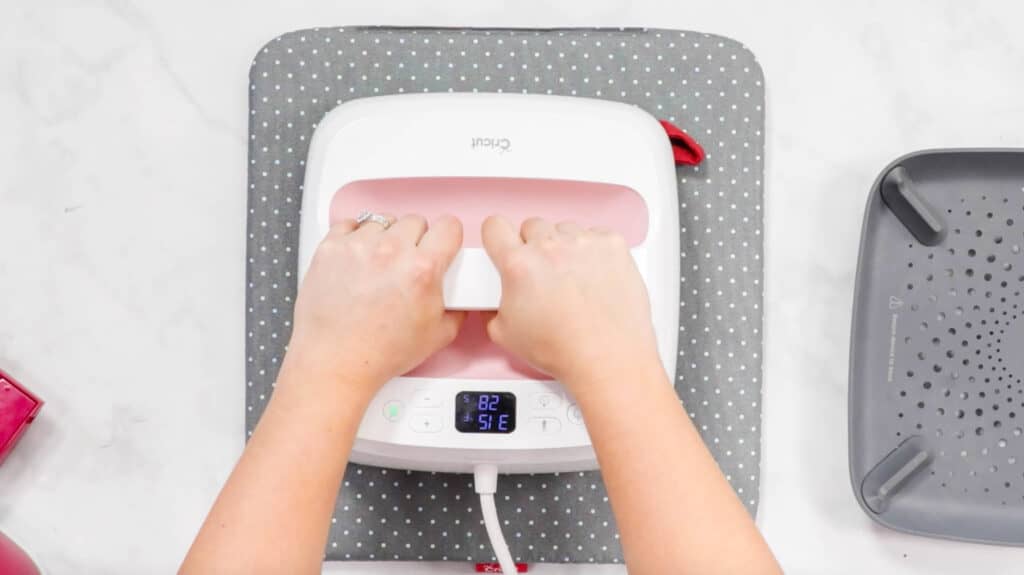
Once your Easy Press is positioned, click the “C” to start the timer. Once you have been pressing for 30 seconds, your Easy Press will beep to let you know that it is done.
Go ahead and let this cool for a few seconds before peeling the backing off. It should be warm to the touch, not hot.
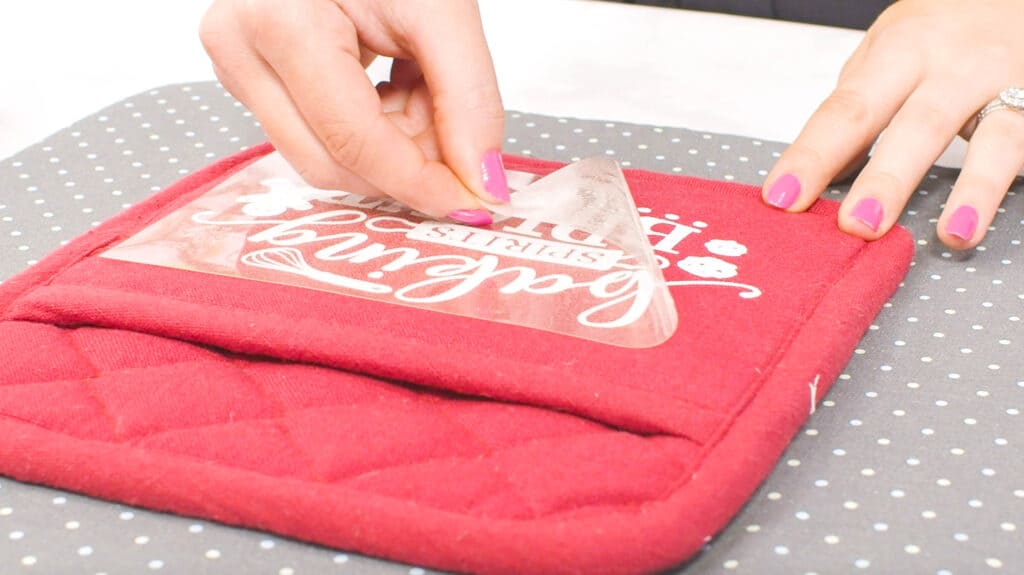
When your design is ready to be peeled, slowly peel it away from the pot holder at a 45-degree angle. I like to start peeling from the corner of my design
As you begin peeling, be sure to check to see if your design has completely transferred.
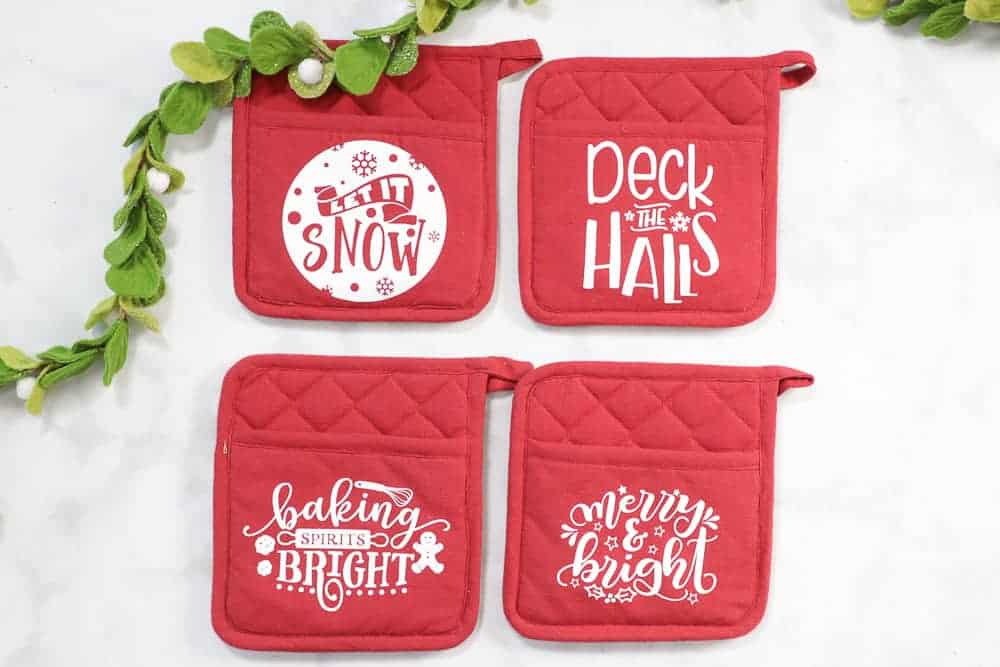
Now we have this cute Holiday Pot Holder.
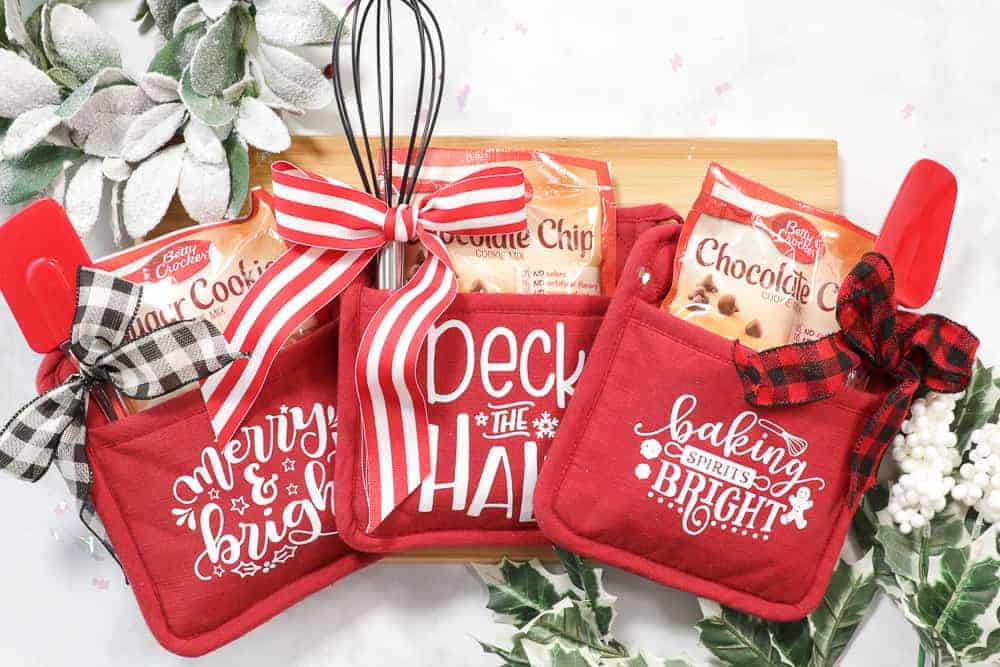
I’m going to fill mine with this spatula and whisk I got from the Dollar Store as well as a cake or cookie mix.
Are you getting a Cricut machine for the holidays this year? Check out some of the machines in the links below to this video.
Don’t forget to join my crafting Facebook group where you can show us what you’re making, ask questions, and learn from others! Come follow me on Instagram for daily crafting inspiration and a look behind the scenes. If you use these files, be sure to tag @sweetredpoppy so I can see what you’re making and share your photos in my stories!
Don’t want to forget about this free template? Save this project for later! Click here to save this project on Pinterest.
Hi I'm looking for the free download of the color by number Christmas color for kids
I will like the print out for this project. Loved it.
Loved it.
I am not sure what I am doing wrong. Every time I click to download the SVG's for the pot holders it has me sign up for free Christmas SVG's. I did this thinking it would email me both and it didn't send the pot holder ones and wont let me get out of it to download the SVG's.
I used red pot holders and white iron on glitter vinyl. Some of the red bled onto my white vinyl. I'm not sure what I'm doing wrong. Thanks
Are the pot holders bought with the pocket already on them?
Do I have to make the pocket?
Hey...I love your designs....thank you so much! I am having the same trouble as Jessica....it lets me download a bonus file but not the actual potholder designs....am I missing something? Thank you so much for getting back to me! 🙂
Me too! x
I'd love to download these but it won't let you unless you give them your Credit card information. Why would you need to do that for something FREE? Nope!
So true.Karen