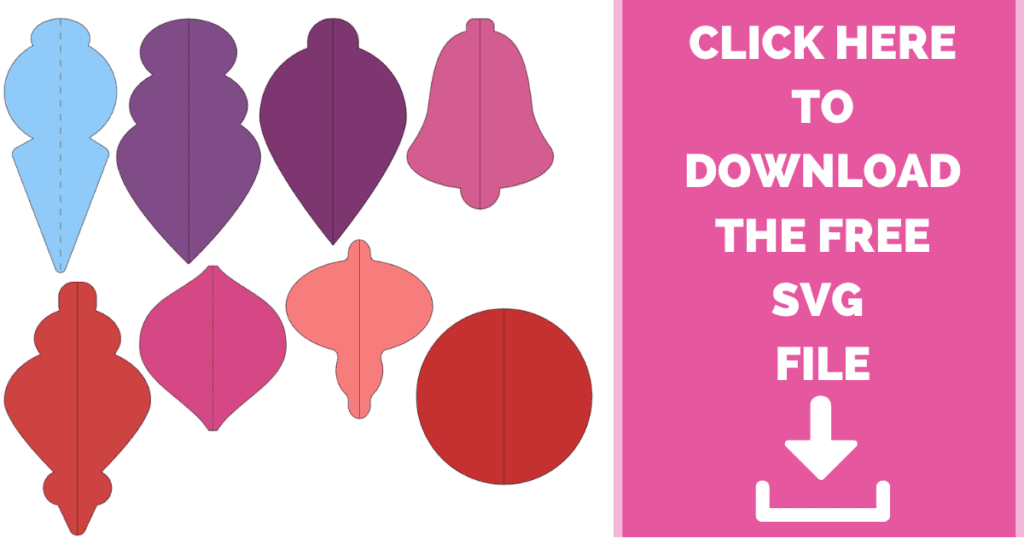
Learn how to make paper Honeycomb Christmas Ornaments with this free SVG file and template.
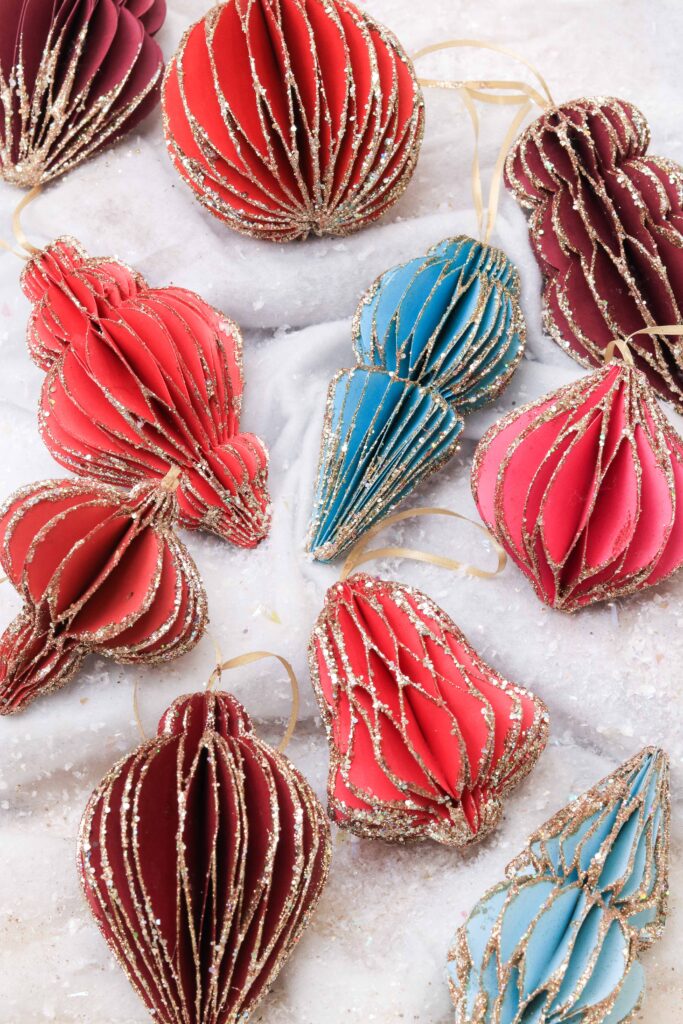
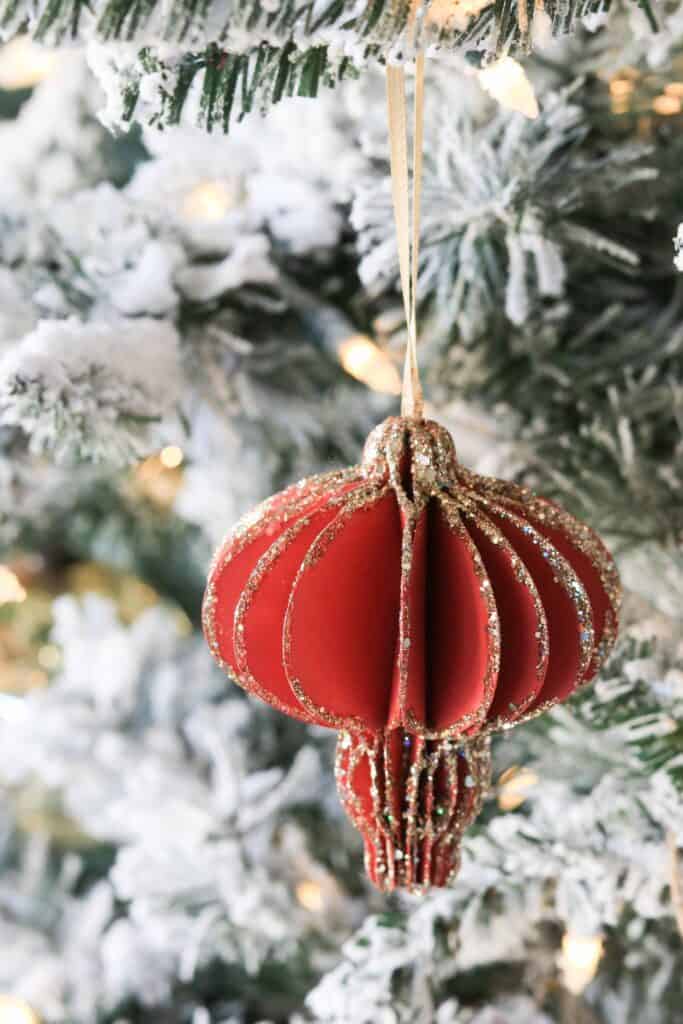
Looking for a unique way to decorate your Christmas tree this year? Make these elegant paper honeycomb Christmas ornaments. You can easily personalize the color palette of these ornaments to match your Christmas decor.
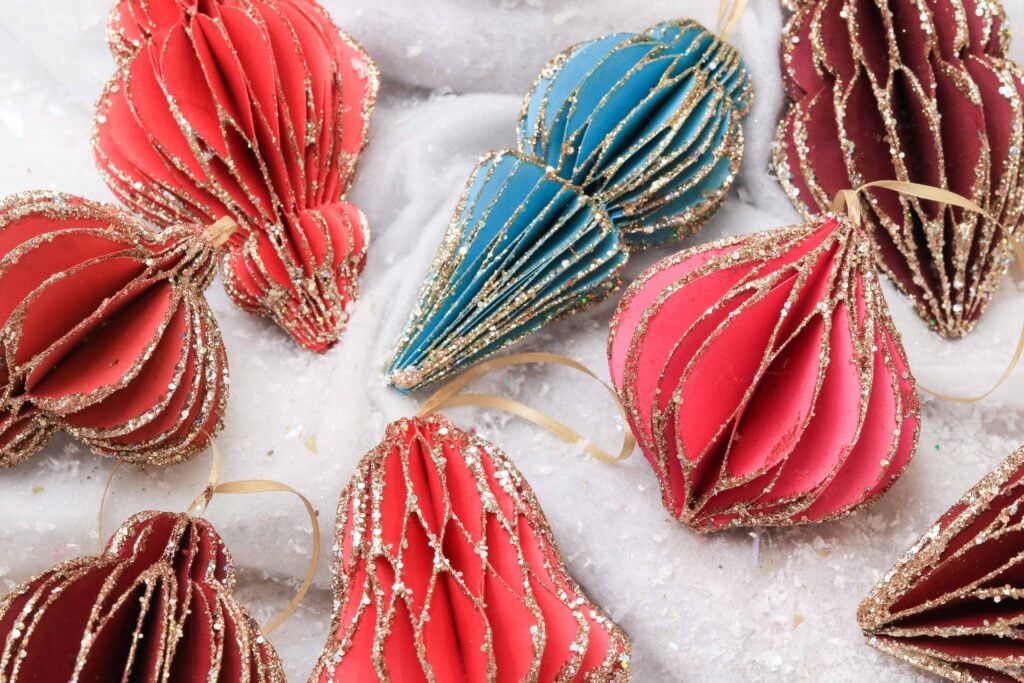
These ornaments are so intriguing because of their unique resemblance to a honeycomb hence the name Honeycomb Christmas Ornaments.
Honeycomb tissue decorations first originated in Germany around 1890. They were later manufactured in America in 1910.
The honeycomb technique is achieved by gluing tissue (or in our case paper) together in an alternate pattern to create a three dimensional decoration.
Looking for more Cricut Christmas ornament tutorials? You'll love this one!

To create ornaments with extra stability, I've chosen to use lightweight cardstock paper. This holds up to wear and tear and creates an ornament that's stronger than it's tissue paper predecessor.
If you have a little one in your house, and you've avoided glass ornaments, you’ll love that these ornaments are kid-friendly!
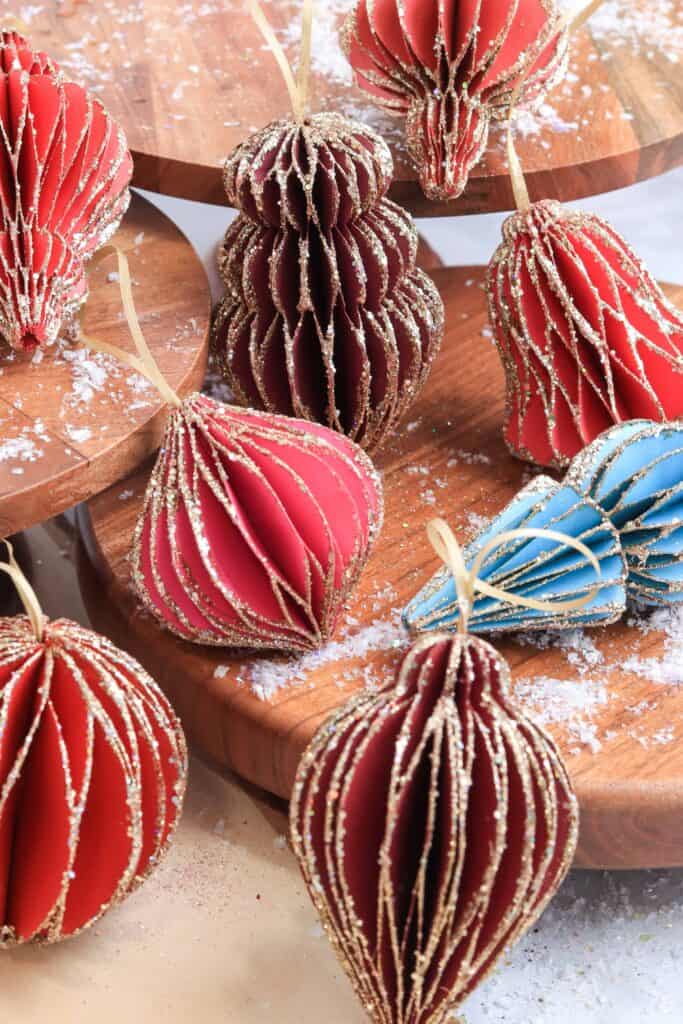
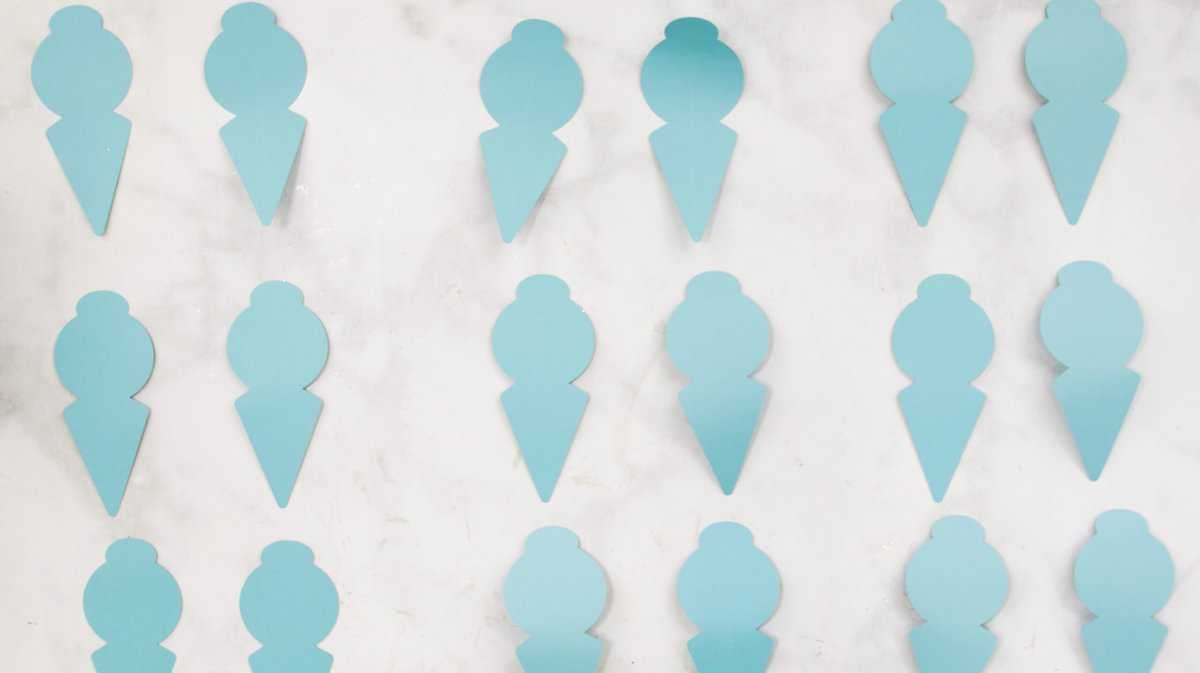
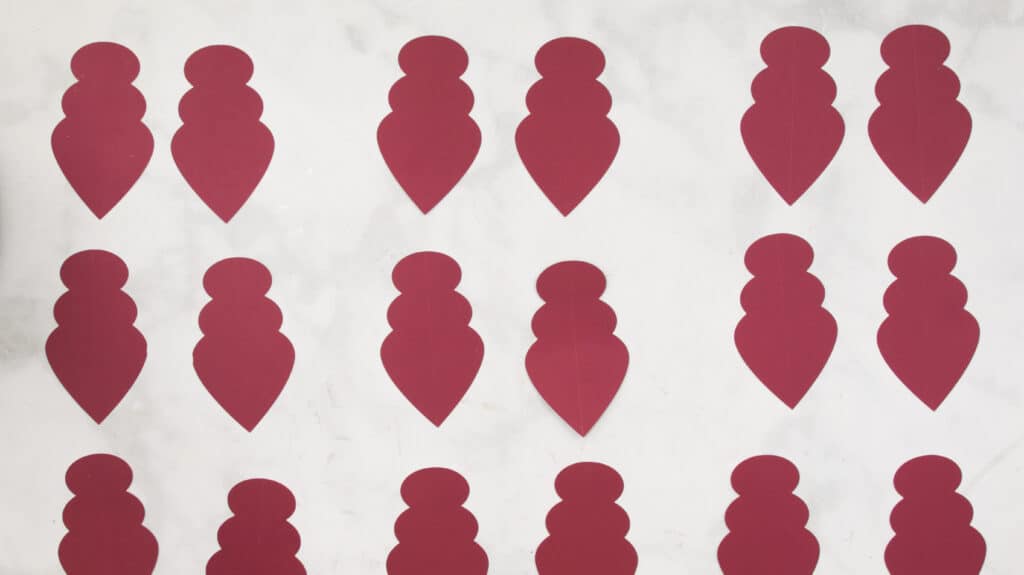
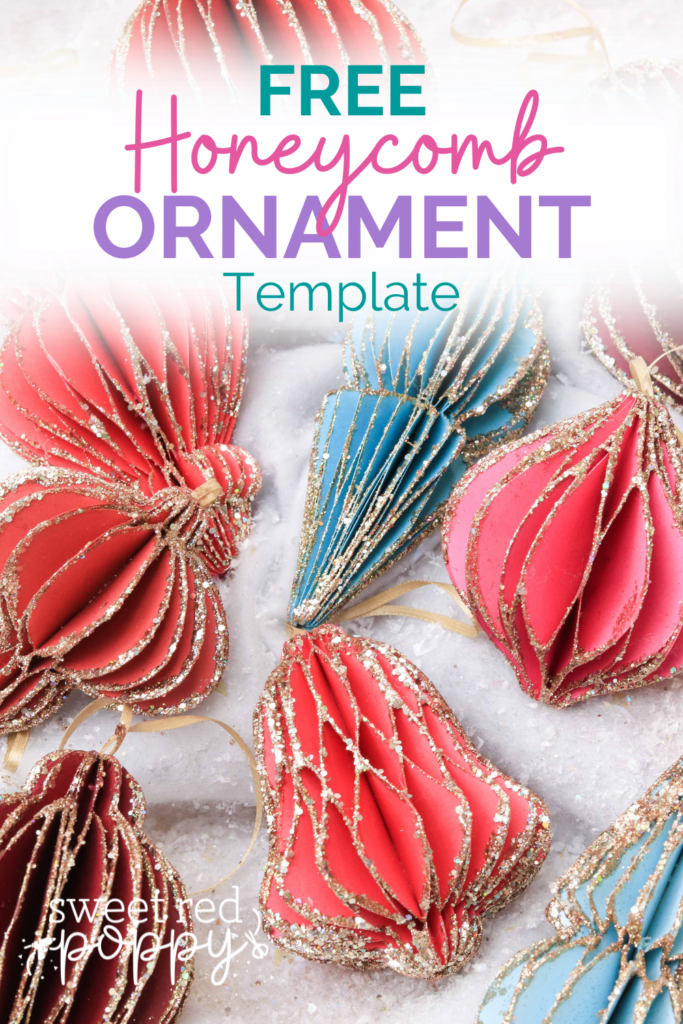
This holiday file includes eight designs to choose from, and each one measures 2"-3” wide and 3.5"-5” tall. You can see all eight variations shown in the photo below.
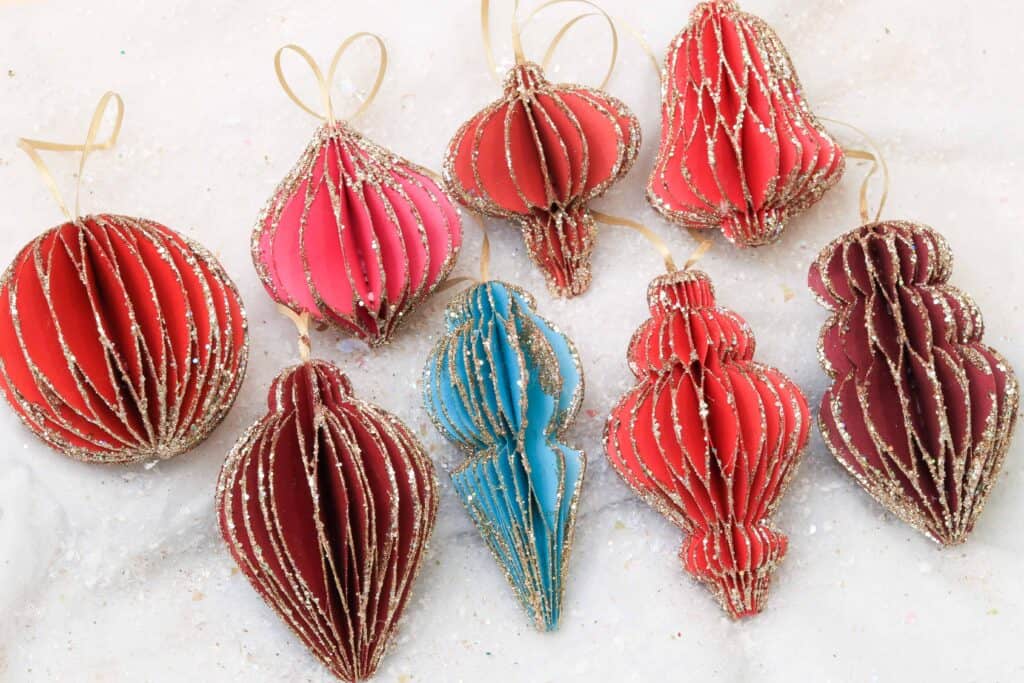
Table of Contents
What Type of Paper Should I Use?
I recommend making these ornaments out of lightweight paper such as standard copy paper or 65lbs cardstock. You want paper with minimal density for it to resemble a honeycomb.
Using cardstock that is heavier such as 100 lb cardstock, would make it difficult to connect the ornament's two sides after gluing the spine. If you do choose to use 100 lb cardstock, I suggest cutting extra ornament pieces and using hot glue to hold it together.
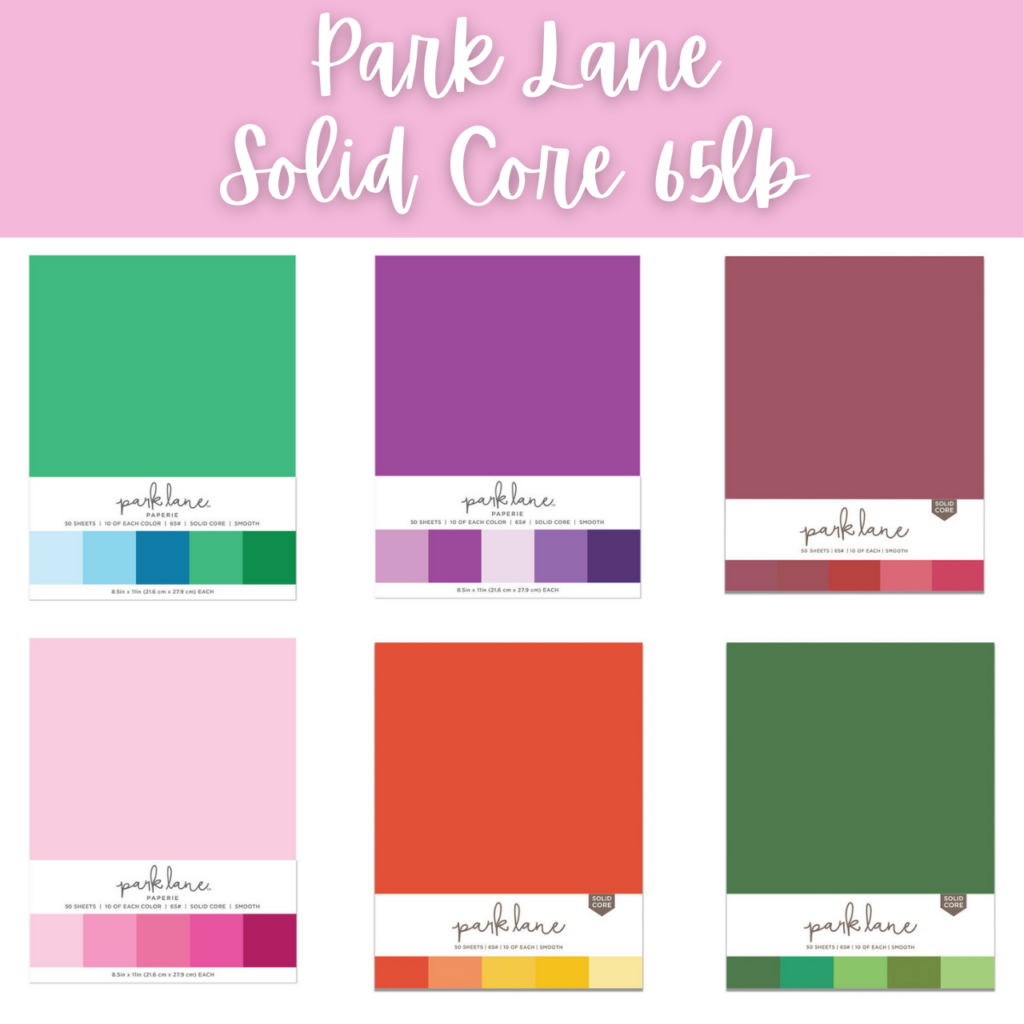
For this project, I used the 65 lb Red Palette 12" x 12" Cardstock Paper by Recollections.
What’s the Best Place to Shop for Cardstock?
You can shop cardstock in person from the open paper shelves or online. Park Lane has quite a few variety packs of paper that work really well for this project and they offer 65lb cardstock.
When you are shopping for paper look for cardstock that is solid core! This is really important! White core paper is a cheaper type of cardstock that has color printed on each side. When you cut into it, it is white on the inside. It tends to look cheap when it's used with paper flowers.


Instead, you'll want to make sure you select a paper that says, "Solid Core". This means the color hasn't been printed on the outside of the paper. Solid core paper has been dyed and has the same color on the inside and outside.
Lets Get Started
The assembly of each ornament is similar, but the gluing pattern is different for each one.
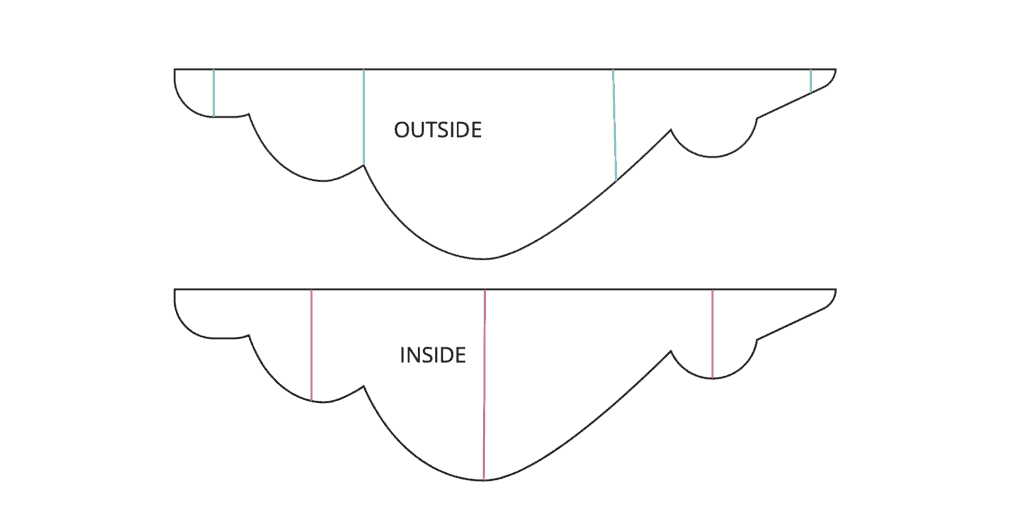
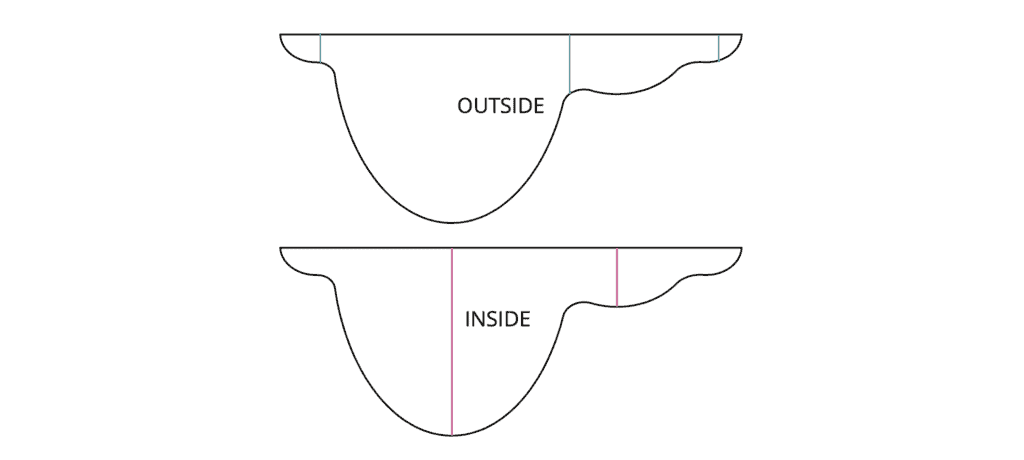
In this tutorial, I will show you the gluing pattern for each ornament design. You can also use this gluing guide as a reference: here.
How Are They Made?
The honeycomb pieces are made by folding and layering several pieces together like a sandwich or a plate-like assembly. Between each layer, there is a pattern of glue that alternates.
Tips & Tricks
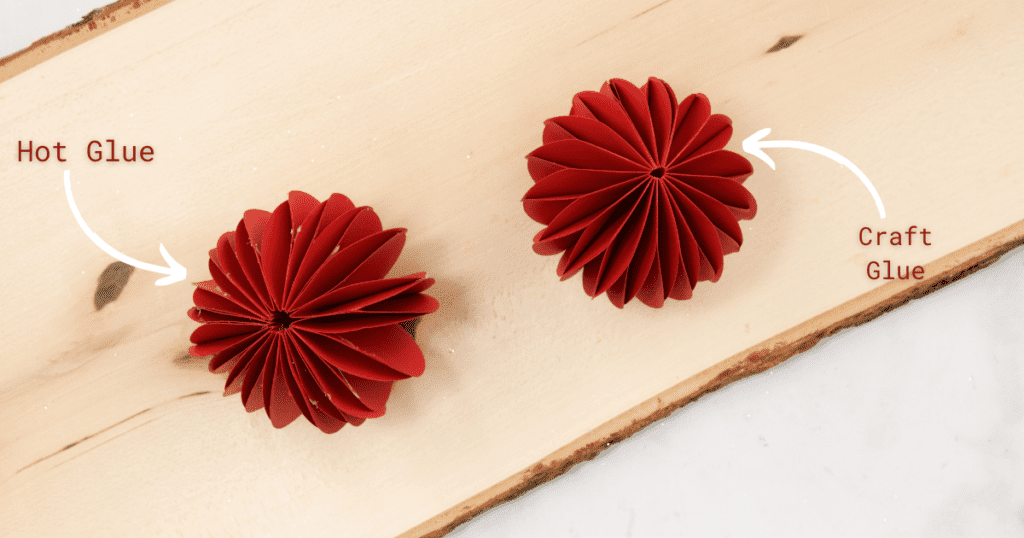
When making these ornaments, I tested what adhesive is best and found that a simple craft glue makes for a clean and professional paper ornament. I tried hot glue with 65 lb cardstock, but personally, it dried too fast and made the project bulky, and left a lot of debris.
There are other alternatives to craft glue. You can use glue dot adhesives or double-sided tape. Whatever works best for you.
When making your ornaments, be careful to apply your glue in thin straight lines to avoid the glue spilling over the edges. You’ll want to take your time as you create this ornament.
Keep your lines as consistent as possible as you are gluing them to create a shape that’s consistent all the way around.
Using a fine tip applicator will give you the very best results. I like Bearly Arts Craft Glue for this project. Use the code SRP10 to save 10%

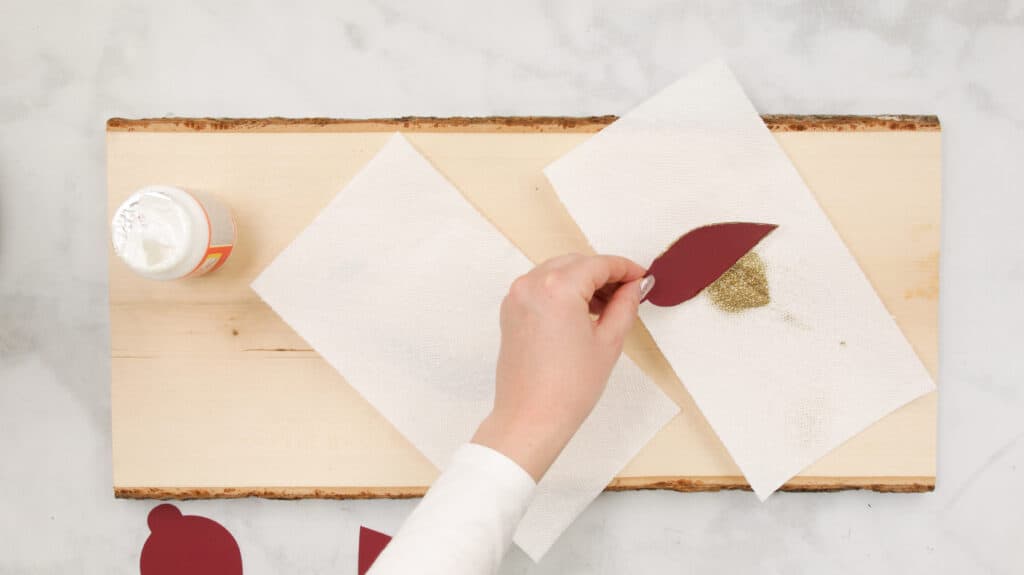
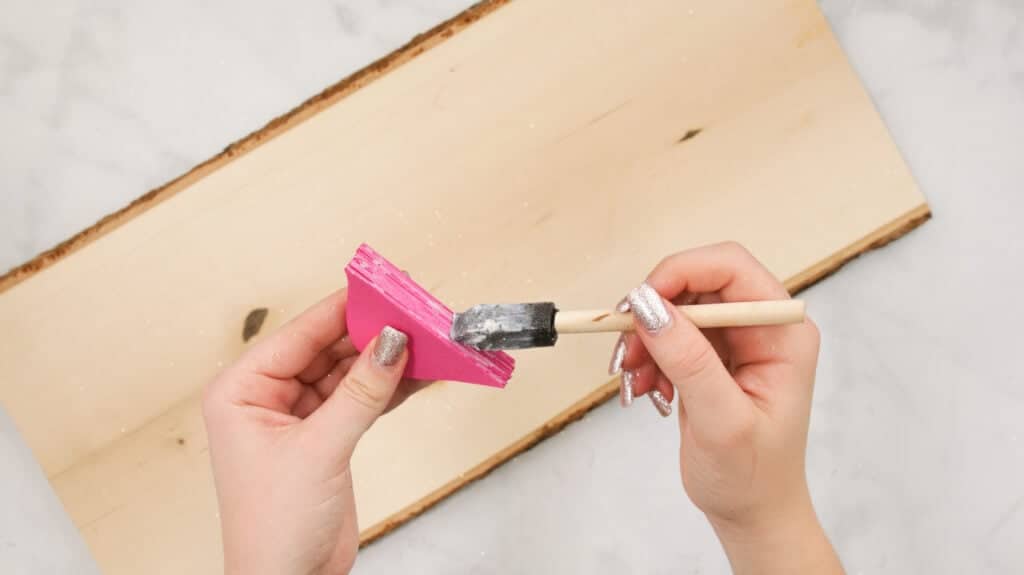
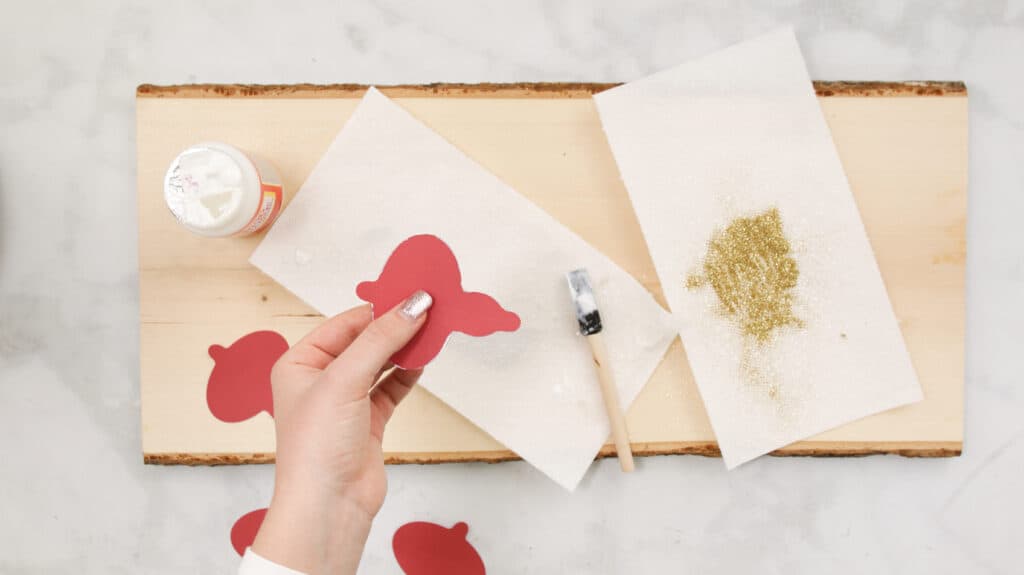
I wanted to add some shine to the ornaments, so I gathered some mod podge and gold glitter. I applied the mod podge to the edges of each ornament piece before gluing them together, and dipped it into the gold glitter.
You can also use a mod podge that already has glitter added. If you choose to do this to your ornaments, let each pieces dry for 20-30 minutes.
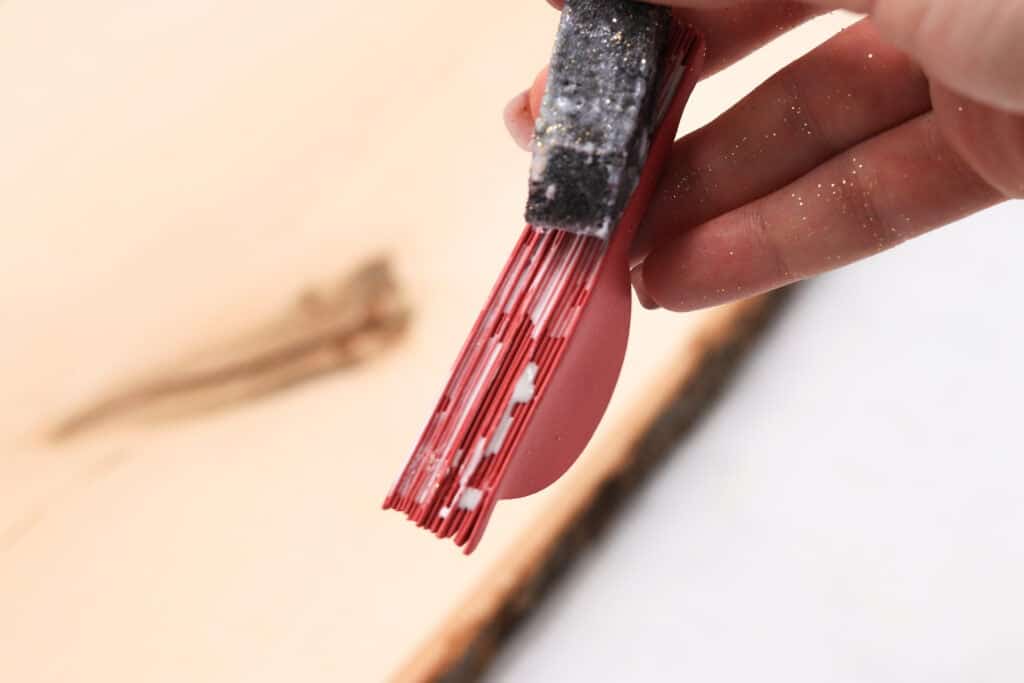
For extra glitter coverage, use a foam brush to paint the edges of the finished ornament with Mod Podge, then sprinkle the wet glue with glitter and shake the excess glitter off. Allow the ornament to dry completely.
Needed:
- Cricut Maker, Cricut Explore, or Other Cutting Machine
- StandardGrip Mat
- Fine-Point Blade
- Single Scoring Wheel Tip & Housing or Scoring Stylus
- Copy Paper or 65lb cardstock
- Hot glue & Craft glue
- Bearly Arts Craft Glue (This is my favorite tacky adhesive)
- Use the code SRP10 to save 10%
- Bearly Arts Craft Glue (This is my favorite tacky adhesive)
- Ribbon (1/8" standard ribbon is what I used)
- Clover Clips to hold layers together
- Foam Paintbrush
- (Optional) Mod Podge- Used to apply the glitter to the edges of the ornaments
- (Optional) Glitter- I used a mixture of fine gold glitter and chunky gold glitter
Download SVG Files Here
Upload to Design Space
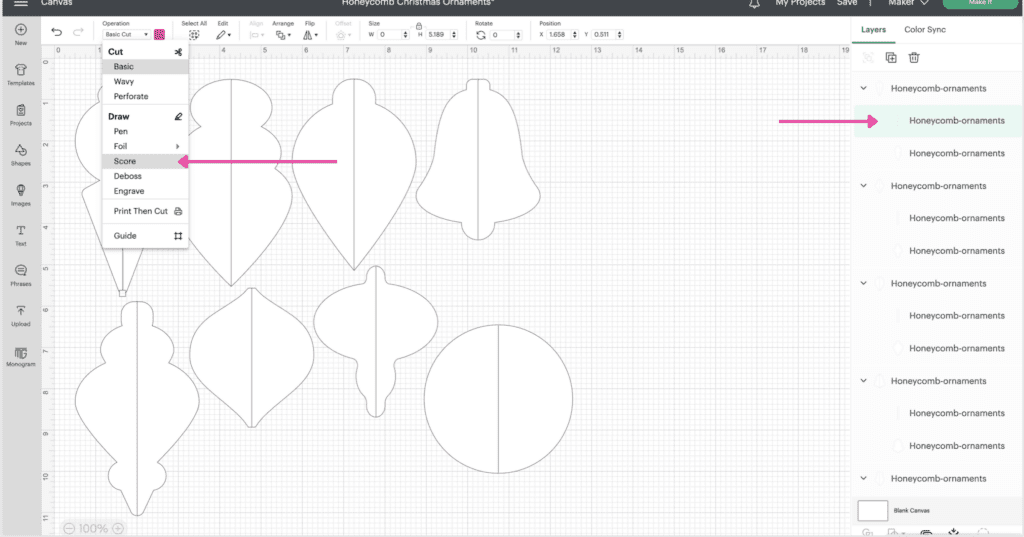
To start, download the file, open Design Space, and Upload the designs to your canvas.
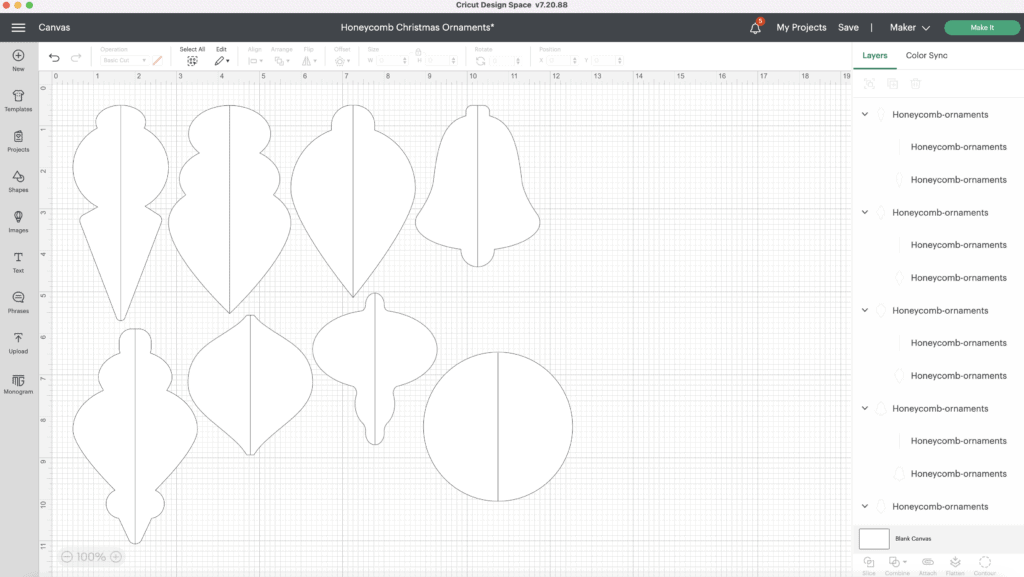
Then, click on the designs and Ungroup them in the layers panel.
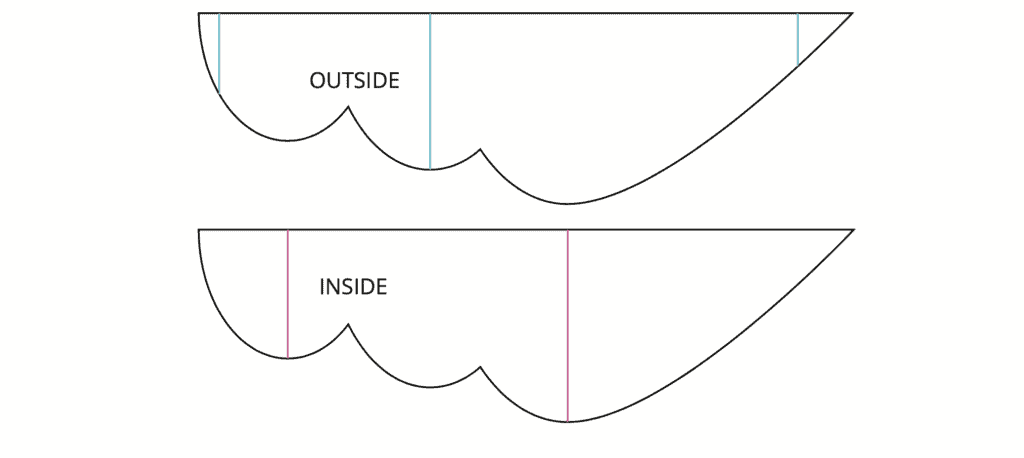
Change the center lines from Basic Cut to Score by selecting one of the ornaments, clicking on the line above the ornament shape, and clicking Score in the operations panel .
After changing the center lines to score lines, attach the score line to the ornament shape in the layers panel. Then, you can change the colors of the ornaments by clicking on the square in the Operation panel and selecting a color.
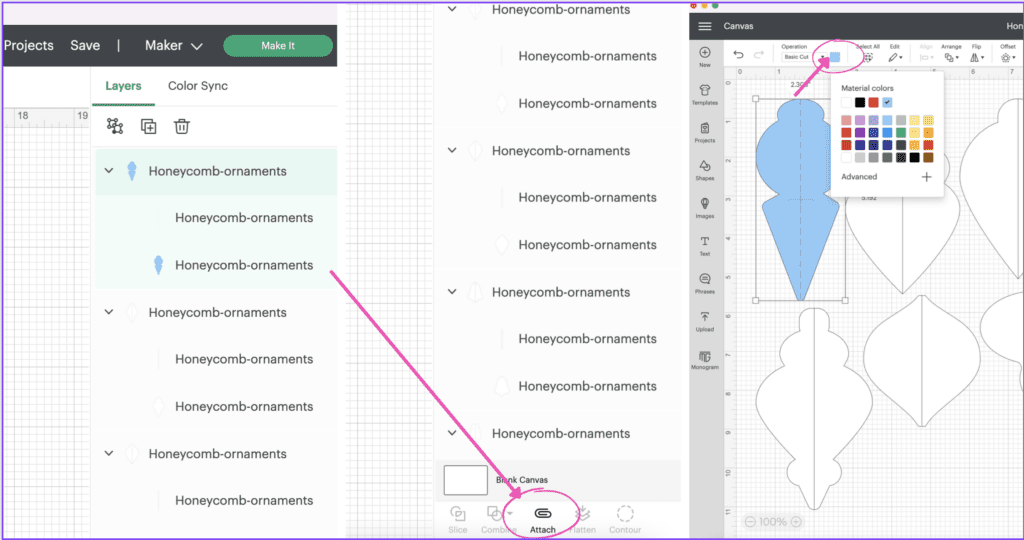
Afterward, we need to duplicate each design.
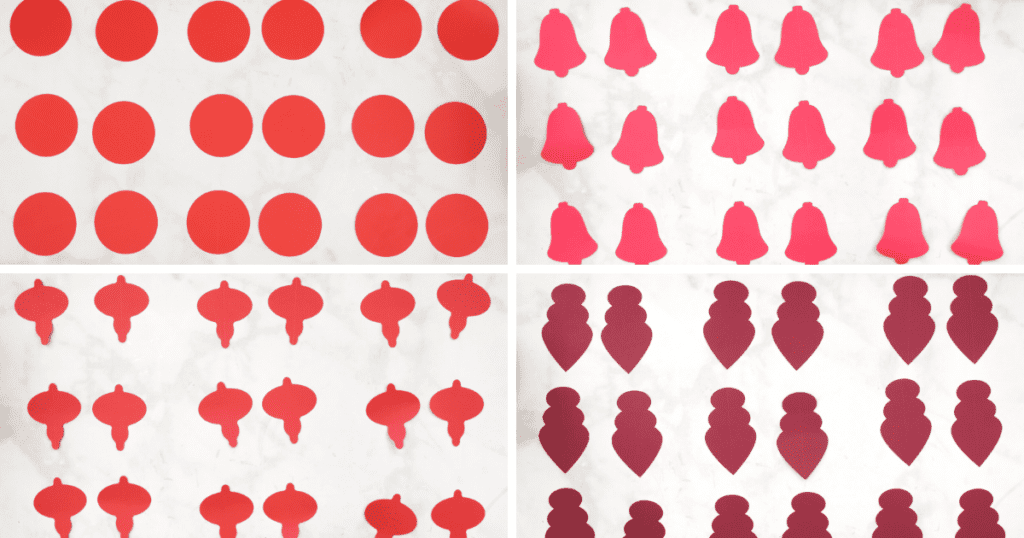
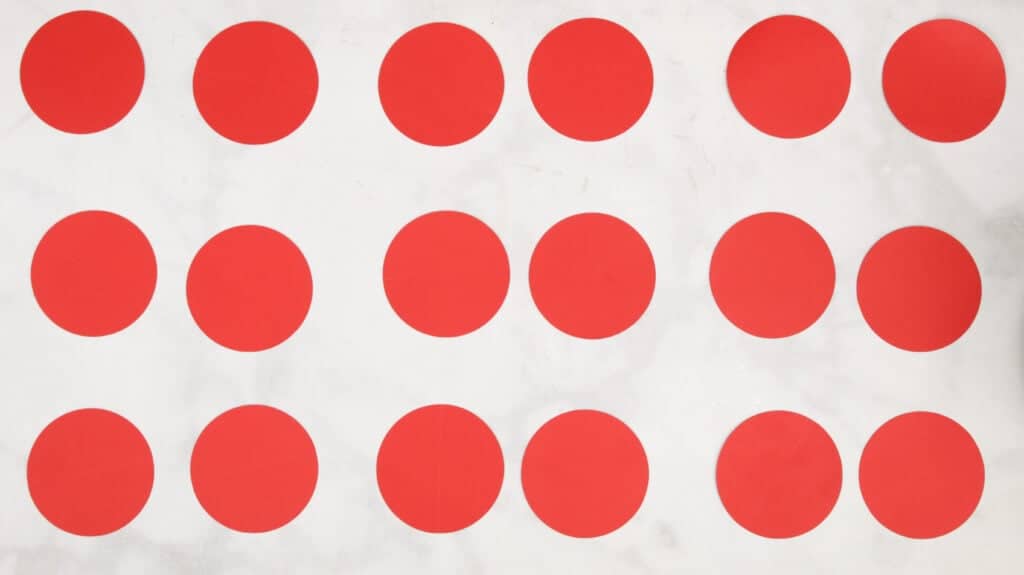
How Many Pieces Should I Cut for Each Ornament Design?
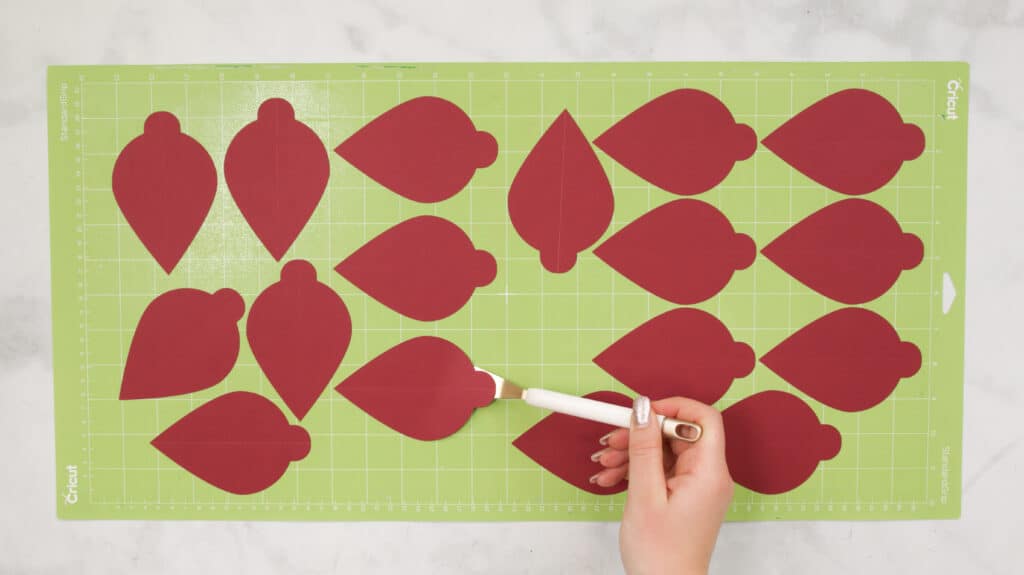
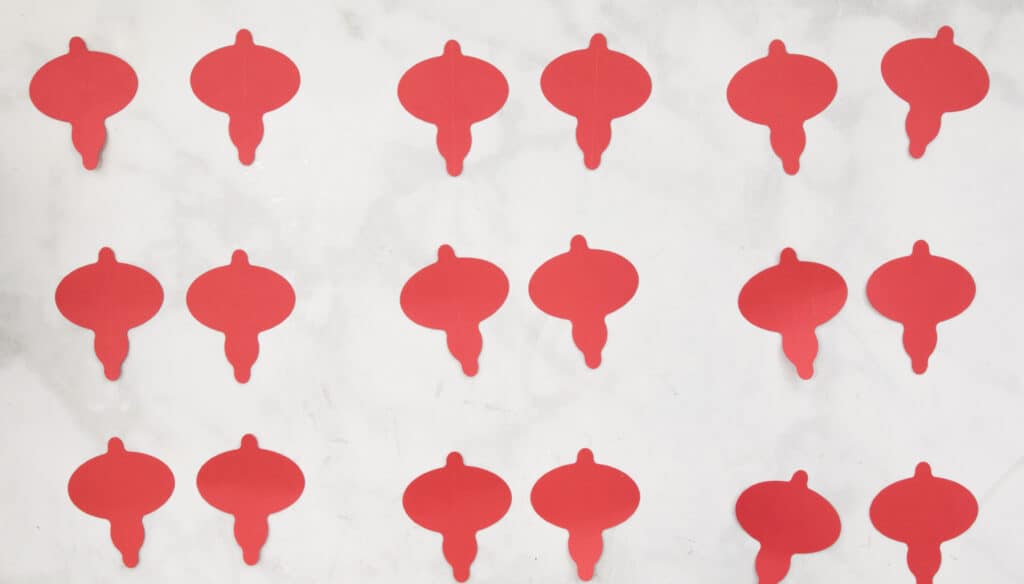
If you are using copy paper, duplicate the designs in Design Space, so there are 20 of each using Command C or Ctrl+C to copy and Command V or Ctrl+V to paste; If you are using 65 lb or a heavier cardstock- some may need to be duplicated to forty so the two ends of the ornaments connect.
Cut Out All the Pieces and Fold All the Ornament Pieces
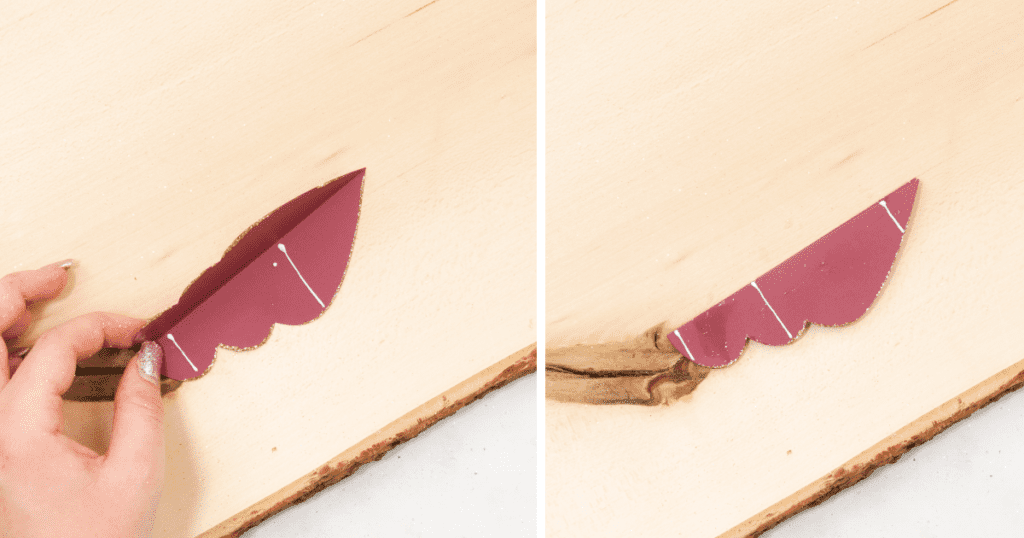
To start, load your mat with paper into your cutting machine and cut out all the ornament pieces you want to make and fold them along the score line down the centers.
After cutting all the pieces, I will show you the gluing pattern for each one.
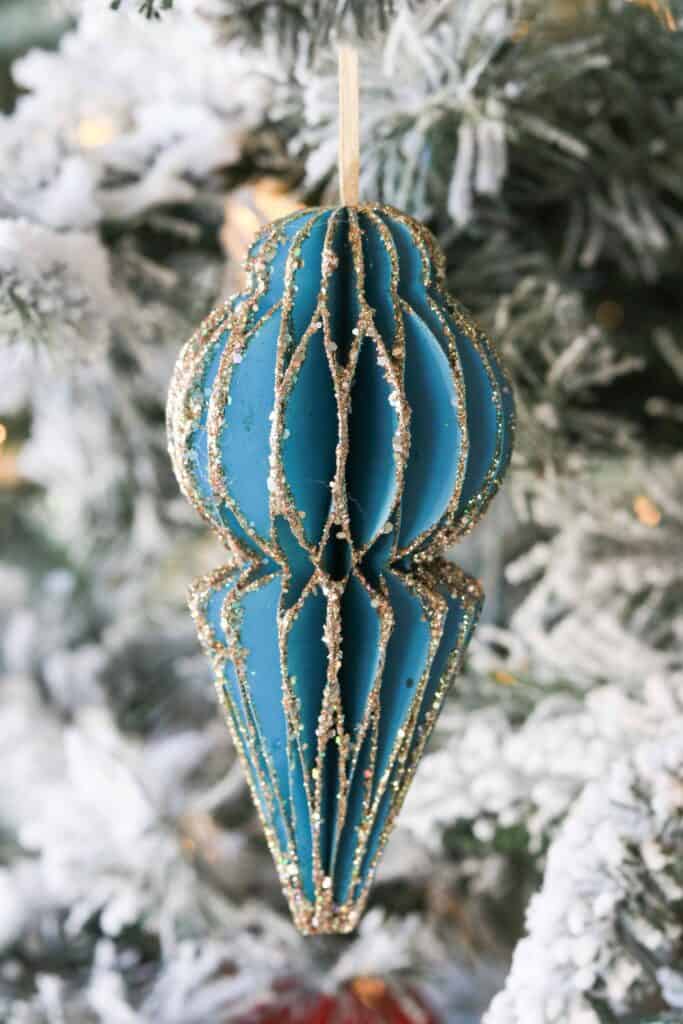
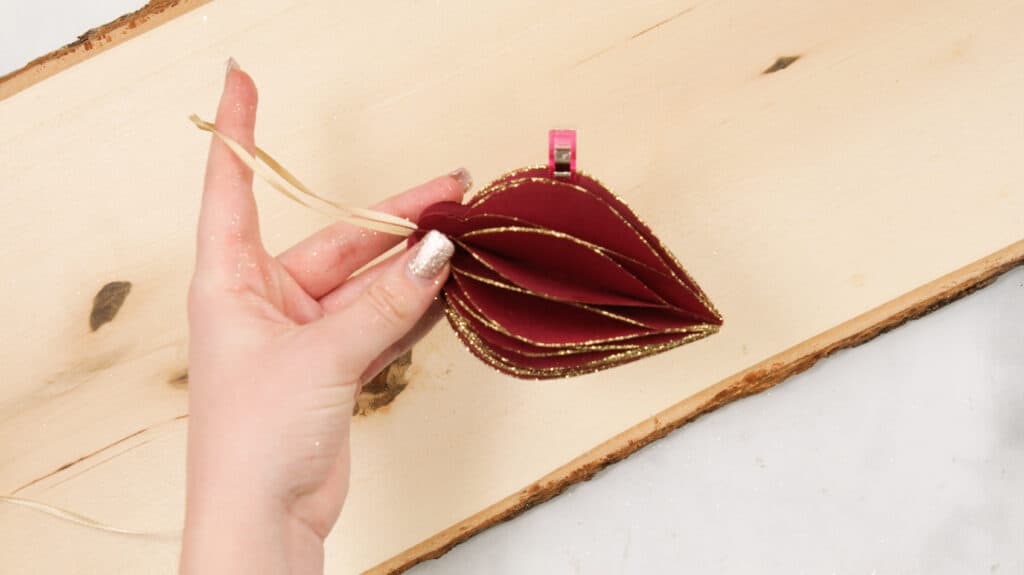
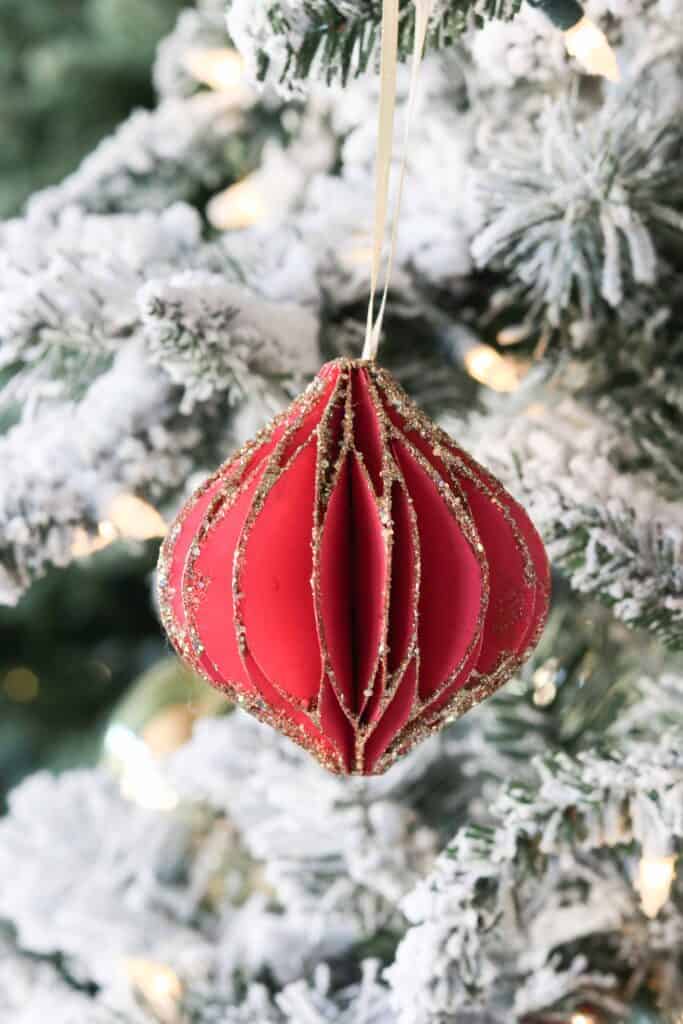
1. Icicle Ornament
Let's start by gluing the icicle ornament pieces together using the gluing pattern.
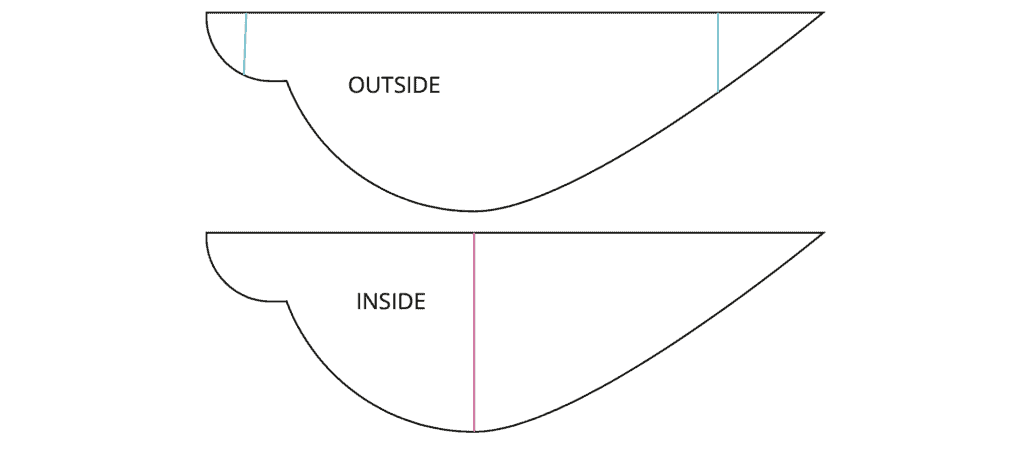
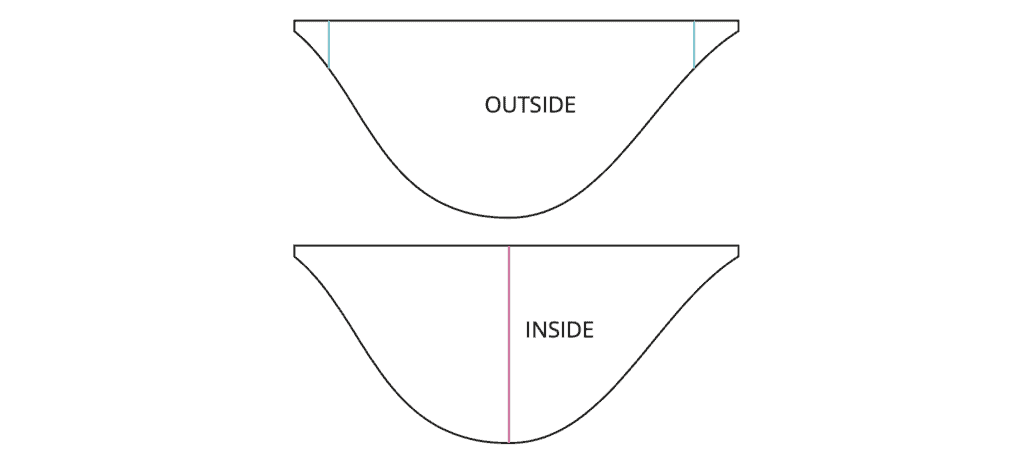
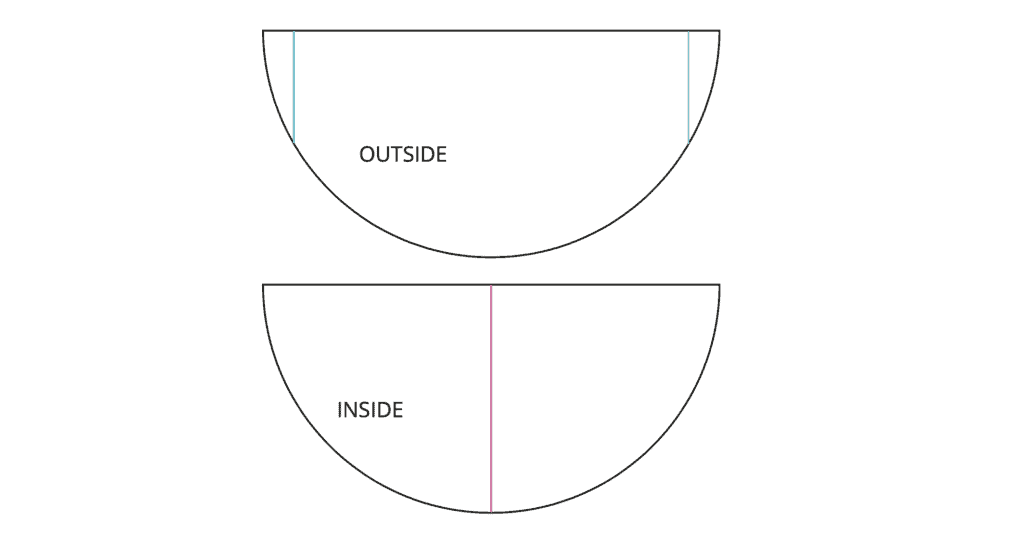
Use this glue guide as your reference for the icicle ornament. This is the pattern that you will continue to follow for each ball ornament piece:
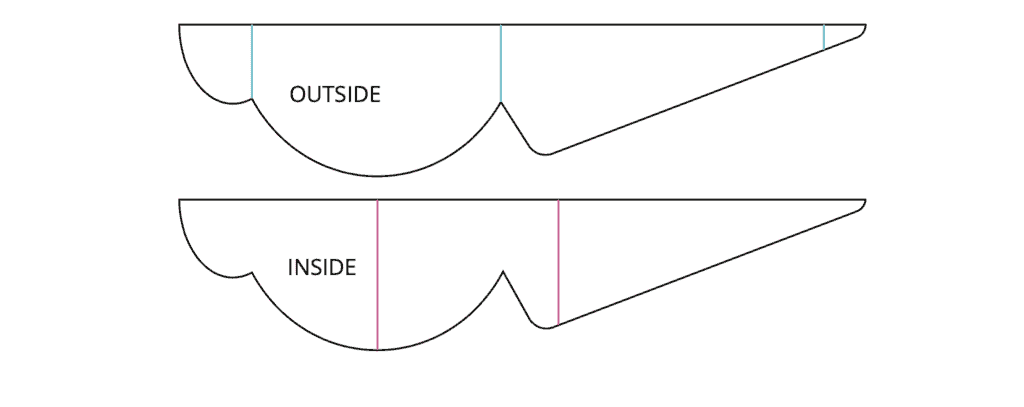
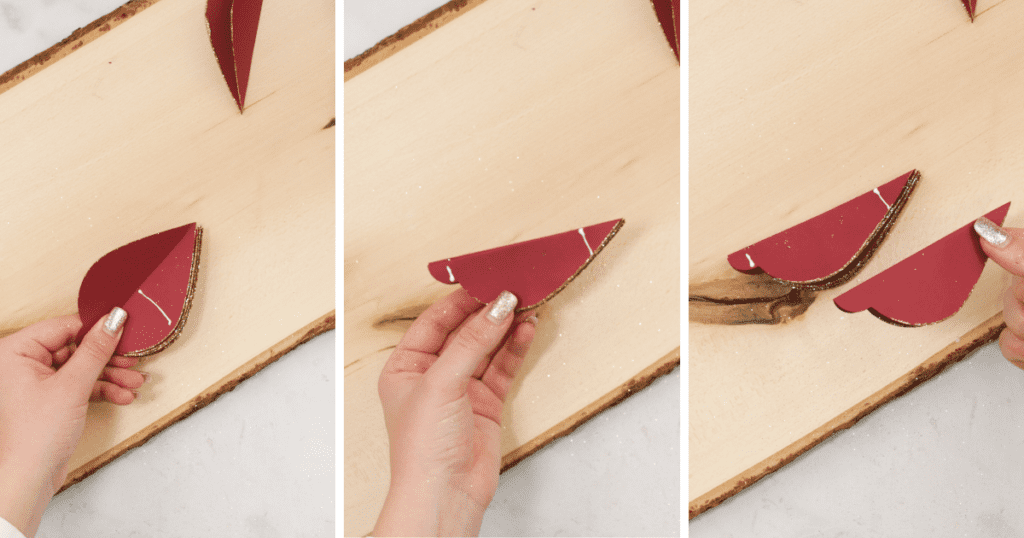
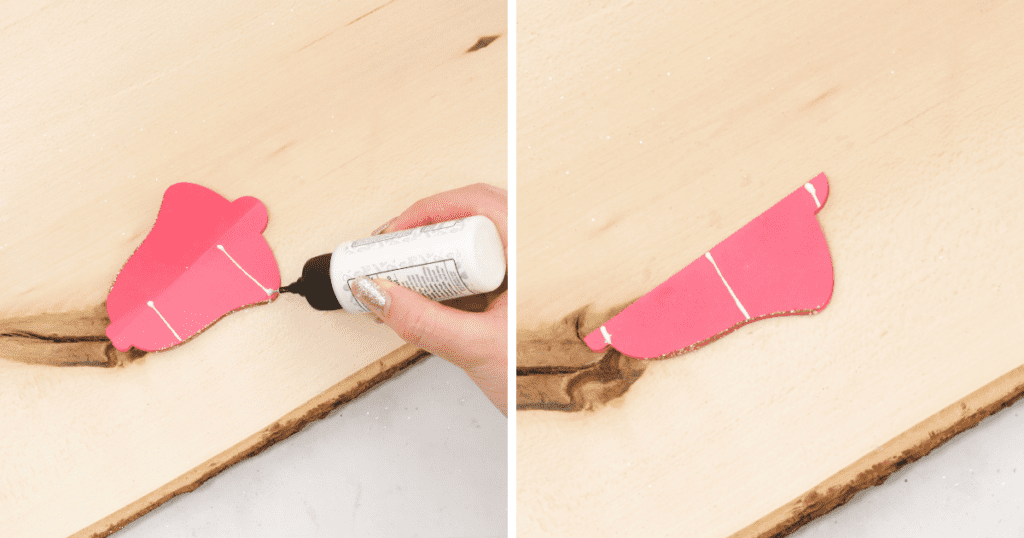
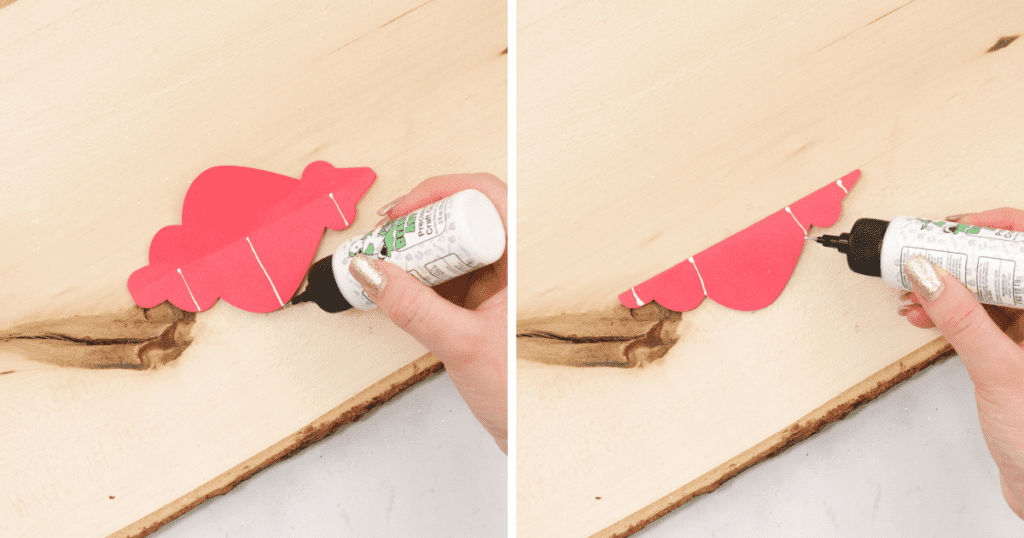
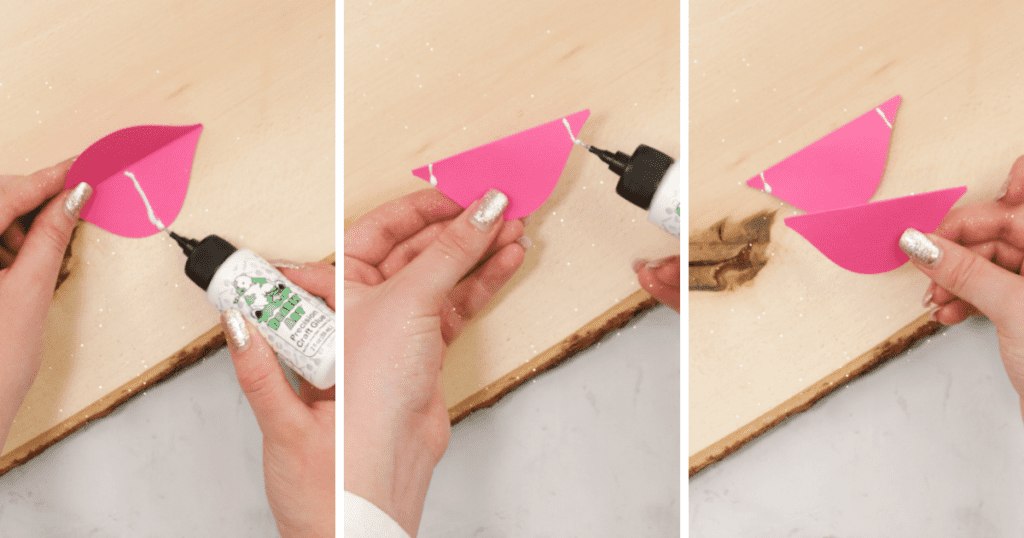
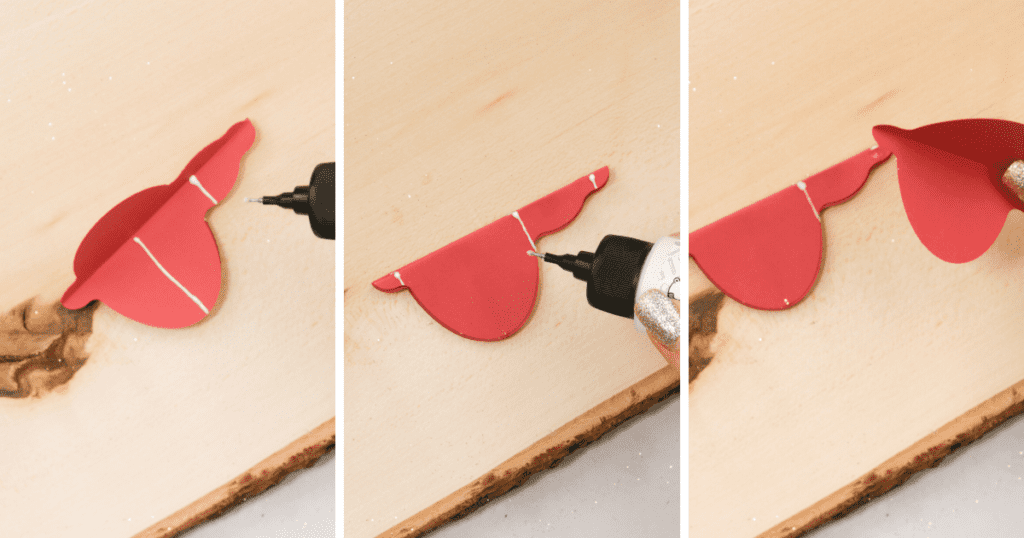
Take one of your Icicle ornament pieces, fold along the score line, flip it to the inside, and apply glue down the center. Once applied, close the piece to the outside, and compress.
Apply glue to the outside of the piece to the two edges as seen in the image above.
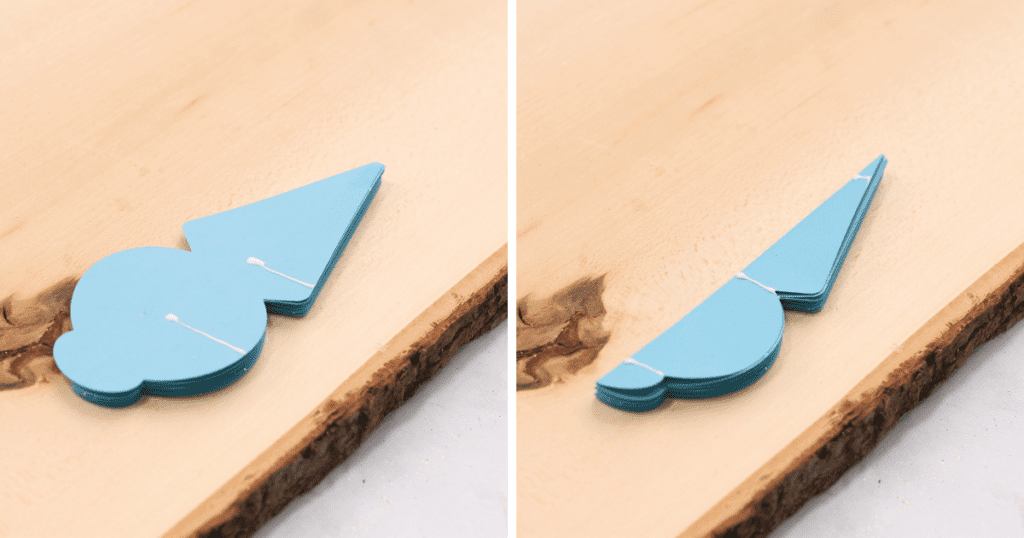
Attach another icicle ornament piece on top of the glue you just applied and continue this pattern by layering the pieces in a plate-like assembly.
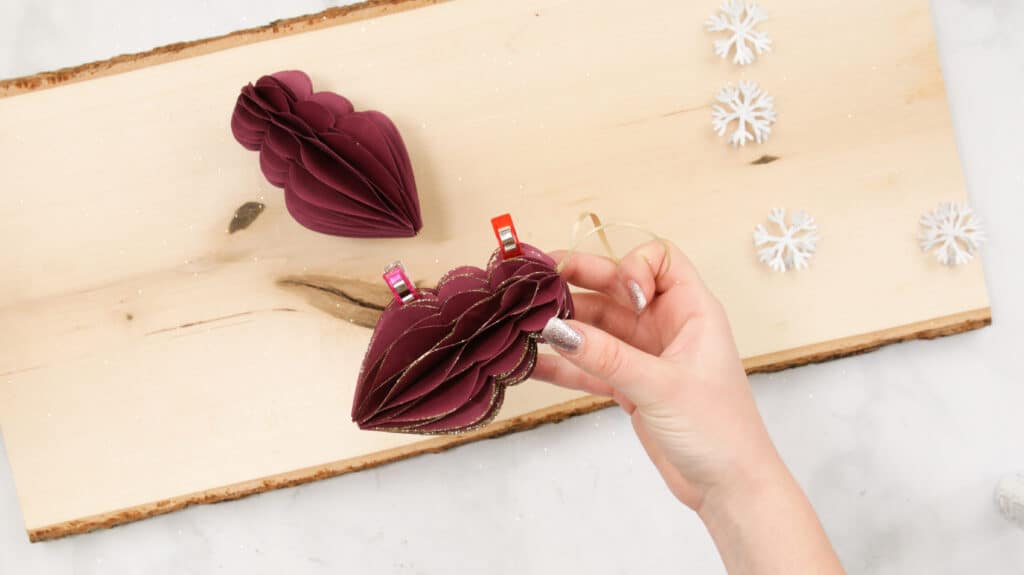
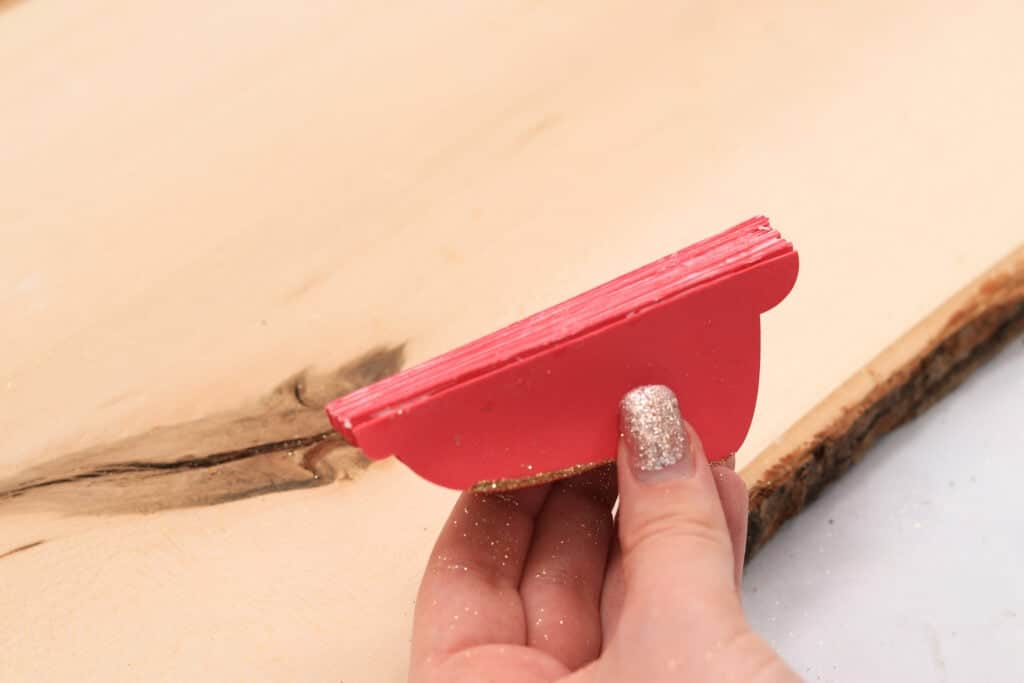
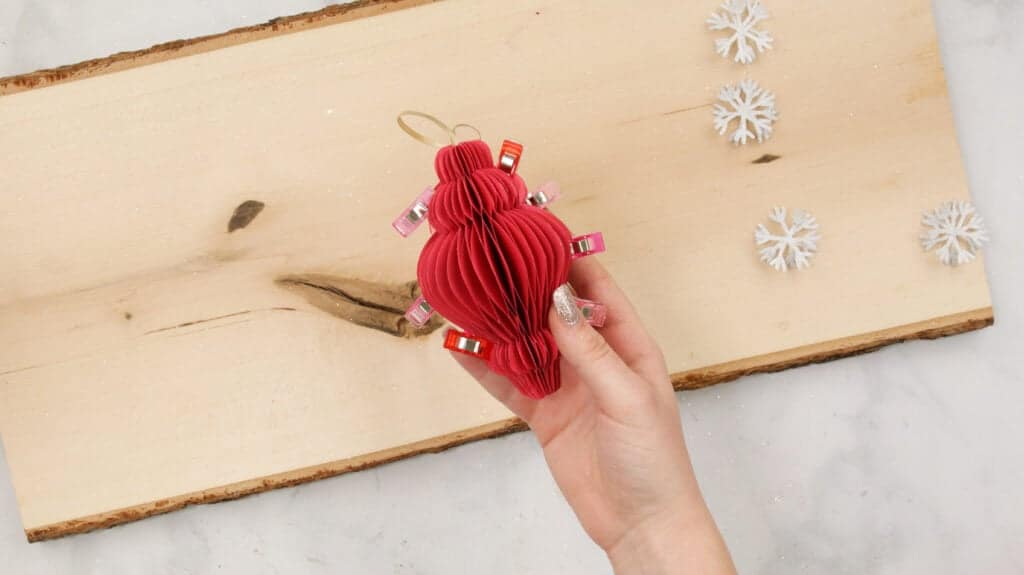
Once all twenty pieces have been glued, compress the layers together by using crafting clips or placing something heavy on top and allow them to dry.
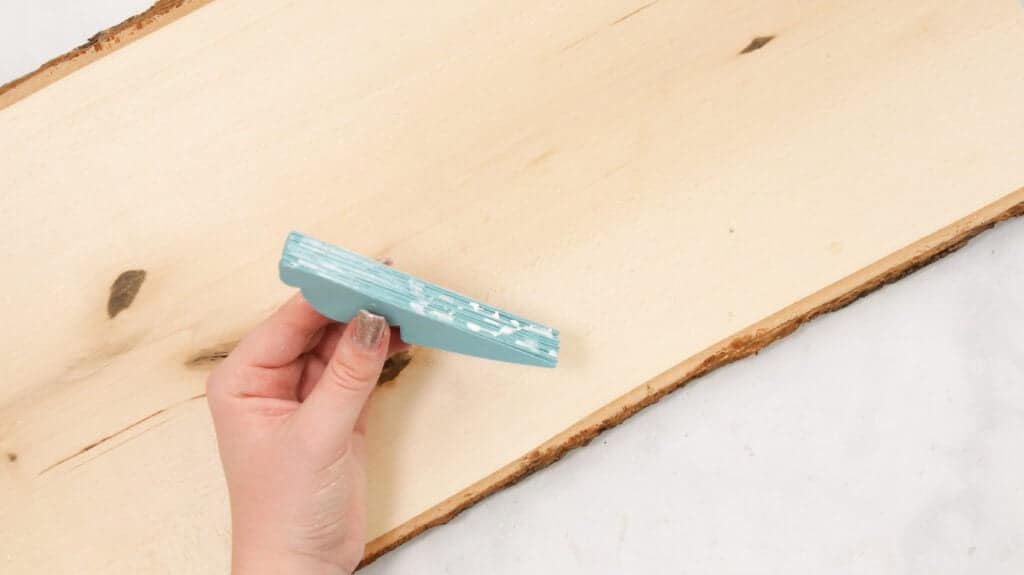
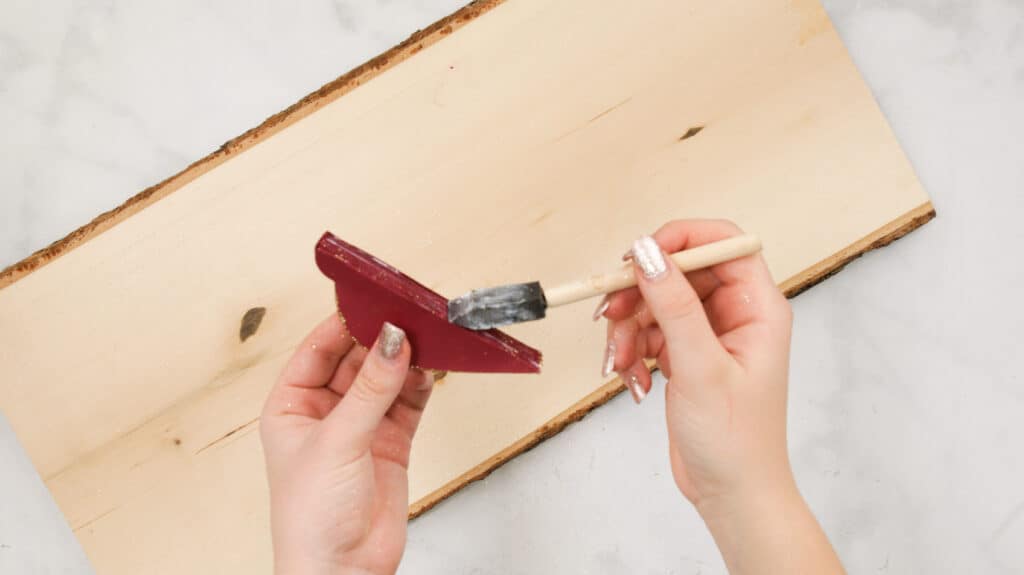
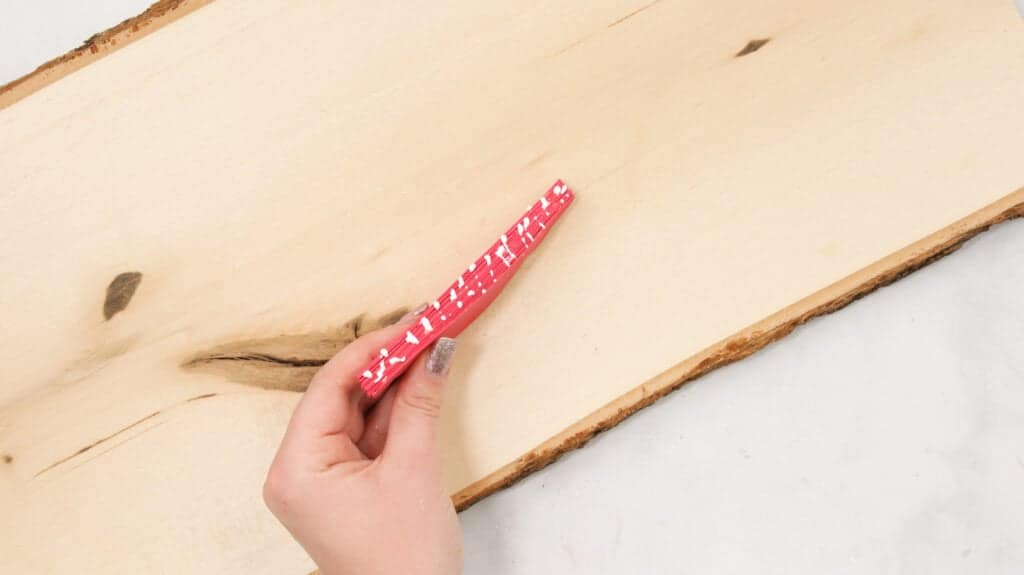
Then, apply glue to the spine using hot glue, Mod Podge, or apply craft glue by using a paintbrush. Doing this will seal all the layers together.
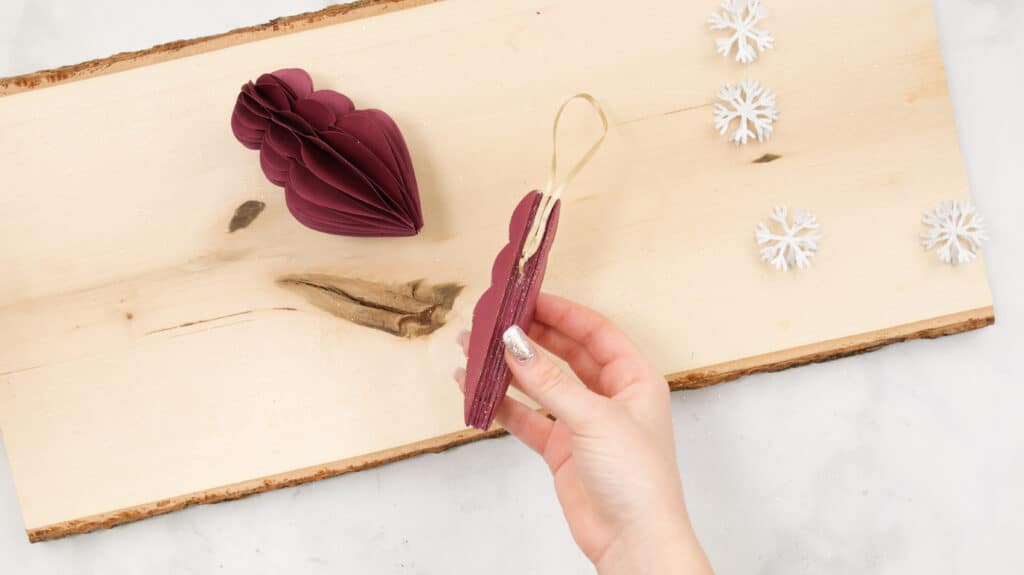
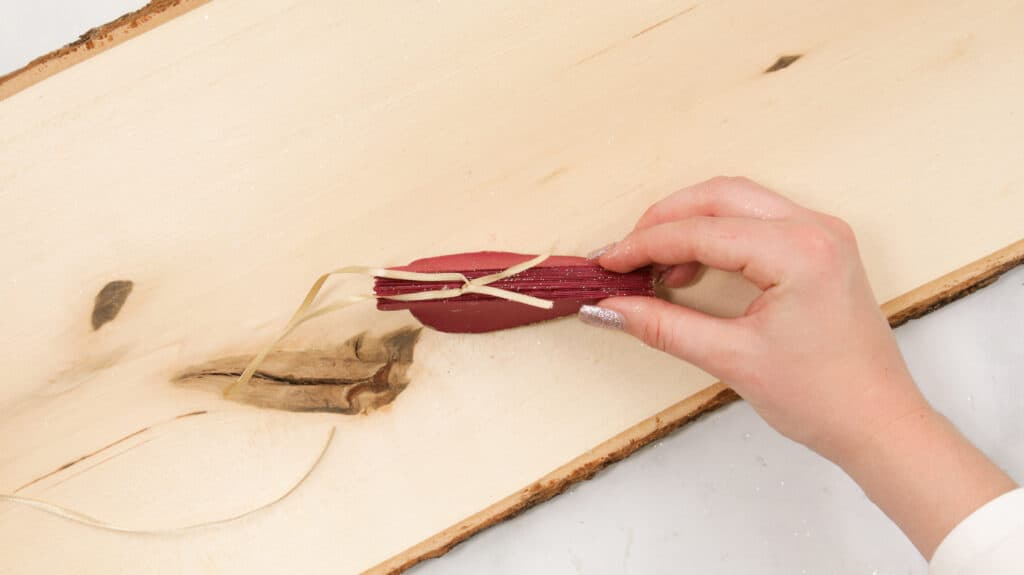
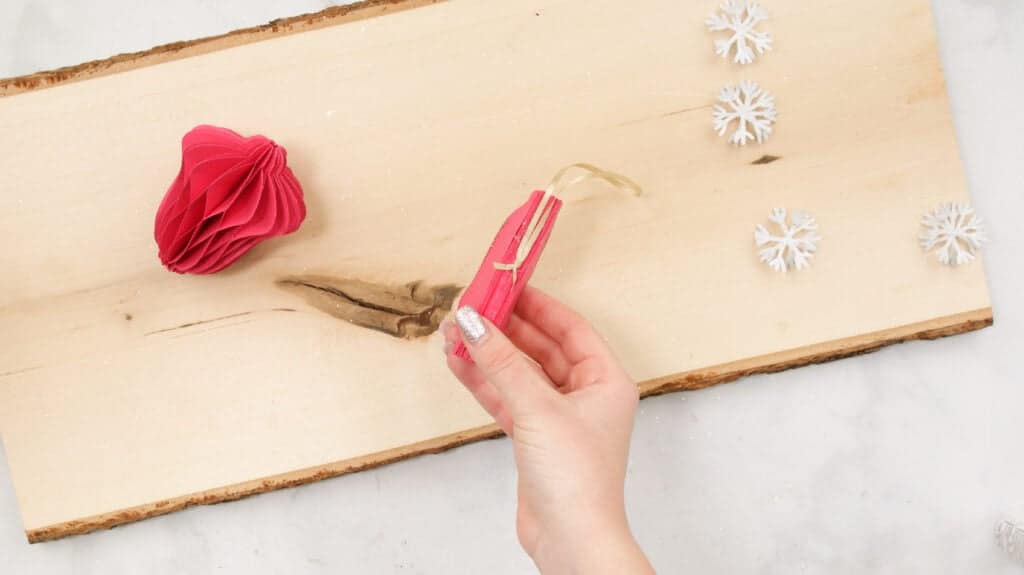
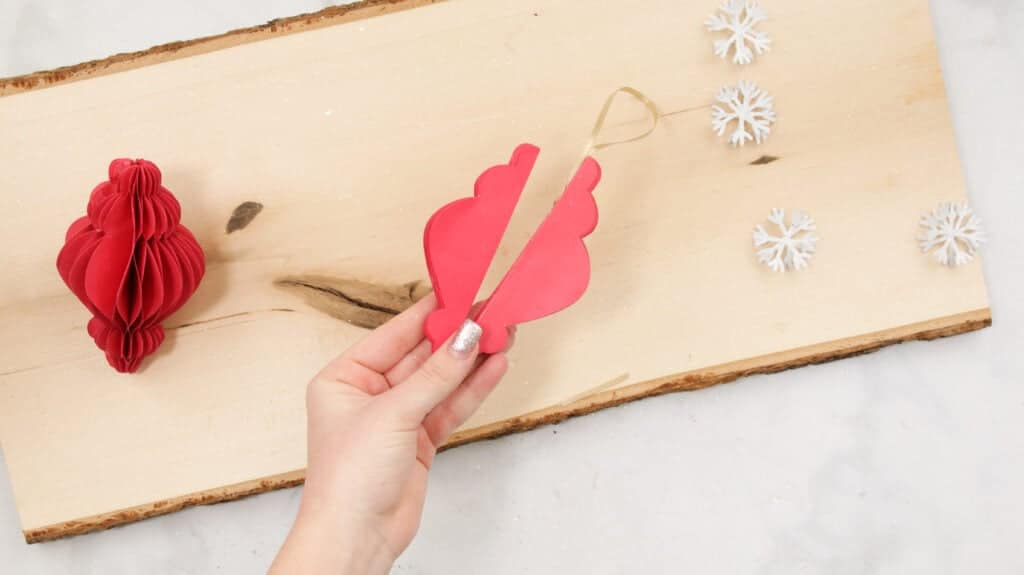
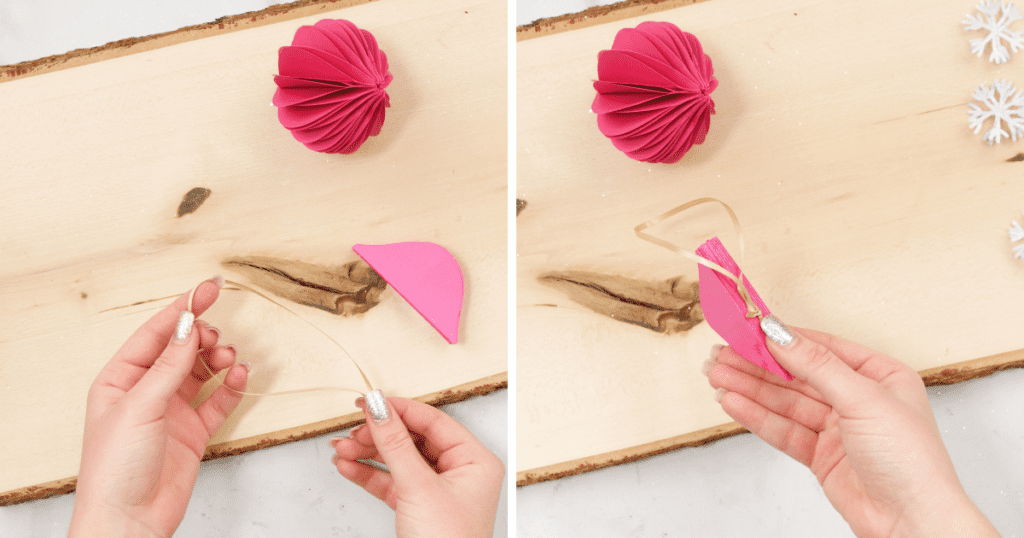
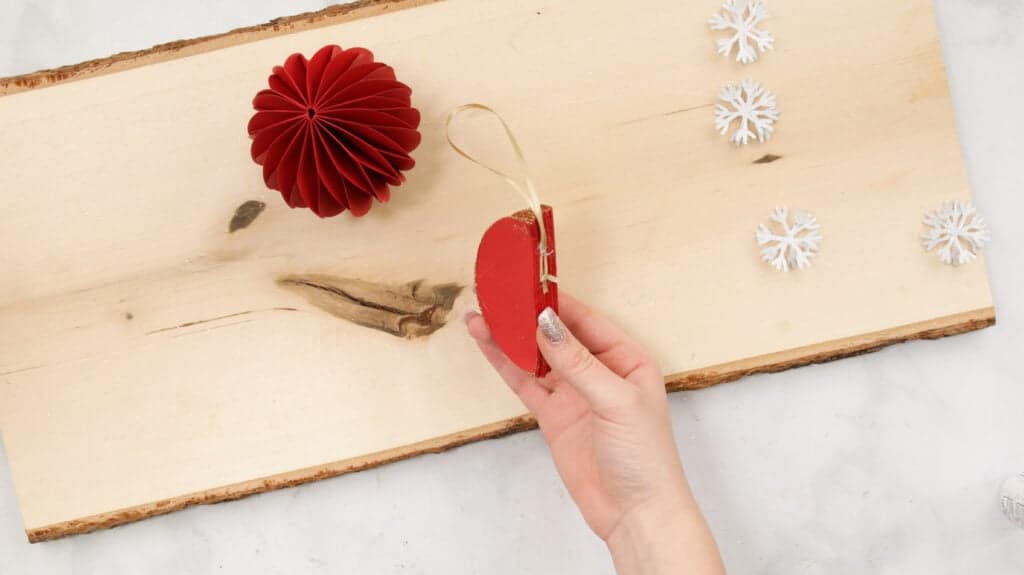
Next, cut a ribbon that measures 15" long, tie the two ends in a knot, and trim the excess ribbon.
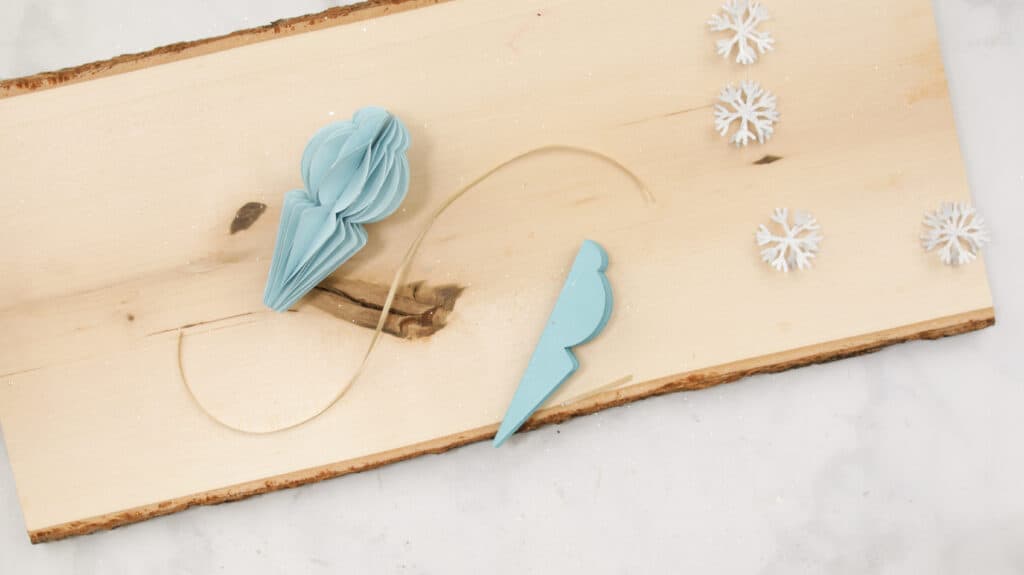
Add a dab of hot glue to the knot of the ribbon and attach to the stem of the ornament.
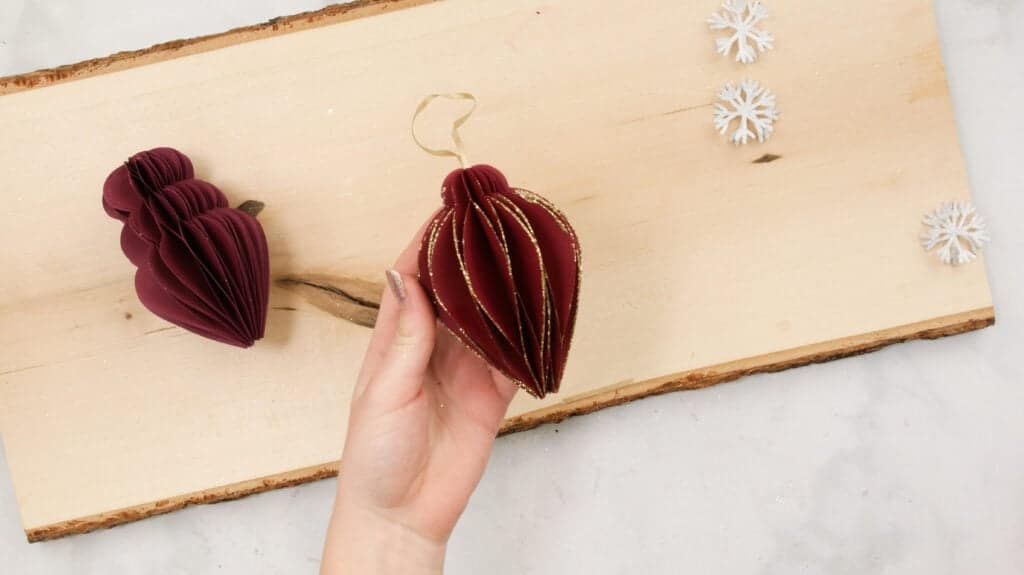
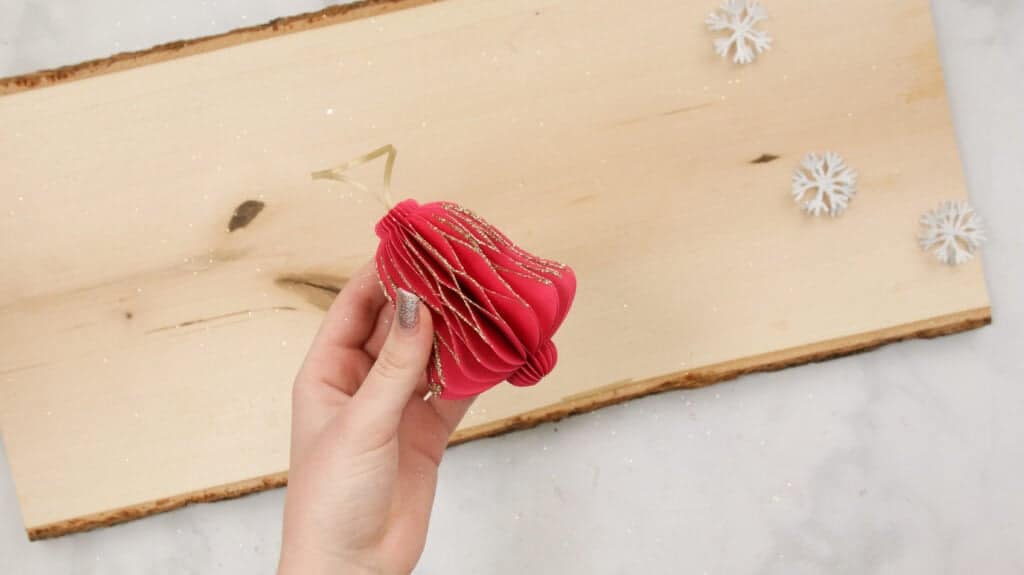
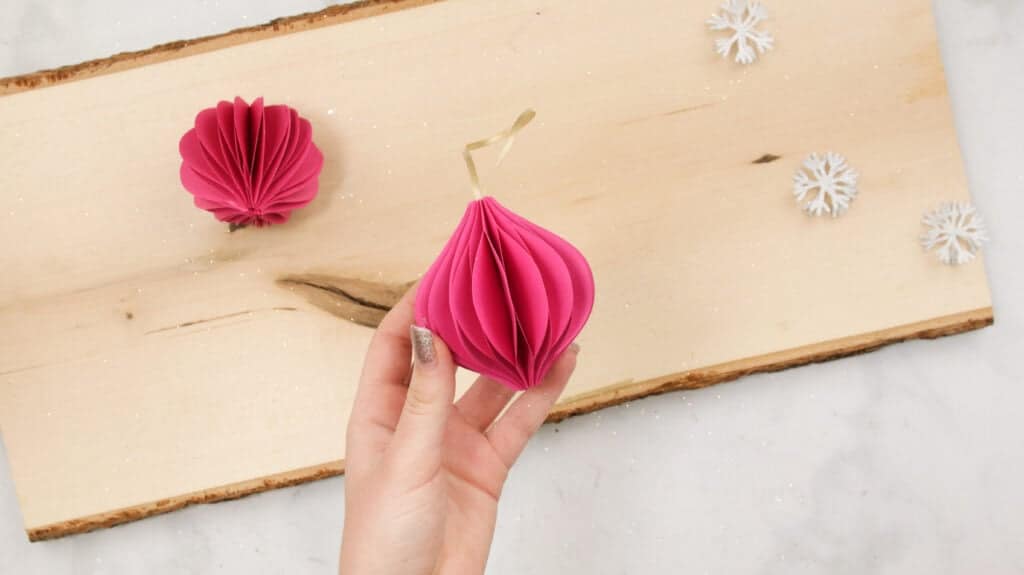
Then, take the two end of the ornament pull them like an accordion until the two sides meet, and glue them together, and allow it to dry.
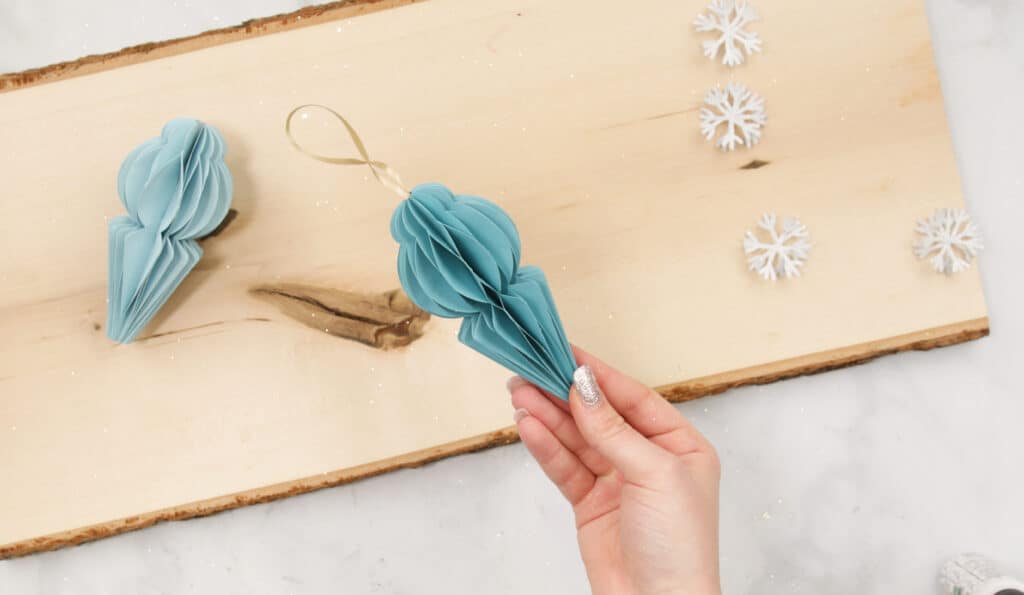
Once dried, your icicle ornament is done!
2. 3 Curved Ornament
Moving on to the next ornament, gather the ornament pieces with three curves.
If you want to add glitter, grab mod podge, a paintbrush, and some glitter (I used a fine gold glitter). Apply the mod podge to the edges of the ornament with your paintbrush, and lightly dip the edges into a glitter pile. Allow the mod podge to dry for 20-30 minutes.

Use the glue guide as your reference for this ornament: This is the pattern that you will continue to follow for each ornament piece.
Take one of the ornament pieces, fold along the score line, flip it to the inside, and apply glue to the middle of the bottom and top curves.
Once applied, close the piece to the outside, and compress. Apply glue to the the middle curve and the two edges of the piece.
Attach a piece on top of the glue you just applied and continue this pattern by layering the pieces like a sandwich.
Once all twenty pieces have been glued, compress the layers together, and allow them to dry.

Next, cut 15" of ribbon and tie the two ends in a knot. Apply a dab of hot glue to the knot and attach it to the stem of the ornament.
Grab the two end of the ornament and stretch them very carefully until the two end meet and glue them into place.
Allow the ornament to dry (using craft clips to hold the two sides is super handy). Once it's dried, it ready to be displayed!

3. Teardrop Ornament
If you want to add glitter to this ornament, dip a paintbrush into the Mod Podge and apply it along the edges of the teardrop ornament, then roll the edges of the ornament into gold glitter. Allow the Mod Podge to dry for twenty minutes.
Once the mod podge has dried, let's start gluing the teardrop ornament pieces together using the gluing pattern.
Use the glue guide as your reference for the teardrop ornament: This is the pattern that you will continue to follow for each ball ornament piece.
Take one of your teardrop ornament pieces, fold along the score line, flip it to the inside, then apply glue down the center.
Once applied, close the piece to the outside, and compress. Apply glue to the outside of the piece to two edges as seen in the reference image above.
Attach a piece on top of the glue you just applied and continue this pattern by layering the pieces in a plate-like assembly.
Once all twenty pieces have been glued, compress the layers together by placing a book or something heavy on top and allow them to dry.
Next, apply glue to the spine using hot glue, mod podge, or craft glue. Doing this will seal all the layers together.
Next, cut a piece of ribbon (I cut a 15 inch string of ribbon). Take the ends of the ribbon and tie them together by making a knot. Then, apply hot glue to both sides of the ribbon and attach to the middle of the spine.
And finally, apply glue to one end piece of the ornament and slowly fold the two ends together.
After you bring the two ends together and allow it to dry, this ornament is done!
4. Bell-Shaped Ornament
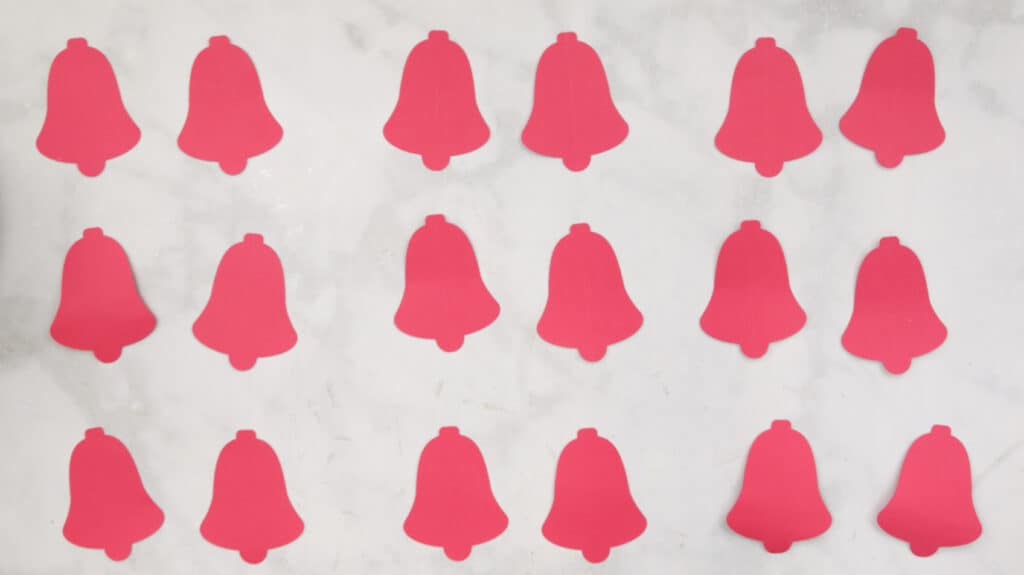
Use this glue guide as your reference for this bell-shaped ornament: This is the pattern that you will continue to follow for each ball ornament piece.
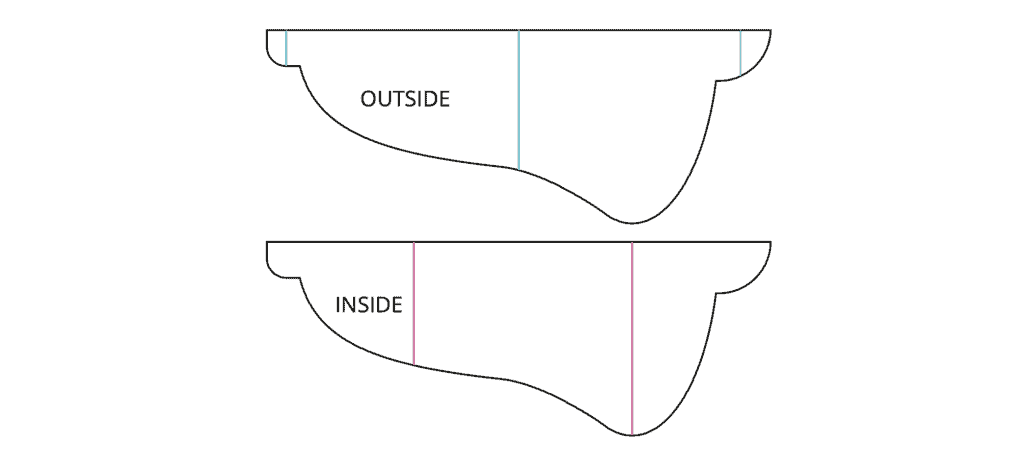
Take one of your bell-shaped ornament pieces, fold along the score line, flip it to the inside, apply two strips of glue.
Once applied, close the piece to the outside, and compress. Apply glue to the outside of the piece to the center and two edges.
Attach a piece on top of the glue you just applied and continue this pattern by sandwiching the layers together.
Once all twenty pieces have been glued, compress the layers together by placing something heavy on top and allow them to dry.
Next, apply glue to the spine (doing this will seal all the layers together).
Cut a 15" piece of ribbon and tie the ends into a knot. Add a dot of hot glue to the knot and attach it to the stem of the ornament.
Once the ribbon has been attached, take the two ends of the ornament and fold them together. Once you've allowed your bell-shaped ornament to dry, this ornament is ready to be shown off!
5. Conch-Shaped Ornament
For this ornament, I recommend that you use standard copy paper or anything lighter than 65 lbs. If you use 65 lb paper, the two ends of the ornament will be harder to connect.
To make this ornament, let's start gluing all the ornament pieces together using this gluing pattern.
Use the glue guide as your reference for the lightbulb ornament: This is the pattern that you will continue to follow for each ball ornament piece.
Take one of your conch-shaped ornament pieces, fold along the score line, flip it to the inside, apply glue down the center.
Once applied, close the piece to the outside, and compress. Apply glue to the sides of the middle curve and to the edges of the piece.
Attach another piece on top of the glue you just applied and continue this pattern by layering the pieces in a plate-like assembly.
Once all twenty pieces have been glued, compress the layers together by placing a something heavy on top and allow it to dry.
Next, cut a 15" string of ribbon, and tie the ends into a knot. Add a dab of glue to the knot and attach it to the stem of the ornament.
(I used 65 lb cardstock for this ornament, so I had to sandwich together another twenty pieces in order for the to ends to connect. If you cut this ornament piece out of standard copy paper, you won't have to cut out extra pieces. Just glue the two ends of the ornament together after attaching the ribbon to the stem.)
Grab the other assembled ornament piece and glue it to the piece with the ribbon. Once dried, bring the ends together in glue into place.
Once you've allowed the ornament to dry, the ornament is finished!
6. Pointed-Oval Ornament
To assemble the pointed-oval ornament, let's start gluing the pieces together using this gluing pattern.
Use the glue guide as your reference for the pointed-oval ornament: This is the pattern that you will continue to follow for each ornament piece.
Take one of your oval-pointed ornament pieces, fold along the score line, flip it to the inside, apply glue down the center.
Once applied, close the piece to the outside, and compress. Apply glue to the outside of the piece to the two edges as seen in the reference image above.
Attach another pointed-oval piece on top of the glue you just applied and continue this pattern by layering the pieces in a plate-like assembly.
Once all twenty pieces have been glued, compress the layers together, and allow them to dry.
Next, apply glue to the spine using hot glue, mod podge, or craft glue using a paintbrush. Doing this will seal all the layers together.
Cut a 15" string of ribbon, and tie the ends into a knot. Add a dot of hot glue to the knot and attach it to the spine of the ornament.
Once the ribbon has been attached, gently pull the two end together, and secure with glue.
This cute pointed-oval ornament is done!
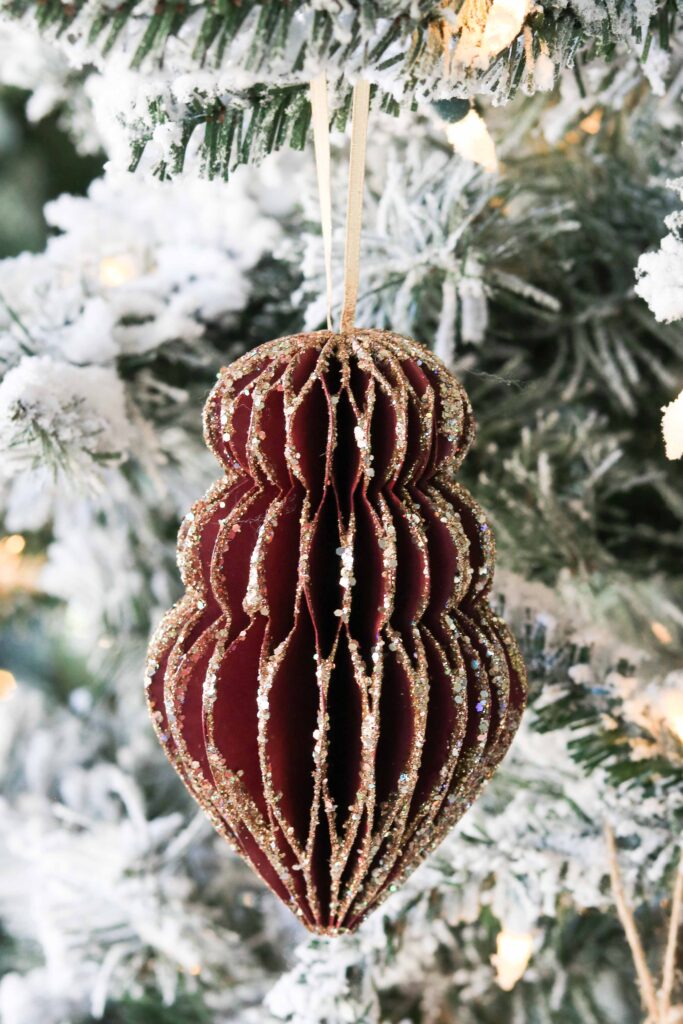
7. Finial Ornament
If you want to add glitter to this ornament, dip your paintbrush into the Mod Podge and apply it along the edges, then roll the edges of the ornament into gold glitter. Allow the Mod Podge to dry for twenty minutes.
Let's start gluing the ornament pieces together using the gluing pattern.
Use the glue guide as your reference for the lightbulb ornament: This is the pattern that you will continue to follow for each ball ornament piece.
Take one of your Finial ornament pieces, fold along the score line, flip it to the inside, apply glue down the center and one strip of glue by the pointed end.
Once applied, close the piece to the outside, and compress. Apply glue to the outside of the piece to the two edges and a strip to the right side of the curve as seen in the reference image above.
Attach another Finial piece on top of the glue you just applied and continue this pattern by layering the other pieces in a plate-like assembly.
Once all twenty pieces have been glued, compress the layers together and add glue to the spine (this will help hold all the layers together).
Cut a 15" string of ribbon and tie the two end in a knot, and then trim the excess ribbon. Add a dab of hot glue to the knot and attach to the spine of the ornament piece.
Once attached, slowly bring the two ends of the ornament towards each other, and attach them with glue.
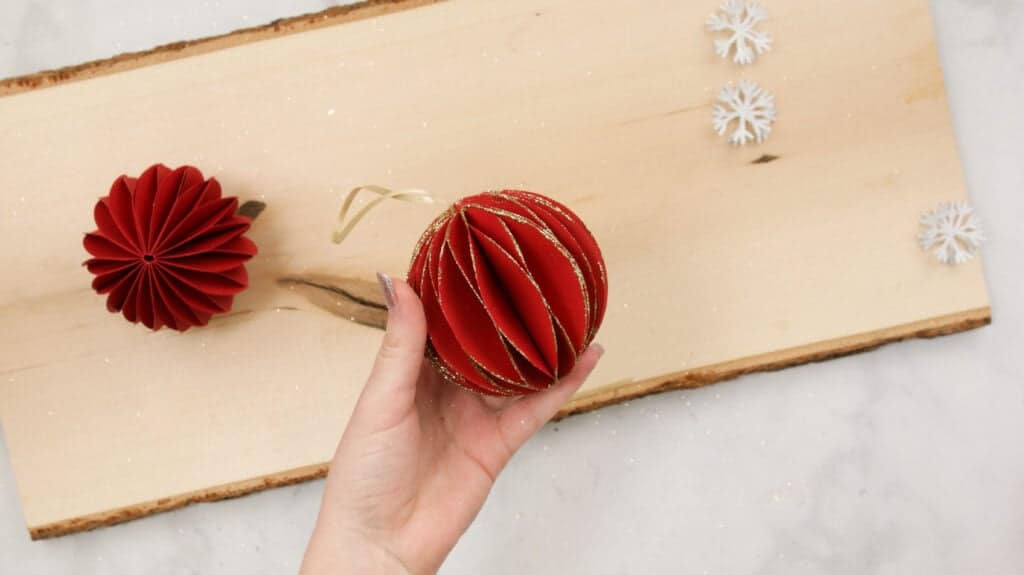
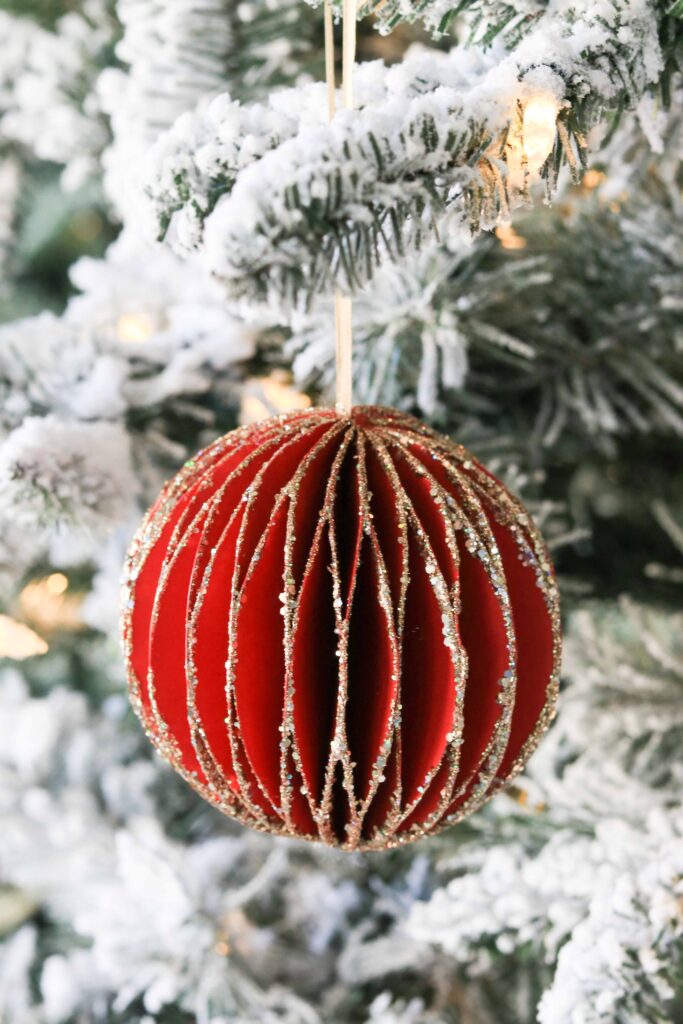
8. Ball Ornament
To assemble this ball ornament, use the glue guide as your reference. This is the pattern that you will continue to follow for each ball ornament piece:
Take one of your circle pieces, fold along the score line, flip it to the inside, then apply glue down the center.
Once applied, close the piece to the outside, and compress. Apply glue to the outside of the piece to two edges as seen in the image above.
Continue this pattern by layering the pieces in a plate-like assembly. Once all twenty pieces have been glued, compress the layers together by placing a book or something heavy on top and allow them to dry.

Next, apply glue to the spine using hot glue, mod podge, or craft glue using a paintbrush. Doing this will seal all the layers together.

Next, cut a piece of ribbon. I cut a 15 inch string of ribbon. Take the ends of the ribbon and tie them together by making a knot. Then, apply hot glue to both sides of the ribbon and attach to the middle of the spine.
And finally, apply glue to one end piece of the ornament and fold the two ends together.
After that final step, this ball ornament is finished and is ready to be displayed with the rest of the ornament designs!

Crafting them in a variety of colors and experimenting with different types of glitter was a blast! I added another layer of chunky gold glitter to my ornaments to give them that antique look and extra shine.
I'd love to see what you make with this tutorial! Be sure to share a photo of what you are making and tag me on Instagram or Facebook!

I hope you enjoy making these honeycomb ornaments for your holiday!

Join my crafting Facebook group where you can show us what you’re making, ask questions, and learn from others!
Don't want to forget this project and free files? Be sure to pin this project to your favorite Pinterest board. Click HERE to pin this image!
These look great! However, if you used a velcro dot on the two "ends" before you do the final connection, would you be able to store them flat to protect them? Just a thought!
Thats a great idea.
These are just gorgeous! Is there one design that is the easiest to start with? Thanks!