Learn How to Make a Show-Stopping Backdrop for Any Party Using this Free Marquee Numbers Template and Step-By-Step Tutorial.
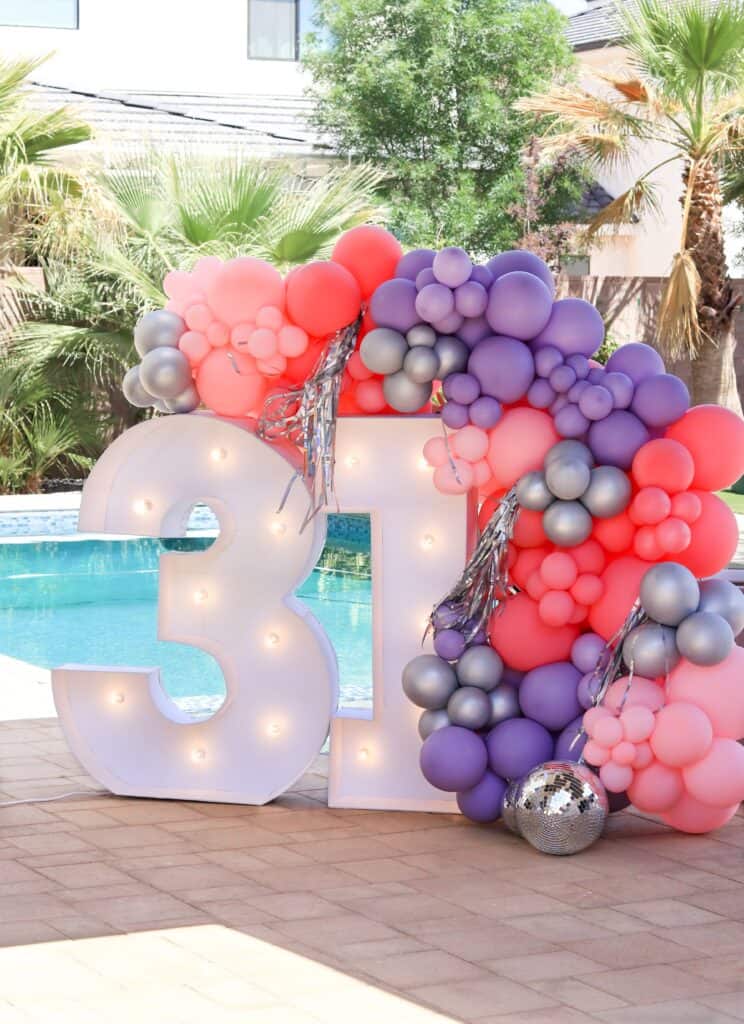
You've likely seen giant marquee numbers and letters at parties as show-stopping backdrops because they are all the rage right now! The giant marquee numbers can be seen at graduations, birthday parties, anniversaries, and weddings surrounded with balloons and lights.
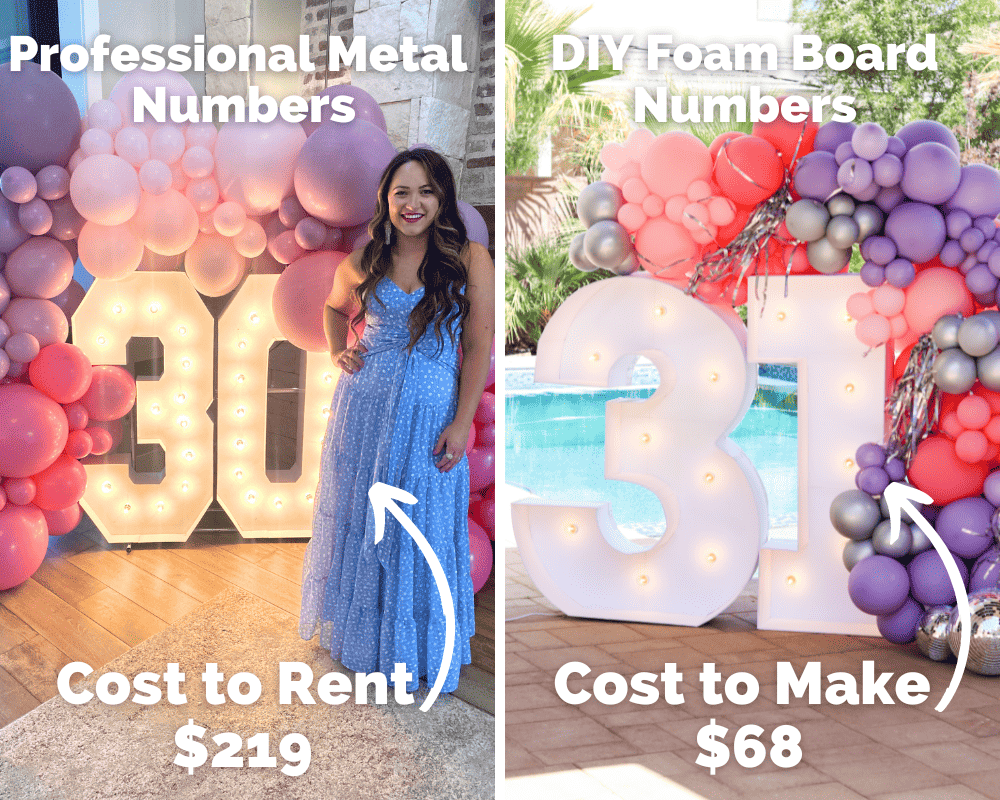
They're a great way to add a WOW factor to any party, and they create a memorable way to celebrate something extra special. The only downside - they can be pretty pricey to rent or purchase. After renting a set of numbers for my 30th birthday party last year, I decided to try my hand at making my own to save a little money!
Today, I'm sharing a free template and step-by-step tutorial to help you make your own Giant Marquee Numbers with Foam Boards.
Spoiler Alert - I saved a whopping $151 by making my own letters. 🤩 The best part is I can recycle the number three for my birthday party next year. I'll make a number two to go with it, which will only cost me about $20. The lights were by far the most expensive part of this project.
These giant marquee letter cut-outs are made out of 20" x 30" white foam boards that you can grab from your local craft store. I stopped by Joann and grabbed foam boards to create each number and the rest of the supplies needed to make this project.
You can also use this tutorial to create 3D foam numbers without the marquee lights, as I did with this number seven for my daughter's birthday party. You could even fill the inside with mini balloons to create a marquee balloon mosaic.

Here's a look at the supplies I used to create my DIY Giant Marquee Numbers.

Table of Contents
Supplies Needed
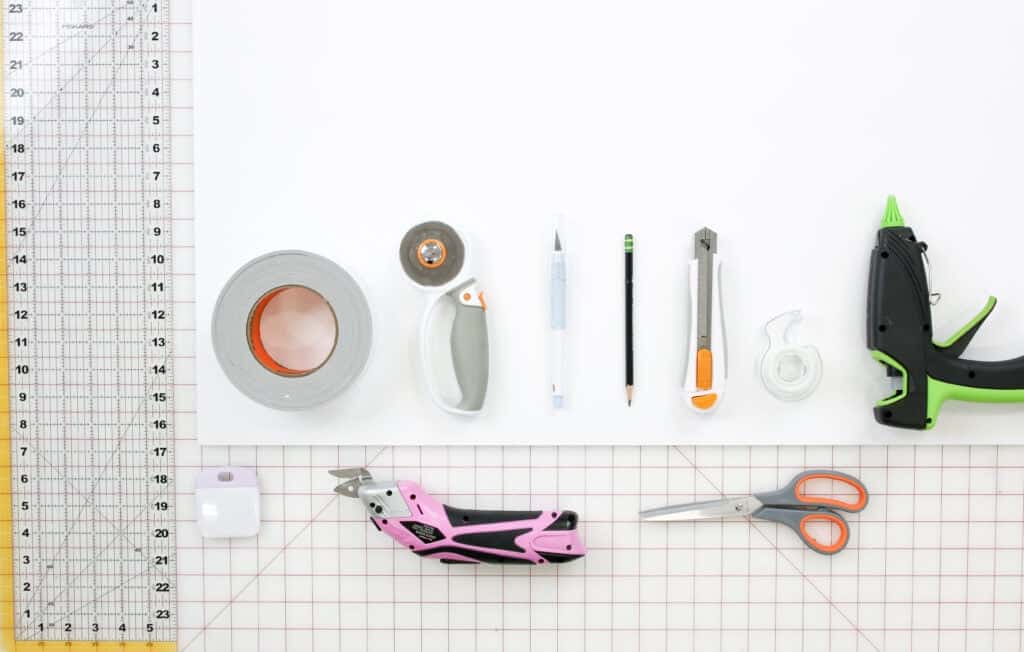
- Free Printable Template
- 20" x 30" Foam Boards You'll need anywhere from 6-12 boards for each number
- Craft Knife or Cordless Scissors- Both do the trick, but the craft knife cuts cleaner lines.
- Rotary Cutter or Scissors- To cut out the template
- Hot Glue Gun - I used one that has a dual temp (high and low) setting.
- 8" Hot Glue Sticks - I recommend a long stick because you're going to be using a lot of hot glue.
- Self-Healing Cutting Mat
- Acrylic Ruler
- Pencil or Pen
- White Duck Tape or Packaging Tape
- Marquee Lights or LED LightBulbs
- Heat Resistant Finger Protectors- If you are prone to burning yourself with a hot glue gun. 😂
Why Shop Through My Links?
When you shop through my affiliate links, it doesn't cost you anything extra, but it helps me out in a big way! I earn a small commission from those purchases, and that support allows me to continue creating and sharing free tutorials and patterns for you. Thank you so much for helping me keep this creative community going!
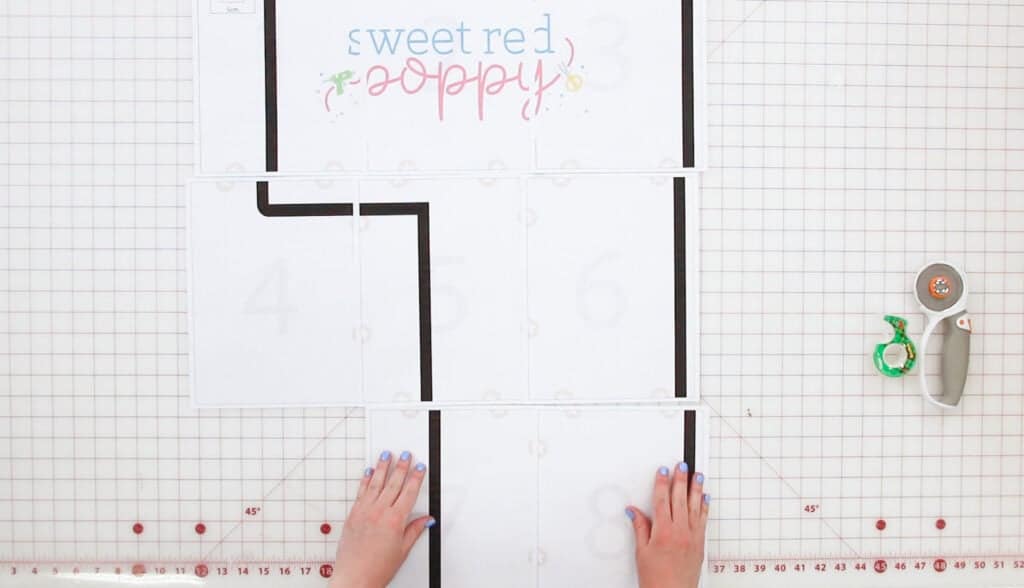
Download the Free Printable Mosaic Number Template Here
To start, download the free printable template for the marquee numbers.
Open the pattern in your PDF reader, I recommend using Adobe Acrobat Reader.
Avoid printing the pattern from your browser as it can cause the scaling to be off and the border lines to print incorrectly.
Print & Assemble the Marquee Number Templates
Next, click on "Print" to open the print settings box. In the print settings, make sure the scaling is set to "Actual Size" or "Custom Scaling: 100%."
This pattern features numbered pages, a border around each page with scissors, and star guides to help you assemble the pattern.
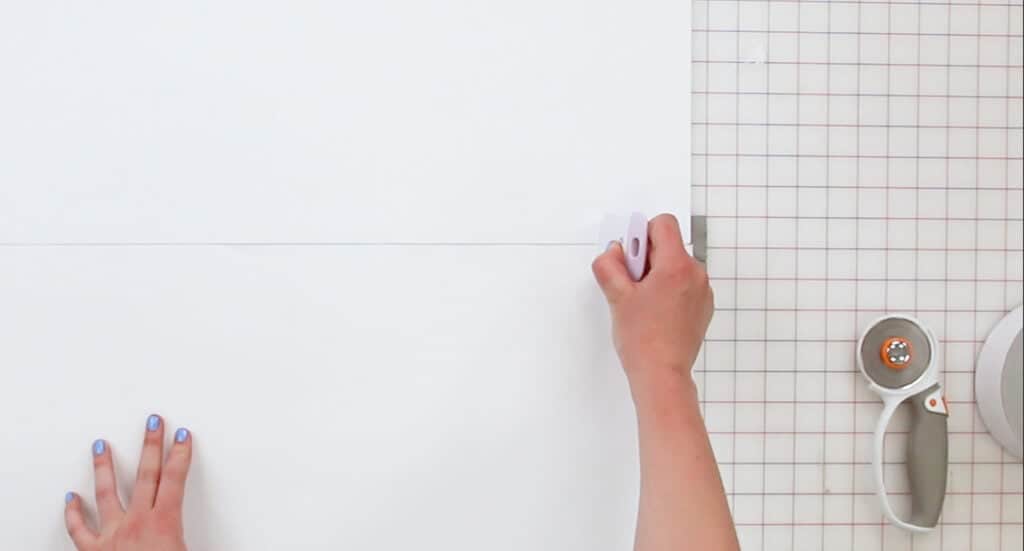
Trim away the excess paper on the sides (along the scissor guide) before taping the pages together.
You can also choose to overlap the papers. Holding the pages up to a light can help you to see through the paper and align the pattern lines correctly.
On a flat surface, place page one out in front of you. Overlap page two, aligning the black border and pink circles with stars. Tape or glue the pages together. Continue this process until you reach a page without stars on the right-hand side. This means the row is complete.
Once you have the pattern taped together, cut out the pattern pieces along the black lines.
Once you're done cutting out the template, lay out the template and assemble boards underneath- this will help you determine how many boards you will need to assemble to create the base.
Tape the boards together with white duck tape along the backside. While you're taping the boards together, plug in your hot glue gun and let it warm up.
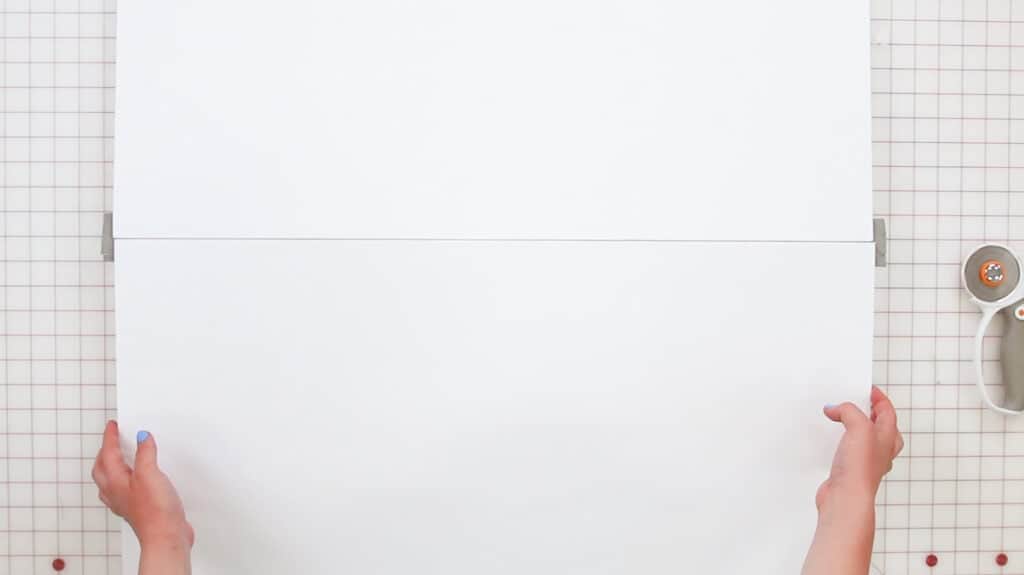
Align the edges of the boards, ensuring they are as close together as possible. The edges on either side should be flush! Aligning them correctly will save you a lot of time later on, and it makes the marquee letters look much more professional if you don't have any gaps between the boards.
After the boards have been taped together, take your hot glue gun and squeeze a small line of glue in between the boards, quickly flush the boards together, and use a scraper tool to remove any excess hot glue.
Adding hot glue during this step helps the boards to be extra secure and creates a stronger marquee number that won't fall apart later on.
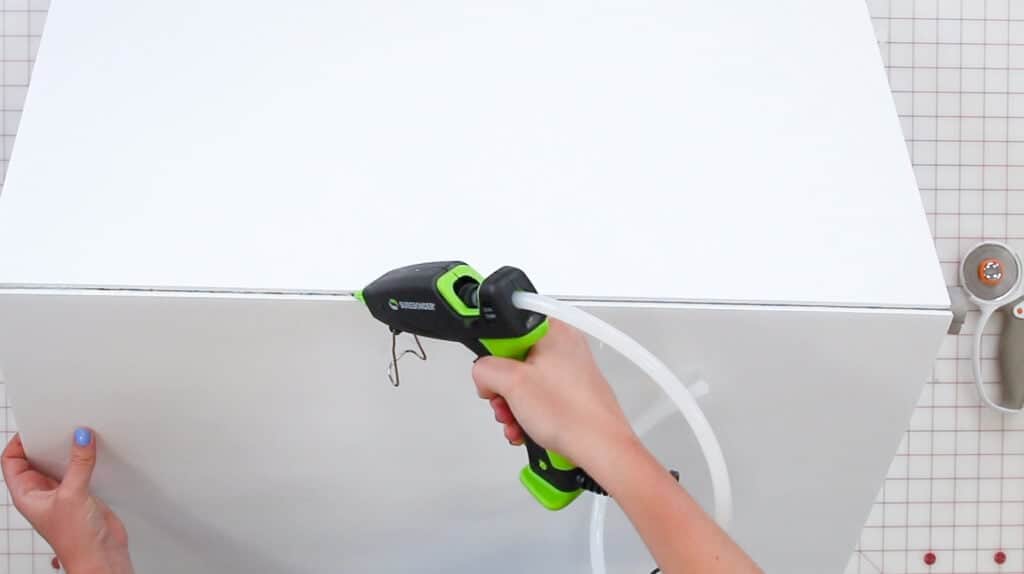
If you use packaging tape on the front of the boards, it will reflect light when taking photos of the mosaic number. Using hot glue or white duck tape will reduce that from happening and will be less noticeable.
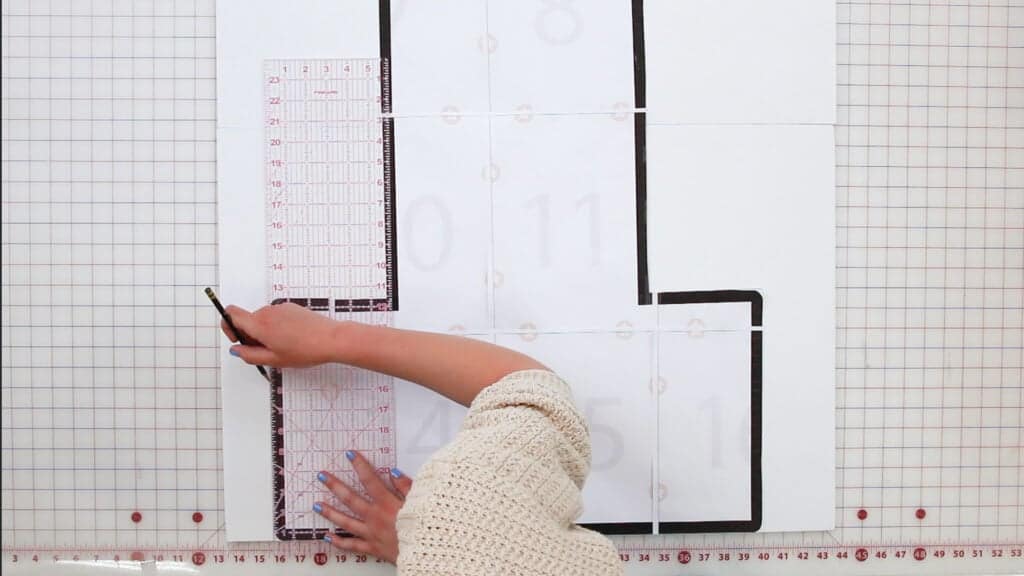
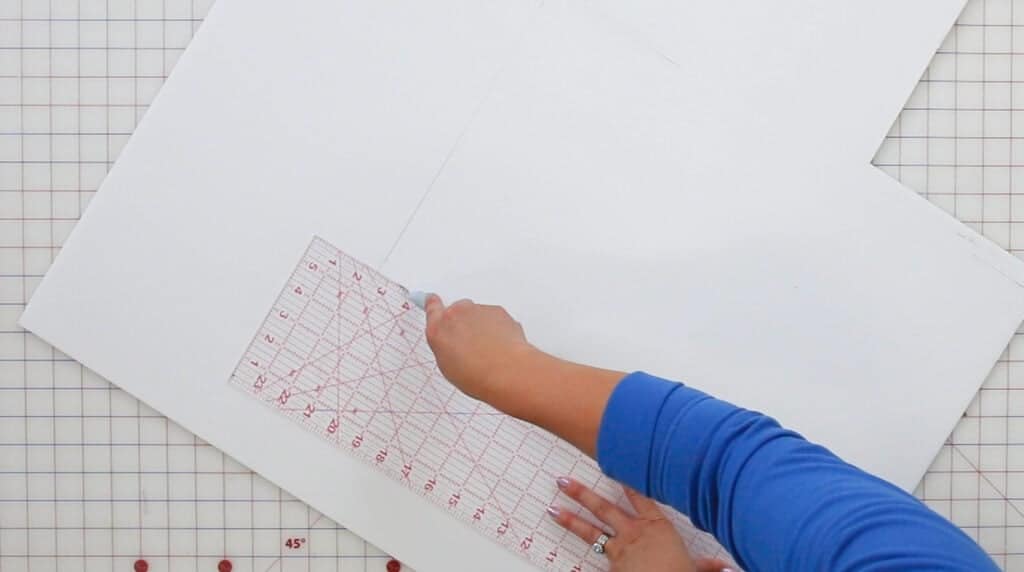
Tape the template to the assembled boards, grab a pencil, and trace the number onto the board.
*Pro Tip: Use an acrylic ruler to get straight edges and lines.
Remove the template and cut along the outline with your cordless scissors or craft knife.
*Pro Tip - Use an acrylic ruler as a guide for your craft knife. This will ensure you end up with clean, sharp lines. I like to make two passes for each cut line. The first pass barely cuts into the top layer, then I follow that with a second pass that cuts all the way through the board. This ensures the material doesn't tear, and it gives a much cleaner cut line.
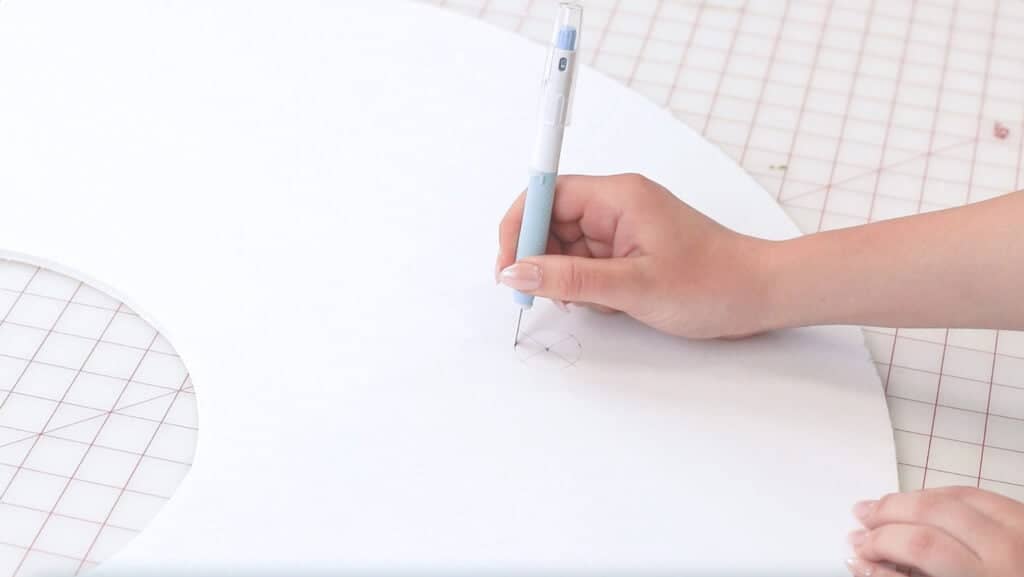
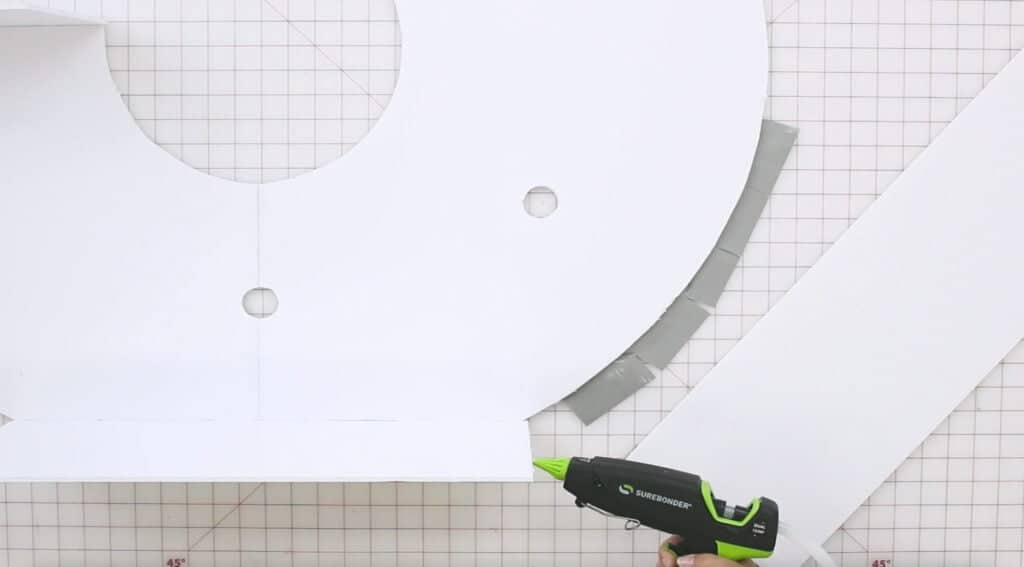
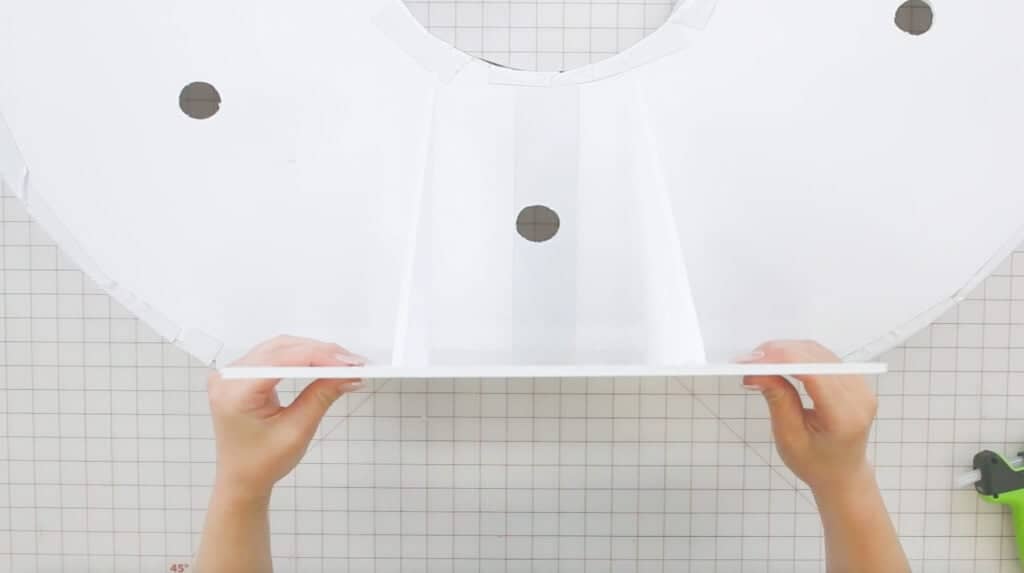
If you're adding tap lights you won't need to take this extra step, but if you're using LED lightbulbs you will need to mark the placement for them.
Remove the light bulb from the socket and use the socket as a guide to trace a circle for where you would like to place your lights. I spread my lights out about 11 inches apart.
Make sure that each traced circle is evenly spaced out. Then, cut the traced circles out with a craft knife and pop them out of the foam board.
Mosaic Number Framework
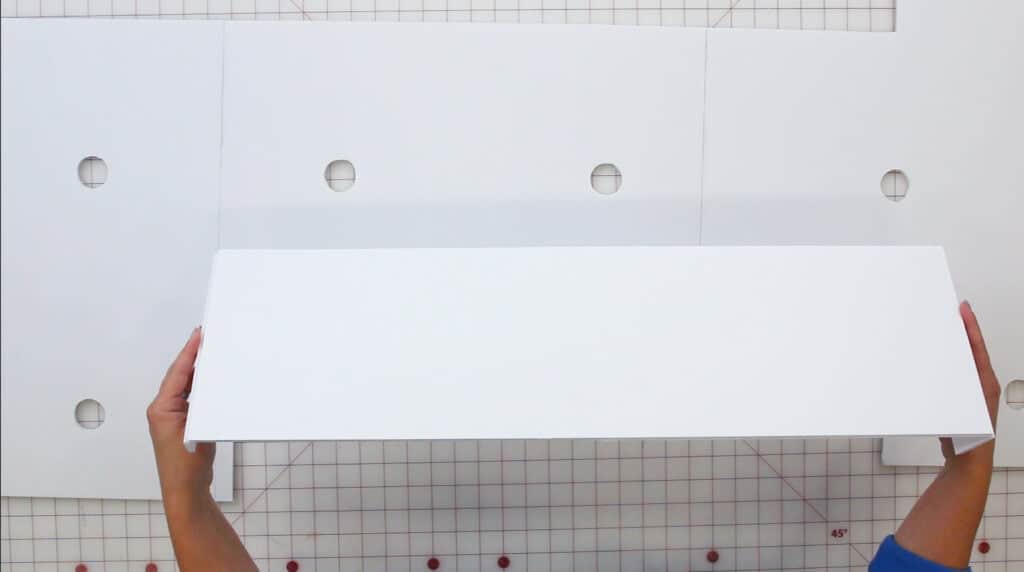
Once you've cut out the base of your number, it's time to cut out the framework. The framework (sideboards) is what makes the number 3D.
To make the frames, I cut 8" wide strips. I was able to cut two 8" x 30" strips out of one board. I cut 3 foam boards and ended up with six 8"x 30" strips.
To maximize your budget and your foam boards, you can cut the side boards to measure 6.5" wide, and this will result in 3 strips per board. You could also opt to skip the side boards altogether and stick with just the base of the number.
*Pro Tip - Take your time when cutting out your sideboards to ensure they are cut as straight and even as possible. This will make your assembly process much smoother if they all line up and don't need to be trimmed down.
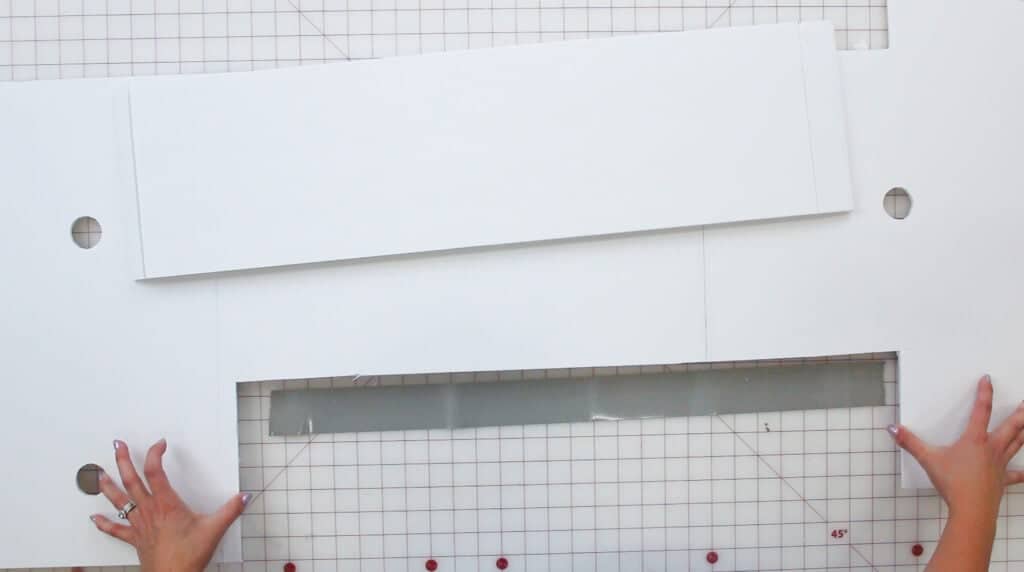
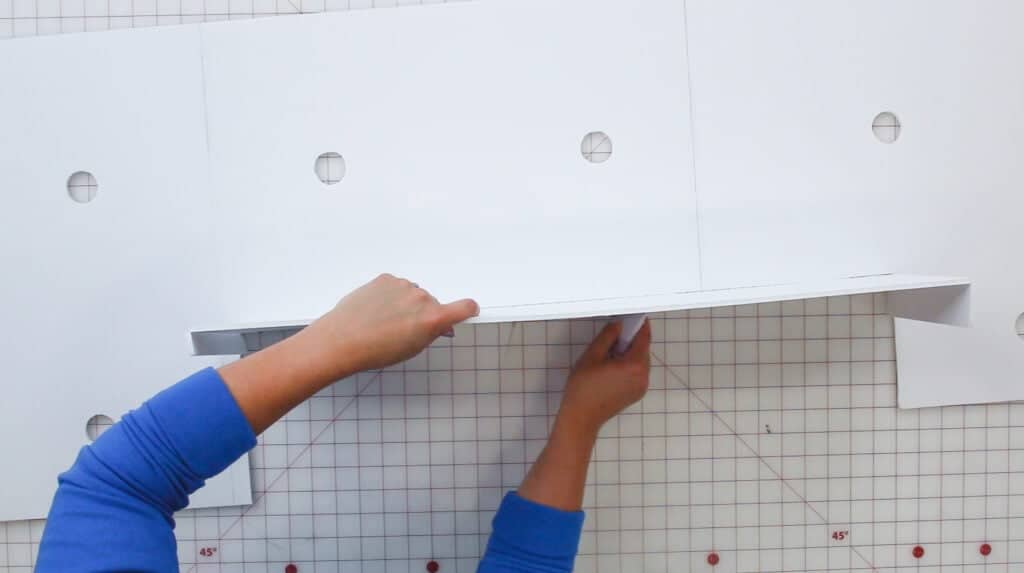
Align the sideboard strips to the edge of the number and mark the measurements of the number on the board with a pencil.

Now, gently cut halfway through the board with a craft knife and acrylic ruler where you marked. Afterward, fold the sideboard along the cut.
You'll want to fold the board so that the cut line is facing inwards.
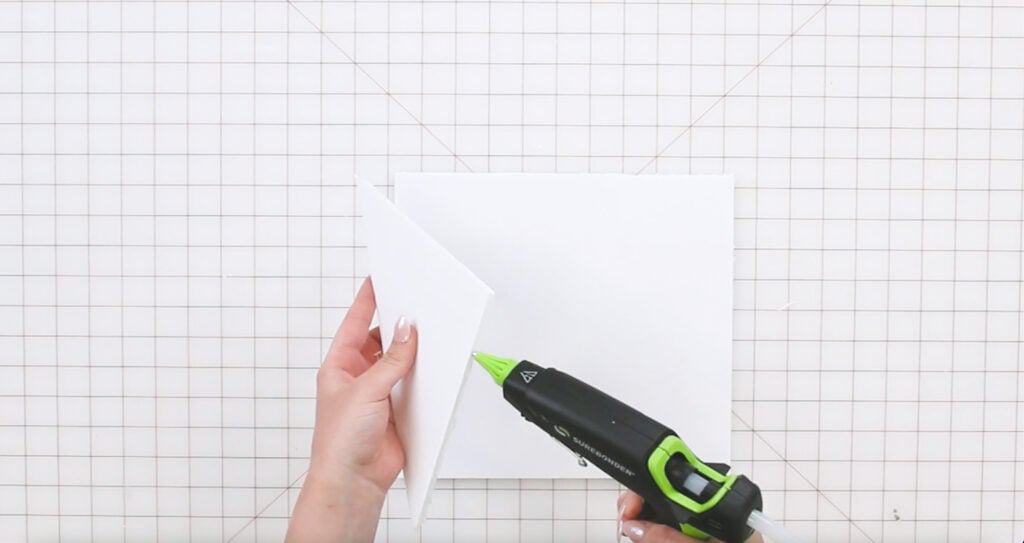
Add tape to the backside of the number where you will be joining the number and sideboard.
Squeeze a line of hot glue on the cut foam edge along the entire length of the piece of tape.
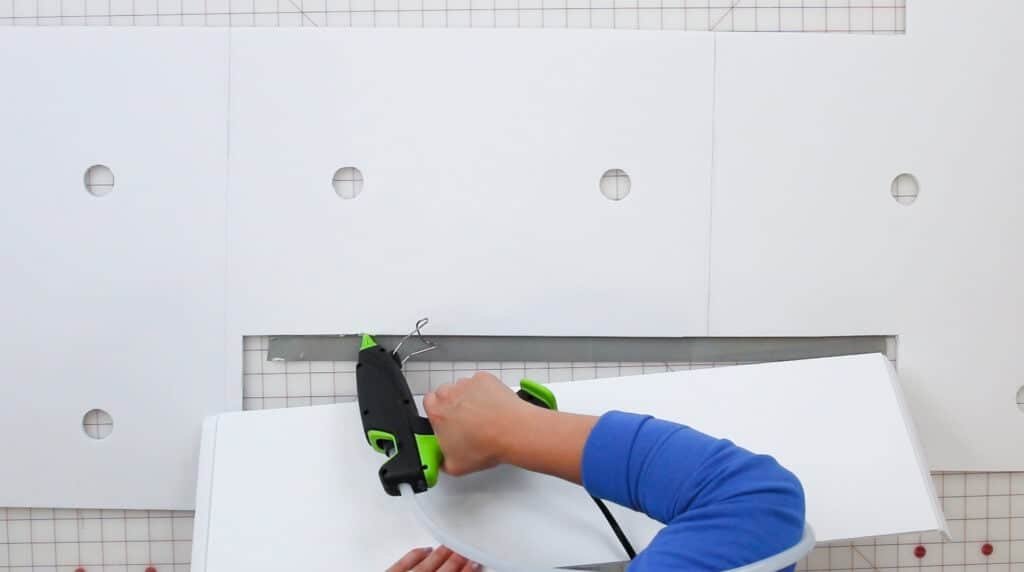
Place the sideboard into position, aligning it along the edge of the number. Adhere the tape along the outside bottom edge of the sideboard to add extra security. Hold the board in place, pressing it flush against the number until the hot glue cools completely. Use a scraper tool to remove excess hot glue.
Continue this process with the remaining edges.
*Pro Tip - When you get to an edge of the number, instead of cutting the board all the way through, only cut halfway through the foam piece and fold it so that it flushes against the edge of the base.
How to Make a Curved Sideboard
Making a rounded number like 3, 8, or 9 can be quite difficult because of all the curves involved, but here are some tips and tricks.
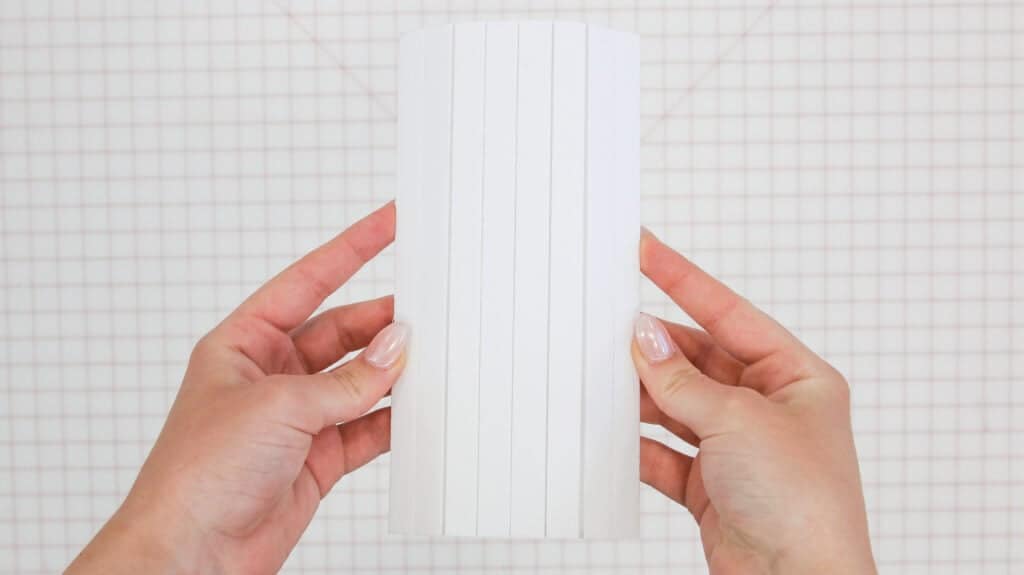
If and when you come to a curve, grab a foam strip, measure, and mark the length of the curve of the number base. Then with a craft knife, score lines 1/2" apart. To score the foam board only cut through the first layer leaving the back layer intact. This will allow the foam sideboard to form around the curve. You can also curve the foam piece by sliding it up and down the edge of your table or craft surface.
Use the same technique we used earlier to attach the sideboard to the base.
Tip: If you want your duck tape to curve easily, cut slits into the tape every 2-4 inches.
How to Make a Marquee Number Stand
Making a stand for the base of the number adds extra support to prevent the number from toppling over.
*Pro Tip - Add a sandbag or large rocks to the stand to secure the number in place to prevent it from falling over. This is especially helpful when it's breezy outside.
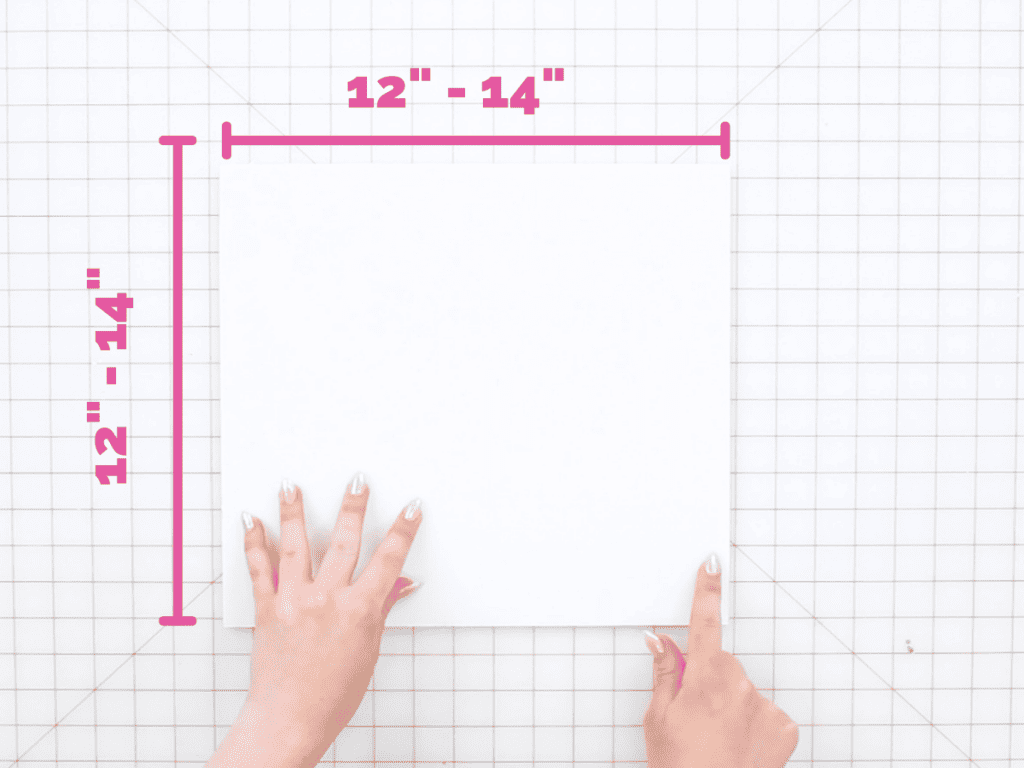
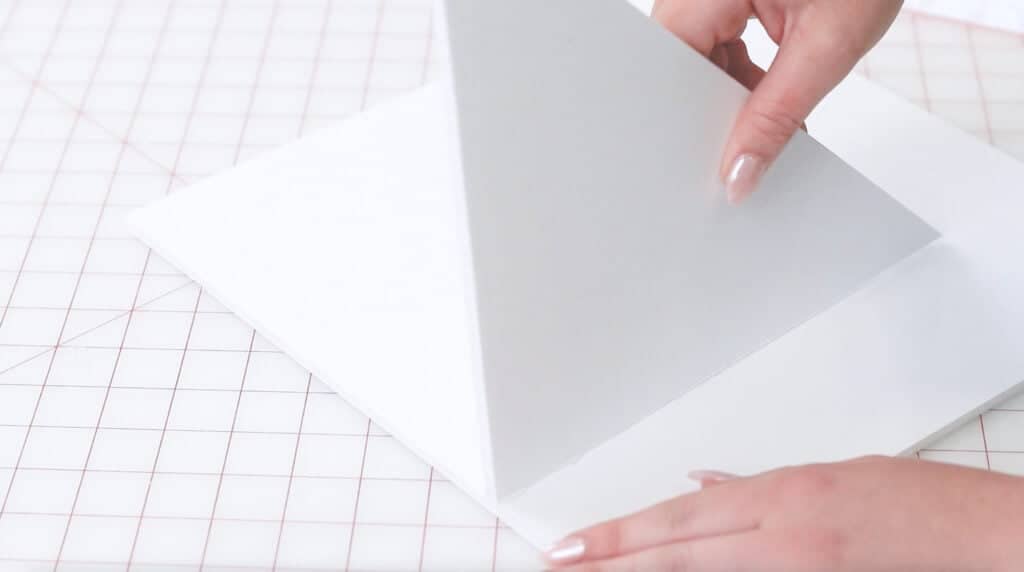
To make a stand, cut two 45-degree angle triangles out of foam board. Next, cut out one square piece of foam board.
Then, glue the triangular supports to a square base piece of foam board.
I cut out a 14" x 14" square for the number three that I made, which I also suggest doing for the five if you're making one, and a 12" x 12" square for the number one.

*Pro Tip: Certain numbers like 3, 5, 8, and 9 may require a larger, taller triangle piece, especially if you are adding heavy lights to the foam number.
Glue the two triangles to the square piece, flushing it with one of the edges, and let it cool completely.
Finally, glue and attach the stand to the bottom backside of your number, flushing the number to the straight side of the triangle and base.
Adding Lights to Mosaic Numbers
Finally, insert the light bulb sockets through the circle cutouts and screw the lightbulbs into place from the front side. To distribute the weight of the lights
*Pro Tip - Tape the cords in between each bulb to the backside of the number, making sure to distribute the weight of the cords evenly. This will ensure the number doesn't become too heavy in any one area, which could cause the number to topple.

If you're using tap lights, remove the protective adhesive piece from the back of the light and stick the light to the number.

Once you've added your lights, you now have your own marquee numbers.
Show it off with balloons or another stunning backdrop. I paired my DIY Foam Board Marquee Numbers with the tablecloth backdrop I made.


I can't wait to see how you make this project your own! Be sure to tag @Sweetredpoppy #sweetredpoppy on social media!

Join my crafting Facebook group where you can show us what you’re making, ask questions, and learn from others!
Don't forget about this free template. Click here to pin this post to Pinterest!

Looking for more DIY crafts? Click here!
Easy to follow direction but im looking for the number
Love this so much! I'm going to try it for my 40th birthday. Thank you for the free template!
Hi Kimberly,
How tall are these numbers?
Hi Kimberley, thank you so much for sharing this! And especially for sharing your template of the numbers, I'm so grateful! Your website is so inspiring!
All the best,
Suzanne from London, UK! 🙂
Hi! How tall are these numbers?
Hi got the templates but can i make the smaller...want an 80 table top one, looking to use 1 foam board 20x30 for each number..how can i make it smaller