• Skip to primary navigation
  • Skip to main content
  • Skip to primary sidebar
Sweet Red Poppy logo
  • Cricut
    • Free SVG Files
    • Paper Flowers
    • Mandala
    • Iron-On
    • Vinyl
    • Maker
    • Explore Air 2
    • Joy
  • Sewing
    • Baby
    • Kids
    • Accessories
    • Christmas
    • Blankets
    • Womens
    • Learn to Sew Tips & Tricks
    • Face Masks
  • DIY Crafting
    • Paint
    • Paper
    • Food
    • Kids
  • Holiday Crafts
    • Valentine’s Day
    • Easter
    • 4th of July
    • Halloween
    • Thanksgiving
    • Christmas
  • Books
    • Cricut Printed Book
    • Cricut E-Book
    • Cricut Joy Printed Book
    • Cricut Joy E-Book
    • Sewing Printed Book
    • Sewing E-Book
    • Face Mask E-Book
    • Mandala E-Book Bundle
    • Mandala E-Book - Inkscape
    • Mandala E-Book - Adobe Illustrator
    • Mandala Printed Book - Inkscape
    • Mandala Printed Book - Adobe Illustrator
    • Baby Pattern E-Book
  • Courses
    • Cricut Course
    • Sewing Course
    • Serger Course
  • Shop
    • E-Books
    • Printed Books
    • Sewing Patterns
    • SVG Files
    • Baby Patterns
    • Subscribe to Emails
  • Search

DIY Teal Pumpkin Project

Written by Kimberly Coffin · This post may contain affiliate links · 1 Comment

582 shares

Have you started decorating for Halloween yet?!? This year I'm incorporating some teal into my decor! If you have a child with an allergy you are probably already familiar with the Teal Pumpkin Project. The Teal Pumpkin Project raises awareness of food allergies and promotes inclusion of all trick-or-treaters throughout the Halloween season. If you are participating in this project you display a teal pumpkin on your porch indicating that you will have allergy-friendly treats or non-food items available for trick-or-treaters.

I only recently learned about this project after finding out that my son has food allergies. Instead of painting a pumpkin teal each year I decided to make some quick and easy reusable teal pumpkins.

Now that I have my house decorated for Halloween (check out these super cute Halloween pillows that I made), I need to get busy making Halloween costumes. Anyone else procrastinating making costumes? I have such a hard time putting so much time and energy into something that only gets worn one time! I think I might just end up buying costumes this year!

Here's a quick video that shows how to create each different pumpkin

DIY Teal Pumpkin Project Painted Pumpkin Tutorial and Sewing Tutorial

Glitter Pumpkin Tutorial

Supplies
Plastic Pumpkin
Paintbrush
Teal Paint
Glitter


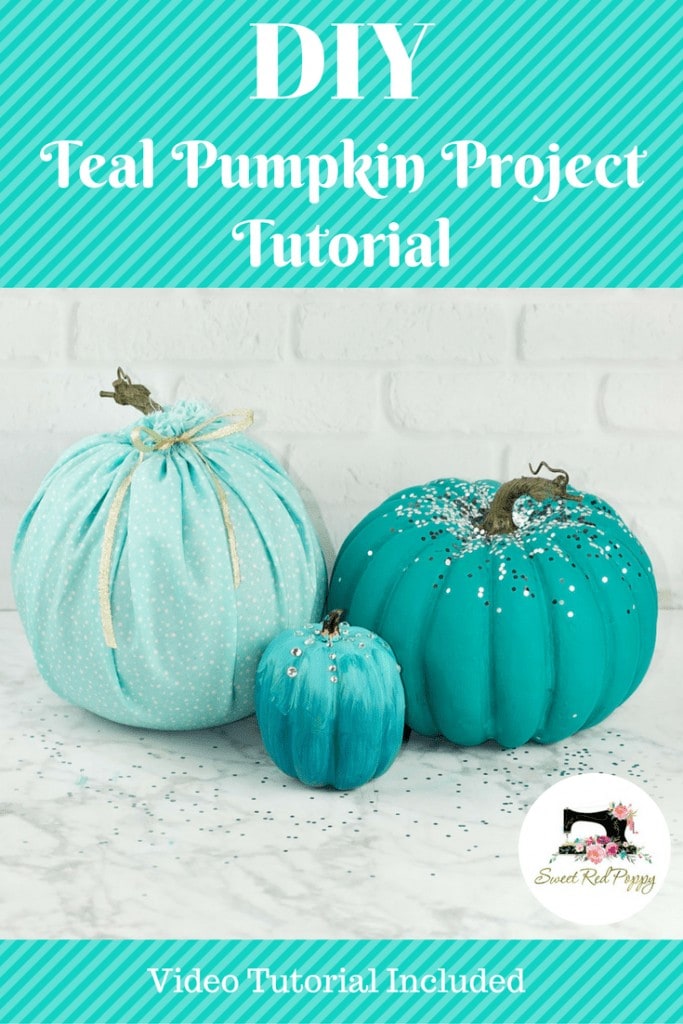
Paint a plastic pumpkin with teal paint with strokes beginning from the bottom and going upwards towards the top. Be sure to paint with the natural shape of the pumpkin instead of across the pumpkin for best results. This is a great way to update an older outdated or damaged pumpkin! Once the entire pumpkin has been painted, sprinkle glitter on the top, concentrating more glitter towards the center of the pumpkin and less glitter towards the outside.

Fabric Pumpkin Tutorial

Supplies
Plastic Pumpkin
Teal Fabric
Thread
Ribbon
Clear Hair Elastic


Place the pumpkin in the center of the teal fabric and bring up the sides around the pumpkin to get an idea of how large of a circle to cut. Cut out the circle and sew a basting stitch 1/2 inch from the edge of the fabric all the way around the pumpkin. Carefully gather the fabric by pulling on the thread. Place the pumpkin in the center of the fabric and continue to gather the fabric circle. Once it has been gathered completely, use a clear elastic to keep the fabric together. Place a small ribbon around the elastic and tie it into a bow. Wasn't that easy?!?

 Ombre Teal Pumpkin Tutorial (Glow in the Dark)

Supplies
Plastic Pumpkin
Paintbrush
3 Shades of Teal Paint
Rhinestones
Glow In The Dark Paint


Choose three varying shades of teal paint as well as glow in the dark paint. Add the glow in the dark paint to the teal colors. Start at the top of the pumpkin with the lightest shade and paint 1/3 of the pumpkin, repeat this step with the other colors covering the lower parts of the pumpkin. Allow the pumpkin to dry slightly and then use a paintbrush to gently blend the different shades so there isn't a harsh line in between each color. Add rhinestone sparkles with a sticky backing for a fun finishing touch.


Now you have three super easy teal pumpkins! Try using these tutorials with other shades of paint or fabric to modernize older plastic pumpkins.

DIY Teal Pumpkin Project Painted Pumpkin Tutorial and Sewing Tutorial


« Sewing Hacks, Tips & Tricks Every Seamstress Should Know!
No Sew Fabric Pouch With Craftables Heat Transfer Vinyl »

Reader Interactions

Comments

  1. Ivory says

    October 28, 2020 at 3:50 am

    Wow, so beautiful. I truly love this idea. I will put this in my to do list. Thanks for sharing. Fabulous!

    Reply

Leave a Reply Cancel reply

Your email address will not be published. Required fields are marked *

This site uses Akismet to reduce spam. Learn how your comment data is processed.

Primary Sidebar

Ready, Set, Sew! An online sewing course for beginners by top US sewing blogger, Sweet Red Poppy.

Hello, I’m Kimberly, the creator of Sweet Red Poppy!

I’m a wife, mother to 3, seamstress, and lover of all things crafty! Sweet Red Poppy is my creative outlet where I find and create inspiration. It’s a place where I can share my never-ending sewing projects and my love of learning!

Read more about me →

The Latest

  • 5 Useful Tools to Help You Organize After the Holidays with JOANN
  • How to Make Christmas Gift Tags with Your Cricut Machine
  • How to Make Sock Gnomes
  • How to wrap a gift step by step
    How to Wrap a Gift - Four Ways
  • How to Make Perfectly Painted Wood Signs with Cricut Vinyl Stencils
  • 5 Cricut Gift Box Template SVG Files

Footer

↑ back to top

Legal

  • Privacy Policy
  • Disclosure

Newsletter

  • Sign Up! For Emails and Updates

About

  • Contact
  • About
  • Home

Copyright © 2022 Sweet Red Poppy