Learn How to Customize Starbucks Cups with Personalized Vinyl Logo Decals. FREE Starbucks SVG Template and Files Included.
Affiliate Links are used throughout this post. Thanks for shopping through my affiliate links and supporting Sweet Red Poppy!
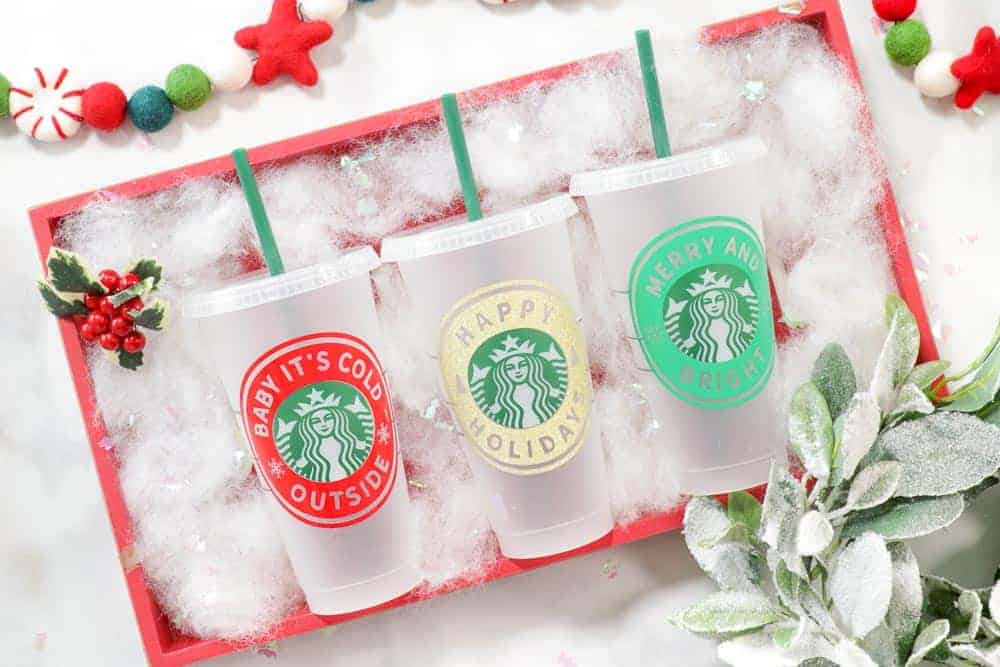
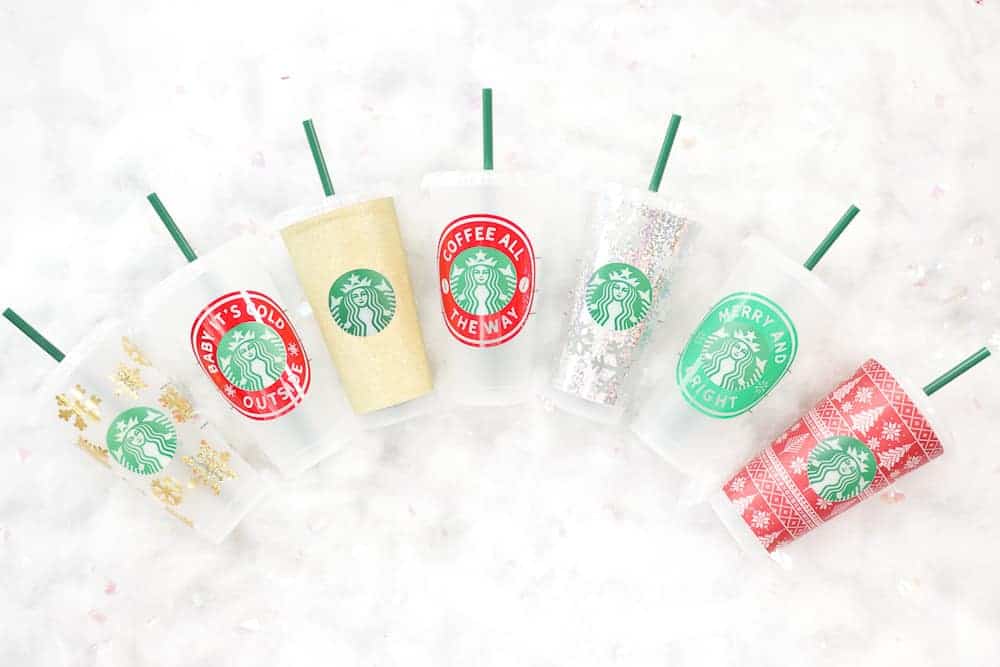
If you’re a big Starbucks fan then you’ve probably seen the trend of adding a decal to your cold cup! I think this is such a fun way to personalize your Starbucks cup and add a bit of personality to it.
In this tutorial, I'll walk you through everything you need to know about making a personalized DIY Starbucks cup with my FREE logo ring templates. Plus, I'm sharing some of my tips and tricks for perfect transfers and how to get a decal that actually fits your cup!
THIS POST IS PART 1 OF 3. CLICK HERE TO READ PART TWO TO CUSTOMIZE BORDER LOGOS. CLICK HERE TO READ PART THREE FOR THE FULL WRAP FILES.
I ordered a few Starbucks cold cups recently and went to try out some free designs online to make them. I downloaded four different files and even purchased one on Etsy only to find out that none of them fit! I was pretty frustrated that I had wasted my time and vinyl on files that weren’t quite right.
So, in typical Sweet Red Poppy fashion I measured about a million times and drafted and redrafted a pattern until it was perfect without any fit issues. And of course, I’m sharing it with you today along with all of my tips and tricks for getting a great result!
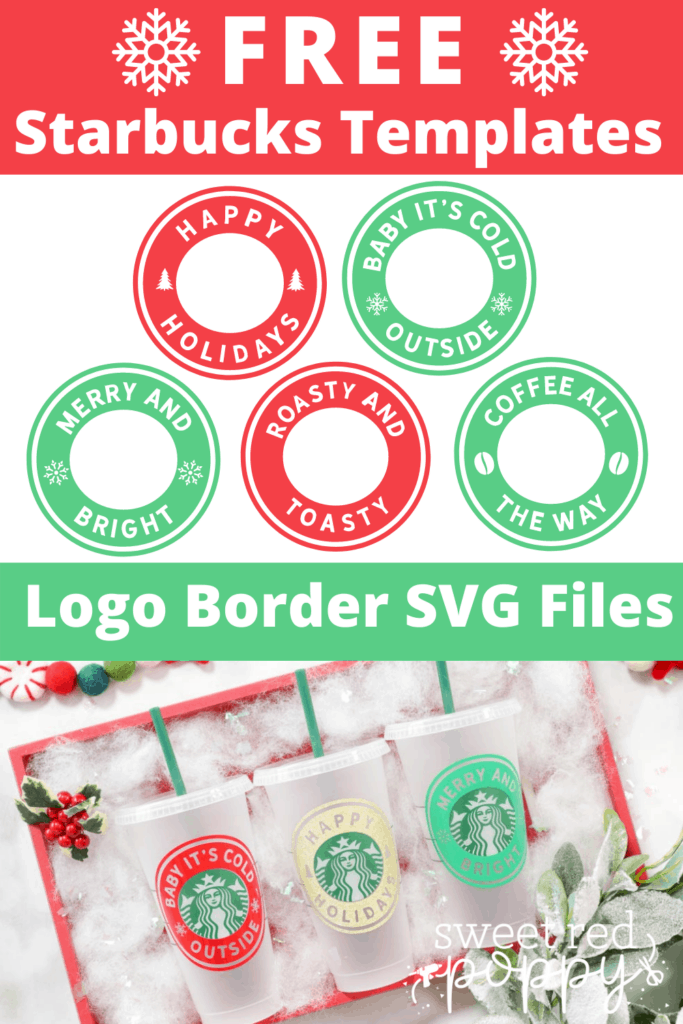
I’ve included a variety of free circle logo designs to help you make your own personalized Starbucks cup for Venti cold 24 oz reusable Starbucks cups.
These Starbucks cups are available online or in your local Starbucks. Since they’ve been so popular lately, they can be a bit hard to find. I was told recently that you can ask your local Starbucks to order them for you, if you’re having a hard time finding them!
The best part about these cups is they can be made and reused over and over!
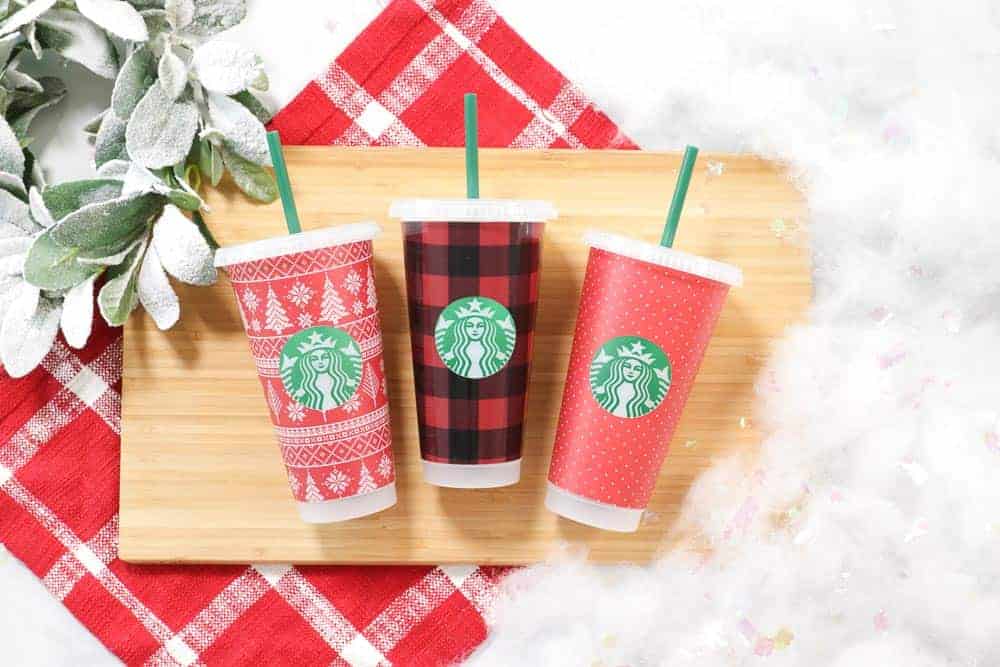
In this tutorial, I’m going to show you how to use my files, but the possibilities with these files are endless, and I’m only touching the surface of what’s possible, so be sure to get creative and make them reflect your own style!

What Materials Should I use to make a Personalized Starbucks Cup?
For this project, make sure you are using a permanent vinyl that can withstand being exposed to water.
How Can I use these Starbucks SVG Files?
You can use the files included in this post in two different ways. First, use the personalized logo borders as is to create adorable holiday cups. Or, use the blank logo border to create your own customized design in Design Space.
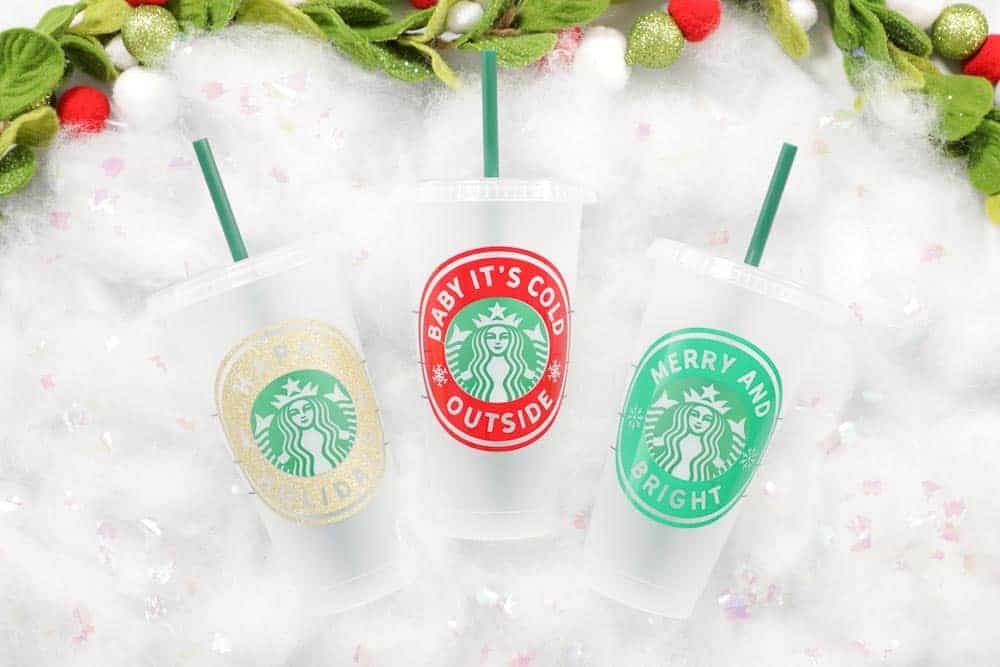
Table of Contents
DIY How to Make Customized Starbucks Cup Designs
Supplies
- Starbucks Cup (Venti 24 Oz Cold Cup)
- Permanent Adhesive Vinyl
- Transfer Tape
- Cricut
- Scissors
- Soft Measuring Tape
- Paper Towels and Rubbing Alcohol
- Optional - Clear Vinyl
- SVG FILES
DOWNLOAD THE SVG FILES HERE!
Step 1: Measure and Clean the Starbucks Cup
With a soft flexible measuring tape measure the width of the logo as well as the height. Write down these numbers! There tends to be a slight variation in the size of Starbucks logos based on where the cup was manufactured so you may notice slightly different measurements on your own cup.
The inside of the Venti Cold 24 oz cup oval should measure 2” tall by 2 ⅛” wide.
Clean the Starbucks cup with a paper towel and water or alcohol to make sure the vinyl has a clean base to adhere to. This will ensure the best possible seal. Let’s set our cup aside and come back to it in just a minute.
Step 2: Download Logo Border Cut Files
Begin by downloading the Starbucks decal SVG files. They will download as a zipped file. Head to your Downloads to find the file and unzip it. Inside of the folder you will find a large ring with oval cutout, a small ring with oval cutout and a logo oval. I’ve also included a variety of different holiday themed files!
Step 3: Upload Files to Design Space and Resize SVG Cut Files
Upload the Designs into Cricut’s Design Space. I uploaded the Coffee All the Way SVG file.
Open Cricut Design Space and select “New Project.” In the bottom left-hand corner click “Upload.”
Select Upload Image, and find the file under your downloads. You’ll be able to select and import one file at a time.
Click Save, repeat this process to import all of your desired designs.
Now click on the image you’d like to bring to your Design Space Canvas under Recently Uploaded Images and click Insert Images.
Now that your image is in Design Space it’s time to ensure the sizing is correct.
Let’s start with the personalized holiday rings.
You’ll notice that one of the rings is slightly larger than the other. This is to give you more options on how large your decal is and how much of your cup it takes up. We need to make sure that the inside of the circle measures 2 ⅛” wide.
Go ahead and group the images
The large circle should measure 4.39” wide
The smaller circle should measure 3.925” wide
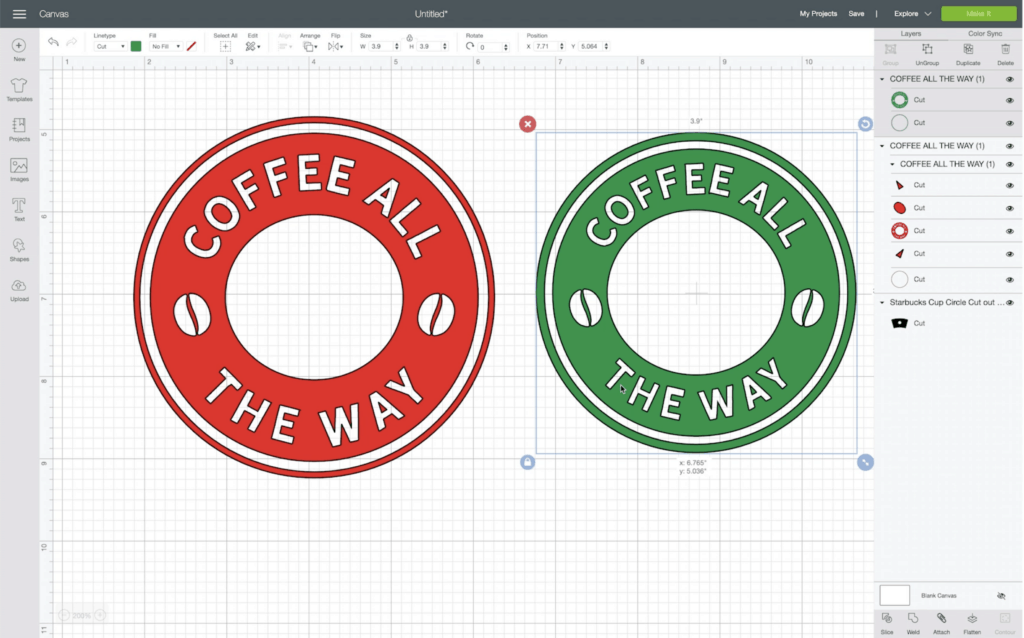
These measurements will perfectly align the decal with the edge of the Starbucks logo. If you’d like a white space gap in between, increase the size of the decal slightly. You can also opt to have it overlap the logo slightly by decreasing the size.
Select the image and hit attach to join the layers together for cutting.
OPTIONAL- Customize the blank logos to create your own design. Click HERE to read the post on customizing your Logos.
Use the Curve feature in Design Space
Step 4: Cut Vinyl Starbucks Designs on Cricut Cutting Machine
Place the vinyl on a Green Standard Grip cutting mat with the paper liner facing down. Load the mat into the Cricut Machine by pressing the arrow and touch the flashing cricut button to start cutting.
One the Cricut finishes cutting the design, unload the mat and begin weeding your design.
Step 5: Weed Cut Starbucks SVG Design & Apply Transfer Tape
Be sure to be careful with the small letters so they don’t accidentally get weeded as you’re working on them.
Cut a piece of transfer tape that’s slightly larger than the design and apply the transfer tape to your vinyl decal. You can use a scraper to burnish the vinyl to help it transfer.
Flip over the design and gently remove the paper backing from the decal.
Step 6: Apply Logo Border Decal to Starbucks Cup
Now, we’re ready to apply the decal to the cup! I like to fold my transfer tape in half and gently mark the top center and bottom on my transfer tape with a small crease. Make sure you’re only doing this to the transfer tape and not the actual vinyl, that’s why we cut it larger than the actual design.
The easiest way I’ve found after lots of trial and error to line everything up is to use the star as the center and draw a straight line vertically down through the logo.
Start by placing the middle of the design down, where you gently folded it, and checking to ensure it’s evenly spaced on all sides. Once it looks even, you can begin to adhere the design to the cup by pressing from the middle and moving out.
Use a scraper tool to go over the entire design pushing out any air bubbles and helping your vinyl to adhere completely to the base. This step is really important to make sure it securely adheres to the cup.
Gently peel the transfer tape away starting at the top corner.
Now you have an adorable customized holiday cup!
How to Care for Your Customized Cup
To care for your Starbucks cup, allow it to completely cure for 48 hours before washing it or using it. This will allow the glue on the back of the vinyl to secure itself permanently to the cup.
For extra protection, you can cut a second layer of clear vinyl and increase the size of the design to give it even more protection.

I can’t wait to see what you make with these free Starbucks Cup files!
Don’t forget to join my crafting Facebook group where you can show us what you’re making, ask questions, and learn from others! Follow me on Instagram for daily crafting inspiration and a look behind the scenes.
If you use these files, be sure to tag @sweetredpoppy on Instagram so I can see what you're making and share your photos in my stories!
Don’t want to forget about this free template? Save this project for later! Click here to save this project on Pinterest.
I am on iPhone 11 Pro Max and can’t access the link to the svg files or tutorial
I tried to save this post for later using Pinterest but can not find a button to click. Do you not use Pinterest? I love this idea but can not work on it right away which is why I save it on Pinterest. Is there another way I do not know about?
I can't find the link to download the designs
Debbie
I am so addicted to your tutorials. I can't wait to get crafting.
My daughter loved this tutorial, she is making Christmas cups like crazy.
I just started dabbling into Starbucks cup customization. Thank you for this post it has been super helpful.
This is what I have been waiting for! In love that it in corporates the Starbucks logo
This tips are awesome!!!! Def going to use the cutting in the middle for accurate placment!!
Yes! Exactly what I needed!!! Amazing.
I love this templates! They fit perfect. Thank you for all the tutorials
So cute !
your a talented arts person i would love to able to do all those things you do ❤️
Thank you for the SVG file and directions, can't wait to try it out!
Love this!!!! Have to try it for the holidays
Amazing tutorial and thank you for the svg!!
Thank you so much for the files for this! I can’t wait to make my snow globe cup!!
It was always my dream to start my own craft shop and thanks to you I've learn so much more.
Your tutorials are so great! I love how you give suggestions for different methods!
These cups are so cuteeeee!
Love this and can’t wait to get started.
Such Fun making these thanks for the help.
These are the perfect gift bag for a Starbucks gift card!
I could do nothing but watch your tutorials all day!
I love this, perfect for tumblers 🙂 so fun and creative.
I thought this was a great tutorial!
I have a question I have a Silhouette and I am not able to get this into my program is this only good for a cricut machine ?
Thank you for the SVG file and directions, love it
I’m having problems with my vinyl sticking to the cup! Any advice?! I am using oracal 651 permanent vinyl! My problem is when I go to transfer it, it won’t stick and stays on the transfer paper.
when trying to print a bought full wrap i get an error about the size. How can I print bigger than the 6.75 X9.25
Will the border rings fit on the Starbucks venti double-wall (insulated) tumblers?
Good blog post. I definitely appreciate this website. Thanks!
These are wonderful! Could I get svg files for hot cups? Thanks so much!
Well I definitely liked studying it. This tip procured by you is very useful for good planning.