Learn How to Sew a 3D Face Mask With Filter Pocket, Nose Bridge, and Ties with This Sewing Tutorial and Free PDF Pattern Download.
After many requests, I'm sharing my 3D face mask pattern! Of the five different face mask patterns I've shared so far, this mask might just be my favorite!
Wearing a 3D mask is preferable to many styles of masks because it sits further away from your face creating a pocket of air that can be breathed in easily. This style of mask is incredibly comfortable, the 3D style allows for more room around the mouth and nose while still providing a secure fit around the nose and chin.
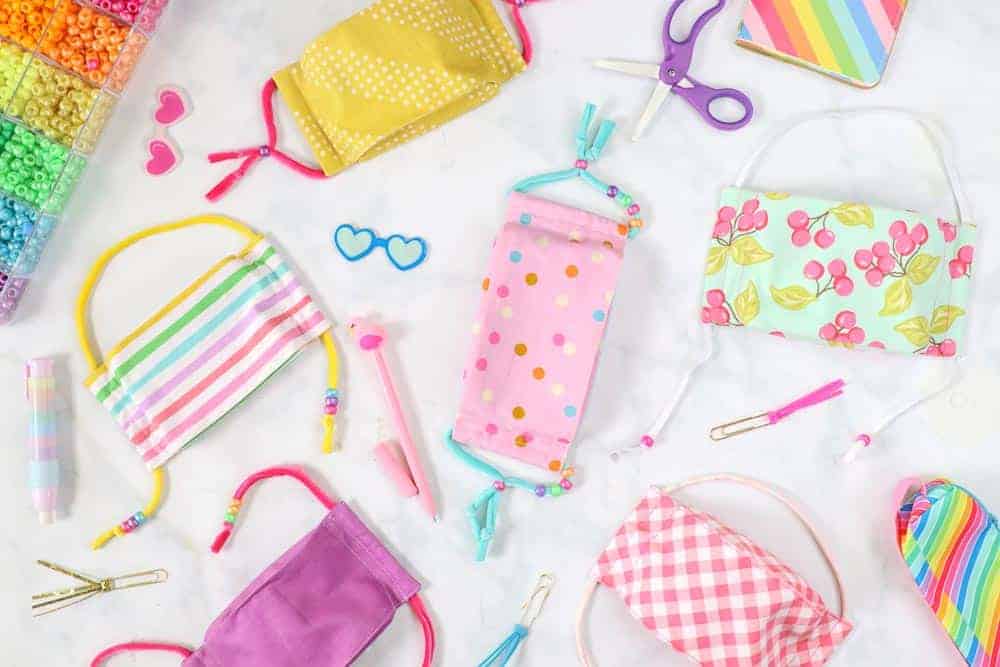
As I'm preparing my children to return to school in the next few months, I knew I needed to create a pattern that would be easy for my kids to wear. The good news is that these masks have been tried and approved by both of my school-age kids! I sewed up a handful of them for my daughter in fun prints, and we added some pony beads to make them more playful. Just don't forget to tie a good knot at the end of the tie!
But this mask isn't just for kids!! This 3D mask pattern is available in 7 different sizes including Toddler, Child, Preteen, Teen, Adult, Large Adult, and XL Adult. So it's perfect for the whole family!
*Face masks are similar to bras in that you might have to try a few sizes before you find the perfect fit! Don't get discouraged, every face is shaped differently so this is to be expected. Personally, I sew the adult size for myself and it's a perfect fit!
DOWNLOAD THE FREE 3D MASK SEWING PATTERN HERE!
Table of Contents
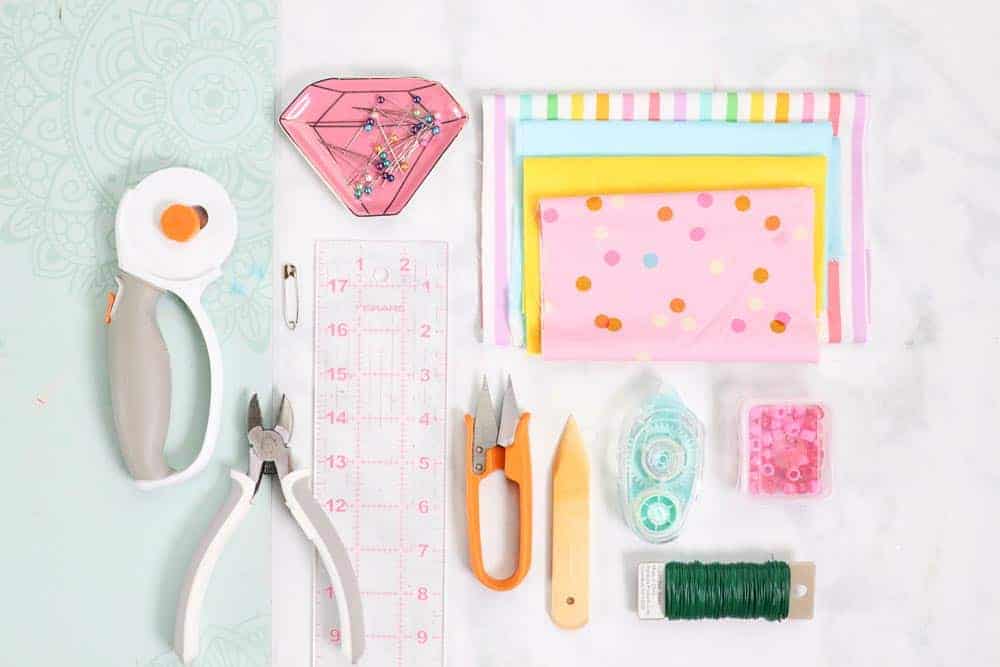
3D FACE MASK SUPPLIES
- 1/2 Yard Quilting Cotton
- 1/8 Yard Knit for Ties or 1/4” Elastic
- Sewing Machine
- Scissors or Rotary Cutter & Mat
- Thread
- Pins
- Iron & Ironing Board
- Pony Beads
- Turning Tool
- Wire
- Wire Cutters
- Filter
- Metal Nose Bridge
Click HERE to get our Back to School Guide for Sewing Face Masks for Kids
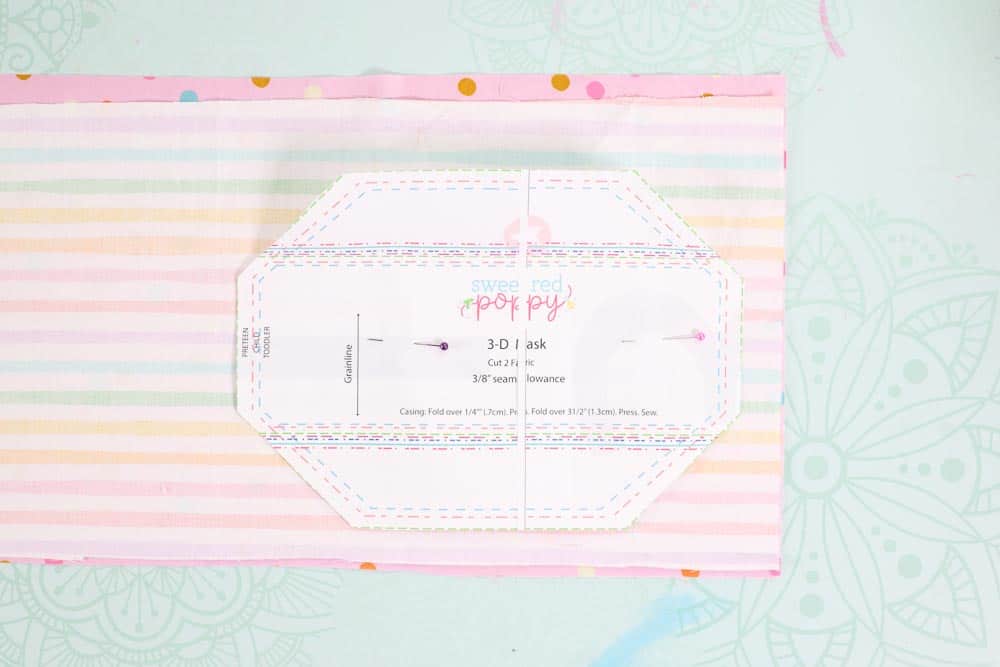
STEP 1. PRINT THE 3D FACE MASK SEWING PATTERN
Begin by downloading the pattern to your desktop. Open the download and print at 100% with no scaling.
Immediately measure the 1″x1″ square to make sure the pattern has printed off correctly. Tape or glue the pattern together and cut out each pattern piece. Align the black lines and pink stars.
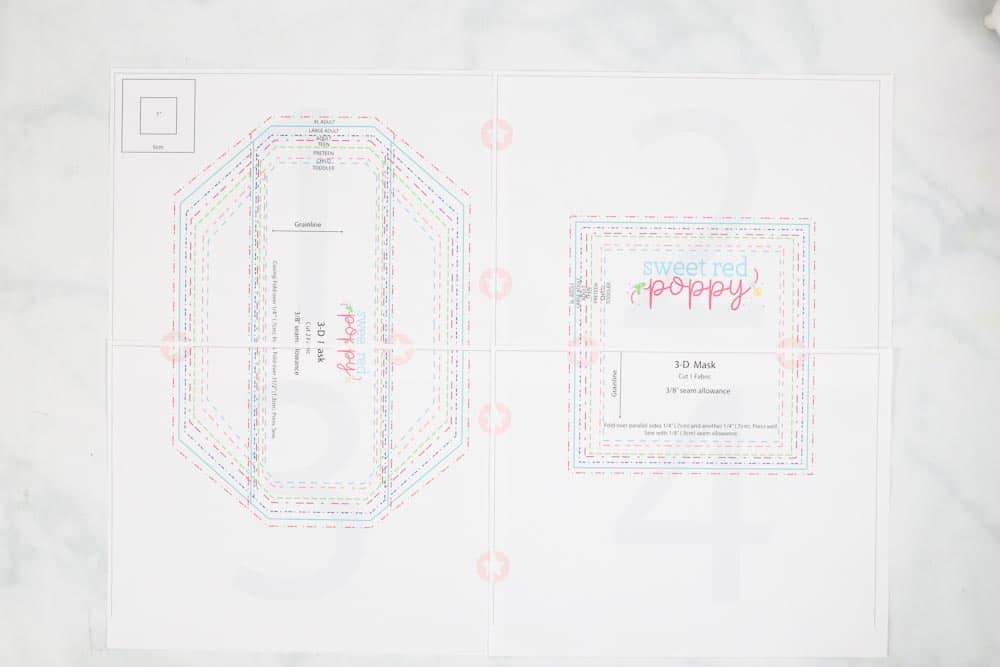
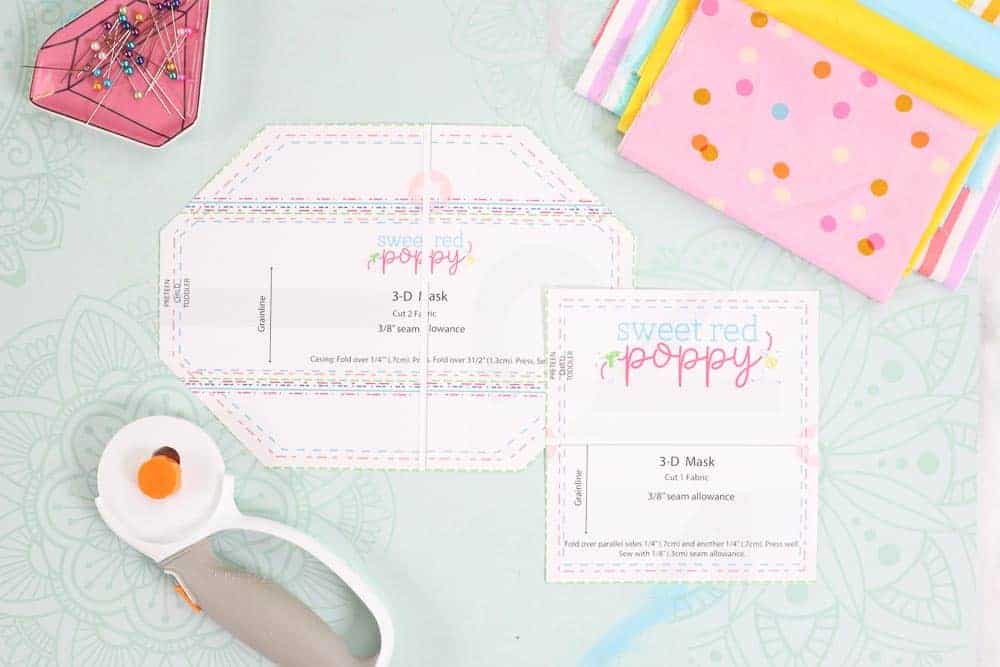
If you plan on cutting out multiple masks, you can cut the template out of something sturdier like a cereal box or cardstock.
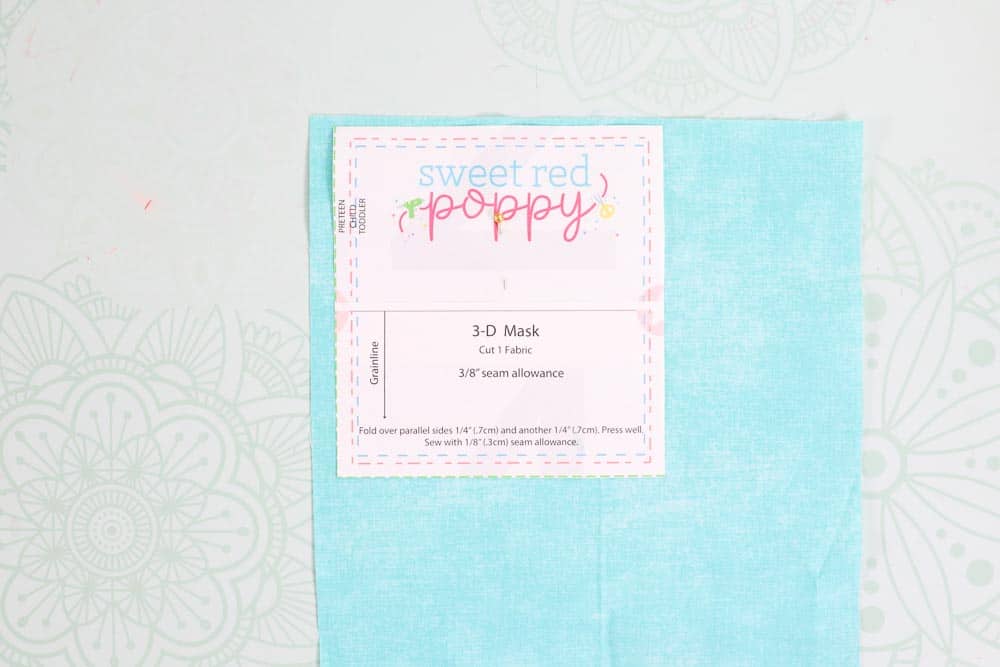
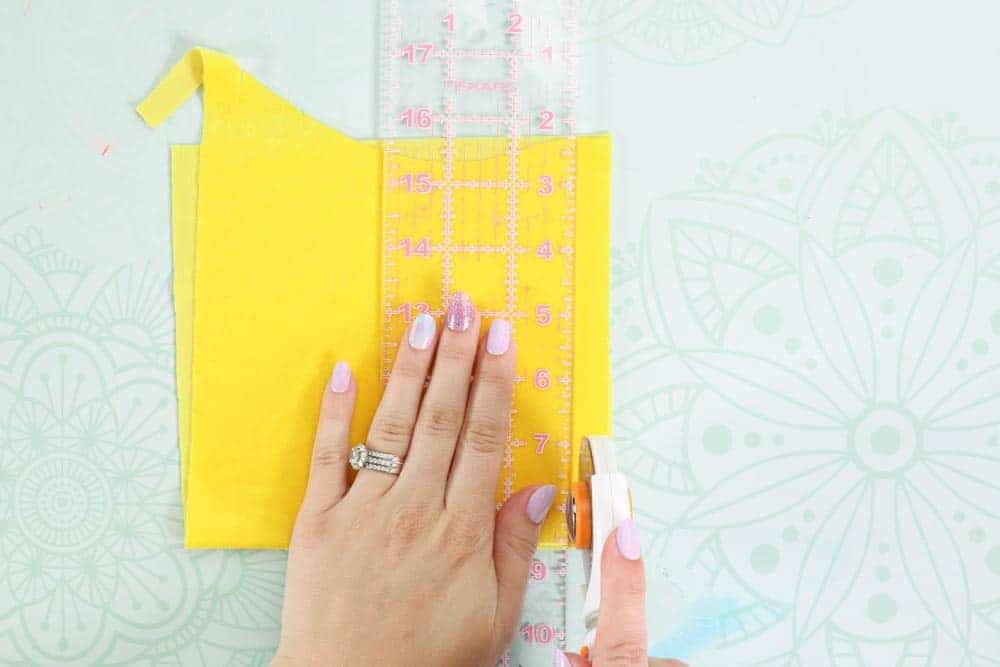
STEP 2. CUT OUT FABRIC FOR YOUR 3D FACE MASK
Fold the main mask pattern piece along the corresponding fold line. I like to use my iron (without steam) to set the crease.
Cut out 2 layers of the main mask and one filter pocket. Cut a 1″ wide strip of t-shirt material to 35” to create an around the head tie. Stretch the t-shirt material by pulling it tight.
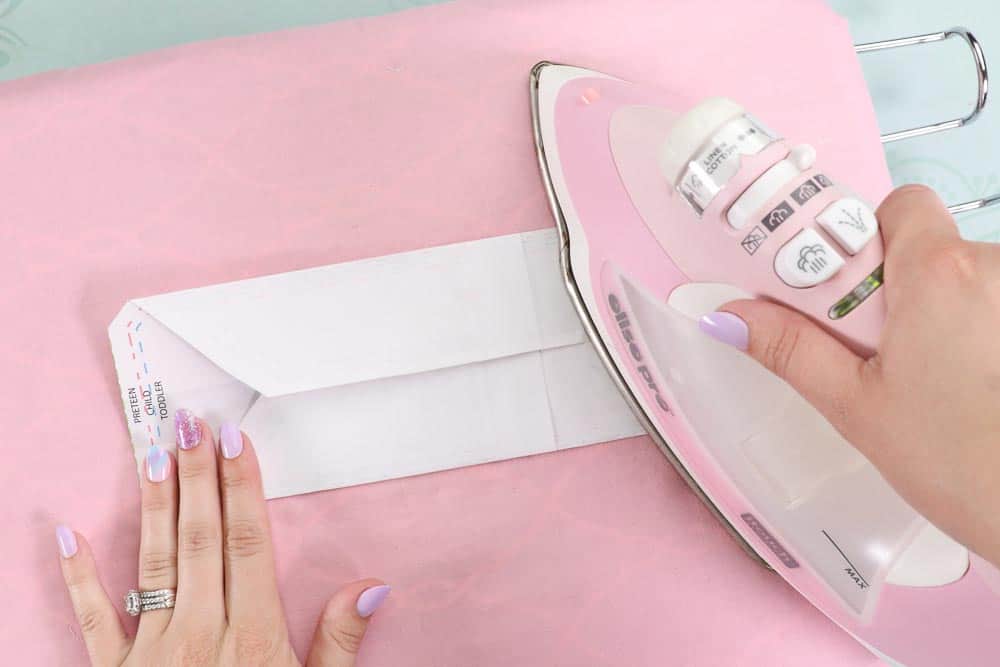
STEP 3. IRON & SEW FILTER POCKET ON YOUR 3D FACE MASK
Fold the main mask along the fold lines of the pattern and iron the fabric. This will create a top stitching guide for a later step.
Make sure the main outside fabric is being folded with wrong sides together.
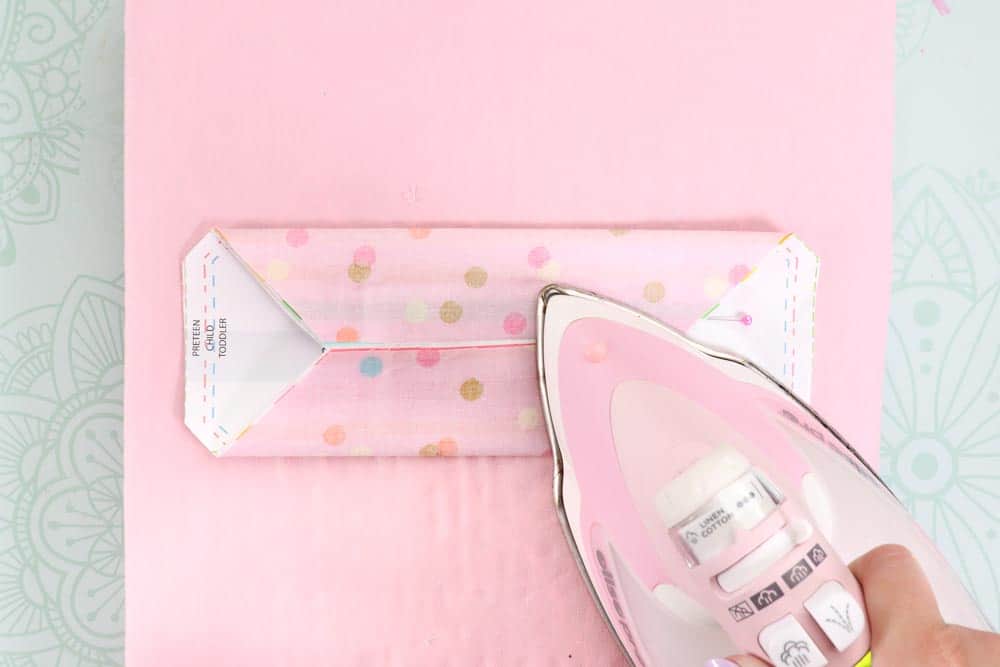
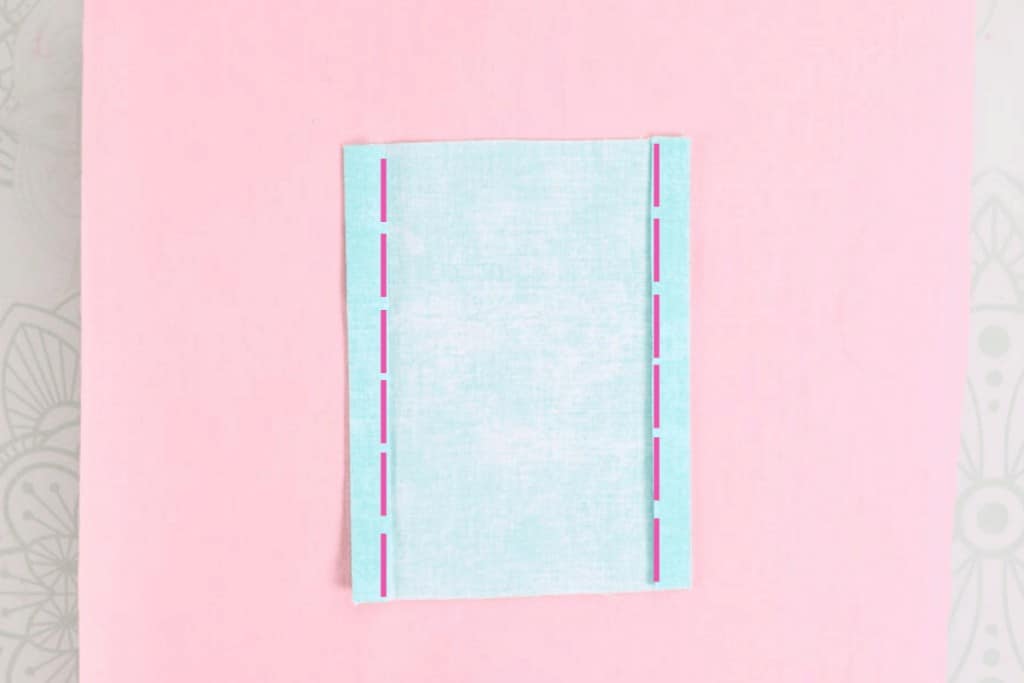
Fold the right and left side of the filter edges under 1/2”, press and sew along the fold.
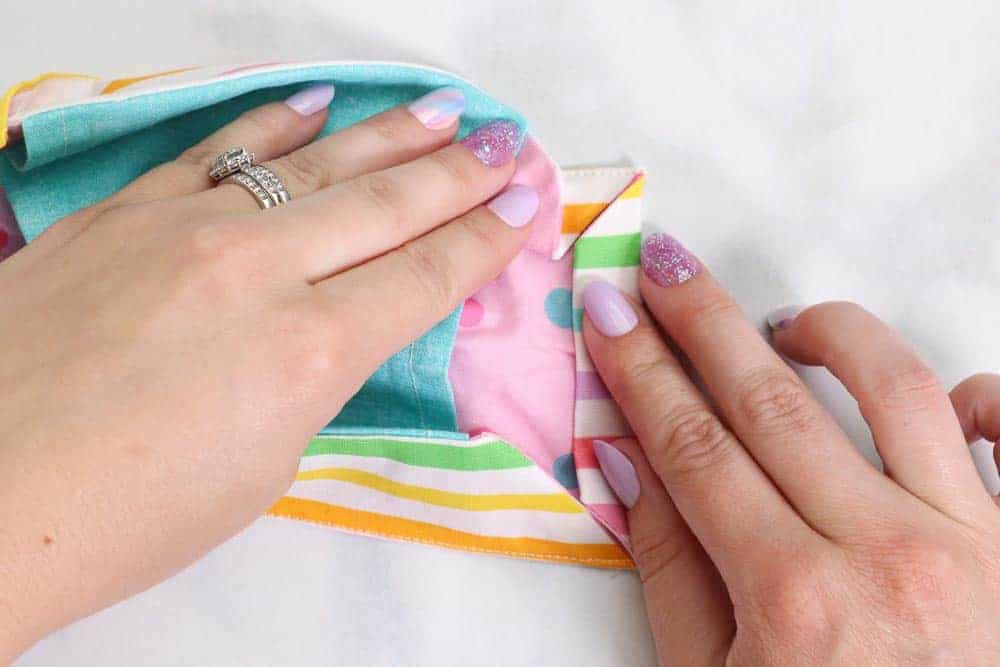
STEP 4. PIN AND SEW YOUR 3D FACE MASK
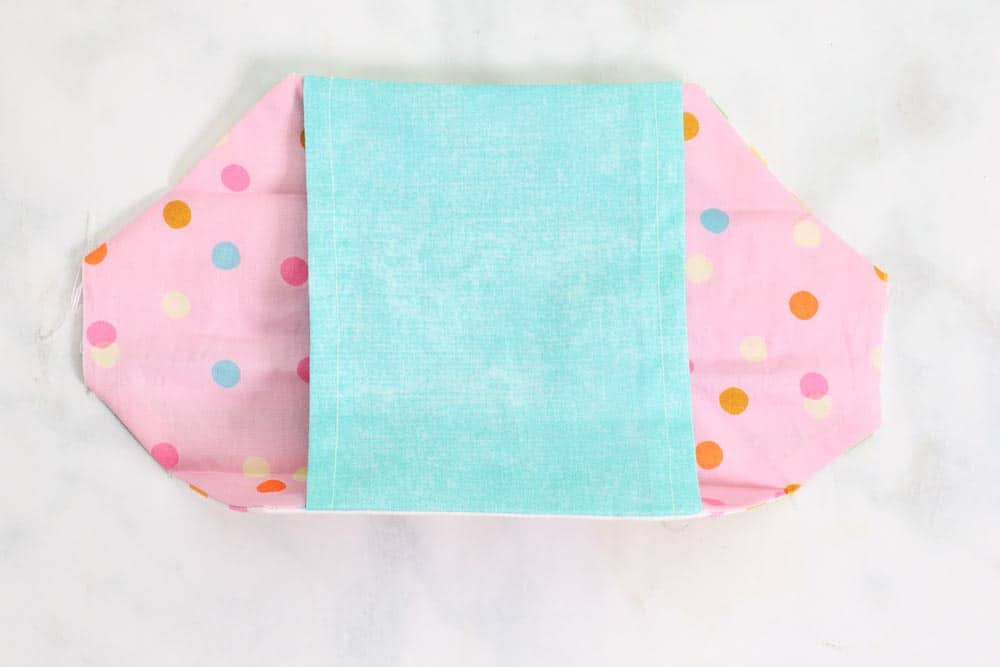
Place the filter on top of the main mask fabric with right sides together. Make sure to center the filter pocket.
Pin along the top of the filter.
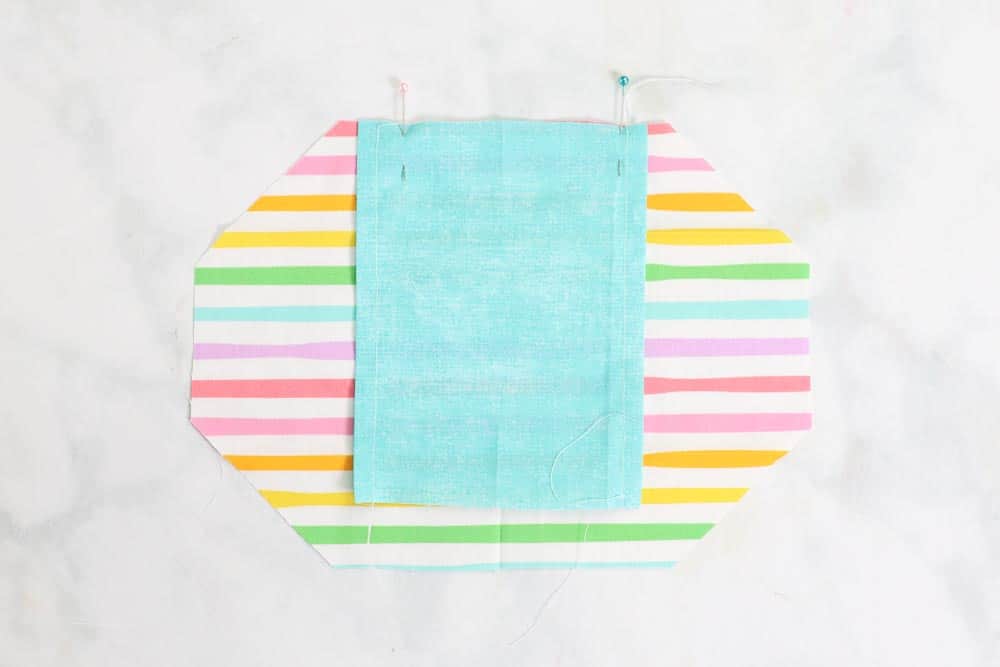
Pull the filter pocket downwards to meet the bottom of the mask. It will be shorter than the actual mask.
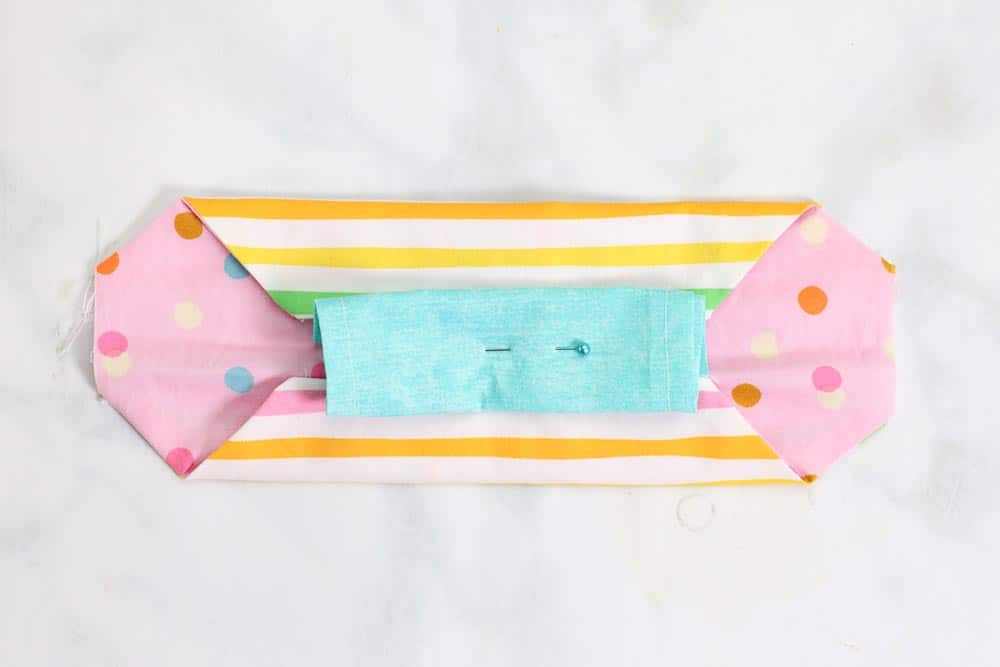
Pin in place. Place the lining right side down and pin around the entire mask leaving the sides unpinned.
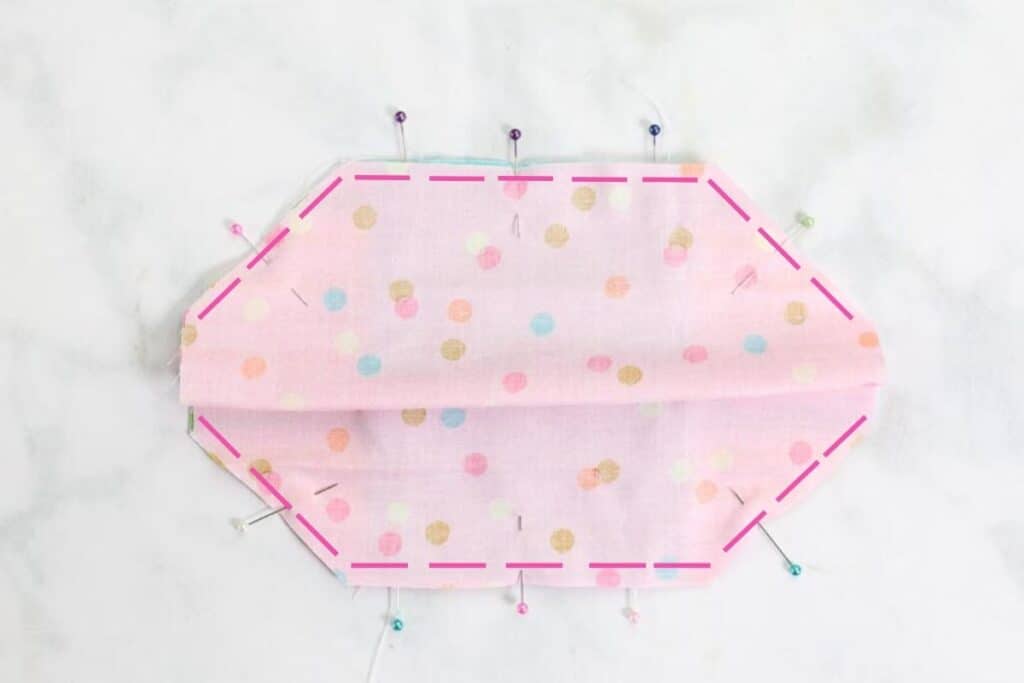
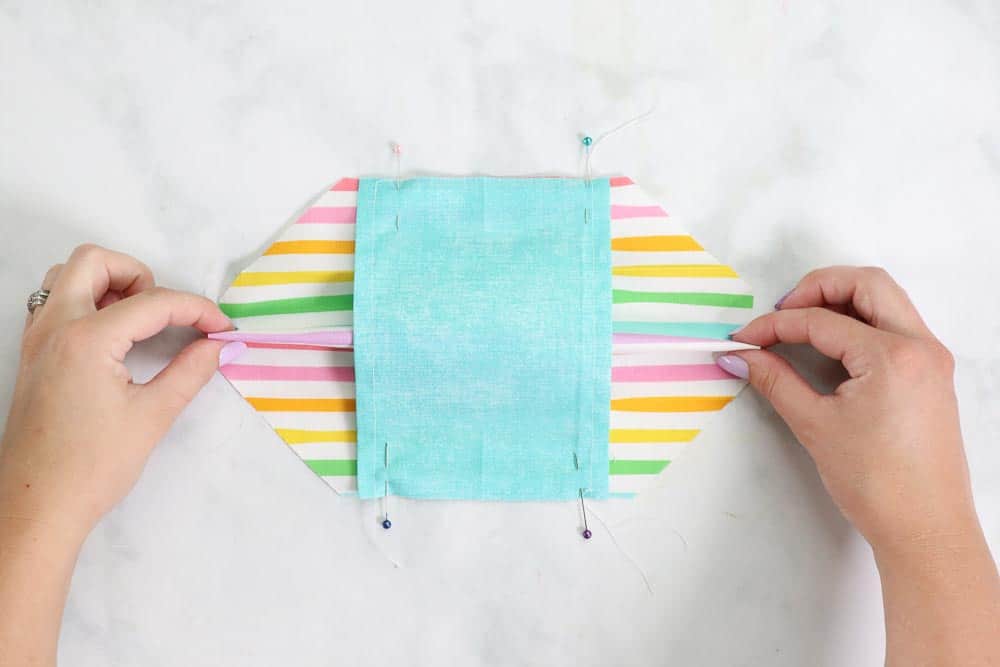
Sew around the mask leaving both sides open. Don’t forget to backstitch!
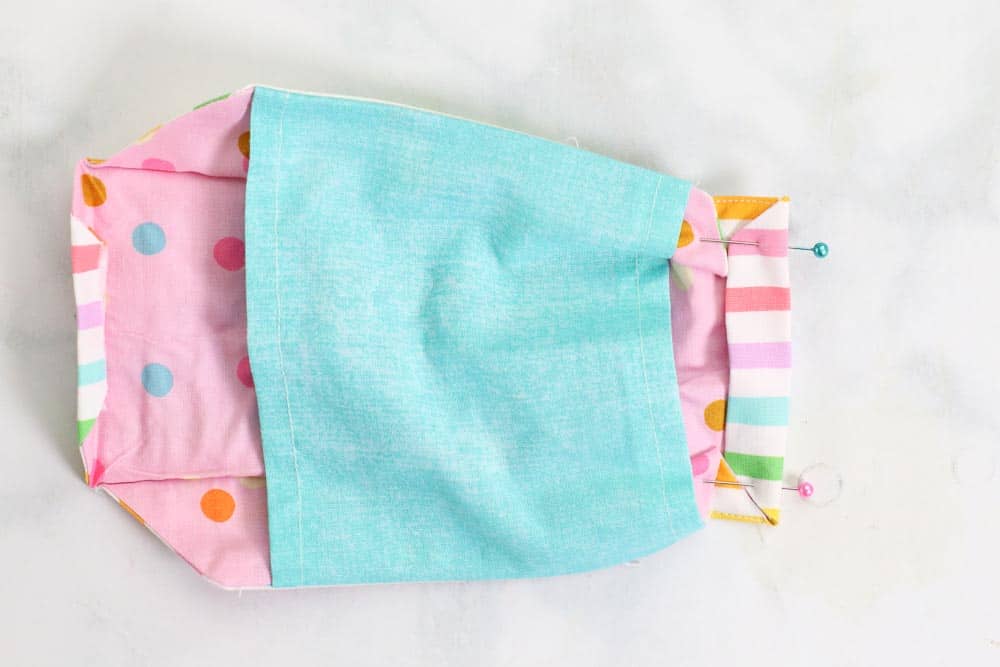
STEP 5. TURN MASK RST, PRESS & SEW FOLDS
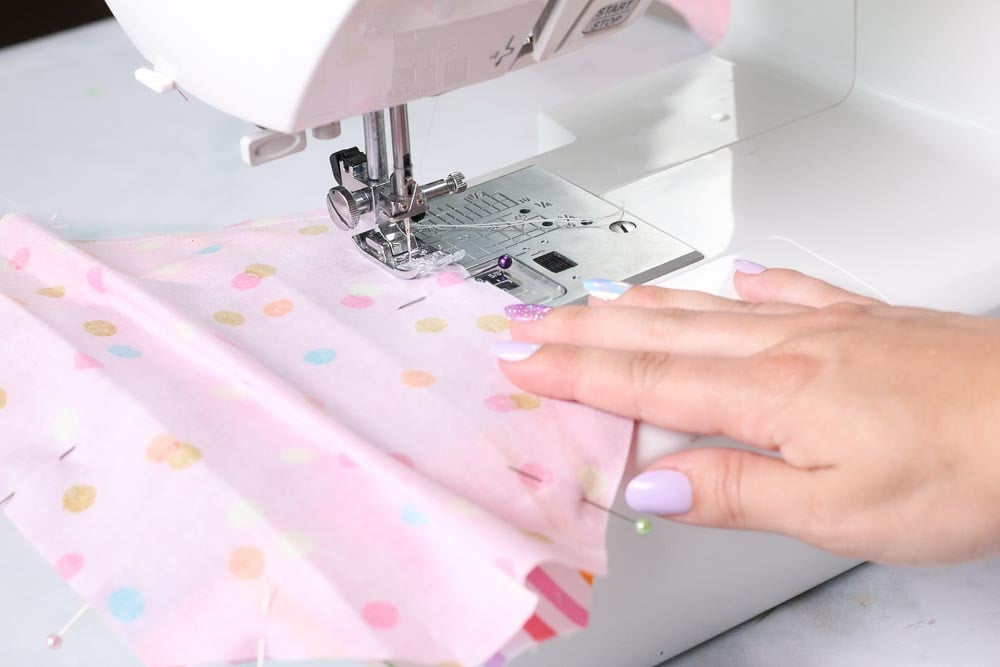
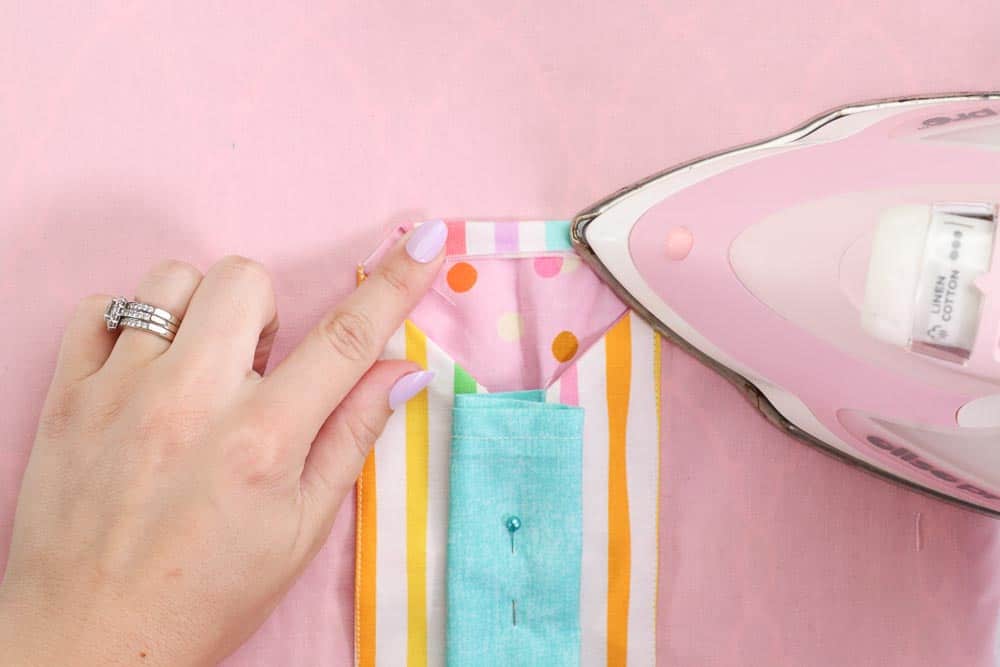
Turn the mask right side out, making sure the filter pocket gets turned to the side of the lining fabric. Use a turning tool to push out the corners of the mask. Press all seams avoiding the pre-pressed topstitching lines.
Fold the flaps inward and pin the filter out of the way. With a 1/8” seam allowance sew along the pressed edge. Press the topstitching. Unpin the filter and push it into the folds of the mask.

STEP 6. PRESS & SEW CASINGS
Flip the mask face down. Fold the raw edge inwards 1/4” and press. Fold the edge in an additional 3/8" and press. Pin the casing in place and sew along the inner fold of the casing.
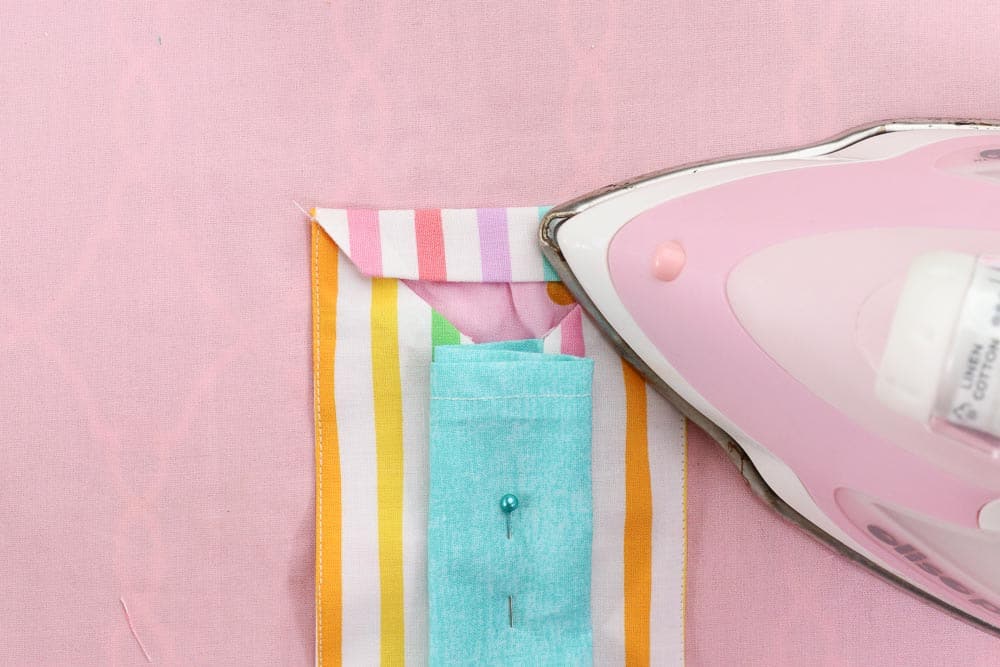
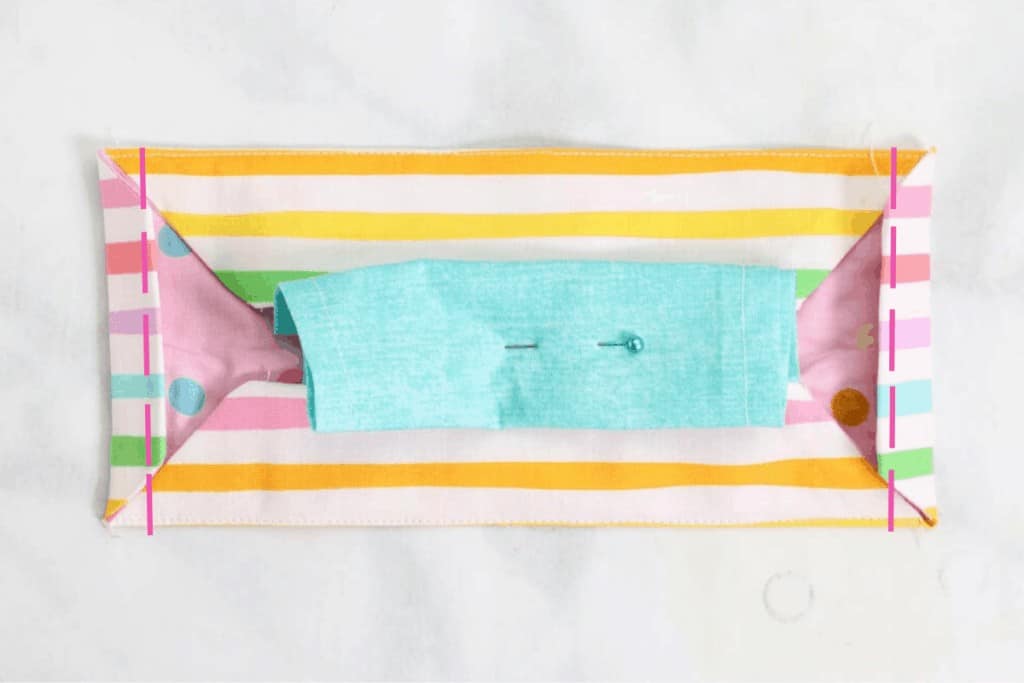
Pull the corner of flap upwards to create a 90-degree angle. Pin in place and sew parallel to the casing stitching line.
I like to draw in a stitching line parallel to my casing line to ensure I sew straight.
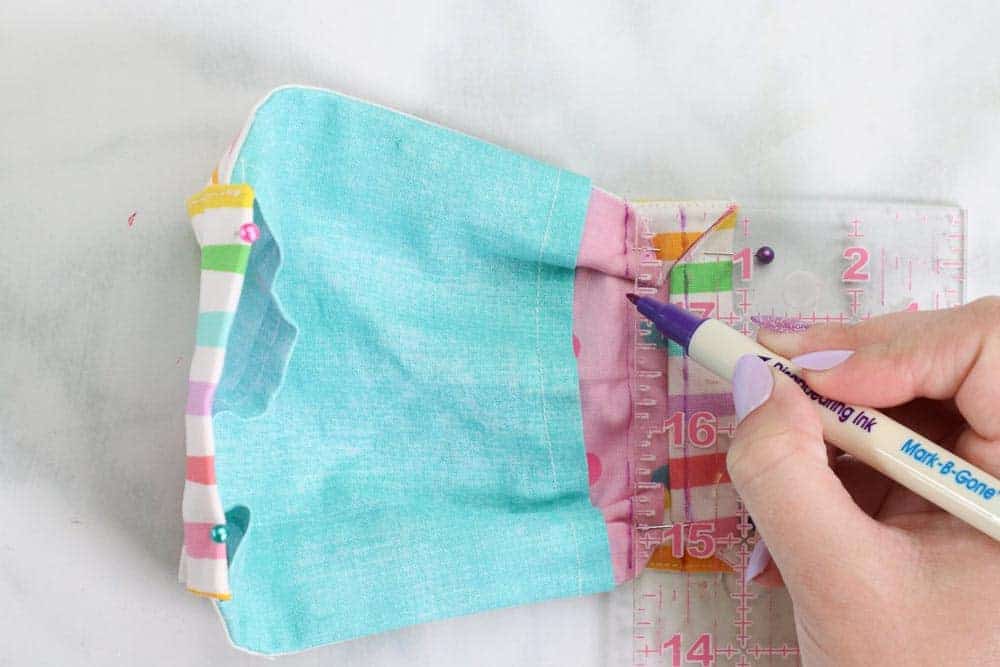
To create a nose bridge pocket sew 3/8” from the top seam along the filter pocket.
STEP 7. CREATE STRAPS FOR YOUR 3D MASK
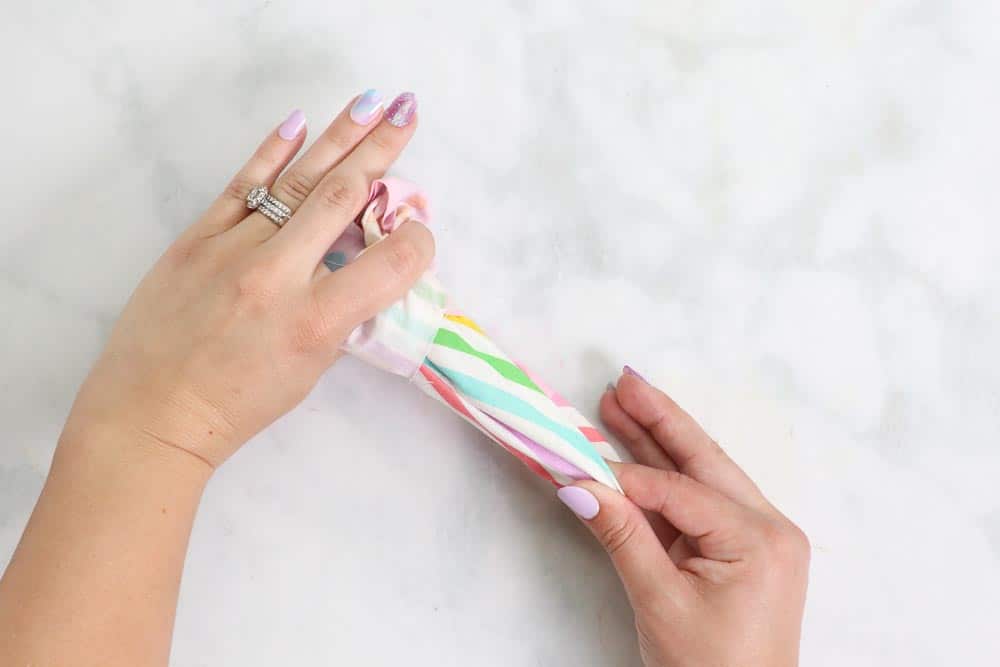
TIES – First off, you can create a T-shirt casing that goes around the head. To do this, cut a length of knit fabric or a t-shirt 1″ wide by 35″ long. You can adjust this measurement as needed.
Attach a safety pin to the t-shirt tie and feed it upwards through the right-hand casing and downwards through the left-hand casing. The tie can be adjusted once it is placed on the wearer for a better fit and tied at the base of the neck.
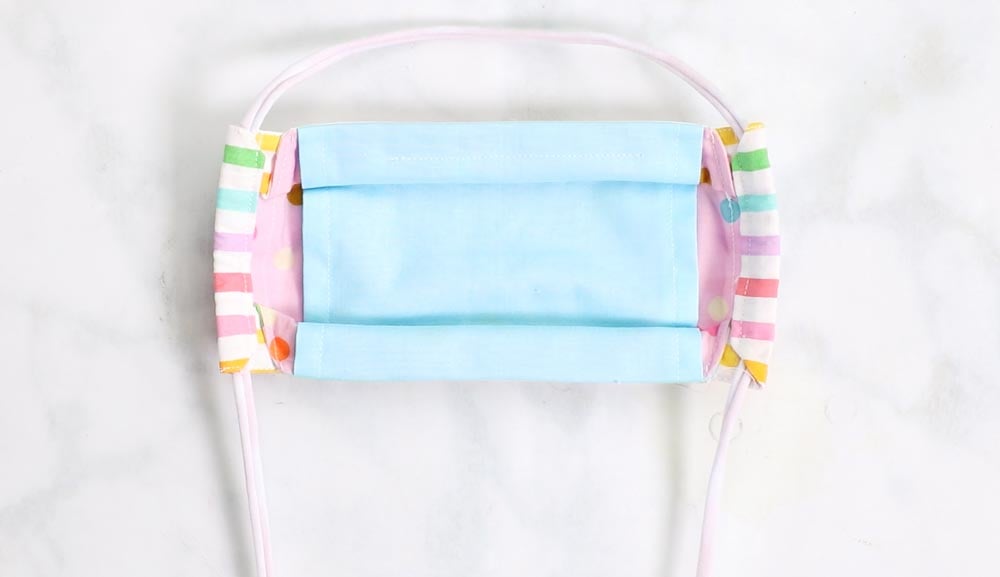
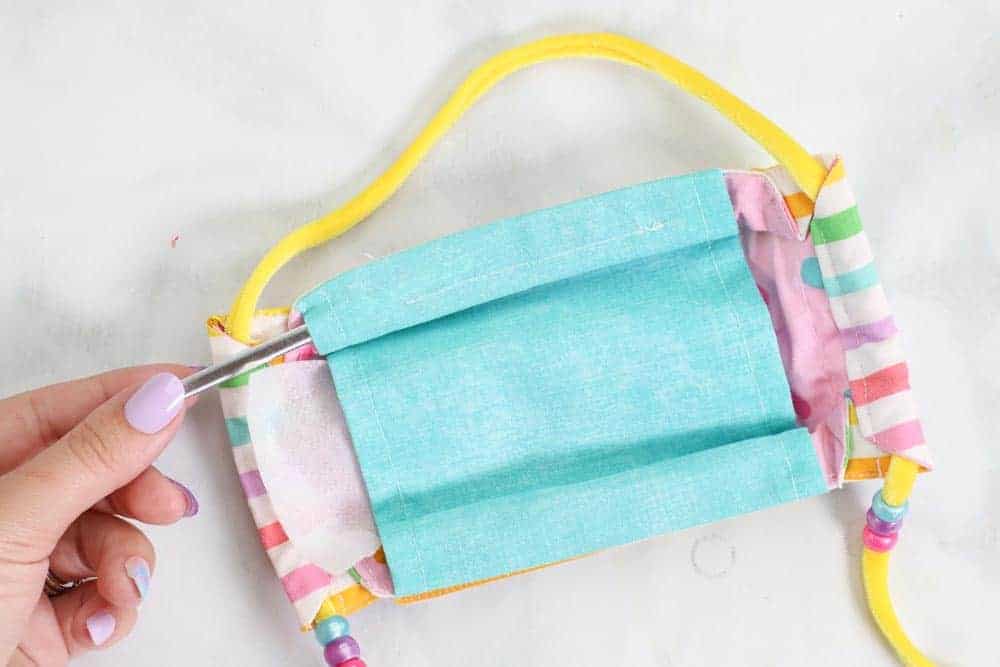
You can also create adjustable ear loops using pony beads. Cut a knit tie about 13" long. Feed the knit tie through one casing. Bend a piece of wire in half and slide the pony bead onto the wire. Slide both ends of the knit tie in between the wire, pull the wire to feed the bead onto the ties. Now you can adjust the ear tie using the pony bead.
FILTER – A filter can be slid into the mask through the openings on either side. Attach a safety pin to the side of the filter to help feed it through the mask.
Don’t forget to join my face mask Facebook group where you can show us what you’re making, ask questions, and learn from others! Follow me on Instagram for daily crafting inspiration and a look behind the scenes.

hi these wonderful fabrics where can I find it?
Thank you so much for your patterns and sharing them for free! My daughter recently got glass and I've been trying to figure out how to make a fog free mask and your pattern is amazing.
Is there a way to print just the written instructions?
I
Yes. Having printed directions would help. Are you going to do a video?
Yes video would help!
I would like printable written instructions too!
I would also like pritable instructions.
Printable instruction please!
I have not a way to print pattern. Please help.
I think I and my family would like this pattern must better than what we use now.
I want to see a picture of what this looks like on! Thanks for sharing your fabulous ideas:-) the polka dot with beads is sooo cute- this is the way to encourage mask wearing making it creative & fashionable so we can all stay healthy!!
I would like printable instructions.
I just downloaded after deleting the little ads and did photos and instructions but if you want to do just the written instructions open your word program aside these instructions, cut and paste side by side then print. I am just a customer trying to save the generous owner some steps, she's already done so much for us already. I hope this helps. Sometimes, I find if I can't do something on the computer, just ask your kids or brands.... they know how to do it all.... lol.....
Thank you. I’m about to do this myself! I love this patten!
If I understand the directions, there is a main fabric, lining and a filter pocket made out of the cotton fabric? Isn’t this warm even before the filter and what do you use for the filter.
Yes, it is warm but my physician husband wears it ALL day because it is most importantly effective. And more comfortable than most. I use the blue Tool Box Shop towels, 2 layers as research was done using these.
I have Evernote (there is a free version) - and you can "clip" the directions as "simplified article" and it takes out everything except the article/directions. You can then print that. It's also a great place to save all of your information in one place and be able to search by tags. This is what I do for directions I want to print without all the extra!
Thank you for the Evernote tip.
Please send written instructions to my email.
Eileen
did not want to down-load from the tutorial.too many pages
Yeah, copy and paste into a word pad...
Please send me written instructions with deminisions.
Please show how you tie this. Can't quite picture where the tshirt ties go.
Do these run small? When I do the 3D sewing it puckers the fabric. I should have only cut one out because these look weird.
How can I print instructions for deaf mask
Can I get patterns for the masks?
Hi, I use Google Chrome and have added the extension Print Friendly & PDF. It converts a blog post to an article that you can print. You can click on anything you want removed and it disappears, then save the article as a PDF.
I also sometimes use the command to Print, then scroll down to More Settings, then there should be a choice to open as a PDF or save as a PDF somewhere in that dialog.
This looks so great! Can it be done without the filter pocket? Just eliminating those steps? Thank you!!
I made one without the filter pocket. I just sewed in the nosepiece to the lining.
What does it look like on? Would like to see a picture, please - thanks!
Annette, I'm not the awesome artist/crafter who owns the website. If it helps, you can search 3D face mask on the internet and see many examples. I have sewn this style of mask previously using information from Youtube but, fair warning, most are in a foreign language so you have to be very visual and able to convert from centimeters to inches and so forth. LOL This happens to be my fave style of mask for personal use.
Where do I find the beads? co***********@***il.com
I got them at Walmart but any craft store will have them.
DollarTree, Dollarama and stores like these usually have them in with kids crafts
What do you do with the 2 loose ends on the striped mask?
Sue, I'm not the originator of this pattern but have sewn this style previously from Youtube videos. I think Step 6 will answer your question about those side open areas. They get folded over twice to make a casing for the strap. I hope this helps.
What length would I use for elastic around the ears?
I would also like the length of the elastic around the ears. Love this pattern, it takes what looks like a difficult sewing task, and made it so simple it ia suitable for a beginner.
Looks great! Thank you. Can’t wait to sew some up for the family!
Thanks for the pattern! I think my grand daughter will like this one better than the first two I have made her. But, like Debrin, I like the be be able to print the instructions as well. I know you must have advertisement with your site.. but it makes a real long print out.
I hope this is OK, people are concerned for using so much printer ink as it is expensive, I have found a site called,,,123 Ink.ca or aus, It certainly helps with printing off projects without a high cost of ink. I love this pattern.
I’m hoping eventually you’ll be able to make printed instructions to go along with this mask style the way you have done for the others. My computer isn’t near my sewing area, so I’ll try to jot down my own instructions. . Thanks for designing this mask! It looks great!
This looks like a great option for anyone who feels claustrophobic while wearing a mask, I know that I do. I am a visual learner, always turns out better when I can watch someone make the mask. Do you have a video showing the steps.
Can't scale 2the accurate 1" square. HP printer thru Wi-Fi. It only asks if U want full page or fit 2page. 1 is to LARGE and fit 2page is off by 1/4th in. All around. Anybody else??
I used landscape instead of portrait. The scale came out just right.
I can't get it to print with the different size lines. Any suggestions?
Hello there, I am a user of site like you.
It asked me for my name and email and then printed of all sizes available.
Don’t have to chose all sizes.
I liked the clear vinyl for hearing in-pared.
From my mother, grocery teller, ect many people need to follow lip movements to understand what we are saying.
Stay well everyone
Thank You for publishing these patterns. I have sewn your other styles for my family and they fit well. Trying to build up my son's collection before school starts.
The only modification I have made to them is to use cord locks to slide up the ties rather than having to tie a bow behind your head.
Thank you , this is amazing...... I am starting to make masks for the students in our district and have been experimenting with this style... You have worked out all the worries I had... Make it a great Day!!!!!
Thank you for sharing your wisdom. Do you have any pictures of the Nose Bridge? Where do you purchase the Nose Bridge?
You can order them from Amazon!
Aluminum Strips Nose Wire,Nose Bridge for Mask,90MM Metal Flat Nose Clips Nose Bridge Bracket DIY Wire (100PCS) https://www.amazon.com/dp/B0872ZMWPR/ref=cm_sw_r_cp_api_i_lJCeFbGHQ3KF3
I buy the folder clasps (the ones that adhere to the top of a folder, like the ones the doctors use to hold papers with two holes at the top of the page).
Use utility scissors to clip off the sides, leaving only the adhesive band that can easily attach to the mask. 1/2 x 3 inches. They are about $6.00 per 100 on Amazon. There are thinner metal bands that are being advertised as “adhesive mask bands”, also on Amazon, for a little more $., but not much more, and they are not as wide. Both options are Inexpensive and work well.
I use the vinyl/plastic covered ties from the top of coffee/donut bags. They're flexible & durable too. Reuse & repurpose friendly.
Like many others, I would like to be able to print the sewing steps without the pictures. Looks like a great idea. Thanks.
printed version please, as I have seen many people above have requested!!
Please post a picture of someone wearing the finished mask. Thank you.
Yes thank you a worn mask pictured is useful
I also would like a printable and video of this pattern.
Thank you for this pattern. I do have two questions and they might sound dumb, nonetheless I must ask. The nose adjustment piece does that get sewn in or is it removable? Also for the filter what is to be used for that?
Can you make your pattern an SVG or compatible file for cutting on a Cricut?
I'd love an SVG of the pattern as well! My Cricut is my go to for cutting mask patterns!
I too would like an SVG for the Cricut. I tried to print and tape the pattern and then upload a picture in Design space. I am not that tech savy so, it look weird. Do you have an SVG file for this? Please !!!
Thank you so much !!
Please make a video and so much easier to follow than pictures.
Thank you again
Text only instructions:
STEP 2. CUT OUT FABRIC
Fold the main mask pattern piece along the corresponding fold line. I like to use my iron (without steam) to set the crease.
3d Face Mask Pattern
Cut out 2 layers of the main mask and one filter pocket. Cut a 1″ wide strip of t-shirt material to 35” to create an around the head tie. Stretch the t-shirt material by pulling it tight.
STEP 3. IRON & SEW FILTER POCKET
Fold the main mask along the fold lines of the pattern and iron the fabric. This will create a top stitching guide for a later step.
Make sure the main outside fabric is being folded with wrong sides together.
Fold the right and left side of the filter edges under 1/2”, press and sew along the fold.
STEP 4. PIN AND SEW MASK
Place the filter on top of the main mask fabric with right sides together. Make sure to center the filter pocket.
Pin along the top of the filter.
Pull the filter pocket downwards to meet the bottom of the mask. It will be shorter than the actual mask.
Pin in place. Place the lining right side down and pin around the entire mask leaving the sides unpinned.
Sew around the 3D face mask
Sew around the mask leaving both sides open. Don’t forget to backstitch!
STEP 5. TURN MASK RST, PRESS & SEW FOLDS
Turn the mask right side out, making sure the filter pocket gets turned to the side of the lining fabric. Use a turning tool to push out the corners of the mask. Press all seams avoiding the pre-pressed topstitching lines.
Turn the 3d face mask right side out
Fold the flaps inward and pin the filter out of the way. With a 1/8” seam allowance sew along the pressed edge. Press the topstitching. Unpin the filter and push it into the folds of the mask.
STEP 6. PRESS & SEW CASINGS
Flip the mask face down. Fold the raw edge inwards 1/4” and press. Fold the edge in an additional 3/8″ and press. Pin the casing in place and sew along the inner fold of the casing.
Sew the casings on the 3d face mask
Pull the corner of flap upwards to create a 90-degree angle. Pin in place and sew parallel to the casing stitching line.
I like to draw in a stitching line parallel to my casing line to ensure I sew straight.
To create a nose bridge pocket sew 3/8” from the top seam along the filter pocket.
STEP 7. CREATE STRAPS
TIES – First off, you can create a T-shirt casing that goes around the head. To do this, cut a length of knit fabric or a t-shirt 1″ wide by 35″ long. You can adjust this measurement as needed.
Attach a safety pin to the t-shirt tie and feed it upwards through the right-hand casing and downwards through the left-hand casing. The tie can be adjusted once it is placed on the wearer for a better fit and tied at the base of the neck.
You can also create adjustable ear loops using pony beads. Cut a knit tie about 13″ long. Feed the knit tie through one casing. Bend a piece of wire in half and slide the pony bead onto the wire. Slide both ends of the knit tie in between the wire, pull the wire to feed the bead onto the ties. Now you can adjust the ear tie using the pony bead.
FILTER – A filter can be slid into the mask through the openings on either side. Attach a safety pin to the side of the filter to help feed it through the mask.
Thank you Anja!!!!!
THANK YOU VERY MUCH!!!!
Thank you Anja!!!
Thank you for printed instructions
Oh my Thank you so much. So nice of you to do this for us
Thank you so much Anja, my computer is quite aways from my machine at the moment. This will save me so much time and steps!!
Thank you so much for putting all of this information out . Online masks are expensive and take a while to receive. I also would like to thank the women who posed different questions that I might run into. Leave it to the women who band together, coordinate efforts and get things done.
Bravo everyone!
So kind of you to type these up. Hopefully people notice.
Anja,
You are an Angel! Thank you so much for the printed instructions. I’m pretty sure I love you.
Thank you
I love your patterns and instructions are great. I dont see the tutorial on this one. I am a visual learner. Thank you for sharing your patterns and ideas.
Can we see a picture of the 3D mask on a child and adult?
I agree. It has not easy to see how it is 3D.
She has one on her FB page
Thank you for the pattern. It is similar to a Singer’s Mask pattern I have found that fits away from face. Do you have a printable instruction option that I can’t find? I find that easier to use with a tutorial as back up. I can make notes! Please!
Thank you so much for this pattern! And for taking the time to make so many sizes! Your little models were so cute trying them all out too.
The 3D is my family’s favorite now, but I never found enough sizes. When I tried to size down for my grandchildren (3-5), I made them too small or too large. So your pattern will be perfect! I’m using it for my donation masks, instead of pleated masks, going forward too.
Is there any place on the 3 d mask
To print the instructions out?
I can't seem to find it.
Thanks, Tammy
for those wanting to print the pattern instructions without the pictures go to printfriendly.com. Paste the link and once printfriendly processes it, you can delete all the pics or just a few pics. I use this all the time to save ink.
Thanks for this great tip, Donna! I will be using it for other websites that I want to print, too.
Would you please show a picture of this mask being worn? I like to see them on someone to see how they look before I make one. Thank you.
Do you have pictures of anyone wearing this style mask? I’m just curious how it looks on!
Could you please a picture of someone wearing it?
How would you use the elastic if you don't use the knit for the ties? Measure how much to go through the casing and then sew together the ends? Thanks so much Anja for the printed instructions only, saved everyone a lot of time. I agree that a video would be very helpful, still not sure of some of the steps. Thanks so much the this pattern and instructions.
Janet, I'm not the originator of this pattern but have sewn several like this from Youtube videos. If you choose to use elastic you could try this:
1) For over the ears, cut a length for each side to match your preference. Thread thru the casing and knot the ends to make it a comfortable length for you. Slide the elastic for each side until the knot is hidden inside the casing. (You could sew the elastic together too, then slide until that sewn area is hidden in the casing.
2) For around the back of the head, cut one long length of elastic and thread thru casing similar to the ties in the pattern. Clip or fasten the ends to make the elastic tight enough but comfortable, then sew the ends together or knot them. Slide that knot or sewn area until it is hidden in one of the side casings.
Hope this helps!
Kim,
Another wonderfully beautiful tutorial! Thank you for sharing your passion. Quick question. Any recommendations for filter material that can be used in the pocket? Or resources to do research? Thanks again!
I am still not sure that I made this correctly: I spent forever on the last three pictures in Step 6, I assumed that you do the same on the bottom corners, but it does not fit quite right under the chin. Could you print closeups of those steps, and yes, a finished product shown from both sides and on a model would be so helpful. Thanks very much for doing this!
🙁 I unfortunately finished this pattern and it was not successful. I honestly do not see how this is 3D. I feel sad now that I wasted fabric and elastic on this pattern. I really think a video would be helpful and a picture of someone wearing it. Off to YouTube I go!
Hi Cass, the post has been updated with a video to help! If your mask didn't turn out to be 3D it probably means you didn't pull your corners tight enough. This is what causes the mask to pop away from your face.
Hi,
I would like to make my Granddaughters the 3-D face mask you created. I don't see instructions or a video. The masks you made are adorable! Looking forward to hearing from you.
Thank you,
Jackie
I have been doing this mask style for quite sometime. There are some very good tutorials on youtube and you can see the mask on someone (search for 3D mask) - just turn off the sound, because they simply play music. A hint for all of you: It is much easier to cut the fabric on the fold and simply cut "1/2" a mask for the lining and outside fabric. Fold the pattern in half so that largest portion of the pattern (the center) fits on the fold. Also, when doing the 3D effect, make sure the wing is vertical and straight and that the top edge point on each corner fits in line with the horizontal portion. You will see what I mean on the youtube tutorials. I also use my machine's quilting guide to make sure I sew completely in line with the ear loop seam. I have so many people requesting this style, I am getting pooped! I am about to try this particular pattern for the first time to see how it fits, as I had made my own previously. I am looking forward to seeing more of these masks around that I personally didn't sew for someone!!!!
I've been making 3D since April. I can breathe more comfortably with this style. So easy and quick to assemble. I highly recommend it. My bridge is made of copper electrical (covered) wire and it's sewn in. I use two to three layers depending on my mood. I really like this style. My whole family, nieces and friends like it too.
Is there a video for the 3D. Mask ?
I just updated the post with the video. 🙂
Me gusta mucho esta página. Me ha ayudado mucho. I love this page.
Thank you for the pattern! Two of the guys in my family do not “fit” the large adult so I am anxious to try the “XL”.
Thank you so much for including the video! I really appreciate it. You do so much to help us with our mask making. Thanks again!
Thank you, Lola!
Sorry, but where can I find the video? Thanks.
The video is right above the Supplies list on this page. Hope this helps.
sent by e-mail too
There are three things I need to be clarified:
1. 2 & 4 go together to make the pocket for the filter Yes ? Therefore 1 & 3 go together to make the mask?
2. Instructions sometimes say filter and sometimes filter pocket. I "assume" that the blue piece is the filter pocket. What is that material? Supplies does not list but 1/2 yd
quilting cotton.
3. What are you using for the filter? That is not in the supply list either.
Thank you for video!!!
Hi,
Do you happen to have the measurements needed to make the pattern if I'm unable to print - my printer isn't printing this correctly no matter what settings I use. 🙁
never mind - got it. Thanks!
Printing tip for the pattern: make sure you set it to print in landscape format! My printer menu goes to portrait format by default, so after I got an unusable printout, I had to re-print changing that setting manually in my printer menu.
Hi Kimberly,
Thank you for the video and pattern. I attempted to make my first 3D version today and looks ok. However, what type of fabric are using for the outer and inner layer for masks-making?
Thanks,
Hi Kimberly,
Thanks for the step by step clear instructions for the 3D face mask. I have watched so many of these. Finally after watching your video I feel confident to give this a try. I have a question: Is there a way to match the physical measurements of one's face ( from bridge of the nose to the eat and bridge of the nose to the chin) to determine the size of the mask to sew instead of doing it by trial and error? Could you please suggest the pattern sizes that maps to the physical measurements?
Thanks.
How do I print this pattern? I have not found any place were they print. I think I and my family would like this mask better than what we have now.
Not the easiest mask to make
I don’t understand how this mask stays on. Does it go around the ears somehow?
Thank You for making this face mask so easy! Now my grandkids will be ready for school and safe.
I'm not sure I cut out the size right. Do I add 3/8" seam allowance? I made it adult size without and it's really small.
I'm wondering the same thing, and I can't seem to find anywhere it's addressed.
I'm a novice with sewing, so I don't know what the usual convention is, but in the past few months I've come across patterns where the seam allowance needed to be added when cutting the fabric and others where it was included in the printed pattern, and usually the only way to tell which was which was through comments / Q&A left by people who were trying to make the pattern. It's been several months since you left your question, and it doesn't seem to have been answered anywhere. I hope someone comes along to answer it!
Anja, thank you so much for this info. I know you aren't the pattern creator. My problem is that when I cannot tell how to line the patterns up. Part is missing. Could you tell me the measurement width wise for toddler on both parts? Then I can tape mine appropriately. I do appreciate your doing this.
Am I the only one who noticed the layers are labeled wrong in the PDF? I have now made a bunch of Large Adult masks for my lady friends and smaller Adult ones for the guys. PLEASE fix this!!
Do you include instructions on how to add a flexible nose piece if one is not including a filter? I made my own casing for one (that will use wire like the other masks) and it would seem that the best time to add the wire casing would be just after you turn it right side out and before you top stitch the folded edge.
Child size mask fits me. I have a adult face. lol. What size is your daughter wearing in the 3D? My daughter put on the child and it seems big!
I really like this mask; its very simple once you figure out the "3D" bit.. Thanks for the pattern and video.
I made a few modifications:
- I skipped the filter pocket and instead just used a casing for the nose strip (as was done for the "fitted" mask)
- I made the pieces about an inch higher (cut the pattern in the middle and inserted an extra inch of paper); and then used that extra to create a pleat. It made it even roomier in front of my nose and mouth -- which made it even easier to breathe.
- the next one i make, i'm going to try using a separate casing for the ties (to avoid the extra bulkiness because of the extra pleat)
Hi I'm wondering if ties that go over the ears would work on this pattern as well for those who can't tie things behind their heads. THANK YOU
where do u get the filters for this
You mention there is a top and bottom to the mask. I do not see any difference at all. What am I not seeing that indicates there is a top and bottom???
Thank you for sharing all your videos, patterns, tips, and such.
I love this idea, but what should the measurements be from ear to ear and nose to chin? for the adult size.
Thank you!
Psst, step 6. You have the wrong measurements. I believe you said on the video 3/4". Not 3/8".
Could you please suggest us the approximate ages for the kids sizing? Like from toddler through to preteen - what ages would you say for each group? Thank you.
Will a carbon filter that is heavier sag down? Thank you for this comfortable mask!
Hi, thank you for your patterns and the easy to follow directions. I am a fairly basic sewer. Would you consider posting a pattern and directions for the 3D mask (child and adult sizes) that includes the filter, a nose wire and also elastic in the chin? That would be so helpful. Thank you.
Thank you SO much! I've sewn well over 100 masks so far, and am experimenting with different patterns. I LIKE yours! Making a couple each for my grandchildren, who are irritated by having fabric too close to their mouths. You have produced an excellent pattern!
Incidentally, after reading many comments, I have to say:
- Quit complaining so much! This lovely person has created something for you, for FREE, and has put a lot of effort into the whole production!
- The pattern pieces fit together perfectly. There is extra information on the pattern itself.
- TWO sets of instructions, for different sewing experience levels! I have never seen this before - so nice!
Again, thank you!
much more easy!.Try it, please! 🙂
https://www.youtube.com/watch?v=jlbYsGlPZzs
kisses
andy
Can I get the measurement in inches for each size? I cannot get my printer to print this accurately. If I had the measurements for each size I could could figure this out a little better.
When you go to your print page there should be an option to scale - My printer automatically went to 75%. Once you find the box (It took some looking for me. It may be in advanced settings.) change that to 100 and Bob's your Uncle!
How is everyone getting this pattern to print properly? I can't get it to print so that the 1 x1 box, actually is 1x1. Any help would be greatly appreicated.
Make sure you choose 100% in the print dialog. As long as one side of the 1x1 is correct, it should be fine. Mine was cut off too-- I think because it's designed for A4 paper, and I'm using letter size (8-1/2 x 11). I just estimated where to join the pages together!
Why doesn't this page match the video? Specifically, the video talks about "making the 3-D effect" and these written instructions don't include them?
I guess it's addressed in the 2nd part of step 6, but I find the ads (I know, a necessary evil) distracting. Maybe emphasize it like you do in the video, explaining the standing up part.
Thank you!
Love your 3 D pattern. I have made many with different fabric patterns and sizes. Best and most comfortable pattern yet !
Thank you
Is there any chance that we could get an SVG to use our Cricut (and other) machines?
Could I get the dimensions of each size, including how much to trim at the corner? I did print the free download (thank you) but my printer will not print to the edge of the paper and letters are missing from the words in the centre of the mask. I cannot tell how much is missing. Plus, my 1" scale box is dead on but the 5 cm box is not, it's bigger than 5 cm. So I don't know which is correct.
The printout should have black-line borders around the edges, and you cut or fold along those to match up the pattern pieces (using the stars to help line it up). The missing word issue I also had - the watermark page number covers it up, but interestingly doesn't do that when I view the PDF in Chrome, so I copied the info from there. That portion should read "Fold over 3/8" (1cm)."
My printout also is exactly on with the 1-inch square, but the 5cm square actually measures exactly 2-inches (5.1 cm). I'm intending to rely on the 1-inch square's accuracy when I make my first attempt at this, though I'm still trying to figure out a few other questions before I start cutting.
Love the pattern, I modified the ties. I use a bigger bead and run the tie through again. Slides up and down really easy, and I used a pony bead at end to ensure you don’t slide tightener bead off. My husband has a muscle disease that makes his muscles atrophy, he just couldn’t grasp the pony beads. Hope it was ok to make that adjustment. Thank you for the wonderful pattern.
Thank you for this pattern and all the other mask patterns. I’ve made so many masks it makes my head swim and your patterns and instructions are the BEST! Thank you.
I need to try this pattern!
I've made hundreds and hundreds of masks, but I have not made one specifically for myself yet. I want to try this pattern for myself!
These are my favorite masks to see.
I’ve made about a hundred of these and live them! The people I make them for live them too - very easy to breathe in them. Love the range of sizes too - my partner has a big face and so many masks don’t stay up on his nose - made him the extra-large adult size and it’s a perfect fit! Thanks so much for this pattern!!
Going to try a 3D mask this weekend. Thanks
These are my favorite masks to make and wear. Gives you more breathing room and I think easier to make.
Hi!
Im having problems dl the pattern, when I dl the file and open it there are only instructions and no pattern 🙁 Would greatly appreciate it if I can get a copy of the pattern
Thank you!!!
One thing that is not mentioned in the typed instructions, but is mentioned in the video, is that the seam allowance is 1/2 inch. My masks came out too big using a smaller seam allowance.
This design allows you to showcase specialty printed fabric so much nicer than other designs I've used.
Thank you for posting the pattern and the video.
Hi. I love this pattern, have wanted to try this style. I was unable to print the actual pattern. Is it possible to get measurements for the pattern itself? Thank you!
Hi just wanted to comment on how amazing this pattern Is. I made these for my oldest and it was the only mask that fit beautifully out of 10 I tried. It’s an amazing comfy design, absolutely love the filter pocket. I love your patterns, videos and blog so much. And your photos eek you always use and have the most amazing colours/designs ever!!! Thank you so such for all the beautiful free patterns, I made your baby hat recently again it was the absolute best out of 4 other patterns I tried 🙂 you are incredibly talented!!
Your 3D mask is my go-to mask to make now. It's the only mask that fits my small 5 yr old's face the best!
I've been taking off the loops from the disposable masks and using them on these masks because its more gentle around her ears than elastic.
Hi,
I know it's been almost a year since you posted this video but for the life of me I can't figure out how to fix this sewing problem. I sew a teen size mask for myself but on the bottom chin there is a hanging gap. I've resolved to pinching the middle and sewing another stitch to close the gap so it can rest on my chin. Any suggestions what to fix the gap problem?
H
I am in the process of making this but I do not understand this direction "To create a nose bridge pocket sew 3/8” from the top seam along the filter pocket.".
Please explain.
Also, what kind of material are you using for the filter pocket? It looks like gauze in the picture.
Thanks for your help
If you're wanting to add a nose bridge (wire to bend to the shape of your nose), you'll just sew a stitch 3/8" from the top of the seam of the filter pocket.
Here's a video - hopefully it helps! https://www.youtube.com/watch?v=pEOl5GZsgcU&t=3s
I'm using cotton.
Your video is easy to follow and professional. The 3 D mask is exactly what my 2 1/2 year old grandson needs for pre-school. Unfortunately, I have tried unsuccessfully for an hour to print a readable pattern. I measured the 1” square and doubled my print size since my square measured 1/2”. Both patterns I printed were totally unreadable. All the other pages are clearly printed. I’m thinking about winging the geometric pattern on my own. At this point I’m 2 hours in to the effort. MADDENING!!.
I'm so sorry that you're having trouble with the pattern. When you print it off, be sure to set your printer to 100% or no scaling. This should print it off correctly. Please let me know if you have any other questions.
Hi! Just wanted to say thank you SO much for this great tutorial & pattern! I’ve made a bunch for my sons & they fit great & my son prefers them to any other masks I’ve made in the past for him. I have no idea if anyone will scroll this far down the comments, but I wanted to add some things I’ve discovered to really nail this pattern. First, when doing the last “3D” stitch, I’ve found that in addition to making that horizontal line, pinning the point of the top & bottom flap in line with the stitched center crease really makes the mask bump out. I pin there & then make it a straight line across, this also helps keep both sides even, as I had a couple crooked masks at the beginning. Another trick to help with this I’ve found is to sew each fold individually rather than a straight line. I start at the top, stitch down to the crease & then backstitch. Then I take it out turn it around & then sew the bottom, so it looks more like two darts rather than a straight line. This keeps the edge in place & keeps both sides even. I also needed to sew my almost 2 year old some first masks for school this year. I wanted them to be soft & fit well, so I opted for some stretch Jersey I had, rather than the more mask appropriate batik fabrics I used for my older son. I also skipped the filter, since I really need to make sure he can breathe freely. I used the smallest pattern size & sewed a 5/8” seam allowance to make it smaller & it’s perfect for his tiny face. It fits amazing. I get so many comments on how well it fits & other toddler parents always ask me where I got it. Last I use Jersey fabric for ear loops rather than the behind the head straps in the pattern. I cut 22”x1” strips, stretch them & then cut in half & they’re perfect. Then I push both through a pony bead with a thin knitting needle & tie a small knot on each end to keep it from slipping off. This makes the mask fit really well & the ear straps are soft & comfy & adjustable. I hope all that made sense! Thanks again! I really appreciate your patterns!