Everything You Need to Know About Iron-on. Find Out What Iron-on Is, How It’s Different Than Vinyl, How to Cut It, Apply It With an Easypress, and How to Troubleshoot if Something Goes Wrong.
Are you ready to learn everything you need to know about Iron-On? You're about to be a Cricut Iron-On pro in no time at all. With this detailed step-by-step blog post, video, printable cheat sheets, and free SVG files you'll learn everything you need to know to conquer every Iron-On project!

I’ll be sharing some of my favorite tried and true tips and tricks to ensure you get flawless transfers every time with the Cricut EasyPress.
Scroll down just below the Supply List to download my bundle of 10 free SVG files!
In this tutorial, I'll be using the brand-new Cricut EasyPress 3. If you’re using the first or second version of the Cricut Easypress you can still follow along with this tutorial as I’ll be providing instruction that applies to your machine as well.
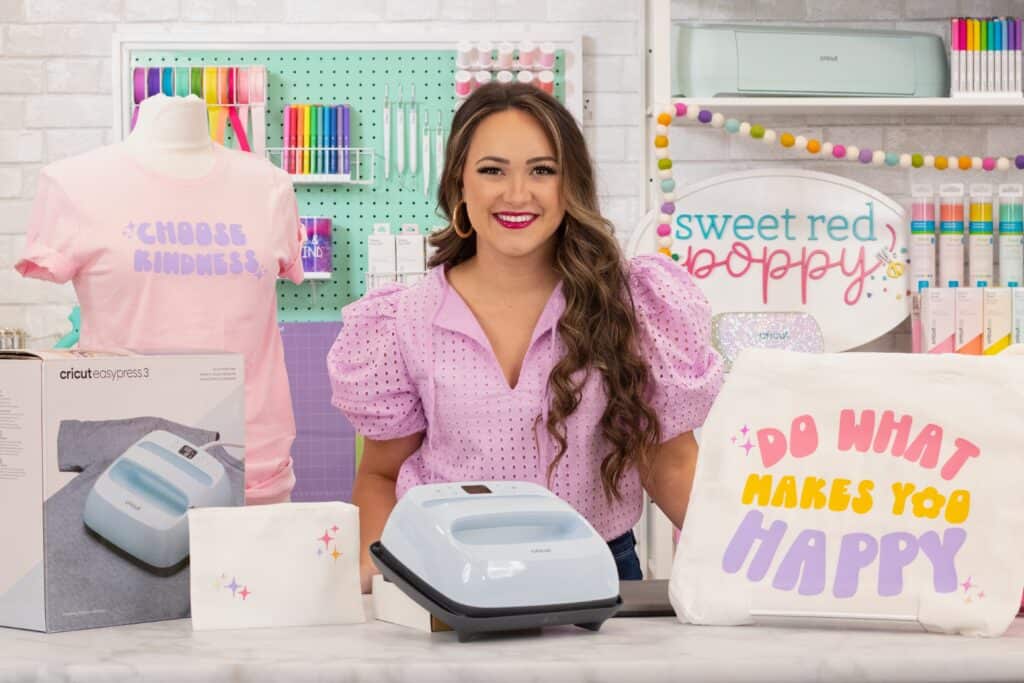
The EasyPress 3 has all of the features we love from the EasyPress 2 like consistent heating, temperature control, and an accurate timer. It is now a Bluetooth-enabled heat press that connects to the Cricut Heat app.
Table of Contents
WHAT IS THE CRICUT HEAT APP?
The Cricut Heat app was designed by Cricut to take the guesswork out of creating projects with Iron-On and Infusible Ink by walking you through every single step of the process from preheating your base to peeling away your liner.
What’s great about the Cricut Heat app is it allows you to input your specific base material, the transfer material you’ll be applying to it, as well as the surface you’ll be pressing on.
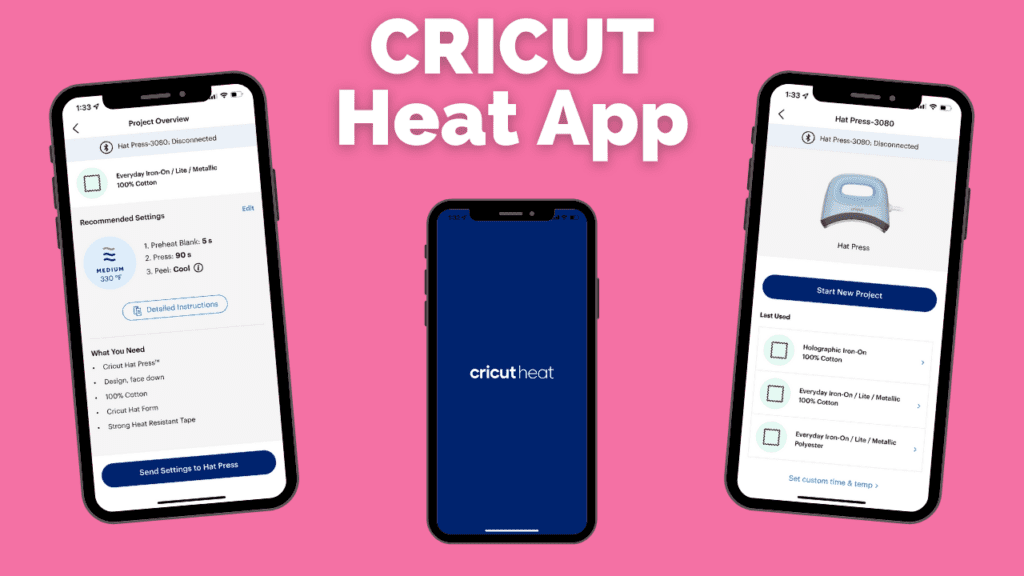
If you haven’t already, go ahead and download Cricut Heat. It’s a free download that can be found in the Apple App Store or in the Google Play Store. You will need to download this app in order to activate the EasyPress 3 and it will ensure you have the latest firmware.
You will need a Bluetooth-enabled Cricut heat press in order to use the Cricut Heat App.
If you don’t have a Bluetooth-enabled heat press, be sure to refer to the Heat Guide on Cricut.com which will tell you the supplies you’ll need for your project, how to prepare your base, the method of application, as well as the best temperate for your specific material.
Click here to get my printable version of the Cricut Heat Guide.
The information is very similar to what you’ll find in the Cricut Heat App you just won’t have access to the automation.
WHAT IS IRON-ON VINYL?
Before we get started on our project, let’s jump into a quick overview of what Iron-On is and isn’t.
Iron-On is typically referred to as Heat Transfer Vinyl within the crafting community, you’ll also hear it shortened to HTV. Cricut's HTV is branded as Iron-On.
If you’re not familiar with Cricut’s Iron-On Vinyl, It's a heat-sensitive adhesive that can be applied to fabric, metal, paper, and wood. It also comes in a wide variety of colors, patterns, and types such as SportFlex, Patterned, Glitter, Holographic, Foil, Mesh, and Smart Iron-On.
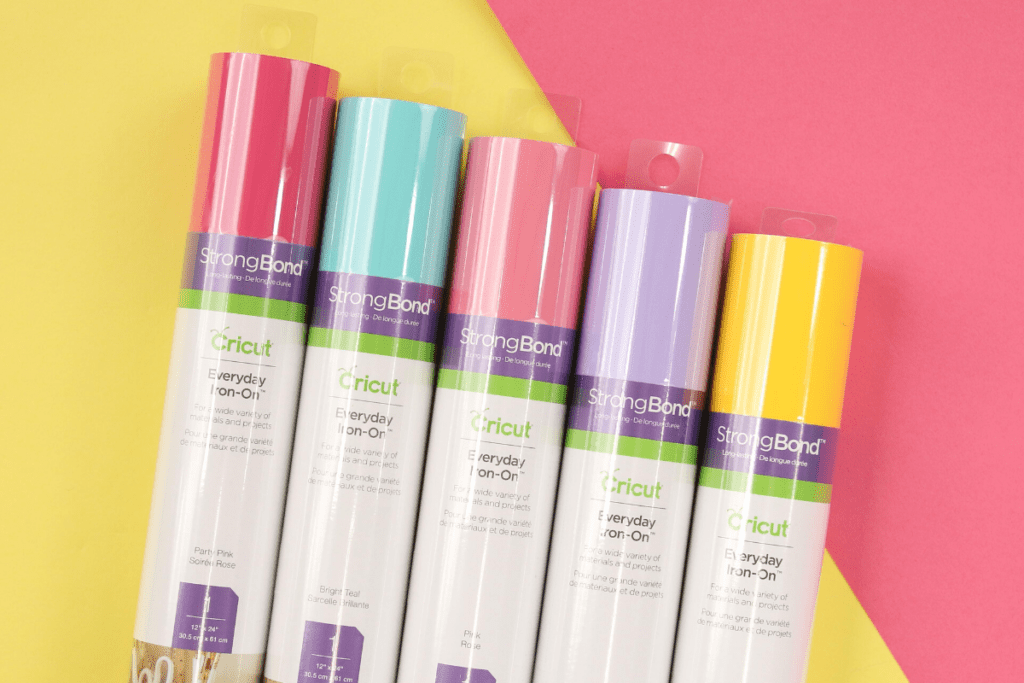
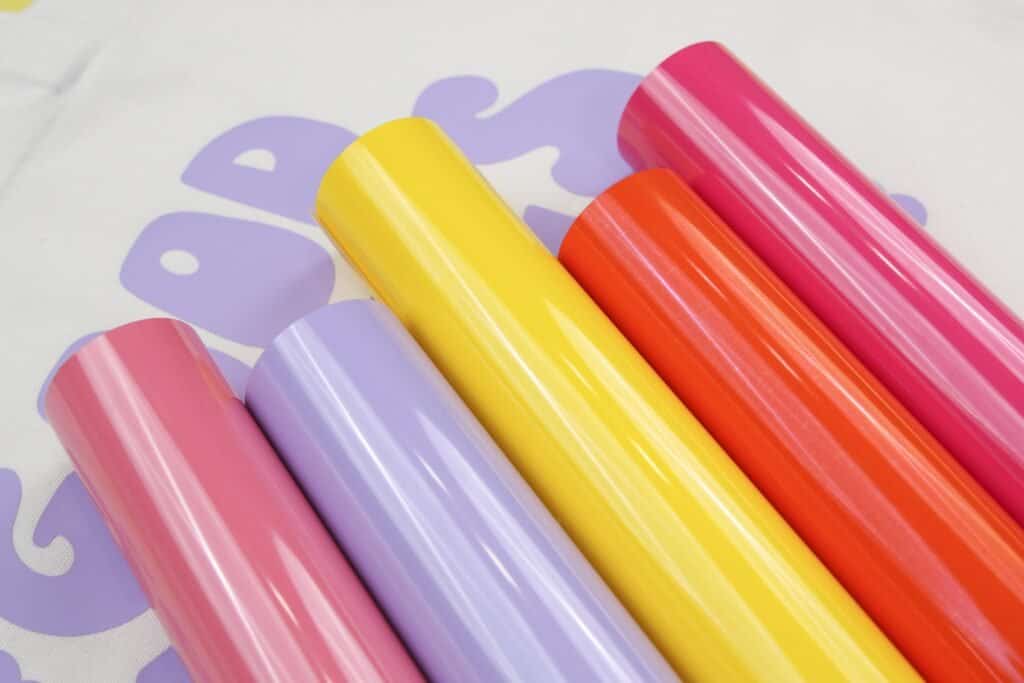
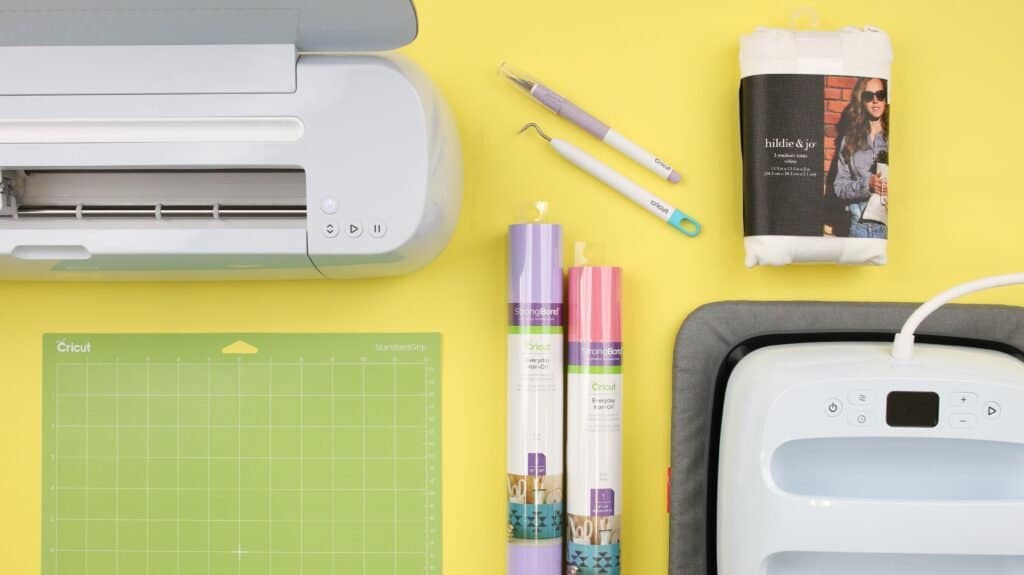
The most popular Iron-On is Everyday Iron-On (pictured above). It’s versatile and durable; comes in a variety of colors and it's user-friendly. It’s my go-to material for the majority of Iron-On projects. Look for the purple StrongBond label.
This material can be used to layer as the base layer, top layer, or even both. Just look at all of those pretty colors. The possibilities are endless!
Iron-On Vs. Adhesive Vinyl
Inevitably you're going to run into Adhesive Vinyl at some point if you haven't already.
If you're just getting started with Cricut, knowing the difference between Iron-On and Adhesive Vinyl and when to use each kind can be a little bit tricky!
They are packaged almost exactly the same and while they may appear similar, the two are NOT interchangeable.
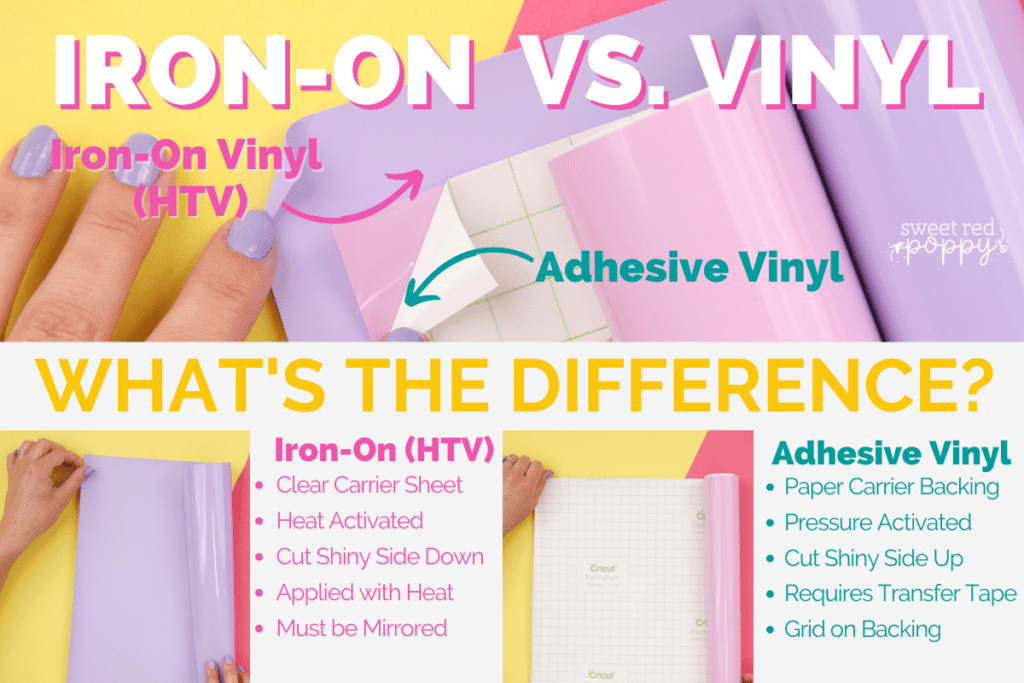
I've created a visual guide (below) to help you spot the differences and tell them apart!
Iron-On Vinyl
Heat Transfer Vinyl or Iron-On has two layers.
The first layer is a clear liner called the carrier sheet, this is a heat-resistant plastic that can withstand high temperatures of heat without melting. This is what protects your Iron-On from burning.
The second layer is the actual Iron-on. When you look at it from the matte side, you're seeing the back of the Iron-On or the unactivated adhesive side. You’ll notice it’s not sticky yet and it requires heat in order to be activated and applied to a base.
Heat Transfer Vinyl & Iron-On are not the same as Adhesive Vinyl!
Adhesive Vinyl
Adhesive Vinyl also has two layers.
The first layer is the actual Vinyl material. This is what you cut and apply to a variety of non-porous bases like glass, walls, and plastic.
The second layer is the carrier sheet which is also referred to as the paper backing. This layer is peeled away to reveal the sticky adhesive of the vinyl material.
How to Spot the Differences
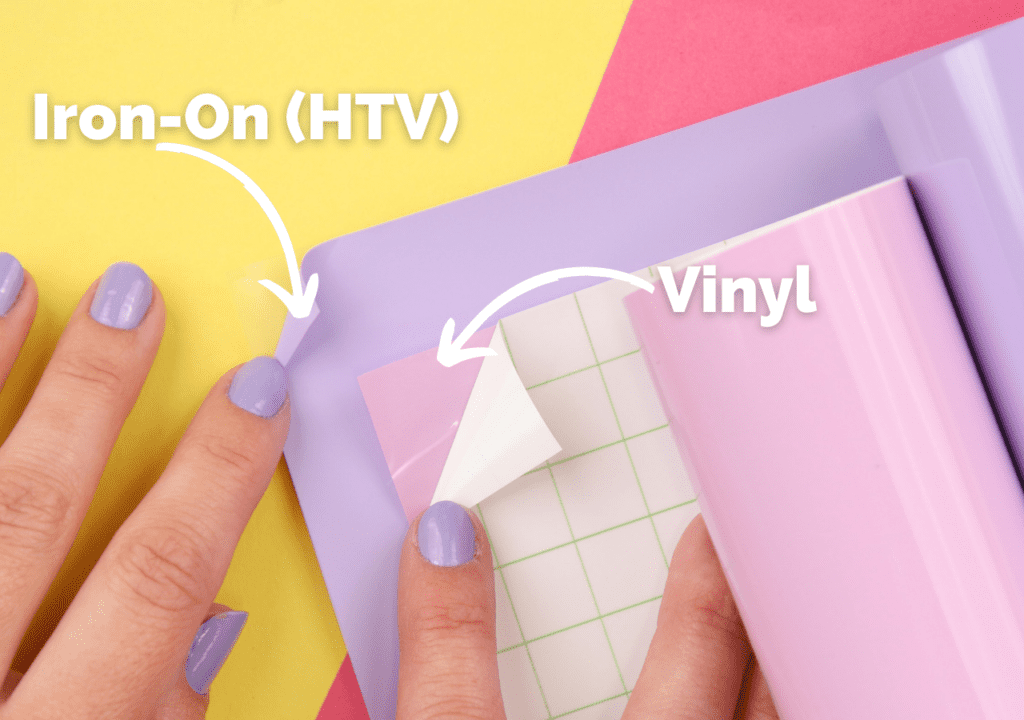
A quick way to tell Iron-On Vinyl apart from Adhesive Vinyl is to pay attention to the liner/carrier sheet.
Adhesive Vinyl has a backing that is peeled away to reveal a sticky adhesive, it may even feature a grid-like pattern to help you make straight cuts.
Iron-On Vinyl on the other hand has a clear, shiny protective carrier sheet that's used to protect the Iron-On from heat during the application process.
Now that we’ve covered the basics of Iron-On let’s jump right into our tutorial!
I’m going to be using Everyday Iron-On, but feel free to try out whatever kind of Iron-On catches your eye!
IRON-ON SUPPLIES
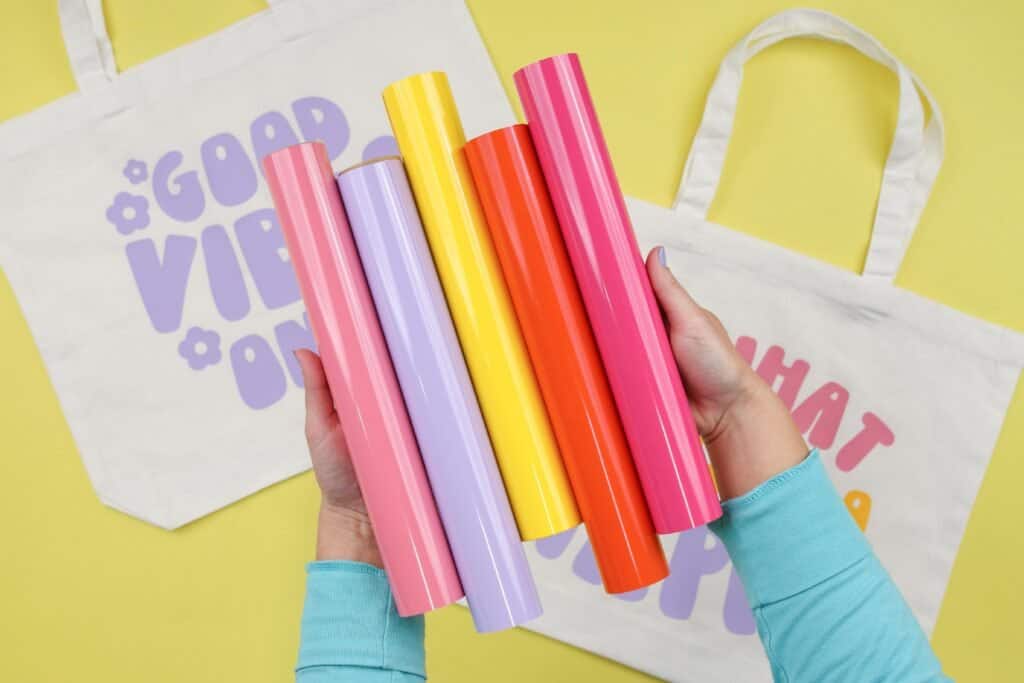
- Cricut Everyday Iron-On Vinyl (Use Everyday Iron-On If You are a Beginner)
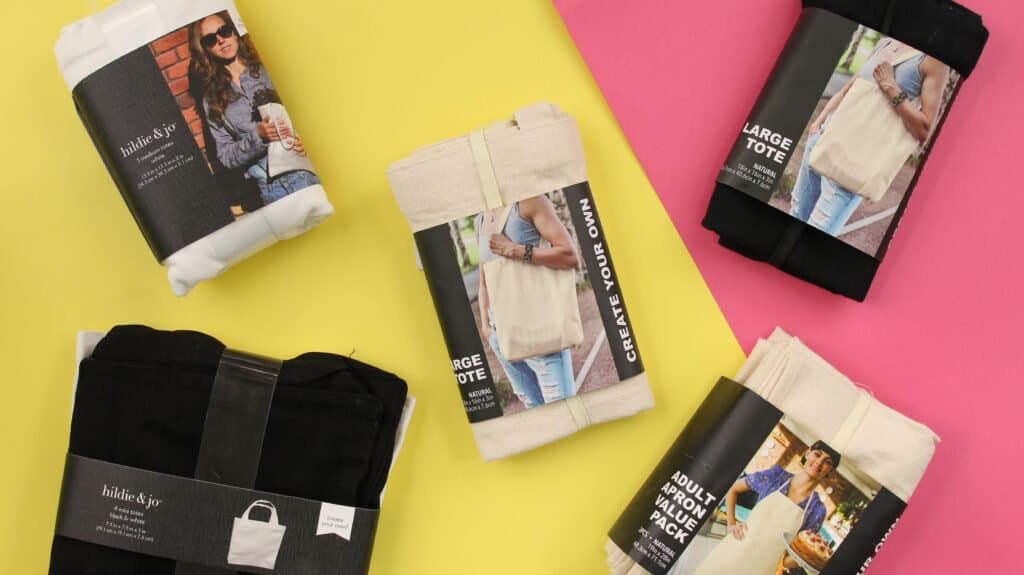
- Fabric Base (T-Shirt, Tote Bag, or Apron)
- Cricut Machine (Cricut Joy, Cricut Explore, or Cricut Maker)
- A Green Standard Grip Mat
- Cricut EasyPress
- Cricut EasyPress Mat
- A Weeding Tool
- A True Control Knife
CLICK HERE TO DOWNLOAD 10 FREE SVG FILES

Looking for even more free SVG files? Click here to view all of my free files.
Need a little extra help? I've provided a step-by-step video just in case you're a visual learner! Sometimes it really helps to see things in action. 😉
As you’re watching the video, feel free to craft along with me. Pause the video after I’ve given the instruction for the step so you can complete it yourself. Unpause the video once you’re ready for the next step.
WATCH THE VIDEO BELOW!
This tutorial is broken down into 7 easy to follow steps. Each step is clearly detailed in text and shown in action through photographs.
Throughout the tutorial, you'll find my Cricut *PRO TIPS marked in bold. These are tried and true tips I've gained as I've taught tens of thousands of students how to use their Cricut machine.
Let's get started!
STEP ONE: CREATE YOUR IMAGE IN DESIGN SPACE

To get started on your project, go ahead and open up Cricut Design Space. This can be accessed from your phone, tablet, or computer.
I’m going to be working on Design Space from my laptop computer. If you’re using a tablet or phone it may look slightly different. But you’ll have the same functionality.
Click on the + sign to create a new project.
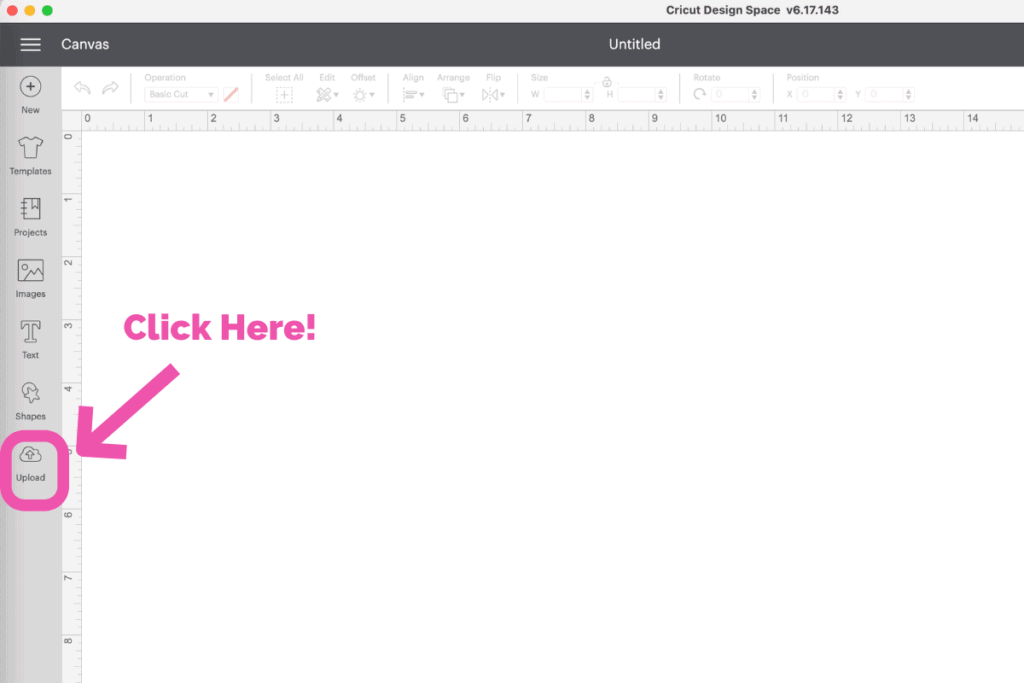
In the Design Panel on the left, select "UPLOAD” from the bottom of the menu.
Click "UPLOAD IMAGE” and then click "BROWSE" to find your file or you can drag and drop the file.
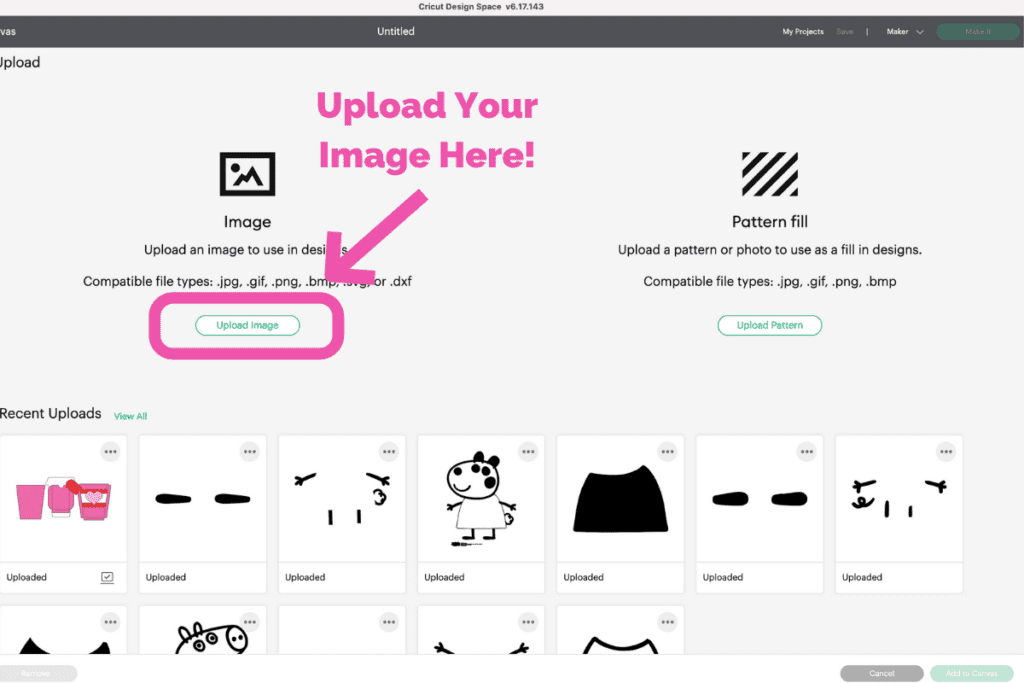
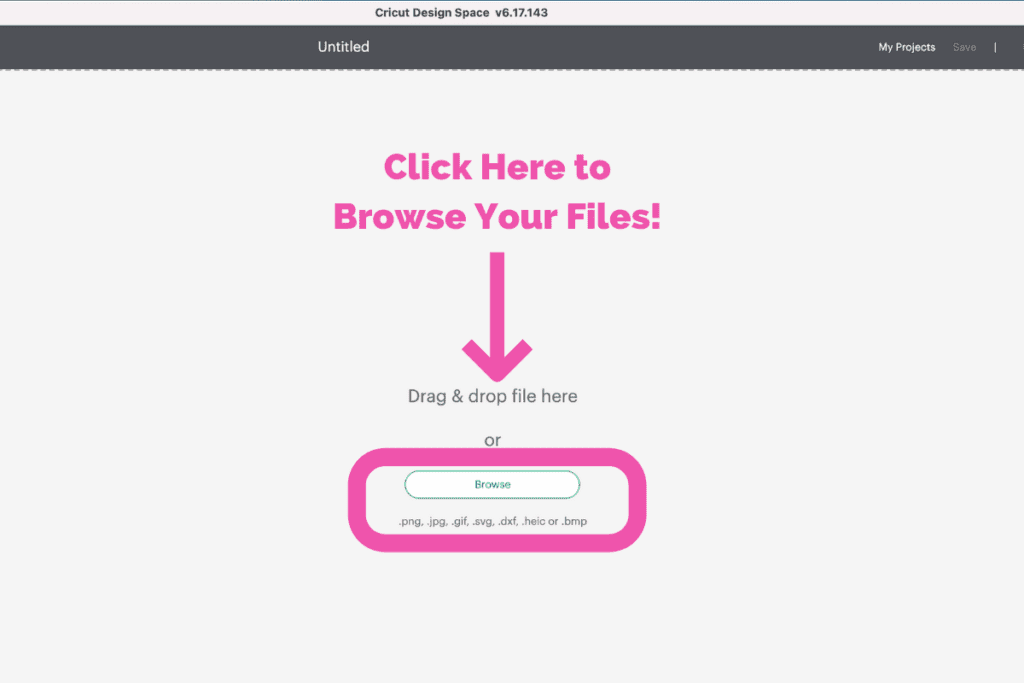
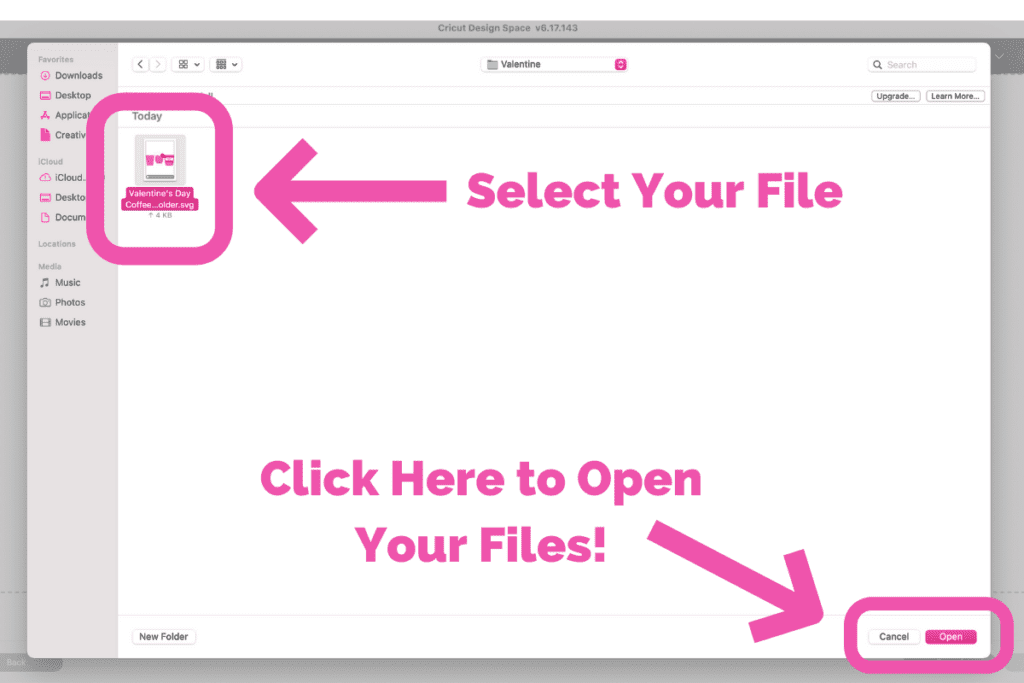
Once you navigate to the file on your device click "OPEN" to add it to Cricut Design Space.
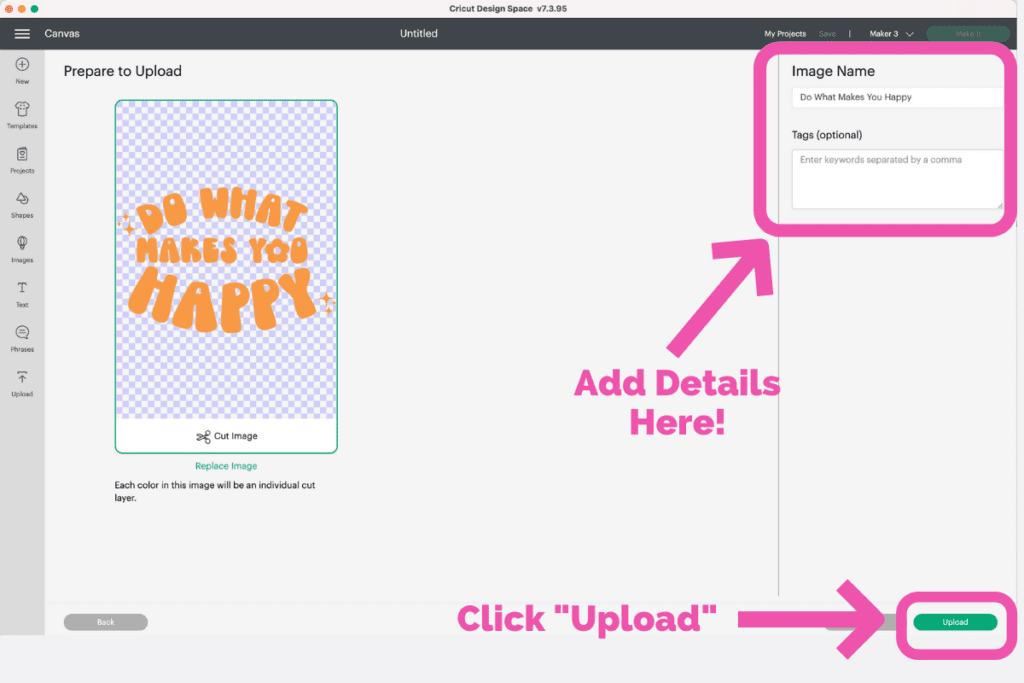
On the “PREPARE TO UPLOAD” screen, you can change the name of the project and add tags which can make it easier to find your image in the future.
Go ahead and click "UPLOAD" at the bottom of the screen.
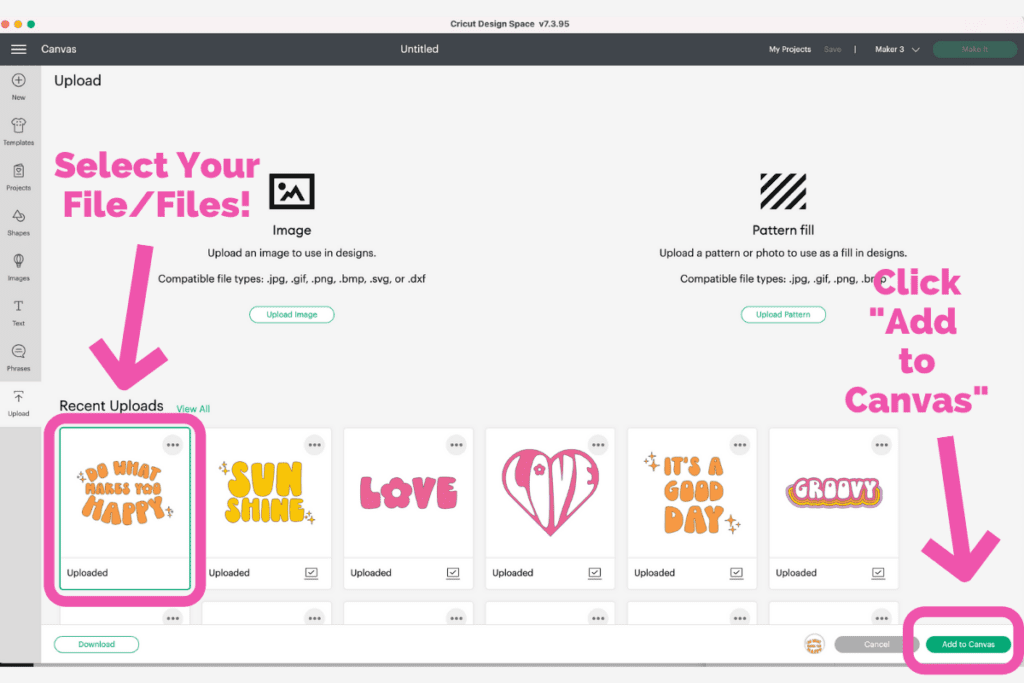
Once you have the file uploaded, select it from your “RECENT UPLOADS” and click “ADD TO CANVAS” to bring it onto your canvas.
In the top right-hand corner make sure that your experience is being optimized for your specific machine. This will change the options Design Space gives you based on your machine's capabilities.
Next, adjust the size of the design to fit your t-shirt, apron, or tote bag.
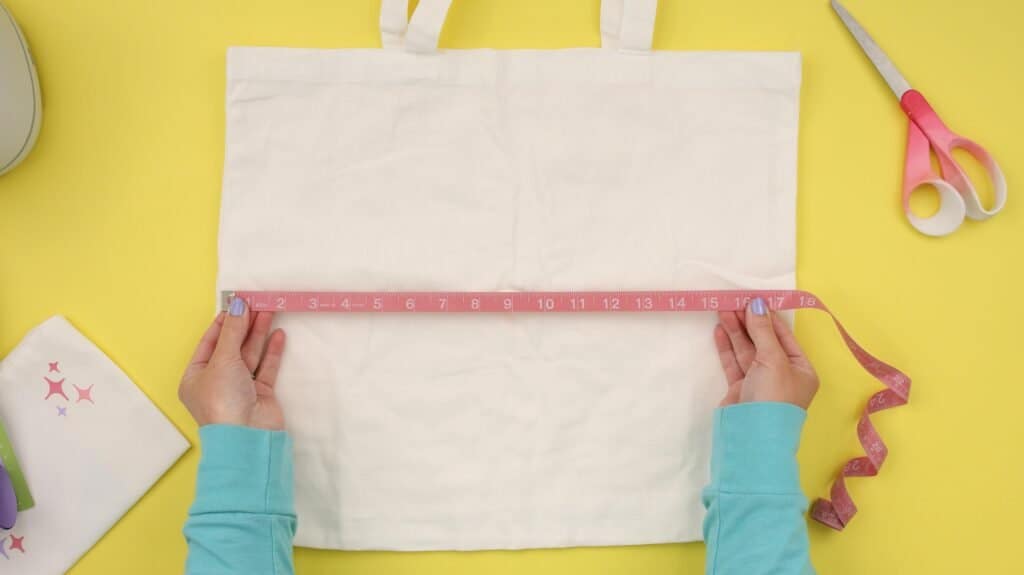
If you’re making a tote bag or apron, use a flexible tape measure to measure the area you would like your design to cover. I always recommend keeping the design a few inches away from any seams for the best results.
For this tote that measures 18" wide, I'm going to size my design to be 11.5" wide.
Not sure how large your design should be? Download my free t-shirt placement guide that will help you to size your image perfectly.
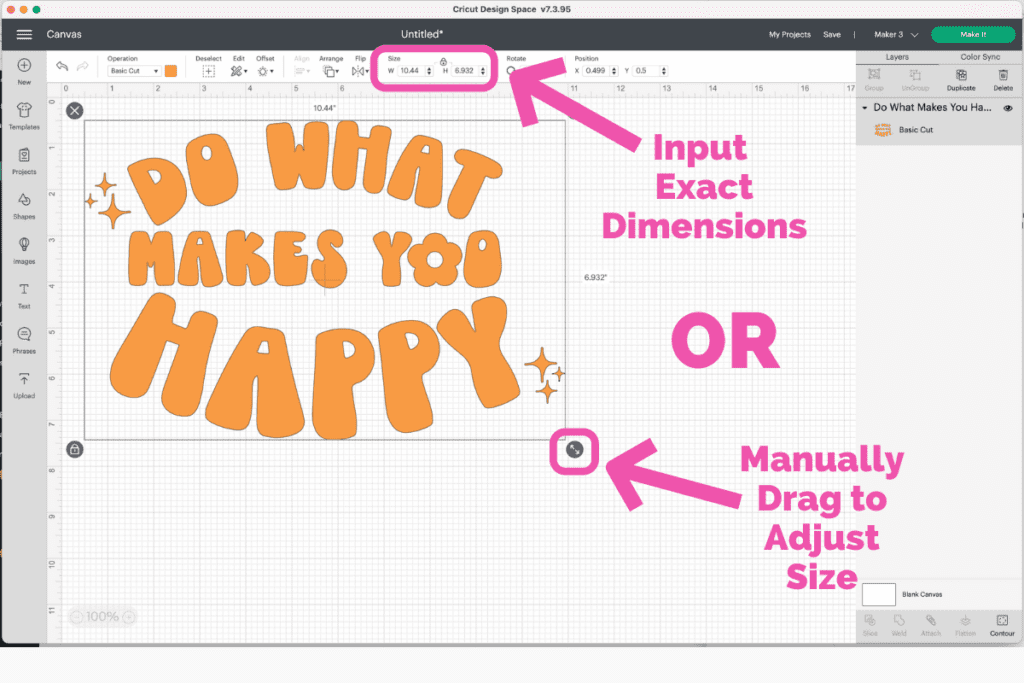
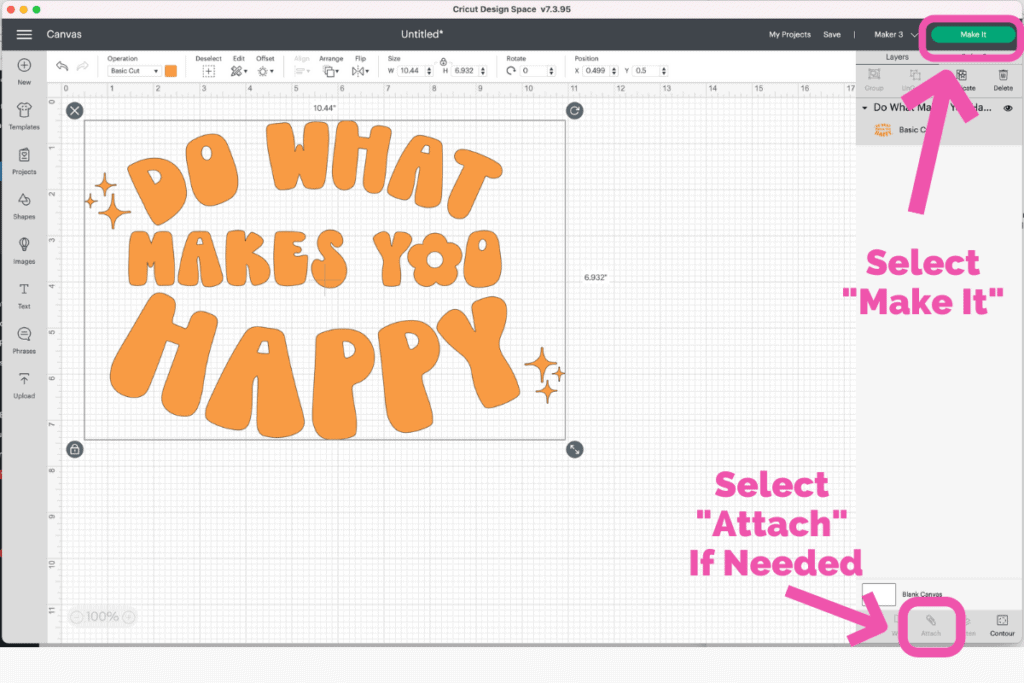
If your design has multiple elements, select the entire image and select "ATTACH" in the bottom right corner. This keeps everything lined up and spaced correctly when you go to cut it, making it easier to transfer.
If your image is composed of different parts and you don’t attach it, it will look jumbled up on the next screen and your spacing will not stay intact. This is Design Space’s attempt to save space by placing each item as close together as possible.
Once you have your design ready, click “MAKE IT” in the top right-hand corner to view the preview screen.
PAUSE because this next step is REALLY important!
Something that’s unique about Iron-On is that it needs to be cut as a mirrored image. This is because the back side of the material is being cut instead of the front. Mirror your image by toggling on the “MIRROR” button.
If you don’t do this, your image will be reversed when you iron it onto your base. I’ve made this mistake before and it’s not fun!
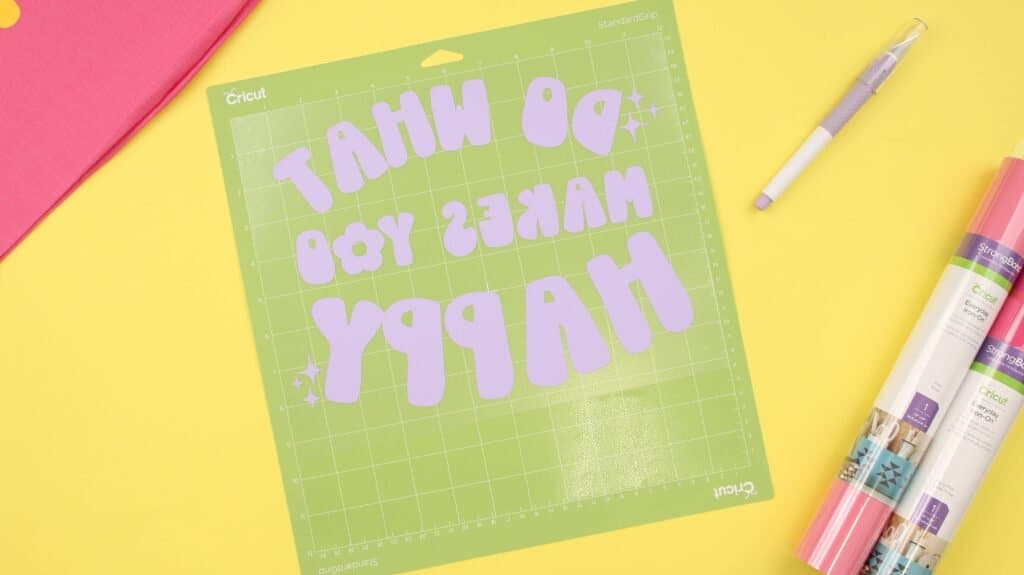
Before you cut, double-check that your image is mirrored. It will appear backward on the cutting mat preview, which is exactly what we want to see!
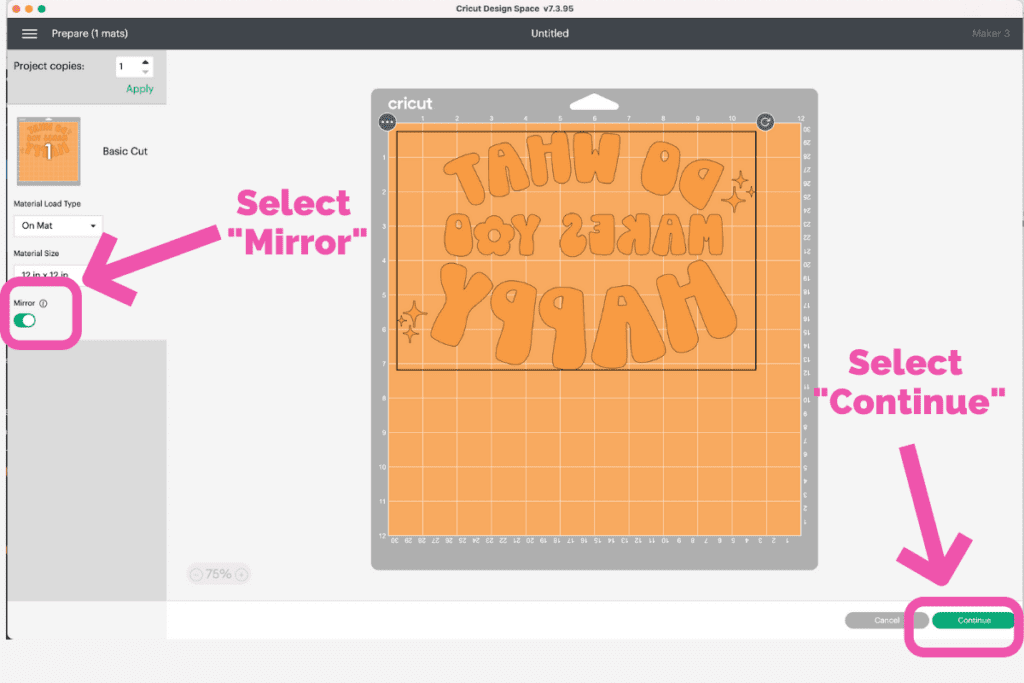
After clicking continue, the screen is going to prompt you to connect your machine. Make sure that your cutting machine is turned on and either connected to your device via Bluetooth or a USB cable.
Next, you’ll be able to select the material you are using. For this project, I am using Everyday Iron-On.
To find materials quickly, you can use the search bar. If you use this material frequently, go ahead and save it as one of your favorites so you can easily access it later on.
*PRO - TIP My personal preference whenever I cut material is to set the pressure to more. I would rather it cut through a little bit of my clear lining than not cut all the way through my Iron-On.
This is also helpful if you’re not using a brand new blade. A dull blade will require more pressure to cut through materials than normal.
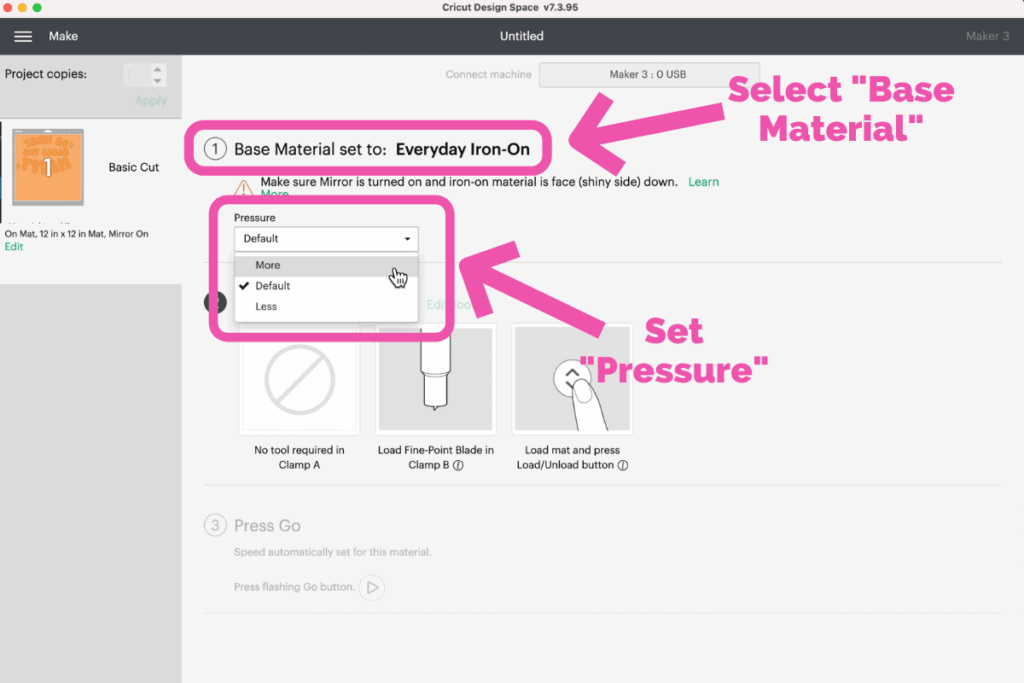
Whew! That was a lot of steps! Not to worry though, once you get used to this process it actually goes by quickly. Soon you'll be flying right through these screens without any need for direction.
STEP TWO: PREPARE, LOAD & CUT YOUR IRON-ON MATERIAL
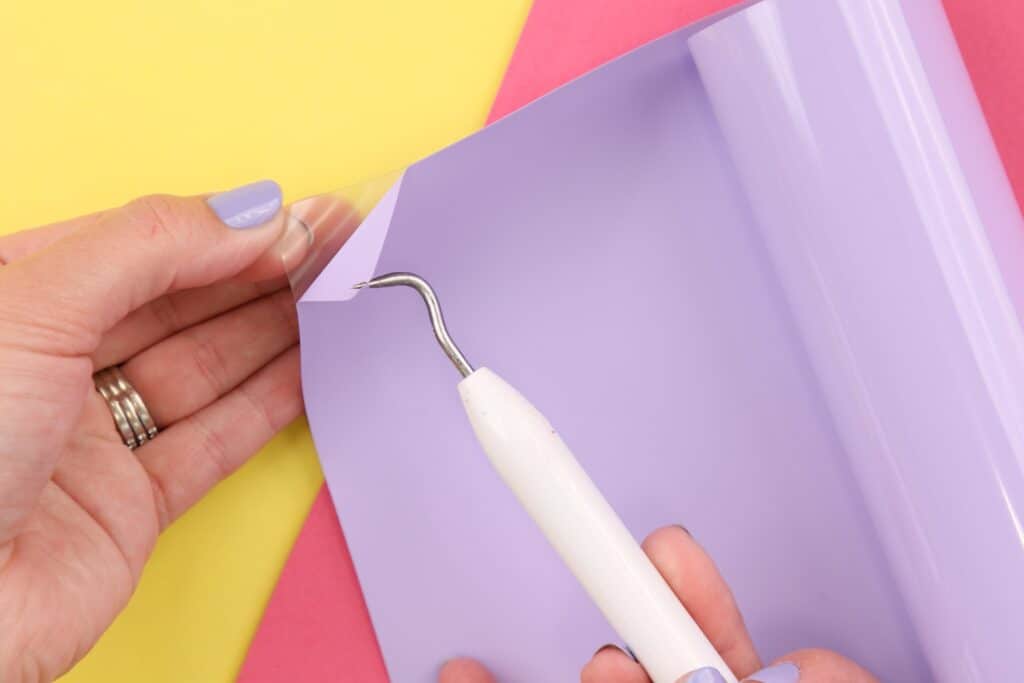
You’ll notice that there are two different sides to your Iron-On; a shiny side, and a matte side.
The shiny side is the protective carrier sheet side. This is what is going to protect your Iron-On when you are ironing it onto your shirt. The backside is your Iron-On material which is what you want to be cutting into.
(Looking for more information about this? Scroll back up to the top where I cover this in-depth.)
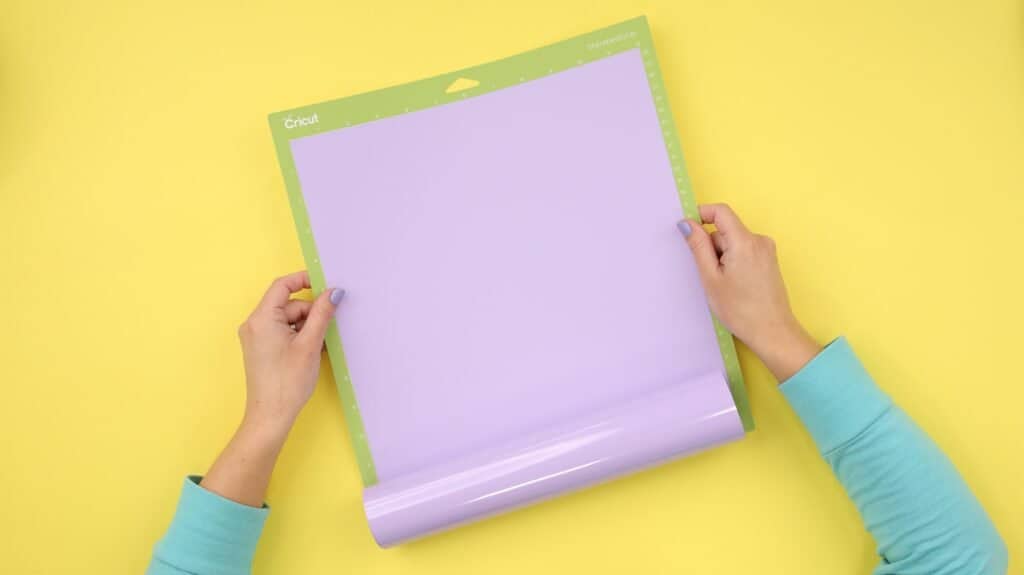
Remove the clear liner from the Cricut Standard Grip Mat and place the shiny carrier face down on your Cricut mat. The matte Iron-On material should be face up.
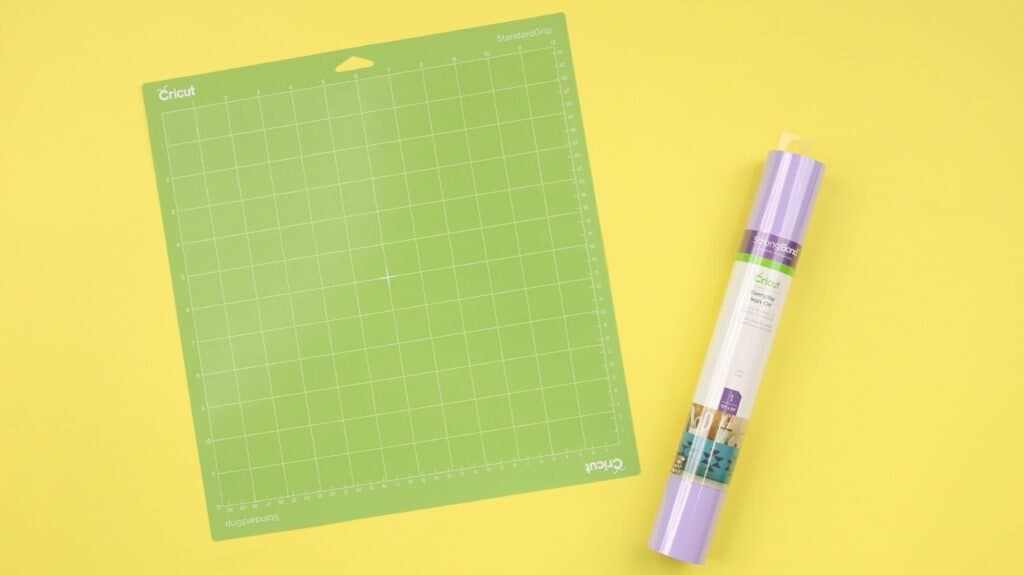
Line up the material using the top left corner as a guide. Make sure to firmly adhere it to your mat and smooth out any bubbles. Having good adhesion is an important part of the cutting process.
*PRO TIP: If you’re using an older mat that has lost its adhesive you can always tape your material down along the sides of your mat with painter's tape or washi tape for a little extra security. Make sure the tape doesn’t cover the area you will be cutting.
Your Cricut should be loaded with the fine point blade. I like to double-check that my blade is clean by pushing down on the plunger and gently blowing away any debris that may have collected on the tip.
Next, insert your mat into your machine by sliding it under the white guides and pressing the “LOAD” arrow button.
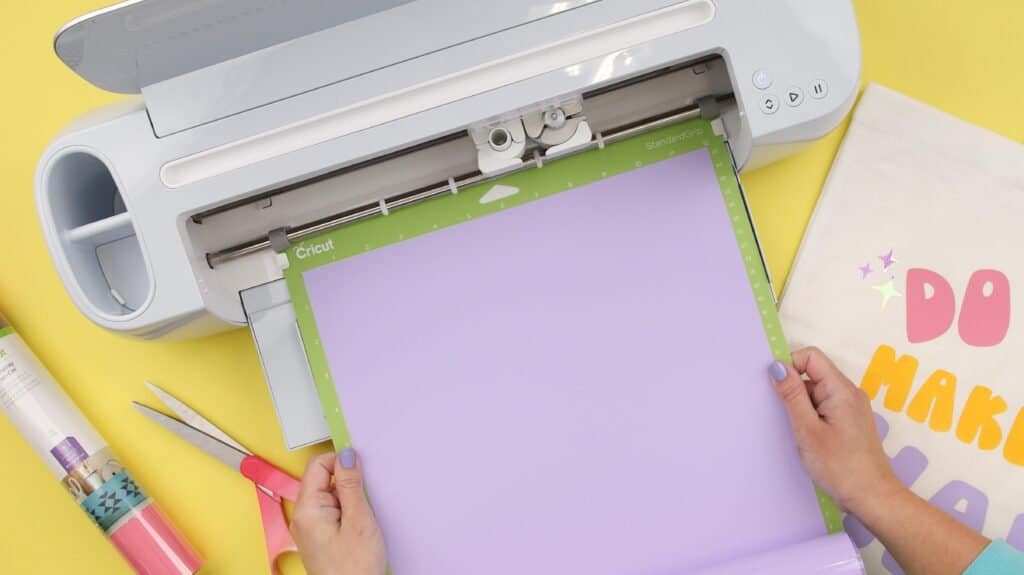
Press the blinking “PLAY” button (if you’re using an older model this will be a “C”) and your Cricut will begin its cut. Design Space will count from 0 - 100% to let you know how far along you are in the cutting process.
Your machine will now perform what's referred to as a "Kiss Cut" this means it will only cut through the Iron-On Vinyl and not the clear carrier sheet.
Before you unload your mat, double-check that the Iron-On material has been cut all the way through. Trust me, there is nothing quite as frustrating as finding out your material didn’t cut all the way through and wasting a piece of material.
To do this, you can use your wedding tool to remove one of the negative pieces of vinyl that you don't want to transfer to your base. The inside of a letter like o, d, or e is a great piece to remove to double-check this.
*PRO TIP: If it hasn’t cut all the way through you can always send your material back through for a second pass by clicking the “C” or "PLAY" button. Unfortunately, you won’t be able to do this if you’ve already unloaded your mat because the cut will be slightly off-centered after reloading it.
Once it’s finished cutting and you’re happy with the result, press the “ARROW” button to release your Cricut Mat.
STEP THREE: WEED YOUR IRON-ON TRANSFER DESIGN

Now it's time to start weeding your project. The next step can be done a few different ways and it really comes down to your own personal preference.
I like to weed my transfer while it’s still on the mat because it’s secure, and it prevents my material from shifting around or curling up.
To do this, remove all of the Iron-On that you do NOT want to transfer to your project.
First I’m going to use my Cricut True Control Knife to carefully cut away the material that I didn’t cut into. I like to save any excess material that way I have as little waste as possible.
I’ll add it to my scrap binder and I can pull it out for a project later on and utilize the Snap Mat feature.
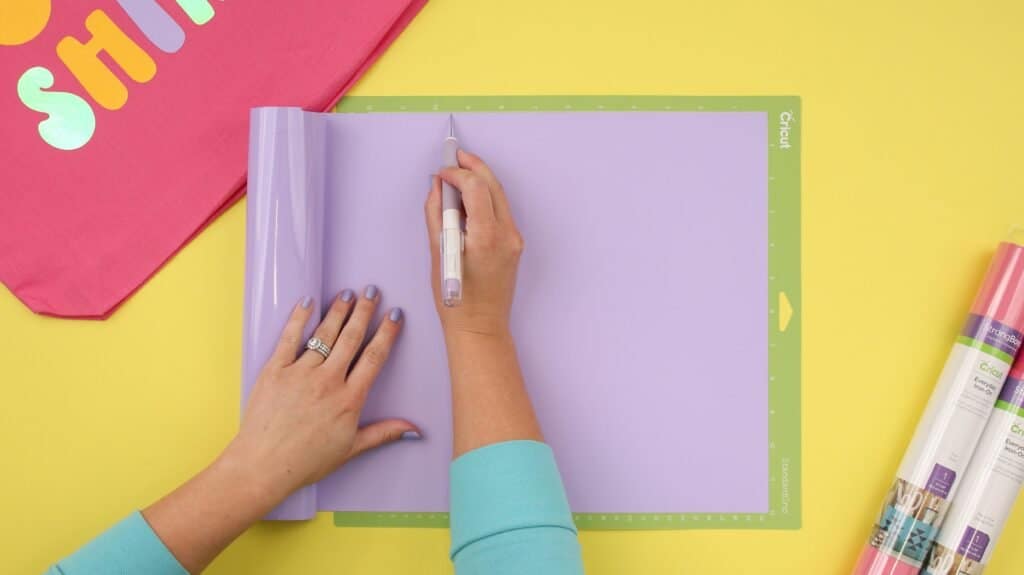
Make sure to cut with enough pressure to cut through your material without cutting into your mat. Once that’s done, you can gently peel away the excess material or leave it in place.
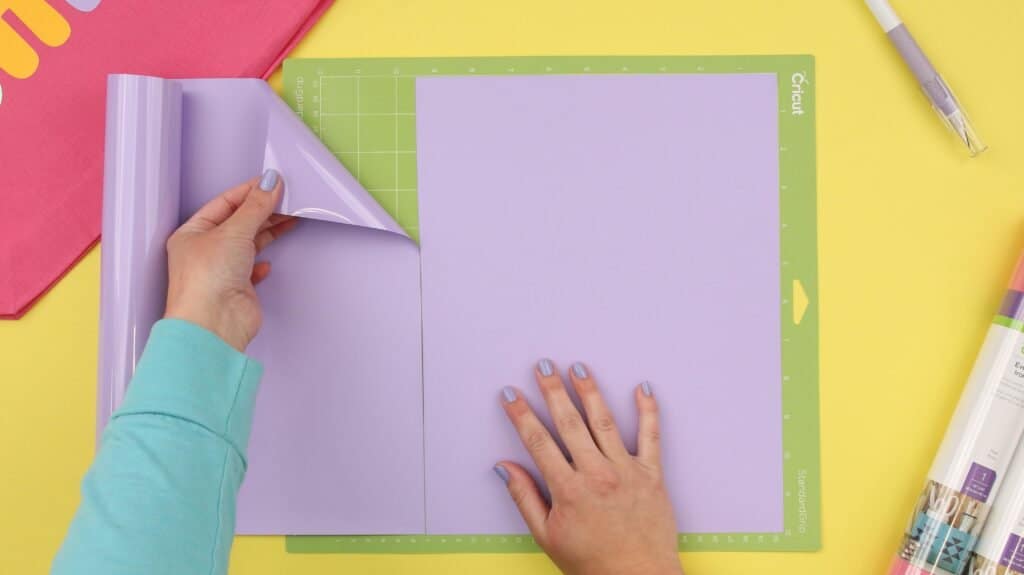
Now it’s time to weed!
You can use your weeding tool to make it easier to pull the Iron-On away from the backing.
To do this, press the tip of the weeding tool into the Iron-On without piercing through the clear protective liner and hook the Iron-On. Gently peel the Iron-On away from the clear carrier sheet.
Once you have the corner up, It’s best to use a 45-degree angle to slowly pull the excess Iron-On away from your project, being careful not to rip anything in the process.
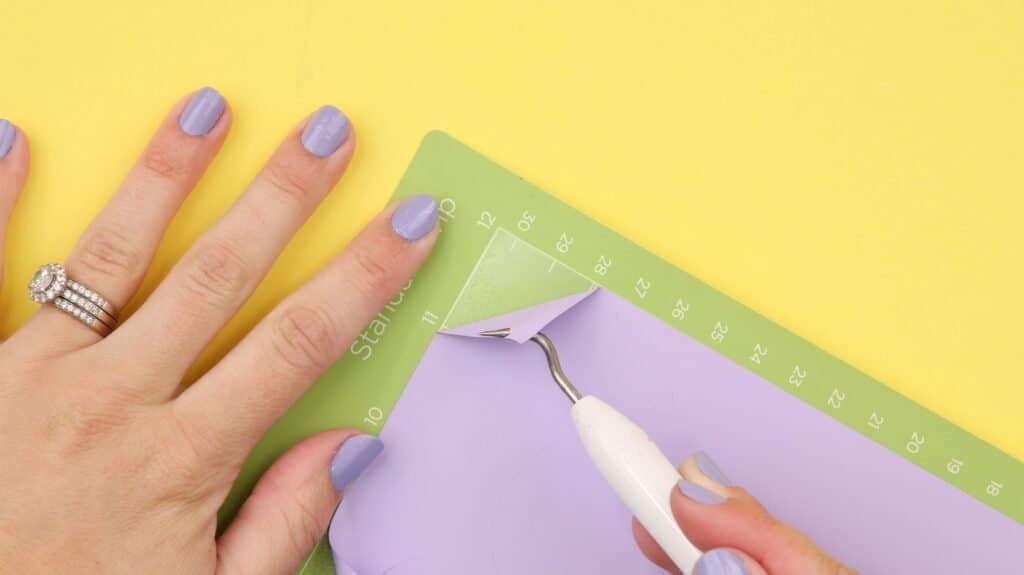
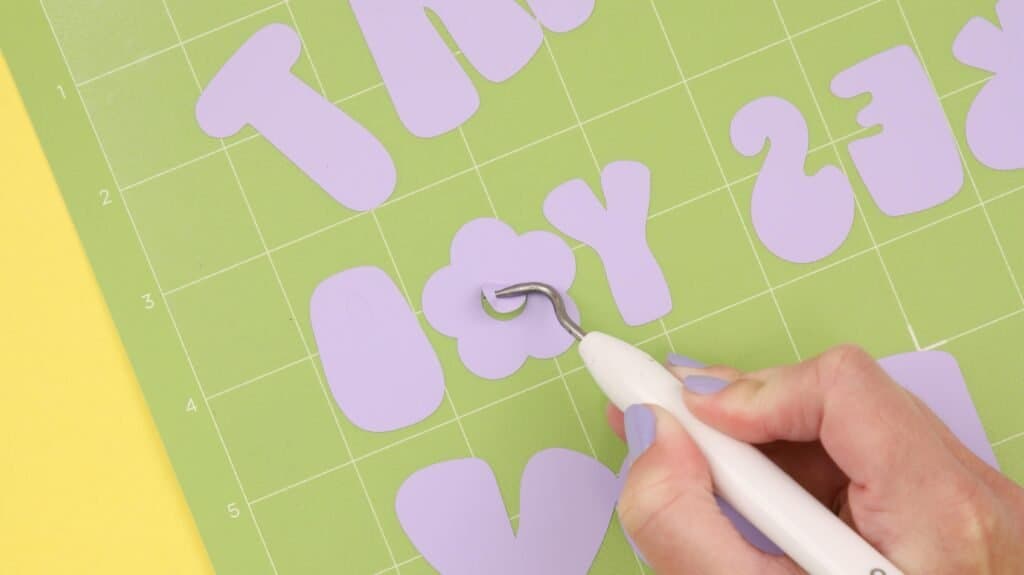
For the more intricate parts of the design like the insides of letters, use your weeding tool to pierce the Iron-On Vinyl and then peel it away from the carrier sheet.
*PRO TIP: Be sure to remove and immediately discard these small pieces from your design. Rogue pieces of Iron-On have been known to sneak back onto the carrier sheet and ruin a design. Don't say I didn't warn you!
Can't quite see where to weed? Remove the carrier sheet from the mat and hold it up to the light or use a lightbox. The light will illuminate the design by shining through the cut lines, making it easier to see.
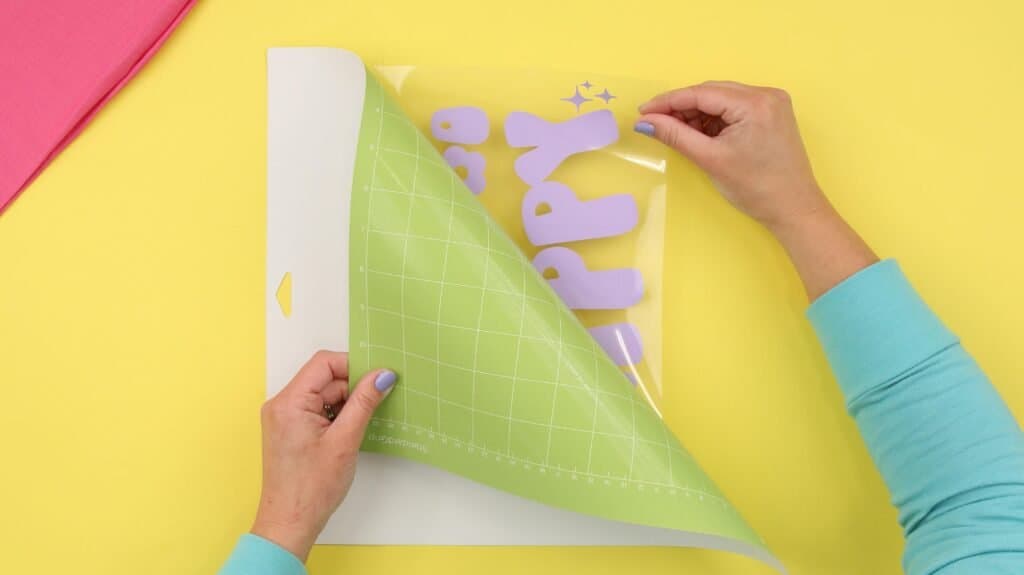
*PRO TIP: Flip your mat right side facing down and gently peel the mat away from the design instead of peeling the Iron-On away from the mat.
This prevents your design from rolling up, creasing, or bubbling; all of which can negatively affect your transfer. And don’t worry, Cricut mats are designed to be able to bend without cracking.
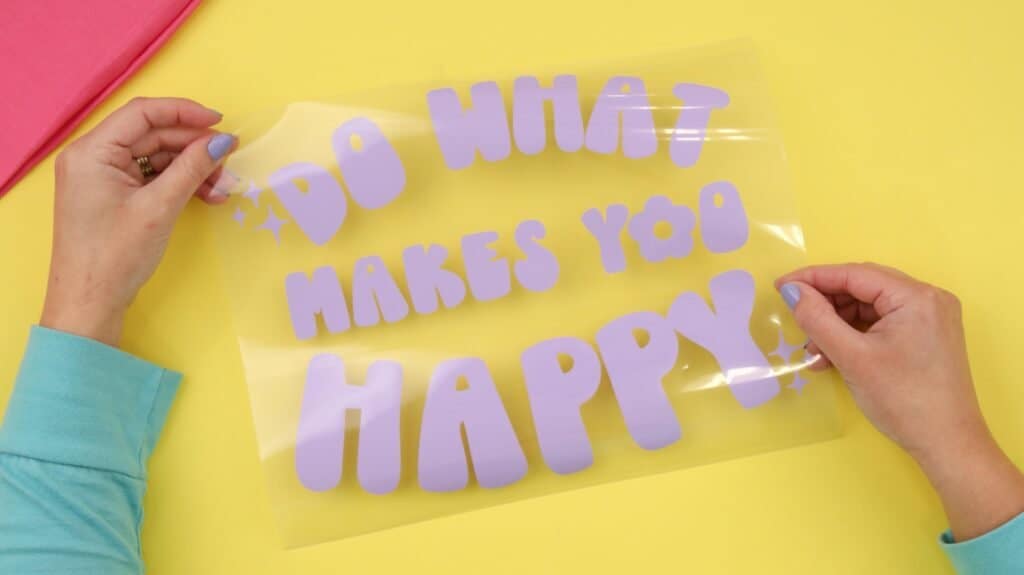
Flip over your design to make sure everything looks perfect from the front protective carrier side.
This is the time to see if you weeded everything correctly or left the inside of a letter behind, I'm looking at you O, A, and P. If you have any extra pieces of Iron-On hanging around be sure to remove them now.
Ensure your material has been cut correctly as a mirrored image. If your letters read backward, it means you didn’t mirror the image and you will need to cut it again.
STEP FOUR: CONNECT YOUR EASYPRESS 3 TO CRICUT HEAT

Now that your design is ready to go, it’s time to heat up your EasyPress. Plug your EasyPress into an outlet and press the power button to begin preheating.
I love that the Cricut Easypress rests in a downward position in an insulated safety base which protects both your surface and hands from any heat.
It also features a large handle which makes it easy to maneuver. The sides of the EasyPress are heat-free so you don’t have to worry about accidental burns. After 10 minutes of inactivity it will shut off, so you can craft without worrying.
If you are using the EasyPress 3 pull up the Cricut Heat App.
If you are using the earlier versions of the EasyPress that are not Bluetooth enabled refer to the Cricut Heat Guide.

I also have a printable Iron-On guide that will tell you exactly what temperature to press your design based on the materials you are using. Click Here to Download the Free Guide
Within the Cricut Heat app, begin by connecting your Heat Press. Then select “START NEW PROJECT.”
Press “SELECT” next to Transfer Material to find the material you will be applying to your base.
Next, select the base you will be applying it to. If you’re not sure what your base is made out of, you can always refer to the tag for more detailed information.
Select “NEXT” in the top right-hand corner.
This will display a Project Overview that will guide you through the entire pressing process.
A short list of the recommended settings will be displayed with easy-to-read steps.
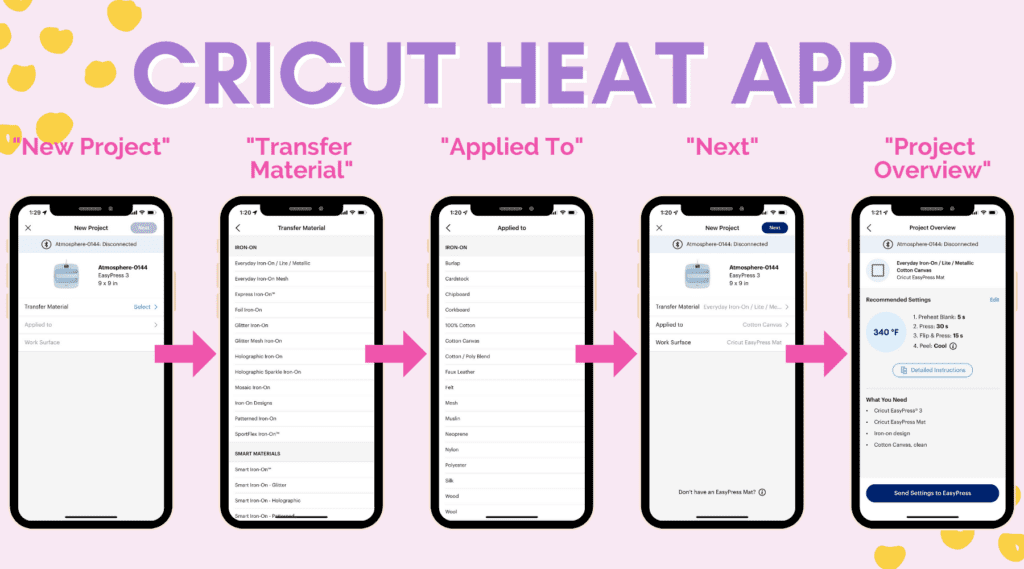
In case you feel like you need additional insight or instructions you can click on “DETAILED INSTRUCTIONS” below for more information. This will provide you with a video as well as images to guide you through this process in more detail.
Go ahead and click “Send Settings to EasyPress.” This is going to preheat your heat press and tell it exactly what’s required for this material and base.
If you’re using the EasyPress 1 or 2 manually enter in your desired temperature as well as time.
STEP FIVE: PREHEAT BASE AND POSITION IRON-ON TRANSFER
While the EasyPress is heating up, It's time to prepare your base and transfer.
Let's begin with the base. Lay your blank base on top of an EasyPress mat.
Now you might be wondering what’s so special about the EasyPress mat?
This mat is an important part of achieving a flawless Iron-On application. It has a durable cover that provides even heat distribution. Inside, there’s a liner that wicks away moisture from your base to deliver dry heat. It even reflects the heat back to your project which helps to insulate and protect your surface from any heat damage.
Before applying the transfer, it’s important to preheat the blank. This will remove wrinkles and ensure a flat pressing surface. It also removes any possible moisture from the surface which could negatively affect your transfer.
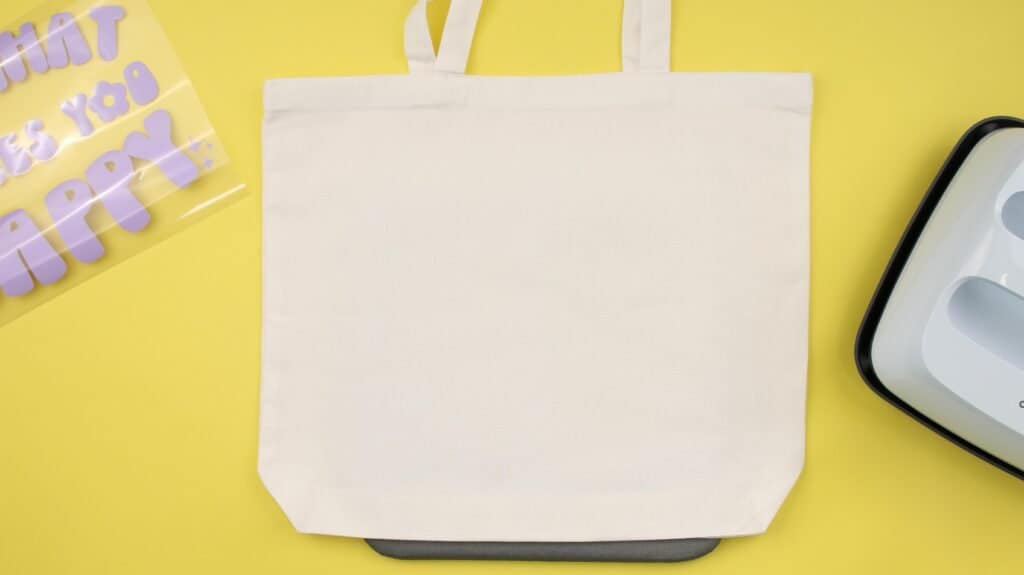
Position the EasyPress and press the Preheat Blank button within the Cricut Heat App for a timed preheat. This is typically between 5 - 15 seconds long. If you have a large base, you may need to do this several times.
For an extra wrinkled base, you may need to lightly spritz it with a spray bottle of water and then press it. Heat alone will not be enough to release deep creases. If you do this, make sure your base is completely dry before applying the transfer.
How to Center a Transfer Perfectly
Nothing feels quite as defeating as putting in tons of work to create a custom t-shirt or tote and ending up with a crooked or off-center transfer. Sadly, I speak from experience yet again. Been there, done that.😭
Now, I’m a bit of a perfectionist when it comes to positioning my transfers. I have a few tricks up my sleeve to help you get professional-looking results and protect you from the dreaded crooked DIY project.
Before applying the transfer, I like to find the center of my base to ensure my design is applied correctly.
These tips can be applied to a t-shirt, tote, and even an apron.
- VERTICAL - Fold the base in half aligning the side, top, and bottom seams.
- HORIZONTAL - Fold the bottom upwards toward the top aligning the seams.
- PRESS - Press along the folded edges to create a light crease
If you’re using a t-shirt the horizontal line should be made by folding the shirt in half right below the armpit seam.
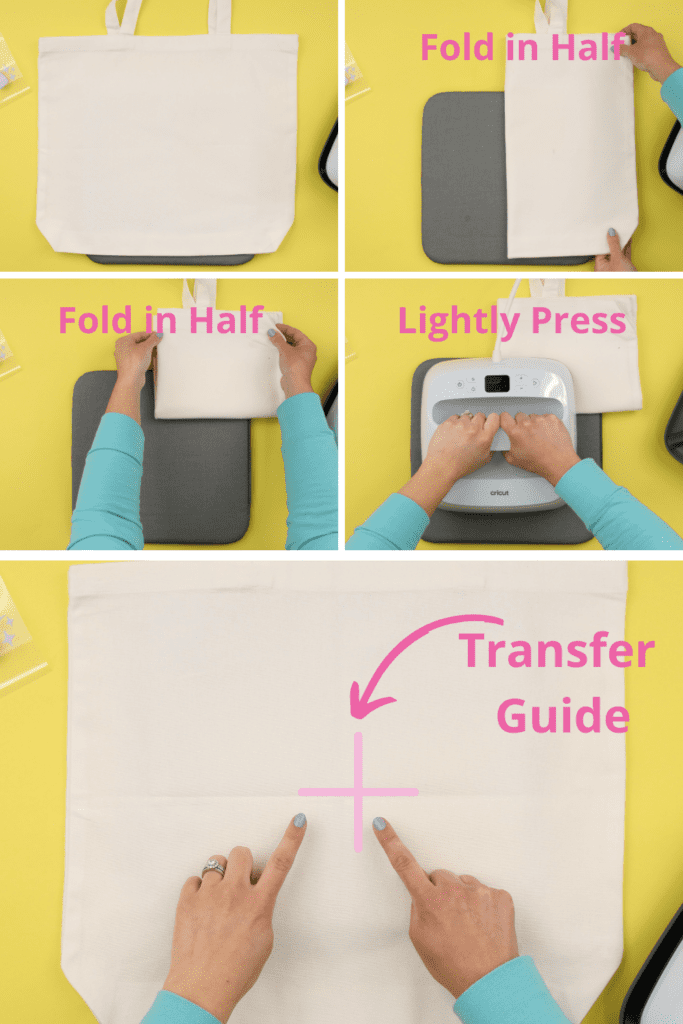
The pressing line should be very faint and just barely visible! A strong crease will interfere with the Iron-On.
This will give you a vertical and horizontal line across the center of your base to use as a guide to position your transfer.
Grab your transfer material and gently bend the carrier sheet in half (shiny sides together) aligning the sides of the design.
Create a small fold line at the top and bottom of the carrier sheet (avoiding the Iron-On material) by pinching the carrier sheet to mark the center.
Open the design and fold it in half horizontally to create another guide.
Be careful not to create a fold in the actual Iron-On material, just the carrier sheet.
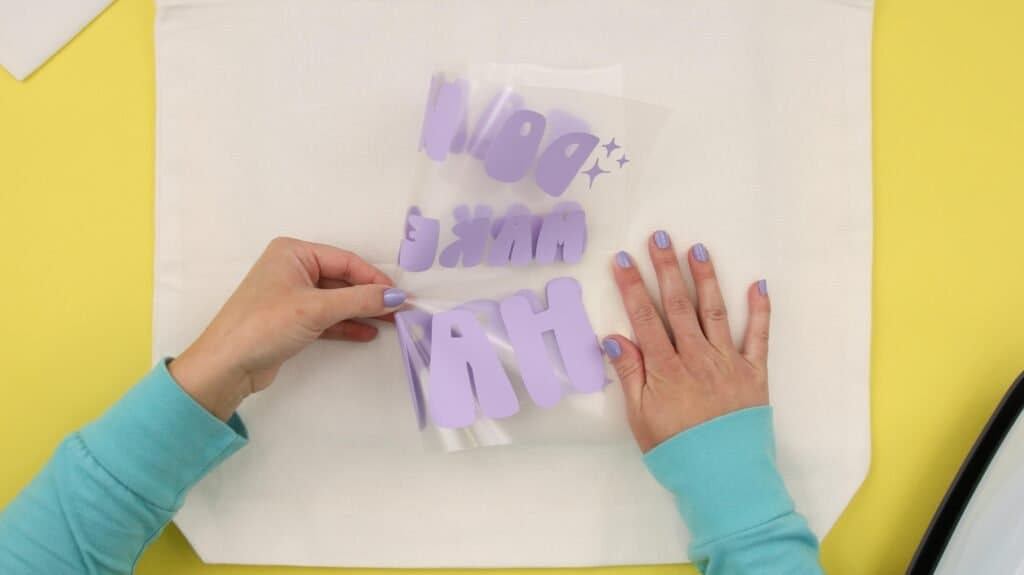
Next, hover the transfer sticky side facing down over the base. Align the horizontal and vertical creases as you lower the transfer onto the base.
The transfer should be placed a few inches away from the seams of your base for the very best results. If you’re using a shirt, it should be at least a few inches away from the neckband of the shirt. Pressing over a seam can interfere with the transfer because it prevents the heat plate from making full contact with the rest of the base.
Press down on the carrier sheet and smooth out the transfer to help it adhere to the base.
If your transfer isn’t staying in place, (sometimes they have a mind of their own) you can always add a few pieces of heat-resistant tape to secure it.
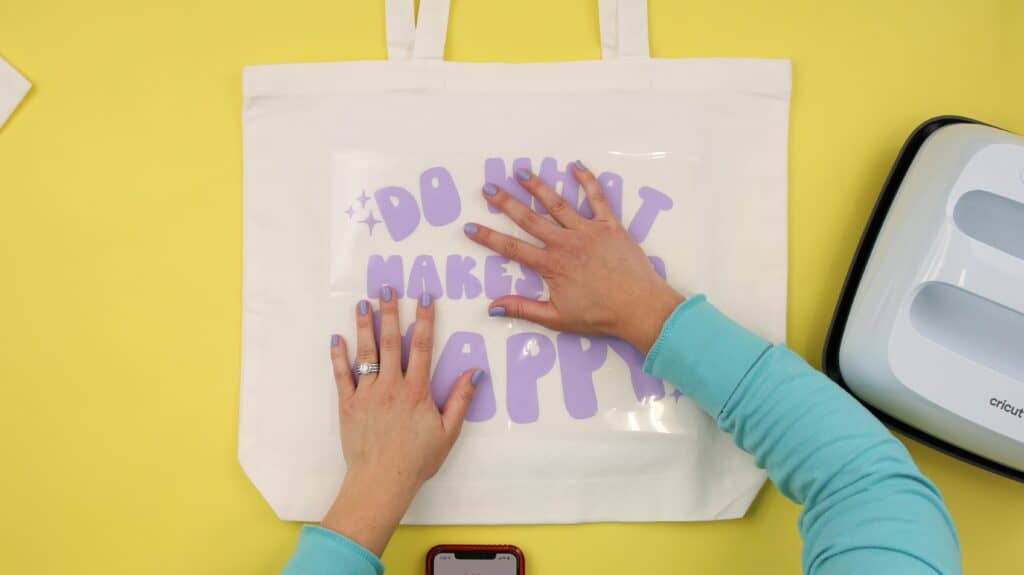
STEP SIX: ADHERE YOUR IRON-ON TRANSFER WITH YOUR EASYPRESS

If you are using the EasyPress 3 refer to the heat app. This will guide you through the next step. If you are using the older model (1 or 2), manually enter in your amount of time as well as your heat setting if you haven't done so already.
Place the EasyPress over your design.
If possible, cover your entire design with your EasyPress, if it is too big for your Easy Press to cover, you can press the transfer in sections. Press the Iron-On for the recommended amount of time, then switch to next other section slightly overlapping the area being pressed.
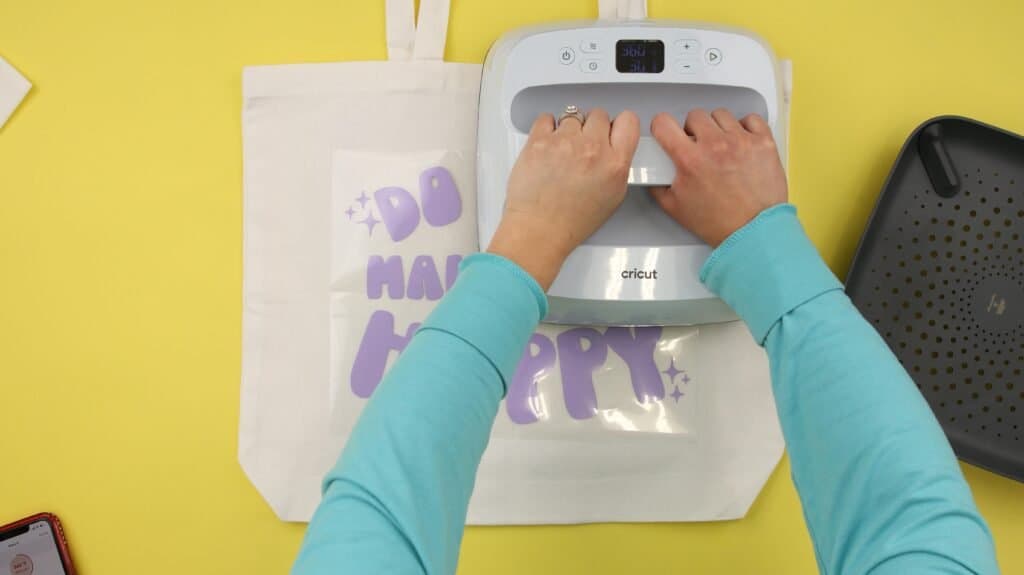
Start your press by either clicking the timer on the EasyPress.
Apply pressure to the base as directed by the Heat Guide or the Heat App. The amount of pressure will depend on the material you are using as well as the base you’re adhering to.
Most cotton materials will only need the light pressure of one hand, while thicker bases like wood or even canvas may require two hands to achieve medium pressure.
After completing the press, flip your base over, position it on the mat, and press from the back.
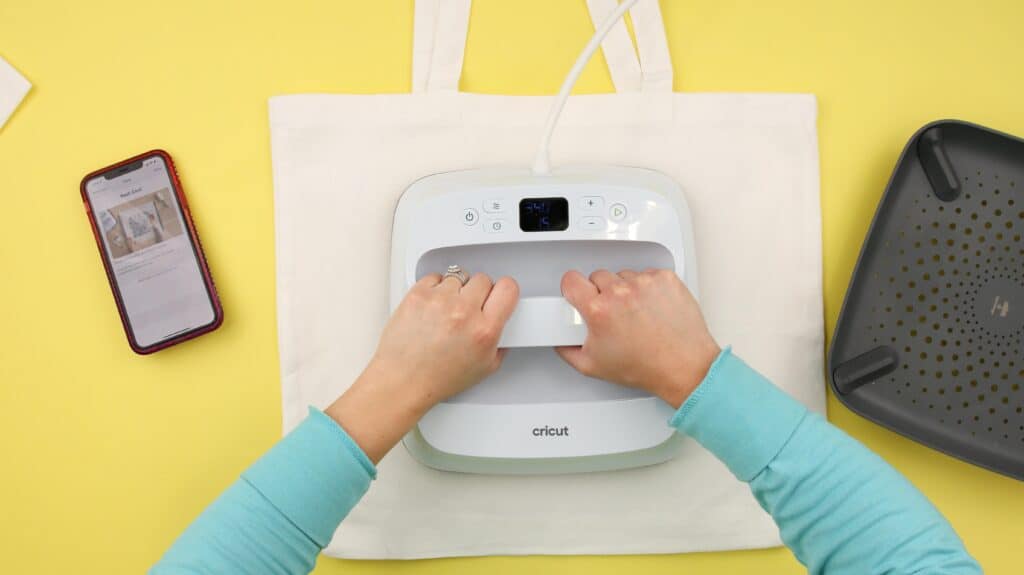
This is typically a shorter press and it ensures that your design completely adheres to the base. Again, refer to the Cricut Heat Guide or the Heat App for your specific timing based on your materials.
Once your press is complete, set your EasyPress back into its insulated base, but don’t turn your press off just yet.
STEP SEVEN: REMOVE CLEAR LINER TO REVEAL YOUR FINISHED DESIGN
Flip your base back over so the transfer is facing upward. It's time to peel away the carrier sheet.
But wait, not too fast! Did you know that different types of Iron-On can require either a cool or warm peel?
If your Iron-On is a warm peel, allow the design to cool for about 10-15 seconds before peeling off the carrier sheet.
If it is a cool peel wait 1-2 minutes, or until your design is completely cool to the touch before removing the carrier sheet.
Now I know you might be excited to remove your carrier sheet right away, but trust me on this. If it says cool peel wait until it cools, if you remove the liner too early the design will not transfer completely.
Again, I learned this lesson the hard way and hopefully, I can prevent you from having the same experience.
When your carrier sheet is ready to be removed, slowly peel it away from the base at a 45-degree angle. I like to start peeling from the corner of my design. As you begin peeling, check to see if your design has completely transferred.
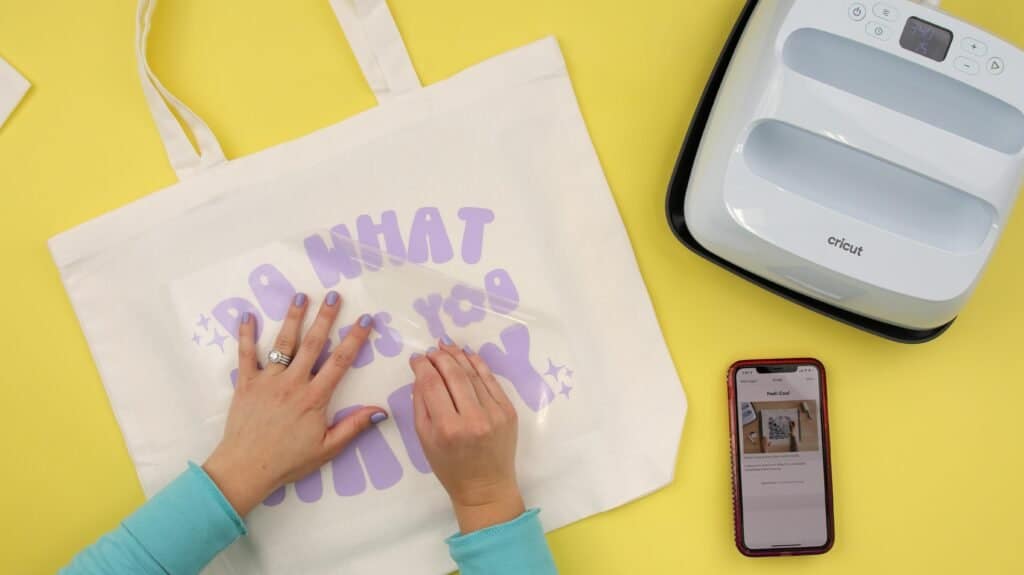
If you peel away your clear liner and the transfer stays adhered to your base you’ve successfully completed your project! You can tell when you have good adhesion because you can just barely see the outline of the fibers of your fabric showing through the Iron-On material.
If you have any lifting, meaning the Iron-On is still attached to the clear liner, stop peeling the carrier sheet away from the base immediately and lay it back down into its original position.
Here’s an example of what it might look like if your transfer hasn’t adhered all the way.
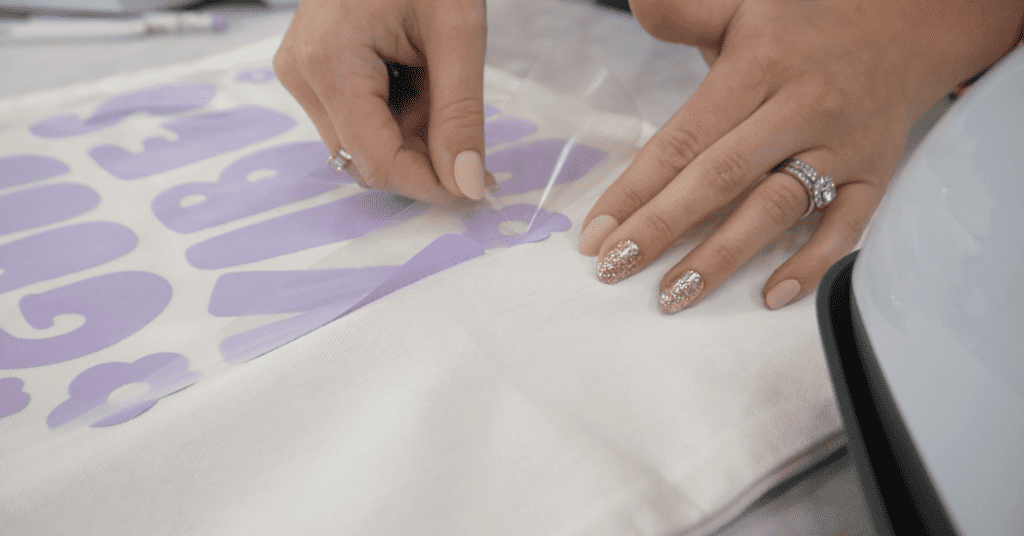
When this happens it can be really frustrating and it happens for a variety of reasons.
- Not using a flat pressing surface
- Seam prevented full contact
- EasyPress wasn't fully preheated
- Press wasn't long enough
- Not enough pressure
However, It’s an easy problem to solve by applying additional heat. Cover the transfer with the carrier sheet and apply 10-15 seconds of additional heat to the front and then the back using the same temperature.
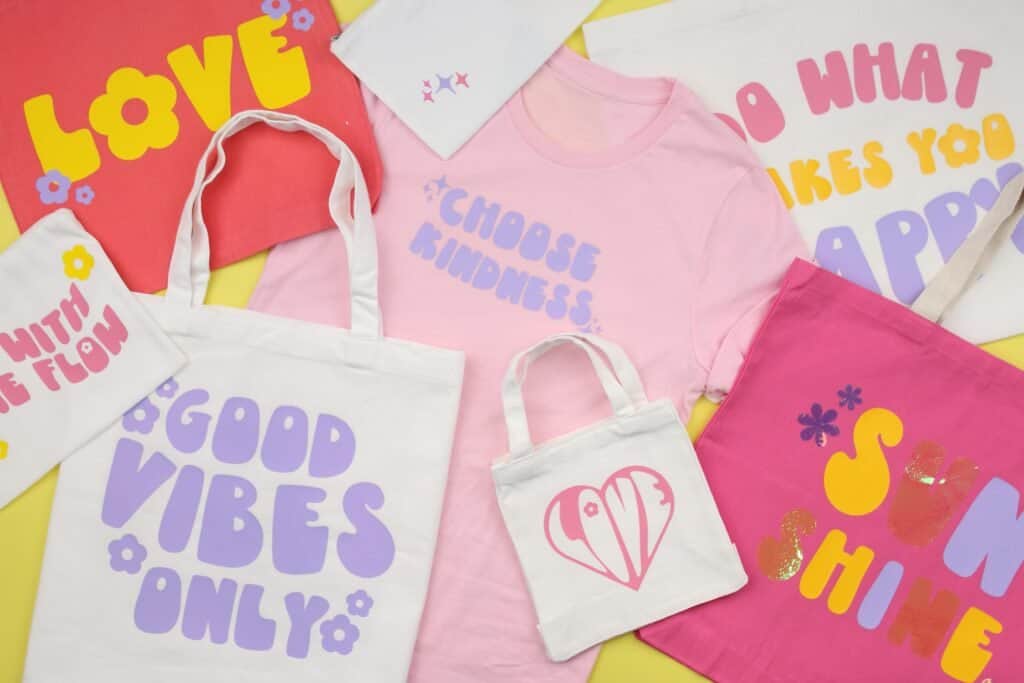
Now you have your own personalized Iron-On project!
Iron-On Care Recommendations
To care for your customized t-shirt, apron, or tote bag, wait at least 24 hours before washing. You’ll want to turn it inside out and tumble dry for best results.
Your project should last for at least 50 washes before showing any signs of peeling or cracking.
On the off chance that it does have any lifting or peeling, cover the affected area with a clear liner and apply additional heat for 10-15 seconds.
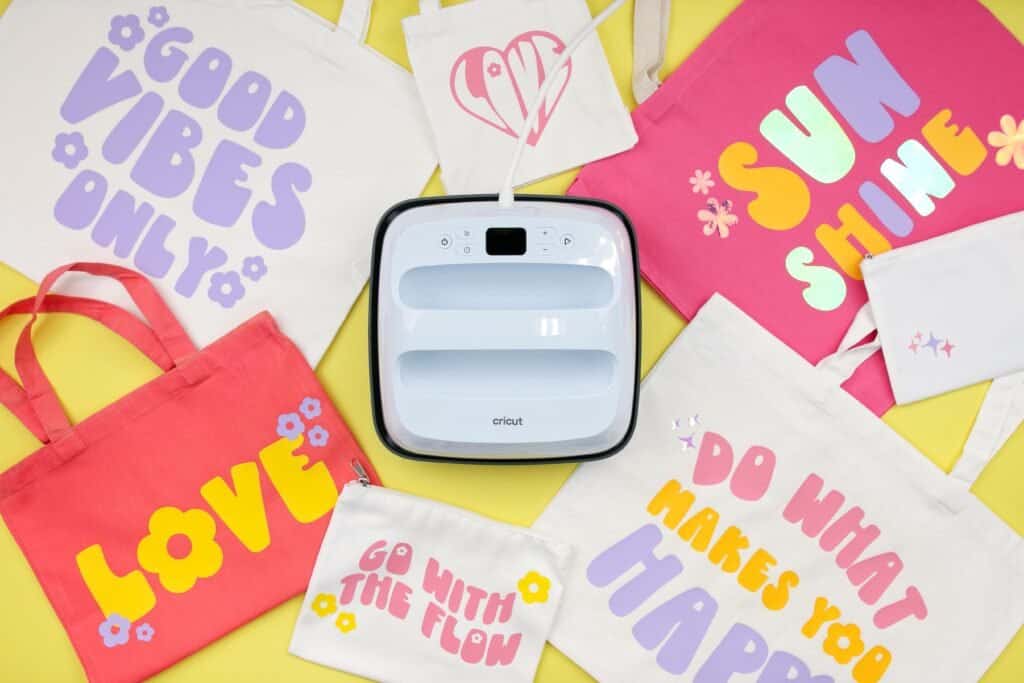
I hope you enjoyed learning all about Iron-On and how to apply it with a Cricut EasyPress 3 and the Cricut Heat App.
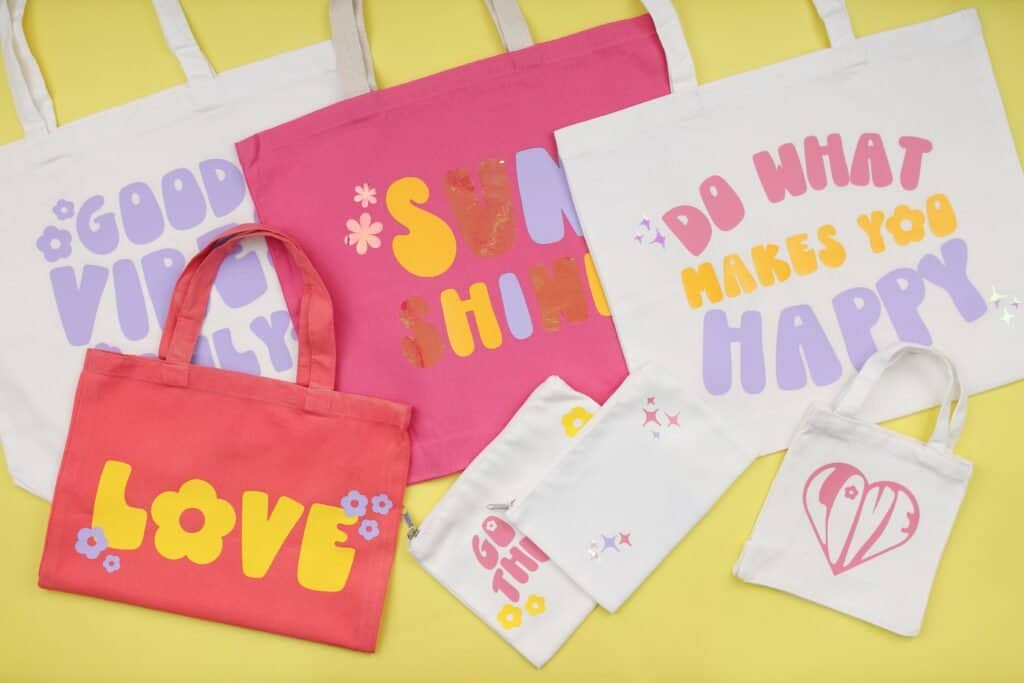
Let me know if you have any Iron-On, Cricut, or EasyPress questions in the comments below!
If you found this post helpful leave me a comment or share it on social media.
Join my crafting and sewing Facebook group where you can show us what you’re making, ask questions, and learn from others!

This was super helpful!! You did a great job breaking down every single step, thank you!
Love these designs - thank you!!
Thanks for sharing. I read many of your blog posts, cool, your blog is very good.
https://accessbridgepharmacy.shop/# AccessBridge
AccessBridge: AccessBridge Pharmacy - mexican pharmacies that ship
Pet Canada Direct: Pet Canada Direct - pet prescriptions online
low cost ed meds [url=http://edmedscoupon.com/#]Ed Meds Coupon[/url] online pharmacy no prescription
Pharm Rate: Pharm Rate - Pharm Rate
http://pharmrate.com/# Pharm Rate
medicine online: pharmacy online - Pharm Rate
overseas online pharmacy https://petcanadadirect.shop/# vet pharmacy
buy ed pills online: erectile dysfunction online prescription - buy drugs online
https://petcanadadirect.com/# Pet Canada Direct
canada pet meds: п»їdog medication online - Pet Canada Direct
Pharm Rate [url=https://pharmrate.com/#]Pharm Rate[/url] online pharmacy without prescription
reputable online pharmacy no prescription https://pharmrate.shop/# foreign online pharmacy
http://edmedscoupon.com/# get ed meds online
Pharm Rate: Pharm Rate - us pharmacy no prescription
online pet pharmacy: Pet Canada Direct - pet meds for dogs
Pet Canada Direct: п»їdog medication online - canada pet meds
https://edmedscoupon.com/# pills for ed online
Pet Canada Direct [url=https://petcanadadirect.com/#]Pet Canada Direct[/url] Pet Canada Direct
where to buy erectile dysfunction pills: erectile dysfunction medication online - best online pharmacy
no prescription needed pharmacy http://petcanadadirect.com/# Pet Canada Direct
Pet Canada Direct: Pet Canada Direct - dog prescriptions online
https://edmedscoupon.com/# best ed meds online
ed pills: Ed Meds Coupon - online pharmacy no prescription needed
ed medicine online: erectile dysfunction medication online - trusted online pharmacy
http://petcanadadirect.com/# п»їdog medication online
Pharm Rate [url=http://pharmrate.com/#]Pharm Rate[/url] Pharm Rate
best rx pharmacy online https://petcanadadirect.shop/# Pet Canada Direct
vet pharmacy online: Pet Canada Direct - canada pet meds
pharmacy online: pharmacy order online - pharmacy no prescription required
https://pharmrate.shop/# Pharm Rate
Pharm Rate: online pharmacy discount code - Pharm Rate
reputable overseas online pharmacies https://petcanadadirect.com/# Pet Canada Direct
online pharmacy: legal online pharmacies in the us - online pharmacy no prescription
https://edmedscoupon.shop/# where can i buy erectile dysfunction pills
Pet Canada Direct [url=https://petcanadadirect.com/#]Pet Canada Direct[/url] Pet Canada Direct
top rated ed pills: ed online treatment - medicine online order
pharmacy order online: Pharm Rate - Pharm Rate
http://petcanadadirect.com/# Pet Canada Direct
online pharmacies https://pharmrate.com/# Pharm Rate
Pet Canada Direct: online vet pharmacy - online pet pharmacy
ed treatments online: cheapest online ed treatment - best online pharmacy
https://pharmrate.shop/# new pharmacy online
ed meds on line: buy ed pills online - online pharmacy without prescription
pharmacy websites http://petcanadadirect.com/# Pet Canada Direct
Pharm Rate: Pharm Rate - safe online pharmacies
https://pharmrate.shop/# Pharm Rate
pills for ed online: Ed Meds Coupon - shop medicine online
rybelsus 7 mg price: where to get rybelsus - us pharmacy no prescription
https://stromectol.reviews/# ivermectin canada
stromectol reviews [url=https://stromectol.reviews/#]ivermectin 10 ml[/url] cost of ivermectin cream
https://antibiotics.cheap/# over the counter antibiotics
empower pharmacy lawsuit semaglutide: how to take rybelsus for weight loss - top online pharmacy
antibiotics cheap: over the counter antibiotics - over the counter antibiotics
https://antibiotics.cheap/# п»їbuy antibiotics
stromectol covid 19: stromectol reviews - ivermectin 3mg tablets
https://antibiotics.cheap/# antibiotics cheap
https://antibiotics.cheap/# over the counter antibiotics
rybelsus canada for weight loss: semaglutide life - top online pharmacy
stromectol reviews [url=https://stromectol.reviews/#]buy stromectol online[/url] ivermectin nz
semaglutide manufacturer: rybelsus canada pharmacy - safe online pharmacies
https://antibiotics.cheap/# prescribed antibiotics online
https://semaglutide.life/# semaglutide 1 mg weight loss
ivermectin pill cost: stromectol reviews - ivermectin 3mg tablets
does rybelsus have semaglutide: semaglutide life - best rx pharmacy online
https://stromectol.reviews/# stromectol medicine
rybelsus for weight loss only [url=https://semaglutide.life/#]semaglutide life[/url] can you drink alcohol on rybelsus
over the counter antibiotics: over the counter antibiotics - buy antibiotics from india
https://antibiotics.cheap/# antibiotics cheap
https://stromectol.reviews/# ivermectin 8 mg
does semaglutide cause depression: semaglutide life - online pharmacy without scripts
rybelsus 14 mg tablets: rybelsus patient reviews - п»їinternational drug mart
https://stromectol.reviews/# stromectol reviews
antibiotics cheap [url=https://antibiotics.cheap/#]over the counter antibiotics[/url] antibiotics for uti over the counter
semaglutide depression: semaglutide fda - medicine online order
https://antibiotics.cheap/# over the counter antibiotics
https://semaglutide.life/# semaglutide and pancreatitis
over the counter antibiotics: antibiotics cheap - over the counter antibiotics
rybelsus bottle: how fast does semaglutide work - shop medicine online
https://semaglutide.life/# rybelsus weight loss cost
stromectol reviews: stromectol reviews - stromectol reviews
https://semaglutide.life/# how to give semaglutide injection
ivermectin 12: ivermectin cream canada cost - stromectol reviews
stromectol reviews [url=https://stromectol.reviews/#]stromectol reviews[/url] ivermectin buy nz
stromectol reviews: stromectol reviews - stromectol reviews
semaglutide injection dosage: semaglutide success stories - no prescription pharmacy paypal
https://stromectol.reviews/# ivermectin over the counter canada
ivermectin brand name: generic ivermectin - stromectol reviews
antibiotics cheap: antibiotics cheap - antibiotics cheap
rybelsus used for weight loss [url=https://semaglutide.life/#]semaglutide life[/url] taking semaglutide
https://semaglutide.life/# rybelsus coupon 2024
where can i get semaglutide for weight loss: compound semaglutide side effects - reputable overseas online pharmacies
https://semaglutide.life/# foods to avoid on semaglutide
rybelsus empty stomach: is wegovy the same as semaglutide - online pharmacy no rx
https://antibiotics.cheap/# over the counter antibiotics
semaglutide pills weight loss: oral semaglutide vs injection - online pharmacy no prescription
antibiotics cheap: antibiotics cheap - antibiotics cheap
https://antibiotics.cheap/# over the counter antibiotics
https://stromectol.reviews/# ivermectin price canada
ivermectin cream cost [url=https://stromectol.reviews/#]stromectol how much it cost[/url] stromectol reviews
how to take rybelsus 3mg for weight loss: semaglutide life - legit online pharmacy
https://semaglutide.life/# does rybelsus work