Learn How to Create a DIY Realistic Looking Terracotta Pumpkin in this Step-by-Step Tutorial.
Fall is officially here! All my fall decor is out, and I've been working on all the fall crafts. Today, I'm sharing how to create this beautiful fall craft: the Terracotta Pumpkin.
This DIY project was all the rage last year and it's still trending because of how fast and easy it is to create a realistic ceramic pumpkin to add to your fall decor. It only took me about an hour to two hours to create this Pottery Barn inspired terracotta pumpkin.

These terracotta pumpkins usually sell for up to $99 at Pottery Barn. The carvable pumpkins that I purchased cost around $10-24- not including all the other supplies needed for this project.
All around, it's a cheap, easy, and a fun project!

The best part is you can customize your own to your liking. From the face to the terracotta color, you choose to match your fall aesthetic.
For this project, you only need a craft pumpkin, acrylic paint, carving tools or a craft knife, pencil and sharpie, and baking soda.

Table of Contents
Supplies Needed
When you shop through my affiliate links, it doesn't cost you anything extra, but it helps me out in a big way! I earn a small commission from those purchases, and that support allows me to continue creating and sharing free tutorials and patterns for you. Thank you so much for helping me keep this creative community going!
Click HERE to shop all the supplies on Amazon!
- Craft Pumpkin
- Craft Knife or Carving Tools- I recommend grabbing a couple of extra knife blades for backup
- Master’s Touch Acrylic Paint in colors: Cashew, Yellow Ochre, and Warm Gray
- Folkart Multi-surface Titanium White Acrylic Paint
- Baking Soda
- Pencil and Sharpie
- Sponges
- Paintbrushes
Gather your supplies, and let’s get crafting!
Why Baking Soda?
Mixing baking soda into your acrylic paint will thicken it, make it more gritty, and give your pumpkin a ceramic-like appearance.

Painting Technique
When painting your pumpkin, I recommend using vertical strokes in an up-and-down motion with thick globs of paint for a textured, even coat. I also went in with a sponge and dabbed it onto the surface to create rough patches that made the pumpkin look more organic.
Step One: Sketch Face onto Pumpkin
Place your pumpkin on a covered surface (this project gets messy) and draw a face using a pencil onto your pumpkin. Using a sharpie, go over the lines to make the lines bolder, removing the guesswork during the cutting process.

Step Two: Carve Pumpkin
Grab your carving tools and start carving along the lines drawn on your pumpkin. If you’ve never carved a pumpkin, go slow and move your blade in a seesaw motion- moving back and forth.
This is optional, but I cut a circle at the bottom of my pumpkin so I can place a flameless candle inside.

Step Three: Paint the Base Coat
For the base coat, I used Folkart Multi-surface Titanium White Acrylic Paint. This step is optional but highly recommended because it acts as a bonding agent that helps the acrylic paint apply more easily. Think of your pumpkin as a blank canvas. When covering it with white paint, the colors will pop and ensure an even base.

Step Four: Create a Terracotta Mix

Mix your chosen colors in equal parts until you get your desired terracotta color in a bowl or cup. For mine, I mixed Master’s Touch Acrylic Paint in colors Cashew, Yellow Ochre, and Warm Gray with a small amount of red and a little titanium white.
Once you have your desired color, add the baking soda. You’ll want to mix baking soda into your paint mix until it thickens (it should look like a textured cake batter).

You could make the mix thicker by adding more baking soda, just keep in mind that baking soda sucks a lot of the moisture out of the paint making it more gritty and harder to apply to the surface.
Step Five: Apply Terracotta Mix to Pumpkin
Apply your terracotta mix to your pumpkin with a pumpkin brush. You can decide whether or not you want to apply the mix in thick strokes or start thin.
I covered my pumpkin with my terracotta mix until I covered all the white spaces.

Let it dry, but not completely. You want it to be slightly wet so that when we apply the baking soda, it will stick to the base.
Step Six: Apply Baking Soda
Scoop some baking soda and sprinkle it all over your pumpkin. Once your pumpkin is covered, grab a clean paintbrush and dry brush the excess baking soda off your pumpkin. Use a sponge to tap the baking soda into the paint.

Pro Tip: Instead of baking soda, you can use flour to cover your pumpkin. But, this may mold over time. If you live in more humid climates- seal it with Mod Podge to give it extra protection.

Step Seven: Finished Terracotta Pumpkin
Let your pumpkin dry completely, and your pumpkin is finished! If you plan on placing your pumpkin outside, I recommend applying exterior Mod Podge or other sealant to your pumpkin to lock the baking soda into place.
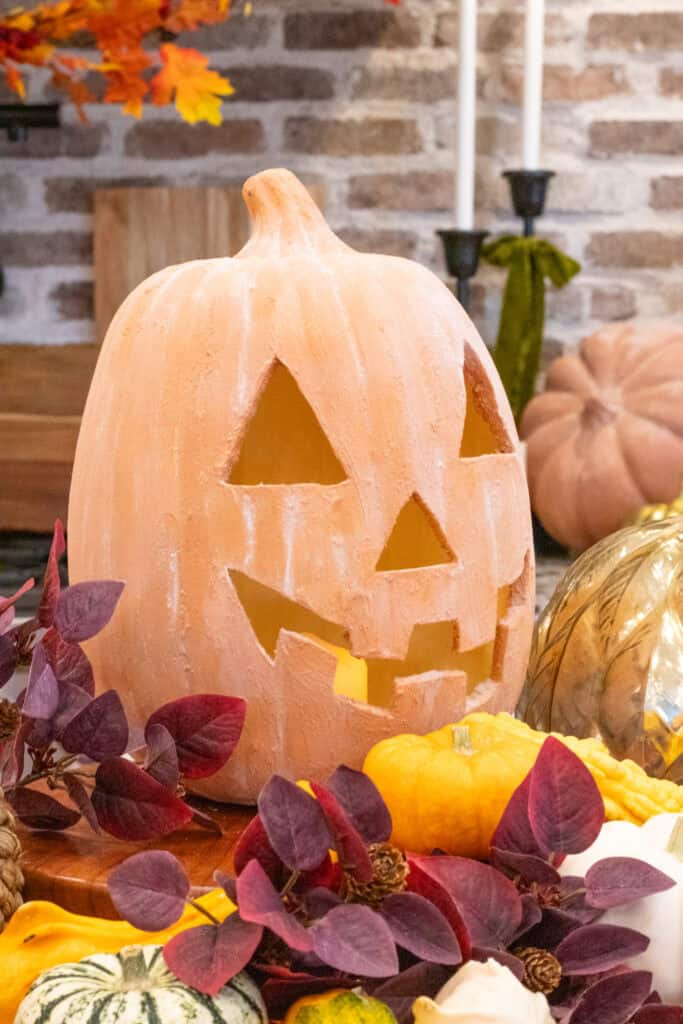
Look how great these pumpkins look with the rest of my fall decor! 😍 It makes me want to pull out all my baking supplies and bake a pumpkin pie!

I hope you have a lot of fun with this project and can't wait to see what your create with this tutorial.

Want more craft projects? Click here and here for more inspiration!
Follow me for more inspiration, projects, and a look behind the scenes on Facebook, Instagram, TikTok, and Pinterest.
Don’t want to forget this project? Save this project to Pinterest!

Should I seal it if I want to put it outside?